Overview
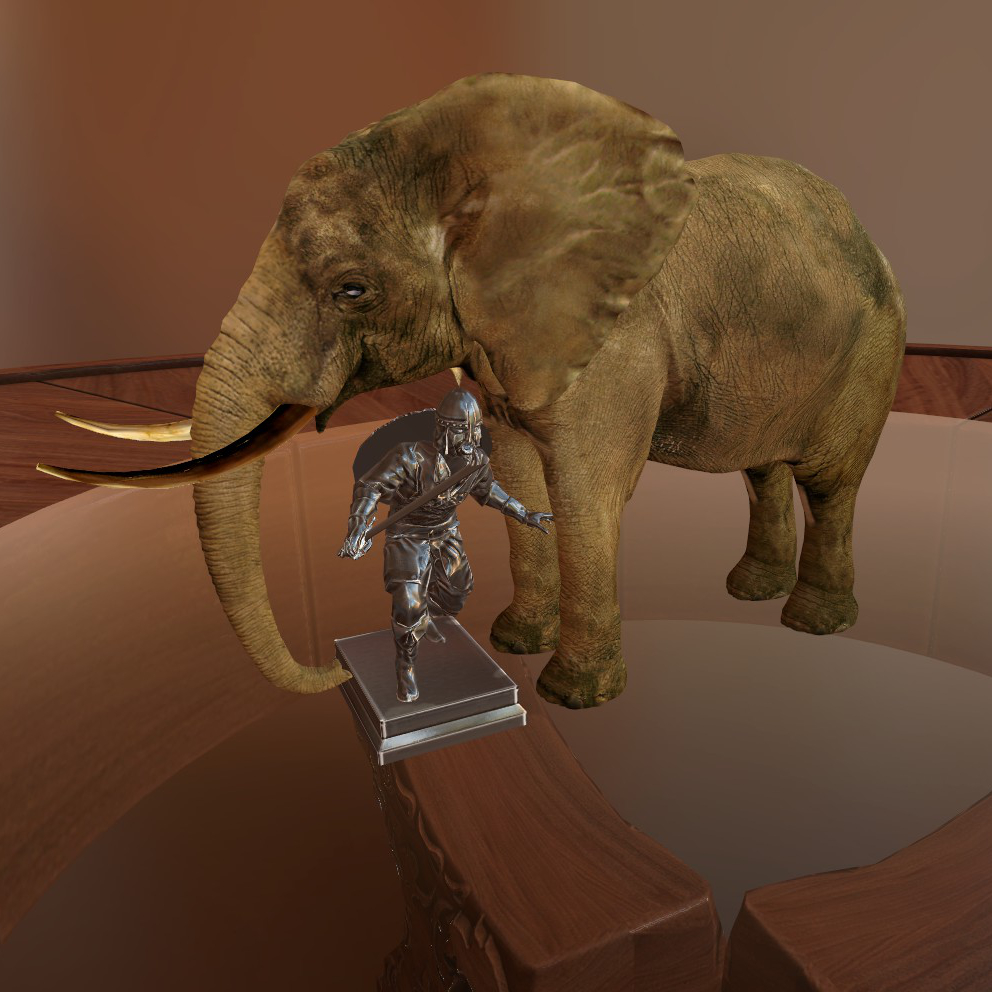
This guide will try to teach you how to import a 3D model and its texture into Tabletop Simulator. It will also cover how to combine several textures into one, since the game only allows one texture to be used per model (at the time this guide was written).
Introduction
Working with 3D models appears to be highly complicated work to most people. Programs such as Blender have so many buttons and functions that they already repel the common user by the the sheer complexity of its starting window.
However, to work with it you merely need a fraction of its whole capacity. Once you get to know the program a bit, get practice and routine, getting new models into the game will be a matter of minutes, depending on the model of course.
So naturally, the first step of this tutorial has to be that you download Blender. This tutorial uses Blender version 2.77.
You should also know how to move around in Blender. It is not that much different from Tabletop Simulator, but everything you should know can be found here:
[link]
1. Finding a model
There are several sites with free 3D models out there, such as
- TF3DM
- 3Dwarehouse
- archive3D
to name a few. Make sure you download .obj models, as they will be the easiest to work with.
Note that Tabletop Simulator currently does not support semi-transparent textures – only 100% see-through or not transparent at all. Keep that in mind when looking for things made out of glass or containing water.
The complexity of the model is also important – Tabletop Simulator seems to allow models of around 15k triangles. Blender can reduce the triangle count, but the more you have to take away, the worse it will end up looking. Try to take models not larger than 30k triangles.
For this tutorial I will be using an elephant from TF3DM.
If you want to work alongside this tutorial (and pick up a nice elephant model in the process) the link to it is here:
[link]
A note on models from 3Dwarehouse: You will need to download Sketchup Make to be able to open .skp files. This editor works differently than blender, but basic navigation is very similar. When you have opened the model, draw a selection box around the entire model and right click it. In this menu, select the option “Explode” to remove the component feature from the model. This is a speciality to sketchup that allows users to make components out of their models, which are easier to handle in the editor. However, they cause severe problems in Blender.
Repeat this process until the “Explode” option is no longer available. Then, go to file-> export and select export as .dae file. Create a folder to export the model into, as the program will also dump any associated textures in the location that you specify for export. Then, follow the tutorial as usual, apart from obviously selecting .dae (collada) when importing.
2.1 Bringing the model into Blender
Once you have done that, it is time to start up Blender. After the splash window, you will be presented with the standard Blender screen and a cube.
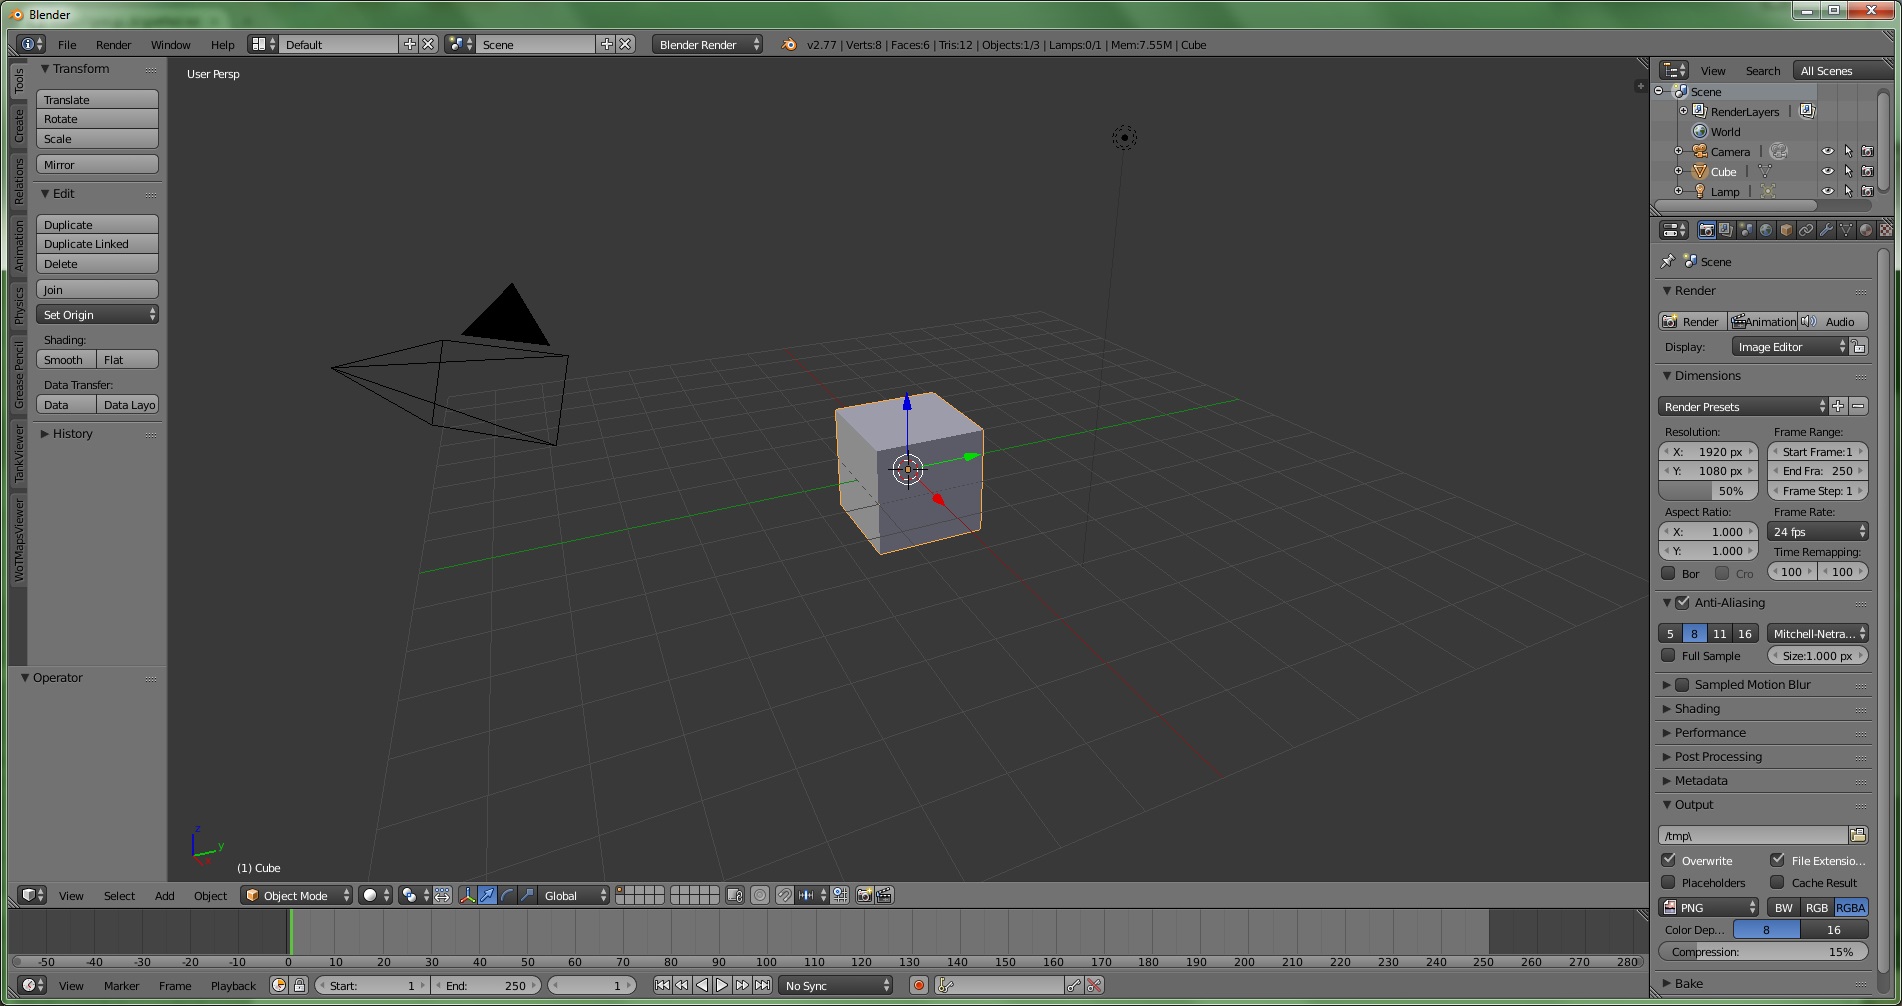
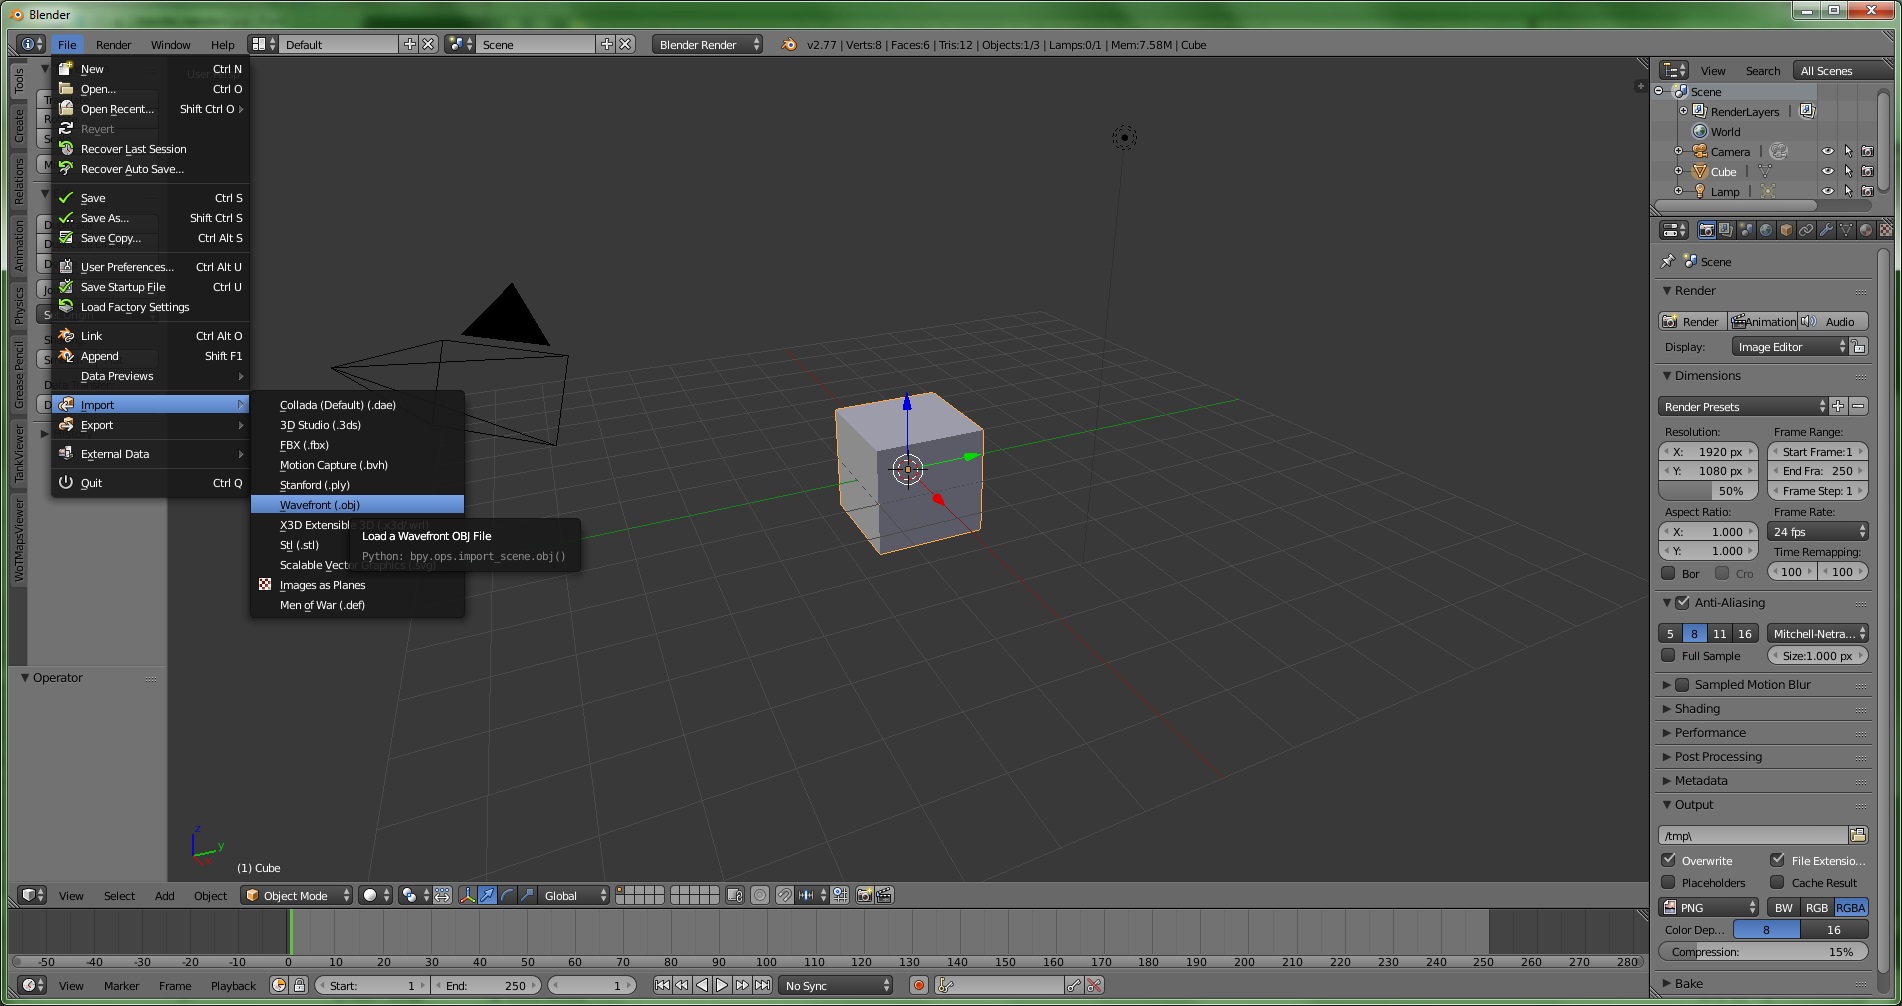
To import the model you just made, go to File -> Import -> Wavefront (obj.) and navigate to the file you created.
Your model should then appear on the screen. It may be possible that your model is either very large or very small, so if you do not see it, try to zoom out or move the cube away by selecting it with right click (the cube should then have an orange border) and click & hold the arrows that show up, just like Gizmo mode in Tabletop Simulator. If you still cannot find it, the imported model will always be selected when you import it, so hit S (with the mouse in the 3D viewport) and move your mouse away or towards the center of the grid to scale the model.
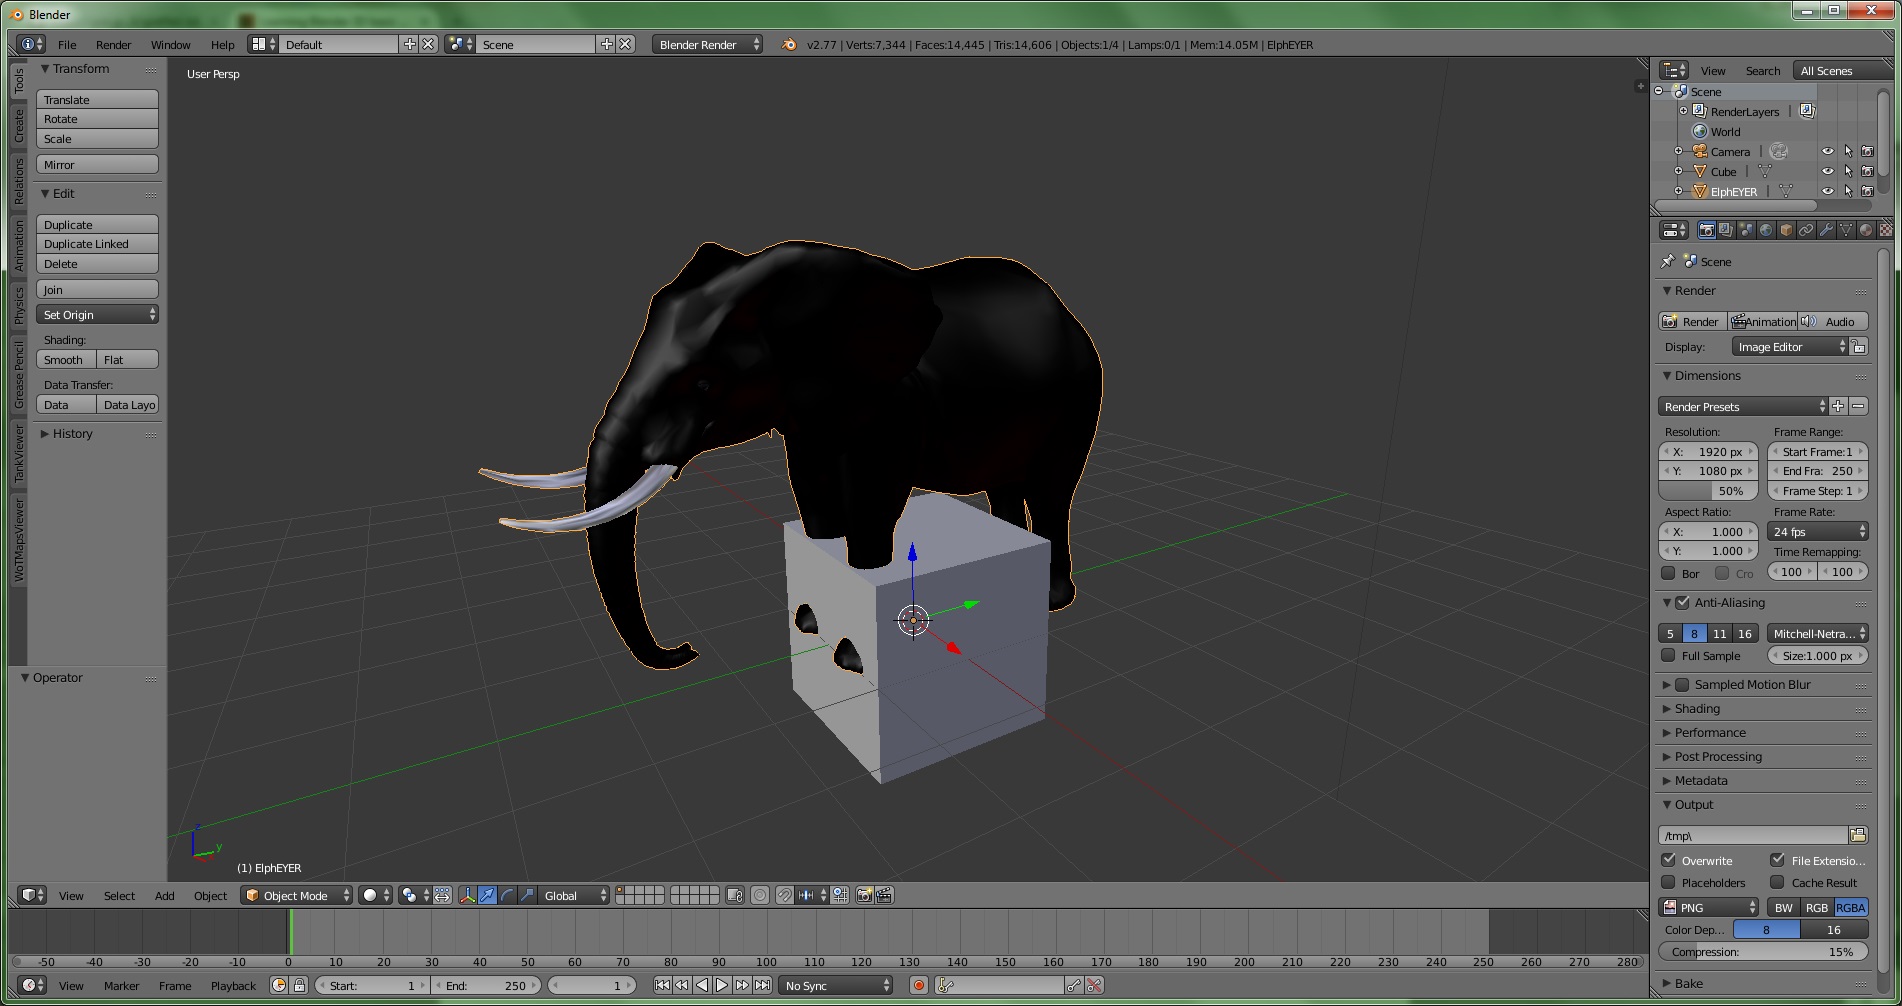
Your model will probably be light grey upon import, but it can also have different colors like our elephant being black. This however is not important.
2.2 Adjusting the model for export
In our case, the elephant model will appear extremely large in Blender. Directly after importing, when the elephant has a dark orange border around it, press S with your mouse cursor in the 3D viewport and move the mouse towards the origin of the line. That way you can scale the elephant down.
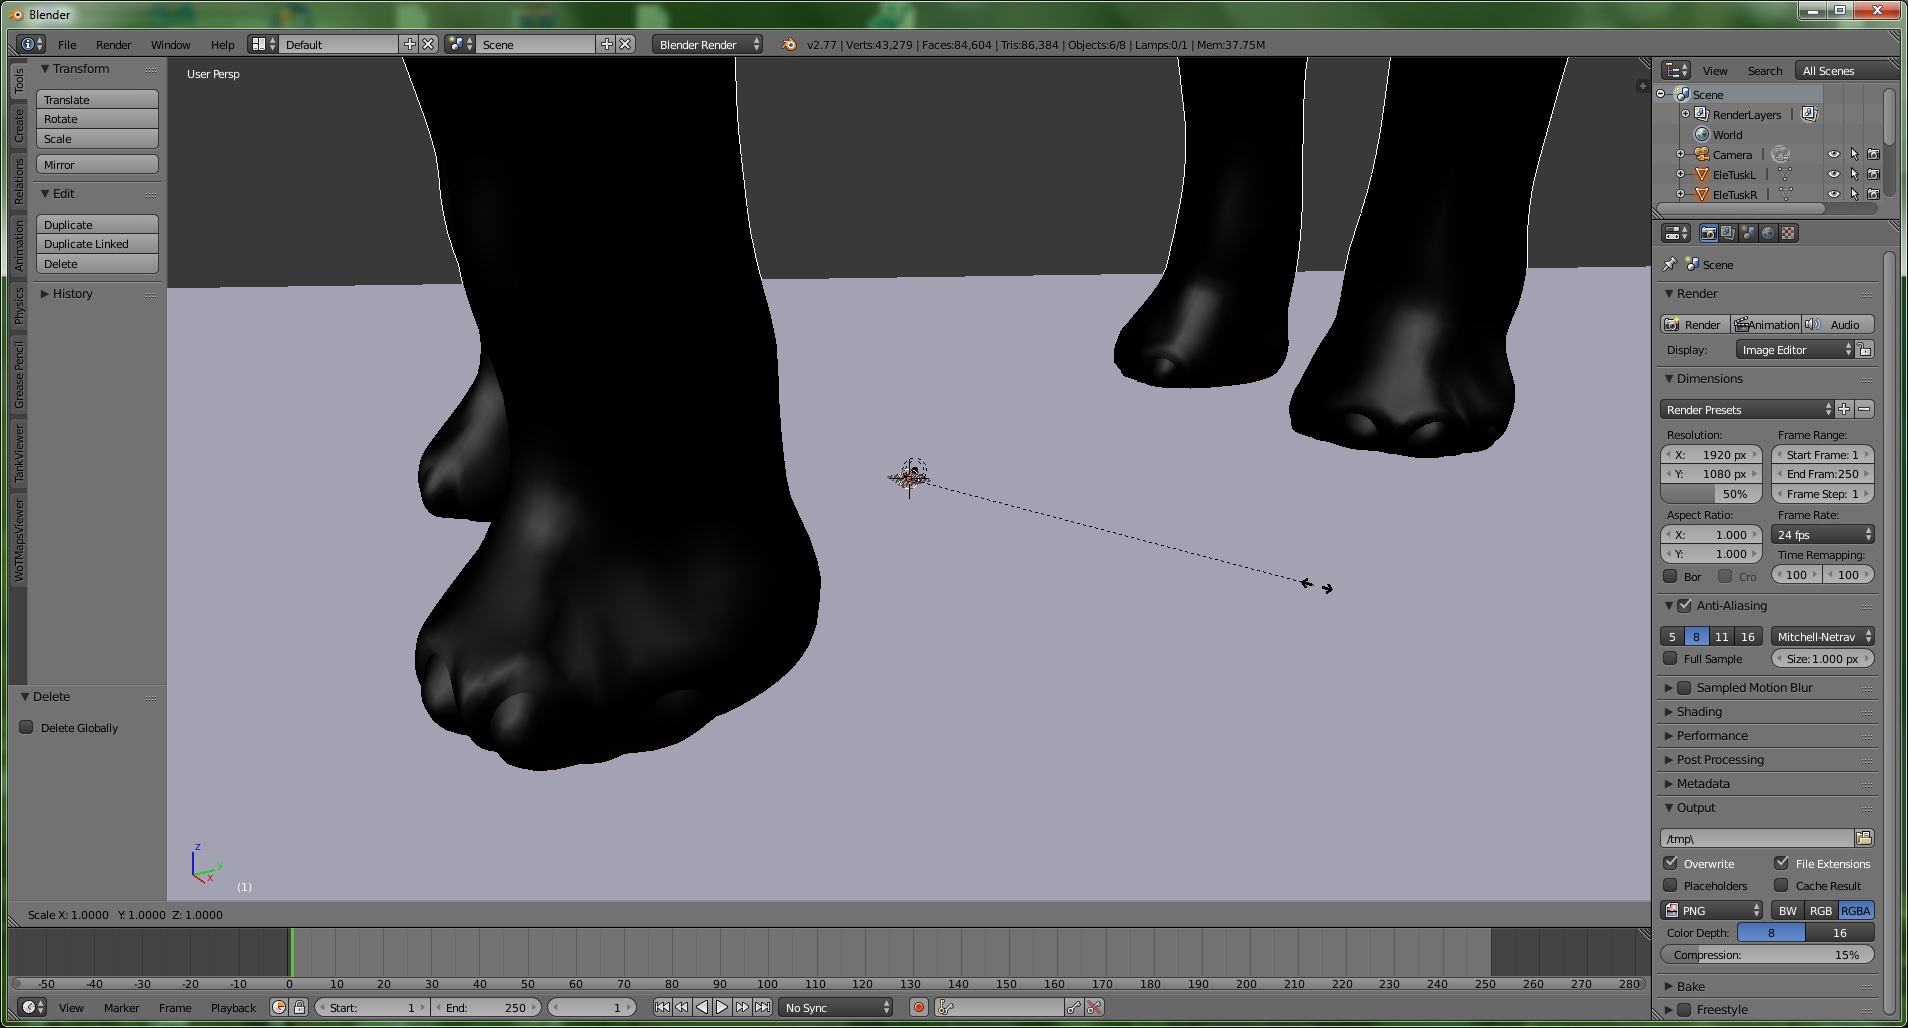
For a rough guideline on how big it should be, take the grid in Blender as about the size of the square table in Tabletop Simulator.
This elephant seems to come with a large flat piece to have as decorative underground, called a plane in Blender. It will not be needed, so right click it till you notice that it has the orange selection border and then press Del. You can also do the same with the default cube if it blocks your view.
Now, when you right click the elephant to select it, you should notice one thing: The model is split into pieces. The tusks are one piece each, as are the eyes and finally there is the rest of the body.
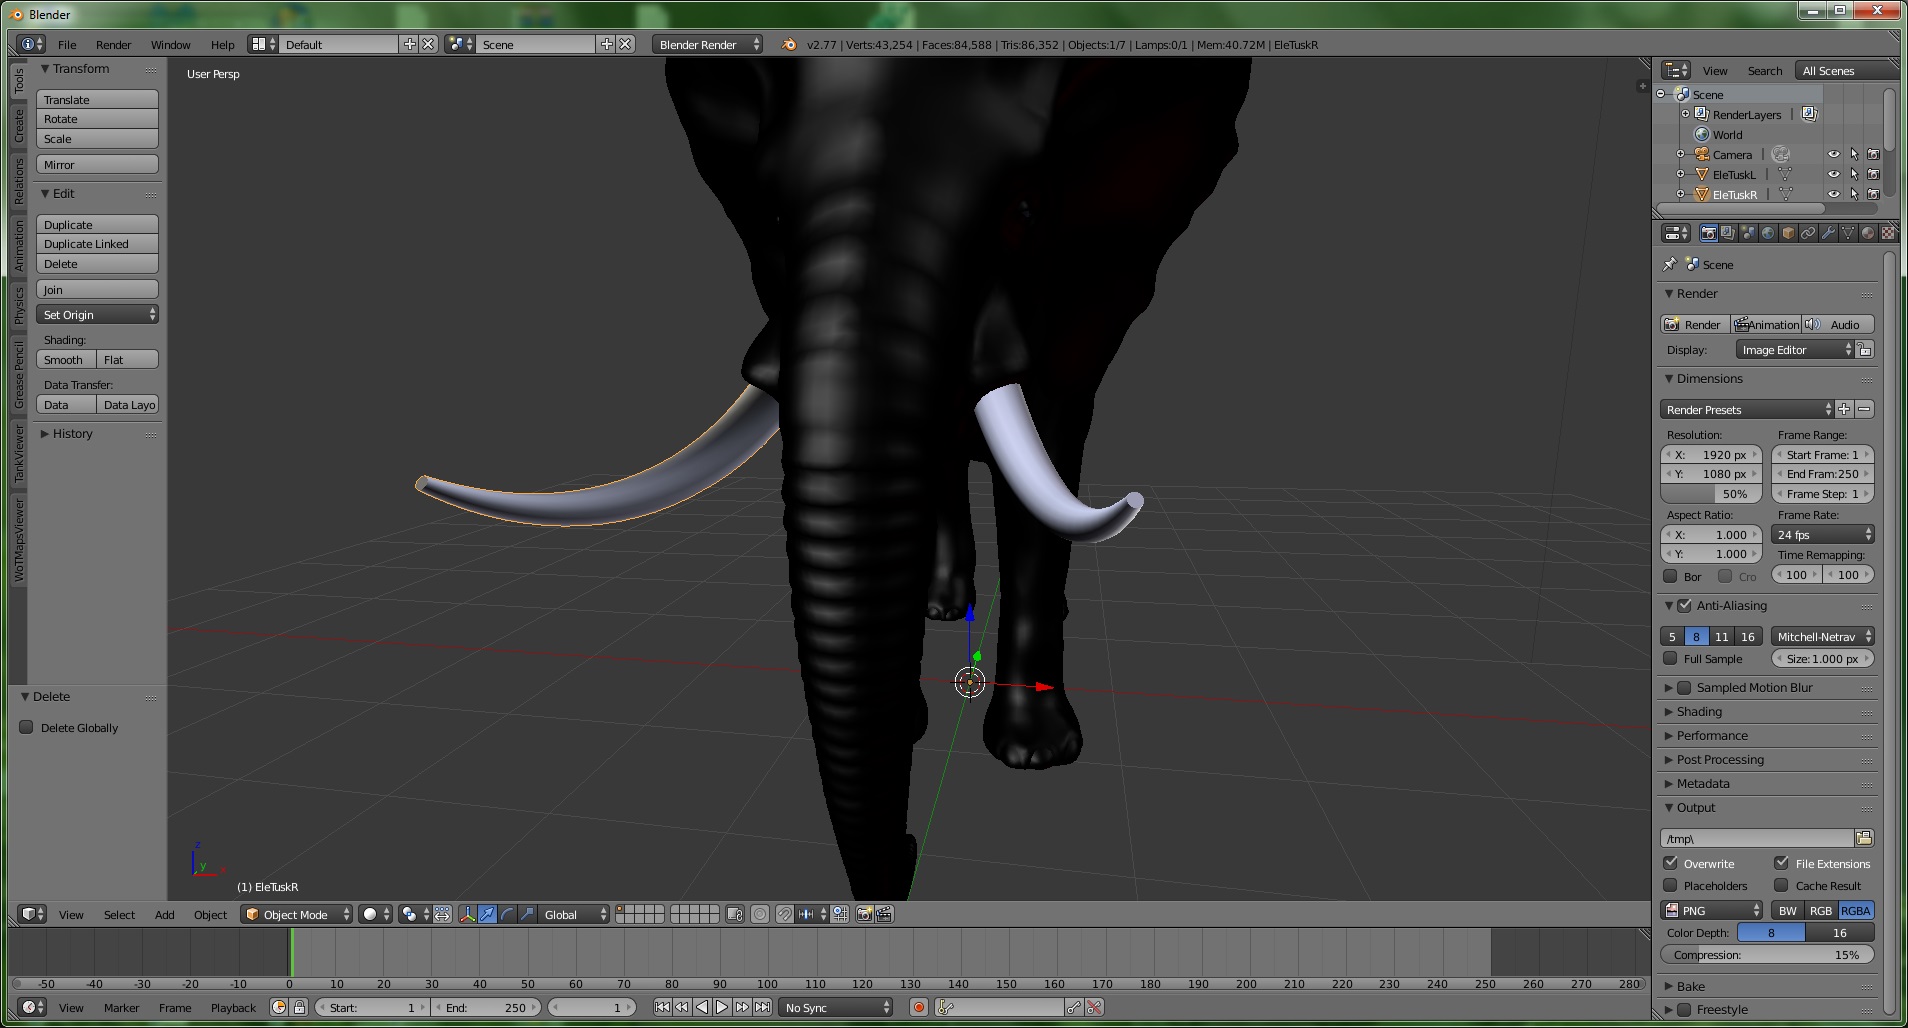
This will be important later on when creating the texture.
For the next step in preparing the model, the viewport shading must be changed. At the bottom left of the 3D viewport, next to the button saying object mode, there will be a white ball. Click it to open the viewport shading menu. Select “Texture”. The model should now appear on the screen wearing its texture as you probably saw it on the page where you downloaded it.
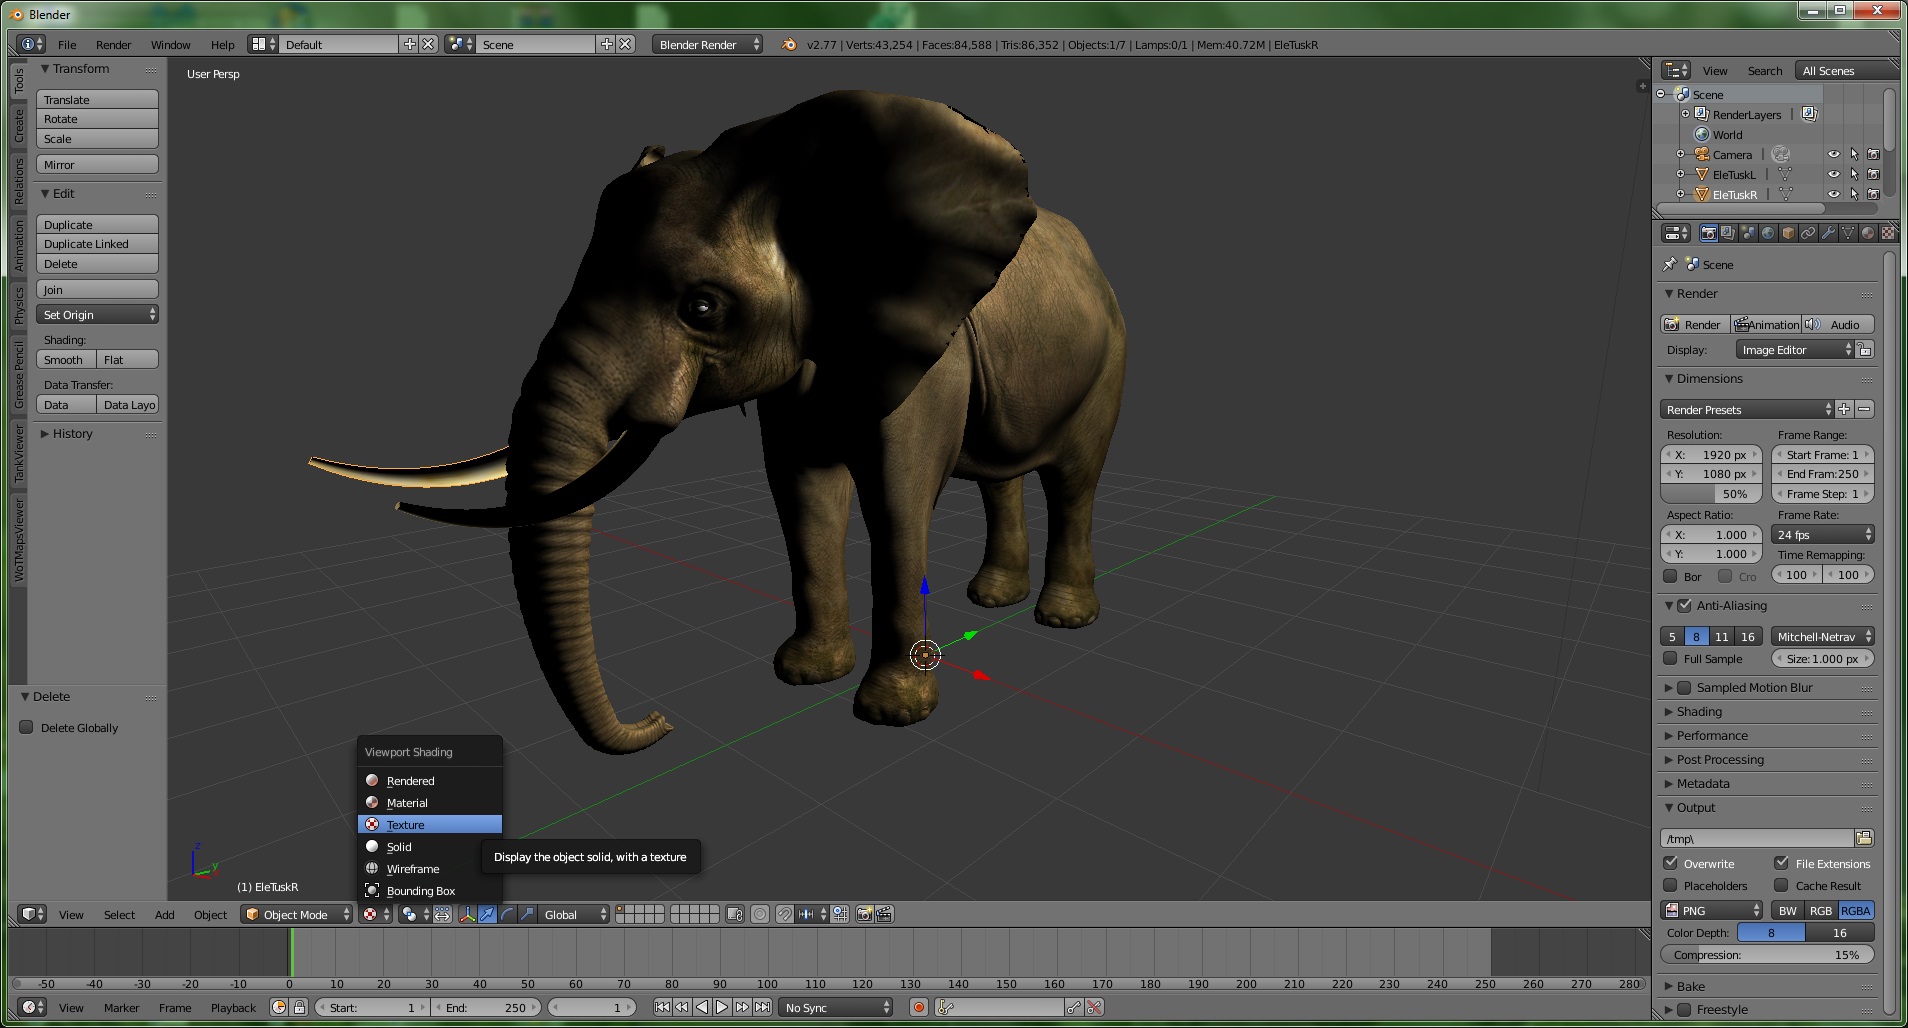
Now it is time to take a look around the model – you will most likely notice one thing right away. Something looks wrong about the tusks. They are dark where the rest of the model is light – and vice versa. This usually means that there is a problem with the face normals facing the wrong way. This however can be quickly fixed in most of the situations.
To do this, select a tusk with right click, then change the 3D viewport into Edit mode. Do that at the button below the viewport or alternatively hit the Tab key while your cursor is in the 3D viewport. Normally the whole model is selected already, to be sure, press A until the whole model is colored in orange, i.e. is selected.
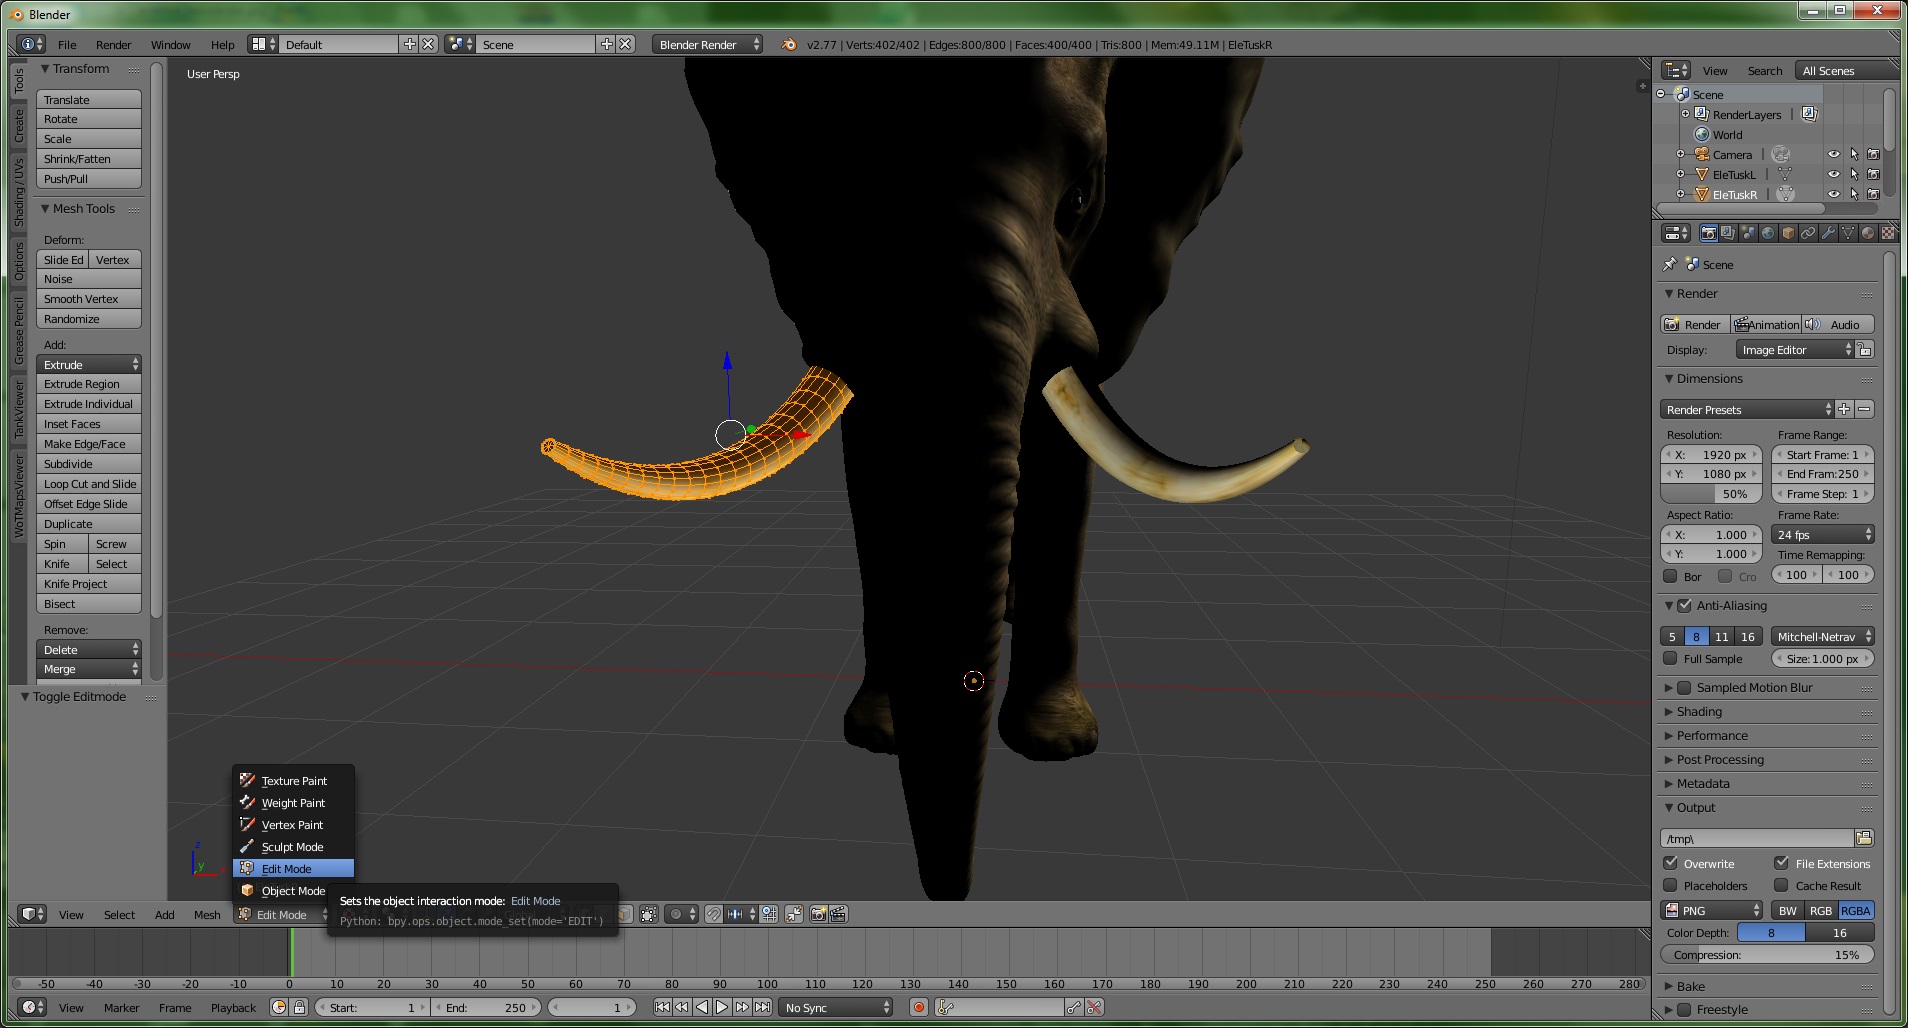
On the far left side of the screen, you will notice a few tabs that stand sideways. In the Tools tab at the top, scroll to the end of the window to locate a button saying “Remove doubles”. Click it once. In our case, it will have no effect as Blender will report “0 vertices have been removed”. However, it is often of great importance for larger models as this operation will also connect some loose edges, which will come in handy later on when reducing the detail of the model.
Next, select the tab “Shading / UVs” (the third one). There you will find a section saying “Normals” and two buttons below it. Usually, clicking recalculate will make Blender fix the face normals so they are all facing outward.
In our case it will be displayed as if the face normals were wrong, but in fact they are not. Such things can appear at times and might cause a little headache but are usually not that serious. Still the work of this step was not in vain, because especially for models coming from 3Dwarehouse this is important to do, as the program these models are created with does not rely on face normals as much as Blender and Tabletop Simulator do. You should do this procedure of removing doubles and recalculating normals on all parts of the model.
Another, more detailed way to check the Face normal direction is to press N while in Edit Mode. This will bring up a menu on the right side. Scroll down to the “Normals” section and click the third of the buttons. This will make blender show you the face normals as blue sticks. Adjust the size of the sticks with the right value if necessary.
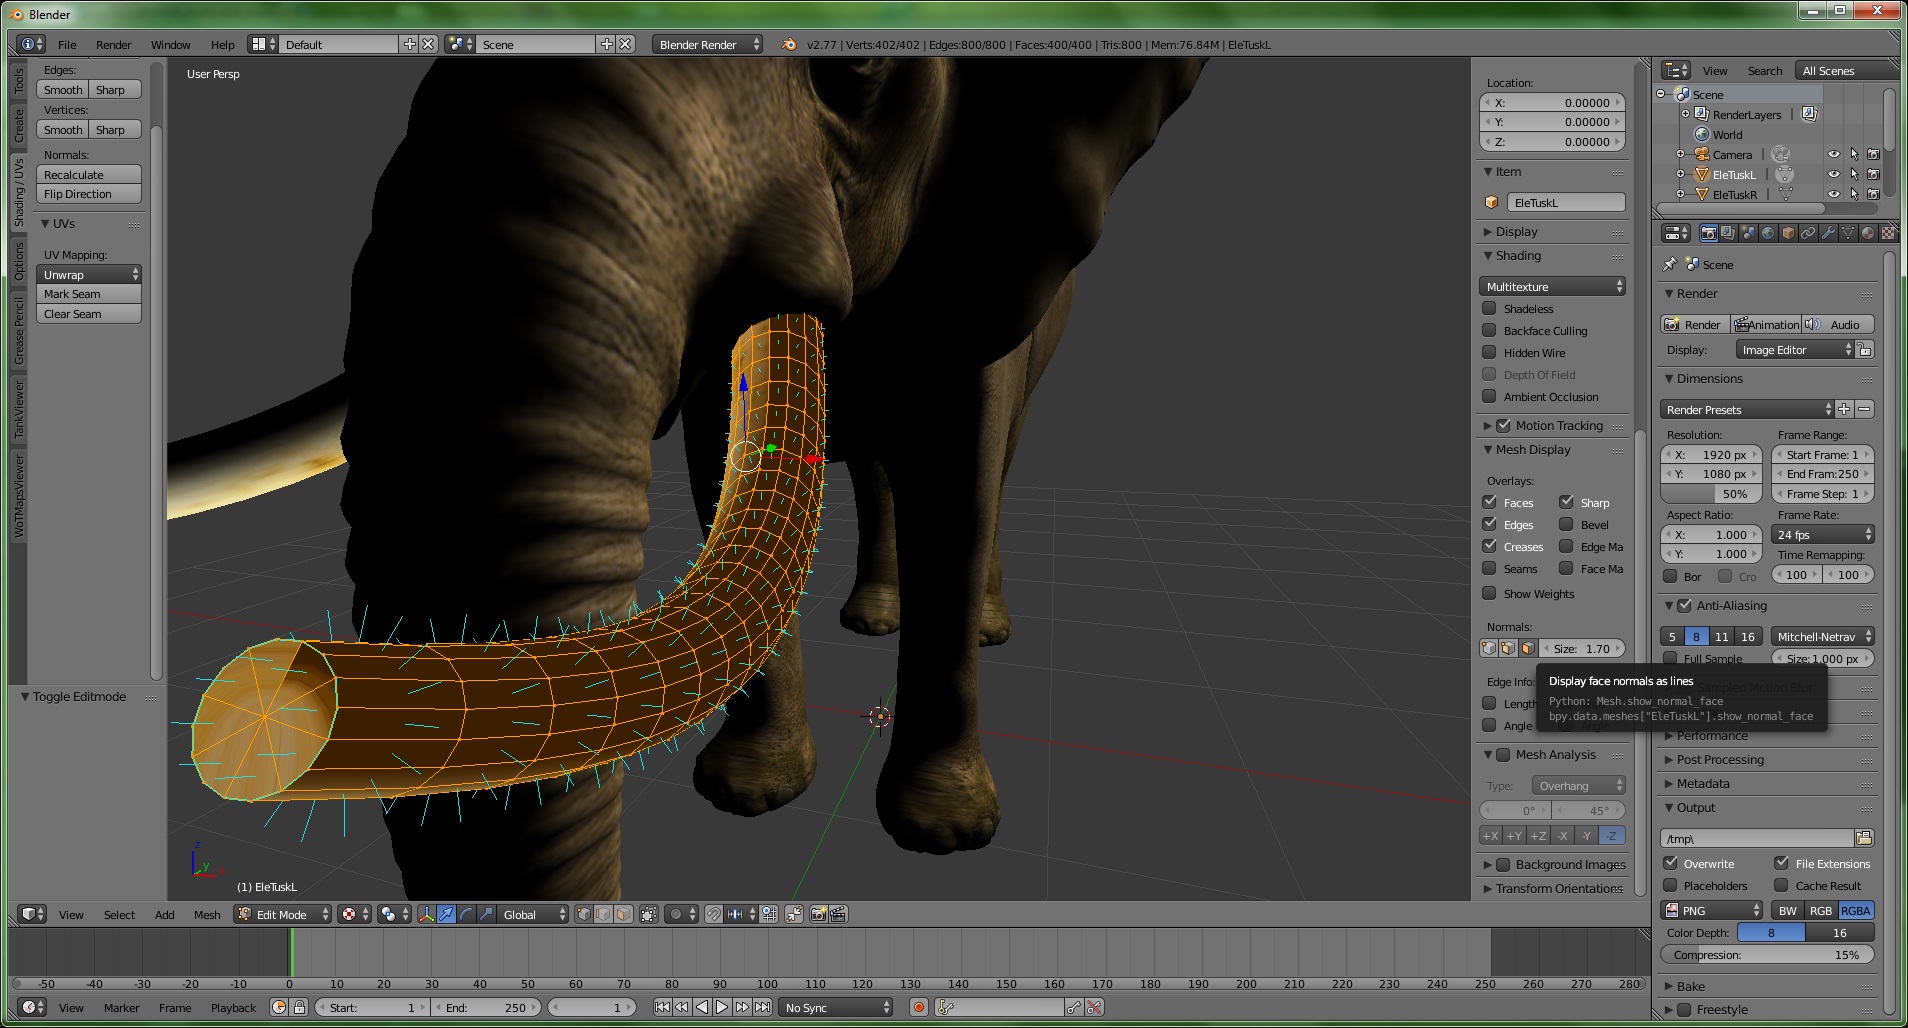
Change back into Object Mode when you are done.
As you can notice at the top row of the window, the triangle count is 86,352 – way too large for Tabletop Simulator! Since the body of the elephant has the most detail to it, it has to be decimated. To do that, select the body of the elephant and click the wrench on the toolbar on the right, in the upper half. This is the modifiers tab. Click “Add Modifier” and then “Decimate”.
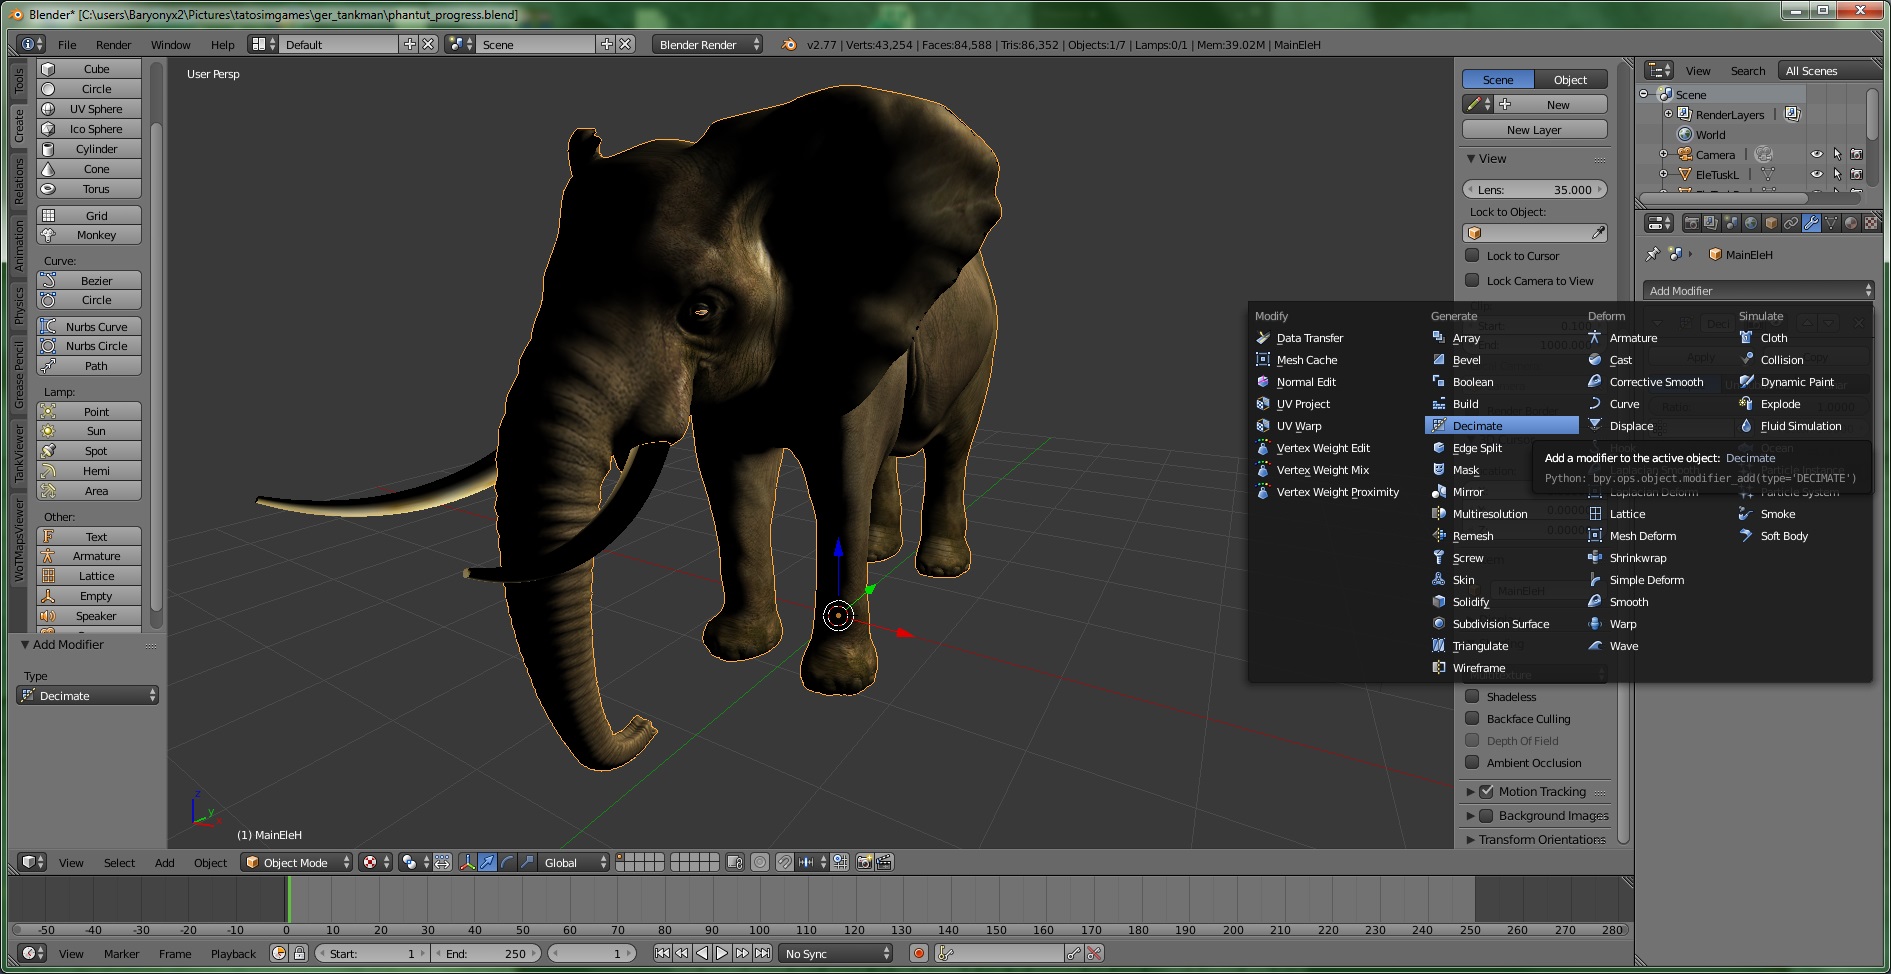
You can now modify the strength of this effect with the slider saying “Ratio”. Just click inside of it and drag left and right to scale the effect. While you do that, look at the top value next to “Tris”. You will want to get it down to about 15000. In our case, a value of 0.14 seems apropriate. As this elephant seems to be a very well done model, it does not suffer from such drastic reduction. A lot of models you will come across do however – the higher the initial triangle count, the worse will be the effects.
Once you have set the value, click “Apply”.
In case your model has a strange shading problem, which can happen especially if your model has sharp edges, like a building or a meeple, then you should apply an edge split modifier. See the image below for an example of this effect.
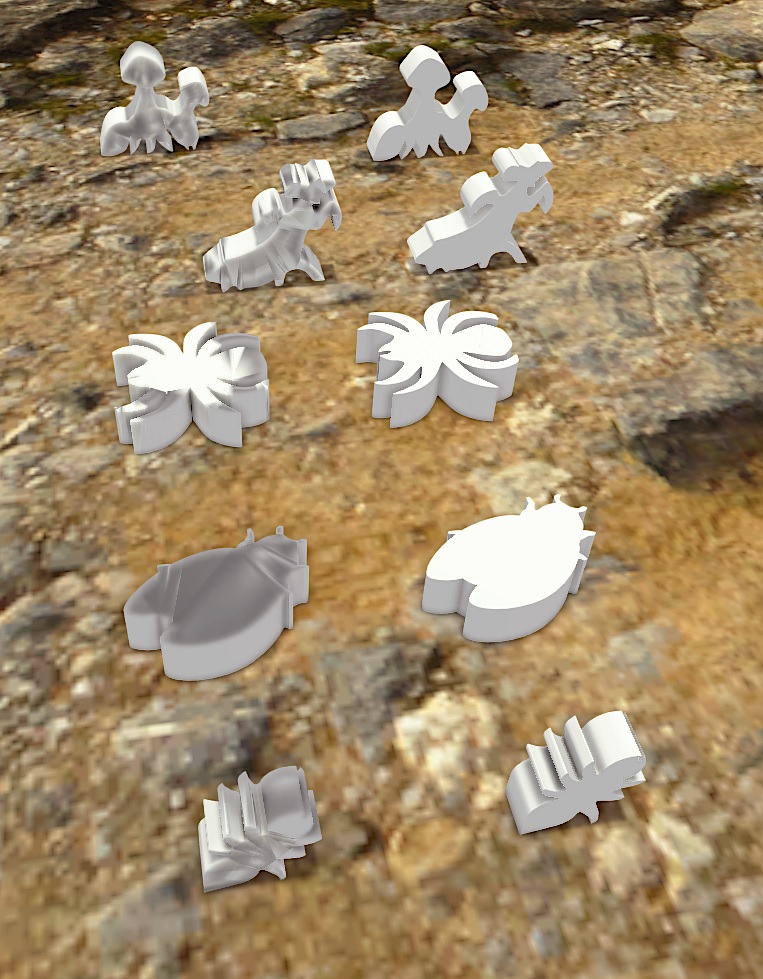
Thanks to 2Huskies for the screenshot.
2.3 The texture
Now is the time to make Blender create a new texture for our elephant that contains all the necessary parts. The first step towards that is making the elephant one object. Select all parts of the model with shift + right click and then press Ctrl + J. If you are not sure that you have all the parts, you can move the model around with the arrows and then observe if anything is left behind. Particularly the eyes of this elephant are a little tricky to select. Once you have done that, the whole elephant should have an orange border around it and nothing is left behind when you move him around. Be sure to bring him back to the center before you proceed.
On the right side where you found the modifier tab there will be a button with an upside down triangle. Click it to open the Object Data tab. Down in that is a section called “UV Maps”. One such map should already be present, simply called “UVMap”. Create a new one by pressing the + on the right.
Next, we need to open a window to look at the UV map of this elephant. At the bottom left corner of the screen, you should see a button next to “View”. Click that and select UV / Image Editor. As this area of the screen is too small at the moment, enlarge it at the border to the toolbar above – just like you resize a regular Windows window. Now change the whole elephant into Edit mode for the UVs to appear.
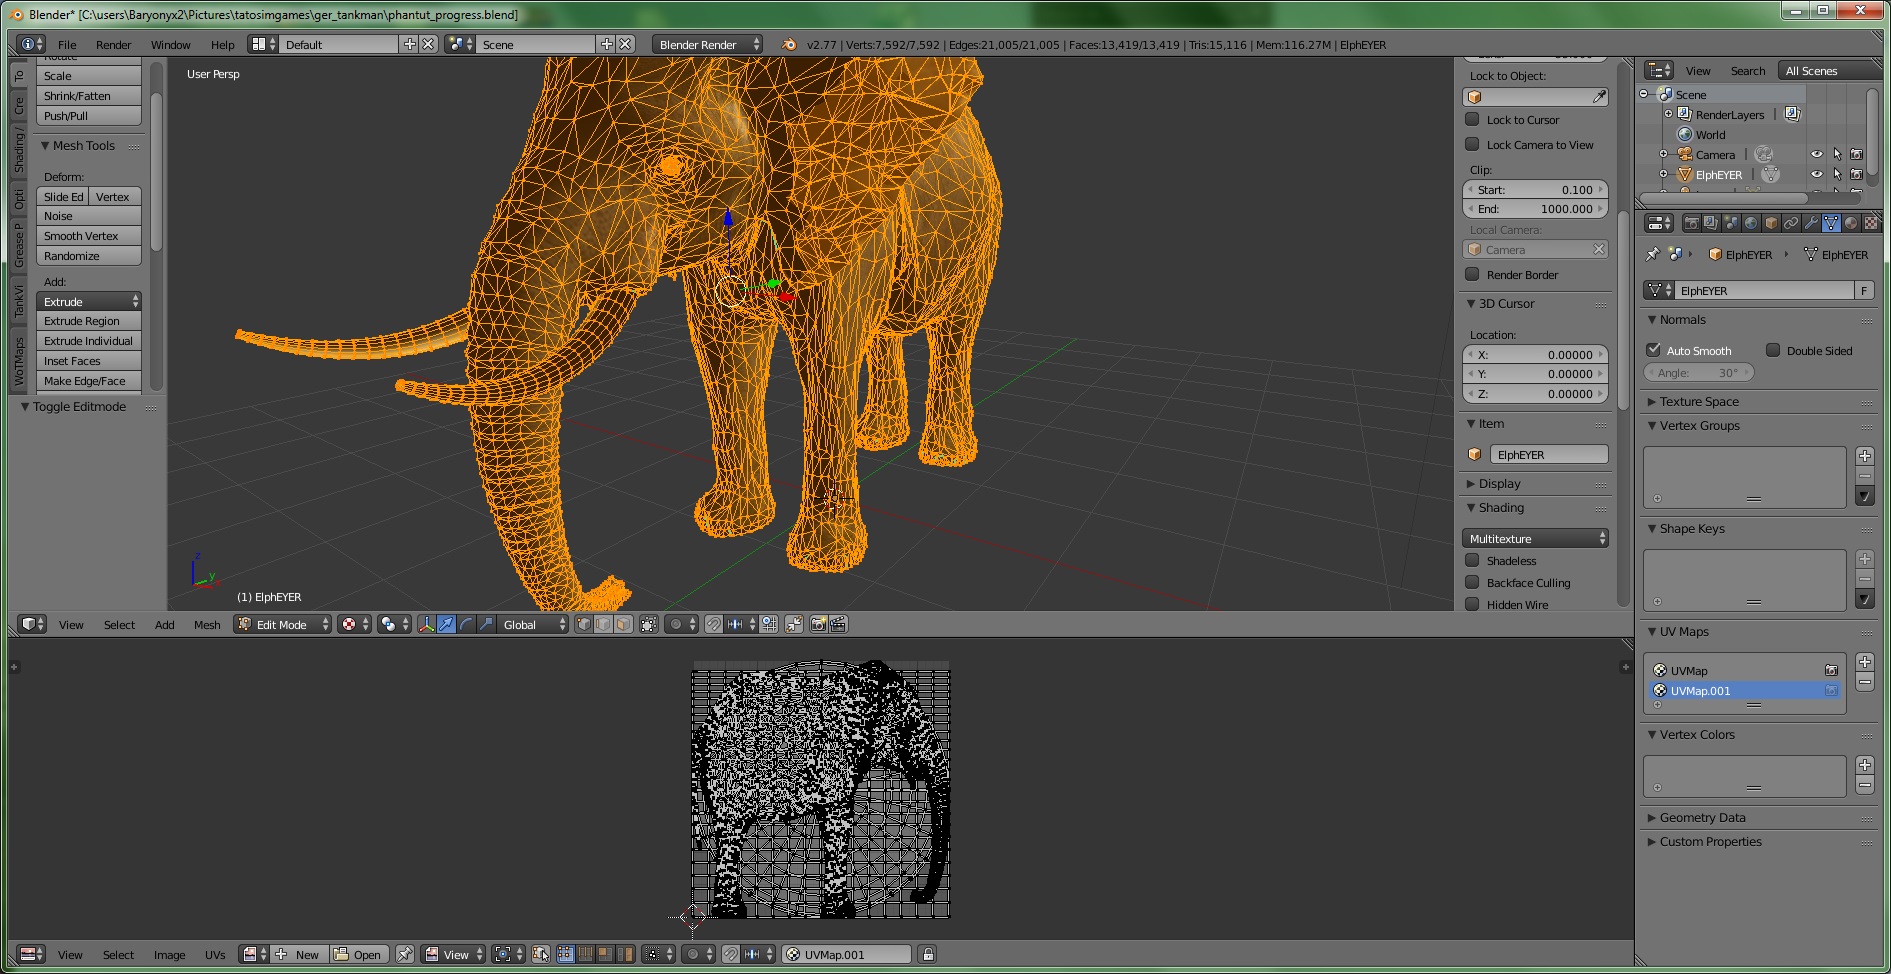
One can see the structure of the elephant there, but certain parts do overlap. Now a new common UV map will be created. Next to the Object Mode button, click “Mesh” and select “UV Unwrap…” -> “Smart UV project”. Do not change any values in this window and press “OK”.
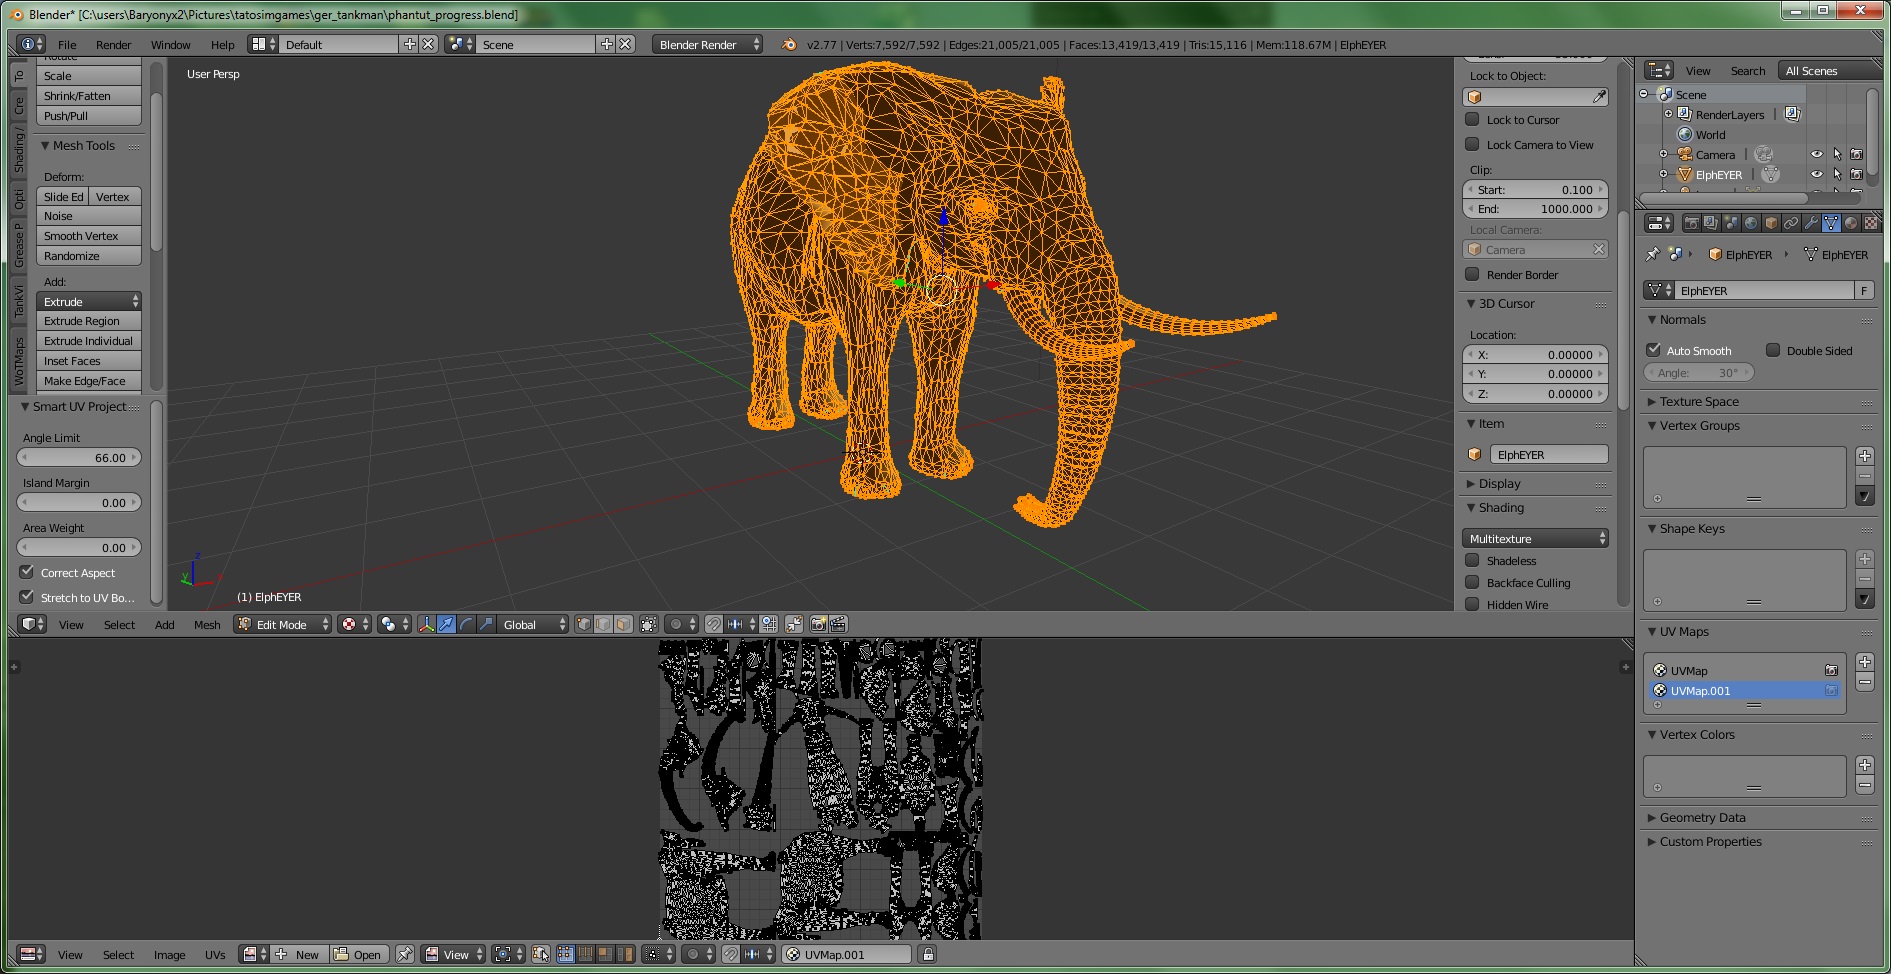
This will be our new UV map that has all parts on one texture.
Below the UV map, press the button “New” to create a new texture. Make it 2048×2048 and confirm. This will create a basic black image.
Next, where the wrench and triangle are, the very first symbol in the row is a camera. Click it and scroll down to “Bake”. Open that menu by clicking the arrow. There, set Bake Mode to “Textures” and change the margin to 4px. Finally, hit the “Bake” button. This may take a while to complete and can also temporarily freeze Blender. Once it is done, the finished texture will appear in the UV window.
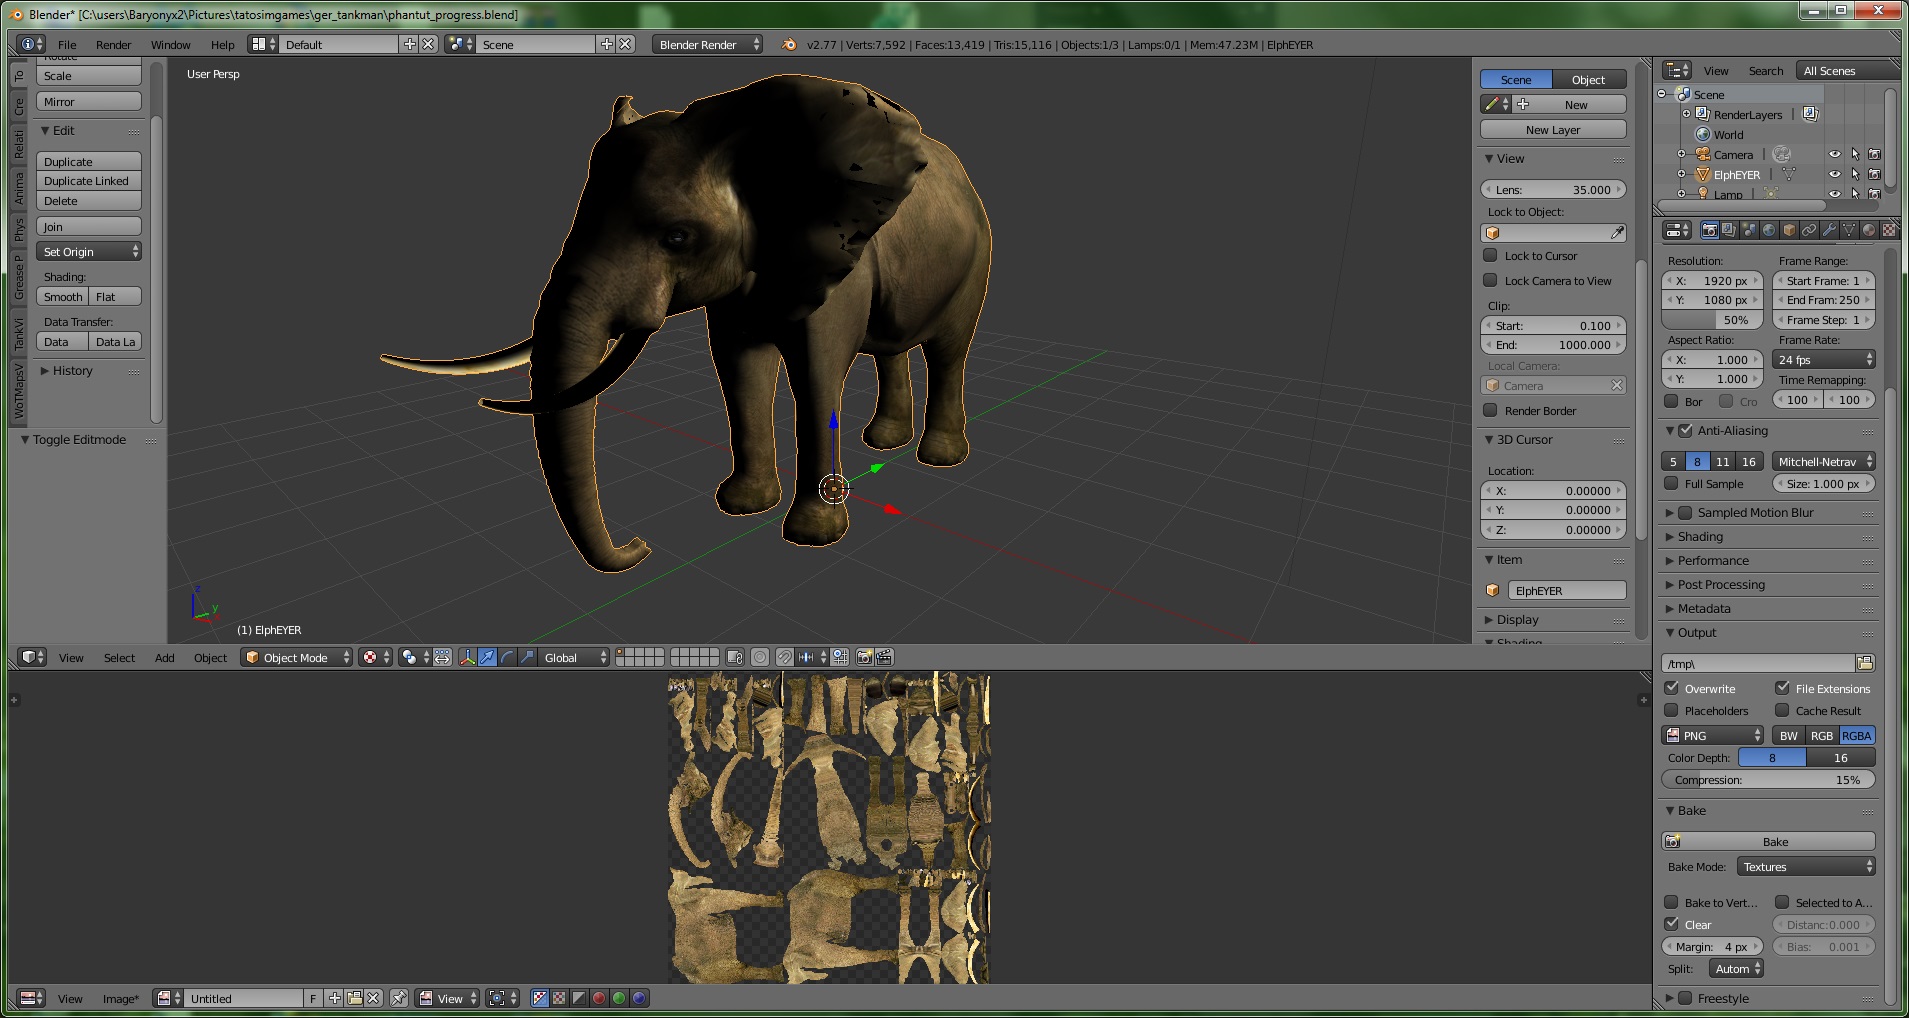
2.3.1 If there are already one or multiple textures available
In case there already is a complete texture available, you can skip the part above and instead do the following:
When the entire model only needs one texture and you have it available (if it was included in the download) then you can just upload that as it is for the diffuse slot.
When the entire model is made up of several parts, each with their own texture, you will have to combine the textures in an external image editing program. Paint would possibly work for that already, but I recommend something a bit more advanced, like GIMP.
I would recommend to always create a square size, not greater than 2048×2048 in case of a .png (this is needed if your model relies on transparent parts) or 4096×4096 in case of .jpg. Most 3D model textures made for gaming already have common sizes that are powers of 2. Make sure that when you align differently sized textures, you make them sit at precise positions. This will be important later on.
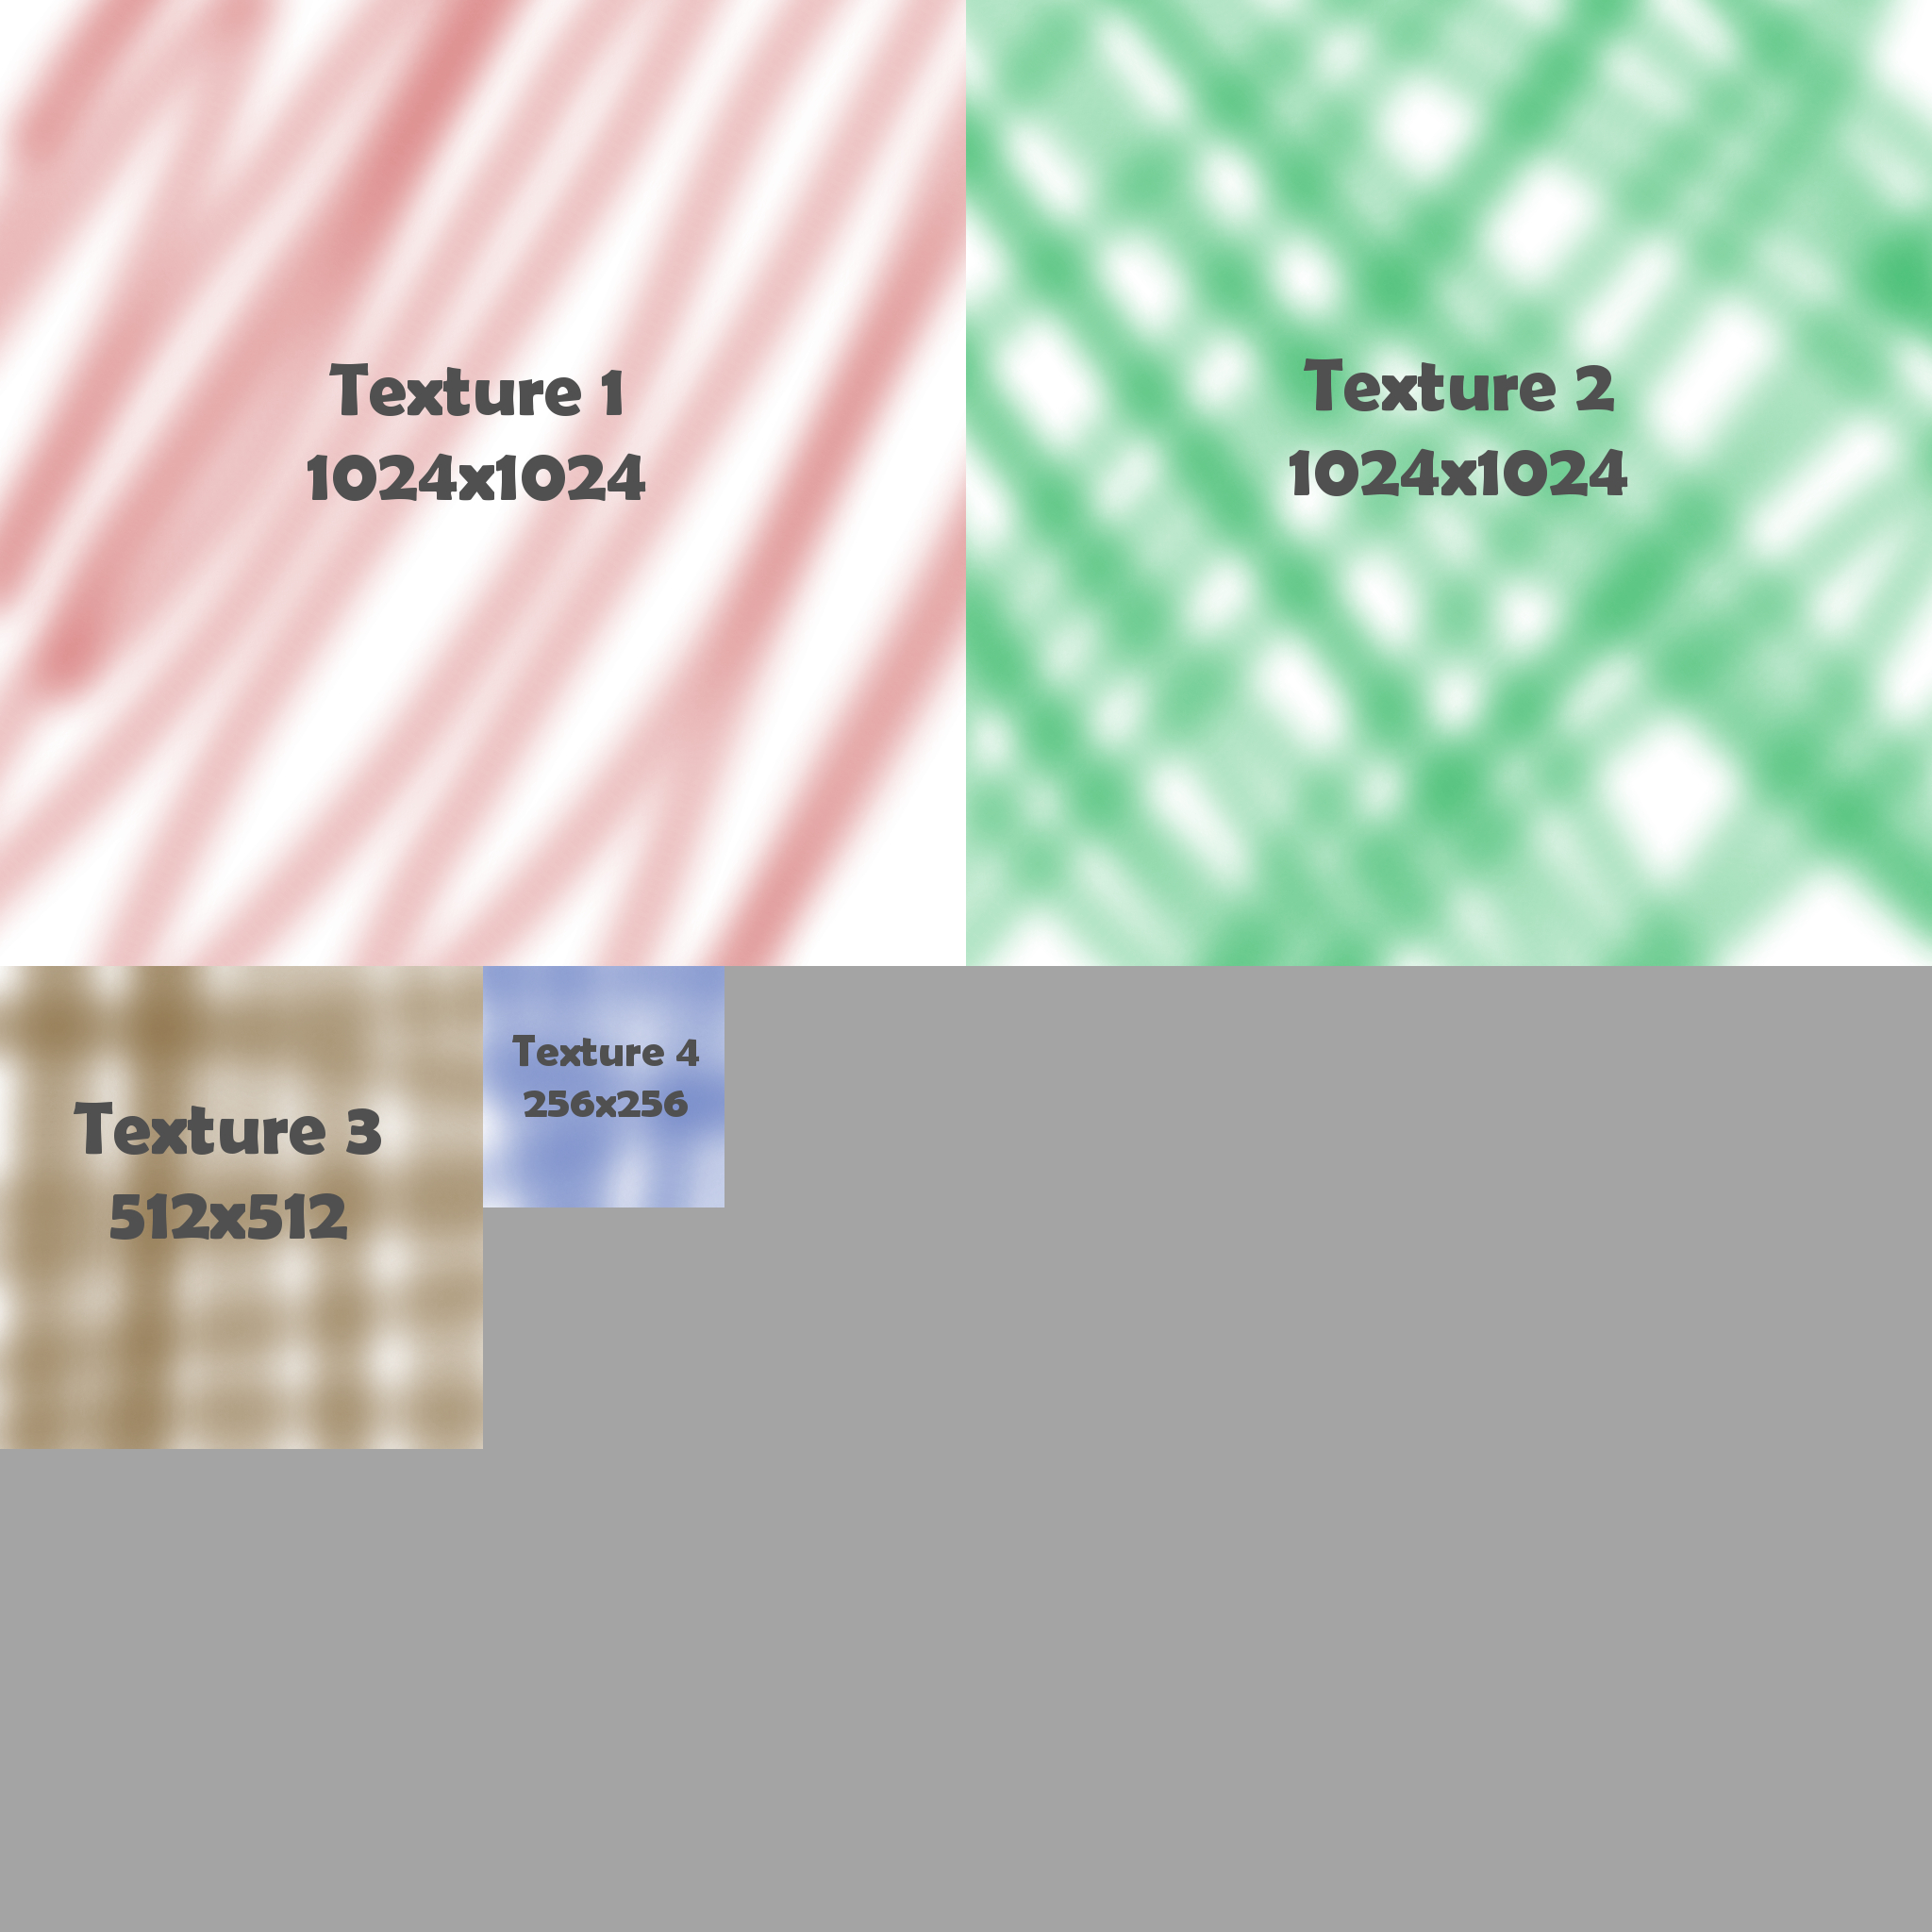
Finally, you have to load the new texture into blender and realign the UV layouts so the model knows where to grab the color information from.
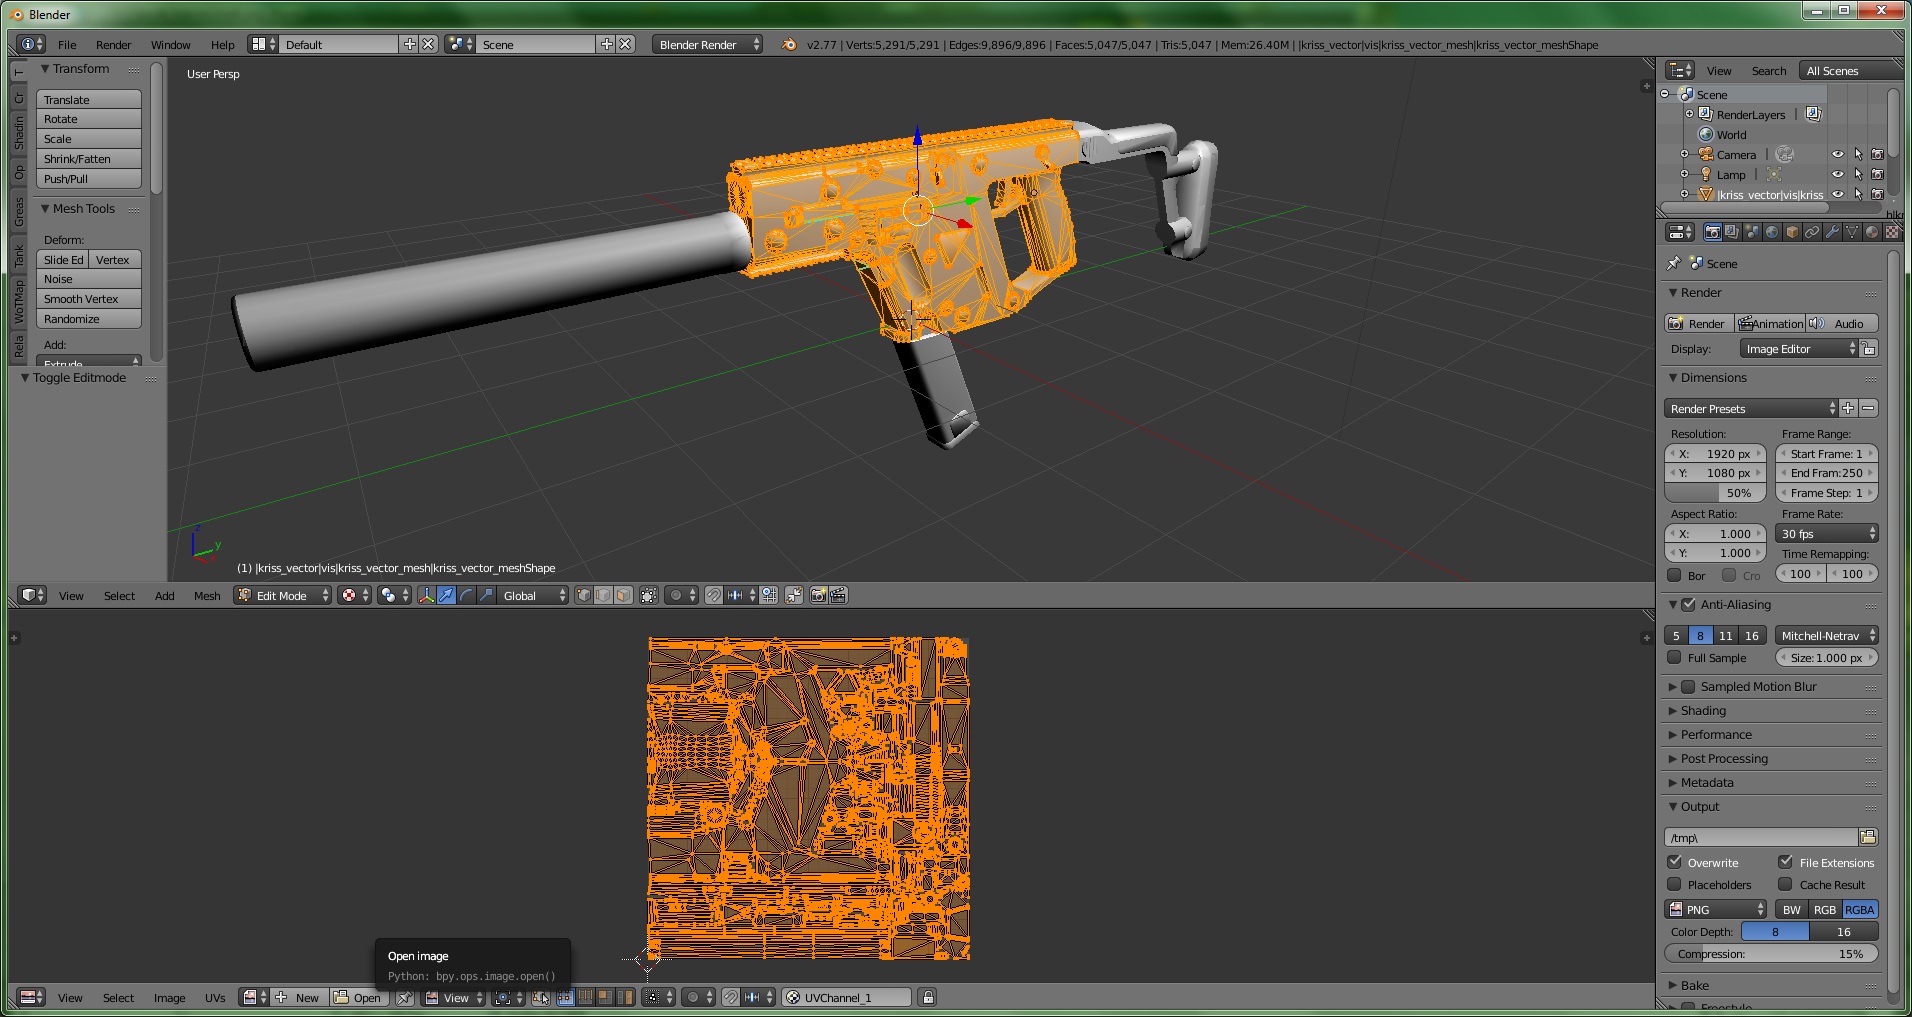
To do that, select the part you need and go into edit mode, then select “Open” as shown above and navigate to where you saved the combined texture. It helps to keep the 3D viewport in texture view for this step. Now you need to align the UV layout correctly onto the part of the image that it needs to be on.
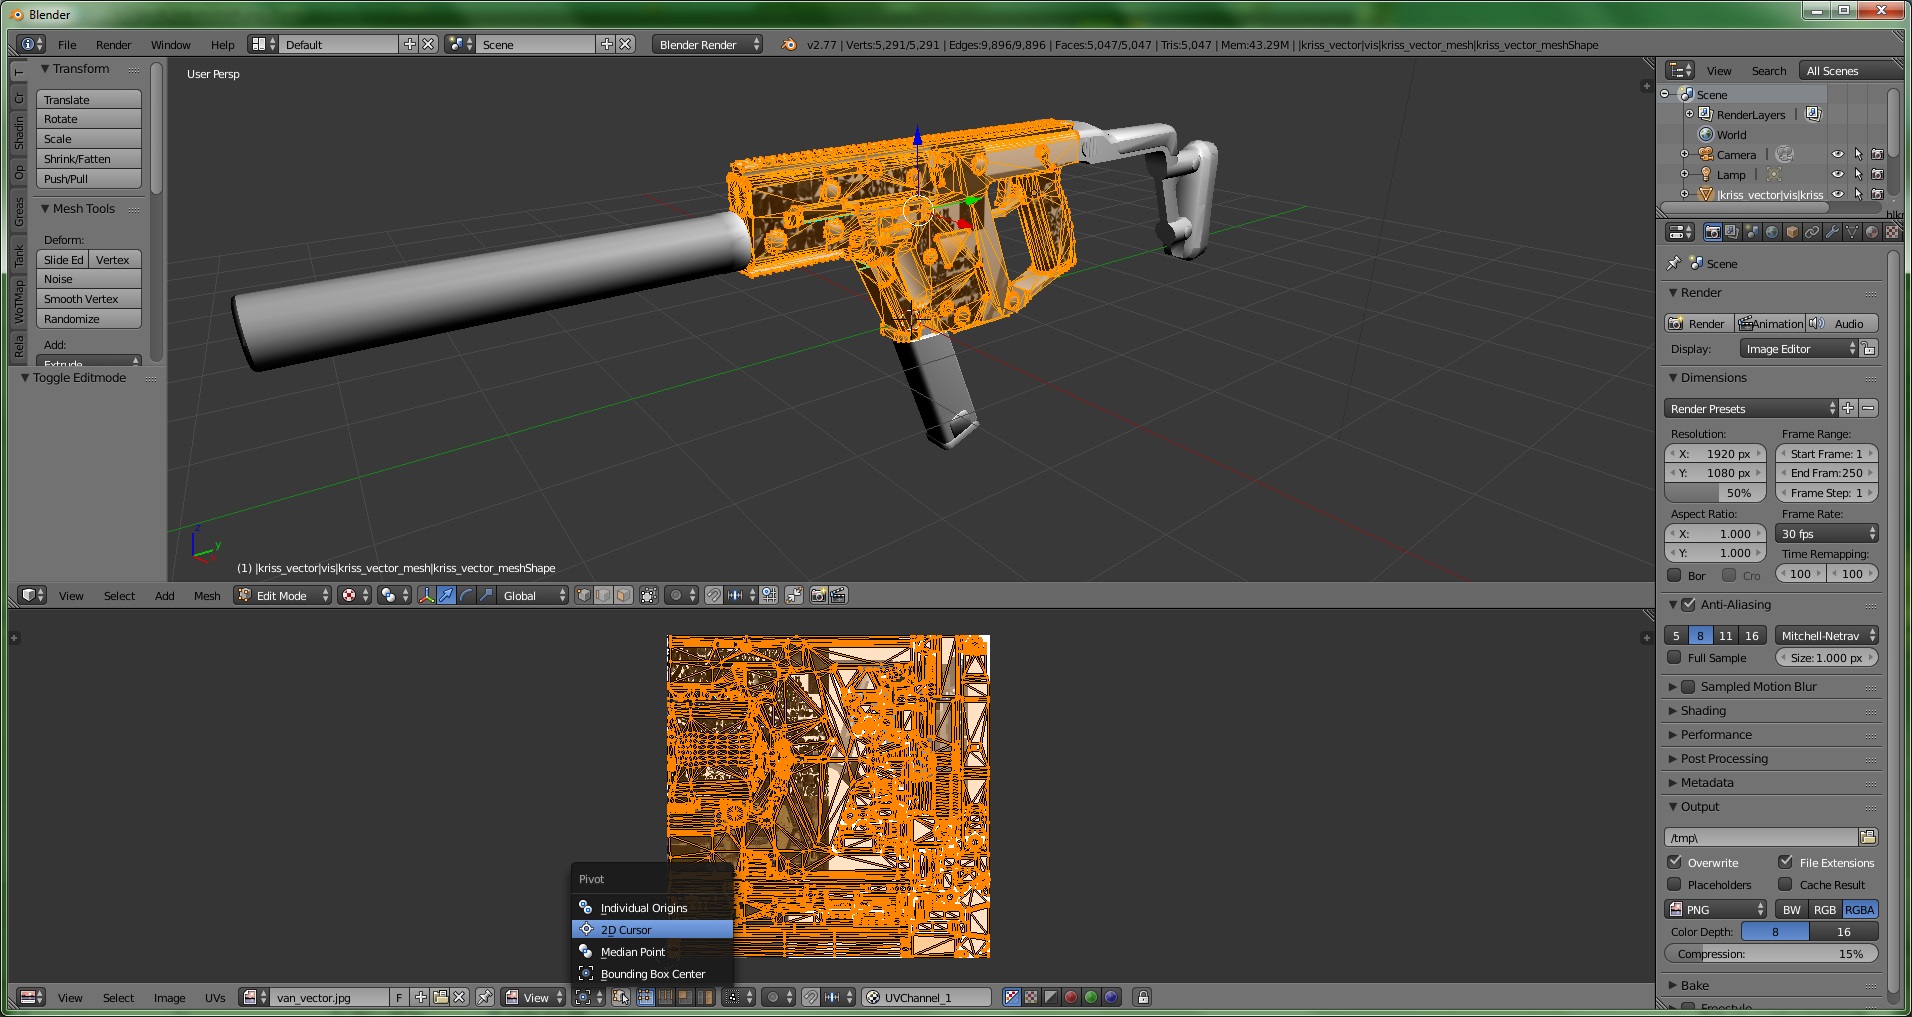
For the next part, I recommend to set the pivot point to 2D cursor as shown above. Move the 2D cursor to one of the corners of the square by leftclicking. Try to make it be as precise as possible on the corner.
To move the UV layout around, move the mouse into the texture area and press G. You can use the mouse to do this, however it will be easier to use precise number inputs. In the case of the gun in the image, I first had to scale the UV layout down. To scale, press S. Again, you can use your mouse movement, but number inputs will be more precise. For this example, I had to do the following inputs to get to the desired outcome:
S 0.25 (to scale to a fourth), G Y 512 (to move the layout up by 512 units and limit it to the Y axis, which is up in this case), G 512 (to move it 512 units to the right)
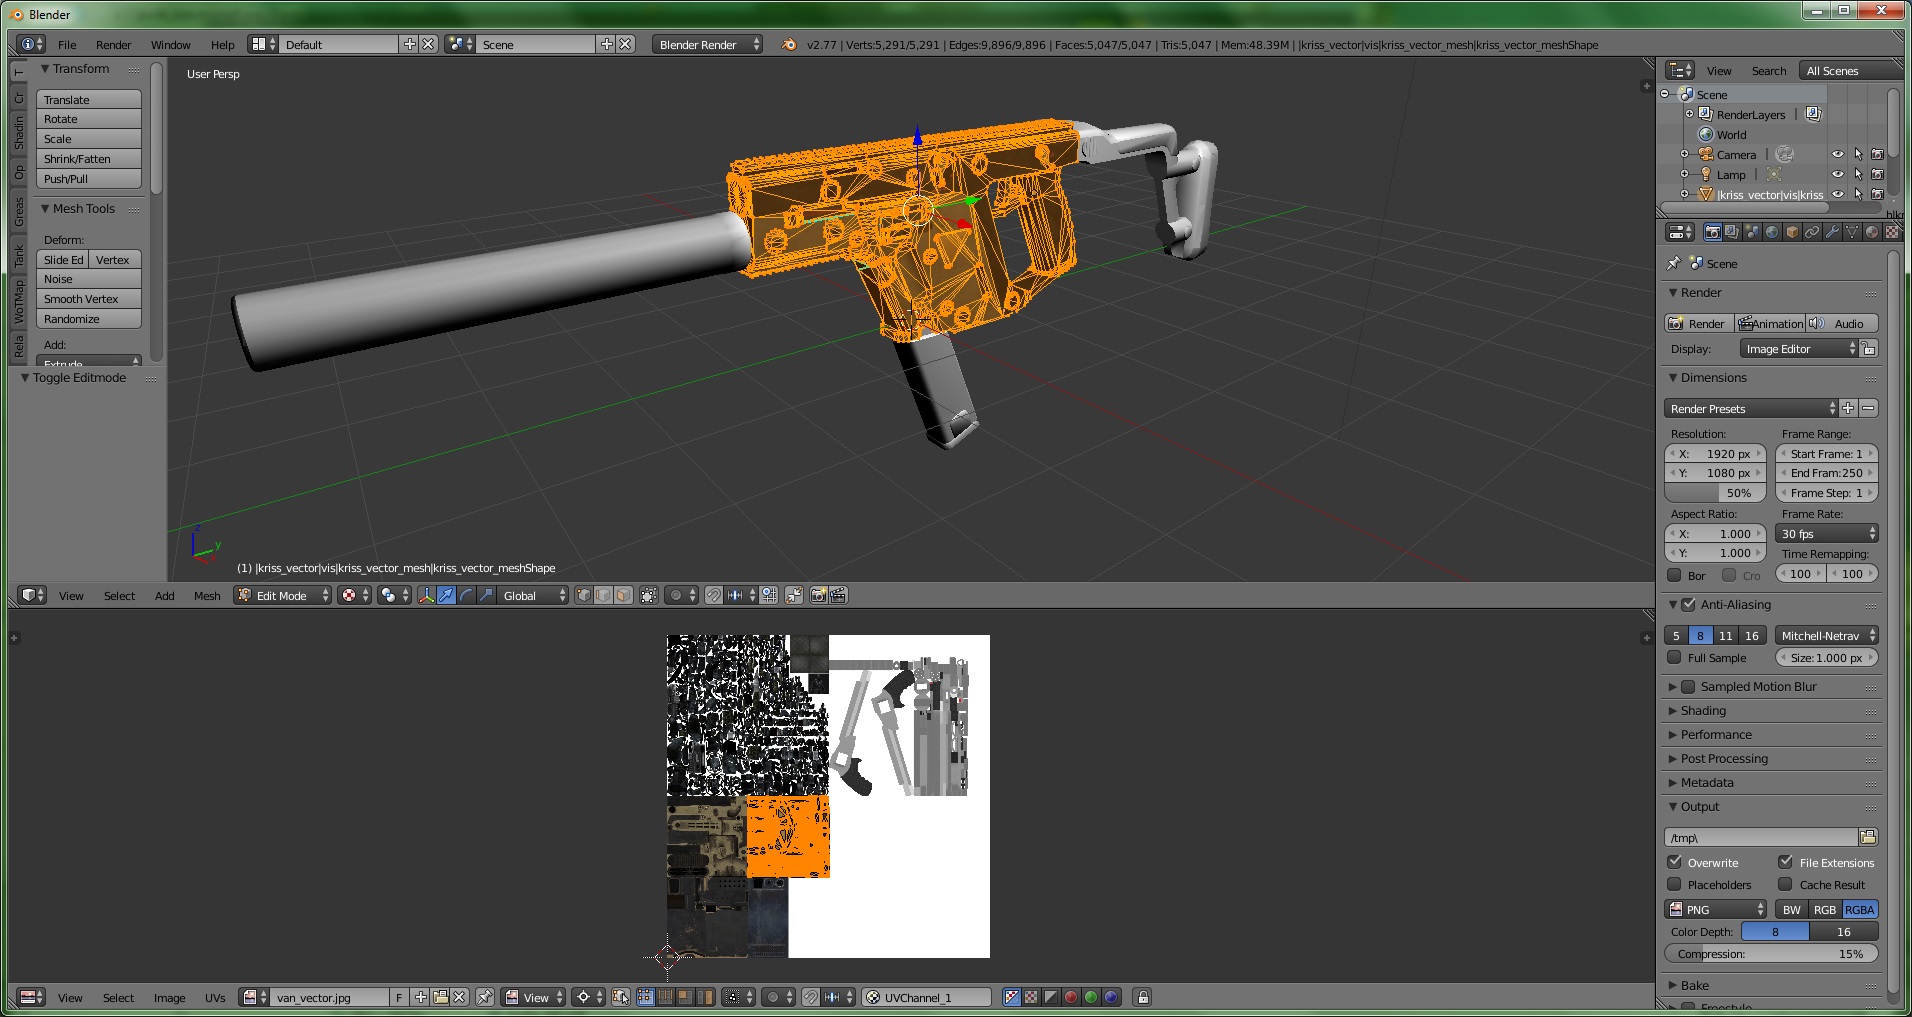
Do this for all the parts of the model, then you can combine them together with Ctrl + J and move it around as needed.
2.4 Exporting
Once you have finished everything you can start the exporting process.
For the elephant, this can best be done with the “Export selected” Script. It may not be enabled in your Blender by default. You can find out how to do that here:
[link]
Note: The addon may already be installed in your Blender, so you probably don’t have to download it again but just enable it according to the instructions on that page.
Get back to Object Mode and with the elephant still selected, click File -> Export -> Selected -> .OBJ and save at a location where you can easily find it.
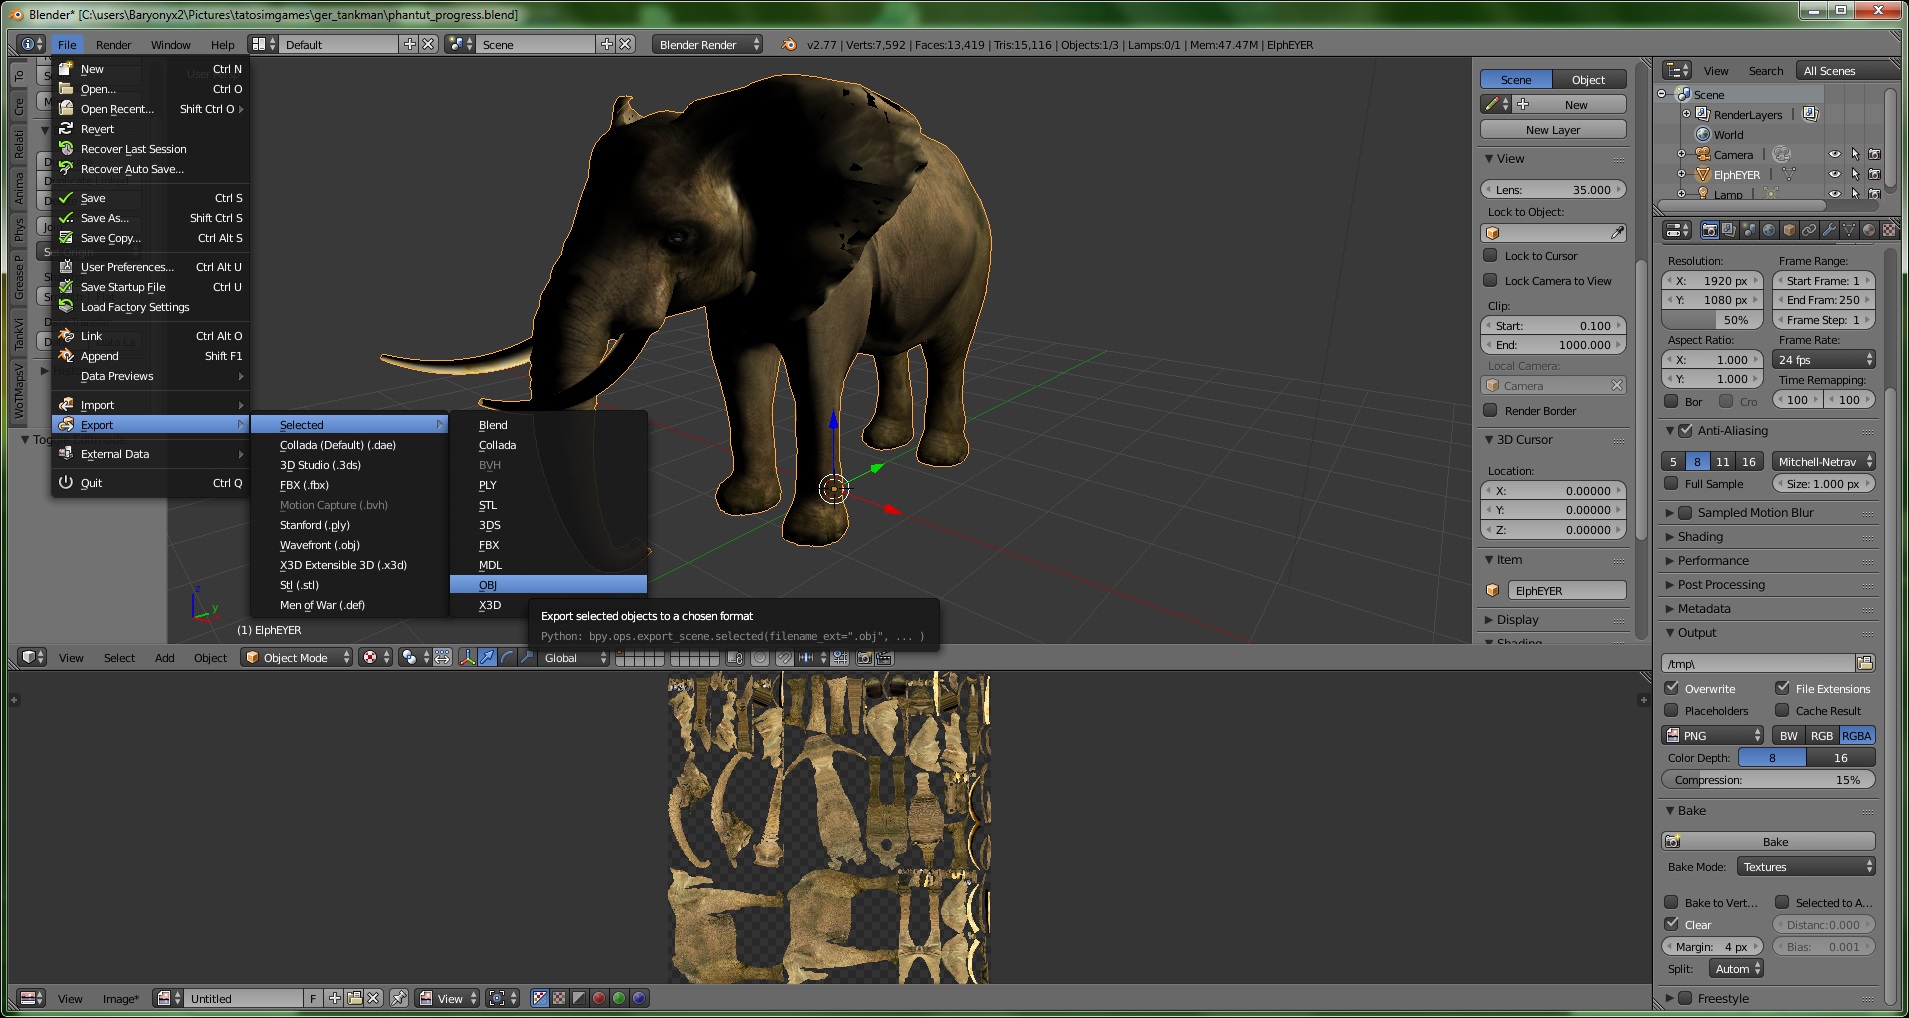
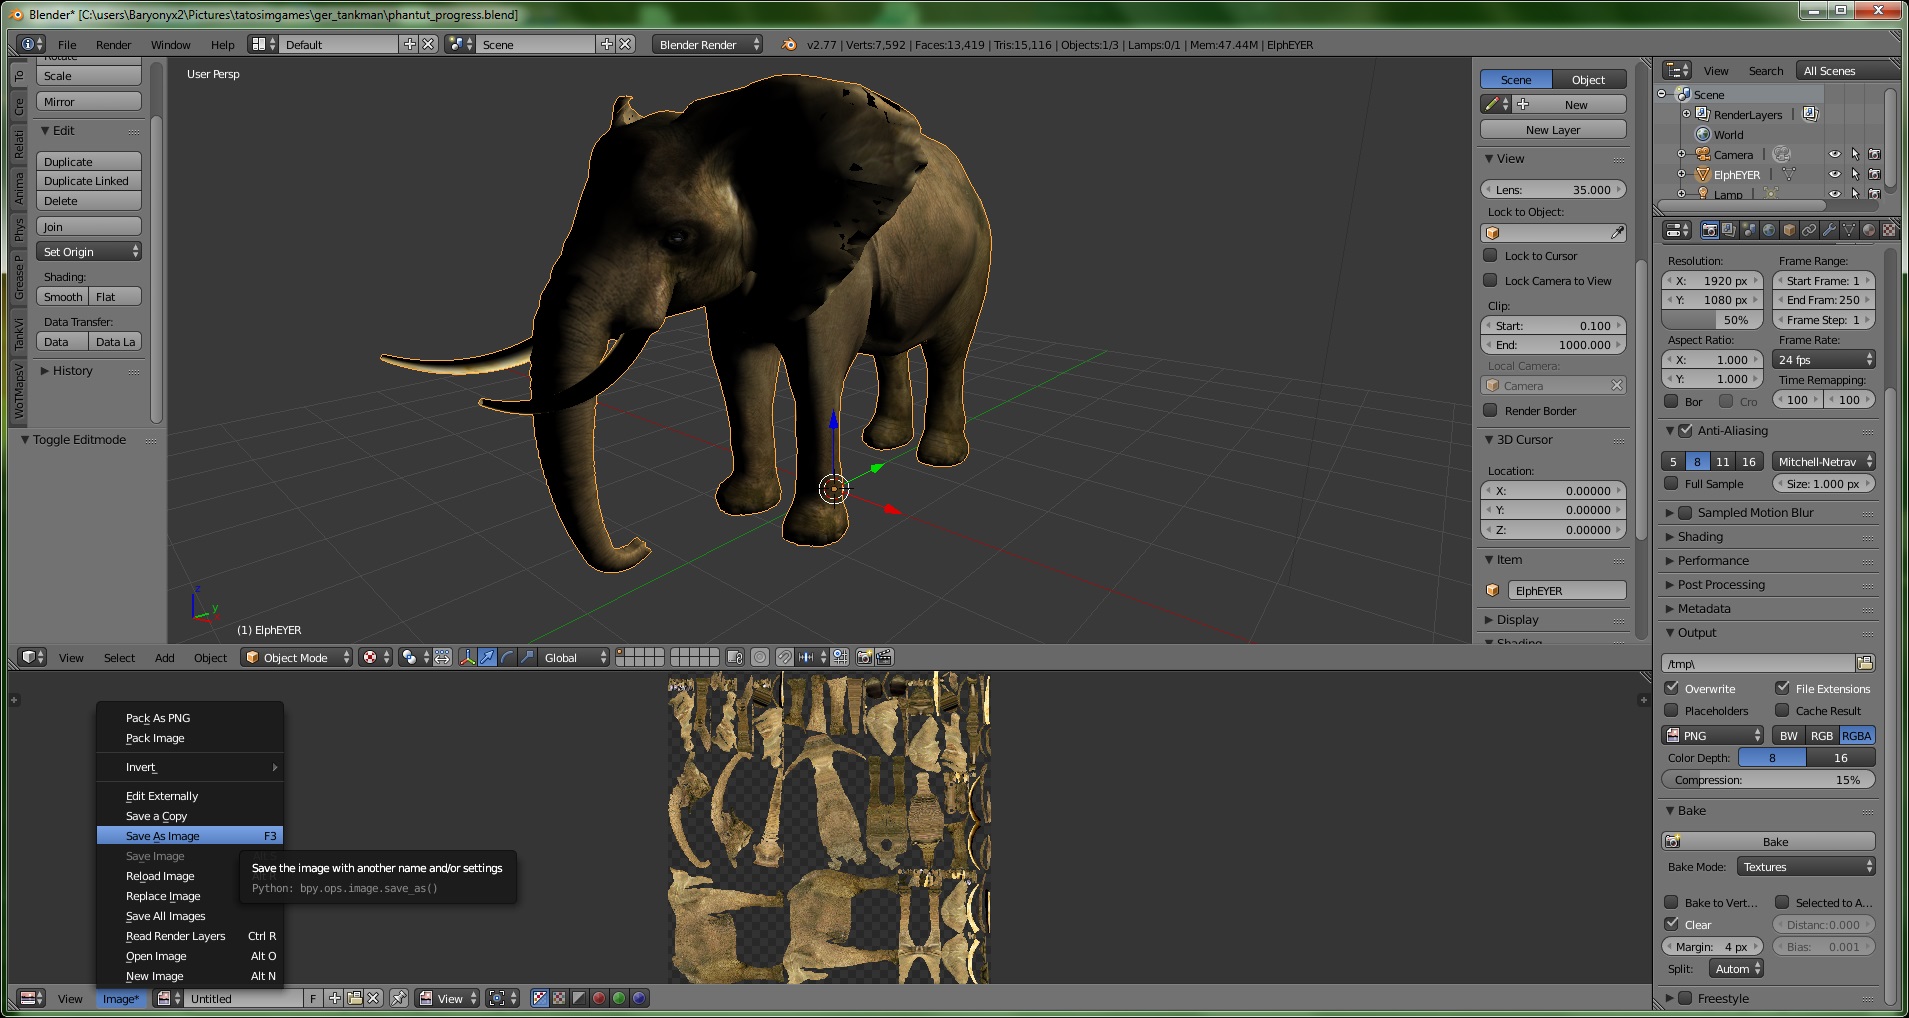
For the texture, at the very bottom should be a button saying “Image” that has an asterisk next to it.
Click that and choose “Save as Image”. Again, save at a location where you can easily find it.
3. Bringing it into the game
Finally, the elephant and its texture need to be uploaded.
It is usually the best option to use the steam cloud. When you open the custom model window, click on the little folder icon on each slot and navigate to where you saved the file. Make sure to not choose local.
If for some reason steam cloud does not work for you or you don’t want to use it, follow the steps below.
First, find the elephant model that you just saved and open it with notepad. In the notepad window you hit Ctrl+A to select the whole content, Ctrl+C to copy it. Then open your browser and go to this website:
[link]
There you paste the content into the big window in the center. Giving it a name in the little space above is not needed but may be helpful.
Click Create secret gist and on the next page, click the button saying Raw.
Copy the link of that page. Open Tabletop Simulator and create a new custom object (Objects -> components -> custom -> model) and paste the link into the Model/Mesh slot of the window.
Then, open a new browser tab and go to an image hosting site such as postimg.cc.
Upload your new exported texture there, and get the full resolution image to show in the browser window (depending on the site, click the image a few times until it doesn’t get larger anymore and then right click and select show image)
Copy this link and paste it into the Diffuse slot.
Hit “Import” and your model should now appear on the table!
Final Review
Congratulations if you have taken your time to read through this and follow it. It may seem like a ton of work, but thats only because I explained everything in a lot of detail. If you have done it ten times, each operation will only take you a few seconds. Especially the texture combination that Blender can do for you can take you around having to learn Unity to be able to fiddle with Asset Bundles.
Apart from that, this section will be expanded with suggestions and feedback later on.
If you have problems in this process (with something else than the elephant too) then feel free to ask questions below and I will try to help as best as I can, thereby expanding this guide.
Thanks.

