Overview
Intended as a sort of one stop shop for everything you’ll need to know in order to play the game the following sections should guide you from basic controls to designing, creating and flying your own ship.Please leave a comment so that I may aim to improve its content.
Starting A Game
From the main menu there are 5 options; Play Interstellar Rift, Interstellar Rift ship editor (the Ship Designer), Options menu, Credits screen and Quit Interstellar Rift. These are pretty self explanatory so I won’t go into them (too much).

Whenever you want to load your world you can select it from the list to the right and click Load Galaxy at the bottom. The bucket with the x next to it allows you to delete the Galaxy.
Controls
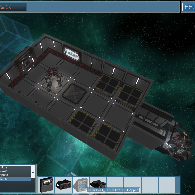
Once the Galaxy is created you are spawned inside the long range transporter of your small space station. You can use your mouse to look around and WASD to move (WASD is mapped exactly like the arrow keys on your keyboard, where W is up and A is left).

The more important reason for showing this first is that you can select this same station as your destination and use the top console to look around and get an idea (map) of the facility. The top console also reacts to mouse input as long as you aim your mouse at it; you can click it, you can use your mouse scroll wheel to zoom in and out; your cursor is pretty much your hand when interfacing with these consoles.

In a Solo Game the most important ones are the Ships Stats and Device Manager. The Ships Stats screen is pretty self explanatory. The Device Manager allows you to interface your omni tool with another device (in this case the transporter console). This is important because this allows you to connect to it and transfer power from your tool to the object you are aiming at, something you may need to do after you have created your first ship (without power, doors won’t open, life-support will be offline, etc). It functions on everything (and probably more) you can interact with without the tool, including doors, lockers, machines, computers, but it gives a lot more options and fine-tuning abilities.
There is nothing much we can do at the moment with the omni tool at this object, so you can return to the tools main menu using the home shaped icons at the top left of the interface (or use Backspace) or press Tab again to lower your wrist-mounted omni tool. Also note that pressing Escape will show your omni tool with game options instead of interface options, allowing you to quit the game or change game settings.

Again, using the omni tool, you can interface, check ship (or in this case station) statistics, etc. But there is no point since there is nothing else we can do here; We don’t have any items to store and it starts off empty.
— FACT CHECK — Not sure if this is a Galaxy wide storage locker; Is its content the same regardless of what locker you open or is it locker specific?

When you find something that looks like an elevator, you can use it using the panel next to the platform. The control inside the elevator doesn’t seem to work (for now). Unfortunately there’s not much you can do on this station, apart from admiring its beauty (and wondering why there are so many chairs when the designers of your suit didn’t think you would sit wearing it), so when you’re done exploring, head back to any one teleporter (there is the big long range one you spawned in, and there are 2 smaller short range teleporters behind it).

Before you click Teleport (on the top console, the ring with the arrow pointing up on the bottom) you should know that there is a 5 second delay (I think its 5 seconds) before the teleporter starts to do its thing. You should be on the platform by then. Now click and run.
Mining & Ore Processing
Now that we’re on the mining station you should first do some exploring. There are a few large machines here we’ll be using and there is a computer center we will circle back to at some point to create our first ship.

Luckily there is another Extractor directly next to this one, so if we set this one to work on an asteroid containing both iron and copper, we can set the other to collect water. Watch as the machines do their thing, teleporting the asteroid into the glass chamber, cutting away the ores and depositing them inside cargo containers which are then placed on the container pad.

So put those containers in there by stepping up to the compartiment, pressing 1 selecting the first item in your inventory and pressing E while aiming at the compartiment.
The items in your inventory will shift 1 slot to the left if an empty slot is found, so you won’t have to change slot numbers while inserting / placing containers.

Keep an eye on the icons and colors of both the ores and the resources; Water for instance can be processed into hydrogen (fuel) or oxygen (life-support). Oxygen shares the same color with iron, as they are both white. Hydrogen shares its color with water, blue. The only differences are the icon and what they are used for.
Now that you have your resources you can stack them on container pads in a cargobay / warehouse for later use, put them on the container pads of a cargo teleporter (looks like a container pad with a big machine behind it, it allows you to teleport resource directly to / from other ships and stations) or stick them in your locker.
I suggest sticking them in your locker, because that is where the ship constructor will be looking when we start making our first ship. Even the hydrogen and oxygen. They’re not required for the construction, but they take up inventory space while you’re busy getting more resources. Keep going until you have somewhere around 9000 iron and 1100 copper (assuming the ship design further down, adjust to facilitate your own design otherwise). As for hydrogen and oxygen, 3 full containers of each should be more than enough.
Ship Construction

When you have a design and you want to realize your beauty in this virtual environment you simply click Build, select your design (note that there might be a big white arrow to the right of the console to scroll through the endless pages of designs) and click Build once more.

Your ship is now happily floating somewhere near the mining station and can be accessed through the teleporters (assuming you did actually put a teleporter pad on the ship to teleport to).
Grab that hydrogen and oxygen from your locker and head back to the Extractor (the machine that mined those asteroids). There should be a cargo pad with a big blue arch behind it; It’s the cargo teleporter. Place the hydrogen on the cargo pads and take a look at the console either to the left of right (makes no difference which you use). First select your ship, then select the fuel tanks and beam that stuff in there. If the Teleport button does nothing, try the other console, I found some problems with this, but generally when one doesn’t work, the other will.
Booboo section; Assuming you forgot to fuel before teleporting over yourself, as I did
When you first arrive on your new ship there is no power; The generators don’t have fuel and as such nothing seems to function. You can’t even teleport back. But no worries, remember the omni tool on your wrist there?

End of Booboo section
(Left in because it teaches you how to solve these situations)
Welcome to engineering. First thing you should look for is a cylindrical container; its a fuel pod and you can fill it with hydrogen. This is where generators get their fuel from. The generators kick in automatically and you should now have power (you can check by disconnecting your omni tool from the door and see if it still functions).

Right now your ship is alive and well, you are powered up, life-support is purring like a kitten and…ehrm…the teleporter doesn’t function? Yes it does actually, the ship is just too far from any viable destination or there isn’t enough power to teleport you all the way over there (The actual problem, as I found out later, was that the teleporter was in the same power group as the life-support system, which means it only got 59 power, where at least 500 was needed). You can do 3 things to solve this; Either connect your GRIP omni tool and use it as additional power source, wait for the on-board batteries to charge (assuming you have any) or jump in the cockpit and fly closer to either station. Guess what the next section is about…
Flight Controls
Nope, it’s not about 1001 things to do with potatoes, but nice try. Lets jump in the cockpit seat and have a look around. Hold the right mouse button to look around, or hold the left mouse button to move the ship in free flight (Pressing Tab at this point will lock / unlock free flight so you won’t strain your index finger). You can, as always, use the cursor to interact with the consoles in front of you (clicking involves pressing the left mousebutton, which WILL move your ship, assuming you have thrusters installed, expecting a solution in a later version).

The console on your right are your assisted flight controls. The buttons at the top are from left to right freeflight (hotkey is Tab as forementioned), hud markers (toggles icons for asteroids, stations etc. on / off), 3rd person / chasecam (fly the ship while observing from behind. White button at the bottom returns to cockpit view) and the all-mighty leave-the-seat button (you can also press Escape).
W and S will fire your primary engines (no retro engines required to go backwards), while Q, E, A, D, R and F are roll left, roll right, strafe left, strafe right, climb and descent respectively. Note that you can also use the Arrow keys (and, again, holding the left mouse button) to rotate your ship, and the Backspace key to go back in the components menu on the left screen.
Ship Design
The Ship Designer allows you to design not only ships, but stations as well, but to be fair, the only main difference is that one has engines where the other does not (generally speaking).

At the bottom, from left to right, are your Group dialog, Menu button (hotkey is Escape), Camera controls and Connection tool (hotkey is F4), Elevation control (hotkeys are PageUp & PageDown), main editing modes (Room, Props & Exterior, hotkeys F1, F2 & F3 respectively), Catagory menu, and Component menu. And there is a coloring tool to the far right of the screen, which determines the color scheme new objects will be using. To repaint exising ones, click a scheme, followed by the button you clicked to open it, and click any and all objects you want to repaint.

Let’s start with a 3×3 engineering room. This will be a small vessel for demonstration purposes, so we don’t need a lot of high power machines like cargo transporters, shields, etc. Just select the room in the Group dialog you want to edit, and left click where you want a section to be added. Right clicking a section will remove it and everything inside and seal attached sections with a bulkhead automatically.

All these items can be found in the Catagory panel while in Room editing mode (F1, remember?). Clicking a Catagory will update the Component panel with the available components of that catagory, with a neat preview of how it’ll look. As before, left click to add, right click to remove. Since these are Room components, they will snap into place depending where you point the cursor. Also bear in mind that removing a component may result in the removal of the room section, so be sure you are prepared to deal with that. F5 (quicksave) and F9 (quickload) may be handy for this, but you’ll need to have saved using Escape – Save at least once to give it a filename. You can also just replace it with a different panel / tile by selecting the desired and left clicking where you messed up.

Note that when you added the door, the Designer automatically added a new room which now also appears in the Group panel. This allows you to just go and expand that room. Also note that the doors in the Room mode catagories only connect 2 rooms.


Another important part is the cockpit (Rooms mode, Cockpit category); note that I put 1 room section between the actual room and where the cockpit object is placed. This will make sense when working on the exterior, and I suggest you take note of this when adding windows as well.
An airvent in the floor, some cargo seats in the front, some lights in the ceiling and some billboards for atmosphere (could have been wallpanels with flowers in front of them, doesn’t really matter) and we’re set.

This is also a good time to play around with the various components available to make your ship more presentable. I’m lazy and terrible at this particular stage, so I’ll leave this to you; You should be comfortable with the control by now and know where to find what you are looking for.

When selecting a group everything that is selected (shows as the actual object instead of a yellow outline) becomes part of that group. Here you can only (de)select objects, so no worries in messing up the design. There are 2 subgroups, power and life-support. These allow you to seperate the function of components by either their power needs or their ability to control the atmosphere. This in turn allows you to seperate the life-support system from say navigational systems (a group you would put engines, thrusters, the cockpit, etc in for example).
This really is just a matter of selecting a group of objects and adding them to a group. A(n oxygen) generator will not supply power to components in another group, so this will allow you to limit the strain on your resources.

We are already cheaper than the out-of-the-box small ship provided by the mining consortium, hell yeah!
Control Reference
Player context:
W – Walk / Run forward
A – Step left
S – Step back
D – Step right
Spacebar – Jump
Tab – Show / Hide GRIP Omni Tool
1 – 0 – Inventory slots 1 – 0
Escape – Game menu
Mouse – Look around / Aim cursor
Left Mouse Button – Select / toggle console option
E – Add / Remove / Combine cargo container
Backspace – Return to previous menu on console / GRIP Omni Tool
F3 – Free camera
F8 – Server administration
Flight context:
W – Fire engines – Forward
S – Fire engines – Backward
A – Fire thrusters – Move left
D – Fire thrusters – Move right
Q – Fire thrusters – Roll left
E – Fire thrusters – Roll right
R – Fire thrusters – Move up
F – Fire thrusters – Move down
Tab – Toggle free flight (control flight by just moving the mouse)
Backspace – Left console (Flight Components) – Return to previous menu
Arrow Up – Fire thrusters – Pitch down
Arrow Down – Fire thrusters – Pitch up
Arrow Left – Fire thrusters – Yaw left
Arrow Right – Fire thrusters – Yaw right
Mouse – Cursor / Fire thrusters – Pitch / Yaw
Left Mouse Button – Select / toggle console options
Left Mouse Button Hold – Free flight
Right Mouse Button Hold – Look around
Editor context:
W – Pan camera forward
A – Pan camera backward
S – Pan camera left
D – Pan camera right
Arrow Up – Rotate object forward
Arrow Down – Rotate object backward
Arrow Left – Rotate object left
Arrow Right – Rotate object right
Tab
F1 – Room mode
F2 – Props mode
F3 – Exterior mode
F4 – Connection mode
F5 – Quick save
F9 – Quick load
Mouse – Move cursor
Middle Mouse Button – Rotate camera
Left Mouse Button – Select option / component / interface item / Add item to ship
Right Mouse Button – Deselect option / component / interface item / Remove item from ship
PageUp – Go up 1 level
PageDown – Go down 1 level
Hint & Tips
Playing
- Cargo Teleporters teleports the cargo on its pad to other cargopads. So a receiving teleporter is optional but not required.
- Cargo Teleporters only teleport the cargo that still fits on the target pad, meaning that anything that doesn’t fit remains on the teleporters pad.
- Cargo Teleporters can teleport hydrogen directly into fuel tanks.
- You can fully fill a cargo pad with 8 containers by aiming at the base of the pad instead of where you want the container to be placed.
- You can fill up a partially filled container on a cargo pad with a stack you have in your inventory.
- All containers you retrieve from the locker are full except for the last one (unless you manage to feed it exactly that amount).
- Engines keep running even when there is nobody at the helm station.
- When looking around while in the pilot seat, you will want to stand up and sit down again to know which way is exactly forward.
- To control the consoles in the pilot seat with the mouse it’s often better to first aim the camera to its center, so to minimize inherent adjustments to you trajectory when clicking.
- When flying a ship over long distances, holding the left mouse button to fly gives you more accuracy than free flight (Tab) or the arrow keys.
- Be sure to always pack enough fuel for those distant asteroid fields.
- Don’t be fooled by power readouts, your equipment IS draining the fuel supply.
- Deconstructing / Recycling ships is done at the same kind of computer it was created on.
- Deconstructing / Recycling ships that still have cargo / fuel will result in that cargo / fuel to be recycled as well (from what I can tell, with 100% efficiency).
Designing
- There is both a raised cargo pad and a normal one. Place a raised over a normal one to double the storage capacity without having to add an entirely new floor.
- Walkways without railings are a good way to access raised cargo pads.
- Add an Extractor to turn your ship into a mining vessel.
- Switch between interior and exterior often to make sure your windows, turrets and cockpits are properly placed.
- Work from front to back or back to front so you can sculpt the exterior around the interior.
- A lot of thrusters may turn your ship into an uncontrollable mess; 2 thrusters per direction is more than enough for a small ship.
- Remember that you don’t need thrusters at the front and back; Your primary engines can handle that.
- It is a good idea to place a cargo pad in your engineering section for emergency resources.
- Batteries can store excess power when in flight and be drained when teleporting cargo or performing other operations.