
Overview
A full walkthrough to beating Fallout’s final boss, the Master, at level 1. If you are curious whether it can be done, then read on. The time it takes from beginning the game to destroying the Master is less than an hour, so it’s fun to do after beating the game once, and will add additional replay value.
1. Introduction
This guide is a complete walkthrough on how to beat the “final” boss, the Master, at Level 1 on Hard difficulty. This guide is not intended for first-time players per se. It’s assumed the reader has completed one or more playthroughs, and are familiar with basic game mechanics and locations. For basic Fallout knowledge, see the Fallout Wiki[fallout.fandom.com].
2. Character Creation
Before starting, open the Options menu and choose the options below:
Combat Difficulty: Rough
Combat Speed: Fastest
Running: Always
Next, create a custom character using the field below. Normally, you want S.P.E.C.I.A.L. stats as high as possible. But for this playthrough there’s only one fight, so we use chems to raise combat stats to 10. The important stats are Endurance (HP), Charisma (barter), Luck (critical chance %), and Int (dialogue).
PE 2
EN 10
CH 10
IN 4
AG 2
LK 10
Traits: One Hander, Fast Shot
Skills: Unarmed, Throwing, Lockpick
3. How to Stay Level 1
In order to kill the Master at Level 1, you must maintain the amount of experience points gained to 1,000 XP or less. There are two areas of this run where gaining XP is unavoidable:
- Tricking the guards at the entrance to the LA vault (750XP)
- Picking necessary locks (3 total, 75XP) and stealing a security badge (10XP)
835 XP is necessary to reach the Master, that means you are limited to only 164 XP to stay at level 1. It’s best to not kill any critters or NPCs before reaching the Master. You also don’t want to do quests, recruit companions, pass speech checks, or anything else that earns XP.
The best strategy is running from all encounters and getting only the bare minimum gear needed to kill the Master. To evade enemies, you can use the open combat glitch.
Press the “A” key before a new area loads. This manually opens combat when entering an area. Keep pressing the “A” key down each time combat ends until you can exit the area. Pressing the A key over and over to manually open combat prevents enemies from attacking and freezes them in place.
4. Items Required
To kill the Master, you need the following items.
* next to items means they’re only necessary to beat the Master’s bodyguards. If you only want to kill the Master and not his bodyguards (easy way), you can skip over these.
If you already have everything needed, skip to section 9 on killing the Master. Sections 5-8 provide a brief description on how to get every item quickly while staying at level 1.
5. Vault 13 – The Hub
Outside of Vault 13, take the 10mm AP and knife from the corpse. Run to the exit while evading the rats. Save the stimpacks. Don’t worry if you take damage – you’ll heal while traveling.
In the Hub, loot Demetre’s desk in the Crimson Caravan for ammo and chems. In Jake’s armory, loot the NW bookcase for SMG, caps, and ammo.
Use the barter button on Jake to open barter and save 35%. This glitch is documented here[www.nma-fallout.com]. Barter everything except the stims and chems ($2520 worth) for 3 pulse grenades and $760 ($2426 worth).
Talk to Vance, and use the barter button to buy 2 Mentats and 1 Buffout for $760.
6. The Boneyard
Take the assault rifle on the bookshelf in Smitty’s house. In the Followers of the Apocalypse library, pick up a robe from the floor – very important! Loot the green ice chest for 6 Rad-X and 6 Stimpacks.
Sneak past the Deathclaws to the Gun Runners hideout. Talk to Gabriel and agree to destroy them for a store discount. Ask Zack for the discount, choose “Great! Show me what you got,” then barter the assault rifle, Rad-X, and Psycho ($3548) for 6 plasma, 1 pulse grenade, and $395 ($3548)
In Tine’s store, click the bottom table of Stuff and select [More] to open barter. Opening barter this way saves 18%. Trade $391 and 1 stimpack ($491) for 2 plasma grenades ($491).
7. The Cathedral
Loot the bookshelf in the room above Dr. Wu for chems and stims. Barter $12 to Francis or Ton for a red badge. From now on, wear the robes or you’ll be attacked.
Go to the 3rd floor, save, and steal the black badge from Morpheus. If he turns hostile, reload. In the adjacent room, lockpick the footlocker for the Power Fist and Tesla armor.
Use the black badge to open the door behind the projector screens. Make a clean save here before going down the stairs. In the basement, use lockpick on the SE bookcase to reveal a hidden lever. It opens a secret door to the L.A. Vault.
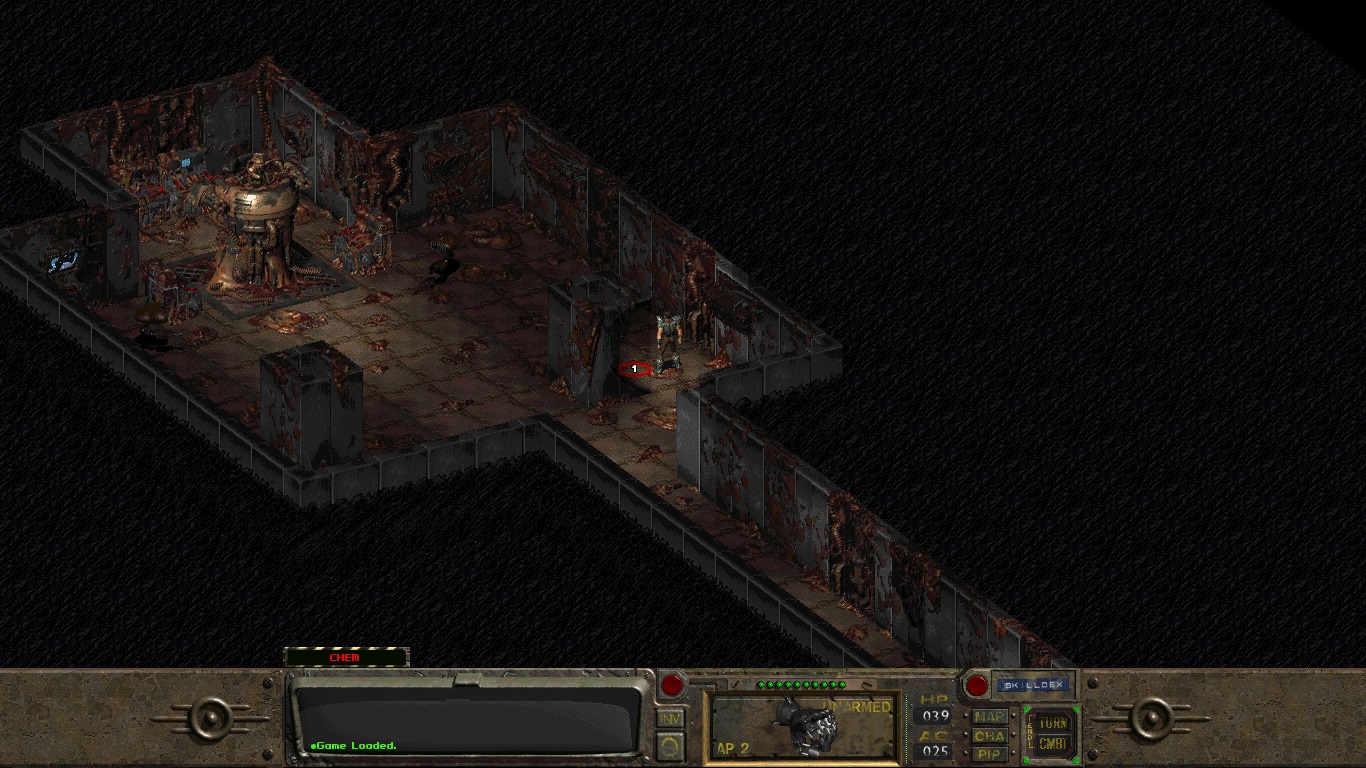
8. L.A. Vault
A guard at the entrance will stop you, pick the 2nd dialog option to pass. If he speaks again, choose option 1 or 3 or else he will attack. You get 750XP for tricking the guards.
Go to the 3rd floor and save. In the small storage room, lockpick the first 3 tall lockers for 4 pulse grenades, 4 plasma grenades, 80 small energy cells, and stimpacks. Take a Buffout to increase carry weight if necessary. You should now have every required item on the list.
Enter the Master’s chamber using the door on the SE wall. Going through the corridor triggers psychic attacks, but since you have 2 Perception, you only take 2-3 damage.
9. Killing the Master (Easy Way)
How easy is it to kill the Master? Well how much time do you have? Only 10 minutes? Ok, that’s 9 minutes, 30 seconds more than you need.
Before starting combat, you need to find two special hexes: the cover hex, and the Master Line of Sight (LoS) hex. If you click on a grenade, then hover your mouse over the Master, the cursor shows if there is LoS or cover. A white accuracy number indicates a clear LoS. A red “x” indicates cover from fire.
To find these hexes, there’s a visual aid. See the flesh colored ball of “goop” behind the right-hand pillar? Stand on it, open combat, and move one hex to the left. That is the cover hex. Now, move one hex to the top-left. That is the Master LoS hex.
The cover hex[1] is 1 hex to the left of the goop ball
Once you know the hexes the rest is easy. Take 4 Mentats, 4 Buffouts, and 1 Psycho to raise your combat stats/AP to 10 and DR by 50%. With the One Hander and Fast Shot traits, you can throw 3 grenades/turn with 95% accuracy.
Stand on the LoS hex and start combat. Throw 3 pulse grenades at the Master. Use your last AP to step onto the cover hex. Since the Master has no LoS to fire, he will pass his turn. Step on the LoS hex, throw 2 grenades, and step back on the cover hex. On your next turn, move back to LoS and throw 3 more grenades for a total of 8. After 8 pulse grenades the Master will explode.
You can use the 4 plasma grenades in the 3rd floor locker to kill the super mutant. That’s it – you’ve destroyed the Master, Fallout’s final boss. The fight is over.
….
Er… what’s that you say? That was too easy? Ok, fine, we’ll do it the hard way.
10. Killing the Master (Hard Way)
So you want to kill the Master and all 10 of his bodyguards to complete the final battle 100% at Level 1? It won’t be easy, but it is possible. This section gives a complete walkthrough on how it can be done.
This section is longer and more complex than the previous sections. It’s divided into 3 parts:
A. Areas/Hexes
B. Strategy
C. Mutants
There are 3 main areas: the corridor, the bend, and the pillar. The corridor is where the mutants end turn 1. The bend is the turn at the corner, where the mutants end turn 2. The pillar provides cover from fire, and where the mutants end turn 3. When ranged mutants reach the pillar, they have LoS and will shoot you.
The main areas: The corridor [1], the bend [2], and the pillar [3]
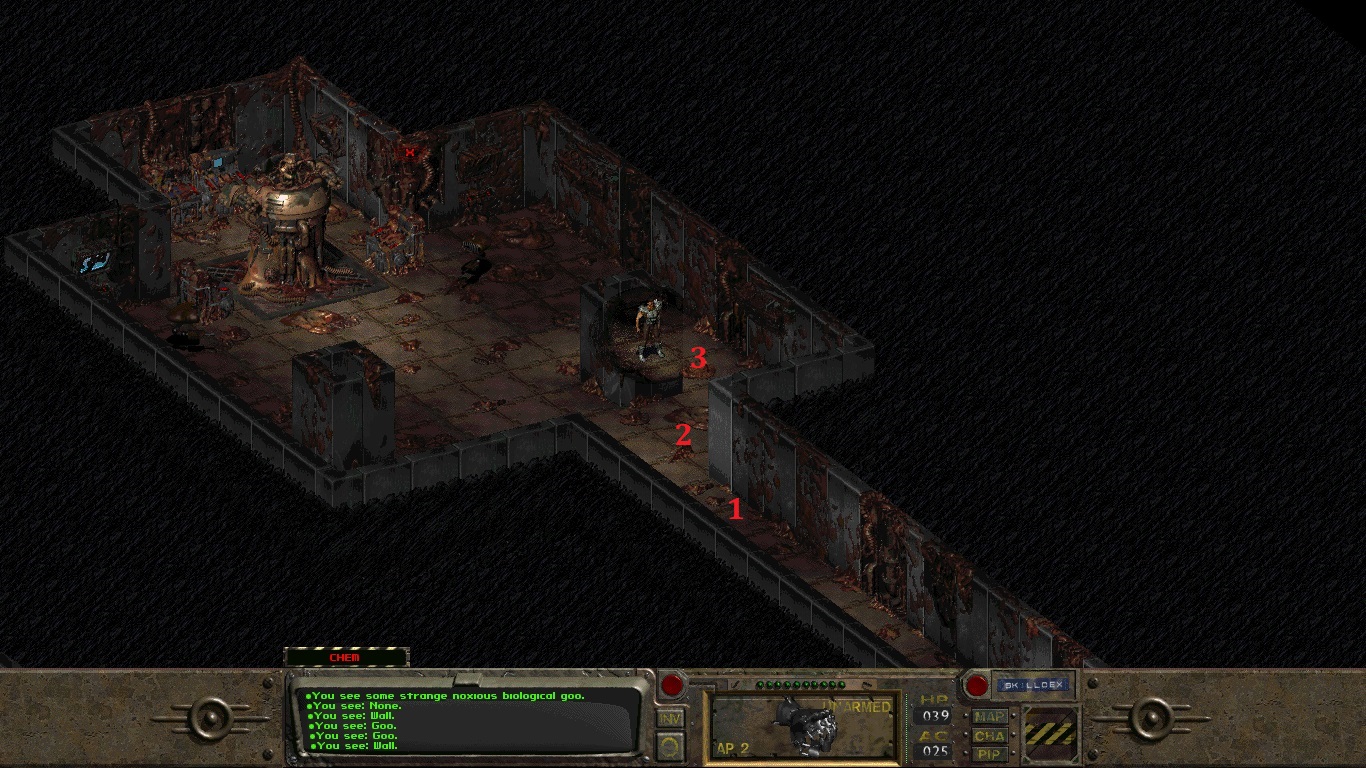
There are 3 key hexes: the cover hex, the melee hex [1], and the grenade hex.
- The cover hex is the same as the Master fight.
- The melee hex is one hex to the bottom-left of the cover hex. It is where you stand to be in melee range of the mutants at the pillar.
- The grenade hex is one hex to the bottom-right of the melee hex. This is where you have LoS to throw grenades at mutants in the bend.
The melee hex [1] is one hex to the bottom-left of the goop ball

Due to Fallout’s glitchy engine, ranged mutants in the corridor have LoS on you on the melee hex, but not on the cover and grenade hexes. When standing on the melee hex, you will get shot at.
There are 10 super mutants which spawn every other turn. The mutants have 3 spawning sequences. This strategy is based on spawn sequence #1. In the Mutant section, there is a table listing all the mutants in sequence #1.
Before the fight: From the Master’s chamber, use the elevator to go to floor 1, then back to floor 3. This loads sequence #1. Don’t go to floor 2 or the mutants will spawn out of order. If you mess up, load the clean save from the Cathedral.
THE BASIC FORMULA
Step 1. When a mutant spawns (turn 1): stand on the cover hex while they are in the corridor.
Step 2. When they reach the bend (turn 2): move to the grenade hex, throw 1-2 grenades, then move to the melee hex before ending your turn.
Step 3. When they reach the pillar (turn 3): punch 3-4 times with the power fist to kill them, then return to the the cover hex before ending your turn.
Step 4. Repeat.
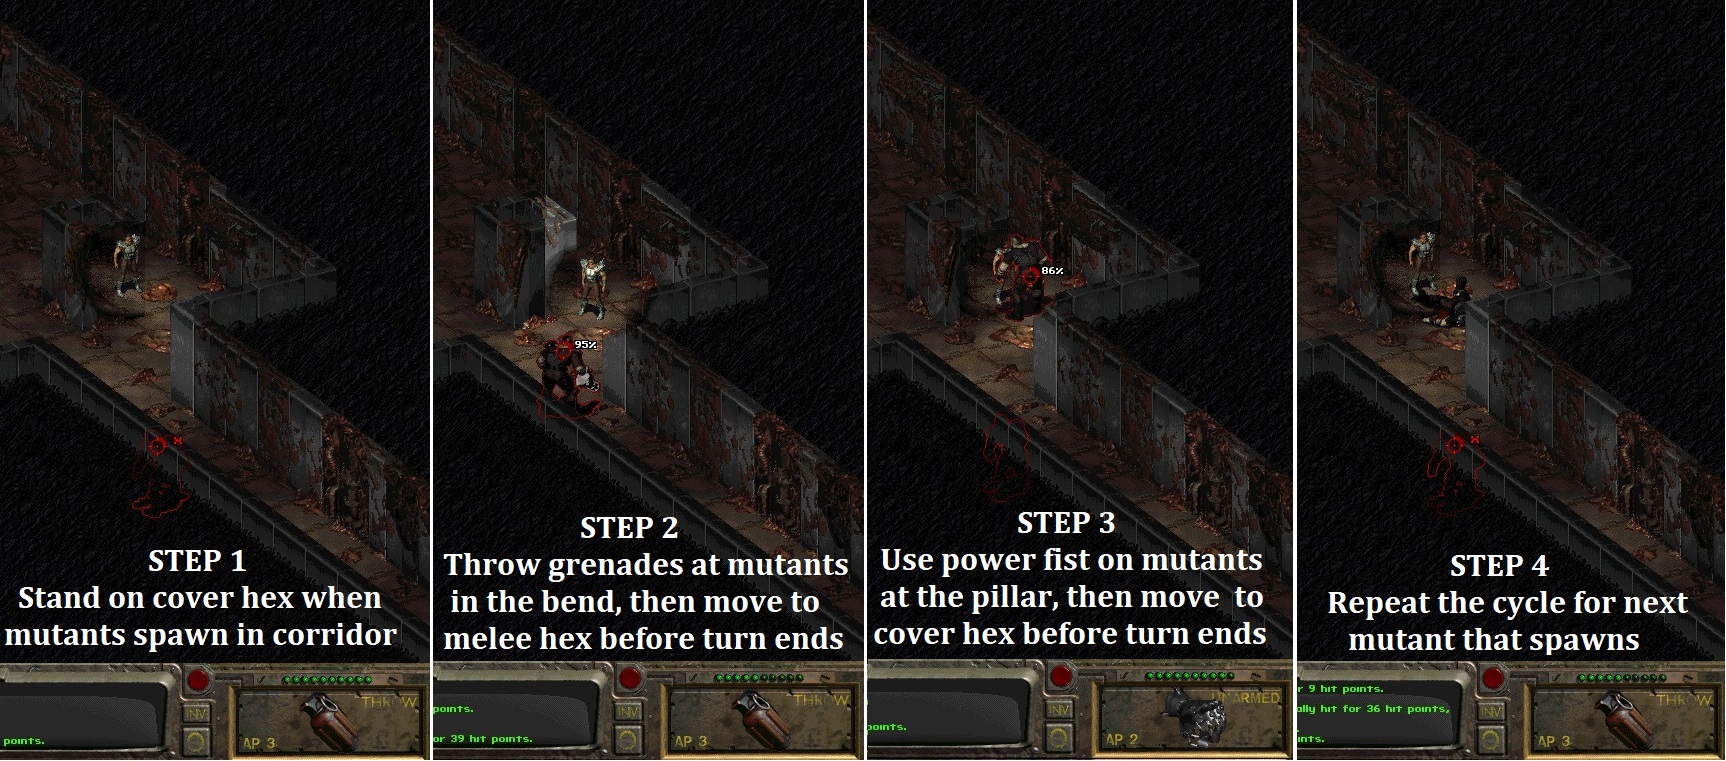
► The goal is to soften their HP with grenades so you can kill them with 3-4 punches when they reach the pillar, and have 2 AP remaining to move back to the cover hex.
VARIABLES IN THE FORMULA
There are several variables which can disrupt the formula:
- The AI and pathfinding for mutants is determined by your location.
- If you stand on the cover hex, both ranged & melee mutants move to a LoS hex in the bend. This is the “good spot”. You want them to be in the good spot.
- If you stand on the melee hex, ranged mutants in the corridor will shoot you, and melee/flamethrower mutants move to a “bad spot,” where there’s no LoS for grenades.
► If you are stuck on the melee hex at the end of your turn, it causes a logjam effect. You must return to the cover hex to keep the cycle running smoothly.
If the strategy sounds complicated, don’t worry. After a couple practice runs, everything will be much clearer.
The basic formula works great for all mutants except Mutant #1.
Mutant #1 is a tank that has 120 -140HP and 2 stimpacks; you need special tactics to kill him. Luckily, he’s the only one. With grenades and the power fist, there are 7-8 ways to do this. Statistically, however, only 2 ways are reliable.
The easy method is throwing 3 grenades and hoping you crit for lethal damage.
Method #1. Hit the Master with a pulse grenade to begin combat, equip the plasma grenades and power fist, then wait behind the pillar for Mutant #1 to spawn. When he reaches the bend, throw a grenade→move to the cover hex→end turn. He will move to the pillar. Step backwards one hex→throw 2 grenades→return to the cover hex.
Throwing one grenade in the first attack prevents him from healing (unless it crits) so that he moves to the pillar and you can throw 2 more. You have 3 chances to land a crit before he uses a stimpack to heal (which creates a logjam).
This method is easiest, but works only 40% of the time (8/20 tries).
The consistent method is to find the melee/grenade hex (MGH) which is in the bend [1], 1 hex to the bottom-left of the flesh colored goop “pancake.” The MGH gives both LoS to throw grenades at Mutant #1 after his 1st turn ends, and proximity to melee attack after his 2nd turn ends.
Method 2. Hit the Master with a pulse grenade to begin combat, equip the plasma grenades and power fist. Mutant #1 spawns and moves into corridor. Move to a cover hex in bend→end turn. Mutant #1 moves to bend. Move onto MGH→throw 3 plasma grenades. If he doesn’t die and you do ≥ 27 dmg/grenade, then: he will use both stimpacks directly the MGH. Punch him 3-5 times to kill him.
This method is complex, but works 85% of the time (17/20 tries).
The melee/grenade hex[1] is one hex to the bottom-left of the goop pancake in the bend

After mutant #1 is dead, hit mutant #2 in the bend with a grenade then move to the cover hex (he is melee and follows you). From this point forward, the formula works consistently.
That wasn’t too complicated, was it? … But you said the hard way, not the EZ Cheezy way. *Sigh* … people are hard to please.
Table of Master’s Soldiers (Sequence #1)
The table below has info on all mutants for sequence #1. # Grenades column indicates how many grenades are needed to throw. If you want, you can use frag grenades on Mutants #9 and 10.
Note: HP for some mutants is 1 of 2 possible values and chosen randomly
*Risk factor is based on the DT/DR values of the Tesla armor. It has 90% DR for energy weapons, so laser/plasma rifles are low risk. Big guns can kill you in a single shot and so are high risk Melee mutants do 10-14 damage, but can attack 3 times/turn, so use stimpacks and be cautious. The gatling laser is only deadly in close range and if it crits.
Addendum
Thanks for reading! Hope you enjoyed my guide. Did I make any mistakes? Please let me know in the comments below. Also if this guide helped you in game, let me know by leaving a rating for me. Thank you.