Overview
If you have used or made a remix mod before, you might notice a song restarting from the very beginning when it is over. if a song starts out slow and then picks up after an intro, it can be a bit jarring and break immersion if the song just cuts and restarts while you are in the middle of doing something. This guide will show you how to create a song that starts out, and moves into a section that loops perfectly.
Before anything else, watch the official remix tutorial.
This guide will not cover the steps to make the remix mod, it will only show how to setup your soundcue and audio files so that the remix will loop smoothly. the tutorial by MekuCube will show you everything else you need to know if you are just starting to make a remix mod.
Finding and separating the looping portion and the intro
After choosing the song you want, you will need to create two different .wav files, one for the intro and a second for the looping section.
I will use a song from Sonic mania, Studiopolis Act 1 as an example:
And I will be using Audacity ( a free audio editor ) to make the changes necessary.
So open your audio file with audacity – it will look something like this:

Finding the exact time where the looping section actually starts can be very difficult, but thankfully most songs from other videogames have the times listed on this site:
[ edit, link removed – looks like the site i used to link to is gone now, so not sure where to get the information from now. rest of the guide still applies if you can find the info on the looping section yourself ]
Using the CRTL+F search function, i can find the section for sonic mania very quckly, and again find the exact song i need.

On the page you will see a “Start Loop Point” and “End Loop Point”

Going back to audacity, at the very bottom you will see a “Selection start” with an arrow pointing down – click it and select “Samples”

This is where you will put the numbers in you obtained from the site. By inputting the start loop point as the Selection start, and the second ( set to end ) as the end loop point, you will have the looping section you need selected.
Press the “Trim audio” button

And audacity will cut out the rest of the audio, leaving you with only the portion that loops. Go to File > Export, and make sure you save it as a .WAV file or the editor will not recognize it.

Now you have the looping audio, but need the intro. in audacity go ahead and undo the trim you made, and set your selection start to zero and your selection end to the Start loop point. Trim that, and you have your intro section. go ahead and export that too. Now all thats left to do is set up the sound cue in the editor.
Delay node randomness
As it turns out, the Delay node we will be using in the next step has a slight bit of a variation with its actual Delay, causing a strange inconsistency even in the base game. to counteract this, we will need to edit our Intro audio in order to cover it up ( like the base game does )
Select the last 1-2 seconds of your intro’s audio, go to the “Effects” tab and select “Fade out”
If your intro is particularly long, the same way you set it to samples you can set it back to seconds and use that to select the very last bit of your intro.

That should cover any variation that could happen, hopefully.
Setting up the SoundCue in the editor
After importing both .wav files ( explained in the tutorial video by mekucube ) you will be looking at your package in the content browser like this:

Right click in the content browser, and create a new soundcue then open it up in the soundcue editor.
it is completely empty at the moment, so select one of your SoundNodeWaves and right click in the soundcue and add it in using the option it provides:
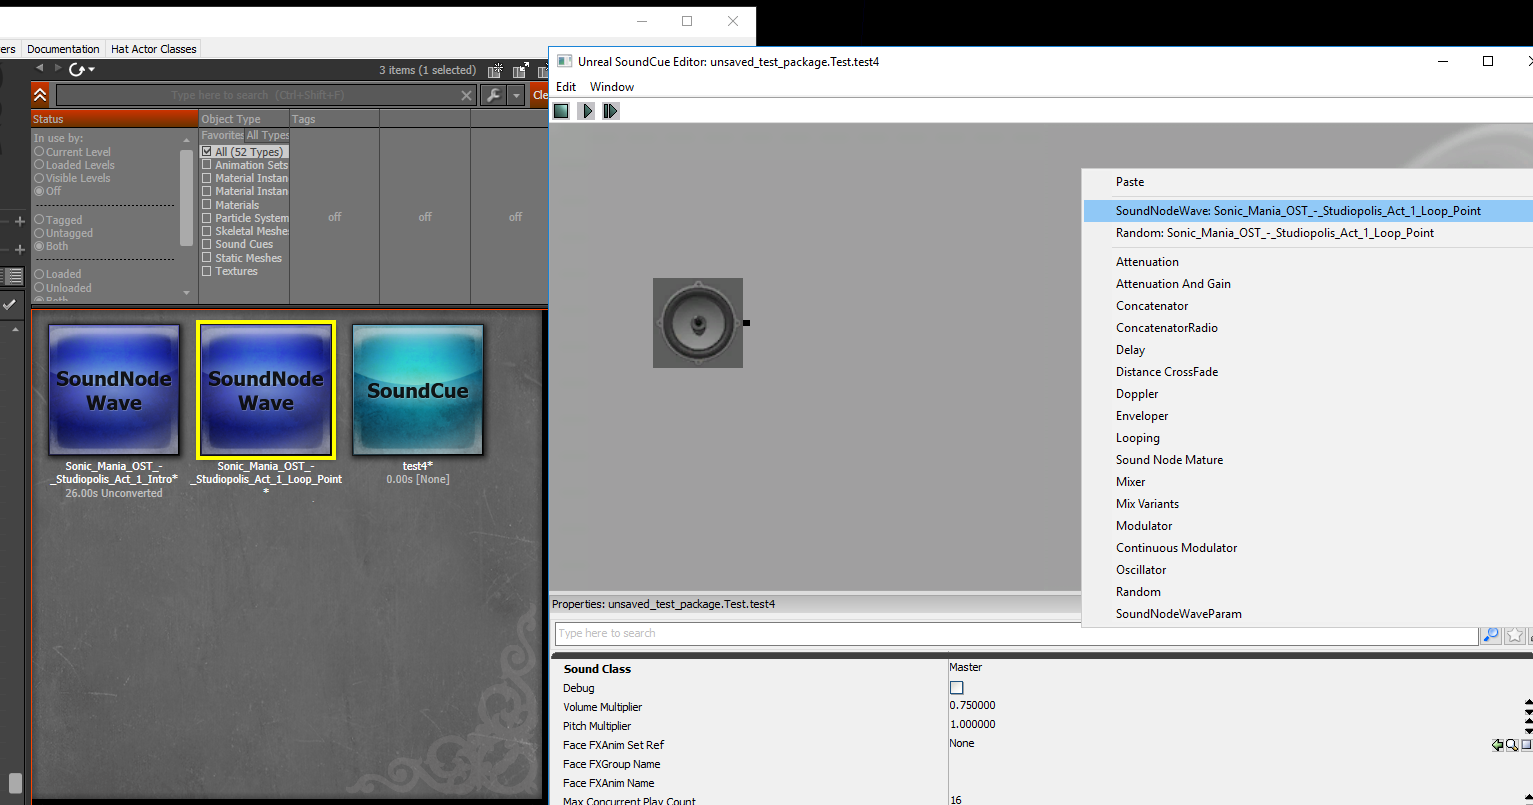
Do this for both your intro and your loop files and your soundcue will look something like this

Right clicking in the soundcue editor, you can add a node.

Add the “Mixer” “delay” and “looping” nodes in the soundcue, and hook them up something like this:

Now, in the delay node you will want to set it to the duration of the intro section. The duration of the intro sequence in this example is 26 seconds, so i set the delay to 26 seconds. now select the mixer node and hit the play button at the top of the soundcue editor. If all has gone well – it should now loop perfectly.
You may have to manually adjust the Delay node, in this example i had to set it somewhere closer to 27 seconds to make it go together smoothly.
That should be your perfect loop, finished. As a side note, in the mixer you can adjust volume. make sure to test it in game before uploading it as it may be extremely loud. i reccomend setting it to 0.4 for both things in the mixer, so the player has the ability to adjust the music to be as loud or as quiet as they want it to be.
Additional Support
If you have any questions, comments or concerns, feel free to either leave a comment on this guide or request help from the “Modding-Help” channel in the Official Hat in time Discord.
Credit goes to Master Dimentio for the idea, and for all the details of using audacity and the website to separate the Intro and looping sequence, and Starschulz for setting up the SoundCue in the editor.
A mod that currently uses this method:
[link]Feel free to download it, reverse engineer and see how it is done.