Overview
This guide will help you get into Hell Let Loose and understand the system and game play basics. It will also go through some settings you can apply to make the game run better,
Intro
Hello and welcome to my Beginners Guide for Hell Let Loose in 2021. This guide has been made for first time players in mind, but it could also help out veteran players. I have made a video version of this guide on my Youtube channel, along with nearly 30 guides and tip videos for Hell Let Loose and more will come. So if that interests you, then check the video out! I also live stream Hell Let Loose where I play with my community.
[link]
DirectX 12 – Increase your FPS!
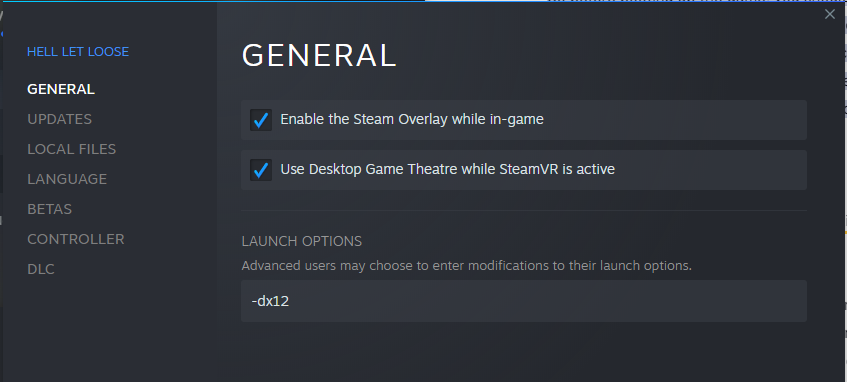
So before booting up the game, you should go into the properties for the game. So go into your Steam library, right-click the game, click on properties, and enter -dx12 into your launch options. This setting will give you a nice frame rate increase. It can make your game a bit stuttery when you get into a match, but if you spin around a couple of times after your first spawn, it clears up.
Options
So after booting up the game for the first time we should check out the options.
Head into Gameplay options and these Nameplate settings should be set to at least 250 meters. Many players recommend setting them to 500, but for me, 250 works fine. What this setting does is control how far the names and icons of friendly players appear. This helps to reduce instances of friendly fire and team kills.
Now into Video Options. At the time of recording, Hell Let Loose is in Early Access and needs further optimisation. So I would recommend setting your graphics all to Medium, then adjusting from there. I have a performance guide which I will link at the top right of the video which goes over how each setting changes the look of the game, and how it impacts performance. What I would recommend though is to set everything to Medium, but put Shadows to Low and SSAO to Off as those 2 are the biggest hitters to your frame rate. Once you get in the game, start adjusting the rest of the settings to get something that suits your and your system.

Now onto Audio options. Some players do get a slight performance increase by setting the quality to Epic, so give that a try. Set your microphone setting to 50%, and when you first get in-game, do a mic check with your squad to see if you need to turn your setting up or down.
The Barracks – Loadouts/Appearance
The Barracks is where you track your overall rank and the rank of each of your roles. You can also change your appearance for each role, and as your role rank increases, you can unlock extra cosmetics. Some cosmetics are unique to certain roles such as the Medic helmet. You can also change your role loadout. Your loadout will change what weapon you will take into combat, along with different equipment. Some of these loadouts can drastically change how the role will play. Such as the Engineers Sapper loadout. The main Engineer loadout is to build fortifications, but the Sapper is designed to blow them up. You unlock these extra loadouts by levelling up the role.
Now lets briefly look at each Role.
Commander
They Command the overall battle by communicating with Squad Leaders. They can also use abilities such as bombing run, supply drop, and strafing run. The Commander is a key role in winning the battle. I would recommend getting experience in every role, especially an Officer before trying out the Commander.
Officer
The Officer commands a Squad. Their default loadout comes with an SMG, Pistol, grenades, smoke grenades, bandages, binoculars, and a watch. They can place down makers for their squad, and build Observation posts which are spawn points for their squad, and Garrisons which are spawn points for the team.
Rifleman
The rifleman is the “standard” role in the game and a good role for beginners. They come with their forces standard issue rifle, grenades, bandages, a hammer and an ammo box. They can place the ammo box on the ground for friendlies to replenish their ammo and equipment. The hammer is used to build fortifications once someone with a wrench has placed down a blueprint. The blueprint will look like this, a transparent green object.
Assault
The Assault is the close quarters specialist. They come with an SMG, grenades, smoke grenades, a hammer and bandages. This can be a tricky role to play the SMG is weak at range, but if you can get close you can cause havoc!
Automatic Rifleman
This role is built to kill and suppress the enemy. You get a very powerful weapon powerful rifle, grenades, a hammer and bandages. This role, in my opinion, is the best for newcomers.
Medic
The Medics primary function is to revive and heal friendlies. They come with a rifle, pistol, smoke grenades, morphine, and a lot of bandages. If you play this role be aware of the limited ammunition that you carry.
Support
The support function is to place supplies down which other roles can use to build. Officers need supplies for garrisons. Engineers need them for everything, and the anti-tank can use them for gun emplacements. This is a very important role in the game. They come with the standard-issue rifle, grenades, a hammer and bandages.
Machine Gunner
Well, you can guess what the machine gunner does. They carry a light machine gun which can be deployed on the ground or on top of cover, and you can destroy the enemy very effectively, and suppress them even better. They also carry a pistol and bandages. The key to this role is your position. Don’t expose yourself too much as you will get sniped.
Anti-Tank
The anti-tank comes with the standard-issue rifle, a rocket launcher, grenades, and bandages. Their primary function is to take out enemy armour. They also come with a wrench which they can use to build an anti-tank gun emplacement. However you do need supplies to do this, and every shot from the gun takes munitions from your team’s munitions resource.
Engineer
The engineer is a key role. They come with their rifle, anti-personnel mines, anti-tank mines, a wrench, a hammer, a blow torch, and some bandages. They can repair tanks with their blow torch and place down fortification blueprints such as sandbags, barbed wire, and tank traps. They can also build resource nodes to help generate resources for the team. If you need more information on the resource system then check out my video in the top right of the screen.
Tank Commander
The Tank Commander is the leader of an armour squad. They come with an SMG, a pistol, bandages, and binoculars. This role can go into any position in the tank itself and it is not limited to the commander seat.
Crewman
The crewman fills up the other parts of the armour squad. They come with only a pistol and bandages. They can go into any seat in a tank.
Spotter
The spotter’s primary function is to lead the sniper and spot people for him. The spotter acts like a squad leader and can build outposts and garrisons. They come with an SMG, grenade, anti-personnel mine, a watch, binoculars, and bandages.
Sniper
The sniper, well. you snipe people from far away! You get your forces sniper rifle, pistol, grenade and bandages.
Getting into a game.
Now, hit Enlist to find a server to play on.
When the list refreshes you can see the server name, the number of players on the server, the max amount of players on the server, the map, the mode and the ping. You can also set a server as a favourite by clicking the star on the left. The 2 game modes currently in Hell Let Loose are Offensive and Warfare. Offensive is an attack v defence mode where the attacking team needs to keep moving up and taking objectives. They get limited time to capture each point, but doing so will increase the time they have. Warfare is more of a traditional push-pull conquest type mode. If you’ve played Battlefield, or Call of Duty Ground Warfare you will be familiar with this. But only 2 objectives are active at one time.
When you click on a server you get this extra information on the right. VIP slots are something set by the server owner, and let players who have VIP status jump straight into the game and skip any queues. You can also see how many people are in the queue, and how many people the queue can hold. I would recommend playing on a community server and not one of the “HLL Official” servers. This is because, on the official servers, there are no active admins who can remove toxic players, team killers and cheaters. But on community servers, there will be.
So now join a server, and once it’s loaded you need to choose which team to play on. If one of them are greyed out, it’s because there are too many players on that team. Once your team has been selected, check out the server rules on the right.
The next choice depends on what type of game you want to play.
Do you want some Infantry action?
How about to roll around in a Tank?
Or to be a bit sneakier and snipe away?
Whichever you decide, my recommendation would be to join an already existing squad which you do by clicking the white arrow next to the squad name. You can request to join locked squads by clicking the same icon. If there is a microphone icon next to the squad’s name, then the squad leader has set this to a VOIP squad, so if you join it, make sure you use your microphone. The squads can also have a set designation. Offence, Defence, Logistics or Artillery. If the squad leader has chosen a designation then that’s what the squad’s function will be during the battle.
Once you have joined a squad, you now need to choose your role. All roles are limited to 1 in each squad apart from the Rifleman. If you are a beginner, I would recommend either picking Rifleman or Automatic Rifleman, as their functions are primarily just to kill and have no special equipment or ability, although the rifleman does have an ammo box that you can place down. Another good role is Support, as with this role you will be key in building garrisons which are spawn points for your entire team. The Officer will need you close to them so you can place down your supplies and allow them to build a garrison up.
If you cannot decide on what role to take, then just ask the squad leader if he wants a particular role.
Once you’ve selected your squad and role, you now need to spawn. You can spawn at one of 4 locations. Your HQ, a garrison, an outpost, or an airhead
Your HQ is your main base and cannot be taken by the enemy. Your tanks and trucks will spawn on your HQ points.
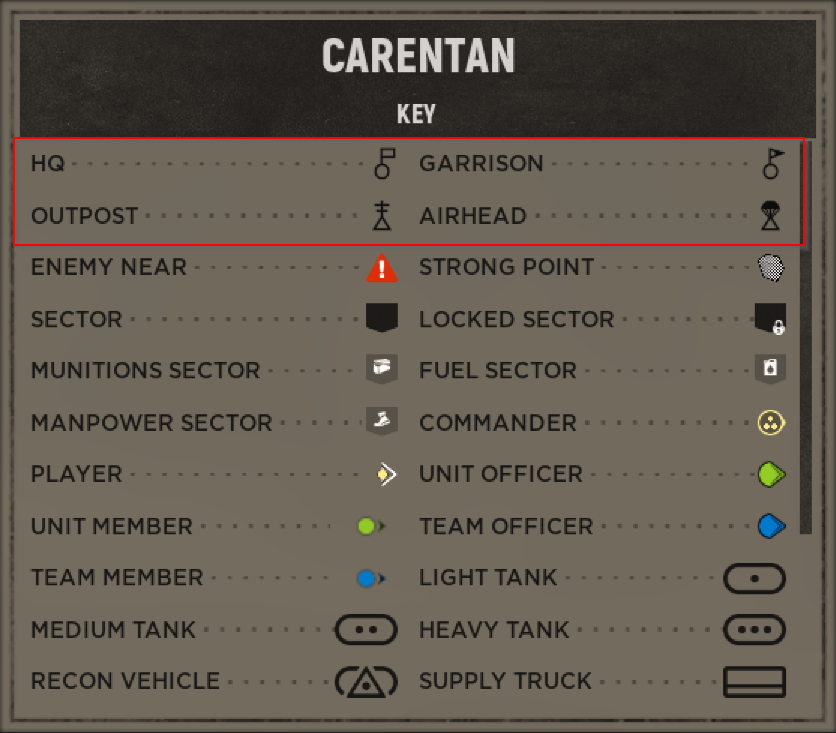
A garrison is a buildable spawn point that your entire team can spawn on. A Commander, Officer and Spotter can build these, but they need 50 supplies close to them. They can only be built in a friendly “blue” sector, and not within 200 metres of another friendly garrison. If you spot an enemy garrison, you must destroy it. These can only be destroyed in 1 of 2 ways. Going up to it an holding your interact key, or placing down a satchel charge. If you manage to destroy an enemy garrison, it will cripple their ability to get reinforcements in.
An outpost is built by an Officer or Spotter, and it allows their squad to spawn on them. Outposts will have quicker spawn times than garrisons, and they can also be built within the first enemy sector to allow quick deployment to combat. The Spotters outpost can be built anywhere on the map. To destroy enemy outposts, you either need to get close to it and it auto destroys. You can also destroy it with a grenade and a tank shell.
An airhead is a commander ability. They can drop this behind enemy lines, and it acts as a temporary garrison. It is very useful to launch surprise attacks on the enemy. If you are playing as an Officer and you spawn on an airhead, make sure you get down an outpost as fast as you can. You can destroy it by interacting with it.
Now just before we spawn in, you may see some spawn points have a red exclamation mark on them. This means that there is at least 1 enemy unit near it. If you spawn there quickly scan around you for the enemy and take them out. If you see a red garrison marker, then this means this garrison has been disabled and you cannot spawn there due to the enemy being to close.
Now let’s spawn in, click on where you want to spawn then click Deploy in the bottom right.
Infantry
Now we are in-game its time to get to the fight. Notice your teammates. You can tell who they are by the uniform, and by their names being visible, along with a blue icon to show what role they are. Enemy soldiers will not have any icons above their heads. Soldiers with green icons above them are in your squad. You should stick with your squad and focus on the same objective that they are, whether it’s attacking or defending an objective.

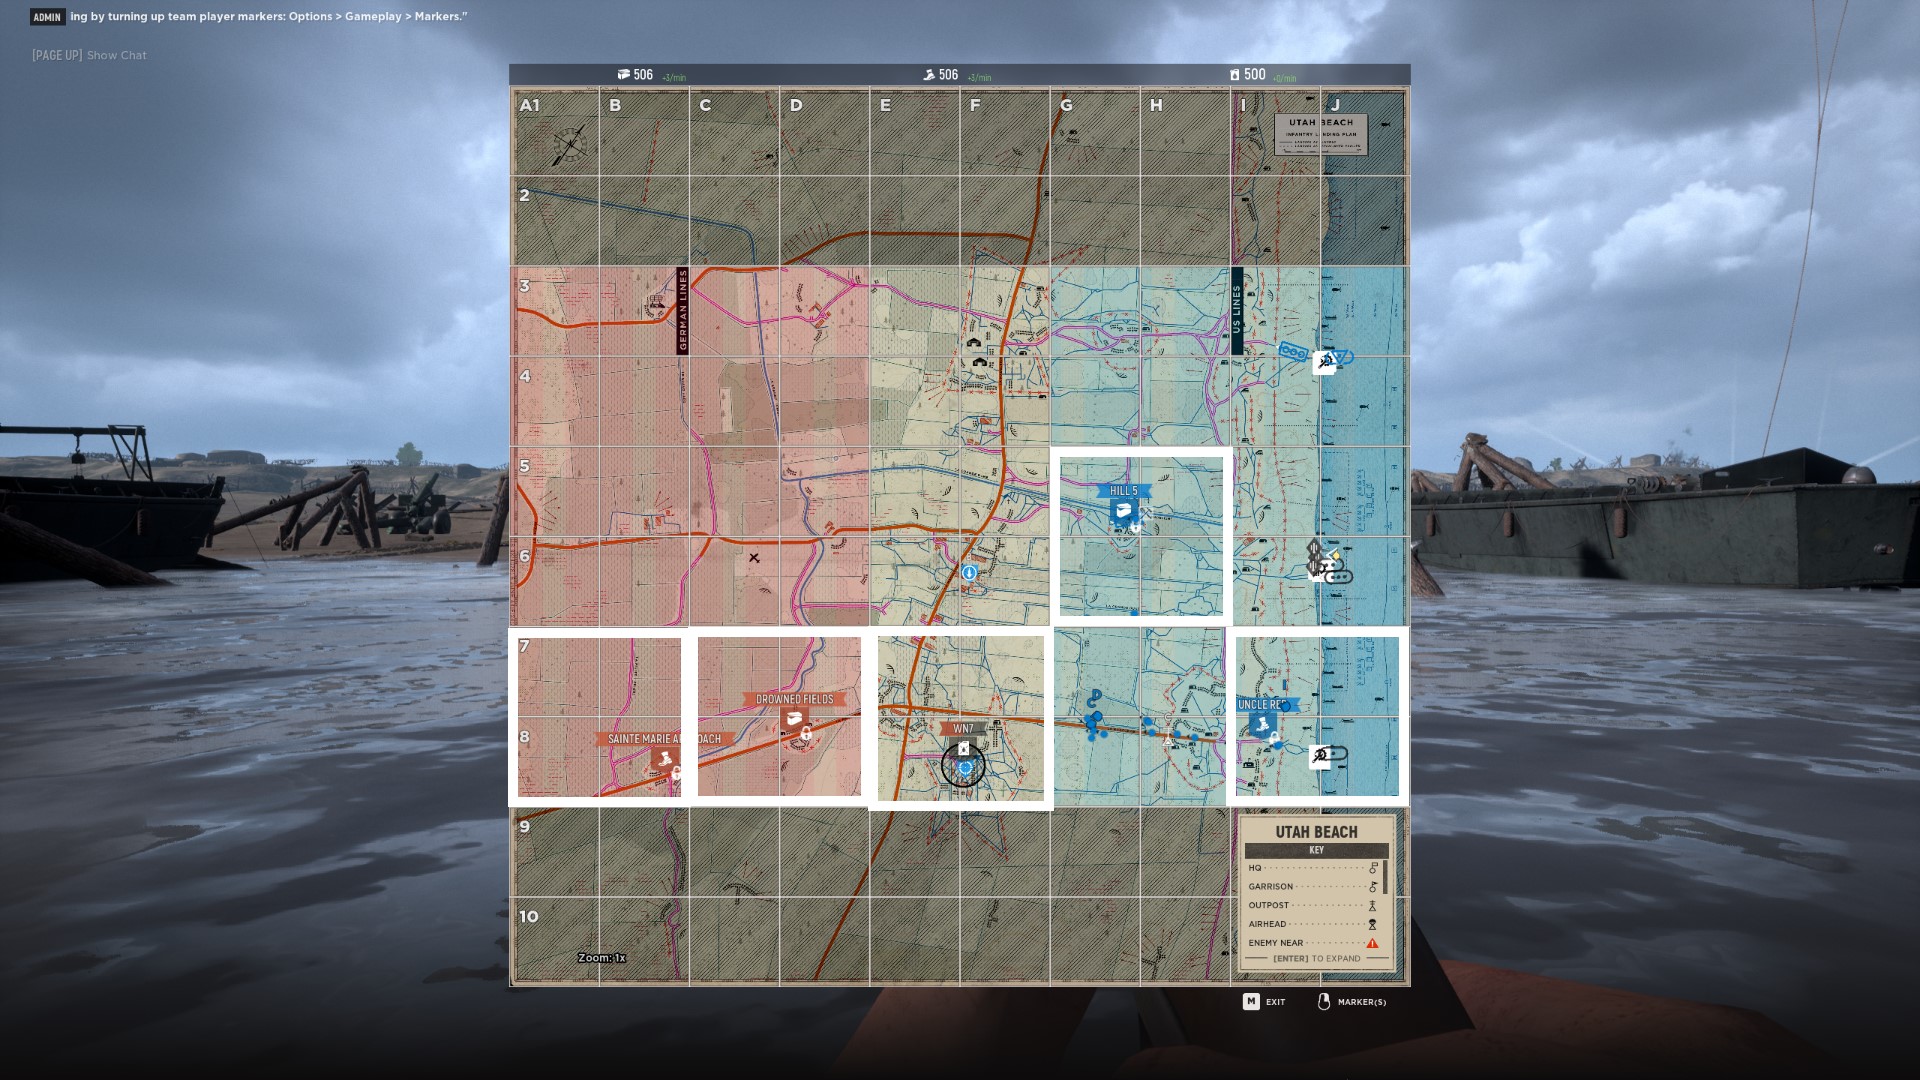
Let’s check the map to see the state of the battle.
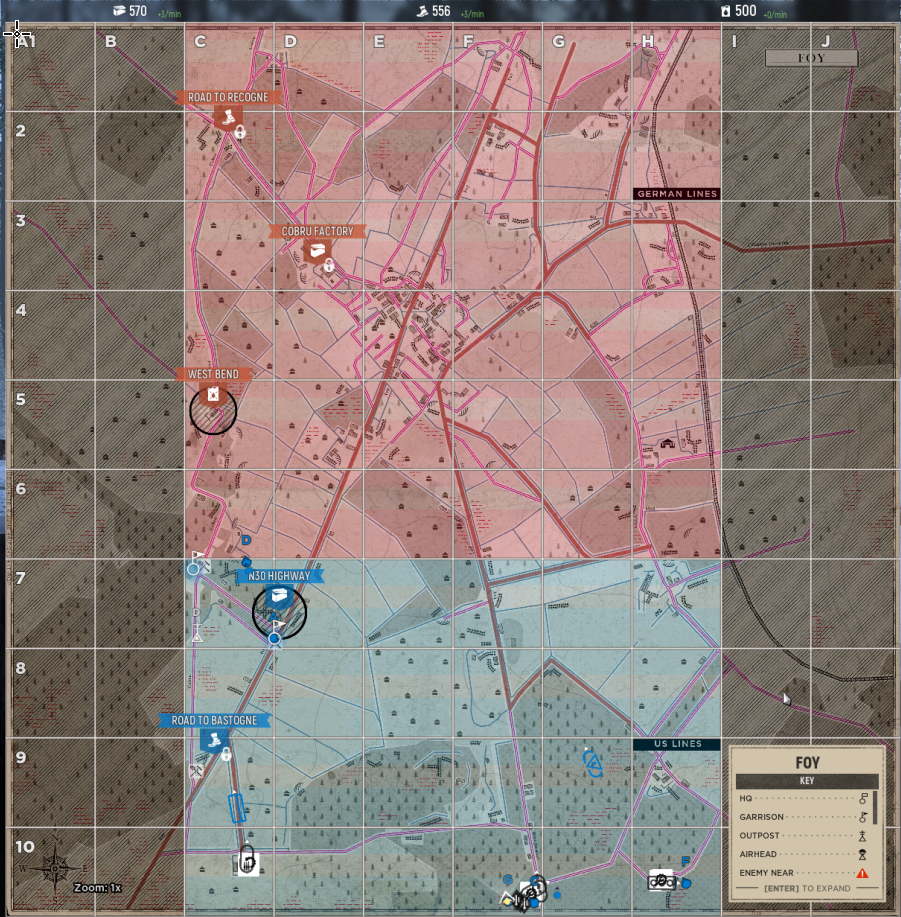
To capture an objective you need to move into the sector where the objective is located. The 4 squares on the grid are the sector.

Armour
If you join an armour squad your objectives are the same, but this time you’re in a metal beast. Each tank has 3 seats. Spotter, Gunner and Driver. You should always have at least 2 people in each tank as many servers have rules against solo tank play, and also you will be a lot more effective with more people in your tank. The tanks spawn back at the Headquarters and they are spawned by the Commander. Each tank spawn costs fuel from the resource pool. More on resources later. Also do not use multiple tanks per squad, only stick to 1 tank. To enter a tank you hold your use key. You need to start the engine before you can drive it, and you need to shift gears up and down to increase your speed, but note you will not be able to manoeuvre as well at higher gears, so shift down for tight corners. You can also reverse by shifting all the way down. You also get access to a machine gun and you can see where you are aiming y checking out this box here. The dot is where you are aiming. As a gunner, you can scroll up on the mouse will to increase the zoom on the sight. You can also change the shell type as you have 2 available shells. HE for infantry, and AP for tanks. You can also use your machine gun. The spotter can scroll up on the mouse wheel to use a periscope to keep an eye out for enemies and other obstacles. You sort of act as a squad leader. I will link to a guide on tanks made by mono as I don’t have that much experience in tanks.
Trucks
There are 2 available trucks in the game. A transport truck and a supply truck. The transport truck can hold a total of 12 people, that’s the driver and 11 passengers. These are great to get to the front line quickly or to try for a wide cheeky flank.
The supply truck can carry 2 people. That’s the driver plus 1 passenger in the front. Their function is to drop off supply crates to aid in building up fortifications, nodes and garrisons. They carry 2 crates to a value of 150 each.
Both of these trucks can be re-spawned by the commander at a HQ, but this costs fuel.
Supplies
So I’ve mentioned supplies here and there so far, but what are these things.
Supplies are needed to build all fortifications, nodes and garrisons in the game. A Team that doesn’t use their supplies will be a team that loses.
You can get supplies in several ways.
Firstly the support role can drop down a box of 50 supplies. They get their supplies back after a cooldown of 5 minutes. They can half this cool down if they walk within a radius of a manpower node. They don’t need to stay in the radius, just walk within it for a second.
Another way to get supplies is for the commander to drop them from the sky. This can be risky as they parachute in and they are easy to spot. These are what the supply drops look like. If you see an enemy drop, then there could be enemies where it is dropping and they could be planning to get a garrison built with some fortifications. Report these drops in and head there to take them out.
The last way to get supplies is from the Supply trucks.

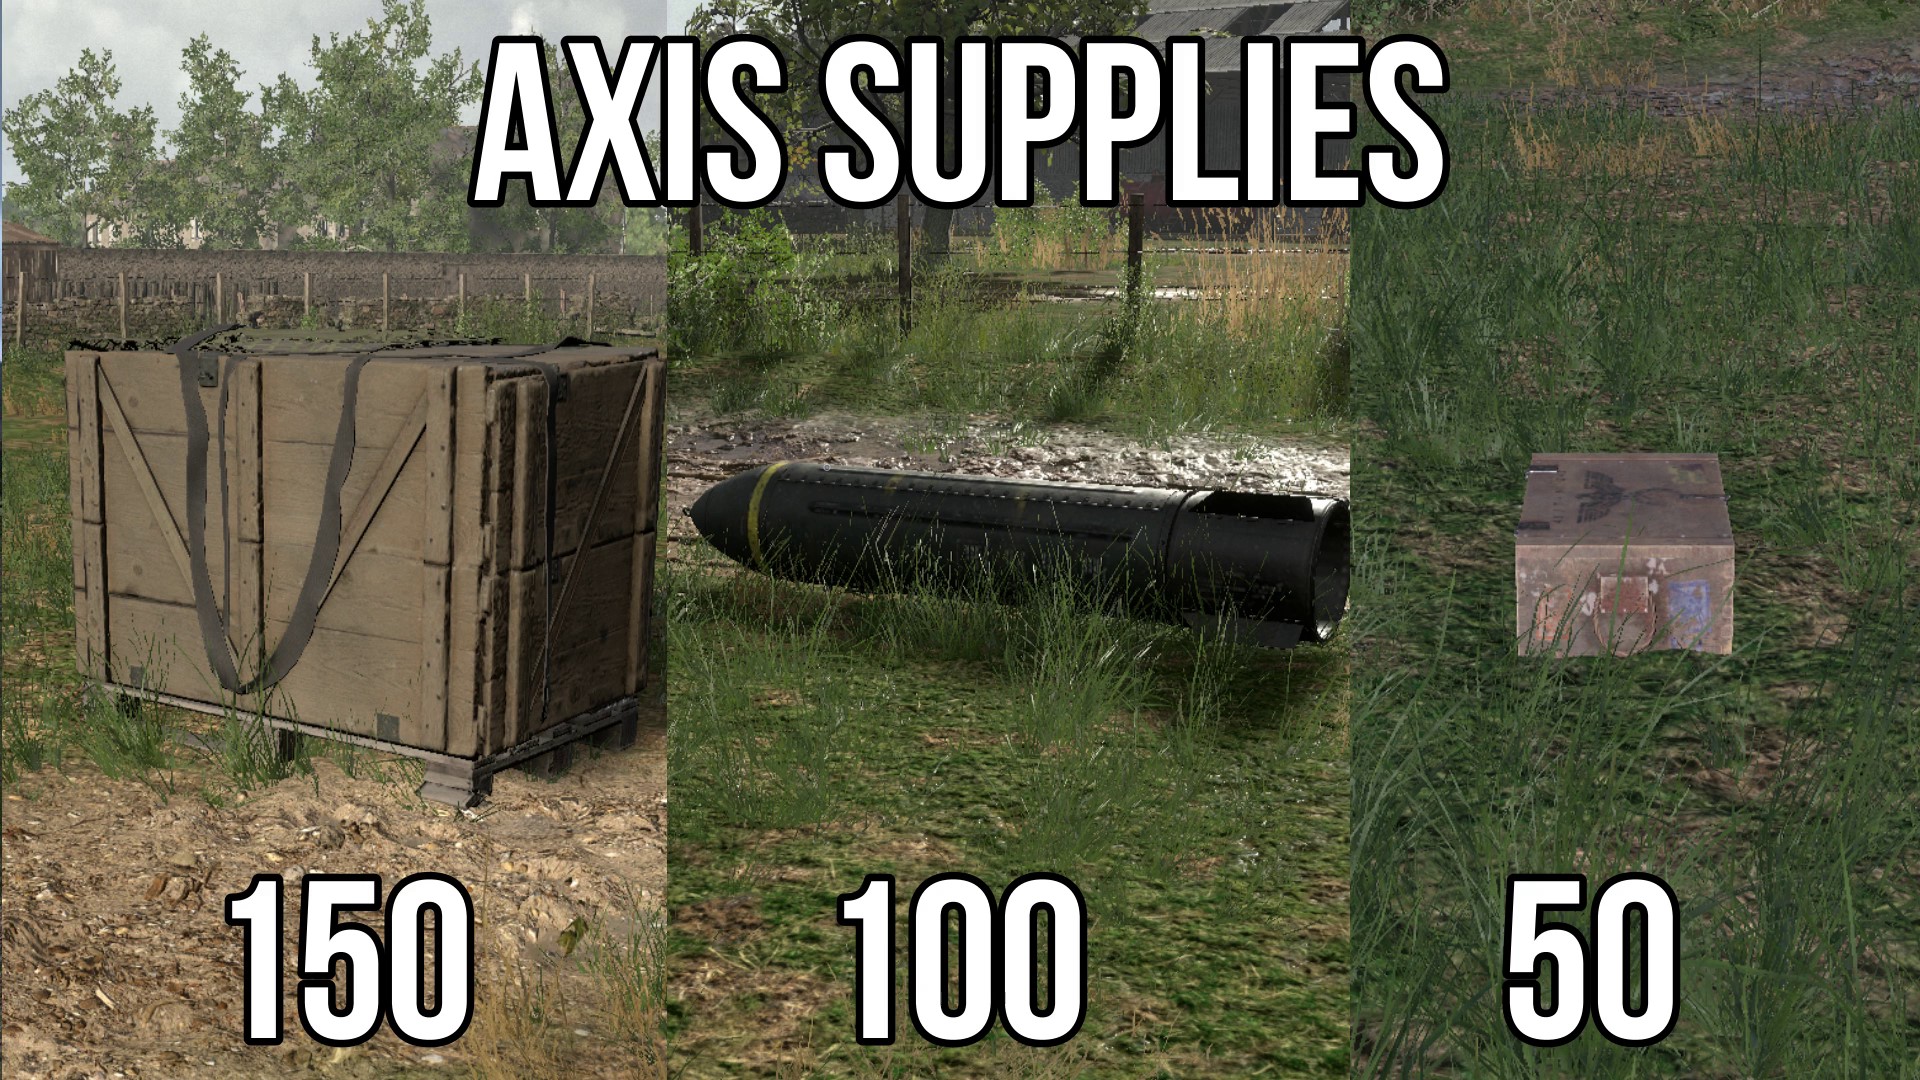
If you see enemy supplies anywhere, you should dismantle them by going up to them and holding your use key.
Resources
Resources are needed for various things in Hell Let Loose. Firstly though, you can see how man resources your team currently has by opening your map and looking at the top. We have munitions, manpower, and fuel. They are generally used for commander abilities such as a bombing run, or to spawn in vehicles. Without resources you are gonna have a tough game. I have a resource guide already on my channel and you can check this out below.
[link]
Artillery
Playing as Artillery may not be the most glamorous of positions but it can be extremely devastating to the enemy. You can wrack up a load of kills and make a significant impact on the match. Check out the video below for details on how to play artillery.
[link]
Communication
Communication is key in Hell Let Loose. If you have a microphone then use it. If you don’t have one, don’t worry you can still have a great game. Just don’t play as an Officer or Commander as a microphone is needed for these roles.
When you are calling out bits of information or enemy positions, try to keep it quick and simple. Something like “Contact 200” that’s letting your squad know you’ve spotted someone at the compass direction of 200. The compass is at the bottom of your screen. You can also ping in this game. But a bad habit to get into is to ping the enemy and just say “enemy on my ping” at least give a direction to let your squad know where to look.
Combat
Hell Let Loose is a tactical or realistic shooter, so every weapon in the game is deadly. The rifles will 1 hit kill you up to 100 metres, SMGs are 2 shots at close range, so you will die quickly. A headshot with every weapon will kill at any range. So when you are in combat, keep in cover or at least use concealment. It’s important to note that bullets can penetrate cover in this game. It depends on the type of cover and the type of weapon. Generally, small arms fire, such as the weapons you use, will penetrate wooden cover, but not trees or stone. Remember you can lean out of cover with Q and E, and if you get hit, you will start bleeding out so use a bandage.
Bullets in Hell Let Loose have physics, so when you are shooting distant targets, you will need to compensate for bullet drop, and if you are aiming at a moving target, you will need to aim ahead to hit your target. I have created guides for the weapons in the game which will show you where to aim. So check a playlist of these below.