Overview
This will be the first Frontline Guide of the series! Hopefully you enjoy.We will, as usual, be doing a video guide with more information to go along with it! Which you can find here: (Maeve Guide) (Cassie Guide) (Ying Guide) (Evie Guide)(Lian Guide)(Guides Playlist)
YouTube Version
Makoa – The Ultimate Guide
Introduction: (What makes Makoa special, what are his main objectives?)

Here it comes; our first Frontline guide of the series, and who better to start with than everyone’s favourite top tier Turtle. We will be covering an extensive overview of Makoa’s abilities, strengths, weaknesses and how to hit those illusive hooks. After this guide, you should be sure of yourself that ‘no one can challenge Makoa’!
Ability Overview
Ability Overview: (A run through of Makoa’s abilities, when to use them, and how to maximize their impact.)
(Cannon) (LMB) (Direct)
Makoa, unlike other Frontlines, has a decently ‘bursty’ weapon. His cannon can shoot once every
second, dealing 650 Damage. More often than not, this is enough to pack a hefty punch to supports and flanks, however it comes with the trade off that he is nowhere near as strong against a large grouped bunch of enemies. When playing Koa, it’s important to get your target prioritization right – focus on one enemy, normally a highly effective strategy is to bulk past the enemy frontlines, and attack their support, this will help you take down the rest of the team. Each shot, depending on damage dealt will gain you 1-2.5% Ultimate Charge, which brings to light Makoa’s aggressive damage falloff and projectile dropoff; it’s important to get some practice in when it comes to long range Makoa shots.

(Dredge Anchor) (RMB) (Direct/CC) – [11S]
Arguably, one of the strongest abilities in Paladins, and what makes Makoa so good: his hook. Now this is going to be quite a big section, since a lot of a Makoa’s skill is contained in this ability. If you are reading the steam guide, I recommend watching the video too since it’s going to help more easily with a graphical representation.
Some general hook tips:
- When hooking, it’s always important to keep the target prioritization mentioned earlier in mind. Although Frontlines will be much more easy to hook, it’s not always about the easy option – try and look for hooks onto Supports, Flanks, or Damages, since it will be much more punishing for the enemy and will allow your team to create much more space.
- When you hook a victim, do a turn to face your team – this will put the enemy more out of place and allow your team to more easily focus fire them.
- The more range you can land a hook from; the better, it will displace the target more. Furthermore, hooking an enemy from a highly contested high ground can do you wonders, try jumping and you can occasionally hook people through surfaces. This is of course a lot harder with the new hook hitbox, but can still work.
- You can hook through Androxus reversal and Terminus siphon at the right angle, however you cannot hook through shield barriers.
- The hook is CC, so can be blocked by CC Immunity, time your hooks carefully with a Khan, and just don’t hook Totemic Grohk’s – just leave the poor thing alone.
- The hook comes out the left side of Makoa – keep this in mind when hooking next to walls, it will hit the wall even if you can see your target. On the other hand, if you stand with a wall to your right, you can hit targets behind the wall; the mechanics are more easily explained in video form, so please watch that for more info.

(Shell Shield) (Q) (Defense) – [16S]
To avoid dragging on too much, the next abilities will be considerably shorter. Shell Shield is a spherical shield, similar only to Barik’s ultimate and Barricade. The shield will penetrate through walls – making it useful in holding chokes. It’s also key to remember you can shell spin with shel shield up, and as long as you’re not running Half Shell, you can deactivate the shield. This means you can use the shield to block incoming heavy fire, such as a Drogoz fire spit, then put it back down. My best tip for using Shell Shield is to think about your allies as well as yourself, try to use it absorb as much damage as possible and move over allies to protect them.

(Shell Spin) (F) (Movement) – [12S]
Shell Spin is a useful ability – primarily used for movement, but can also be used to displace enemies with the knockback it applies. Additionally, a favorite card of some heals them on successful shell spin collisions, meaning it can be seen as a way of self healing – in general I’d recommend using the ability to escape sticky situations, or aggressively push on an enemy, knocking them about to throw off their aim.

(Ancient Rage) (E) (Ultimate) (Area) –
Do you challenge Makoa? I’d hope not, because this ultimate is one of the most powerful, and influential ults in the game. As with everything Paladins, HiRez hates melee, so Koa’s ultimate performs more like a shortrange shotgun, hitting a wide field in front of him. The ultimate buffs the Ancient’s health by 5000 and allows him to achieve slightly higher DPS. It’s nice to know that the ultimate counts as area damage, and for some reason Makoa holds two anchors? – He can still hook people when in ultimate form. I think the biggest thing to know about Makoa’s ultimate is it should NOT be used as just a Terminus ult. Many use it to give them another life when on low health; here’s why you should not do so:
- The ultimate has an activation time of 0.3 seconds, meaning you might already be dead by the time you have your bonus health.
- Using the ultimate like this more often than not achieves nothing but a stagger, if any more than two of your team have recently died, do not try to stay alive until they come back with Ancient Rage.
I would personally recommend using the ultimate to be extremely aggressive and push up on to the enemy backline, pulling away the entire enemy team’s attention and activating the ultimate at about half health. I personally like to B-Line straight for the Support, and then move onto secondary targets, this can be very easy, especially if you activate the ultimate to exploit the enemies grouped up nature in a tight space. There is virtually no counter to the ultimate when the Makoa is running leviathan – except Drogoz. Try to take out a Drogoz or ask the team to target him before using Ancient Rage.

Talents
(Pluck)
Gain 65% Bonus Damage on your first shot after hitting an enemy with Dredge Anchor.
The old ‘meta’ card, I personally believe that this card has little value unless the enemy team has no CC or CC immunity, and is quite squishy. The talent also means you need to reliably hit hooks on all kinds of classes to obtain decent value.

(Half Shell)
Shell Shield is now placed on the ground, is not Channeled, and lasts 2 seconds longer.
A bit of a story for this talentl – me and my good friend Xemor used to believe Half Shell was just about the best card for Makoa, this was mainly due to our misconception that Leviathan only gave 1200 Extra Health in Ancient Rage, you might be able to see why we were confused. Half Shell is strong, and allows Makoa to easily duel enemies, by using the shield similarly to Barik’s, weaving in and out – however, the fact that you cannot put the shield down is fairly crippling – not to mention the fact that sometimes being able to move your shield can allow you to save your dying teammates. Unless you are confident, I would honestly say Leviathan is just the safest card to go with.

(Davey Jones Locker)
If your victim dies within 4 seconds of being hit by Dredge Anchor, the cooldown is reset.
Regretfully, I must admit I have never used this card seriously – in my view it’s a downgrade to Pluck, and requires the same hook accuracy (to even more of a degree) and team composition to obtain any value.

(Leviathan)
Increase your Maximum Health by 1200, and gain CC Immunity during Ancient Rage.
As explained in the Half Shell section; Leviathan is the safest, and arguably the strongest card you can go with. It allows you to be a bit more of a ‘bruiser’, as well as making an extremely strong ultimate, even stronger. This can be especially true when going up against a Khan, who otherwise will simply pick you up, even if you are ‘raging’… In general, a good legendary card is normally something that can always be of use. This is important to keep in mind with all champions.

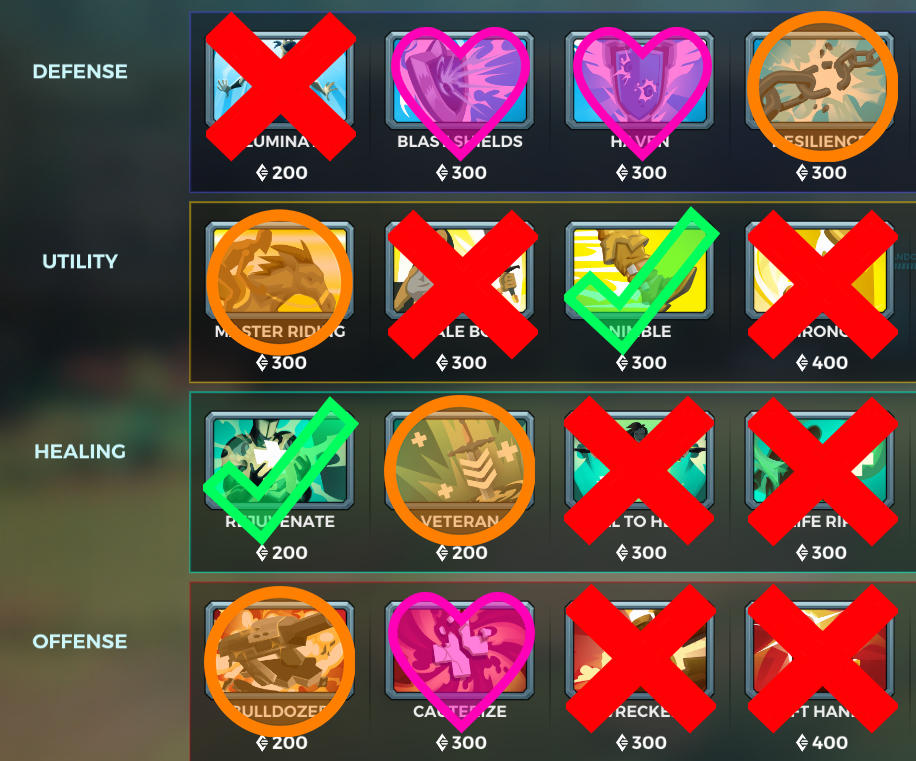
Itemization
Itemization: (General notes on what to purchase with credits.)
This section is to show you some good Items to buy on Makoa. Obviously these are subjective and can change depending on the situation!
What You Should Buy For Makoa –
1 – Early Game – Caut, like always is your most solid pick. Sometimes some frontline Cauterize is really needed to sway the game – I suggest at least getting Cauterize to level 2 in almost any situation. After Cauterize, it basically depends on the map, healer or enemy team.
2 – Late Game – Depending on the points mentioned above you want to pick up Rejuvenate if you need more healing, especially if you have a Grover, Jenos, Ying or Pip. Master Riding is a good pick on larger maps such as Timber Mill & Ice Mines. Of course choose Haven or Blast Shields depending on the enemies team blast/direct spread.
Loadouts
Creeves’ Standard Loadout:
Bully – This loadout, as mentioned later in the Hints & Tips section, allows you to play aggressively, making lots of space for your team and zoning. There are some disadvantages and advantages to this deck, so check them out in Hints & Tips. It also has a CC version. As with all loadouts, you can import them from ‘Creeves’.
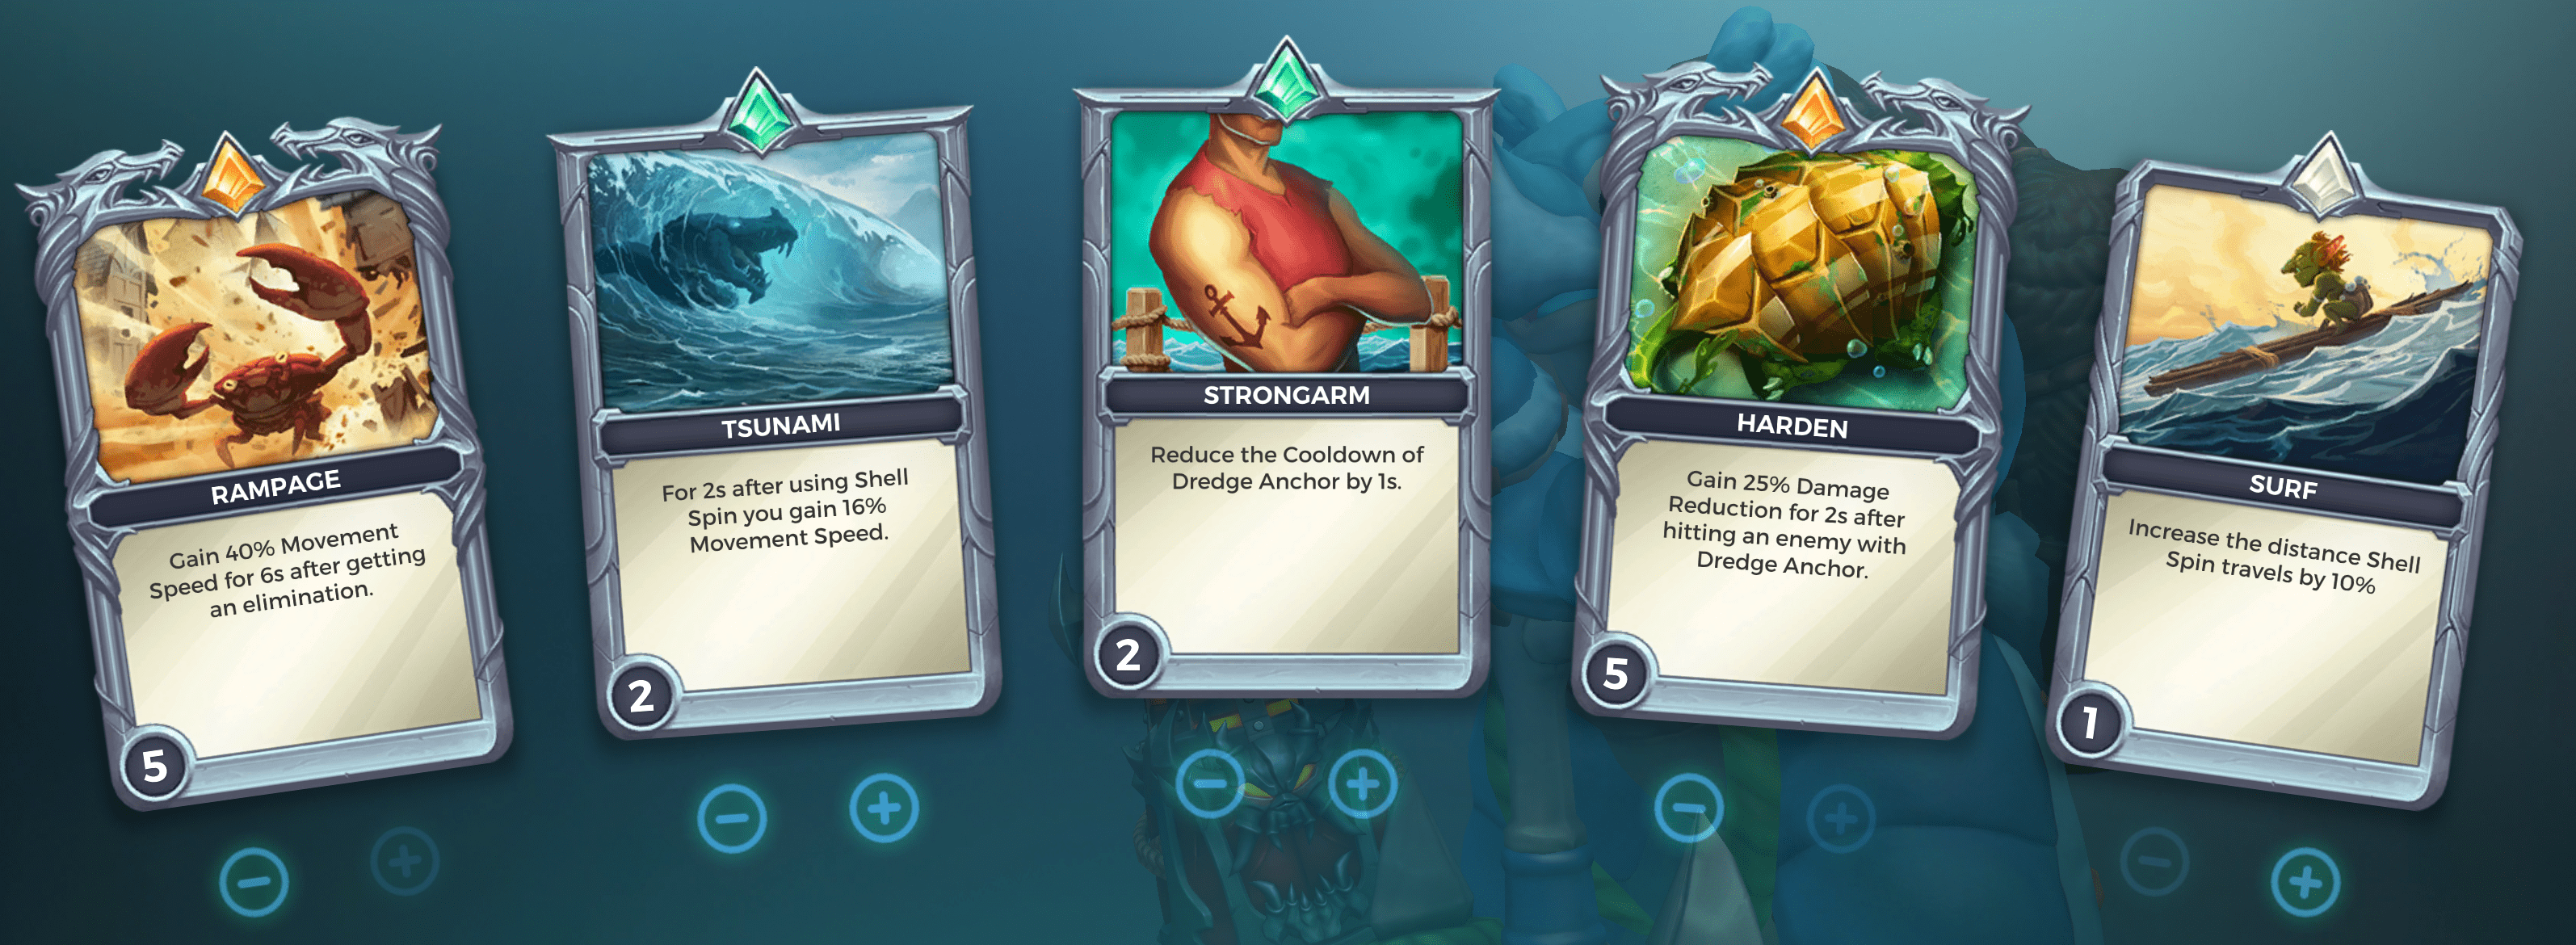
Bully CC –

Xemor’s Standard Loadout:
Standard – This is the loadout I use when fighting teams with CC. In contrast to Creeves’ Loadouts, I feel this loadout is more effective in difficult games where it’s harder to get a pick on an enemy, or when there’s lots of spam, or if you’re being forced to push the cart or capture the objective.

Hints & Tips

Lot’s of main tips for Makoa are mentioned in the Dredge Anchor section but there are some other important things to remember.
Body blocking can be a highly effective strategy, it’s highly effective to body block enemy Frontlines after you have hit hooks on them, not allowing them to reposition back to their teammates. For me, bodyblocking is really what makes Makoa really good fun. My playstyle with Makoa always includes the ‘Bully’ card; rampage. It allows you to go on really good rampages, killing the entirety of the enemies backline – not to mention it makes zoning enemies after a teamwipe much more easy. I implore you to give it a try, it’s effective, fun, and is what makes Makoa interesting and viable in a more DPS playstyle. The issue with the loadout is it does need momentum to get working properly, so it does not pair well with stomps.
When fighting enemy shield frontlines – keep in mind that if you have the opportunity you can hook enemies from behind, and the sides, bringing the shield down; the displacement of the shield will allow your team to openly fire at them, normally this allows you to take out both those hiding behind the shield and the shield bearer himself.
Ranked
Ranked: (Makoa in ranked, when he is banned, who he might counter.)
Makoa is an absolute top pick, and ban in ranked. As of recent times, he has not been banned as frequently – I would generally say to ban him when you have first pick, to see if you can get one of the really powerful DPS’, Furia, or Khan. There’s not really a time when you shouldn’t pick Makoa up, he should be picked and banned every game, and for the most part is. Not to mention, he is one of the viable solo tanks, and can work well with a Jenos or triple DPS team, however it is mainly his bulk that allows him to do this (obtained from Leviathan).

Thank You For Reading
Thank You For Reading!
Thanks for reading the comprehensive Lian guide, good luck on getting more wins, and please leave a favourite and a comment telling us what Champion you would like to see next.
Any feedback is greatly appreciated!
Guides channel on YouTube! Guides will be posted their with in game footage and more!
https://www.youtube.com/channel/UCpqhkT9mY08yI27nlNUFmkw