![How to redeem '3rd Echelon' map - [DEPRECATED; GAMESPOT REMOVED THE PAGE] for Tom Clancy's Splinter Cell: Conviction](https://steamsolo.com/wp-content/uploads/2021/07/how-to-redeem-3rd-echelon-map-deprecated-gamespot-removed-the-page-tom-clancy-s-splinter-cell-conviction.jpg)
Overview
This tutorial will show you the basics of porting MMD-models to SFM.Your MMD model will be imported to Blender and it will be modified so you can turn it into a MDL file after exporting it as a DMX or as an SMD file.There are two export file types:–> DMX: If your model has facials and shape keys, use this export type–> SMD: It’s almost the same as DMX files, but all shapekeys get erased during porting. If your model is made out of bones only it’s your choice if you want to use DMX or SMD(alternative porting guide: https://steamcommunity.com/sharedfiles/filedetails/?id=245723825 )
1. Requirements
In order to keep up with this tutorial you need the following requirements:
[link]
This addon in this guide uses v.2.10.2
[link]
(you need a DeviantArt account to access the download)
Do not move anything from its folder!
_____
You also need a MMD model. You can find most of them on DeviantArt. Most of them are in MMD download forums depending on which category of character you choose. E.g here is a forum for kaiju models: [link]
For the port you will only need the PMX-file and the textures.
2. Blender
You can activate it in the Blender settings in you Steam library

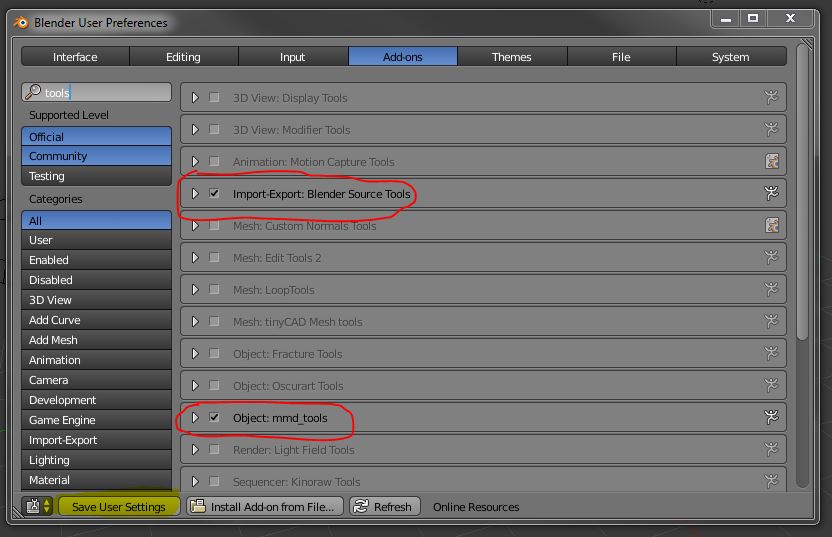
When opening up Blender, the first thing to do is activating the addons you’ve downloaded before (the tutorials of how to install them are shown on their download website).
In order to activate them, go to File>User Preferences and set a mark to Import-Export: Blender Source Tools and Object: mmd_tools.
Click on Save User Settings so they are already activated when restarting Blender.
Now go to the right, select the camera, right click and go to Delete Hierarchy. Do the same thing with the cube and the lamp so the entire area is empty.
Before importing your model, import the spy files first. Go to File>Import>Source Engine and select the qc and all SMD files with shift and import them at the same time. This model will only be used for scaling your MMD-model and it will be removed later.

Go to mmd_tools on the very left and select Model: Import

Select your model (PMX/ sometimes it’s a PMD file). However, before you import, select Remove Doubles, Fix IK Links and set Rename… to Internal Dictionary.
If your model has weird texture names (like this: âîâbâh.JPG) do NOT use Internal Dictionary because the texture names will be replaced with [][][] and you won’t be able to continue at the texture application part!

Now that your model has spawned you can rotate with the middle mouse button. Use Shift + middle mouse button in order to drag the model.
But you may have noticed your “human-sized” mmd-model is really small compared to SFM human sized models.
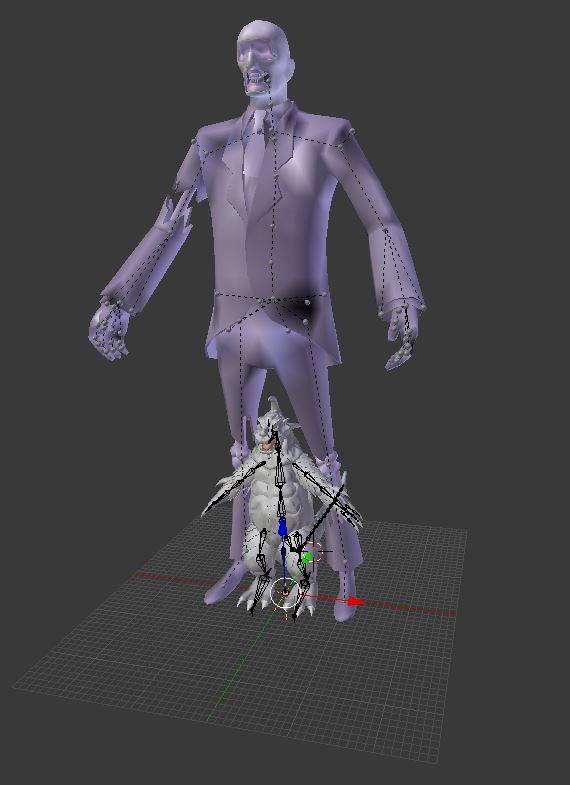
Remove your mmd-model with Delete Hierarchy and import it again with a different scale with the scale-function on the left when selecting your model before importing. It might take multiple attempts to get your model to the same size as the spy.

If your model has the same size as the spy, remove the spy with Delete Hierarchy.
If your model has joints/ rigidbodies delete them with Delete Hierarchy.
Switch to Edit Mode, select UpperBody, select the bone sign down below, go to Parent: and choose LowerBody.

Now the relation of UpperBody and LowerBody should look like this:

The only thing you have to do now before exporting is renaming all the bones on the model in SFM style.
– All of the bones start with bip_
– If there are multiple bones of the same type, you have to give them numbers, starting with 0 (e.g. bip_spine_0; bip_spine_1;…)
– At the end you write R or L if neccessary (e.g. bip_index_0_L; bip_index_1_L)
– The finger bones are: thumb, index, middle, ring and pinky
– You don’t have to rename Tips and IKs (marked in blue)
Here’s an example of a fully renamed model (In this case it’s Kraid from Metroid):


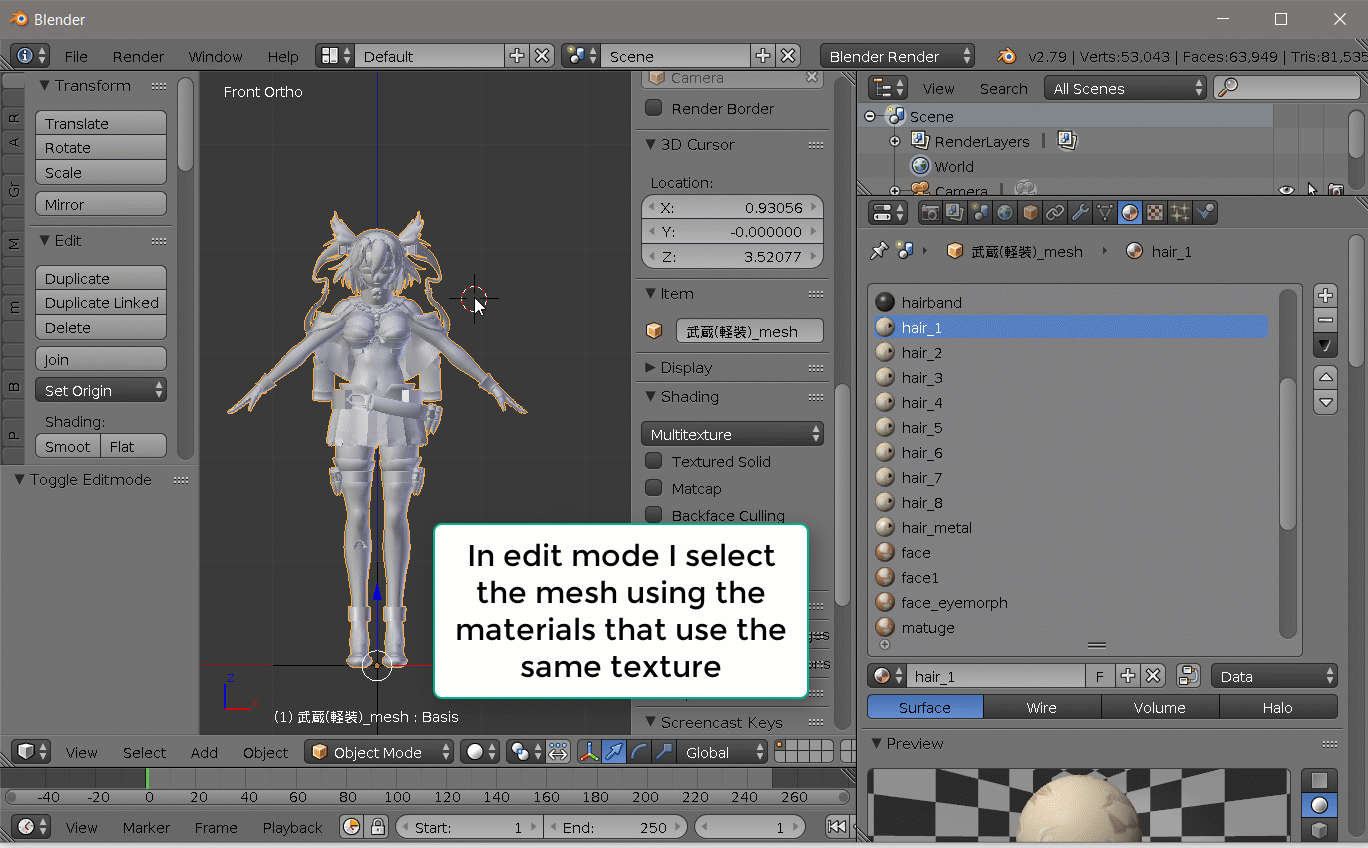
Now go to the mesh of your model.
Rename all the material files by their model and primary texture name.
If there are multiple versions just add a number after it (e.g kraid_belly_2).
This will help you in the texture application part.

Be sure you check the shape keys section in Blender.
If your model doesn’t have any, you can skip this part and export your model as an SMD.

However if there are any, be sure they have a proper name (most of them get automatically renamed to [][][] or anything similar to that) and your model should be exported as a DMX file!!!
If you don’t know what each shape key does to your model, select the specific shape key and experiment with the value scale. It should help you renaming all shape keys.
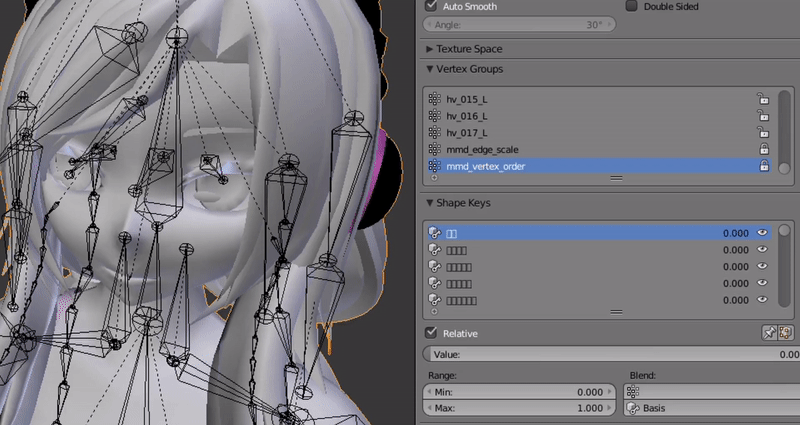
If you feel you don’t need any shape keys, export the model as an SMD.
Go to

Go to the Source Engine Export Section, select SMD or DMX (depending on your model) and an export path.

Go to File>Export>Source Engine>yourmodel_mesh.smd or yourmodel_mesh.dmx
Your model is now exported.
3. From SMD/DMX to MDL
From now on, you don’t need Blender anymore except for texture references.
Put your exported SMD or DMX file in a separate folder. Name it after you model’s name. For this tutorial it will be called yourmodel.smd / yourmodel.dmx
Create a text file in the same folder. You can name it whatever you want, however it has to end with .qc (e.g. sample.qc)
It should contain the following:
(for DMX files replace the .smd parts with .dmx)
yourname will be the folder where your model will be. Use your name for crediting purposes.
This software will compile your SMD/DMX with the help of your qc into a MDL file.
If you use GUIStudioMDL for the first time, you have to go to Config>Set EP1 Tools Path. When the “Browse for Folder” is open, go to Program Files (x86)/Steam/SteamApps/common/SourceFilmmaker/game/bin and click OK.
If you get an error message, it’s because you’ve never opened up the Source Filmmaker SDK. Go to your Steam Library, right click on Source Filmmaker and Lauch SDK. As soon as the menu opens you can close it already because that generates the gameconfig.txt file in the SFM bin. After that try the previous step again.
Select Program Files (x86)/Steam/SteamApps/common/SourceFilmmaker/game/usermod in the “Target Mod or “GameInfo” path” section.
Before you compile, make sure that there is a yourname folder in the following categories:
> Program Files (x86)/Steam/SteamApps/common/SourceFilmmaker/game/usermod/models
> Program Files (x86)/Steam/SteamApps/common/SourceFilmmaker/game/usermod/materials/models
Go to File>Load QC File and select your qc. Then go to compile.

If it says Completed “sample.qc” (depending on your qc file name) your model is now available in SFM.
You can already use it, but you will realise that the model’s texture is pink and black. You will have to apply textures in the next chapter.
4. Texture Application
Open up VTFEdit.
With File>Import you select a texture and with File>Save As it will be converted into a VTF file.
You will name your VTF after the original texture name but with the model’s name in front of it.
E.g. eye.png will be yourmodel_eye.vtf
For this you will only need the regular textures and bumpmaps (if available)


Bumpmaps are blue-negative versions of regular textures and they define the textures’ 3d-surface when it comes to lighting etc.
After converting those texture files to VTFS put them all to Program Files (x86)/Steam/SteamApps/common/SourceFilmmaker/game/usermod/materials/models/yourname
In order for the model to refer to the textures you will need VMT files.
In VTFEdit go to Tools>Create VMT File
Before you do anything, go to “Options” and
– set Shader to VertexlitGeneric
– set a mark on “No Cull”
If you have textures like this
you should also set a mark on “Alpha Test” to avoid texture “errors” like this:
if “Alpha Test” is applied:


Go back to “Textures”.
The only parts which are important are Base Texture 1 and Bump Map 1.
Naming the VTFs by their original names will help you at this step.
Go back to Blender and look which material uses which textures.
Select the required VTFs and put them into the right category.
If you click on “Create”, the created VMT must have the exact(!) same name as the material in Blender.
Save it to Program Files (x86)/Steam/SteamApps/common/SourceFilmmaker/game/usermod/materials/models/yourname
Blender does not mention the bumpmap textures. If the bumpmap looks like the base texture, use it.
Also: If your model is too complex, Blender doesn’t mention everything or it causes textures being a little bit on the wrong position.
– red: base texture
– blue: bumpmap
– yellow: material name


______________________________________________________________________________
After you’ve created all the VMTs you have to do nothing else.
Your MMD model is now in SFM.
Have fun 🙂


You don’t neccessarily need those type of textures:
If you still want your model to have metallic textures, you can use the .

*5. Updating Your Model
If you want to update your model, it’s pretty easy.
Go to Program Files (x86)/Steam/SteamApps/common/SourceFilmmaker/game/usermod/models/yourname and delete the MDL, VVD and the DX90.VTX file of your model.
Make the changes on your model in Blender and export it again and convert it with GUIStudioMDL again.
If you renamed a material you have to rename the VMT for it as well.
If your model is already being used in SFM while updating, you will see that the model looks like “spaghetti”. To solve this, right click on your model in the Animation Set Editor and go to Utilities>Reattach To Model
You have to do this step everytime you restart SFM.
*6. Adding Bones
The SMD export does not include facials/ shape keys.
They automatically get deleted, but there is an alternative to let them work if some areas are not controlled by shape keys in your DMX file or you think it’s easier to work with bones instead of shapekeys: You add bones.
The following example will be adding a jaw bone to Kraid.
Creating the bone:
The jaw bone starts where the head bone starts.
For this, right click on the head bone’s origin point (this is where the jaw bone will start).

After selecting, press Shift+S and select Cursor To Selected.

In Edit Mode press Shift+A and you’ve created your custom bone.
Right click on the bone’s tip and drag it to the position the bone should lead to. In this case it’s the jaw’s tip.

Rename the bone. In this case it will be renamed into bip_jaw. Parent it to the bip_head bone.

Now you have to assign the mesh which is controlled by the bone.
Select your model’s mesh and select the object data.
Create a new vertex group in the “Vertex Groups” section and name it after the exact(!) name of your custom bone (in this case it’s bip_jaw).

Select the vertex of your custom bone, press C and you can go “paint” the part of the model which should be assigned to the bone. As soon as all edges of a part of the mesh is selected, the area is painted. With the middle mouse button you can remove it. Right click in order to stop painting. Be sure you save everytime. Once you misclick you have to start painting again from the beginning!
If you don’t know which parts of the mesh should be selected or some areas are hard to reach, there is a simple trick. Go to the “Shape Keys” section and select one. Those parts of the mesh which move (refering to the custom bone) should be painted.


After the mesh for the bone is painted, click on Assign and you’re done.

*7. Too Many Materials
Your model is only allowed to have less than 32 material files.
However if you have less than 32 base textures, there is a way to reduce the high number of materials.
Go to File>User Preferences and select the addon “Material: Material Utils Specials” (this addon is pre-installed)
In Edit Mode select “Face Select”

After this you only have to assign the multiple materials to one material and remove the now “empty” ones.
Other Stuff
– Be sure you have the creator’s permission to upload your SFM version of the model to Steam Workshop, SFMLab, etc.
– Not every model works perfectly with porting. Deal with it.
– Huge shoutout to Pte Jack who helped me a lot with some difficult steps of porting. If you have questions which are not answered in this guide you can also ask him : )