
Overview
This is a guide that will walk you through unpacking your D:OS2 save files, the relevant data files, and then how to change your characters name.This process also unlocks all sorts of other save file editing possibilities but I don’t want to get into those as it may break the game in ways I haven’t tested.
Programs needed
To achieve our glorious renaming goal, we will need two pieces of software. One of them ships with every installation of windows 😉
- Notepad (or text editor of choice, I use emacs)
- GR2 Converter[larian.com]
Once you have the GR2 tool extracted somewhere, we are ready to go!
Unpacking the save file
Now that we have our tools ready, we need to first unpack the save file.
BEFORE DOING THIS I HIGHLY RECOMMEND MAKING A NEW SAVE FILE AS YOU MIGHT MAKE A MISTAKE THE FIRST COUPLE TIMES
You can find your save files in this directory:
DocumentsLarian StudiosDivinity Original Sin 2PlayerProfiles{YOUR_PROFILE_NAME}Savegames{SAVE_NAME}
Inside that folder will be a file with the “.lsv” file extension, this is the guy we are looking for.
Once you have found that file we can proceed to part 2, which is actually unpacking that bad boy.
Steps:
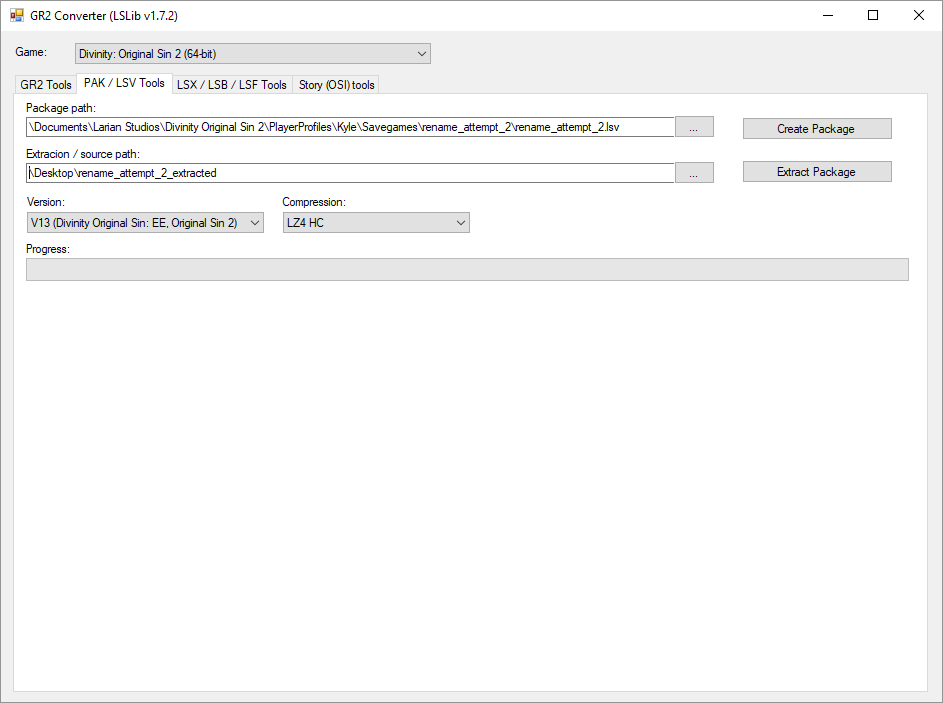
- Open up GR2 tool, and click on the “PAK / LSV Tools” tab.
- In the “Game” dropdown, select “Divinity: Original Sin 2 (64-bit)”
- Under the “Version” dropdown, select “V13 (Divinity Original Sin: EE, Original Sin 2)”
- Click on the “…” next to the “Package Path” input
- Select the LSV file that you found above
- Click on the “…” next to the “Extract Path” input
- Put it somewhere easy, I use my desktop
- Click “Extract Package”
The window should look something like this:
You should get a nice success message, and with that we can move onto the next piece of the puzzle!
Unpacking the configuration files
Now that we have an unpacked save file, we can unpack the two LSF files in the unpacked directory. These files will be named “globals.lsf” and “meta.lsf”.
Steps:
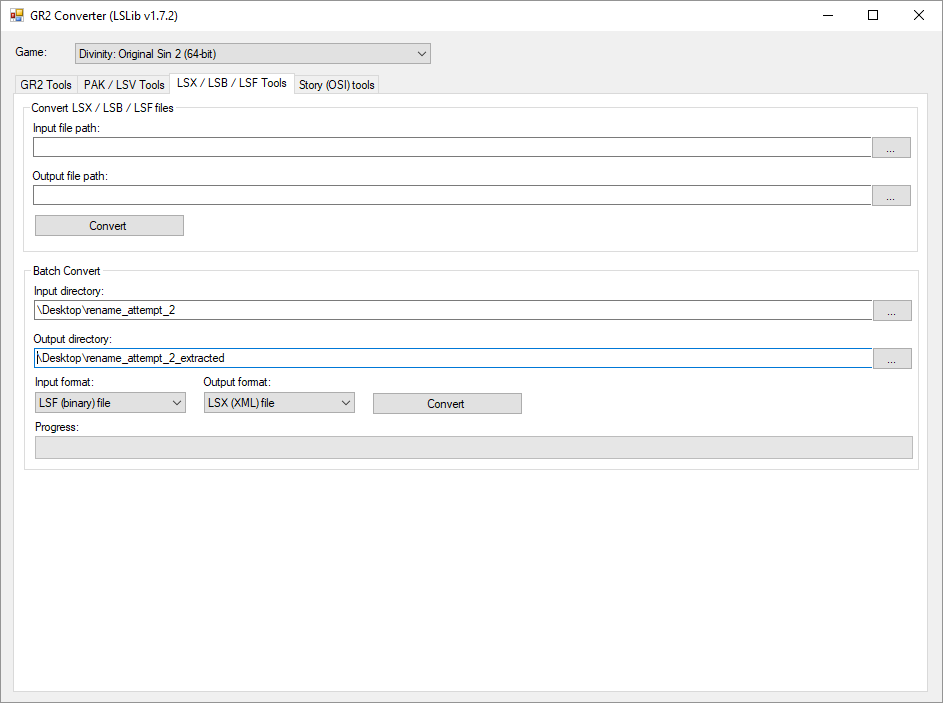
- In GR2 Converter, click the “LSX / LSB / LSF Tools” tab
- Under “Batch Convert” click the “…” for “Input Directory” and select the extracted savegame path
- Under “Batch Convert” click the “…” for “Output Directory” and select a new path (I used a different folder on my desktop)
- Make sure that the “Input format” is “LSF (binary) file” and the “Output format” is “LSX (XML) file”
- Hit “Convert”
The GR2 Converter screen should look something like this:
You should again be greeted with a nice success message, and we can move onto the next step, which is actually changing the values for your save!
Rename your character
Now for the good bit.
Now that we have both of the LSF files unpacked as XML, we can easily “Find and Replace All” to change our name!
Since this piece is text editor reliant, and since the vast majority of you don’t use emacs, I’ll let you fish for yourselves on the text editor piece of this puzzle.
Once you have finished replacing all the instances of your name in each file, you are ready to move to the next step!
Repack all the things
Now that we have made the desired changes to our character’s names, we’ll need to repack all the files that we have edited.
First, in GR2 Converter, we will need to reverse the Batch Conversion that we did.
Steps:
- Select your extracted directory as Input
- Select a new directory as the Output
- Ensure that the “Input Format” is “LSX (XML) file” and the “Output Format” is “LSF (binary) file”
- Convert
Now that we have our XML files repackaged as binary files, we can repackage our save file.
Steps:
- In the directory where you first unpacked the save file, go in and delete the “meta.lsf” and “globals.lsf” files
- Drag your newly repackaged LSF file into this directory
- Open GR2 Converter
- Select the “PAK / LSV Tools” tab
- Under “Package path” pick a new directory, I used my desktop again
- Under “Extraction / source path” select the directory where you put the files from the first two steps of this list.
- Check that your “Game” and “Version” dropdowns are both correct (Divinity: Original Sin 2 // V13)
- Hit “Create Package”
Now that you have a newly packaged save file, you can put it back into the original folder where you found it.
Be sure that the name of the new save file matches the name of the folder in which you are putting it, as well as the name of the PNG image file that is already in that folder.
Profit
Now you can boot up the game, load the save file, ignore the “This save file has been tampered” warning, and enjoy your newly renamed character!
I hope this is of some value to people out there since I just spent my morning figuring this out for my multiplayer group. (everyone was named Roderick…)
Please rate if you liked this guide, and leave comments/questions. I am very active on Steam and will be answering questions as they come up.
Thanks as always,
Kyle