![How to setup Visual Studio [Gold Src Modding] for Half-Life](https://steamsolo.com/wp-content/uploads/2021/07/how-to-setup-visual-studio-gold-src-modding-half-life.jpg)
Overview
I am creating this guide so those people who are interested in modding can learn where to startIn this guide you’ll learn how to Configure Visual Studio (2013) alongside Half-Life Gold Src SDK for programming Learn How to build,run and compile the code Run the game in Debug modeLet’s begin
Installation
- Must have Visual Studio 2013 installed (If don’t have it why are you even here dude?)
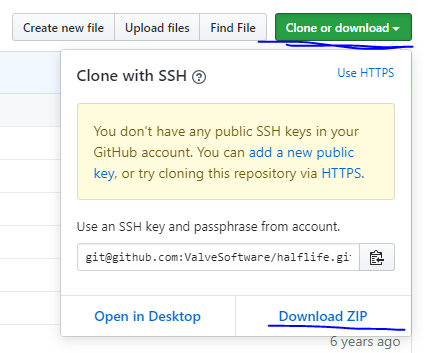
- Download Half-Life SDK from Valve’s Github Repository HERE[github.com]
After downloading the ZIP file extract it anywhere
The Installation section is complete now double check everything before moving forward
Opening project file and configuration
Navigate the “halflife-master” folder after you’ve extracted it and locate the projects.sln file
The path is
halflife-masterhalflife-masterprojectsvs2010
Here’s an image to show which file to open

Now you WILL and MUST see an image that asks you to update VC++ compiler and libraries
Click OK

To the extreme right of the IDE will be 6 projects in the Solution Explorer
We’re interested in using hldll (bold means start up project)
NOTE:-If hldll isn’t the start up project (which it MUST BE) simply right-click hldll and select “Set as StartUp Project”

Now we need to make changes to hldll’s properties so simply right-click on it and select “properties”
Now you should have a menu like the one below,change the configuration in the top-left corner to “All Configurations” (Highlighted in screenshot below).This means that changes we make to the properties page will be the same throughout all other project configurations in our case both “Debug” and “Release”.

Now to disable post build processes which is shown in screenshot below

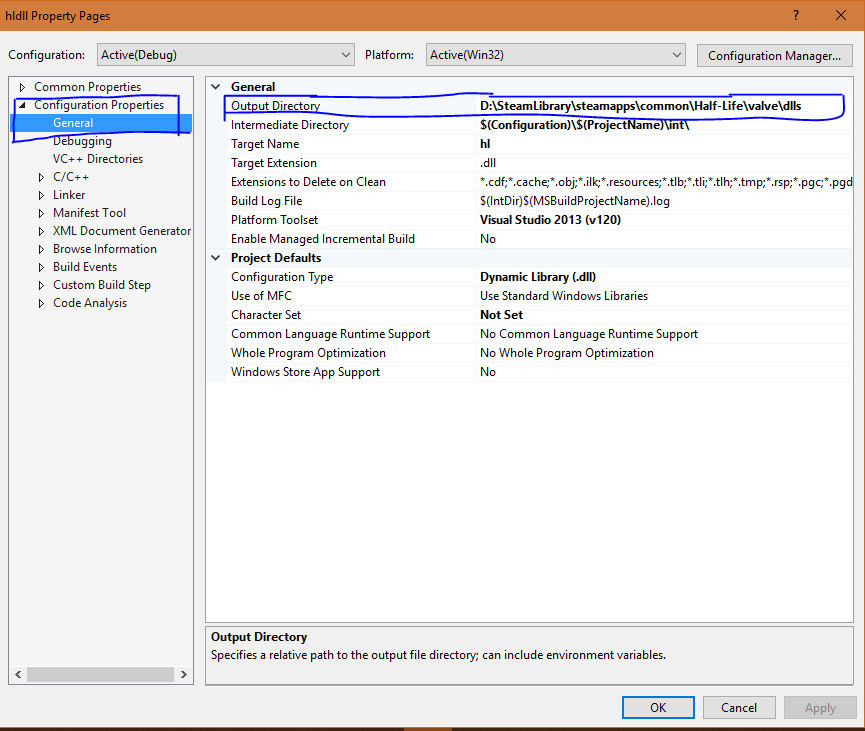
Now we’re going to make some changes to the “General” tab under “Configuration” as shown in screenshot below
The default path is
Change it to directory where your Half-Life installation is and where you’ll find hl.dll
For me it is
Now after configuring your tab should look somewhat like this
Now to set the debugger
We need to provide path to hl.exe in our debugger tab
go to “Debugging->Command” to provide the path to hl.exe
In my case it is
You’ll also see “Command Arguments” below “Command”
copy and paste the following arguments into “Command”
Now set the “working directory” below command arguments to the root Half-Life directory
which for me is
This is how it is supposed to look

Build Project
Now time to build our project. Go to build->Project Only->Build only hldll
My screenshot looks like this because I unloaded all other projects don’t worry if yours looks different that’s ok too

Now wait for the compilation to complete
And yes there must be some warnings that appear when our code is compiling
That’s because C++ evolved over time and the sdk was released by Valve on github in 2013
To disable warnings
Right-Click on hldll and go to “properties” and go to “configuration properties” from there it is like
configuration properties->C/C++->Advanced
and make sure that the configuration is set to “All Configurations” On the top left of the properties window
now copy this line below
and paste it in “Disable Specific Warnings”
your screen MUST look like this now

Now apply settings and compile the code again,No more warnings will appear
Your build has now succeeded and for verification you can go to the Half-Life directory and check for the timestamp of the newly generated hl.dll
For me it is located here
If everything is done correctly to this point now we can run the game from visual studio
Click on the Local Windows Debugger Button

If everything has been done correctly you should now see that Half-Life is running now through steam
But if steam isn’t running you’ll receive an error saying

If every instruction of this guide was followed correctly then YOU WILL DEFINITELY SEE Half-Life running
and this will appear on your screen

Thank You
If this guide helped you please rate it up