
Overview
This guide explains how to upload a MOD for Homeworld Remastered to the Steam Workshop.
How to upload a MOD for Homeworld Remastered
How to upload a Homeworld mod to Steam Workshop using Homeworld Remastered:
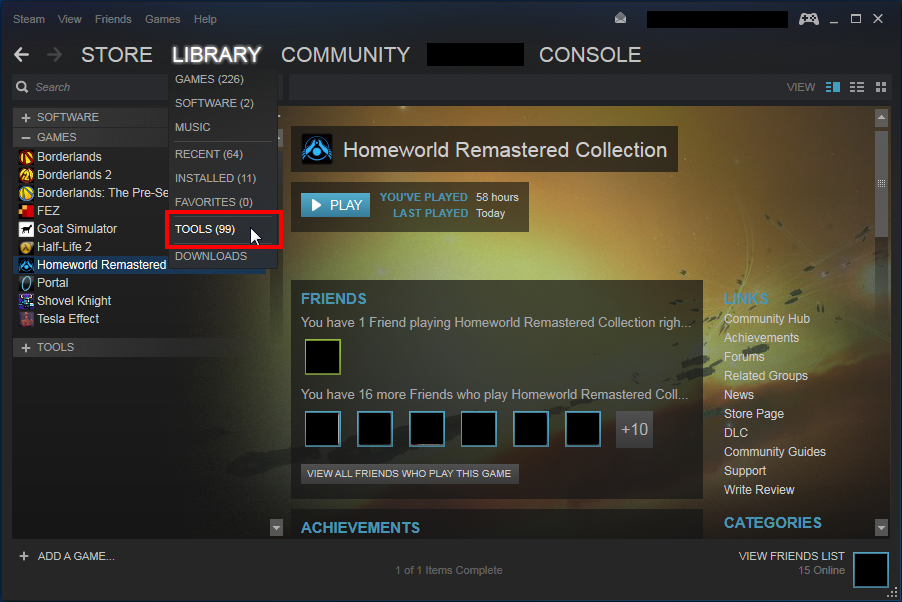
In the Steam client, move your mouse over the “LIBRARY” menu item and select “TOOLS”…
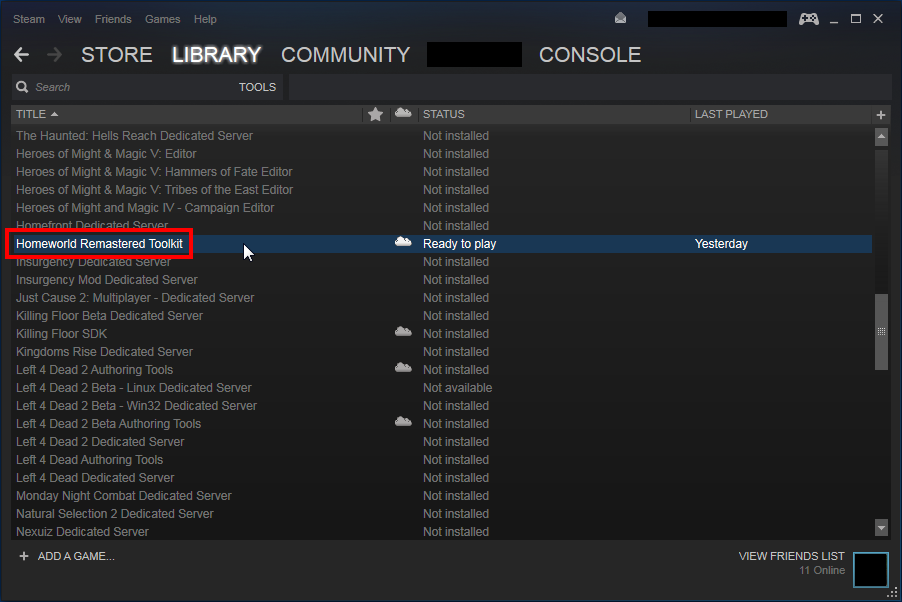
In the list of tools, scroll down until you see “Homeworld Remastered Toolkit” and double click on it to install it…
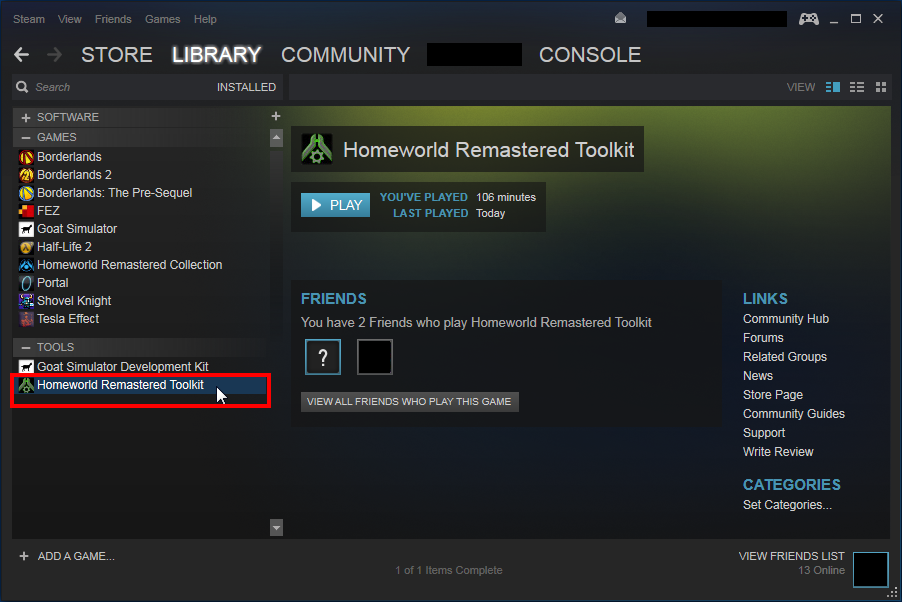
Once the Homeworld Remastered Toolkit is installed, you can double click on it to launch the WorkshopTool (which is used to upload MODs) to Steam Workshop…
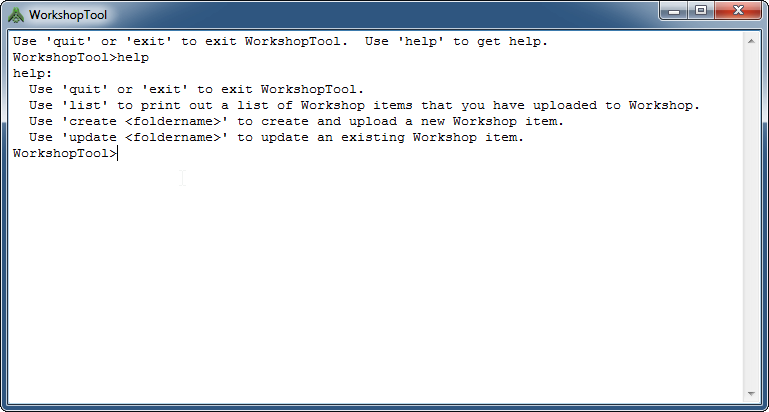
Here’s what the WorkshopTool looks like:
The tool has a few simple commands. You can get a list of MODs that you have previously uploaded to Workshop. You can upload a new MOD to Workshop. You can also update an existing MOD on Workshop with new or updated content for you MOD.
The WorkshopTool is located in the HomeworldGBXToolsWorkshopTool folder in the Steam installation. If you used the default path to install Steam, this will be:
C:Program Files (x86)SteamSteamAppscommonHomeworldGBXToolsWorkshopTool
When the tool runs, the current working directory will be:
C:Program Files (x86)SteamSteamAppscommonHomeworld
When you use the WorkshopTool to create or update a MOD, you need to use the path to the folder that contains your MOD data (which we talk about more below). For example, if I was creating a MOD for Homeworld 2 Classic and I named my MOD folder “DataMyMod”, then I would use the following command in the WorkshopTool to create this MOD on Steam Workshop:
create Homeworld2ClassicDataMyMod
The WorkshopTool expects there to be loose folders and files in the MOD folder (in this case inside the ‘DataMyMod’ folder). The WorkshopTool will automatically pack up the loose files into a .big file archive and upload that archive to Steam Workshop. The WorkshopTool will not allow you to upload pre-created .big files.
The WorkshopTool also expects 2 other files to be in your MOD folder. There needs to be a file named ‘preview.jpg’ or ‘preview.png’ that is a preview image that will be displayed in Workshop and in the game. This image needs to be a valid JPEG or PNG image and must be 256×256 pixels or 512×512 pixels in size. The other file that is required is a ‘config.txt’ file that contains information about your MOD that will appear on the Steam Workshop. You can find a template version of the config.txt file in the WorkshopTool folder mentioned above. Just copy the config.txt file from the WorkshopTool folder into your MOD folder and open it with a text editor to set up some things.
There are comments in the config.txt file to explain what each option is, but in general, you will need to set a Title for your MOD. You will need to set the GameType for your MOD (this can be ‘HW1Classic’ for Homeworld 1 Classic, ‘HW2Classic’ for Homeworld 2 Classic, or ‘HomeworldRM’ for Homeworld Remastered). You will also need to set a filename for the .big file for your MOD. You can modify the Tags information to be specific to your MOD. The tags are used in Workshop to allow people to search for MODs using keywords (or tags).
At the bottom of the config.txt file is where you can write a long description of what your MOD is, what it does, how to use it, etc. The description text is limited to 8,000 characters.
Once you’ve set up all of the above information in the config.txt file, you are ready to upload your MOD. Use the ‘create’ command with the path to your MOD folder to begin packing up your loose files and uploading them to Steam Workshop.
When the create command is done uploading the files, it will modify the config.txt to change the ‘WorkshopID’ value to the item number assigned to that Workshop item by Valve. You should not modify this value once it has been set. This WorkshopID value is used later when you make updates to your MOD (using the ‘update’ command in the WorkshopTool).
Now, let’s talk about how to set up a MOD. Currently, we only support modding for Homeworld 2 Classic. The tools needed to modify Homeworld Remastered are not yet ready for release, but they will be available in the future. Since Homeworld 1 Classic didn’t support the same modding data structure that Homeworld 2 Classic did, we don’t currently have Steam Workshop support ready for it, but we are working hard to make it possible to support Workshop mods for Homeworld 1 Classic as well.
For each type of game where you want to create a MOD, we are using a new ‘Data’ folder to hold the MOD folders and loose files. For example, if you look in the Homeworld2Classic folder in Steam:
C:Program Files (x86)SteamSteamAppscommonHomeworldHomeworld2Classic
You will see a ‘Bin’ folder and a ‘Data’ folder. The ‘Bin’ folder holds files needed by the game’s executable and the ‘Data’ folder contains the .big files with all the game’s assets packaged up in .big archive files. We will add a new folder at this level called ‘DataMyMod’ (although you can name it anything you want to allow you to work on multiple separate mods at the same time).
So, create a folder called ‘DataMyMod’ in the Homeworld2Classic folder and it would look like this:
Inside the ‘DataMyMod’ folder is where you would put your loose folders and files for your MOD (for example, ‘leveldata’, ‘scripts’, ‘ship’, ‘weapon’, etc.).
To run the game with your loose files, it is easiest to create a shortcut to the game executable and then modify the command line arguments to launch your MOD. To do this for Homeworld 2 Classic, use Windows Explorer to browse into the HomeworldHomeworld2ClassicBinRelease folder in Steam. Right mouse click on Homeworld2.exe and drag it to your desktop. Release the right mouse button and select “Create Shortcut Here”. Then right click on the shortcut and select ‘Properties’ and at the VERY end of the Target: line, add the following text (with a space after the last double quote):
-moddatapath DataMyMod -overridebigfile
You will also need to create an empty file named ‘Keeper.txt’ inside your MOD folder. Do this by opening your text editor, type a single space, and save this to your ‘DataMyMod’ folder and name the file ‘Keeper.txt’ (you might not need to add the .txt part if your text editor adds it for you, otherwise the file in Windows will be named ‘Keeper.txt.txt’).
Now you should be able to double click your shortcut to launch the game using your MOD.
Once you have the MOD working the way you want, you can use the WorkshopTool to create or update your MOD on Steam Workshop.
The “-overridebigfile” will can be used when playing the game on a LAN for multiplayer testing, but cannot be used when playing a multiplayer game on Steam. To do that, you will need to use the Workshop tool to upload your mod to Steam and then browse to that mod on the Steam website and change the Visibility of the mod to “Friends Only” and this will allow you to test the mod with anyone in your friends list (both players will have to launch the game with the mod from the MOD screen of the launcher in order to join the server running that mod).
Note that this guide doesn’t go through the process of how to actually create a mod for Homeworld. That would be much too complex to put in a simple Steam Guide. We plan to release additional documentation and tools in the future.