
Overview
[14/01 POINTLESS TRIVIA AND GENERAL ADVICE UPDATE] Crafting tips, unclear points, hardcore hints, obscure game secrets that aren’t described in any other guides!
Introduction
After months and months of tedious alt tab to the New Vegas wiki looking for stats, perk bugs and amusing yet pointless trivia about items in the game, I asked myself “Musc, I just want to craft ♥♥♥♥ without having to go to every item page to see how it’s crafted. I’m lazy and impatient ; wouldn’t there be a way to know which item to pick, which not to pick, what are the most efficient healing means, where to go and where not to go?”. I then casually ignored myself because those are useless boring details and oh my god who cares? Just pick whatever I find and tp-gun back to the Sink where I’ll throw everything in a trunk to never look at it again.
Then I finished the game the only non-shaming way, the Independent way, and it was pretty cool. The unlocked achievements kept staring at me behind their grey-tainted curtain, begging me to carelessly tear the cloth that hid them, exposing their naked (and colorful) nature. But I wouldn’t force my way in with SAM! No! If I wanted to ravish the Hardcore achievement, I had to do it the slow, long, passionate way, that is by doing a second playthrough. And boy, that’s a whole different world.
So after examining other guides, I want here to collect and describe every little stuff that I found out over my two plays of New Vegas, first to keep me a handy list of important stuff to remember if I do a third playthrough (I plan on doing a strong Legion ♥♥♥♥ that needs no NCR), second to share unique, important stuff on the internet because I always was a bit of a Holywood easy girl
So to sum it up:
Read this guide if:
- You plan on doing your first hardcore run, and want to know how hard will it be exactly
- You already finished the game, and want to know about stuff you missed
- You love handy lists to remind you what to pick and what is useless
- Your lack of social activity and education makes Steam achievements one of your only sources of self-worth
- You’re doing your first run of the game, but for some unknown reason you refuse to do second playthroughs of a game with huge replayability, and you want to min max everything and know EXACTLY how to play it RIGHT on the FIRST TIME. You probably hate videogames.
Do not read this guide if:
- You’re doing your first run of the game, and want to discover most of the stuff by yourself. Other Steam guides will already give you essential info about what stats, perks and skills you should choose or ignore. There are some spoilers though, and I won’t always use the spoiler balise because it’s very long to type by yourself and the oh so clever designers of Steam Guide FORGOT to add the button to add them automatically. I’m in pain, so you’ll pay!
- You do not own New Vegas and do not plan on playing it. Your visit on this guide is already recorded in its view stats, and you were probably tricked into coming here. Thanks anyway!
- You hate reading long texts. There are some pictures, though. Important parts are divided into clickable chapters, and some contain basic info you probably already know. Just click on whatever catches your interest, or scroll through it to stop only at the big bold parts, like the ADHD-ridden schoolboy you are
- You think Three Dog of FO3 was, by any means, an interesting, funny, or well-written character. You obviously hate depth, and depth is all what this guide is about
I’ll use the standard abbreviations for the DLCs (DM, OWB, HH and LR). You’re supposed to play the game of the year version, that you bought at a Steam sale. Doing otherwise would only be the proof you are bad at managing your budget (or you’re a Chris Avellone fan, and that’s fine!).
Learning how to walk
If you’re using something else than a QWERTY keyboard, well I hope you remember the emplacements of QWERTY keys because the game actually recognizes whatev foreign keyboard you’re using BUT doesn’t say it. So if it tells you “Press Q”, but you have an AZERTY keyboard, press A, et cetera.
Controls are those used since Oblivion by Bethesda. Q to keep running, Z to lift an object (very useful, you’re expected to use it to reveal some objects buried under buckets, corpses, and it allows you to defuse mines you couldn’t have reached otherwise).
We’re not playing a Source game (or a game with a real physics system), so crouching to get under an obstacle won’t work. If you can’t pass by walking or jumping, you can’t pass at all.
Now the tricky parts:
- Hold TAB to make your pip-boy light up
- Hold E when drinking, to keep drinking without interruption
Those are two extremely useful actions that are NEVER stated ANYWHERE in the game. Lighting up was actually mentioned in FO3, but only in Loading Screens tooltips, and if you had a fast computer OH BOY
Just like in FO3, you can reverse pickpocket NPCs to make them briefly confused, then splattered on the walls. Pickpocket them, then put an explosive (grenade or mine) in their inventory. Then get back, and feel the fresh gory gale passing on your face
An even bigger secret, that I discovered while writing this guide: there are shortcuts to use specific items. This was also in all of the Elder Scrolls prior to New Vegas, and every time I only knew about them after one year of playing the game (this will probably happen when I’ll get to play Skyrim).
In order to do that:
- In the pip-boy items menu, hold the 1, 3, … 8 key (2 or 9 won’t work)
- While still holding it, hover on the item you want to link the hotkey to, then left click. It can be a weapon, a consumable, or even clothes, but not misc items.
- Now get out of the pip-boy, and press the key to equip the weapon/consume the item/equip the clothes.
You can’t use the “2” key, because it’s to change the ammo type of the gun you’re drawing.
Wouldn’t surprise me if it’s common practice, but since Oblivion I use the “Wait” button as a radar to check if enemies are close or not. As far as I could tell, the distance it covers is superior to when your compass start showing red marks with a PER of 7. Very useful to check quickly when you can fast travel.
Another big tip, that I discovered on my 4th playthrough: when hacking, if similar brackets that open AND close are among the random signs ( such as <ù^$$ù>, {} [] or () ), clicking on them will either remove a wrong password or give you another free attempt.
VATS is more than a slowass moment of throwing dices to check if your character managed to shoot Bandit Bill in the head. In VATS, you get double base damage with unarmed/melee weapons, take 15% less damage, gain 5% critical hit chance.
You can also make special attacks with Melee or Unarmed Weapons if your skill is high enough (50 for Melee, 50 and 75 for Unarmed). Since I’m speaking about that, the Cross Unarmed attack (75) has a very high chance to cripple your target, meaning it will often one-shot Ghost People in DM.
You can keep the VATS button pressed to zoom out and have a global view of the battlefield.
Only mod I used was CONELRAD radio (found on fallout nexus, as for everything). Since I’m kind of a vanilla boy I’m not used to mods, just check the other Steam guides on the subject, there are plenty of them.
I have no idea if mods can disable achievements, but I know using the dev console (²) does. Save regularly (regular separate saves, not quicksaves). If you get eaten by a Hole in the World, or if you F5 just before getting bitten in the head by something big and fast, you won’t be able to noclip or tgm. Don’t freak out if you press ² by mistake, it’s USING the console that stops achievements, not OPENING it.
We’re not only numbers: an efficient character sheet
I’ll remind you here that with all DLCs, the max level is 50. You’ll be able to choose a perk only when the level you gain is an even number.
Be extremely cautious with perks based on %. Some are multiplicative (those related to VATS), some are additive (pretty much everything else). The difference is essential : get a perk with a +50% chance on something, and with a starting chance of 10% you might end up with 60%, or only with 15%.
There are a lot of perks that work incorrectly, or have hidden effects:
- In Shining Armor doesn’t work at all
- Certified Tech doesn’t give the +25% ciritical hit chance
- Heave Ho! applies also to Fat Man and Grenade rifles, not only to grenades and throwing spears.
- Them’s Good Eating: Blood sausages augment temporarily max hp by 10, thin red pastes by 5.
- Big Brained and Brainless (OWB): the 5-10% increase in DT is on your naked DT, not your clothes DT. It’ll add never more than 1 DT.
Some perks are meh:
- Friend of the Night gives you night vision. Remember Night Vision in Oblivion? Do you like green tint on a world with no shadow? You can see very well at night even without this perk, and the effect is weaker than Cateye
- Life giver gives you 30 hp. Intense Training in Endurance gives you 20hp, and other bonuses.
- You shouldn’t need Intense Training, unless you really screwed up your starting stats. But you’re reading this guide, you’re a methodic man, this doesn’t apply to you.
- Junk Rounds doesn’t work with Bent tin cans. You could just sell the components of the bullet recipe and buy your bullet at a proper merchant
- Grim Reaper’s Sprint gives only 20 AP now. That’s just worth one shot of most weapons
- Perks that give bonus experience will be useless at level 50, and you have no reason to rush the game
- In a general way, do not take perks that could be useless. Explorer is good if you hate exploration (and playing RPGs). Tag! and Educated may seem like good ideas, but there are plenty of skills that don’t need to be at 100 to be efficient (such as repair, for which every point beyond 90 is wasted). I picked Educated in one of my playthroughs, and by level 45 I already had all of my skills maxed, without having even used every skillbook of the game! Comprehension can find its use early when a stupid quest asks you for 50 in Explosives to get some free items and you didn’t level Explosives because ♥♥♥♥♥♥♥♥♥ who levels Explosives when you have a gun
- Infiltrator and Computer Whiz. The Quickload function is here for a reason. In addition, I myself haven’t failed a single lockpicking attempt while being sober, no reason you cannot.
Perks that add a chance to hit in VATS are multiplicative, and iron sights make VATS way less useful. I took none of those with a character that used guns, didn’t notice the difference. Better take Implant GRX instead for close contact precise shots, long-range VATS will always be at super-low chances to hit anyway.
There are some perks you must take:
- Them’s good eating: Blood sausage heals better than a Stimpak, weights practically nothing, and sells for 175 caps. You have a chance to find one on everything living (dead), including Brahmins and humans
- And Stay Back: 10% chance per shotgun pellet to stun your target. There’s 7 pellets every time you shoot, so a bit less than 60% chance to stun on each shot, if all pellets touch the target. You can now kill a Deathclaw with a Lever-Action shotgun and lot of ammo
- Heartless: you cannot be poisoned anymore. Makes Cazadores harmless
- Jury Rigging: the only way to fix your armor without spending tons of caps or wasting hours looking for a similar one
- Pack Rat: makes you carry two times more stuff, and since ammo has a weight in hardcore, two times more ammo!
- Chemist: it affects not only drugs, but also food. Stimpaks are counted as drugs, so this basically gives you double healing for everything
New Vegas contains also challenge perks (you’ll find the exhaustive list on the wiki[fallout.wikia.com]. You’ll get them usually after completing in-game challenges that involve consuming items, killing specific kinds of critters or just doing a huge load of damage with specific weapons. Aparte here : in a general fashion, challenges that ask you to do a huge number of something (talking 10,000 huge here) won’t be repeatable, and will often unlock after completion more specific challenges.
Traits are purely facultative, so you’re free to take whatever you want.
- I take Skilled every time, as it boosts your skills without any real penalty (you get less experience, but you don’t have to rush the game and sleeping in an owned bed gives you the bonus anyway).
- I don’t recommend Hoarder : you’ll be stripped of all of your weapons before entering high security places, which will make you more than often go under the 160lbs weight limit, and a penalty to INT when you need to pass Speech tests is really crippling.
- Four Eyes can be countered very early in the game, since there’s a pair of glasses in the doc’s house.
The hardcore part of me
Important point : you were teased with a “Special reward” if you finish the hardcore mode. You got interested by it, and wondered during your normal run what it could be. Let’s reveal it right here :
it doesn’t exist. There’s just the achievement.. Will you dare reveal the spoiler?
Now that you know exactly why you’re going to do the hardcore run, another big surprise: it’s not that hard. Fast travel makes it very easy to get your food, water and bed, ammo weighs a lot but you never need to pack much of it, and there are still multiple healing solutions other that going to bed. I have never been in critical danger because of starvation, dehydratation or lack of sleep. Stimpaks and RadAways aren’t much of a problem, just don’t wait until you’re just a leg hooked up to a mangled piece of blue meat to heal up
The only real danger is the death of your followers. Unless heavily prepared, you won’t be able to attack large packs of Deathclaws, and NCR or Legion assassins will be very problematic if they appear on the wrong side and blast the head of poor Raul. And since you have 1 in charisma, no DT for your followers!
Yet overall it adds maybe not challenge, but depth to the game, making some items you would never have picked rather useful and making a not-quick-enough encounter with geckos more dramatic that it ought to be (thank you, F9 key!)
Eating: an american tradition
FOD increases at a 4/hour rate 
Now food weighs on the hips, but it weighs also in the bag. So we want high-power low-weight foods, that you can eat up without taking a pound! Numbers are HP healed at survival lvl 100, as a comparison Stimpak and Super Stimpak at Medecine 100 heal respectively for 90 and 180, Thin Red Paste for 210 and Blood Sausage for 300 (at Survival 100).
Easy to get, easy to cook. Those will just need one ingredient, that is, a piece of meat. In terms of hp the best steaks are gecko and brahmin. Gecko removes the most FOD, brahmin steaks are the lightest and give you a +2 STR bonus. Oddly, you can cook gecko steaks with a low survival skill, while the lesser coyote steak can be only cooked with a skill of 50 and coyote meat, the latter being, in both meanings of the term, quite rare. Hence,
Dog (60) = Bighorner < Coyote (72) < Brahmin (90) = Gecko
Those are the meals that require only meat and some plants, that is those you can craft without killing or interacting with anyone sentient enough, for they do not contain alcohol or pre-War food. They’re not very diverse, but their ingredients are easy enough to get to enable mass cooking, they’re all more potent than a Stimpak, and will remove FOD and H2O.
Namely, this category contains Gecko Kebab and the Bloatfly Slider. In the long run they will replace your steaks and all of the more advanced meals you’ll have no time to cook.
Bloatfly Slider (135) < Gecko Kebab (120, weights less and removes more FOD and H2O)
All of the other food you can cook will require extra ingredients, that you’ll have to find, or to buy if you hate exploring mysterious places.
Grilled Mantis (90) < Caravan Lunch (135) < Brahmin Wellington (150) < Mole rat Stew (180) = Fire Ant Fricassée (180) < Trail Mix (225) < Desert Salad (315) < Cook-Cook’s Fiend Stew (360) < Thick Red Paste (570, doesn’t remove FOD) < Black Blood Sausage (700, doesn’t remove FOD) < Wasteland Omelet (720)
Above all, cannibalism aims to make the inedible edible, that is to give you more available sources of food. Eating a corpse heals you for 25hp, removes 25 FOD, gives a bit of rads and takes a lot of time during which you can’t do anything but eat, meaning a snack in battle is impossible (when given the option to search or eat the corpse, press Esc if you want to search the body).
But cannibalism brings some hidden benefits: after eating 25 meals, you get the Dine and Dash perk that allows you to keep some parts for later, which diminish your hunger (-50 at Survival 10) without any radiation gain. The karma loss is very minor and can be easily fixed by shooting some Powder Gangers or Fiends, plus the guys you kill are usually alone and nobody can witness you while you’re picking their parts. You’re not really harming anyone!
An even more hidden and difficult to get perk is Meat of Champions : if you eat the corpses of The King, Caesar, Kimball and Mr House, you’ll get a +1 in LCK, INT, CHR and STR after eating another body. Not big and very hard to get, but it’s there.
Alternatives consist in eating insects with Tribal Wisdom (+12 hp, -12 FOD) or eating feral ghouls or Super Mutants with Ghastly Scavenger (+50hp, -50 FOD). Don’t get those, they’ll be useful in very few occasions.
How not to die like a plant
You should, and will, always have some water on you. Dirty water has the same effects as Purified water, but gives you +6 RAD. They will remove as much dehydration as a Gecko Kebab (the amount depends of your Survival skill), but I don’t recommend carrying nothing but kebobs: although they’re lighter, reduce FOD and taste probably better, using them only to decrease your H2O level is a bit of a waste. You will encounter plenty of Purified water, and it is largely sufficient to keep you hydrated without you having to waste precious kabob ingredients.
H2O grows faster than FOD: you could keep your FOD level at bay just by eating every time you were hurt – a bit like a bulimic person -, here you’ll have to drink just because you need to drink, so carry always 2-3 waters if you don’t want to fast travel to a lake/the King’s bathroom/Victor’s shack every time you’re thirsty (Dirty and Purified water have the same stats except for radiation, and remove 150 H2O at Survival 100).
You can easily purify 5 Dirty water (giving 4 Purified water) at a firecamp with 2 glass pitchers and one surgical tubing (the recipe consumes no ingredient), but I’ve never found the need to do so, since Fiery purgative or a doctor easily removes unwanted RAD, and the whole process is quite tedious. Furthermore, you’ll always have a good supply of Purified water if you don’t waste it to heal yourself : at Survival 100, Purified water heals for 30, which is even worse than raw Gecko meat.
Otherwise, there’s plenty of water in natural sources (i.e sinks, toilets and lakes). One sip of it removes 100 H2O (wiki says 200 but I think they’re lying), and you can drink continually by pressing the E key.
In addition, your Vault 13 canteen (included in the GOTY edition) removes 25 H2O, and heals for 15 every 5 minutes.
Sodas in game don’t actually remove dehydration, some dehydrate you even more! Sunset Sarsaparilla was your favorite healing source when you were playing in nomal mode, and it’s still useful in Hardcore mode, but you’ll learn to replace it with food.
Nuka-Cola heals as much as Sunset Sarsaparilla (150 at Survival 100) and removes a bit of SLP, but dehydrates way more (dehydration gained gets more important as your Survival skill grows!) and irradiates you. I found no use for it.
Nuka Cola Victory and Nuka Cola Quartz are famous variants of Nuka-Cola that you found hidden in secret places but then never used later in the game.
- Nuka Cola Quartz (the white one) heals a bit more than regular Nuka-Cola, gives low-light vision, 10 RAD, +2 DT and no dehydratation. It sounds like Med-X, but with a messy visual effect
- Nuka Cola Victory (red version) heals for the same amount, with +10 RAD, -15 SLP, +10 AP for 2 minutes, and strangely enough -1 PER, the two latter stats scaling with your Survival skill. It can be used to craft Atomic Cocktail, otherwise it’s ♥♥♥♥♥♥ Jet with no addiction risk
Atomic Cocktail is the best remedy against sleep (-100 SLP), at the cost of +30 H2O and +9 RAD. It also adds Fire resistance and Energy Weapons resistance, which will be rarely useful. All in all, rare drinks aren’t precious at all, and can be sold without regrets.
Drugs: the double-edged word

While rusty syringes and home-made medicine can find their utility, they aren’t generally that needed. You can very well finish the game without using any addictive drugs. Yet, in some dire, unexpected, situations, you’ll be happy to feel that specific kick in the head.
Most drugs are weightless, and they do not bear all an addiction risk. Addiction risk rises every time you consume a drug (for example 10% risk at first use, and 90% risk at 7th use), and decreases to its base level after some hours (if nothing is indicated in my list, the chem is addictive).
Remember that when drugs wear out, you’ll become practically blind for 2 seconds (picture it as the visual effect in FO3 when you get out of the Vault for the first time).
As a reference, a +1 in a SPECIAL stat gives +2 to the related skill (+2 INT gives +4 Medecine, etc.).
Drugs effects are sometimes described in game in rather cryptic terms, such as “Turbo +1”, that aren’t even always right, so here are the descriptions of what you will encounter in game:
Ant Nectar : with some minor downsides (-2 CHR, -2 INT), ant nectar gives a huge +4 STR gain, with a very low addiction rate. You started with 6 STR, nectar is then roids for you. It’s an instant +40 lbs item, so it can be pretty useful to quick travel when overburdened.
Buffout : +2 STR, +3 END, +60 max hit points. If you have 7 END or less, total hp boost will be +120. Fine if your END level and your firepower are too low for you to survive an encounter with beefy opponents. Adds +20 lbs to your weight limit. Not bad, but there are more powerful alternatives (Wasteland Tequila and Ant Nectar). It’s the item with the highest END/hp gain.
Coyote Tobacco Chew : minor gains to INT and PER make that addictive plant outclassed by every other drug. It however reduces 30 SLP, and is thus one of the cheapest and most efficient items to fight sleep.
Fiery Purgative : your main source of healing will be food, which is cheap to get and efficient. Only negative effect of food is that it’s very often irradiated. Fiery Purgative will fix the issue, and is (mainly) made of vodka, which makes it rather easy to get, USA’s stock of russian juice still looking strong even after two centuries of common debauchery and casual looting. It’ll heal 50 RAD at the temporary cost of 1 END, which makes it best be used when nobody’s shooting at you (non-addictive)
Fire Ant Nectar : gives +4 AGL, so the highest AGL gain item in the game. Gives a +8 boost to Guns and Sneak, and some more AP to use in VATS. This is pretty disappointing (non-addictive).
Fixer : thanks to a bug, fixer doesn’t remove temporarily, but permanently any addiction (except some wackass ones like Ultra Jet addiction).
Hydra : heal all limbs. A bit like a Doctor’s Bag, but weightless, with an addiction risk, much rarer, and cannot be applied on a single limb. Craftable.
Jet : +15 AP. You won’t use VATS, use it to craft Rushing Water, a non-addictive attack speed booster, very useful for melee-oriented characters.
Med-X : morphine. +25% damage resistance, so approximately the same effects as VATS. To use when you came unprepared to the gunfight, which won’t happen.
Mentats : an essential component for Party Time Mentats. +2 INT, so gives you 10 INT with recommended SPECIAL stats. +2 PER. It’s pretty ♥♥♥♥.
Party Time Mentats : a bit more addictive than Mentats, and 4 times shorter. Yet it gives +5 CHR, which means, thanks to your low CHR, +10 speech points. Stacks with Mentats, clothing bonus and catalogs, meaning that added to Meeting People (with Comprehension perk) and Naughty Nightwear, you’ll end up with a +42 Speech bonus whenever you want. A mere 53 Speech skill will be enough for you to pass every speech challenge in the game!
Psycho : +25% damage. Never found the use, but could come in handy if, say, you want to headshot someone with a silenced weapon in a room full of jumpy soldiers and you don’t feel like giving your target an occasion to turn around and scream loudly after your first shell only takes off half his brains
Rad-Away : the proper way to decrease your level of global cancer in dangerous situations (Vault 34, Searchlight). Hardcore mode make those acting over 10 sec instead of instantly, which isn’t that important, and they get better with your Medecine skill. You NEED to carry some of those if you plan to go loot an irradiated area: without any way to heal your rad level, the maximum amount of time you can prance around radioactive material is a bit more than 15 minutes. It is a rather rare item, so consider just going regularly to a doctor if the situation isn’t that urgent. Just like you’d do yourself, if you were old! (non-addictive)
Rad-X : a radiation suit in a box. Lasts for 4 minutes. Only use some if the amount of rads your body passively gains is higher than 1 rad : rad resistance can’t be higher than 85%, so you will get irradiated no matter what (no 100% res). Rad-X is here to put irradiation at a minimum level, and gets more efficient depending on your Medecine skill (non-addictive)
Rebound : regenerates AP at a rate of +5/sec for a minute (300 AP total). As useful as Jet.
Rocket : Jet with detergent and Nuka-Cola, for +30 AP. Whatever.
Slasher : made from Psycho, Stimpak and banana yucca. Basically, Med-X and Psycho combined in the same syringe. It’s slightly more addictive than regular drugs and will stack with Med-X (50% damage reduction), but not with Psycho
Steady : makes your aim more precise. If your weapon has a spread equal or inferior to 0.1 (check that on the wiki), your accuracy in VATS will always be superior to 70%, and more than often reach 95%. This means shots from huge distances with most energy weapons, including Laser Pistols. Be aware that a lot of guns (.44 magnum, shotguns, miniguns) won’t be affected by Steady in VATS, because of their natural important spread, and won’t get that much accurate even if using iron sights (most rifles have very little spread however). Steady is one of the most potent drugs, and as such is highly addictive.
Stimpak : can’t heal limbs in hardcore mode. Although the syringe, the promising-looking red glowing content and the drug’s well-established reputation could lead you to believe it is a very potent healing item, Stimpak heals actually less than Sarsaparilla, and just a bit more than a gecko steak. However, the healing is done in half the time. Better used in combat situation (non-addictive)
Super-Stimpak : heals two times more than a regular Stimpak under 3 seconds. Its healing power is outclassed by very few items, but it also decreases STR and AGL by 1, which makes it problematic in combat situations if you suddenly become over-encumbered.
Turbo : bullet-time effect. Like the Implant GRX perk, you move at normal speed while everyone moves more slowly. Good to run, hide, aim, shoot, and reload while being attacked. Craftable!
Basic alcohols (Beer, Wine, Vodka, Scotch, Whiskey) all have the same stats (+3 STR +3 CHR -3 INT at Survival 100). You can craft Wasteland Tequila and Large Wasteland Tequila, that manage to dehydrate you (+75 at Survival 100) while giving somewhat okay stats in the end game. Alcohol will only be slightly less useless with the Old World Gourmet perk. Fortunately, many useful crafting recipes require alcohol.
Absinthe is a bit different, since it gives a PER gain instead of a STR one.
Sinews of War
You didn’t choose to follow a pacifist New Vegas playthrough. This is very good! Pretending to murder people isn’t just normal, it’s healthy. As in every post-apocalyptic universe, the tools of the trade are present by hundred of thousands in the hands of every single bandit. In a world where working cars are an extremely rare sight, an army of potheads could get their hands on high-tech weaponry, and ammo lies in buckets in deserted shacks.
Abundance needn’t lead to gluttony, and the survival of the fittest demands of you the ability to distinguish the impotent pea-shooter from the nuclear BFG. Here we will examine New Vegas’s weapons and their characteristics, for all of you who can’t tell at a glance if that black automatic rifle does more damage than this other black automatic rifle. The weapons described here will only be those findable around New Vegas (no DLCs stuff, except for GRA), and there’ll be no mention of unique weapons. This here is mainly to consider and compare the often hidden value of regular weapons, Obsidian’s goal being to make modded regular weapons as good as unique weapons. All values indicated in DPS, no reload taken into account (unless indicated otherwise).
Guns are most players’ favorite weapons. They shoot far, fast, and hard, come in long-range or shortgun versions, have customizable ammo, fit perfectly in a post-apocalyptic western setting, literally grow on trees (trees you have TO KILL for their ripe harvest).
Colts and derringers
Besides an intense fear of red barrels,FPS games taught us that pistols are trash weapons. It’s not loud, does less damage that a broken piece of stuff you’re hitting people with. Overall, simply inconvenient as a penile substitute. Hence your natural disgust for revolvers.
Still, pistols stay the lightest guns you can carry (heaviest has a weight of 5). Most can have a scope added (9mm, 44 magnum), or already have it (Hunting Revolver), making them the poor man’s Sniper Rifle, or be silenced (10mm and 12.7mm pistols). All of them except for the 12.7 are holdout weapons, and as such those will be the only guns you can keep in a casino with a 50 sneak skill.
Silenced .22 pistol (31.5) < .357 magnum (45.5) < 9mm pistol (50) <) < .44 magnum (67.5) < 5.56mm pistol (77) < Hunting revolver (87) < 12.7mm pistol (110)
Note that the 5.56 is the only pistol that can use armor-piercing ammo.
Boom sticks
Main advantage of shotguns is their stopping power, thanks to the And stand back! perk. Shotgun ammo is way less diversified than for other guns: you get 20 gauge (regular shotguns) and 12 gauge (high-damage shotguns), with some unique effects such as the dragon’s breath slug, or the very rare pulse slug. Their natural high damage and large spray make them ideal when you realize that red mark on your radar was created by an interference located exactly next to the desk you maybe too hastily looted. Shoot in the approximate direction of your target, you’ll be sure to touch it. Without the proper perks, shotguns however are rather inefficient against targets with high armor, or that runs towards you a bit too quickly.
Interesting fact here: even the most basic shotguns inflict a lot of damage per shot. However, the dps differs drastically depending on how many slugs can be loaded. For example, the single shotgun does on average, for each shot, more damage than the lever-action shotgun (50 > 48), which means the single shotgun has a bigger dps than the lever-action (128 > 84.9). However, if you take the reload time into account, the lever-action shotgun does way more damage than the single shotgun (45.1 > 20.9). Shotguns with low ammo-capacity will then have extremely good dps, but for a very short time (with a very impressive 234.4 dps for the sawed-off shotgun, that drops to 28.2 with reload).
Values here will hence only consider the dps with reloading, but in no way imply that the shotguns at the lowest end are garbage. I haven’t tested it yet, but they may prove to be excellent ways to cripple a limb in a very short time, that is if you manage to aim precisely at it.
Single shotgun (20.9) < Sawed-off shotgun (28.2) < Caravan shotgun (42.4) < Lever-action shotgun (45.1) < Hunting shotgun (65.8) < Riot shotgun (155.6)
Camping tools
New Vegas draws a lot of influence from the spaghetti western genre, in which only the protagonist has a steady and precise aim, making him always triumphant over the incompetent/primitive mexicans/locals. One-bullet kills make you conserve ammo, avoid retaliation and enable sick slow-mo body parts explosions. The iron sights that New Vegas introduced in the Fallout series make precision jobs way more easier, and sniper rifles are sometimes mandatory to take on huge groups of dangerous enemies. Their usefulness decreases with the distance that separates you from your target, in which case it is often more appropriate to use VATS.
One must always take care not to shoot the target’s weapon, if it is worn on its back. A sneak critical hit with that kind of high-damage weapon will instantly break the weapon, which will make it unsellable. Wait until the target turns its back to face you to make him kiss the bullet, or aim for the leg if a quick kill isn’t needed.
Values here will be all in damage per-shot, those rifles not being meant to be shot for a long time at the same target. If the weapon has a scope or can have one, it will be notified as Sc, if it can be silenced as Si. The varmint rifle is the only weapon that can be modded with night vision in the game.
BB gun (4) (Si) < Varmint rifle (Sc, Si) (18) < Cowboy repeater (32) < Sniper rifle (45) (Sc Si) < Trail carbine (48) (Sc) < Hunting rifle (52) (Sc) < Brush gun (75) < Anti-material rifle (110) (Sc)
Sprayers
The guns listed here are automatic or semi-automatic, one-handed or two-handed, precise or “precise”. All have in common the fact that their magazine contains far more bullets than the average gun, and that they can be efficient at average or short range. Missing a shot with those guns isn’t crucial: it’s expected. You’ll have to carry a lot of ammo if you expect to be efficient with those, as VATS forces you to shoot with short bursts, and the critical chance is way lower than for any other guns. SMGs are marvelous to take down small fast moving targets (a 10mm SMG melts Cazadores in seconds), but shouldn’t be used to shoot rare, special ammo. They, with some rare exceptions, cannot be silenced, and the eventual scopes are rather useless given the recoil and lack of power in a single bullet.
Regular ammo isn’t rare nonetheless, and since those guns are quite common on NCR troops, they can be easily repaired if you’re cunning enough (= shoot NCR discretly)
Sinews of War 2: the Sinewing
(sections intersected because of character limits)
Comparing the firepower of those guns cannot be done exclusively through their dps. The 9mm submachine gun, which requires little Gun skill and that you can get early, does nearly as much damage as the Assault Carbine, that requires 75 in Guns. However, the SMG fires 9mm, and the carbine shoots 5mm ammo, which reduces the target’s DT, which means the SMG is only as good in theory, most of its damage being reduced by armor.
Damage Threshold has a huge impact on automatic guns: you don’t care much if your .308 sniper rifle gets -10 dmg if it hits for 150 because of the target’s armor. It would mean -100 dmg overall on 10 shots, but since you have to shoot that guy just three times to kill him, you didn’t really notice.
However, the DT starts to be really annoying when your gun is designed to shoot 30 times without reloading. If your average 9mm bullet shoots for 20 dmg, you have indeed your overall damage reduced by half, without taking into account the fact that not all of the bullets will hit.
Hence, for practical reasons (also because I can’t be arsed to use the damn things) those guns will be compared on their value in caps.
Service Rifle (540) < 9mm SMG (850) < Silenced .22 SMG (1850) < 10mm SMG (2370) < Assault Carbine (3950) < 12.7mm SMG (5100) < Marksman Carbine (5200) = Light Machine Gun (5200) < Minigun (5500)

Ammo isn’t too rare, and only four types exist : (small) energy cell (SEC), microfusion cell (MFC), electron charge pack (ECP), flamer fuel. SEC is used by one-handed energy weapons, MFC by two-handed, and ECP by rapid-fire weapons or by the Tesla Cannon. Flamer fuel is used by all fire-based weapons.
Energy weapons contain laser, plasma and fire weapons. The difference is based on their precision: laser will shoot one straight instant ray, plasma rather slow-moving big projectiles, fire big streams of burning fuel that may touch several enemies at once. Precision itself varies a lot, with some weapons that can carry a scope and others that you can only use at close range by spraying as wide as you can.
Overall, energy weapons offer a rather good DPS since, apart from the fuel, every ammo decreases armor by 2 (armor-piercing bullets decrease it by 15), plus correct precision and rather high shooting speed.
Death by Disco
Laser weapons have the advantage to make you know exactly where you shoot. Like all other energy weapons, their iron sights are garbage (you can get a scope on the laser rifle), but firing from the hip is actually viable due to their incredibly small spread (the RCW has one of 0.08, the 10mm SMG one of 2.2, and they shoot at the same speed).
Laser pistol (45) < Laser rifle (67.8) < Laser RCW (135) < Tri-beam laser rifle (180) < Gatling laser (300)
Caught by the Green Goo
Plasma weapons are the guns with some of the slowest projectiles of the game. You’ll need to aim a bit ahead, and unless in VATS you’ll have trouble aiming at a specific part of the target, since the projectile itself is of quite large dimensions. While not technically speaking plasma weapons, I chose to put the Tesla cannon and the pulse gun here due to their firing modes that aren’t shared by other kind of energy weapons.
Pulse gun (5, 255 against robots, 115 against power armor) < Plasma pistol (57.8) < Plasma rifle (65.8) < Plasma defender (95) < Multiplas rifle (105) < Tesla cannon (107 + 20) < Plasma caster (195)
The Great Cleanse
DPS here is by the regular attack, then by damage over-time. The flamer is actually the only weapon that shoots straight, since the two incinerators function like a grenade launcher, and have a little explosive area damage.
Incinerator (42 + 4) < Flamer (128 + 2) < Heavy incinerator (140 + 8)
Explosive weapons are always a bit specific compared to regular armament. They’re more than often rare, can hurt their user, and few ammunitions means that every shot counts. Using grenades is impossible in a closed space, and unless timed properly are useless against a swift opponent. Yet their quick damage burst more than often is worth the effort. Note that when throwing something against an opponent, the projectile will first hurt him because of the force of the impact (1 damage), and then it will explode. A sneaky attack attempt will then not work when throwing something directly at your target, since the first minimal damage will make you go [Detected], and the sneak attack bonus will be wasted on the impact damage.
Curiously enough, explosives are one of the sneakiest ways to kill someone in a territory full of neutral people but that could arrest you for murder. Drop any explosive, like dynamite (you’ll find it one the corpses of Powder Gangers you just killed) on the path of/next to the target. Drop several sticks separately, not just one big pack, or it will not produce several explosions. Step back, then shoot at it with a gun/energy weapon. It’ll blow up, and since you didn’t throw yourself the explosive, it doesn’t count and you’ll be able to walk away fine without any karma loss or stranger hostility, if only your target was touched by the explosion.
Following the same procedure, any time someone is ready to throw a grenade at you, go in VATS and shoot it while it’s in his hand (apparently this doesn’t do damage with dynamite after they’re lit. Too bad, Powder gangers!).
If you add to that the reverse-pickpocketing explosive technique (described above), explosives constitute a real asset, whatever your way of playing might be.
Explosives crafted with the Mad Bomber perk will be mentioned with a * next to them, since the perk is a huge plus for who wants maximum explosives potential.
Stoning 3000
Damage here is expressed by projectile. They each take 3 seconds to blow up after being thrown, and they’re all improved holdout weapons (50 Sneak required to hide). Throwing them with VATS ensures an on-target explosion. The longer you hold your left mouse button, the further they’ll be thrown.
Pulse grenade (10, 200 against robots, 100 against OWB robots, 80 against power armors) < Dynamite (75) = Long-fuse dynamite (75) (6 second-long fuse) = MFC Grenade* (75) < Tin grenade* (100) < Frag grenade (125) < Incendiary grenade (50 + 6 x 15s) < Time bomb (150) (15s fuse) < Plasma grenade (225) < Nuka-grenade* (350 + 2 x 5s) < Time bomb, high yield* (400) (15s fuse)
Your mines
Mines can be hard to be used efficiently. Knowing where the enemy will walk is very easy if he only has melee attacks, as he will run to you in a straight line. But enemies with guns tend to circle around you, making mines rather unreliable. They can’t be launched very far, so more than often the best way to use them is to run backwards while throwing them on the floor while hoping you’re not going towards something even more dangerous.
Mines will blow up if any NPC go near them.
Sinews of War 3: Judgment Day
C4 is a peculiar kind of “mine”, since it’ll only explode if you make it detonate with a Detonator. You can circumvent that fact by shooting them, or simply by putting a regular mine on top of them, following crudely here the modus operandi of a real-life detonator designed for inert explosives.
No mine is usable in VATS.
Pulse mine (same damage as Pulse grenade) < Powder charge (75) < Gas bomb (80 + 2 x 5 s) < Plasma mine (150) < Bottlecap mine (200) < C4 explosives (250) = Satchel Charge < MFC Cluster* (450) (6 sources of damage, meaning it can be reduced more by DT than a single explosion) < Fat mine* (450)
Noob tubes
Grenade and rocket launchers differ little in the way they work. Grenade throwers typically have a shorter range, with a projectile that is simply pushed out, while a rocket is self-propulsed and will go in a straighter line. Since those weapons follow a more-regular way of firing, comparison will be done here in DPS with reload taken into account, since those weapons can go from a one-shot use to automatic firing. Do not compare those values with other weapon lists, that would be pointless: just know that the Fat Man and the Missile Launcher are the weapons that hits the hardest in the game.
Important point with the Fat Man: there are two versions of it, the regular one and the (GRA) one. Only the (GRA) Fat Man can receive mods and modified ammo. Merchants don’t sell the mini-nukes that are needed for the regular Fat Man, and there are only like 10 mini-nukes total, so you can just sell without regret any Fat Man you find that doesn’t have (GRA) next to it. Ammo used is rockets, mini-nukes, 40mm grenades for the lesser grenade launchers and 25mm for the two best.
Grenade rifle (41.4) < Grenade launcher (57.4) < 25mm grenade APW (68.3) < Missile launcher (70.1) < Grenade machinegun (107.1) < Fat Man (275.2)
Stealth killing will be the adequate option if you prefer light armor. Melee is silent and does good on-hit damage. If your target isn’t instantly killed, stand up and hit it as fast as you can: your attack speed is way lower if you stay crouched.
All of melee weapons have a special VATS attack, that you can do with a Melee skill of 50, but that you can usually reproduce with a power attack while moving forward.
Seasoning
All melee weapons can be poisoned, even thrown ones. Tremble, if used against a weapon-holding opponent, is the most potent poison to use. Mother Darkness’s debuffs are pretty useless: AGL doesn’t change your movement speed, the skills debuff are just -6 to Guns, Energy weaps and Explosives. Poisons are otherwise rather easy to make and pretty useful on throwing spears, doubling their damage.
Tremble (-2 x 10) (-50 to every weapon skill) < Mother Darkness (-8 x 10) (-3 AGL, -3 PER) < Silver sting (-8 x 10) (-2 STR) < Bleak venom (-15 x 10)
One hand
Special attacks here are Back Slash for the bladed weapons (less damage for less AP, doable out of VATS by powerful attack + going forward) and Lights out for the blunt weapons (more damage for more AP, doable out of VATS same way).
Rolling pin (5.2) < Cattle prod (11.5) (-50 fatigue per hit) < Switchblade (14) < Cleaver (17.8) < Straight razor (18.5) < Knife (24) < Police baton (27.7) < Machete (33) < Tire iron (34.6) < Hatchet (40.6) < Combat knife (48.5) < Ripper (50) (ignores DT) < Dress cane (50.8) < Lead pipe (55.8) < Machete gladius (84) < Shishkebab (92.3 + 2)
Two hands
Most interesting part of two-hands handled melee weapons is the fact that they can stun your opponent (except for the chainsaw). To do so, either do their special attack in VATS (need Melee 50) or just do a power attack while moving forward (it’s only a stun chance, and the hit will do less damage).
Shovel (20.8) < Pool cue (23.7) < Baseball Bat (36.3) < 9 Iron (38.3) < Bumper sword (45.5) = Sledgehammer (45.5) < Rebar club (53.1) < Katana (71.1) < Chainsaw (80) (ignores DT) < Fire axe (86.8) < Super sledge (110.5)
No hands
Thrown melee weapons are the only way you can get some middle-range damage with melee weapons. Spears can be found on any Caesar’s recruit, but throwing hatchets and knives are much rarer. You’ll have to buy them from Chet of Goodsprings, or Blake of the Crimson Caravan.
Note that throwing spears do the most damage-by-hit. Hence they’re the weapon to use to decapitate a lonely guard with a Sneak Critical attack.
Throwing hatchet (17.6) < Throwing spear (30) < Throwing knife (48.2)
Unarmed weapons have a quite complex way to work, which kind of defeat their purpose. They have two special attacks in VATS (Uppercut at Unarmed 50, which increases damage, and Cross, which has a high chance to cripple limbs), and you can learn 4 new special moves among different factions. You can also stomp stunned enemies if you’re Unarmed 50, which does two times more damage than a regular attack.
Apparently using your bare hands to hit your target in the face has a chance to stun it, but I’ll have to check that.
Here’s a time as good an any to talk about fatigue damage: every NPC in the game has a Fatigue level, that works a bit like hp. Average NPC fatigue level is 250, and depends on END and on a base level (maximum is Lanius, with 910). Hit your target with a fatigue-damaging weapon, its fatigue will drop. If it reaches 0, it’ll be stunned for 30 sec. In that regard, the best item is the Golden Gloves (-50 fatigue each hit), and the most basic is the boxing tape (-20).
Boxing gloves (1.3) (-35 fatigue) < Boxing tape (5.1) (-20 fatigue) < Dog tag fist (31.6) < Brass knuckles (36.9) < Bladed gauntlet (39.1) < Power fist (43.6) < Zap glove (57.3) (additional damage against robots and power armor) < Spiked knuckles (59.2) < Displacer glove (68.) < Ballistic fist (87.3)
Of good ammo use
On their first playthrough, most players take a rather straightforward approach to ammunitions: take whatever you find since it’s weightless, shoot with whatever you have. If you’re loaded, good for you, if you’re not, loot some more guys till you are. On my first playthrough, I didn’t even bother to check how to diversify my ammo, aside from armor-piercing one because the little shield was annoying to see. But even here, on my third playthrough, I’m unable to determine if whatever bullet I pick could go in my main gun, or if I should sell it afterwards. You can afford to be careless in casual mode, but in hardcore mode, where everything has a weight, getting aware of the properties of different ammo types becomes essential to keep a tidy inventory.
.223 round / 5.56mm round : Marksman Carbine, Service Rifle, Varmint Rifle, Light Machine Gun, 5.56mm pistol . .223 does a bit less damage, but damages less your gun.
.22LR round : Silenced pistol, Silenced SMG
.308 round : Hunting Rifle, Sniper Rifle
.357 magnum round / .38 special round : .357 Magnum Revolver, Cowboy Repeater .38 does less damage to target and weapon.
.44 magnum round : .44 magnum revolver, Trail carbine
.45-70 Gov’t : Brush Gun, Hunting revolver
.50 MG : Anti-Materiel rifle
5mm round : Assault Carbine, Minigun . 5mm rounds are all armor-piercing, except the hollow point variety.
9mm round : 9mm pistol, 9mm SMG
10mm round : 10mm pistol, 10mm SMG
12.7mm round : 12.7mm pistol, 12.7mm SMG
12 gauge shotgun shell : Hunting shotgun, Riot shotgun, Sawed-off shotgun
20 gauge shotgun shell : Caravan shotgun, Lever-action shotgun, Single shotgun
25mm grenade : Grenade machinegun
40mm grenade : Grenade launcher, Grenade rifle
ECP : Gatling laser, Laser RCW, Tesla cannon (armor piercing)
MFC : Gauss rifle, Laser rifle, Multiplas rifle, Plasma caster, Plasma rifle, Tri-beam laser rifle (armor piercing)
SEC : Laser pistol, Plasma defender, Plasma pistol, Pulse gun (armor piercing)
Flamer fuel : Flamer, Heavy incinerator, Incinerator
Missile : Missile launcher
Fire damage isn’t reduced by DT or armor here.
+P : more damage, armor piercing, damages the gun
Armor piercing : less damage, armor piercing
Big Kid : more damage, shorter range
Buck : less projectiles, less damage
Buck magnum : more damage, armor piercing, damages the gun (same stats than Magnum, but with less projectiles)
Bulk : less damage to target and gun, higher DT threshold
Coin shot : more damage, armor piercing
Dragon’s breath : less damage, fire damage
Explosive : explodes on impact, can knock down targets
Flechette : less damage, armor piercing
High explosive : more damage, bigger radius
High velocity : projectile travels faster
Hive : contains 9 missiles
Hollow point: more damage, higher DT threshold (won’t damage armored targets)
Homemade : damages the gun more quickly
Incendiary (bullet) : fire damage
Incendiary (grenade) : less damage, lesser explosion radius, fire damage
JFP : more damage, armor piercing, more precise
JHP : more damage, higher DT threshold
JSP : more damage, armor piercing, damages the gun
Low yield : decreased damage and radius, can be shot further
Magnum (shell) : more damage, armor piercing, damages the gun
Match : more damage, more precise
Max charge : more damage, armor piercing, damages the gun
Optimized : more damage, armor piercing, slightly damages the gun
Over charge : more damage, armor piercing, damage the gun
Plasma : more damage, lesser explosion radius
Plinking : less damage, cheaper
Pulse : very little damage, huge bonus against robots and power armors, smaller radius
Pulse slug : less damage, more precise, one projectile, bonus against robots and power armors
Slug : more precise, one projectile
Surplus : more damage, damages the gun
SWC : more damage, armor piercing, damages the gun
Timed : explodes after 5 sec, not on contact (can bounce)
Tiny tots : contains 9 mini-nukes
You’re not my friend till I shoot you in the back
Compared to games like World of Warcraft, it’s not hard to get Exalted/Idolized with all relevant factions (Powder Gangers aren’t a relevant faction).
It’s often believed that you can’t get all the safehouses in the game (Followers of the Apocalypse, Legion, NCR and Brotherhood of Steel), but I could rather easily get all of them in both my playthroughs.

- Give the drugs you don’t want to the Followers of the Apocalypse, and follow their few quests. You’ll have to become Idolized, then go talk to Julie Farkas.
- Legion quests should be enough to make you Liked by them. Then, go talk to Lucius, who is sitting behind Caesar. I strongly recommend to become Idolized by the Legion. In most cases (3 endings over 4) you’ll become hostile towards the Legion as you progress on the main quest. If you are only Liked by them, or if you kill too many Legionnaries after Legion stops dealing with you, Legion hit squads will try to eliminate you every once in a while, and they’ll hit hard, most of the time killing your companions. To get easily Idolized, bring NCR Dog tags to Aurelius of Phoenix at Cottonwood Cove. There, GIVE 5 DOG TAGS TO DECANUS SEVERUS AND ASK HIM FOR SOME FOOD. Reputation values are bugged and are only slightly proportional to the number of dog tags you give, 5 for food is the best ratio you can get.
- Simply follow the NCR quests to get Liked by them (don’t go too high on the main quest), then talk to Colonel Hsu at McCarran.
- Get Veronica as soon as you can, then muzzle her annoying voice with a Legion mask. Follow her companion quest to get easily into the Brotherhood of Steel bunker. Finish the Still in the Dark quest to get the key. Then lock up Veronica in the Ultra Luxe fridge. The Veronica points must be followed for proper roleplay, and not respecting them may conduct to invalidation of the Hardcore achievement.
Some companions won’t be your friends if you’re liked by the Legion (Arcade Gannon, Boone). Trick them into liking you by wearing a NCR uniform while asking them to join you. Then remove it, and reveal the horrible truth to them.
Since we’re talking about safehouses, the Presidential Suite in the Lucky 38 is NOT a good place to store your food items : any companion you sent there holds a grudge against you for making his/her/its daily life resumed to walking around in a hotel suite, and WILL eat/drink the items you put in the fridge, or even let on the floor.
Until you get the Big Mountain Transportaltapaonder, I recommend the Fields’ Shack, which is on the way to the Nellis Air Force Base. It has a firecamp, containers, isn’t surrounded by hostile creatures, and two junkies spawn in front of it that make handy target practice.
That’s it! You now have a lot of friends! (Powder Gangers aren’t people, they rank lower than animals and HAVE to be shot on sight)
Having a gun is one thing. It doesn’t make you violent, it makes you able to defend yourself. Being greedy is another thing. You’re not necessarily a thief if you want something, and the thing is just lying there, belonging to no one. On itself, being a sociopath can be difficult, but you still can live. You don’t see people as people, but you’re still an intelligent man, and you know very well the consequences for hurting, or killing someone, would be bad for you. And even If there were no consequences, you still wouldn’t do it : you don’t necessarily find it useful, and it would be difficult to do so.
You now see clearly where I’m going : the Wasteland is full of mindless people that carry lot of stuff you want, and being all oblivious to the fact that you’re the only real human being in the universe make them not willing to give you their valuable possessions. We’re not going to persuade them, we’re not going to steal. We’re going to kill them, you and I, and we’re going to take what must be ours.
Members of Legion and NCR very often carry useful stuff. Legion scouts are a good supply of Antivenom and Throwing Spears, which sell for good money. NCR recruits carry rifles that often go for more than 300 caps, and NCR Dog tags don’t grow on trees. But assault on members of those two factions will lead to an entire army suddenly turning on you, and while we don’t necesarily see the point in keeping our friends alive, we still want them to be our friends!
In order to kill NCR and Legion members without losing faction reputation, you’re going to have to stealth kill them, that is killing them while being hidden with a silent weapon. Ratslayer[fallout.wikia.com] is an excellent rifle in this respect: it’s silent, has a scope, isn’t too hard to get and has high crit multipliers (which affect sneak attacks). Go find it in the Broc Flower Cave (giant rats in there are rather dangerous, and can kill your companions), and try it out in the Legion Raid Camp nearby. Aim for the head, and shoot only when you’re hidden. The shot is silent, so Legionnaries won’t react, even if your target was talking to them when its brains suddenly blew up.
An even easier silent rifle to find is the Abilene Kid LE BB gun (found in the Fields’ shack I already mentioned). It has no scope and isn’t very precise, but has absurdly high sneak attack damage (every sneaky headshot is lethal), and has a weight of only 1.
You won’t get karma losses if you kill NCR or Legion members (I think you even win Karma for killing the latters); Killing prospectors or merchants is also totally okay, since they don’t belong to any faction and respawn. Sell your useless stuff to the merchants before you shoot them.
♥♥♥♥ Cheat Sheet
Listing the ingredient list for each and every item in the game would be rather tedious and redundant, since you can find them all in the wiki, or in-game. So I decided to list what you must take, in an order of priority.
The list assumes you’re going to cook food, craft some ammo, Weapon Repair Kits, Doctor’s Bag, medicine, and some basic explosives (not those of the Mad Bomber perk). This won’t be about tanned hides, armors, poisons, or weapons. You’re supposed to pick everything weightless, and to decide by yourself what you should keep to resell later.
Banana yucca fruit
Barrel cactus fruit
Bighorner meat
Bloatly meat
Brahmin meat
Broc flower
Buffalo gourd seed
Dog meat
Duct tape
Empty soda bottle
Empty Sunset Sarsaparilla bottle
Empty syringe
Forceps
Gecko meat
Honey mesquite pod
Jalapeño pepper
Medical brace
Nevada agave fruit
Prickly pear fruit
Scalpel
Scrap electronics
Scrap metal
Sensor module
Surgical tubing
Vodka
White Horsenettle
Whiskey
Wine
Wonderglue
Wrench
Xander root
Beer
Brahmin steak
Cave fungus
Cazador poison gland
Coffee mug
Cram
Egg timer
Fire ant meat
Flour
Fresh apple
Fresh pear
Fresh potato
Gum drops
Instamash
Leather belt
Lunchbox
Maize
Mole rat meat
Mutant Cave Fungus
Mutfruit
Nuka-cola
Pilot light
Pinyon nuts
Pork n’ Beans
Radscorpion poison gland
Sugar bombs
Tin can
Turpentine
Ant egg
BlamCo Mac & Cheese
Butter knife
Crunchy mutfruit
Deathclaw egg
Empty whiskey bottle
Fission battery
Fork
Large whiskey bottle
Metal cooking pan
Metal cooking pot
Metal spoon
Pot
Tin plate
Yeast
Coffee pot
Glass pitcher
Book (every pre-war, burned, destroyed, ruined or scorched book)
Bottle (every empty bottle, plus Milk bottles)
Camera
Clipboards (Earnings, Finance, Medical or regular clipboards)
Coffee mug
Coffee pot
Hot plate
Iron
Plate (every kind of plate)
Toaster
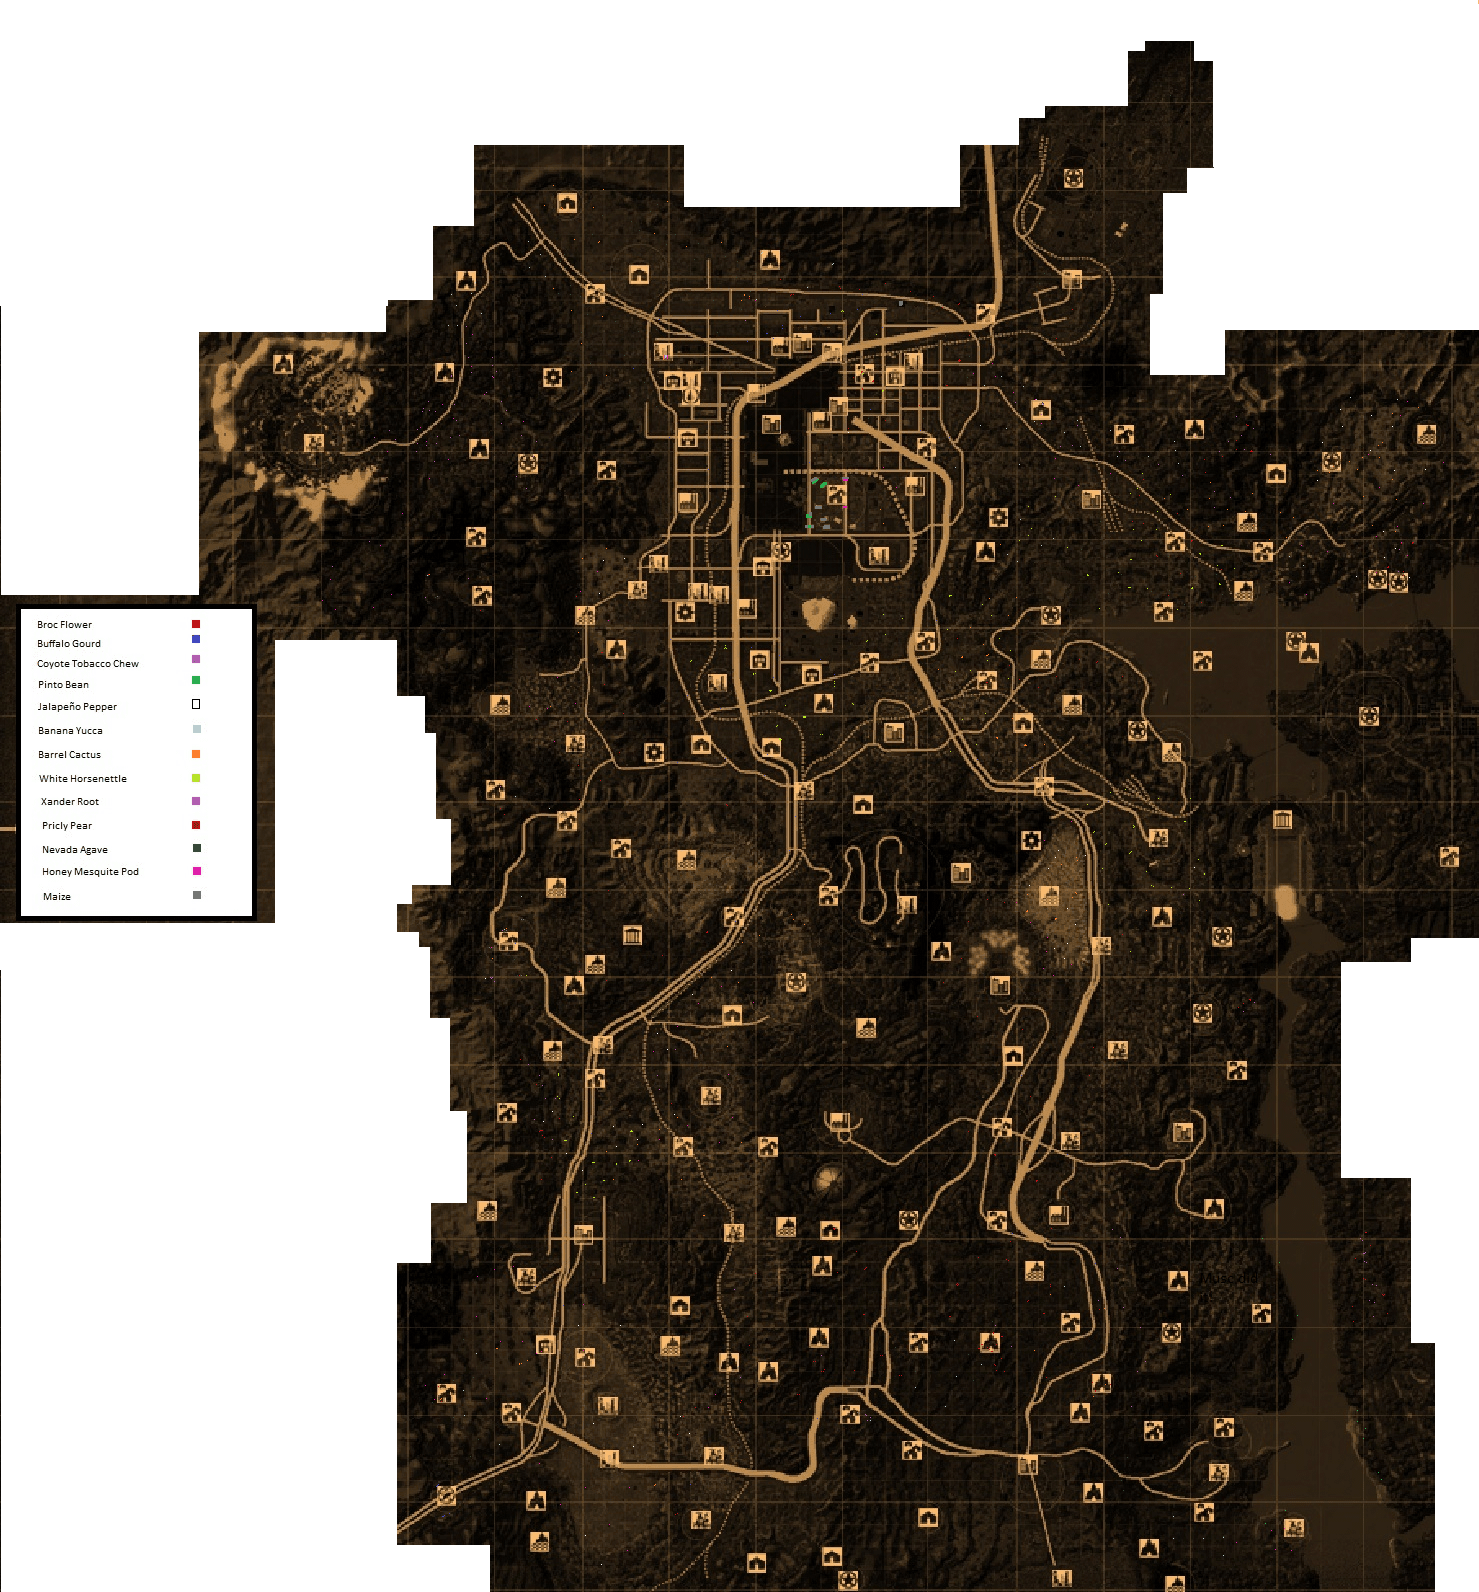
In addition, what I believe is the only map of plant locations in the Mojave Wasteland. It’s hard to keep image quality when the picture basically consists of little dots of color slightly different from each other, so copy the link adress of the picture to see it in its original size (or use this link). Each Nevada agave, Prickly pear and Pinto bean come 2 per plant.
Pointless trivia and unmemorable facts

Those facts are knew by few people (other very good guides describe and list easter eggs and Wild Wasteland effects) and will never be of use in your playthrough.
Some can be surprising enough, and I feel like sharing here some of my observations on New Vegas DLC’s themes.
Suggestions welcomed, if the phenomenon is curious and unique enough!
- Playing the game with an INT of 1 gives you various unique changes in dialogues, most of the time mispronounciations of complex words. The effect isn’t as marked as in FO1 and FO2, but it’s there!
- I believe there is an important association between OWB and The Wizard of Oz, I’ll detail this in some kind of chart
- It is possible to end Dead Money by siding with everyone. Yes, even with Elijah and Dean Domino. You’ll have to be Vilified by NCR and never disagree with Dean (that means not passing a certain skill check dialogue with him where you’re threatening him).
- You can tip Brahmins. Crouch, get next to one, activate it, and your character will push it over.
- If wearing an outfit with no shoes (or no outfit), a female character will uncontrollably tiptoe
- In DM, if you redeem an outfit you’re wearing with an AGL bonus in a Sierra Madre vending machine, the bonus will stay permanently (same effects as if you kept wearing it, which means won’t let you get new perks).
- “DHG” (?) Scary tells me that, when refusing FISTO’s services after recruiting it(/him?), you’ll receive 10 caps, and can repeat this undefinitely. No less, no more!
All cut dialog can be found here: [link]
Coming eventually
- A chapter on Monsters
- A chapter on sleep