Overview
This guide will show you how to get ALL of the Transformation scenes as well as overcome the many obstacles that you will face.This guide is for the beta Special version of Changed. What is Changed-Special? Think of it as a remastered version of the original Changed. This version of the game is still in development. Will only cover publicly released to Steam stuff.Currently this guide is up-to-date as of Nov. 1st, 2020.
Introduction
Welcome to my in-depth guide for Changed-Special! This guide will show you how to get through all the obstacles of the game as well as every transformation scene.
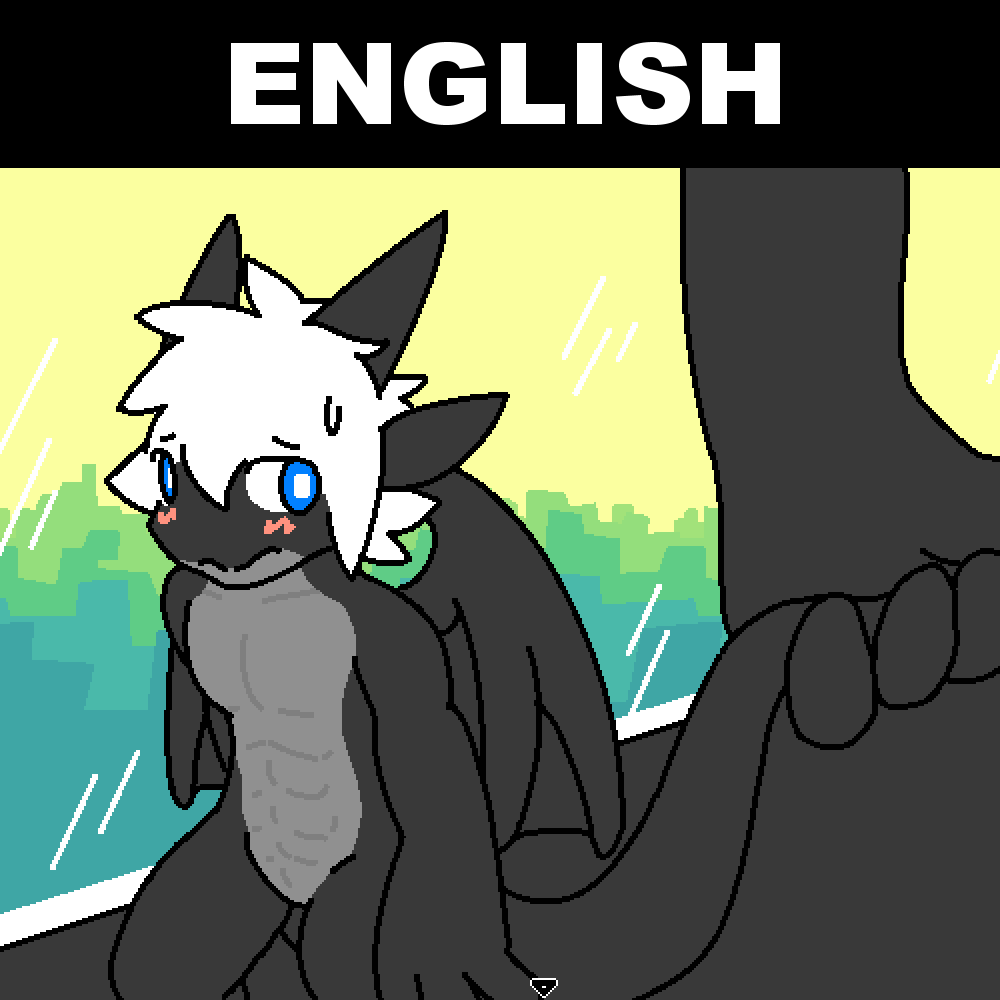
***This guide is for the English version of Changed-Special***
!!!!!!!This guide is for Changed-Special only! If you want a guide for Original, I do have one!!!!!!!!
Special is a remastered version of the original. While it still follows the original, you’ll find improved sprite animations, more polished environments, and additional rooms, enemies, and obstacles.
Each transformation now has a unique aftermath picture that is different in each room. So reoccurring enemies will now give you different TF pictures in other rooms.
There is now an overarching antagonist in the form of the “Mysterious Doctor” who will taunt you and try to thwart your progress throughout your entire journey.
The developer seems to be much more generous with the save points, pretty much giving you a save at almost every obstacle.
The English translation, while not perfect, is much improved compared to the original.
Overall, the experience seems much more polished and thought out. Difficulty-wise, seems a bit easier than the original, though still some tricky bits.
First, you must already own the original Changed.
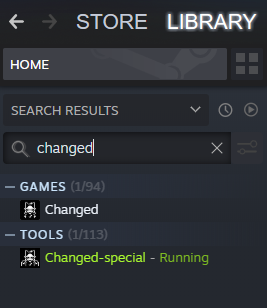
On Steam, go to your “Library” tab. In the library search box, type in “Changed.” In the search results you should see “Changed-Special” under “Tools.” And from there you can download it and play it.
Don’t worry, it’s free.
The entire game is played using your keyboard. Your mouse is not used at all. (Also, having a pen and paper is handy for solving the cryptic password puzzles in some areas).
Arrow Keys: Movement / menu navigation
Shift: Hold to run
Z / Enter: Interact
Space: Interact, also used in quick-time events
X / Esc: Exit selection
F12: Return to main menu (useful for skipping transformation scenes)
F1: Game properties menu
F6: Toggle between 3 windowed-mode sizes
Alt+Enter: Toggle between Windowed and Full Screen mode
On the title screen you’ll have three options.
Wake will start a new game.
Load will bring you to the 99 save slots.
Exit will exit and close the game.
There appears to only be one difficulty. No option to choose will ever come up.
I will be listing all the possible transformations you can get in each room, so feel free to read ahead if you want. I’ll only be listing transformations that you haven’t encountered before, as some of the transformations are just duplicates of one’s you’ve already seen. Most of the enemy names are plucked straight from the original Changed credits gallery while other transformations are simply my own description of what happens. “TF” is shorthand for transformation.
Some transformations are the same as the original game. But any new ones or any original ones with new aftermath pictures will have “(NEW)” next to it.
PART 1: Hibernation Cabin Zone
First Room
A brief power outage will wake you up from your hibernation. The room features a locked door at the bottom as well as some notes that will explain the controls and provide some story stuff.
You can trigger the first possible transformation in game by interacting with the white goop on the back wall a few times.
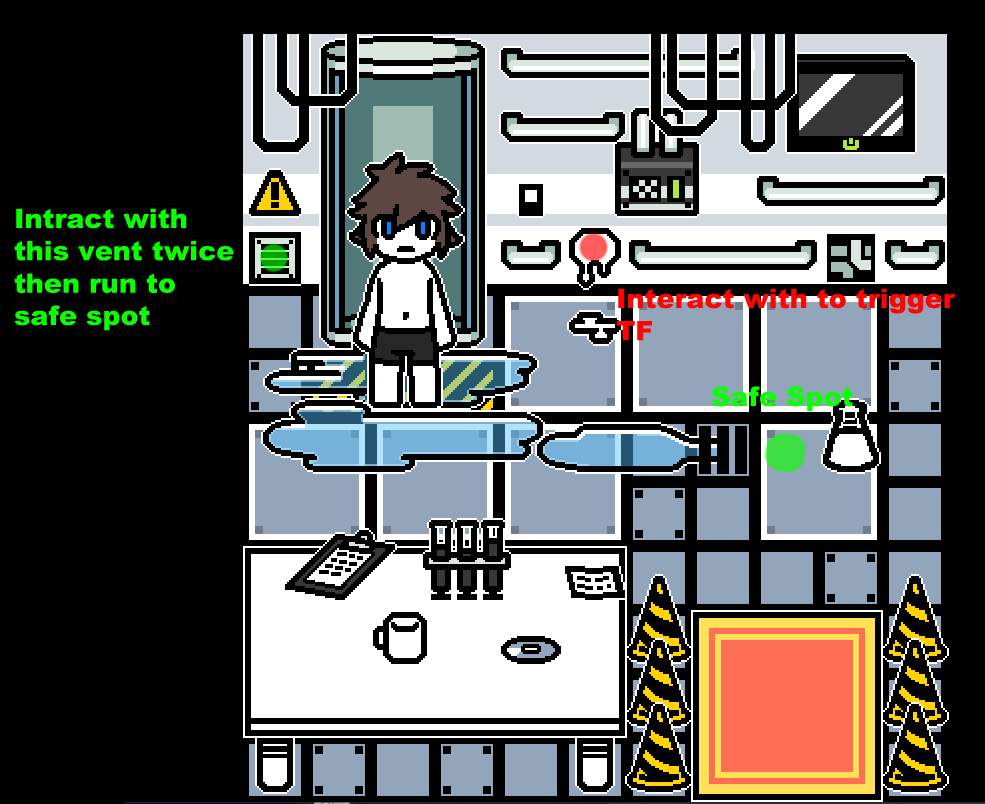
Familiarize yourself with controls and move up to the top left side of the room to a vent and interact with it 2 times. Immediately run out and position yourself on the right side of the drain in the middle of the room. A glob of white latex will pop out and try to chase you, but if you are behind the drain it will fall in and go away. Head back up to the open vent and you’ll find a switch inside that opens the door for you.
TFs:
1. Gooey human: Interact the white goop on the back wall a few times. Must be done before you trigger the latex goop from the vent. The TF will resemble a melty version of your human self.
2. White Latex Wolf: Get caught by the goop that comes out the vent after you interact with it. Scene will feature your newly transformed self at a table looking curiously at his new hand paw.
Tip: I recommend reading all the notes, pictures, and signs. Sometimes you’ll get to see pictures of previous latex creature experiments as well as subtle warnings of suprise TF’s coming up. The story plays out like a mystery, and the notes will help hint at what happened to the laboratory and outside world while you were hibernating. Although some of the notes can extremely difficult or downright impossible to get to due to pursuing enemies, so dont fret if you miss a few. The story isnt that deep and all the photos will be available in the credits gallery at the end.
Hibernation Cabin Corridor
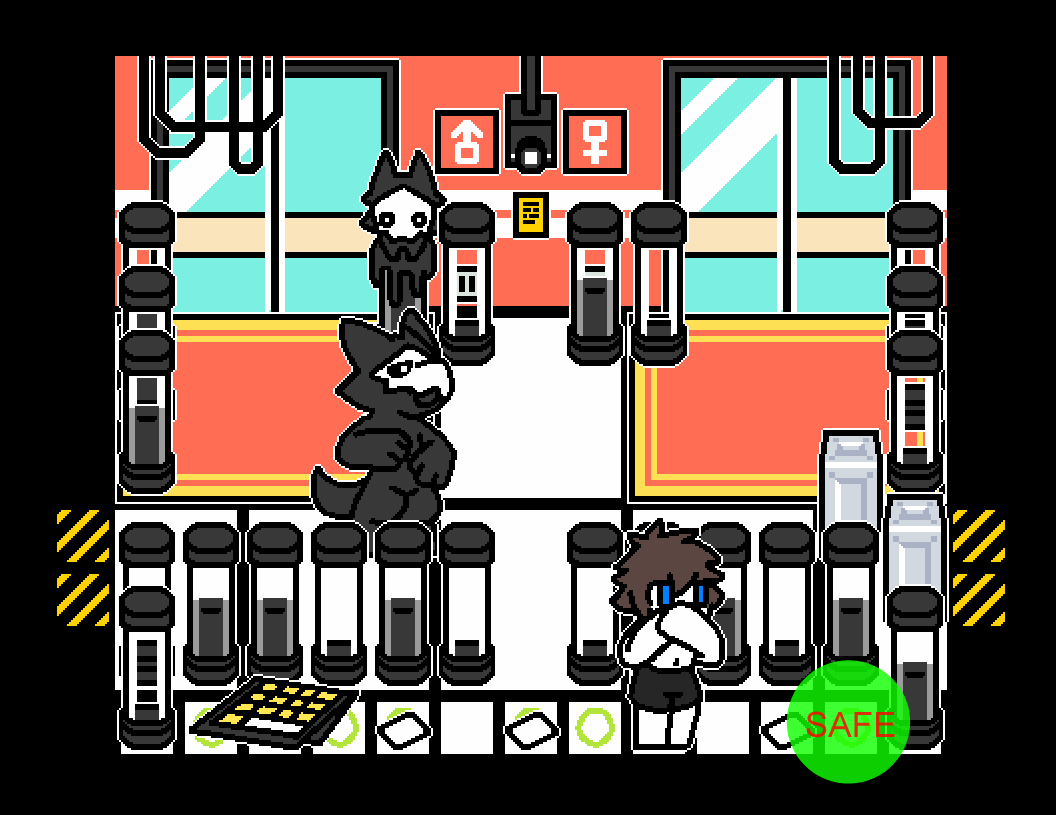
You’ll find yourself in a long wide corridor with doors to the right, left, and all along the top. Go to the right for your first save point (reddish looking computer box on the wall). There’s also a panel that you’ll have to enter a password in to advance. The door to the far right is the one you want to open, and the other doors don’t really lead to anywhere other than some deaths and story stuff (unique TF’s listed below).
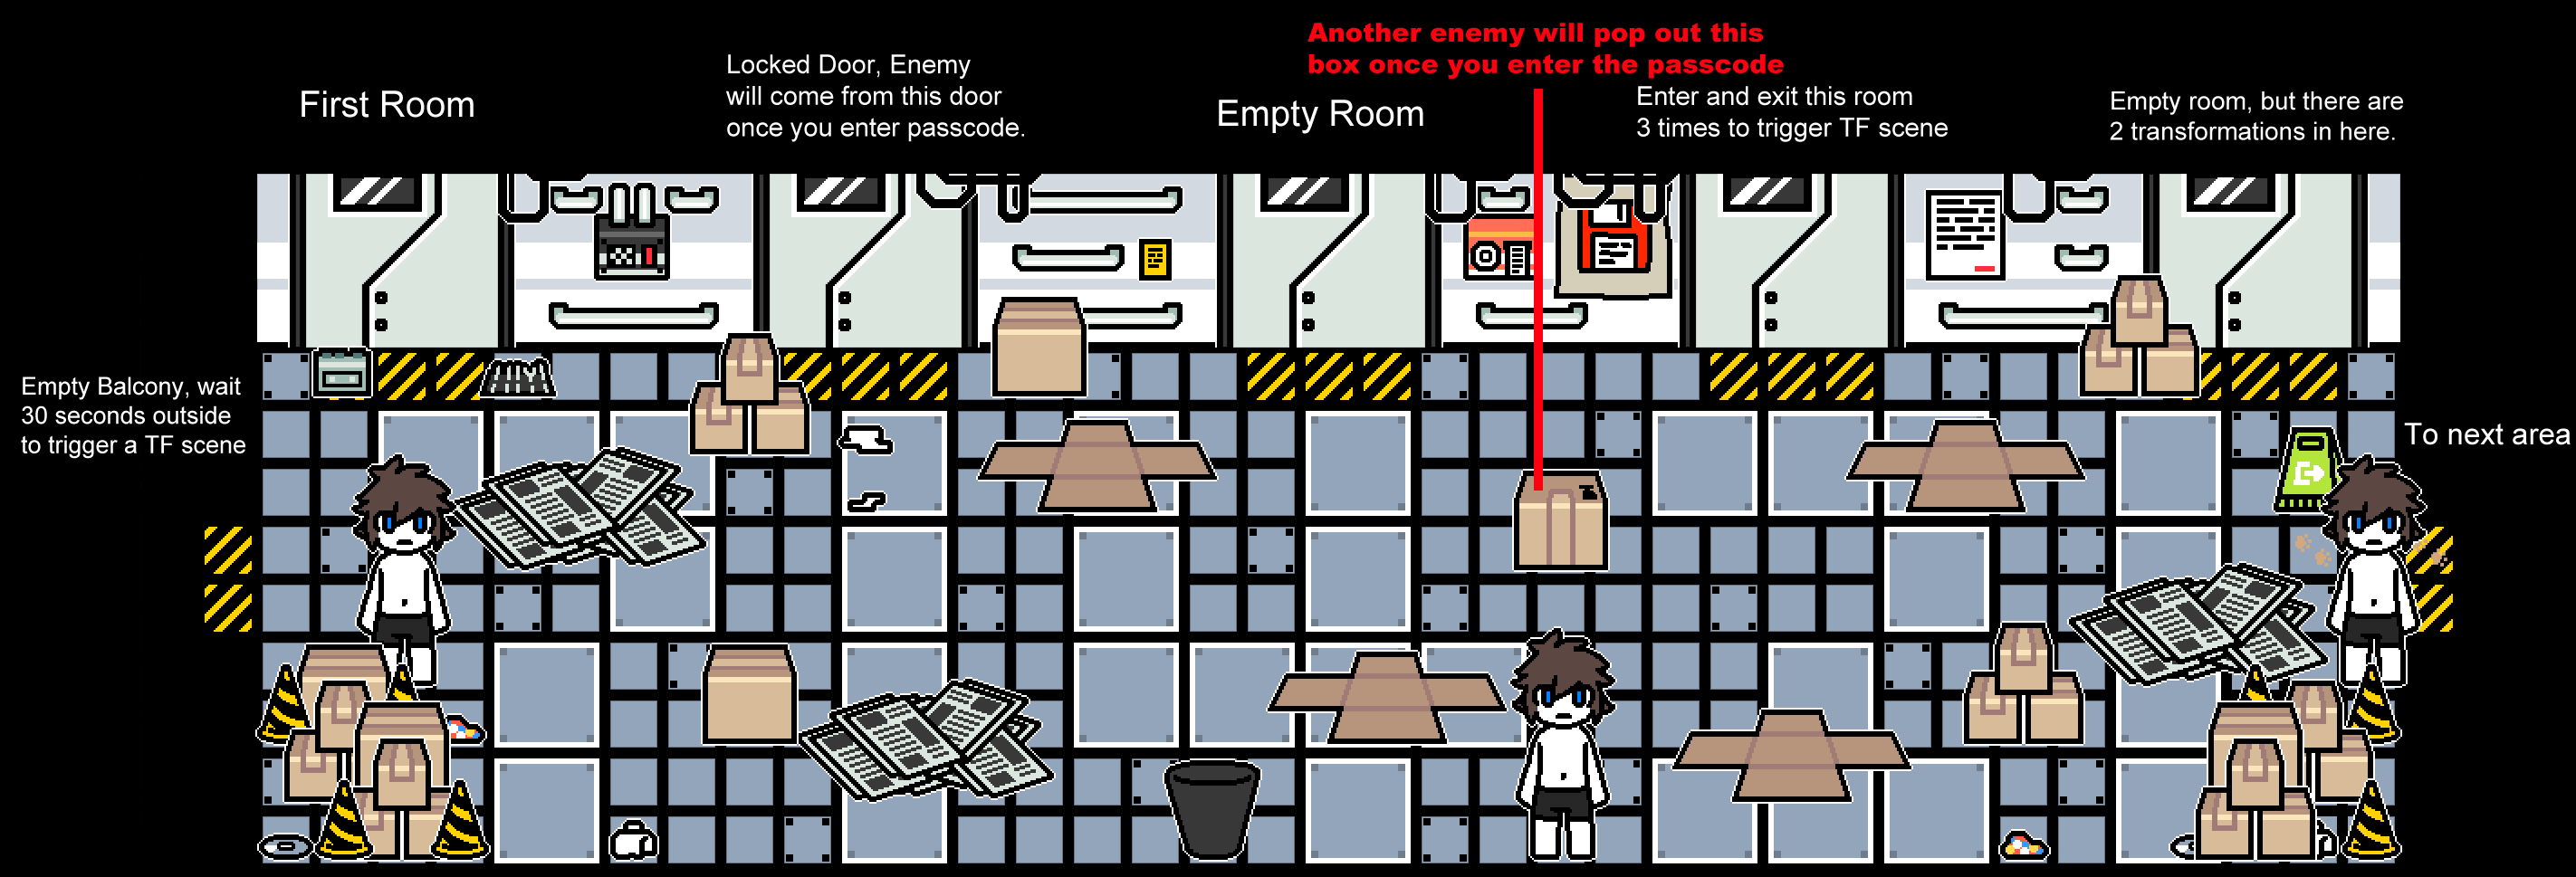
The password hint can found by reading the yellow note in the center of the room. To get the password, you can clear out all the debris in the room. Look at the floor tiles, and larger ones should resemble big numbers running across the room. Those numbers are the passcode. Type in the password 71421 and get ready for your first chase.
Tip: For the password puzzles in the game, you are able to enter the passcode and proceed into the next area if you already know them. You dont have to go to certain places to trigger the game to let you advance as far as I know.
Another Tip: Save your game often. Getting transformed will send you back to the title screen where you’ll have to continue from your save slots.
TFs:
1. Civit: Stand on the balcony through the west door for 30 secs to trigger. You’ll become a dusty colored feline.
2. White Wolf 1: Enter and exit the 4th door from the left to trigger it. Will show a scene of you with your back against the door getting attacked by a large mass of white goop. Result will be your transformed self hugging their new large tail.
3. (NEW) White Wolf 2: Get caught by the white goop enemy in the 5th room from the left. Result will be your character standing there looking pleasantly at their new hand,
4. (NEW) Extra Fluffy White Wolf: Also in the 5th room from the left. Interact with the white “star” shape in the upper left corner. A second goop enemy will show up in the room. Getting caught will cause both enemies to goop up on you at once. Result will be an extra fluffy wolf looking at both of his hands.
White Knight Chase
Upon inputting the passcode, the locked door at the top will open and a light latex monster will hop out and give chase. Use shift run to get to the eastern door to escape from it into the next area. While running, beware of a white latex glob that will jump out of the box in the center of the room and try to catch you as well.
TFs:
1. White Knight: Get caught by the monster who emerges from the door after you enter the passcode. Result will resemble a canine centaur.
2. (NEW) White Knight+White Goop Combo: Get caught by the goop enemy that pops out of the box during the chase. The goop will start to coat you, then the chasing monster will come up and also goop around you. Result will be a bipedal 4 eyed version of the White Knight.
Cat Room
Save your game using the save point at top. In this room, there’s a sleeping cat on pillow and boxes all over the place. The brown boxes are moveable simply walk into them while hitting an interact key. Move some boxes around and once you step on the tan latex puddle the cat will awake and begin to chase you.
The room is filled with large obstacles. Luckily the cat doesn’t know how to walk around stuff. If you’re behind an object and the cat is on the other side, you’re safe. You’ll have to get over to the upper right of the room. The trick is to wait until the cat gets sad and walk slowly then quickly move over to the next safe zone. Make sure you always keep the cat on the other side of the obstacles from you. Some of the tan goop piles are unavoidable but whenever you can try to avoid them. Once you’re on the far right wall, just move a couple of boxes and enter the next area.
(Blue Path) Alternatively, you interact with the note and string right next to the cat bed, that will pull down a cardboard monster distraction that will scare the cat. While the cat is scared, you can run all the way to the exit with out worrying about the cat chasing you. While in that first safe zone, you’ll have to wait until the cat gets sad and moves slow, then bait it to running walking down on the left side so you have enough time to interact with the note.
Tip: Walking on any of the tan goop puddles will cause the cat to rapidly chase you again.
Also, try to stand in the middle of each safe zone while waiting. If you’re close to the edge, the cat is too and will be able to catch you after you try move to the next safe spot.
TFs:
1. Ming Cat: Get caught by the cat. End result will be your transformed self lounging on the pillow
Hallway
Save your game (as always) and proceed to the right. The second you try to pass the vent it will trigger your first quick time event. Mash the Space Bar on your keyboard or you will eventually be transformed into a white latex wolf. Then proceed to the next room by heading east. The door on the bottom is lock, so dont worry about it.
TFs:
1. White Latex Wolf: Fail the quicktime event. You’ll be on all fours wagging your tail.
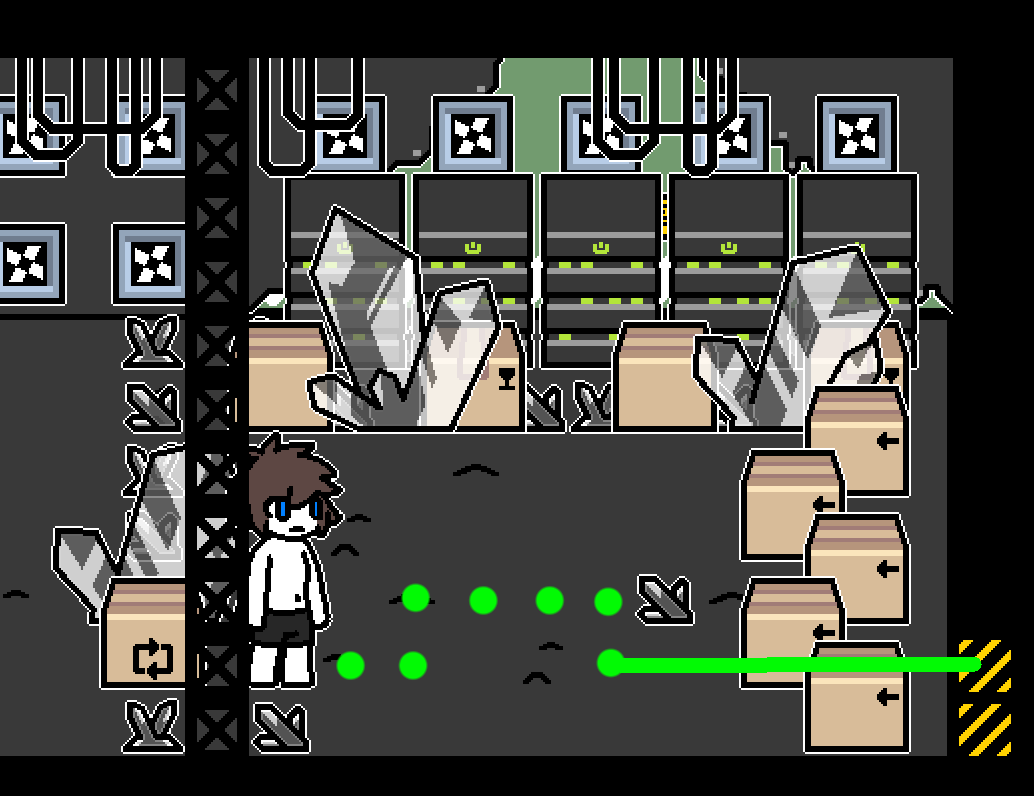
Doctor’s Laser Trap
You’ll find yourself in a dark looking industrial room. A mysterious doctor will begin to speak to you on the intercom. He’ll then activate a laser trap that you’ll have to avoid. For each step you take the lasers will move. So you’ll have to take this one step at a time. The best way to get through is as follows.
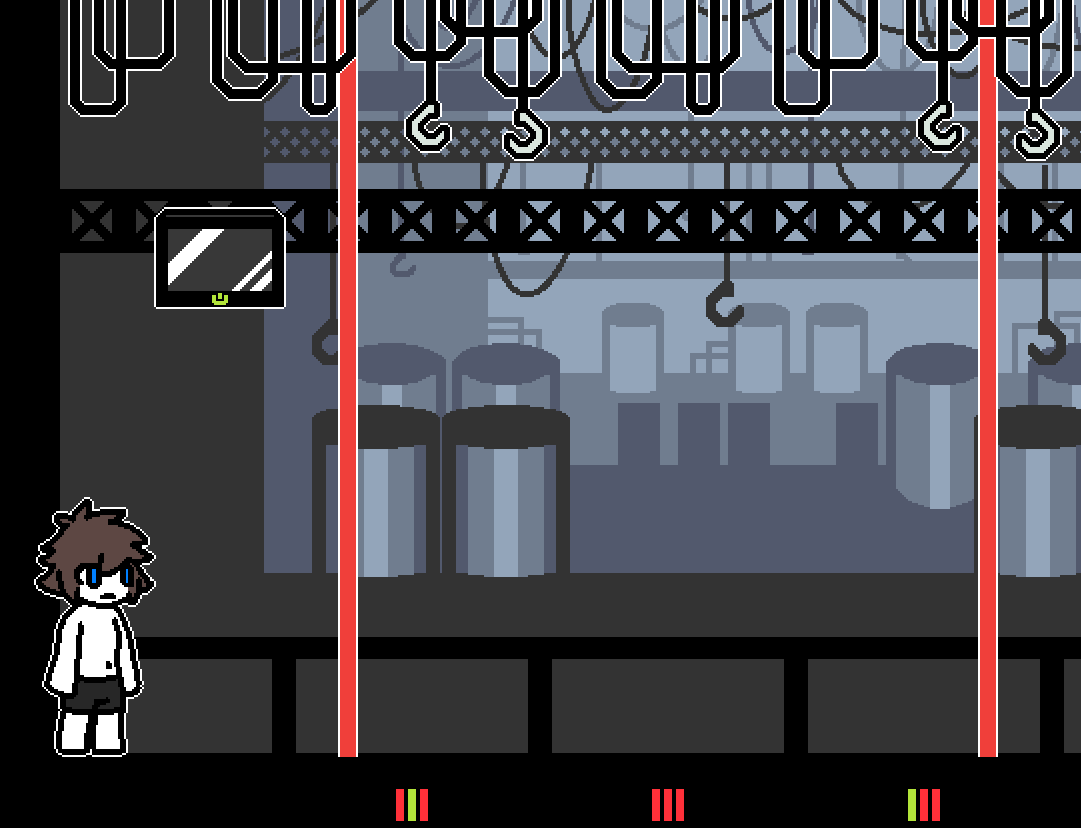
From where you start, move:
Right 3 spaces, then left 1
Right 6 spaces, then left 1
Right 12 spaces, then left 1
Finally, just move right the rest of the way.
TFs:
1. (NEW) Black Restrained Canine: Get caught by laser. You’ll get gooped up into a black latex canine that’s restrained by their own goop. A blindfold will form and cover your eyes as you struggle.
The next room is just a long hallway with nothing of note. Just continue into the next area.
PART 2: Black Latex Wolf Den
In this first room, not much to do other than save your game. You’ll notice that the lights are flickering off and on. Take note of this as it will play a big role during the next few rooms. Continue to the next area or search the boxes at the bottom for a werewolf TF scene.
TFs:
1. Werewolf Injection: Search the box in the room. You’ll get poked by an old syringe in the box and transform into a brown werewolf.
Flickering Office Area 1
In the next room, it is very important that you don’t run (DON’T PRESS THE SHIFT KEY). The enemies in this room are attracted by both sound and movement. In this room there will be 2 stationary black latex wolves.
You’ll have to sneak by them. Remember, they can only see movement when the lights are on. If the lights flicker on, you’ll be safe if you stand still, even if you’re right in front of them. So, only move when the lights are off. Also avoid stepping in the black latex puddles on the ground, they will make noise and cause the enemies to attack.
Get past the first 2 enemies. But be careful! As soon as you get close to the next door a 3rd wolf will walk out of it right in front of you. Sneak past it into the next room whenever the lights go off.
TFs:
1. Black Latex Wolf (M): Get caught by the black latex wolf. You’ll be seen as a black latex wolf on all fours with the enemy standing behind you.
2. (NEW) Black Latex Wolf (F): Get caught by the female version of the black latex wolf. (Shoulders are less broad and arms down by the side compared to the male enemy). Your transformed self be looking down happily at your new breasts.

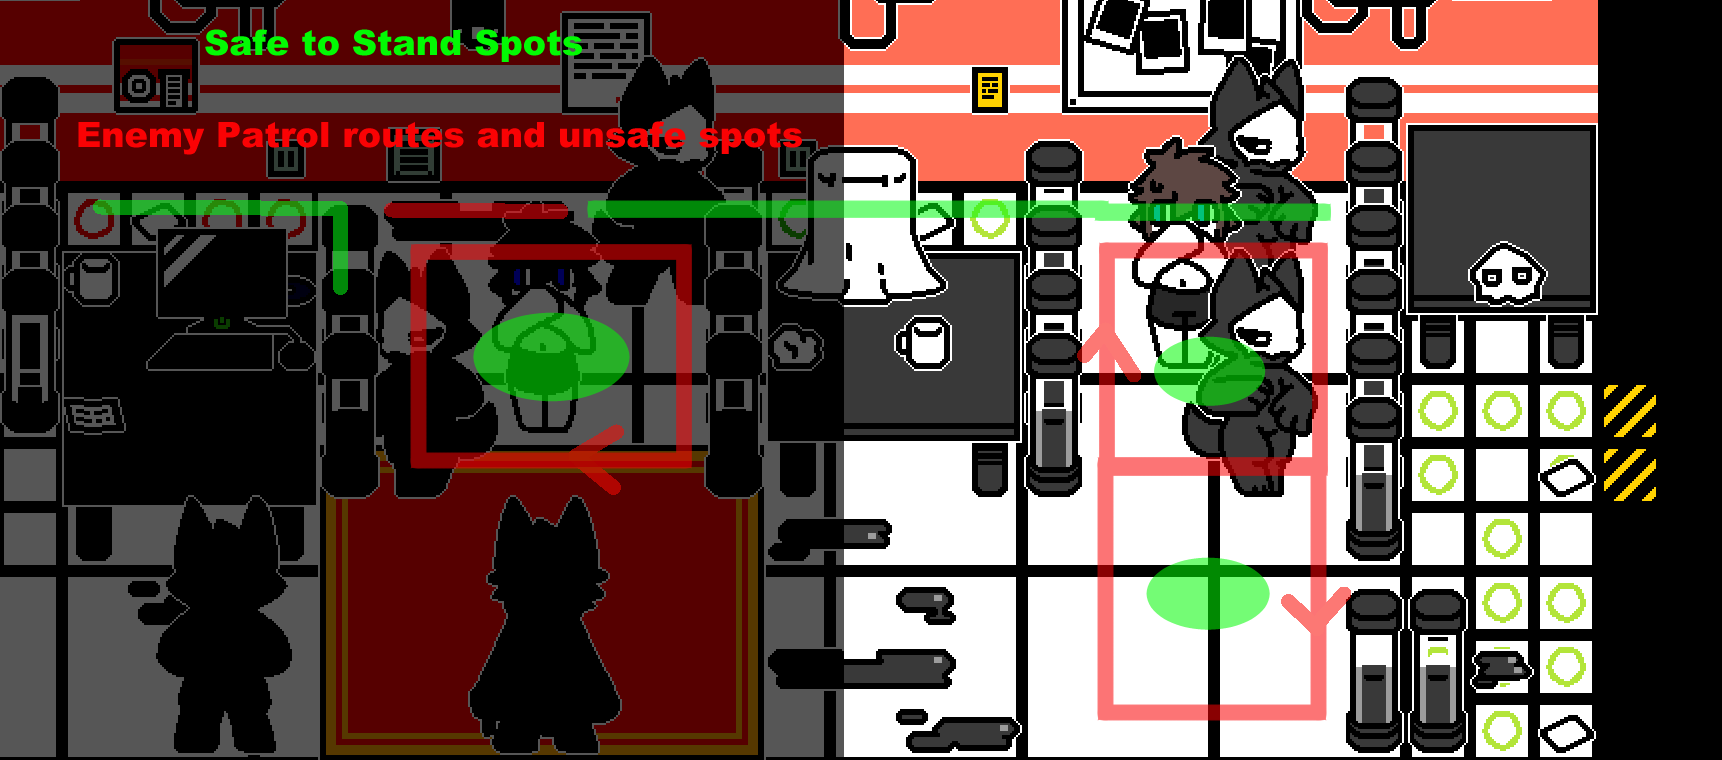
Flickering Office Area 2
In this room the same tactics apply. This time you’ll have several stationary monsters as well as ones that are walking around in circles. Carefully make your way up to the save point. Time the patrolling one’s pattern with the with the lights and go to the save point and save. From the save point head eastward along the top of the tables. You’ll encounter 2 wolves patrolling. I find the best way around them is to walk and stop in the middle of each one’s circular patrol route. Once you get past them, proceed to the next room. Interacting with the mask on the table will transform you.
TFs:
1. (NEW) Black Latex Wolf: Get caught by any enemy. Aftermath pic will show you as a transformed wolf with all the other wolves reaching their hands down at you.
2. Skull Mask: Interact with the mask on the table. You’ll get a scenes of the mask latching onto your face and transforming you into one of them.
Pillow Room
Nothing dangerous here, unless you decide to shift run or disturb the sleeping wolves. Proceed into the next room.
There is a puppy sleeping on its back in the center of the room. If you interact with it, you can pet it. Don’t worry, it won’t wake up and attack you no matter how many times you pet it.
TFs:
1. (NEW) Black Latex Wolf: Run in the room and get caught. You’ll become a blue-eyed black latex wolf lounging happily on a pillow.
Bathroom Area
You’ll be in a room with a door to the right that’s blocked by heavy metal boxes as well as doors to a men’s and women’s restroom. There’s save point in the women’s room while the men’s room appears to be an empty room at first glance. Running in any of the restrooms will cause enemies to jump out the stalls and attack you. Avoid the puddles with the spike as well.
You’ll need a strong male wolf to move those boxes for you. Enter the male restroom. Don’t do anything. Wait for the text box to go away. Then Shift-Run immediately out of the men’s room. As you leave, the 2 male wolves hiding in the stall will have jumped out.
Back in the restroom lobby area, walk (don’t run) down to the bottom of the screen behind the test tubes and get to the far right corner. On your way down to the safe spot, a male wolf will emerge from the men’s room and begin to sniff around. Make sure you’re only moving when the lights are off. Once in your safe spot, just wait for the wolf to get over to the boxes and move them. Once he leaves, enter the next room.
TFs:
1. (NEW) Black Latex Wolf: Get caught by any of the enemies. It will be a mid-transformation shot of you on all fours with your lower half covered while a mask latches onto your face.
2. (NEW) Black Latex Puppies: Move into any of the puddles with the spike in them. You’ll turn into 4 puppies.
Flickering Office Area 3
Upon entering, you’ll notice a wolf suit hanging on a rack. Put it on, you’ll be safe to do anything. You can walk on puddles, walk into enemies, and even shift run but nothing will happen to you. You’ll be free to just walk to the end of them room. The mysterious doctor will have a few words to say with you on the intercom as you move on.
This room can be done with out the suit. Though it will become a bit harder. Even if you’re sneaky, the doctor’s voice will alert all the enemies in the room and you’ll have to run to the end.
TFs:
1. (NEW) Black Latex Wolf: Don’t put on the costume and get caught by an enemy. It’s a mid transformation scene. You’ll be sitting on the ground, struggling with the goo as the mask latches to your face.
Lab Room
Save the game and head over to the door on the right. Before you get there, a quicktime event will occur. Mash that Space Bar to get out of it. Then move on to the next room.
TFs:
1. Yu Feng Cub Attack: Fail the quicktime event The result will turn you into a Yu Feng (Adult) sitting on the floor wagging it’s tail.
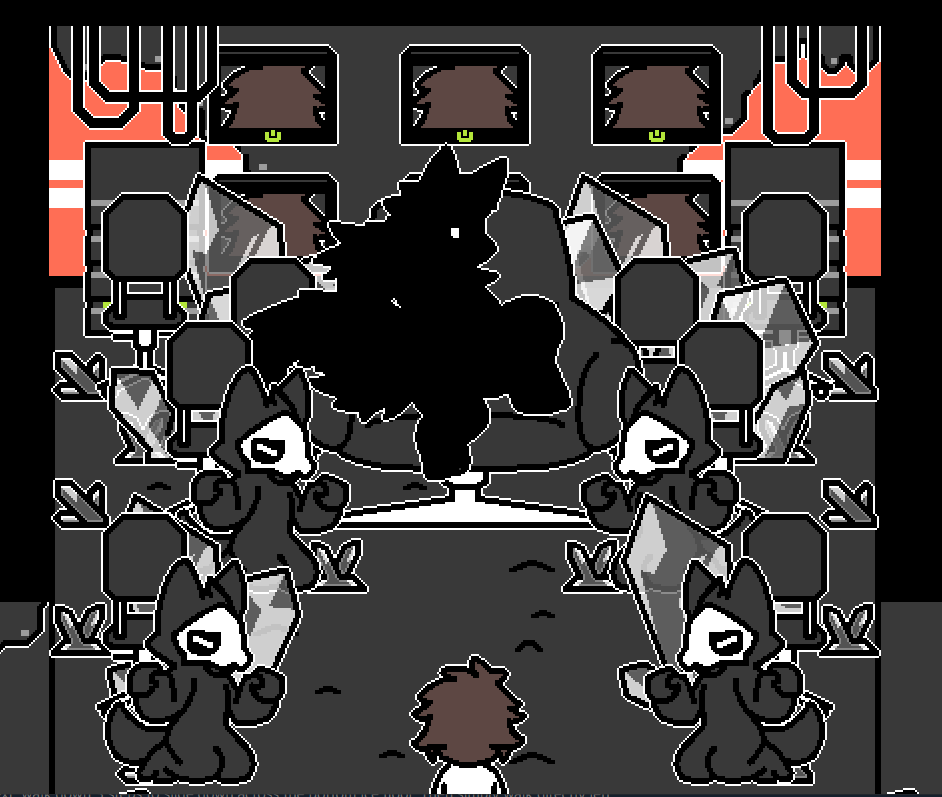
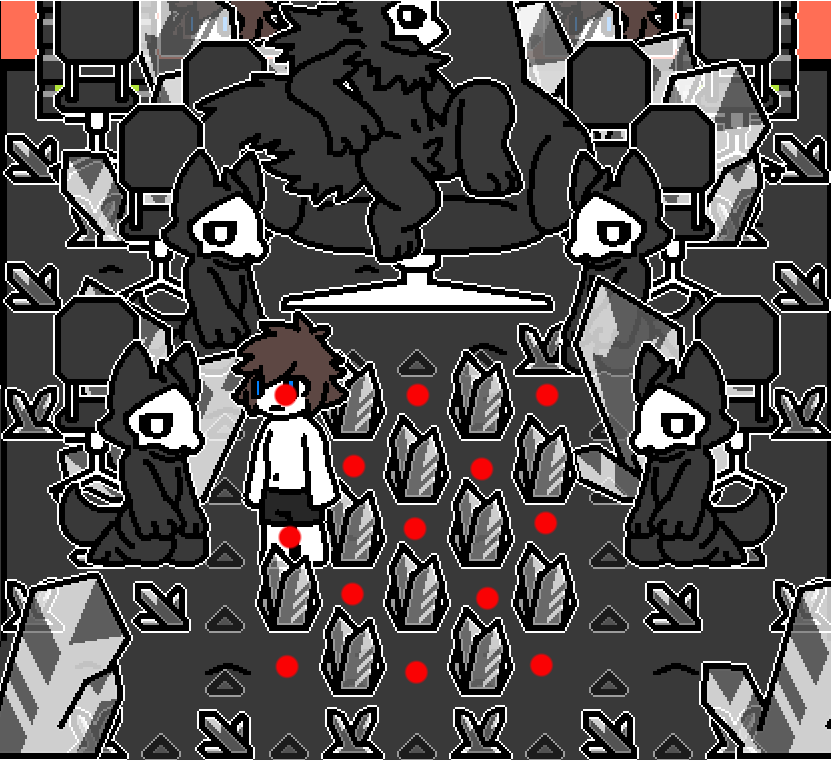
BOSS: The Wolf King
Upon entering the room. First save your game. As soon as you get to the center of the room, crystal will pop up and block your way. You’ll see 4 chanting black latex wolfs and a large office chair with a shadowy figure on it. He’ll turn around and snap his fingers at you, starting the fight.
Fight mechanics:
The fight goes like this. He’ll snap his fingers a row of small cones will pop up. These cones will indicate where crystals will pop up. 1 sec later, he’ll snap his fingers again and crystals will burst up from the ground where the small cones were. Basically, you’ll have to dodge all the attacks.
He has 3 styles of attack.
Vertical rows of crystals. (Other configuration of attack shown in red)
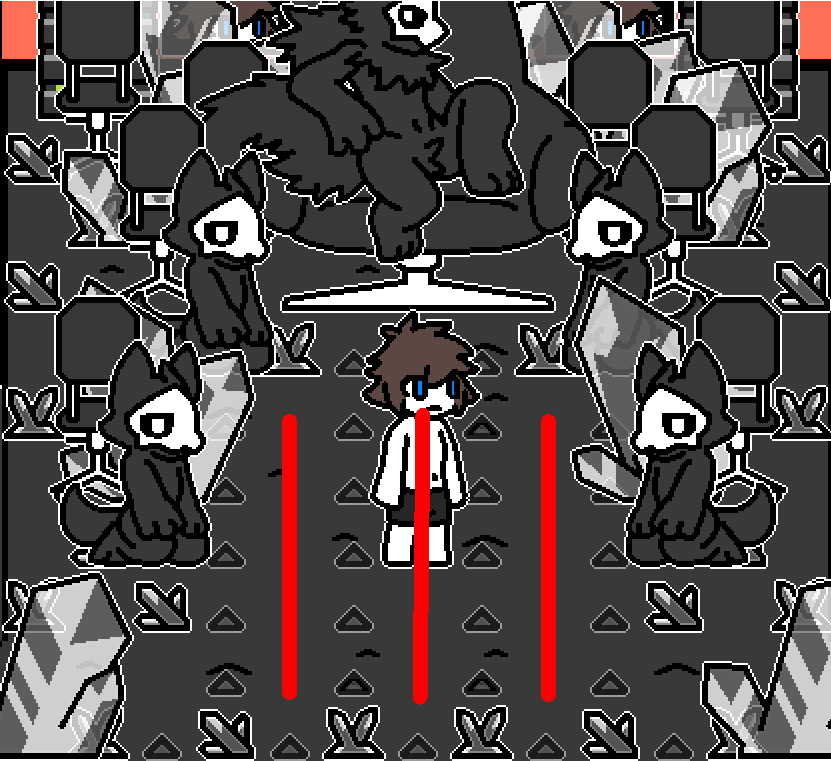
Horizontal rows of crystals. (Other configuration of attack shown in red)
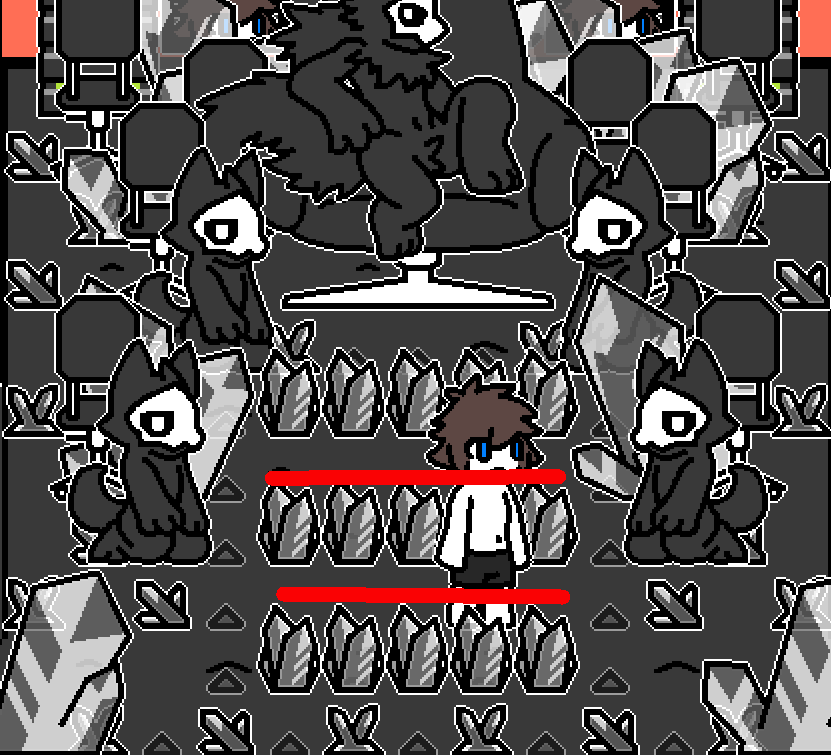
And an every-other style of attack that only leaves 1 space between each crystal. (Other configuration of attack shown in red)
It’s completely random which attack he’ll use each time.
Tip: Most of the time you’ll only have to move 1 step to dodge the attack. Sometimes you can even sit still and dodge a few attacks in a row.
The fight has 3 phases.
Phase 1:
Simply dodge his attacks 5 times and the second phase will occur.
Phase 2:
The wolf king and his followers will let out a howl. Then the king will snap his fingers and a shadow will appear. If the shadow moves over you, you will be transformed. So now you’ll have to dodge that as well as his usual attacks.
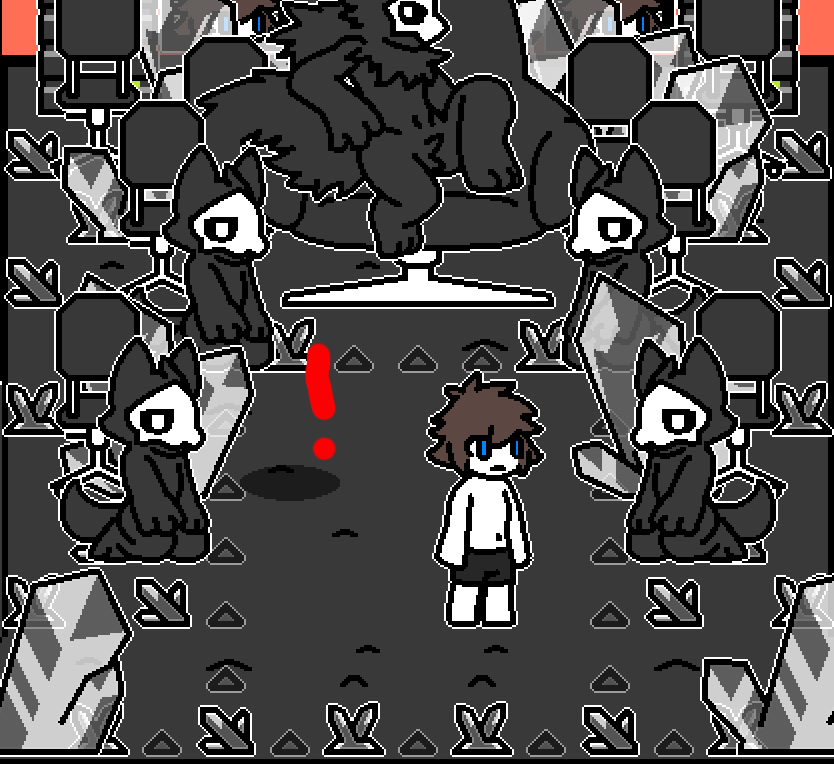
The shadow will always move vertically or horizontally towards you. It will move 1 space each time the king’s crystals burst up from the ground. The trick is to always make sure you are at least 2 spaces away from it.
Dodge the king’s attacks and the shadow 5 more times and the final phase will occur.
Tip: The shadow will appear in the upper left area at first. So if you stick mostly to the bottom right quadrant, the shadow will pretty much become a non-factor until phase 3.
Phase 3:
The king will howl once more, and a second shadow will appear that you will have to avoid. This phase will get a little tricky since by now the first shadow will be fairly close to you. But you’re still dodging the same attacks from the king.
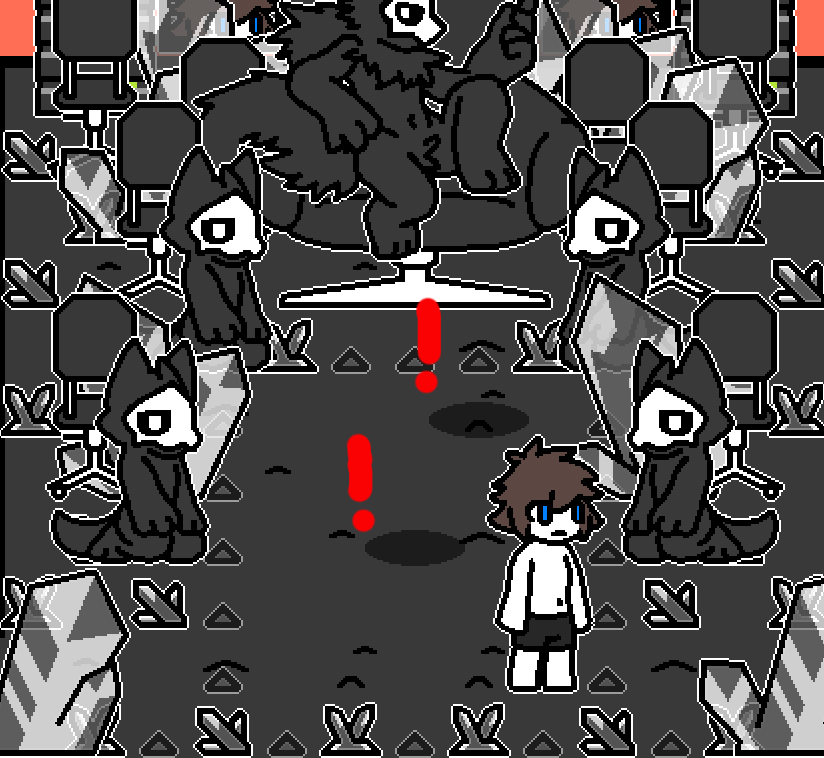
Tip: Wait until the shadows get kind of close to you, then move to the opposite side of the room.
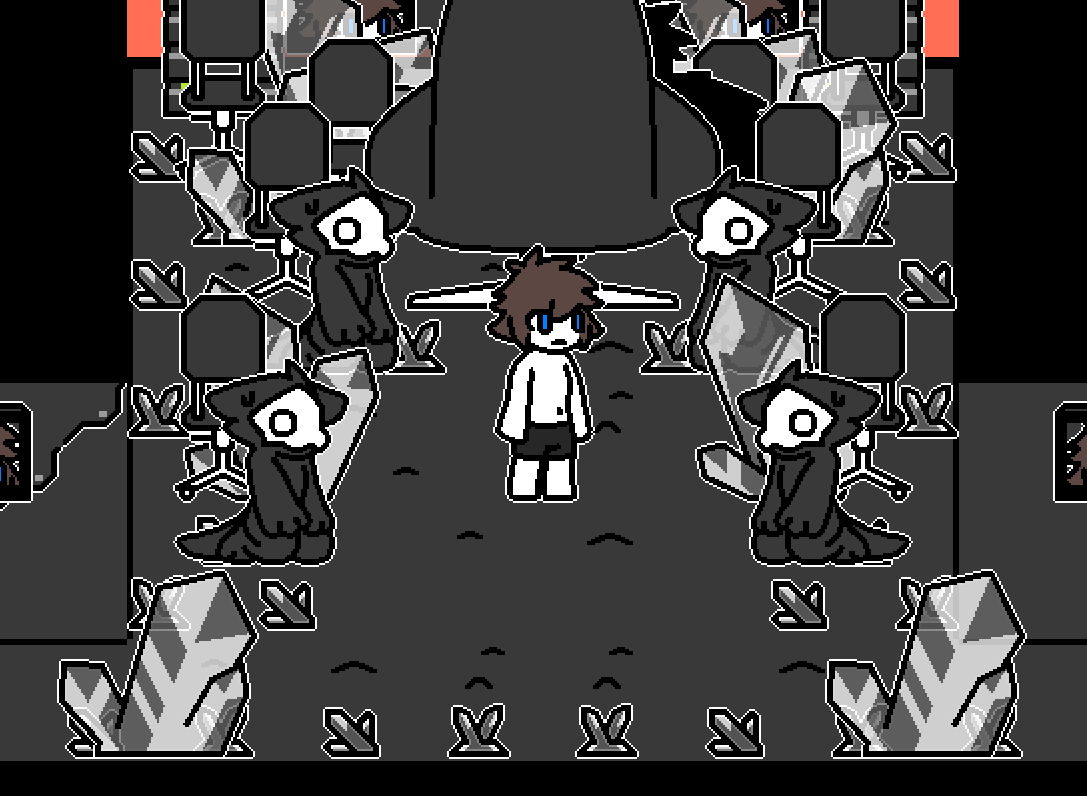
After dodging the Wolf King’s attacks 5 more times, he’ll let out one final howl. He’ll snap his fingers to summon another shadow, but this time he’ll accidently drop it on himself. Injured and humiliated, he’ll turn around while his followers sit there in defeat.
The path forward will now be open and you can proceed to the right, or interact with the wolves to see their sadness.
TFs:
1. (NEW) The King’s Pet: Get hit by any of the boss’s crystal attacks. He’ll snap his fingers and begin to transform you. You end up being a half transformed human with wolf ears, paws, and tail on all fours getting ready to serve the king.
2. (NEW) Falling Canister: Go under the shadow of a falling canister. You’ll get gooped into a regular looking black latex wolf. The king will have one hand on your shoulder while he props up your chin with the other.
PART 3: Server Warehouse
You’ll be inside a what appears to be a server room with a lot of crystals growing in it. Save your game first. There’s no enemies here, so just traverse to the right side of the screen. Along the way, the mysterious doctor will verbally harass you over the intercom. Eventually you’ll get to point where the some strange fan tiles block your way. The docter will then contact you again and activate his trap.
Mysterious Doctor’s Laser Trap 2.0
At first he’ll just activate some fans, and claim that you can’t go any further or “you’ll cut your feet up.” It’s just a bluff, go ahead and walk over them to trigger the next part of the trap.
Note: If you fall for the Doctor’s bluff and try to backtrack, he’ll just activate the laser. But you’ll be unable to get away from it, even if you get back to the entrance. It will give you a slightly different TF however.
So the next part of the trap is a laser that stretches vertically across the whole room. It will appear to the right of you and you’ll have to backtrack your way back to the entrance door. The laser starts off slow, but gets gradually faster. If you get hung up on any of the crystals or obstacles, it will mean the end for you. Because of the black latex covering the floor, you aren’t able to shift run either.
After you successfully back track to the entrance door way, the laser will run out of juice, and you’ll be free to move on. Recommend saving of course.
TFs:
1. (NEW) Restrained Black Dragon 1: Fall for the Doctor’s fan bluff and backtrack to the entrance. The laser will catch you and you’ll get descriptive drawn out scenes of your pants turning into a gooey faceless dragon suit. Your tail will wrap around you and gag your mouth.
2. (NEW) Restrained Black Dragon 2: Don’t get fooled by the Doctor’s fan bluff, but get caught by the laser. You’ll sprite animation of the same TF as #1, but with a frontal aftermath picture.
Airlock Room
In this room you’ll see cones blocking the other door. It’s locked anyways, and the only way to open it is to complete the air lock procedure. There are 2 vents at the top, enemies will pop out once you begin the process.
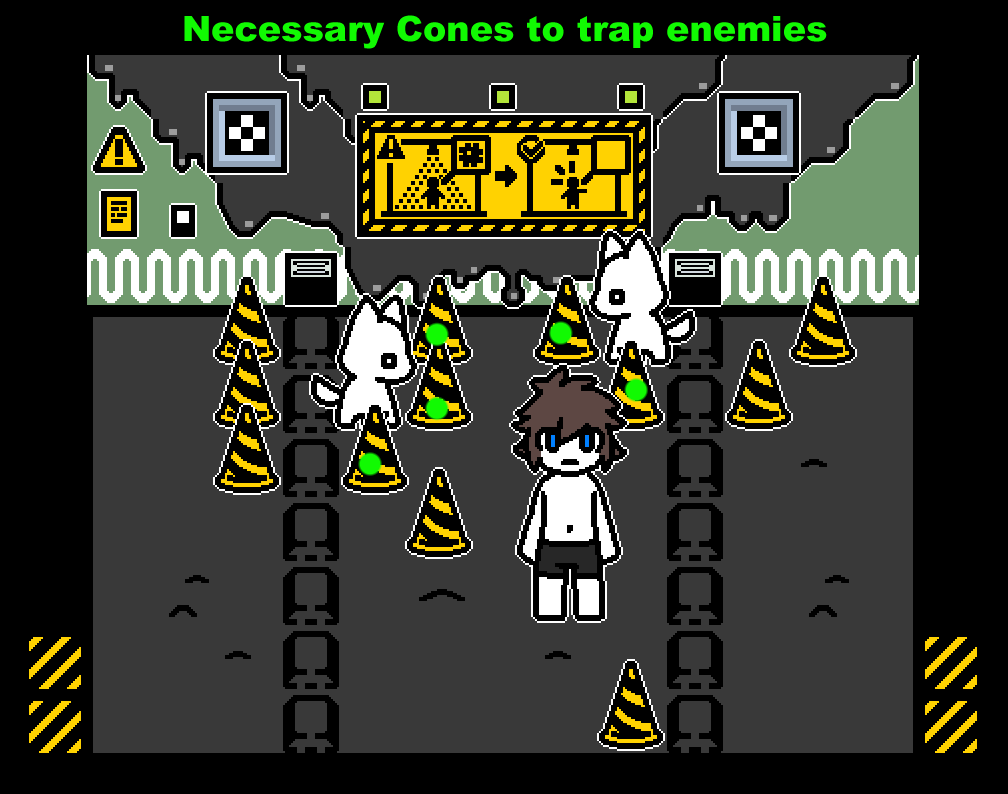
You can pick up the cones by interacting with them. And set them down wherever you want. With the knowledge that 2 enemies will come out, you can set up the cones in a way that traps them. Unfortunately you can’t place any cones on the bumpy parts of the floor.
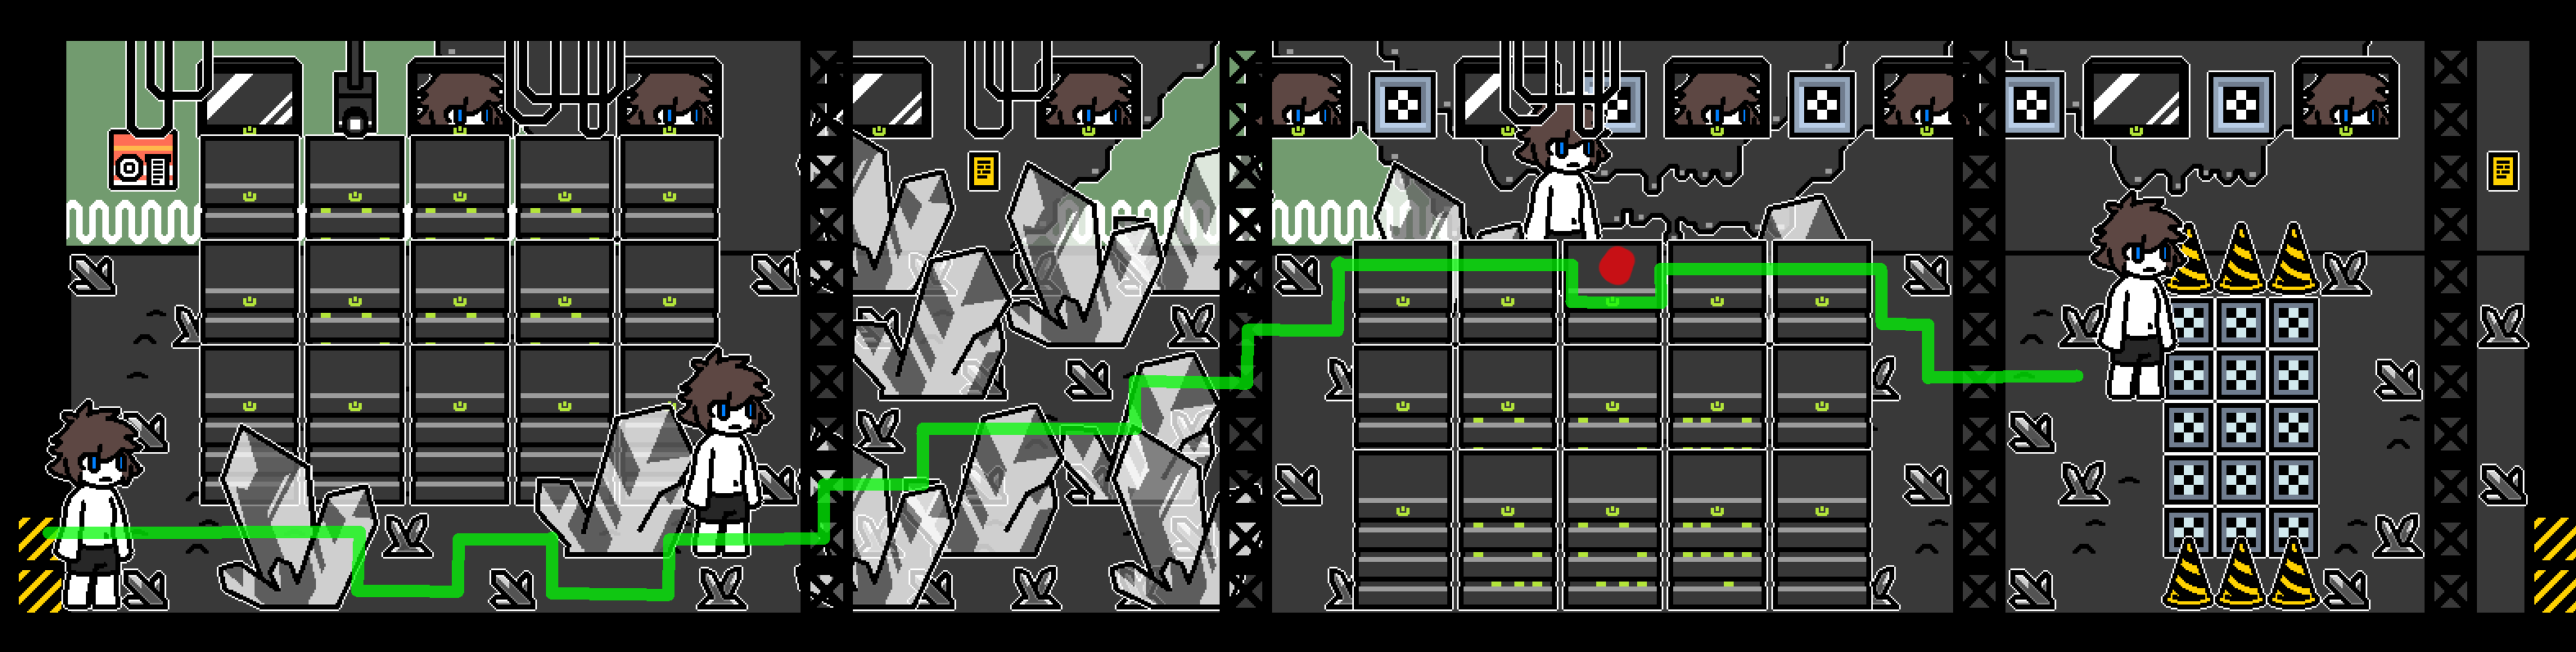
I recommend setting up the cones like this:
Once you have your cones set up, activate the switch in the upper left. The first enemy will pop out from the right vent and get trapped. Quickly make your way to the spot as seen in the image. The second enemy will then pop out the left vent and also get trapped.
Wait in that spot until a text box appears saying that the process is complete. Then quickly get into the next room. As the right enemy will escape from the gap once you pass the opening. (If you want a secret TF, walk into the next room while carrying a cone.)
TFs:
1. (NEW) White Latex Wolf: Get attacked by the first monster that pops out the vent. You’ll become a faceless white wolf struggling to pull off the goo.
2. (NEW) White Latex Wolf x2 Combo: When both enemies are present, get attacked. Both enemies will gloop into you. You’ll become a faceless white wolf struggling to pull off the latex. But a second torso will sprout out of you and begin to make out with you.
3. (NEW) Yellow Dragon: Walk into the next room while carrying a cone. Upon entering, the cone will turn into goo and transform you into a floating wingless yellow dragon.
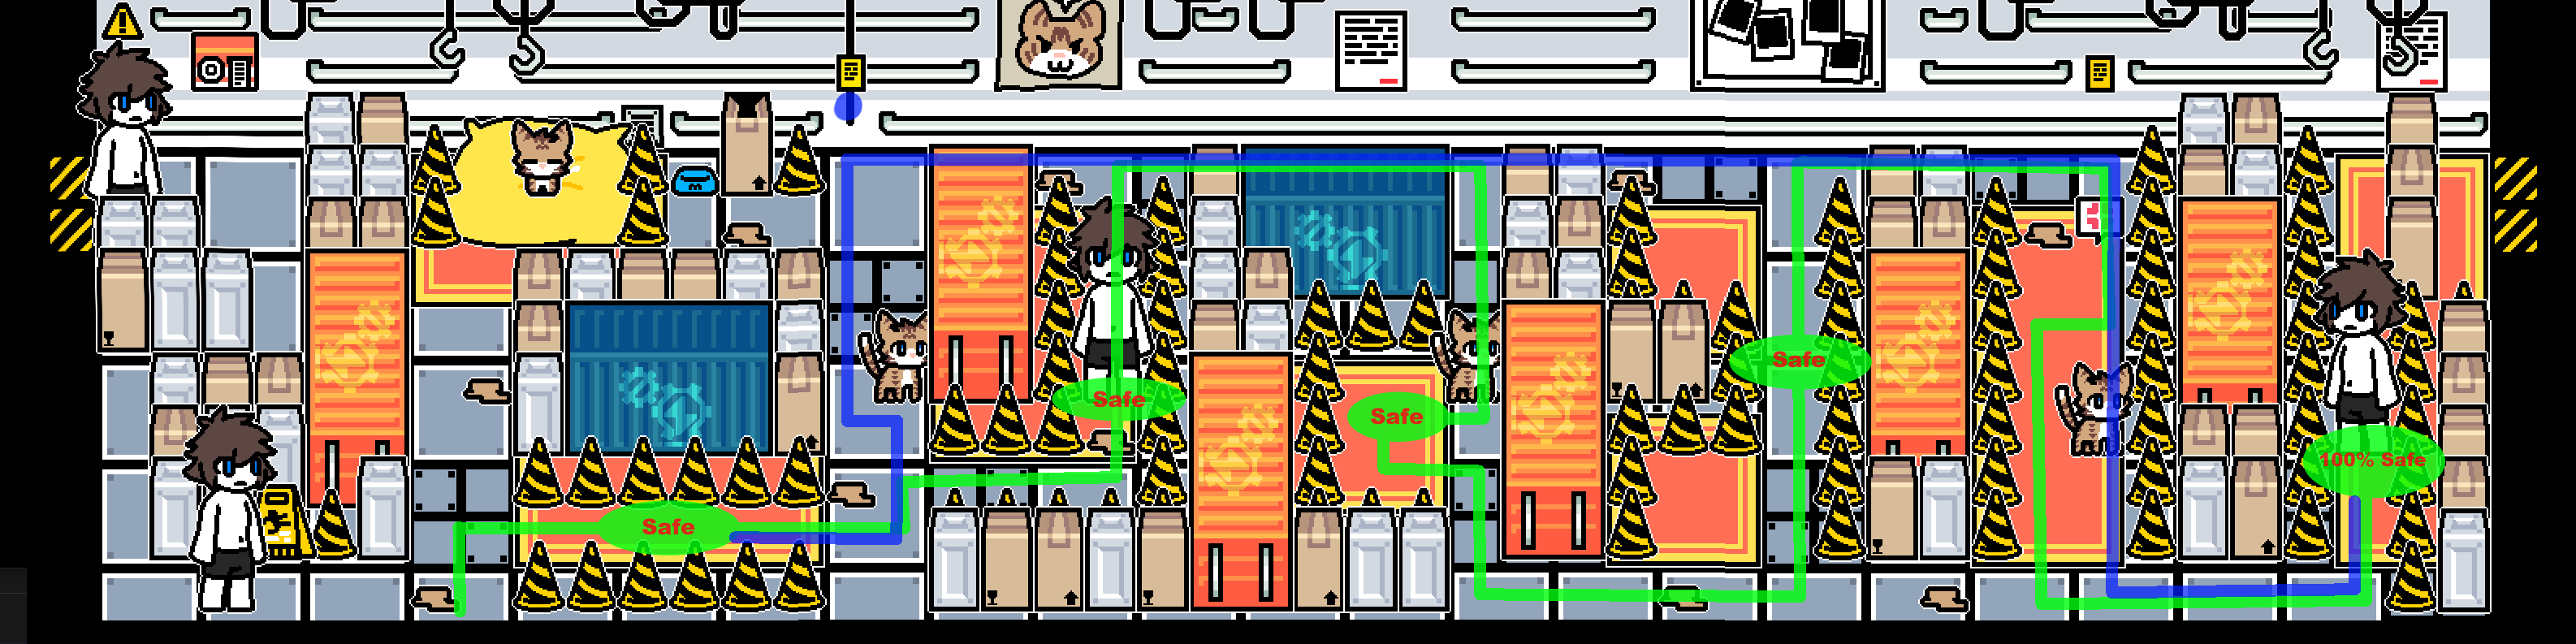
Warehouse Part 1
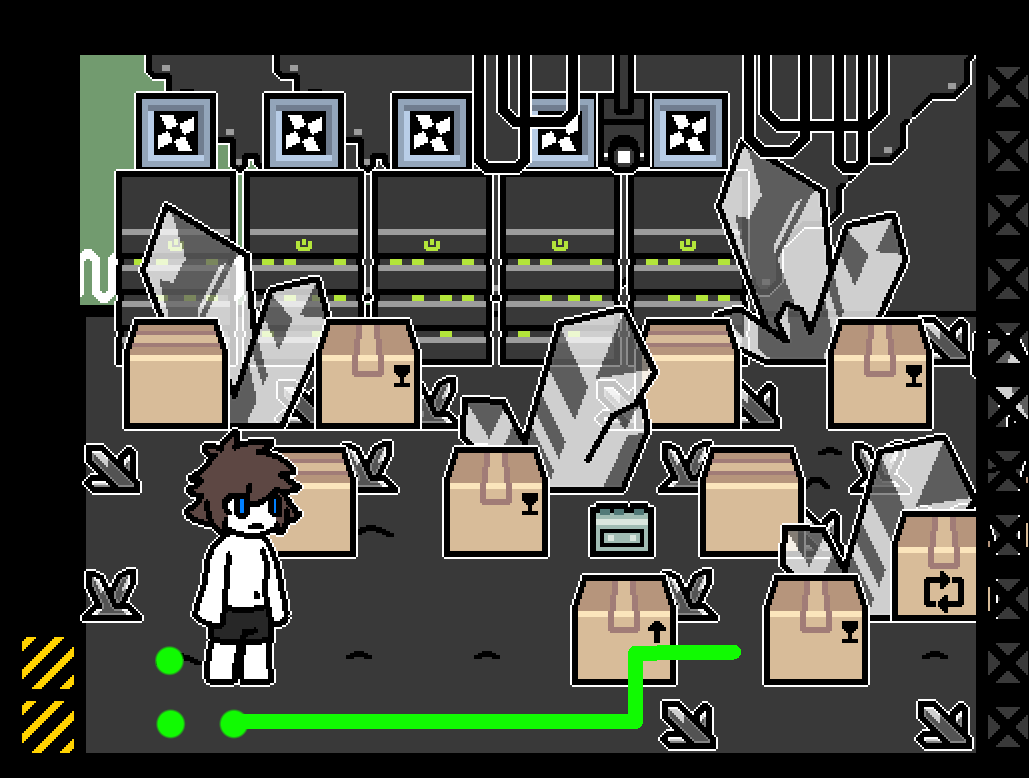
Here, you’ll encounter an enemy that follows some rules. They somewhat mimic your movement. On the vertical axis, they will move up and down with you. On the horizontal axis, they will move left if you go right. And move right if you go left. Using the terrain you’ll have to position yourself and enemies so that you can walk past them.
Lucky for any readers of this guide, here’s the steps needed to get past all of them. In the first section there’s only 1 enemy.
From where you start, walk left 1 space. Enemy should be above a crystal. Then walk down 1 space. Then move right into the next section.
TF’s:
1. (NEW) Yu Feng in a Box: Run into any of the boxed enemies. A dragon cub will pop out and eat you with it’s tail. Once covered, it will suck you up into it’s body, then gain more humanoid features.
Warehouse Part 2
Once you get past the first section and move forward enough, a box will move in and block your path backwards. Then you’ll have 2 enemies to contend with.
From where you start. Move Right 1 space. Then Move up 4 more spaces to the small crystal. Then move left once.
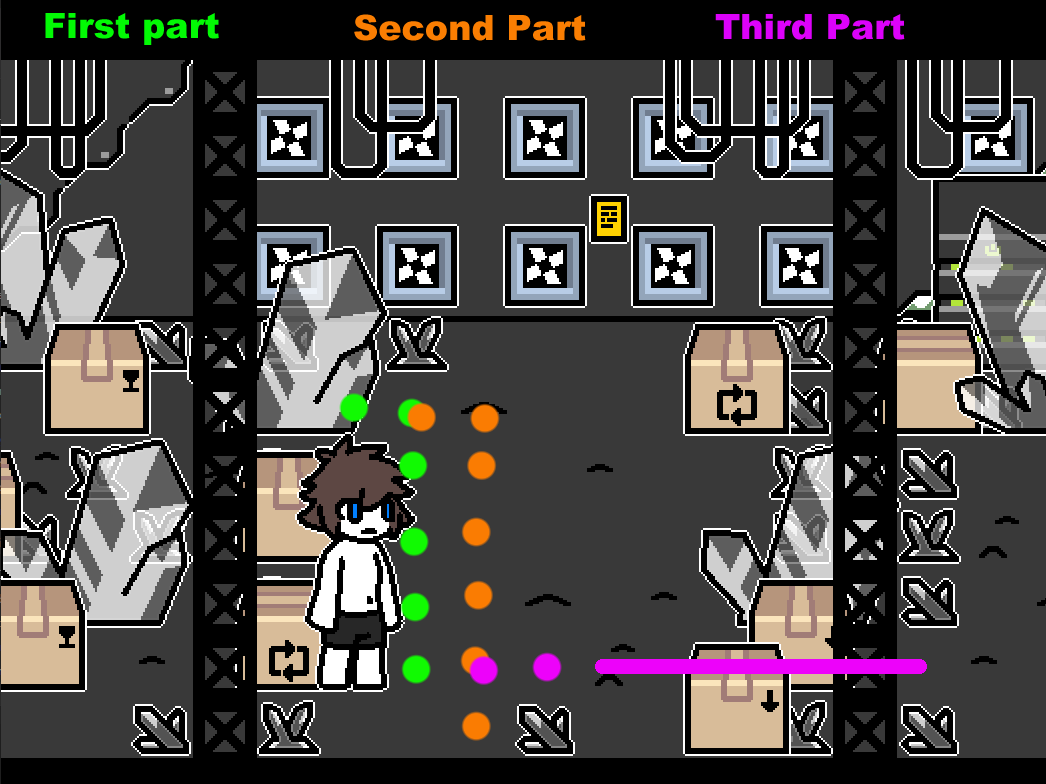
Next, move Right 2 spaces. The walk down until you’re to the left of the small crystal on the bottom.
Finally, move up 1 space. Then walk straight Right to the next section.
Warehouse Part 3
You’ll get boxed in once again. And now there’s a row of 5 enemies to deal with.
But it’s rather simple. Just walk Right 2 spaces. Then Up once. Then walk right until you hit the small crystal. Then just walk down 1 space, and move right into the next room.
Light Latex Puppy Surprise Attack
Upon entering the room, you’ll see 4 puppies notice you. After the text box, IMMEDIATELY shift-run left back into the warehouse.
Once back in, you’ll get a scene of the boxed dragons and them getting into a fight. The white latex creatures will then get boxed in by your new friends, and you’ll be safe to head back into that room. Be sure to save your game, then walk into the small black latex ball to hop over the obstacle and head into the next section.
TFs:
1. (NEW) Light Latex Wolf: Get caught by the light latex monsters. It will be the same sprite animation as the Light Latex x2 Combo back in the Airlock Room. But you’ll get a different aftermath image. A two-headed faceless wolf with saliva trailing from each other’s tongues.
PART 4: Crystal Dragon Nest
Crystal Nest Room 1
In this area, you encounter enemies that follow similar rules to the boxed monsters from the warehouse. They will only move if you do. BUT, instead of mimicking your moves, these enemies will always head towards you. In this area, tapping the arrow keys to move 1 space at a time is the best way to move about. You will also encounter ice that you can slide across and small bumps that will cause you to jump over. Treat this next area like a giant board game. Sliding on the ice for several spaces of distance or hoping over a bump 2 squares still only counts as 1 space of movement to the enemies.
In the first crystal room, you’ll have to a take a careful path. Here’s a route that should always work. From the starting point, take 1 step RIGHT to slide across the ice. Next move 1 space DOWN to hop. Walk RIGHT to slide to the east wall. From there, walk 3 steps DOWN, the 1 LEFT, and then 3 more DOWN to slide on the bottom ice field to the lower wall. Move LEFT onto the hopper to jump west. Then you should be safe to walk straight into the next room.
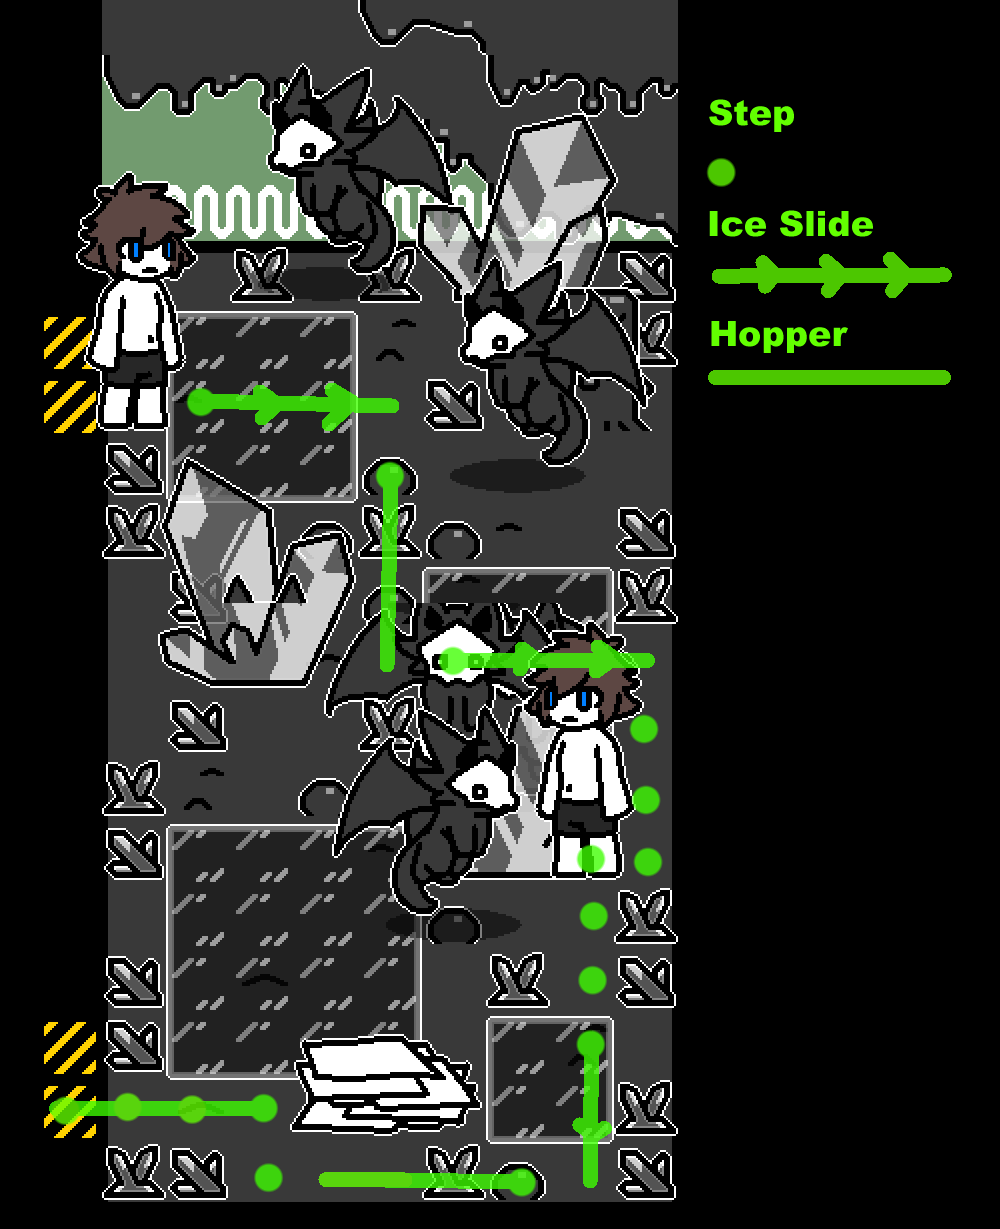
TFs:
1. Yu Feng (cub)- Get caught by any monster in the room. The result of this TF will turn you into an adult Yu Feng dragon.
Crystal Nest Room 2
From where you start. Move LEFT 1 space to hop west. Walk LEFT 1 more space. Then move DOWN 1 space to slide across the ice. Move 1 step LEFT to hop.
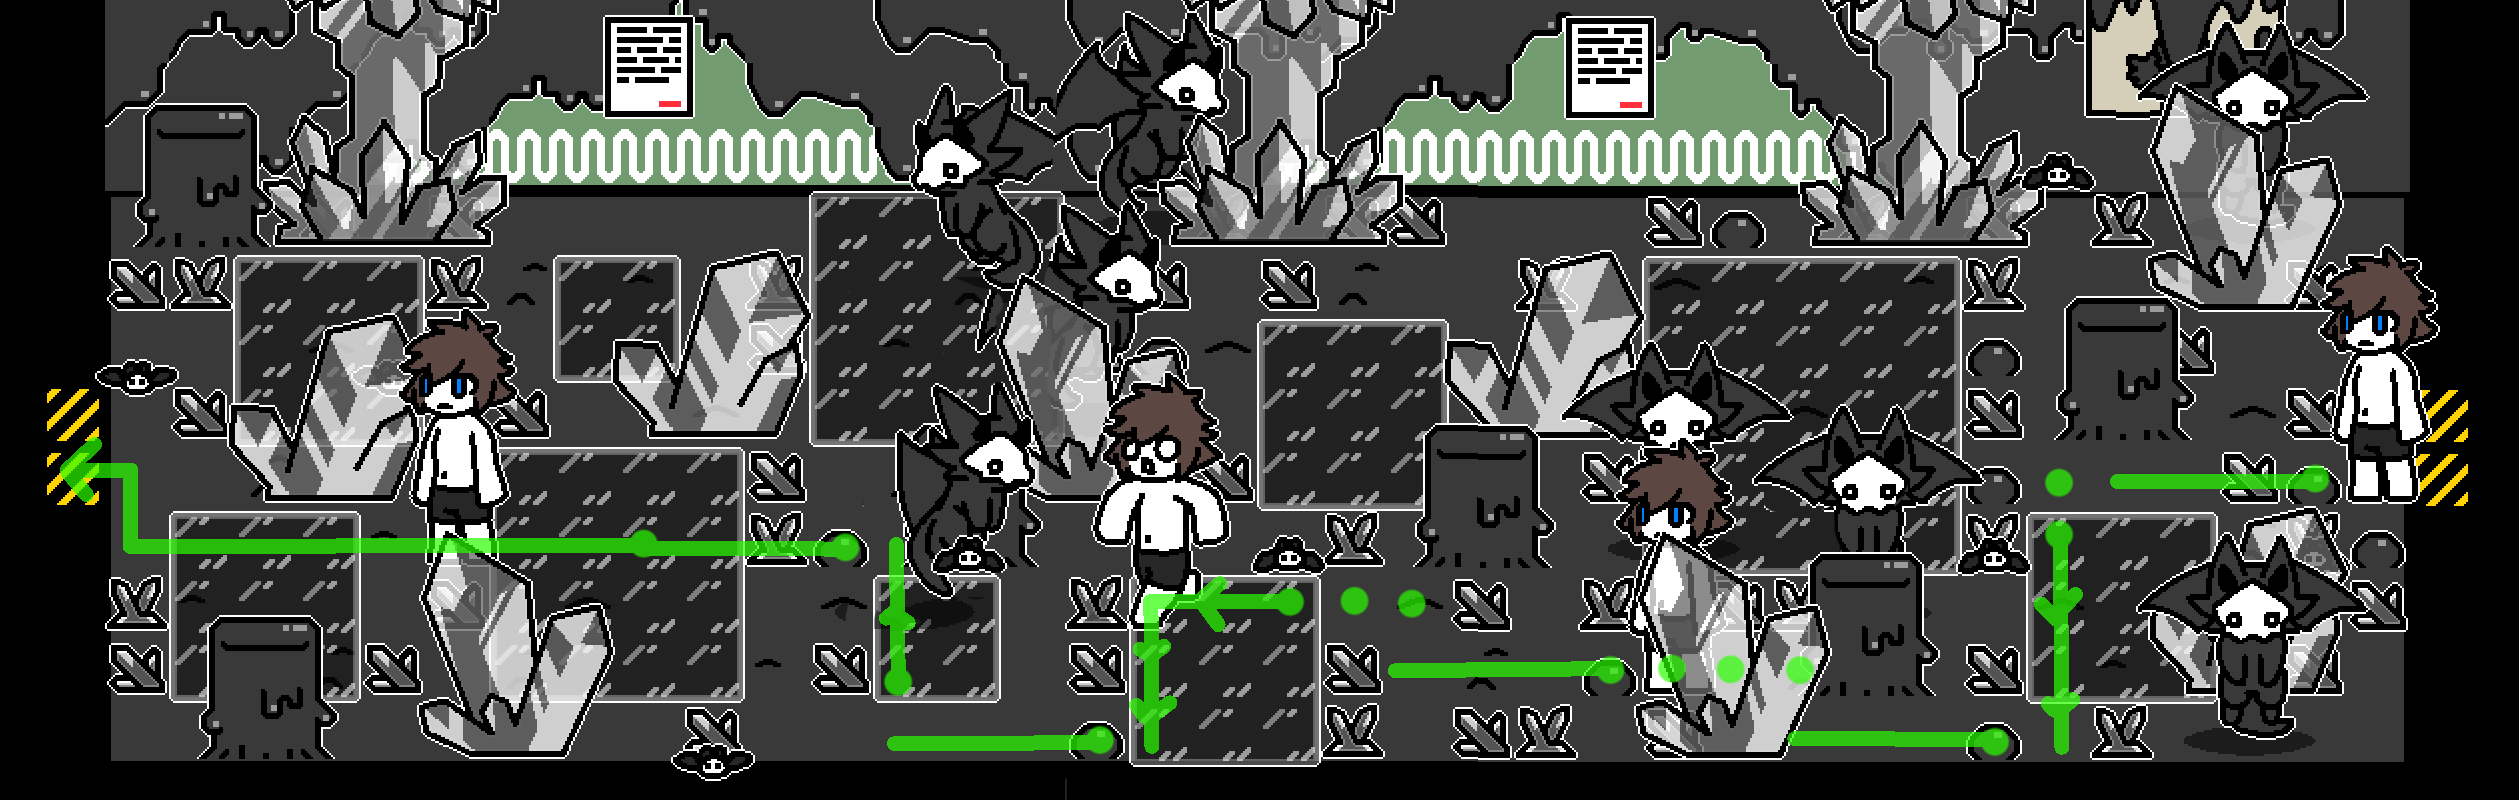
After landing, Move UP 1 space. Then move 3 spaces LEFT to hop once again. By now you should be next to a 3×3 ice field on the bottom of the screen,
From where you landed, move UP 1 space. Then walk 2 spaces LEFT to enter and slide on that 3×3 ice. Move DOWN to slide. Then move LEFT 1 space to hop. You should be directly under a 2×2 ice field now.
Move UP 1 space to slide across that 2×2 ice. The move LEFT 1 space to hop west. At this point the enemies should no longer be of any concern to you and you can safely head west into the next room.
TFs:
1. (NEW) Yu Feng (cub)- Get caught by any monster in the room. Will feature a mid TF scene of the cub oozing over your head with it’s tail wrapped around your neck.
The Elder One’s Hand
You’ll be a in brightly painted storage area. Soon after entering the room. A large dragon’s hand will bust out of the wall and begin chasing you. The hand’s movement is gridlocked to ups, downs, lefts, and rights. If the hand reaches you, you will be transformed. Take note of the stacks of brown boxes scattered throughout. If the hand touches the boxes, it will destroy them but be stunned temporarily. While the hand is stunned, you are able to pass underneath it safely. But be warned, the hand doesn’t stay stunned for long.
It’s kind of up to you how you want to do this. It will require some good timing and skillful movement on your part. Here’s an illustration of a strategy that seemed to work most of the time for me.
Once you get over the hopper and close to the exit door, the hand will go away for good. Proceed into the next room.

TFs:
1. (NEW) Dragon Boy: Get caught by the arm. The arm will pull on your tail bone, revealing a dragon tail. In the process you’ll be turned into a blue-eyed dragon with white hair. The arm will be tugging on your tail as you blush.
Crystal Nest Room 3
In this room you will encounter an adult version of the Yu Feng enemy that will rapidly move 2 squares towards you for each step you take. Also, be warned, running into the giant green crystals will result in transformation. Just like the previous crystal nest rooms, you’ll have to carefully plan out your path.
GREEN INSTRUCTIONS
From where you start, go DOWN 2 spaces. Then slide LEFT on the ice and you’ll be up against a small green crystal. Slide UP to another small crystal.
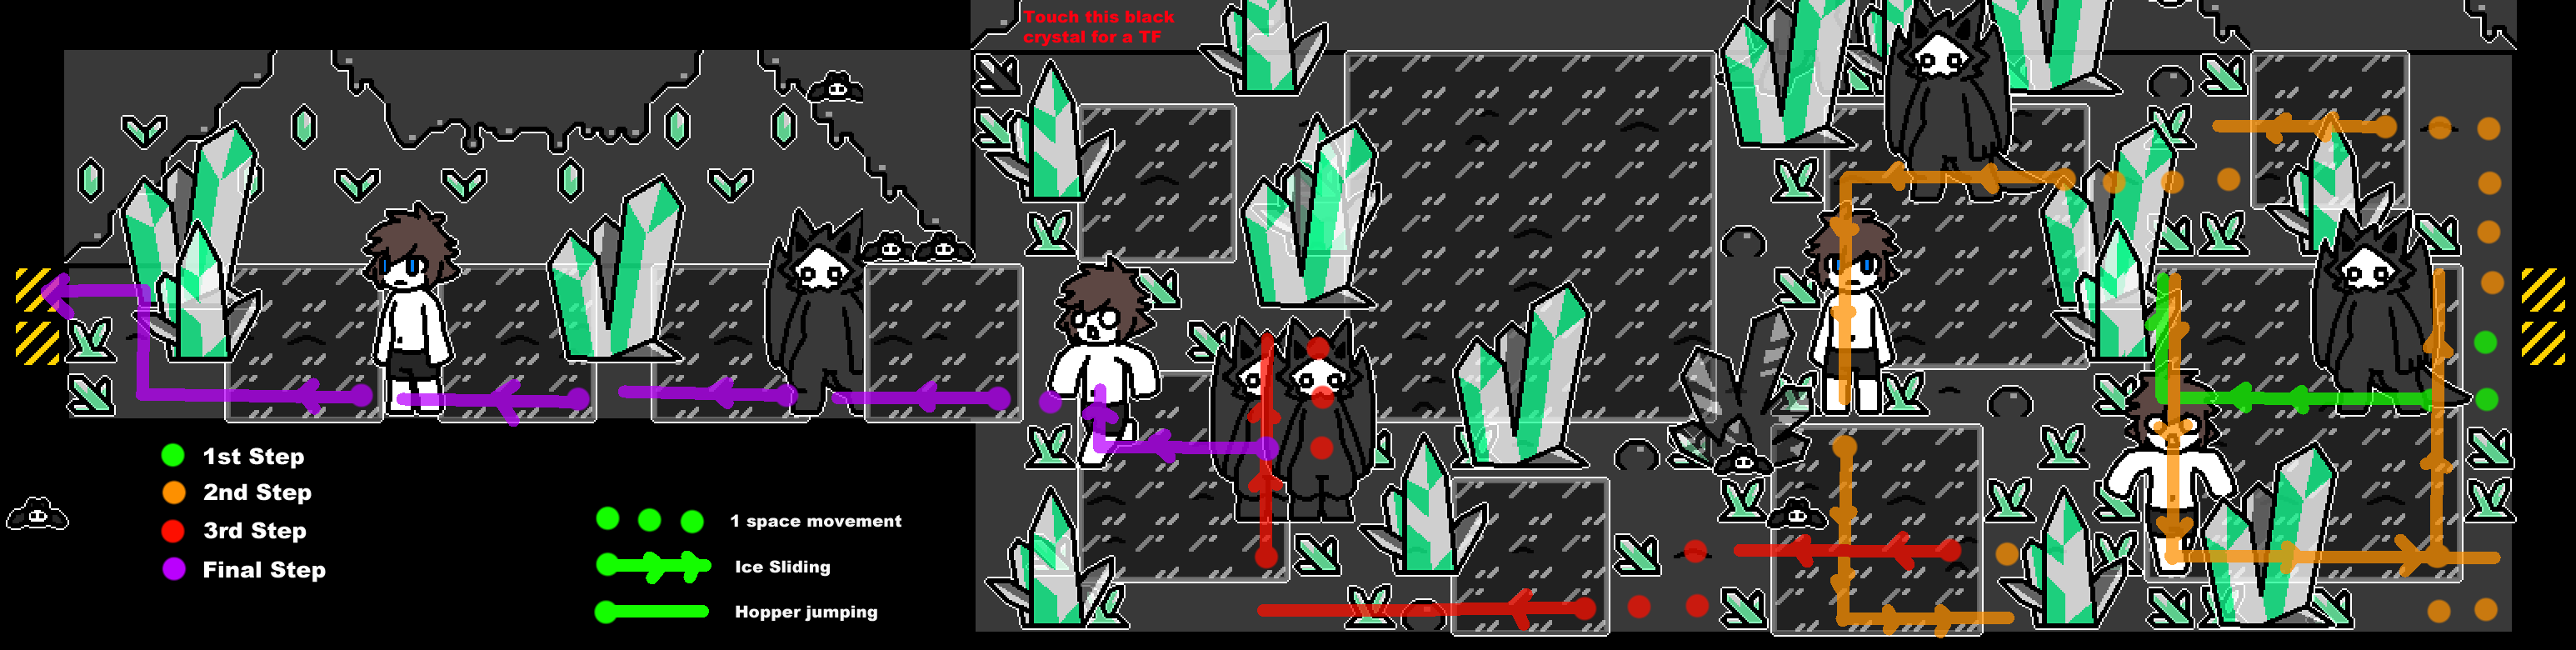
ORANGE INSTRUCTIONS
From here, slide DOWN. Then slide RIGHT to get off the ice field. Move DOWN 1 space, then move LEFT another space. Move UP 1 space to slide on the ice. Move RIGHT 1 space (you should be on the starting space now). Move UP 3 spaces, it will look like the enemy is almost on top of you, but dont be alarmed. Because of it’s grid-like movement, you are able to juke it.
Walk LEFT 2 spaces and you’ll slide on the first northeast icefield to the other side of it. From there, walk DOWN 1 space, then walk 3 spaces LEFT to slide on another ice field. Still on the ice, slide DOWN 1 space to get to the space between 2 of the icefields, then walk DOWN once more to slide to the bottom of the screen. Slide RIGHT, then once of the ice, walk UP 1 space.
RED INSTRUCTIONS
Walk LEFT once, to slide across the ice. Back on land, move LEFT 1 space. Then DOWN 1. Then LEFT 2 times to do a combo ice slide and hopper jump. Once you land, move UP once to slide across the ice. Walk RIGHT 1 space, then DOWN 2 spaces. Again, looks like the enemies are piling up on you, but don’t worry, you’re juking them right now.
PURPLE INSTRUCTIONS
Move LEFT to slide across the ice into a small green crystal. Slide UP one space. From here, you should be able to outrun all the enemies by just heading straight to the left and to the next room.
Tip: There is TF hidden in the room that you can get by interacting with a small black crystal in the second half of the room.
TFs:
1. (NEW) Yu Feng (Adult): Get caught by a moving enemy in the room. You’ll turn into a 2-headed version of the standard monster. You’ll also get a mid transformation scene of yourself getting merged into the creature.
2. (NEW) Bei Feng: Walk or slide into one of the large green crystals. You’ll turn into a blue dragon with blond hair. Aftermath scene will show you taking a knee and wincing.
3. Black Dragon: Interact with the different looking small black crystal in the top left of the room. You’ll end up cutting your hand on the crystal, and get some descriptive screens of you transforming into a black dragon with white hair.
BOSS: The Elder One

Fight Mechanics
The main goal of this fight is to just make your way up to the top of the screen. Just like the previous crystal nest rooms, it’s a one-space-at-a-time board game. Where you will have to carefully plan your route out. Except this time there’s a boss who will throw in his own attacks.
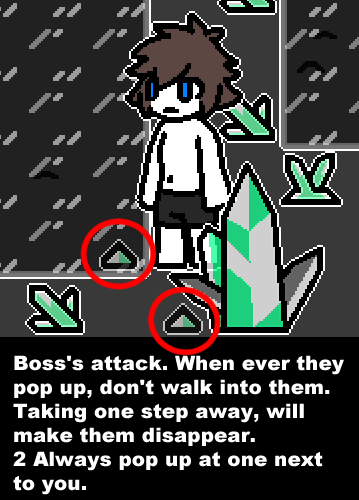
These attacks will look like small translucent cones on the ground. While moving the boss will summon these after you take a few steps. Once these cones appear, if you take 1 more step they will go away. If you walk into them, you’ll be transformed.
These cones will always spawn in pairs. And they will always spawn right next to you, forcing you to take a step in a direction that avoids them. There’s a few different configurations. One space above and below you. To both your right and left. And to the right or left and up or down (as seen pictured above).
As with the previous crystal room, make sure you avoid walking or sliding into the large green crystals. There’s also several Yu-Feng enemies present to mess your day up.
Tip: The boss’s attack cones seem to only spawn when you take a few consecutive steps over regular ground. Most of the time you’ll be sliding on ice fields and jumping hoppers, so you won’t actually see them too often. The boss’s attacks only seem to be a bigger issue in the upper half of the room were there’s several spaces of regular ground you’ll have to traverse.
The Fight
Making your way to the top is the name of the game. Treat this room similarly to the other crystals nest rooms. I’ve outlined a path in the image above. Given the random nature of boss’s attacks, I can’t provide any step-by-step instructions. Areas I’ve marked in blue are spots where I’ve found that I needed to sidestep a boss’s attack.
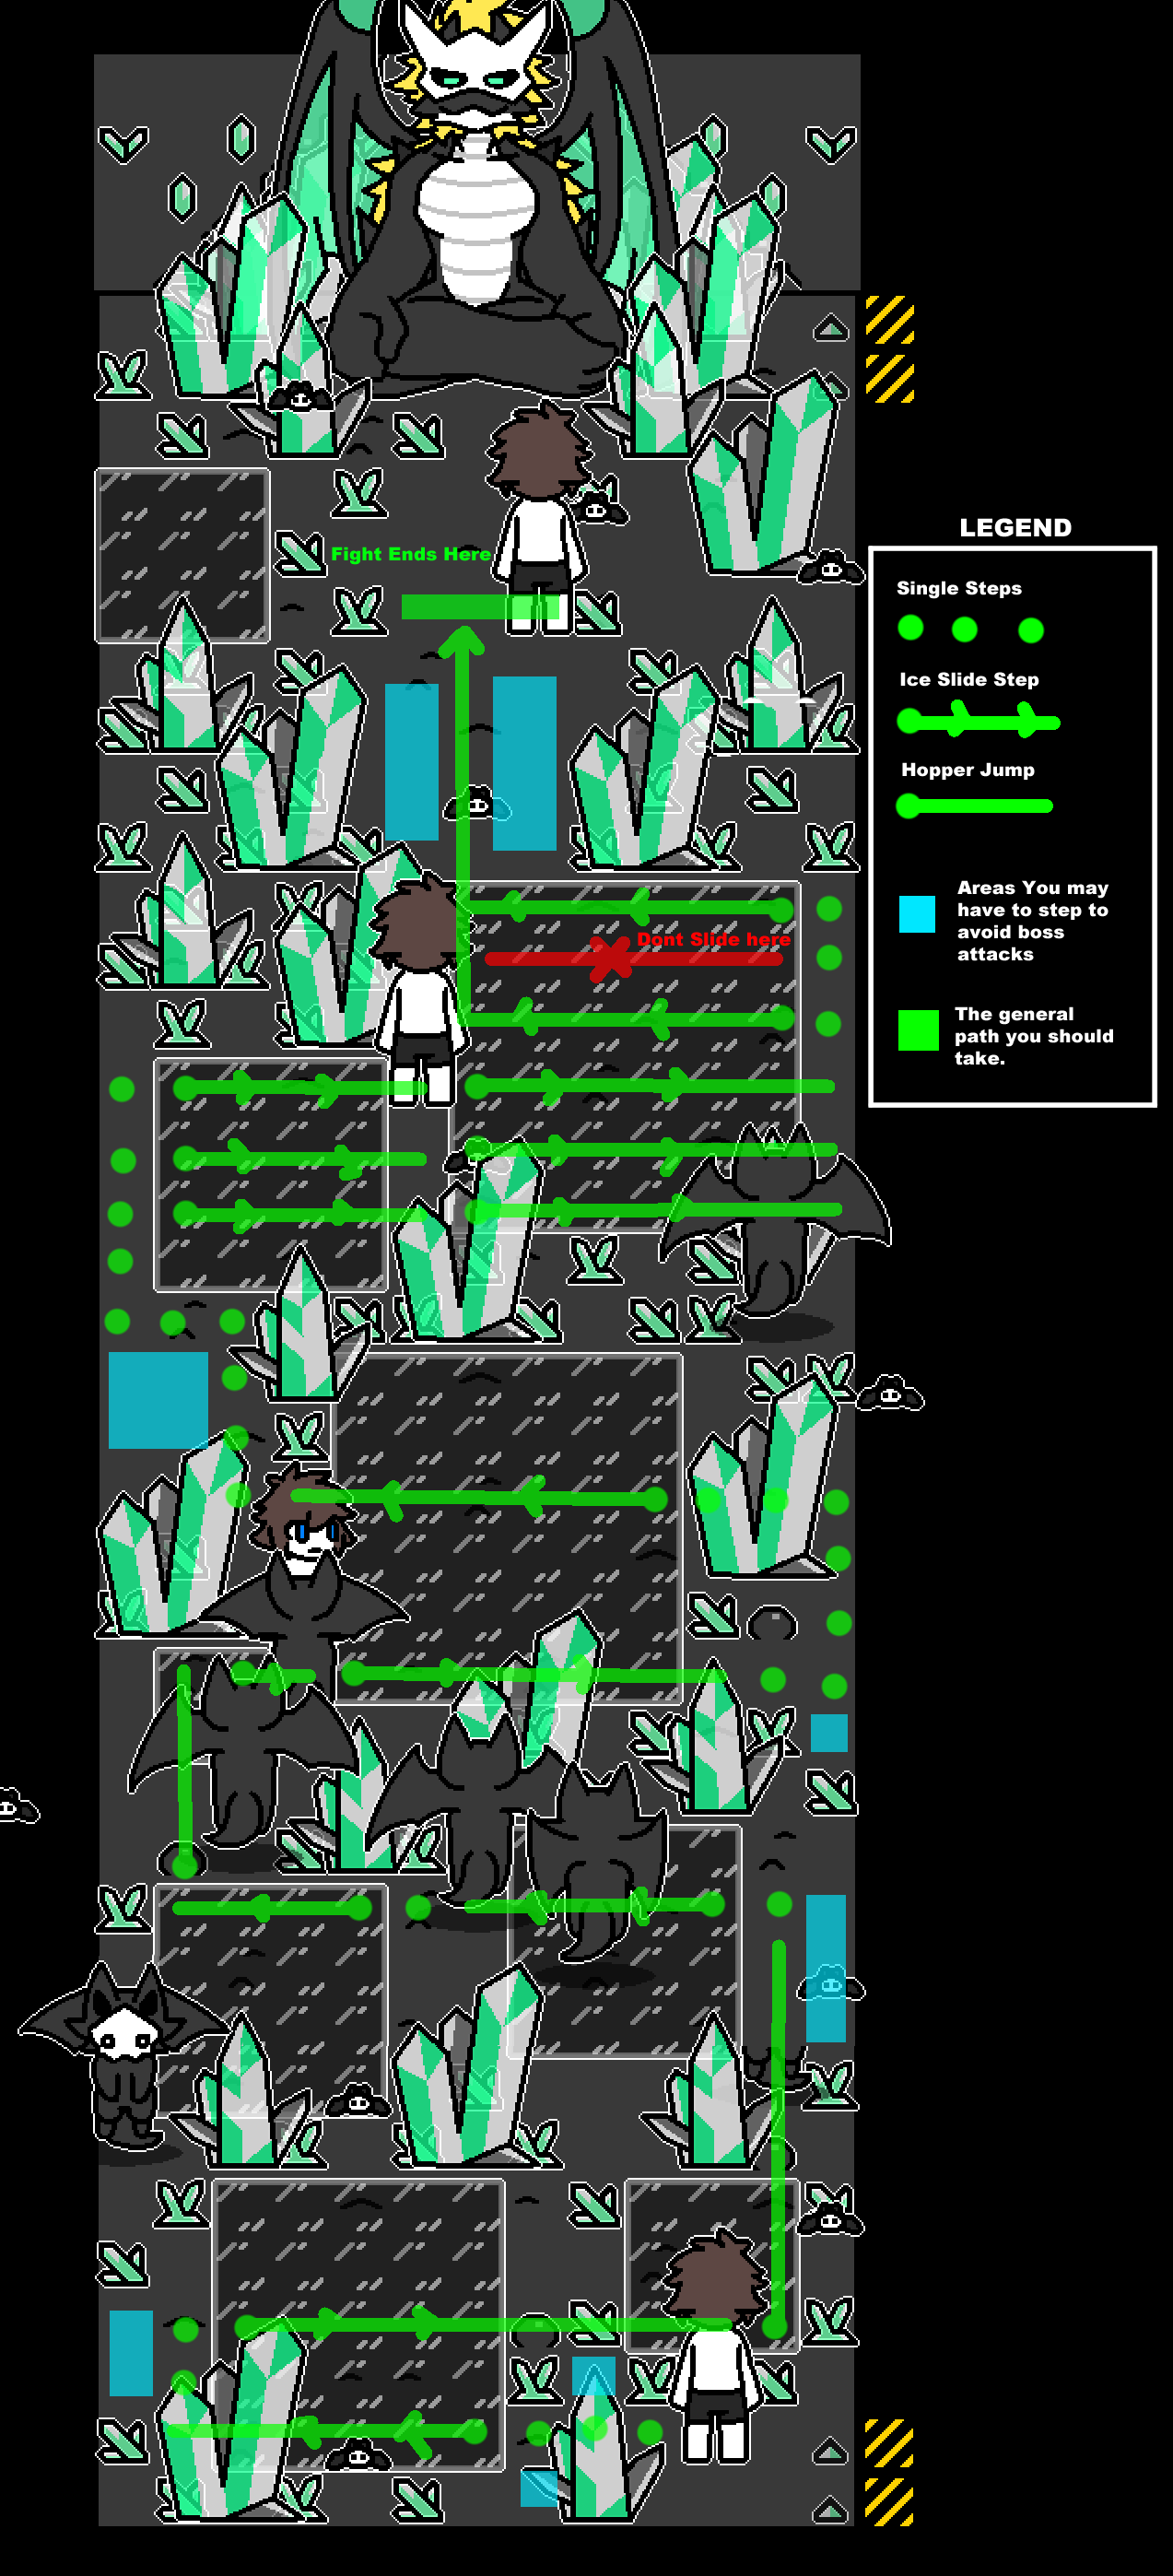
Lower Half of the Screen
As long as you follow the green path in the bottom half of the screen that will get you to the upper half without the black dragon enemies bothering you.
Upper Half of the Screen
On the upper half of the screen, there’s a 4×4 ice field to the left and a 6×6 field to the right. On the left side of the screen, try to walk as far UP as you can while avoiding the boss’s attacks. Given the many spaces of regular ground, you’ll be forced to dodge boss spikes. Slide to the RIGHT across the 4×4 icefield on the upper 3 rows of it.
Then you’ll be to the left of the 6×6 field. You can try to walk a space or 2 in the middle strip of land. But slide to the right of the screen across the 6×6 field. On the right wall, move up until you get to either the 3rd row from the top or top row. Then slide left and up and you’ll be close to the boss now.
From there, walk UP to the boss, you will have to dodge at least 1 other boss attack as you approach the boss.
Once you reach the boss, it will stop all attacks and the battle is over.
Here, the boss will unblock the exit door for you. And you’ll get the chance to ask the boss one question for some more story dialogue. Once done, move right into the next room.

TFs:
1. Bei Feng: Getting hit by the boss’s attack or run into any of the large green crystals. You will turn you into a Bei Feng just like the previous large green crystals, but you’ll get an aftermath scene of you sitting in the boss’s lap.
2. (NEW) Yu Feng: Run into any of the moving enemies on the screen. Will feature a mid transformation scene. Your head will be covered up, as well as your back down to your butt. You’ll have a tail as well as your fore arms covered up.
Field of Crystals
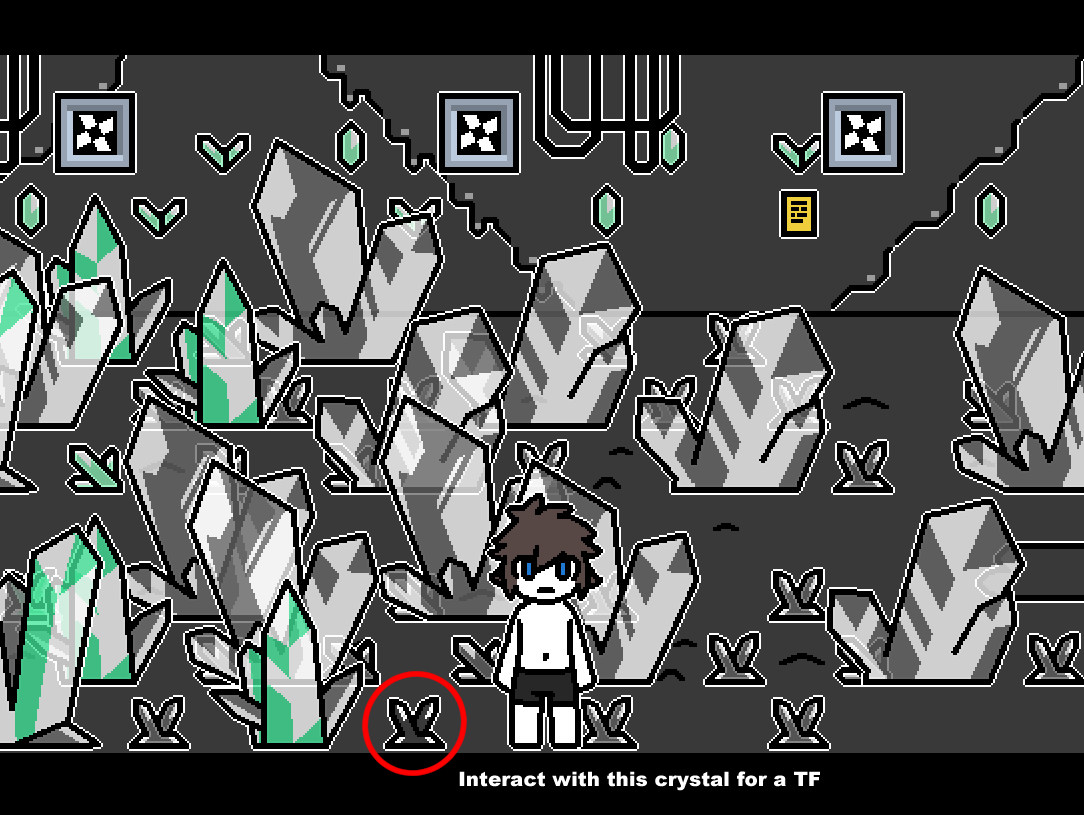
Next you’ll have to move to the right and traverse the large field of green crystals. The large green crystals will transform you if you touch them. So be careful, as there is no save point until the next section. Die here and you’ll have to face the boss again. Otherwise there’s no real true danger here. Just avoid walking into the green crystals and you’ll be fine. There’s also a strange black crystal somewhere in the room that you can interact with to get another draconic TF, if you want to fight the boss again that is.
In the second half of the screen, you’ll see a lot of the Yu Feng enemies strolling about. Don’t worry about them, none of them will attack you even if you run into them. Eventually you’ll start to slow down and your character will collapse and end up in the next part of the game.
TFs:
1. (NEW) Bei Feng: Walk into any of the large green crystals. You get a sprite of your transformed self hiding behind one of the green crystals. Same TF as the boss though.
2. Black Dragon: Interact with the small black crystal in the room after the boss fight. Be warned there’s no save point here, so you’ll have to fight the boss all over again. You’ll get entranced by the crystal and get some descriptive scenes of yourself gradually transforming into a pure black blue eyed dragon with wings. And it’s a butt shot.
PART 5: The Library
You’ll wake up in a bright room with a tree (take note of the tree, you’ll have to use it to hide later). Looks like someone carried you there and left some fruit for you. Don’t worry, it’s completely safe to eat. Save your game! Since this is the first save point after the previous boss fight. There aren’t any ways to die in this specific room, but you are blocked by a password puzzle.
Finding the Password
The answer isn’t in this room. Head south through the door and you’ll be on a balcony full of moveable boxes. Push the boxes and maneuver yourself to the right side of the room. Watch out for the birds moving vertically up and down the screen. Once you get through, head up into the next room.
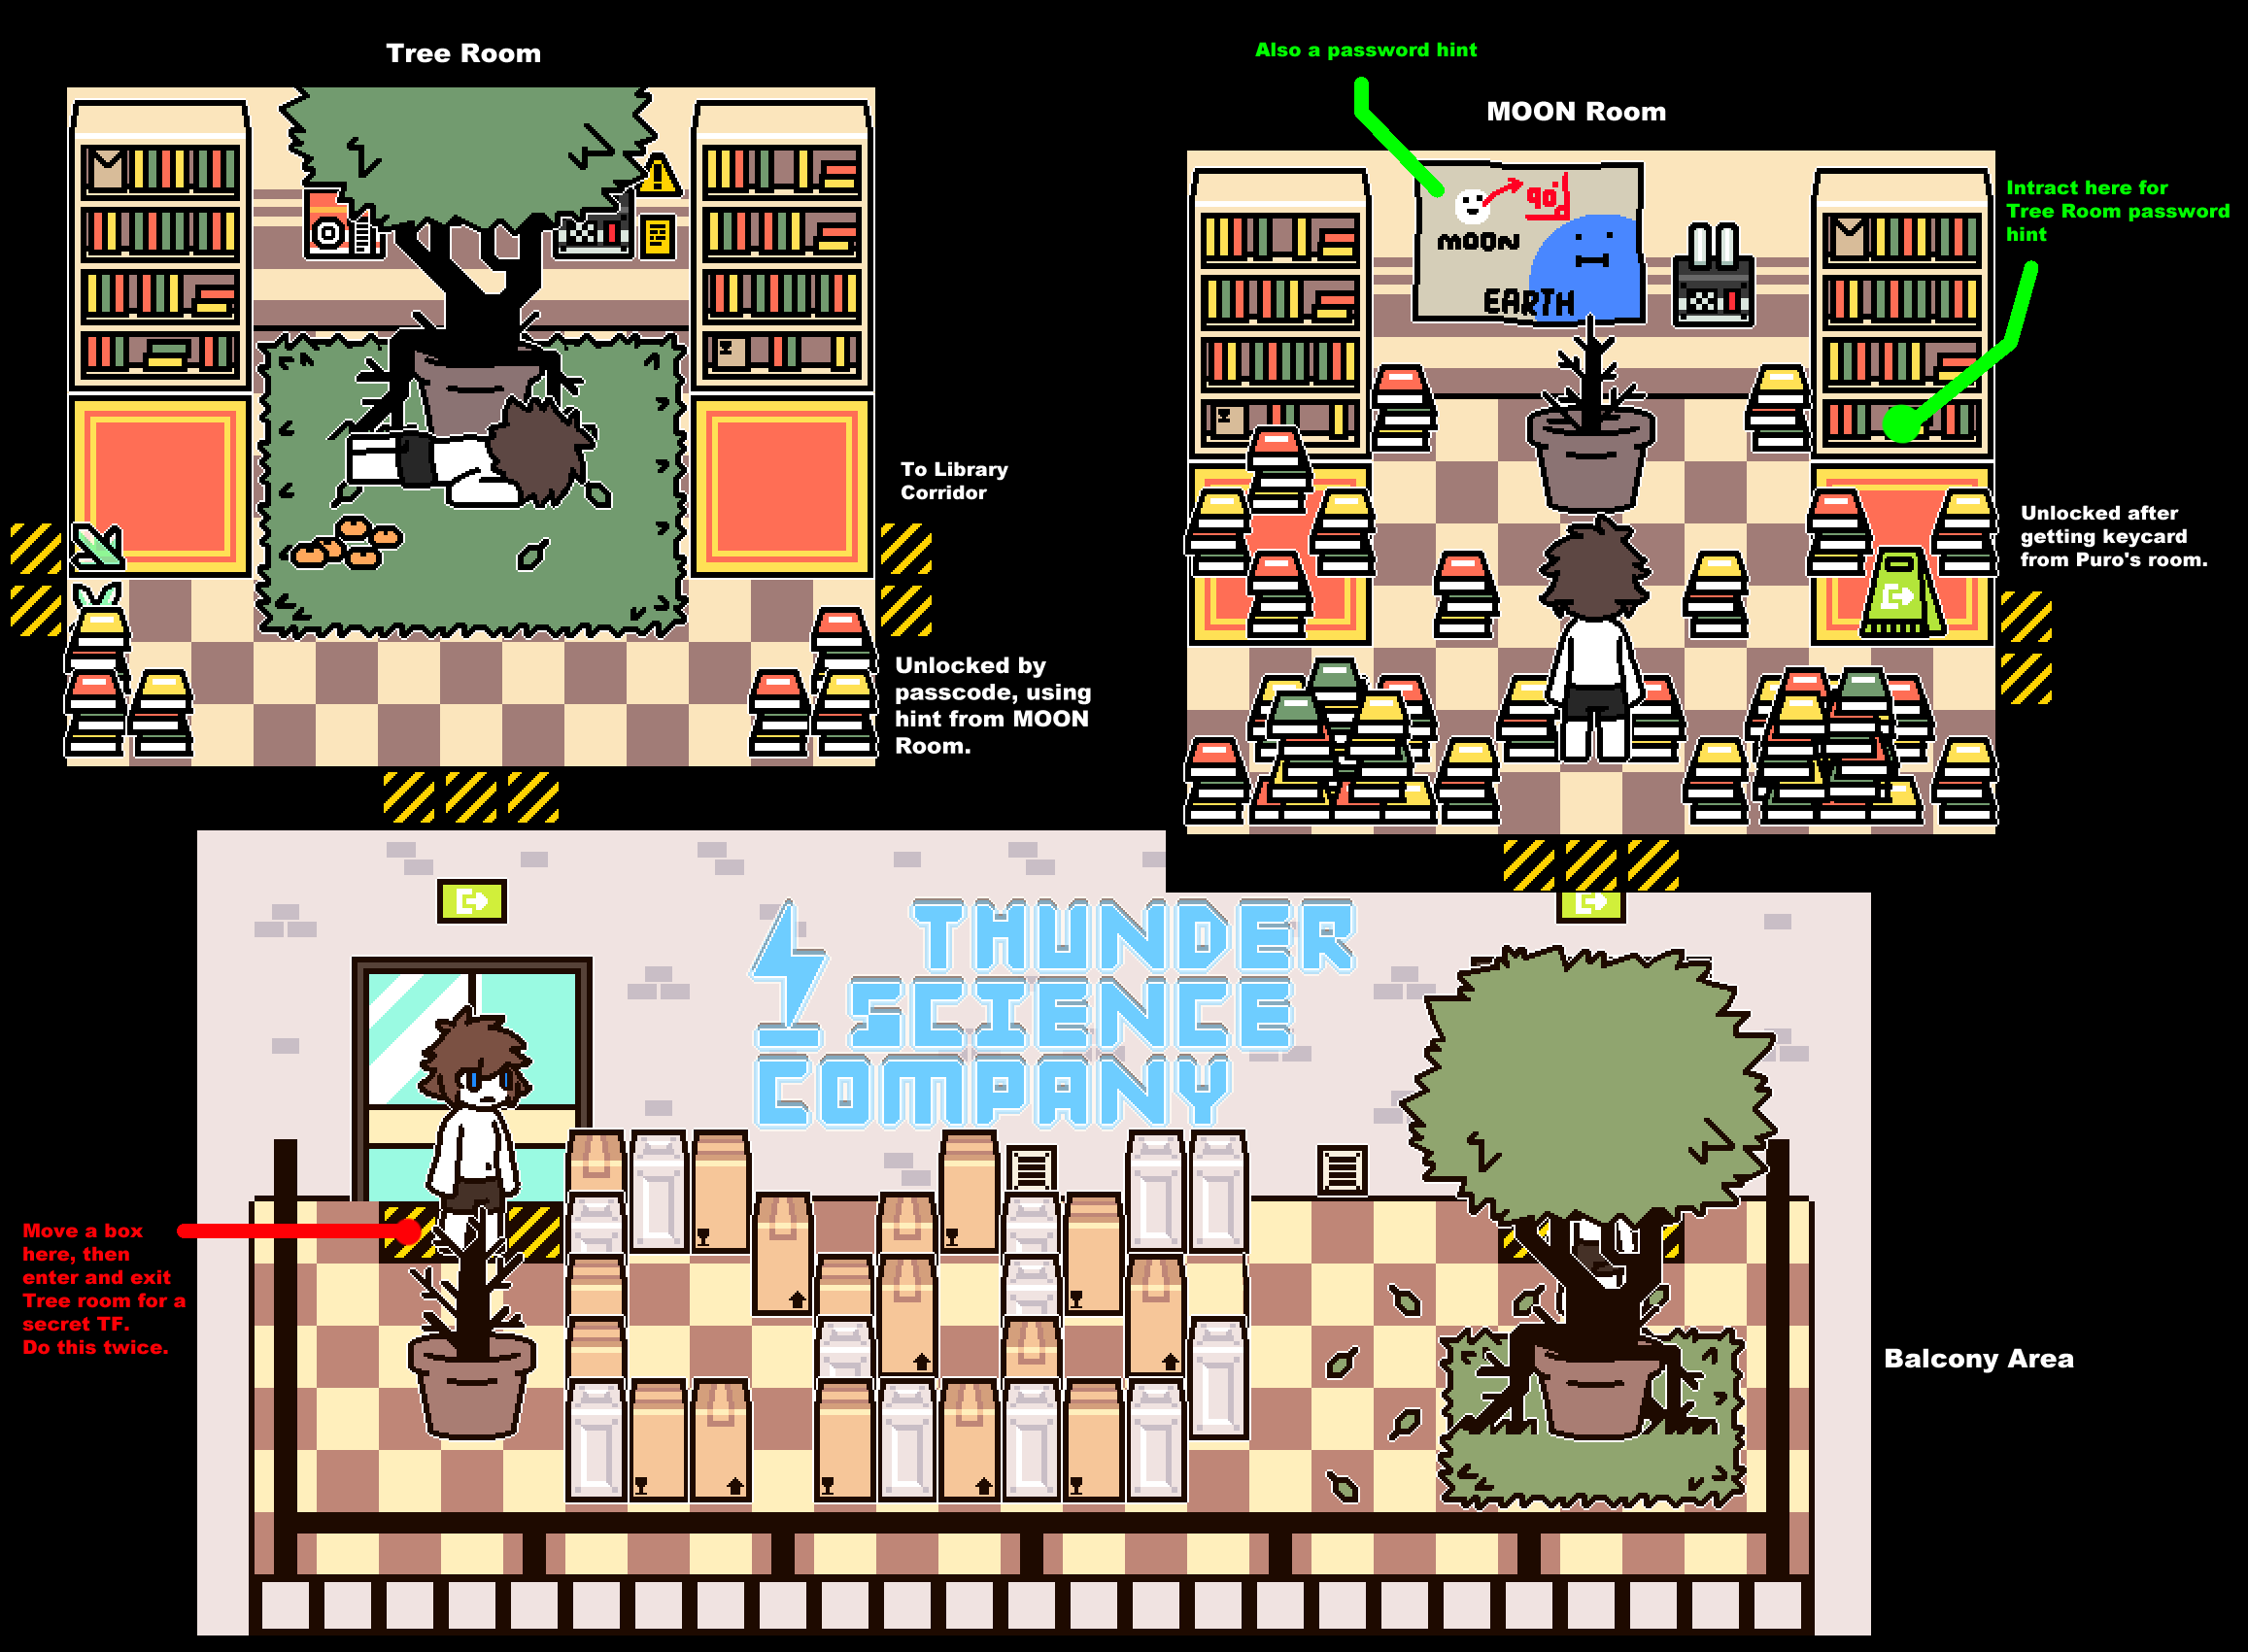
Tip: There’s also a secret death in this area. Move a box so that it’s blocking the left square of the Tree Room door. Then move up into the tree room and try to reenter the balcony. Go through the dialogue and attempt to pass through and you’ll get assimilated by an overly friendly snow leopard. NOTE: May take two times to trigger.
In this next room (that we’ll call the MOON room, because of the picture on the wall), there will be a locked door to the east. Don’t worry about that room right now, you’ll be back here later. Search around the room and you’ll find a hint to the password in the first room.
“Turn MOON 90 degrees” is the hint you’re looking for. May seem cryptic, but the solution is rather simple.Write MOON on a piece of paper, then turn all the letters 90 degrees right. Leave the room and go back through the box maze to the first room and input the code. 3002
TFs:
1. (NEW) Crow: Get hit by the moving crows on the balcony. Scene will show you getting attacking by a small flock of crows with some of them merging into you.
2. Snow Leopard: In the southern balcony room, move a box to the far left then exit and reenter. May take several attempts. Definitely one of the more “suggestive” TF’s. Features a the leopard pinning you against the balcony railing as it spreads some goop onto you.
Library Corridor
In this next room, you’ll want to make your way north. Watch out for the puddles of white goop and the circular shadows moving about. Run into these and you’ll be transformed. The path is pretty simple. The path is a fairly linear zig-zagging route. There’s a save point you can use. Then head up into the next room and be ready for a chase.
TFs:
1. (NEW) Circle: Stand/Walk under a shadow. You’ll turn into a white canine with red markings. Will feature a mid TF scene of the upper half of your body covered.
2. (NEW) Light Latex (M): Walk into a white latex puddle. Will feature of scene of your transformed self looking back with 1 hand on his butt.
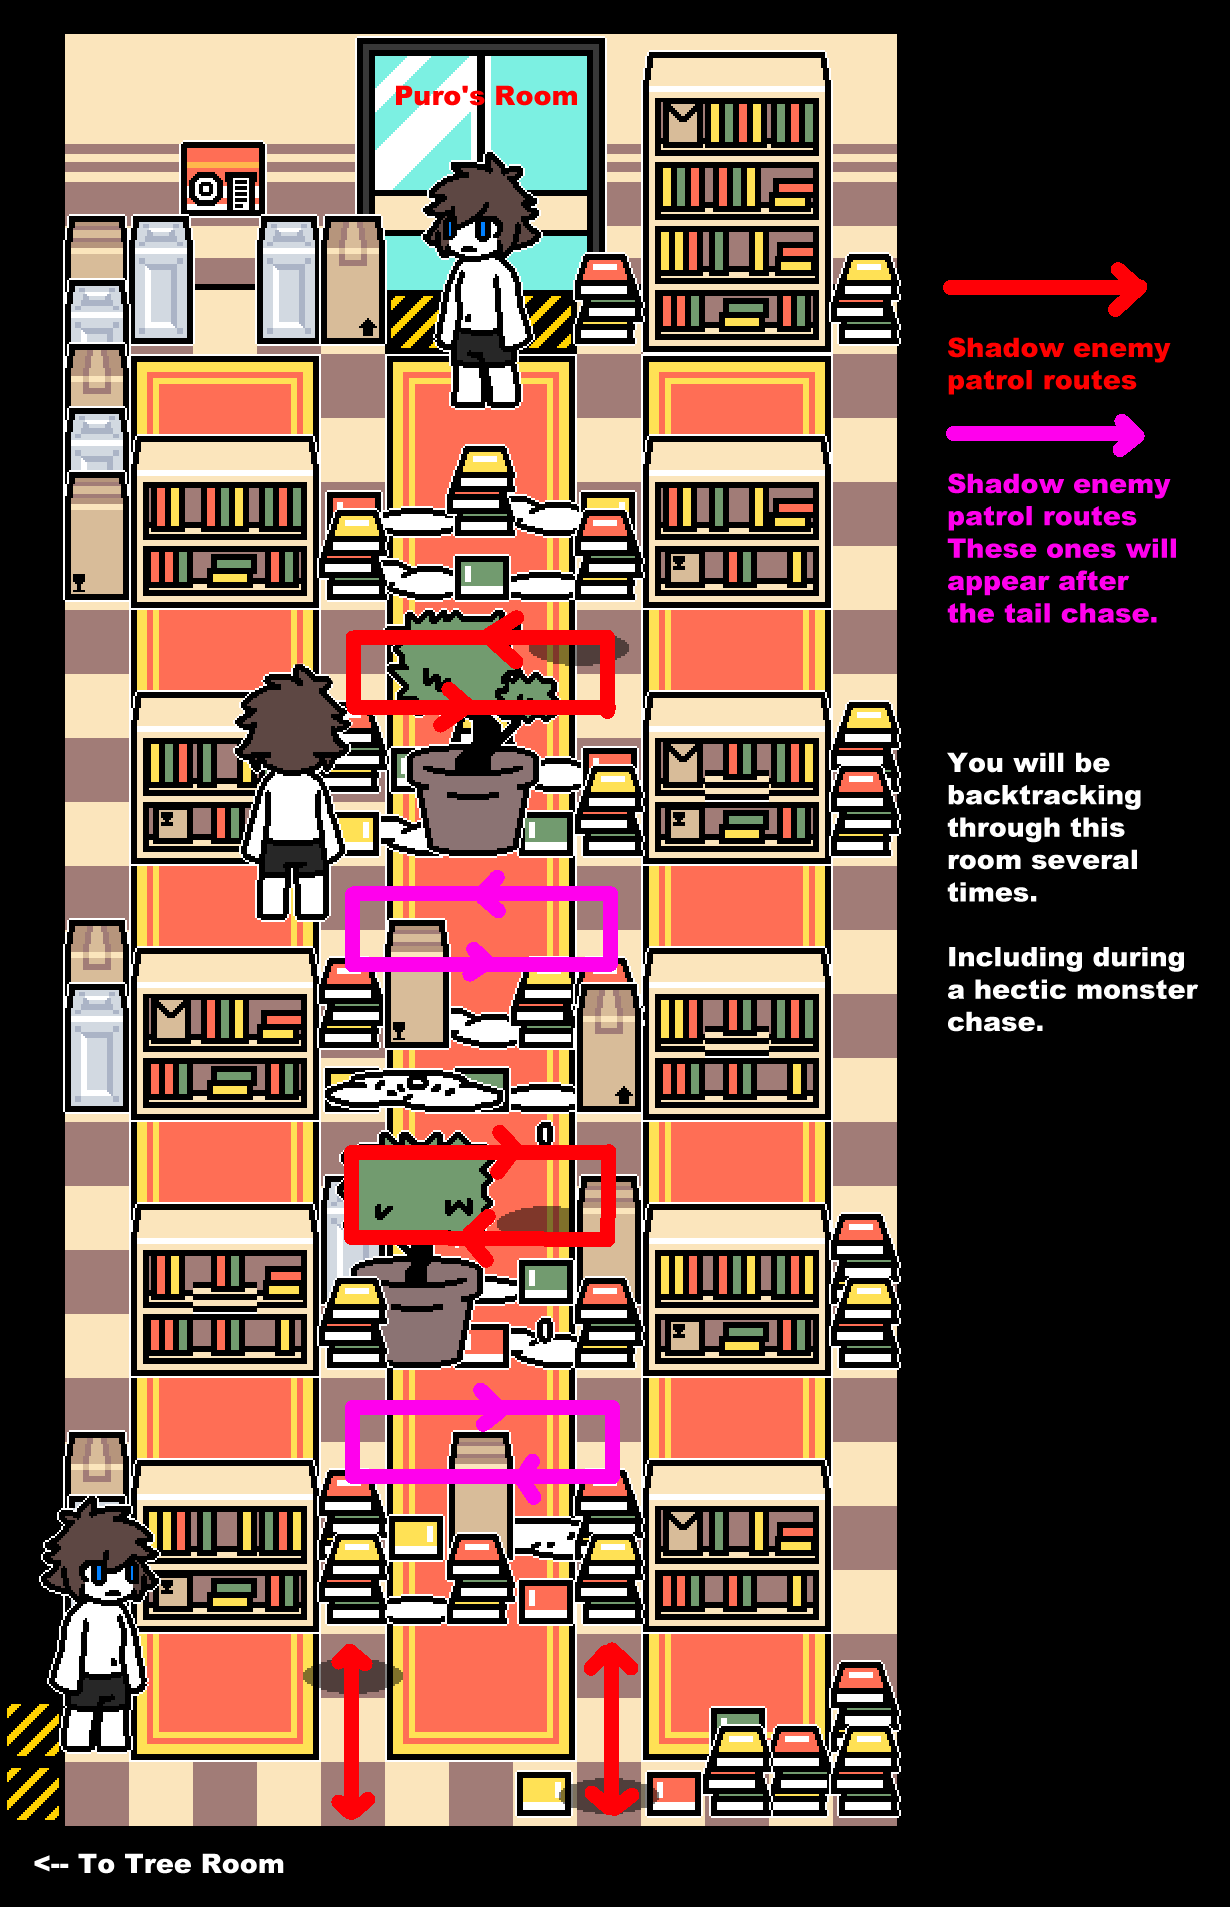
Library Tail Chase
Upon entering, a large white latex tail will notice you and begin to chase you. Immediately run out of the room back into the library corridor and get back to the tree in the first room. You’ll have to now quickly backtrack to the Tree Room.
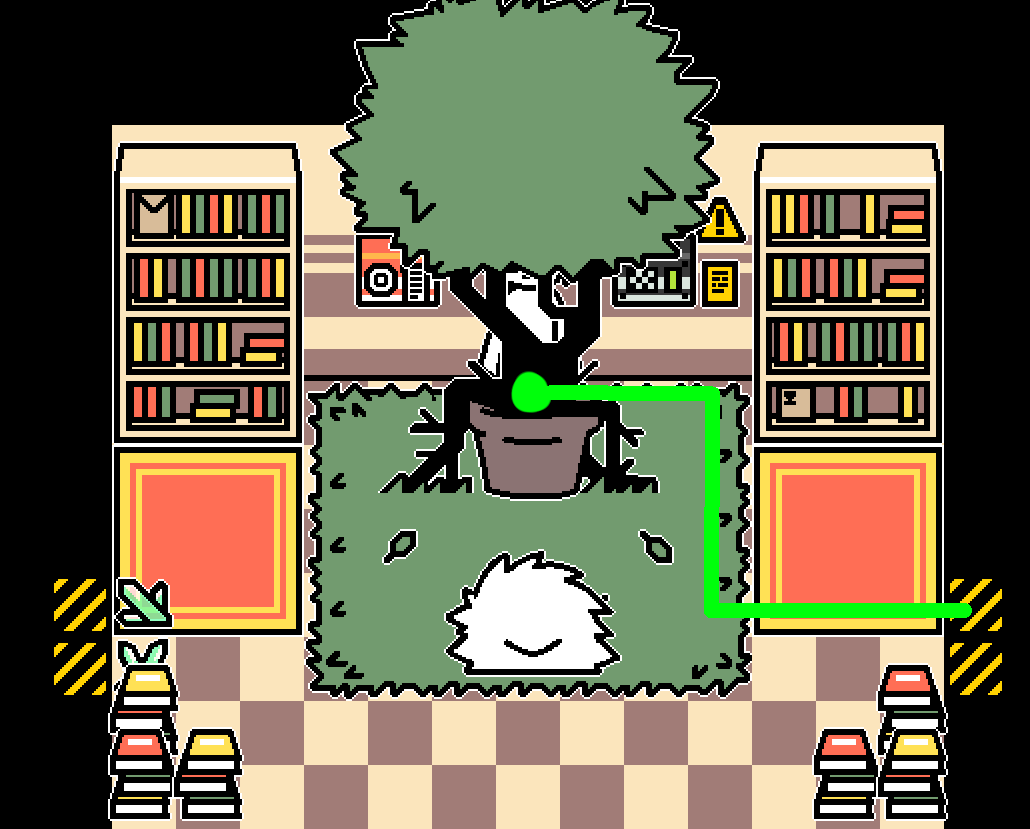
Avoid the shadows and latex puddles till you get back to the first tree room. Run behind the tree and wait there until the creature goes away. Save and then make your way back over to the room where the tail monster first chased you.
Tip: While waiting for the shadows to move out of your way. If an object (like a book shelf) is between you and the tail monster, it can’t get you. The tail monster is able to chase you by passing through the white puddles in the zig-zag obstacles in the room. And it will chase you if you pass any of those puddled gaps.
TFs:
1. (NEW) Kade: Get caught by the large tail monster. You’ll turn into a white fox with red markings. You’ll be on your knees looking at the front with a string of saliva from your finger and mouth.
2. (NEW) Kade + Circle Combo: Get caught by the tail monster while standing on a shadow’s patrol route. You’ll turn into an extra fluffy version of the Kade with more intricate red markings over your body. You’ll be seen sitting down resting your chin on your hands.
Meeting Puro
Here, you will encounter Puro, now with extra cute sprite animations. After the initial encounter, go ahead and talk to him again and he’ll show you where to find a key card to access a locked door. The human will automatically search for and find the key card. Not much else to here for now. The doors to the left and right are locked.
Backtrack over to the MOON room with the locked door, saving along the way. Use the key card on the terminal and enter the next room.
Tip: There are 2 white latex puddles in Puro’s room that will give you different TFs. You’ll also get a funny reaction from Puro.
TFs:
1. (NEW) Light Latex (M): Step on the right white puddle in Puro’s room. You’ll become a white canine giving Puro a tight hug.
2. (NEW) Light Latex (F): Step on the left white puddle in Puro’s room. You’ll become a white boobied female canine trying to seduce Puro.
Doctor’s Sniper Ambush
Upon entering you’ll be a wide hallway area. Both doors will lock and you’ll be greeted by the doctor again. After a scene he’ll fire a sniper shot through the glass and miss you. These shots are special darts that will transform you if you get hit in the head. He’s already wasted 1 shot, but he still has 3 more for you.
The gun sight will meander slowly around the room. Then occasionally quickly move a few spaces horizontally or vertically. The trick here is to shift-run past the sight in the opposite direction of the sight’s rapid movement. Ex: When the sight rapidly moves left, you move shift run right through it.
Dodge his shots 3 times, and he’ll run out of ammo and let you pass into the next room.
TFs:
1. (NEW) Dog: Get hit by the one of the doctors shots. You’ll transform into a german shepherd. Then you’ll get a scene of you trying to resist some mind control. But you’ll lose of course, and start wagging happily. You’ll be seen with your arms crossed, looking satisfied.
Tail Chase Number 2
Don’t walk too far to the right. First head up and save your game, then attempt to go right. You’ll see that the way ahead is blocked off and is one big dead end. Unfortunately, the tail from earlier will enter the room and start to chase you. Run through the linear path to get back into the MOON room. You will essentially make a giant U-turn to get back into the MOON room. While running around the room, avoid the puddles and those shadows that like to move at the most inconvenient of times.

Tip: It is possible to cheese this entire encounter by triggering the scene then waiting until the tail moves right a few squares, then running immediately left into the door.
TFs:
1. (NEW) Light Latex (F): Step into the puddles that have two lumps. It will be a mid TF shot of you mostly covered with some patches of skin showing.
Backtracking
Enter the MOON room and you’ll be safe from the giant tail monster for good. Head down towards the south door of the MOON room and get ready to mash that space bar for a quicktime event. Once you’ve dispatched the troublesome snow leopard suit, backtrack to Puro’s Room.
Careful, on the balcony. The crows will now be more active and fly up and down in pairs of two right next to each other.
TFs:
1. Snow Leopard Suiting: Fail the quicktime event in the MOON room. The living suit will zip you up inside of it.
PART 6: Maintenance Area (End of Beta)
Puro, Second Encounter
You’ll find Puro doing some housekeeping in his library. He’ll share some dialogue with you as well as the mysterious doctor, who will hop on the intercom to verbally harass you both.
After the dialogue you can talk to Puro again and choose the third option to Thank him to get a cute sprite animation out of him.
Note: Assuming that Changed-Special will follow the original and require certain conditions to get different endings, choosing the “Thank” option may be required for a future good ending. But as of right now, none of the choices mean anything.
Your next task is to try and find your way into the maintenance area. And the two previously locked rooms in Puro’s area will now be open.
West Library Room (Optional)
The door to the west leads to a dead end but if you want to enter. There is a sleeping white fox in the room. He’ll wake if you walk over the small white latex puddles. Move some boxes in the left side and enter the large vent. As you’re about to enter, Puro will walk in and get you another funny scene.
You’ll find yourself in a long narrow horizontal shaft. Head right and you’ll see a large vent on top as well as another small doorway opening from south. But a white latex (M) puddle blocks your way. You’ll have to head back to Puro’s area and find another way in.
Tip: If you go to this western library room first and try the vent tunnel. You’ll get some more cute animations from Puro when you go back to his area. He’ll just tell you to go to the East Library Room.
TFs:
1: (NEW) Shizi: Get caught by the sleeping fox. Will give you a mid TF scene of the creature merging into your back. Trivia fact: This is also the character of the game’s BGM composer.
2. (NEW) White Latex (M): Run into the puddle from the left side of the vent shaft room. Will feature a mid TF scene of you looking happy as the goo runs down your body.
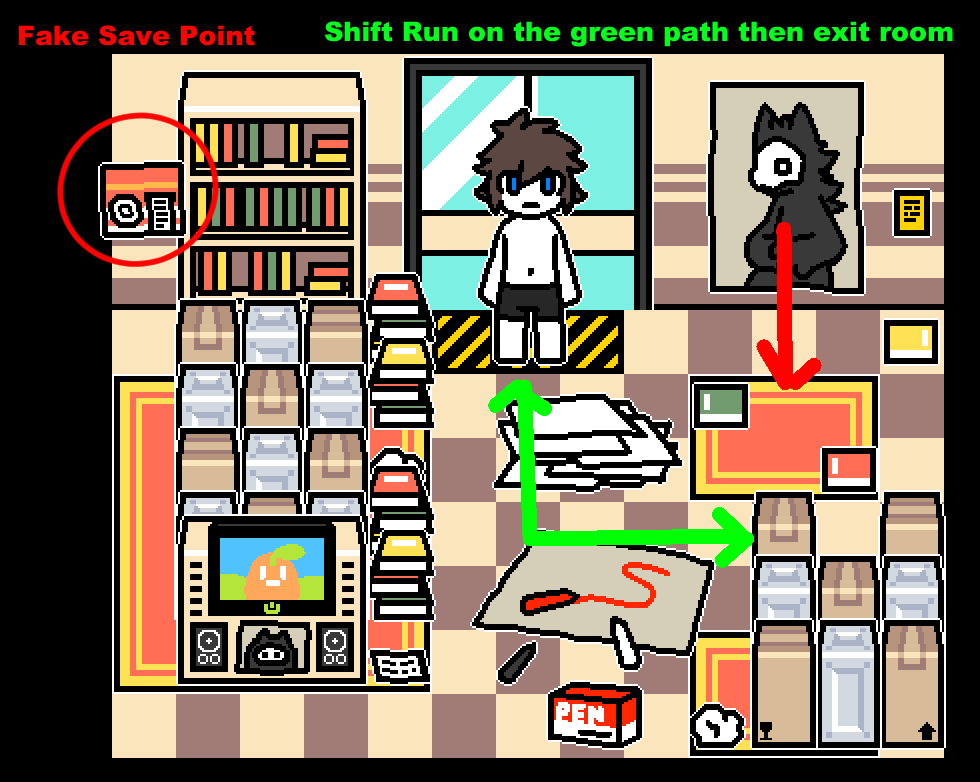
East Library Room
The room you really want to enter is the eastern room to the right side of Puro’s Library room. In this room, you’ll find your first fake save point. DON’T walk towards it unless you want a transformation.
You’ll see a drawing of Puro in the upper right. There is door behind it but first you’ll have to trigger the fox hiding behind it to bust through that painting. To do this; shift run along that green path then quickly exit the room once the fox comes out. Reenter, and the fox will be asleep. Sneak past him to enter the maintenance tunnel you saw earlier from the western room.
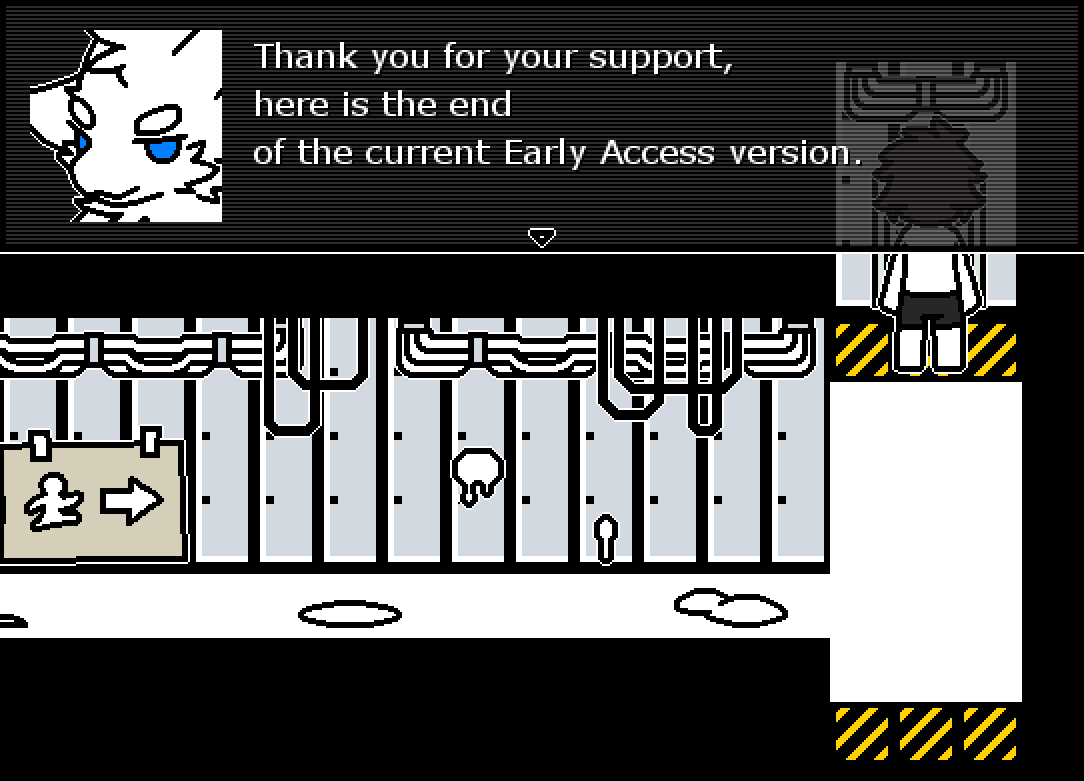
Head up to the vent and the game will be over. You’ll get a dialogue box from the developer. And now you’ll have to wait until the rest of the game gets finished up.
TFs:
1. (NEW) Yuin: Get caught by goo from a fake save point. You’ll be become a white purple haired goat. You’ll giving a cheeky look while holding your removed pants with one hand.
2. (NEW) White Latex (F): In the vent shaft from the East Library room, walk into the double lump puddle. You’ll be winking and giving a thumbs up as your new TFed self.
Nothing else to do anymore. If you go back to Puro’s room after getting the developer’s dialogue, he’ll be missing from the room. You’ll be able to peek through the vent at the top to get a sneak preview of another area in the game.
But yeah, this is as far as the publicly released portion of Changed-Special goes to. I believe there is some more content if you are a Patreon of SnowDragon and have that version of Special. But it’s still in development as far as I know.
This guide will only cover finished publicly released to Steam stuff.
———————-
If you enjoyed this guide, be sure to give it a like. Did I miss something? Feel free to let me know in the comments section.
Special Thanks:
AlphaDawgy ♔ – For showing an alternate path during the Cat Room chase.