Overview
This is an updated tweak guide to my original, meant for v1.1.3. There have been numerous changes by NWI under the hood, so I had to change some of my tweaks. If you’d like to see the old guide, you can still find it HERE. These tweaks don’t always fully eliminate the microstutters, but they pretty much get rid of the big hitches and make things smoother overall.
Introduction
***I used to recommend the older 399.24 nVidia drivers for anyone with a GTX 10×0 or earlier card, since they used to be MUCH better than any of the 4xx drivers have been. But that has changed with the new 419.67 “CRD” drivers — they are the FIRST and ONLY 4xx series drivers I’ll recommend, and have actually been better than the old standby 399.24’s for me. Get them!***
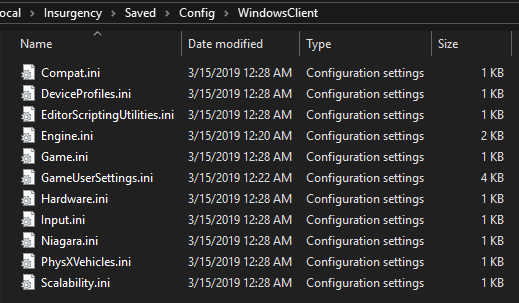
First things first: after updating to v1.1.3, you need to navigate to your Sandstorm INI files and DELETE all them, then relaunch Sandstorm and redo your audio and video settings in order to recreate the INI files fresh. You can then quit Sandstorm and navigate back to the folder to do the editing.
The INI files are located here in Windows (you should back them up now, in case you want to just drag them back and go back to your previous settings): “%LOCALAPPDATA%InsurgencySavedConfigWindowsClient”.
Relevant parts of my system for your comparison are: i7-3770k @ 4.5GHz, overclocked GTX 1070 8GB, 32GB DDR3 RAM, latest Windows 10 Pro, Tweakforce Xtreme-G Modified nVidia Drivers (get them https://www.reddit.com/r/XtremeG/new/ if you want them, 1TB Samsung 850 Pro SSD, 27″ 2560×1440 @ 120hz.
Now, onto the updated guide…
Initial Settings (Before Editing Your INI Files)
You will want to set Sandstorm up with whatever settings you already normally use, and just add my INI tweaks to them afterwards. Not every system runs the same, and your settings will work better for YOU.
*(REMEMBER when you edit your INI, if you change any settings in-game afterwards, you might have to go back into the INI and redo the changes again.)*
Display Mode: Fullscreen
Resolution: Your Preferred Resolution
Vertical Sync: ON (avoids tearing that seems worse in v1.1.3 — this will be forced to “Fast” in the nVidia control panel later)
Gamma: 2.18 (looks nicer/richer to me than the default 2.2)
Field of View: 90.0 (any higher looks weird and hurts performance)
Anti-Aliasing: TAA (we’ll tweak this in the INI to look very good, don’t worry)
Texture Quality: I’d try to keep this at Very High or High, if possible.
Effects Quality: Affects performance somewhat, lower to High or Medium.
Foliage Quality: Affects performance somewhat, lower to High or Medium.
Shadows Quality: Affects performance A LOT, so lower this to High or Medium.
Post-Processing Quality: I’d try to keep this at Very High or High, if possible.
Frame Rate Smoothing: ON (actually does seem to help keep things smoother)
Frame Limiter: Set this to your monitor’s refresh rate to limit tearing and skipping.
Motion Blur: Off
Scope Setting: Normal
Dismemberment: On
Ragdoll Count: Low
Super Sampling: Off (hurts performance noticeably)
Ambient Occlusion: Off (EXTREME performance killer, NEEDS to be off)
Anisotrophic Filtering: Use 8x or 16x (doesn’t hurt performance, but really helps visuals — so keep it high)
Tesselation: On (doesn’t really reduce performance much, but REALLY helps visuals — so keep it ON if poissible)
Screen Space Reflections: Medium (I don’t really see a big difference between Medium and High, so I keep it on Medium for more performance)
Dynamic Shadow Resolution: Depends on your card, but usually 512×512 is a good setting for most.
Cascaded Shadow Map Resolution: Depends on your card, but usually 512×512 is a good setting for most.
Texture Streaming Pool: High (We’re going to tweak this value later. I believe that turning this OFF and thus not limiting it to a value fills up your GPU RAM and causes stutters. But, setting it to Low (400MB) or High (1GB) limits it TOO much.)
OK, now quit Sandstorm and navigate to the INI folder again to start our edits.
Editing the Engine.ini
Next, open up Engine.ini in your WindowsClient folder (it should open in Notepad). All that should be in this INI at the moment is [Core.System] with a 10 lines that start with “Paths” (do not edit these). Here is what it should look like stock/undedited:

(*PAY CLOSE ATTENTION to the part that says “r.Streaming.LimitPoolSizeToVRAM=5120” and “r.Streaming.PoolSize=5120”. That value should be 62.5% of your total available video card RAM! My GTX 1070 has 8GB, or 8192mb, of RAM. 62.5% of 8192MB is 5120MB, thus my value there. I will list common values so you don’t have to do the math yourself:
Total VRAM – – – Use This Value
…..12GB – – – – – – – – – 7680…..
…..11GB – – – – – – – – – 7040…..
……9GB – – – – – – – – – 5760……
……8GB – – – – – – – – – 5120……
……6GB – – – – – – – – – 3840……
……4GB – – – – – – – – – 2560……
……3GB – – – – – – – – – 1920……
……2GB – – – – – – – – – 1280……
……1GB – – – – – – – – – 640…….
At the bottom of the document after the [Core.System] section, add the following lines (Easily copied from this list):
That last part helps make TAA a much nicer-looking option, and isn’t too crazy with system resources. I sharpened textures up a bit to counteract TAA’s tendency to blur/smear the image. (If this is too much for your system, you can try lowering the “r.TemporalAASamples=16” value to 8 or 4. The default setting is only 2!)
Here is what my Engine.ini looks like after the edits:

Save the Engine.ini document and close it. Next we’ll edit the GameUserSettings.ini found in the same folder.
Editing the GameUserSettings.ini
Next, open GameUserSettings.ini. It should also open in Notepad. Scroll down and look for, or do a find for “OverrideOptions=” (no quotes), as that is what we are looking to edit. This is what mine will show:
(*AGAIN, PAY CLOSE ATTENTION to the part that says “r.Streaming.LimitPoolSizeToVRAM=####” and “r.Streaming.PoolSize=####”. Note that you will have to ADD the (“r.Streaming.LimitPoolSizeToVRAM”, (Value=####,bModified=True) part to your INI, as it will not be in there by default.Here is my chart again for reference:
Total VRAM – – – Use This Value
…..12GB – – – – – – – – – 7680…..
…..11GB – – – – – – – – – 7040…..
……9GB – – – – – – – – – 5760……
……8GB – – – – – – – – – 5120……
……6GB – – – – – – – – – 3840……
……4GB – – – – – – – – – 2560……
……3GB – – – – – – – – – 1920……
……2GB – – – – – – – – – 1280……
……1GB – – – – – – – – – 640…….
You will want to change or add the following lines within that “OverrideOptions” section:
Again, the “Value=####” will need to be filled with the value from the chart above, based on your total VRAM.
Next, search for “Limit”. There may or may not be a line called “FrameLimit=###” and/or “FrameRateLimit=###.######”. If one or the other isn’t there, add it. Make sure they are the same value as each other. You can change it to anything you’d like if the in-game options are too restrictive (e.g. you can set them to 75 and 75.000000 respectively for a 75 fps limit).
Next, search for “DisplayGamma=2.#####”. I like this set to “DisplayGamma=2.18000”, as it makes the game look lusher and deeper than the default “2.20000” setting.
Next, if it isn’t in the INI yet, add these lines to get rid of the tutorial prompts:
SeenMenuPrompts=TutorialPrompt
SeenMenuPrompts=GametypeModalCooperative
And Lastly, scroll to the bottom of the INI, and you’ll find a section named [ScalabilityGroups]. It shouldn’t have changed anymore, but just in case, check to see if “sg.ViewDistanceQuality=3”, and not “sg.ViewDistanceQuality=2”. Makes a big difference in view distance quality, and was something NWI changed in the old v1.1.1 patch, but seem to be back to 3 in the newer patches. But, just in case…
OK, we’re done! Save the GameUserSettings.ini document, and close it. It is optional now to right-click on the 2 INI files we edited, select properties, then check the “Read-Only” box and then OK. That will make it so things can’t be changed again by the game. But if you need to do some more tweaking to the in-game settings, you can always go back and uncheck the “Read-Only” box, and you’d probably want to do that before any patch/update as well.
Next, we’ll edit the nVidia Control Panel settings.
Editing the nVidia Control Panel
Open your nVidia Control Panel (you can usually right-click on the desktop and select it from the context menu).
When the control panel opens up, navigate to “Manage 3D Settings” under the first section. It is up to you here whether you want to make this a GLOBAL change (ALL games will use these settings), or just Sandstorm (will be under the Program Settings tab, then in the dropdown menu select “Insurgency Sandstorm (insurgency.exe)”). Scroll to through and change the following settings to:
Ambient Occlusion = Off
DSR – Factors = Off
Power management mode = Prefer maximum performance
Preferred refresh rate (Digital Display) = Highest available
Shader Cache = On
Texture filtering – Anisotropic sample optimization = On
Texture filtering – Negative LOD bias = Allow
Texture filtering – Trilinear optimization = On
Threaded optimization = On
Triple buffering = On
Vertical sync = Fast
The rest can stay at “Application-controlled” or default. Hit Apply to save the settings.
OPTIONAL: As seen in the recent guide by CNN is FAKE NEWS. I don’t know if this actually will help you or not, but it seems it has helped some people — so I’ll include it here. Navigate to “Configure Surround, PhysX” under the “3D Settings” section. In the dropdown menu under “PhysX settings –> Processor:”, change it “CPU” and hit Apply.
Now you can close the nVidia Control Panel. That’s it! You should be ready to launch Sandstorm again and see if these tweaks helped. Spread the word if it does!
Closing
Please, if this guide helps your stuttering problems, pass it on to others to try! I am not a programmer or a developer or anything, I’m just a guy who likes the game and wants to see it succeed. I also want to play without wanting to smash my keyboard into my monitor… LOL!
Thanks an happy gaming!
El Asso Wipo