
Overview
A comprehensive guide for both new players and current players alike. Have all your questions answered here.
Introduction
IF YOU ARE COMFORTABLE WITH THE MECHANICS OF THE GAME AND WANT ADVICE CONCERNING PROGRESSION, PLEASE REFER TO THE SECTION “PROGRESSION TIPS AND STRATEGY“.
If you are familiar with the popular clicker/idle game “Clicker Heroes”, then you should feel right at home with this game. If not, then let this guide bring you up to speed on the gameplay basics.
First is first, download an autoclicking software. This can help tremendously – especially when it gets to the active ability usage because clicking is invaluable during those moments. Keep in mind that for long term playing, clicking damage and clicking critical buffs become the best investments. This should illustrate that clicking is indeed a very important aspect of the game.
(As a Windows 10 user, I use GS Autoclicker. It is a very simple and easy-to-use program.)
Basic Mechanics and Floor Progression
Battle through each room eliminating all monsters. Every fifth room is a boss fight where it is necessary to defeat the boss in the allotted time in order to progress further.
More specifically, each room ending in a 0 or 5 is a boss fight. Every other room has 10 monsters you defeat in order to progress. You can reduce the number of monsters in each room by purchasing “illnesses” (described later).
Note: Make use of the “Automatic Progress” button on the right side of the UI. This will continually climb your room automatically. If you encounter a boss fight you cannot yet beat, then it will bring you to the previous room allowing you to farm teeth.
Briefcases, Chests, Crystals, and Flies
Briefcases:

Chests:

Crystals:

Flies:

Note: If you look at the description for the illness Ludomania, it says that it increases the durability of chests while Teeth Knocker is active. That was found to be a typo by the user Adrenaline Rush. It actually increases the durability of chests while Broken Jaw is active.
Small Note: There is not a set name for the “fly”. The game files refer to it as a “flying item” so the term “fly” should be sufficient.
Idle Mode
If you are considered inactive by the game for 60 seconds, Idle Mode will trigger. During idle mode, any idle DPS and idle teeth gain buffs from Illnesses and Equipment will be activated.
Idle Mode will end or have its timer reset if the following occurs:
- Clicking on the monster
- Manually activating an ability (either through clicking or using the hotkey)
For clarification, the following do not interfere with Idle Mode:
- Collecting teeth
- Clicking on a briefcase (even when over a monster)
- Clicking on the fly (even when over a monster)
- Purchasing levels/skills, changing levels, going to equipment, going to setting, going to shop, etc.
Note: You get one free click on the monster in which Idle Mode will not deactivate. After the second click, Idle Mode will be deactivated.
Note Concerning Active Abilities: Active abilities which have a time duration (i.e. everything except Hellish Ritual, Lens of Darkness, and Mad Hatter’s Clocks) also disable idle mode during the entirety of its duration. For example: if your active ability Titan Strength lasts 90 seconds, then Idle Mode does not activate after the first 60 seconds. Rather, it will activate 60 seconds after Titan Strength’s duration is over (90 seconds + 60 seconds = 150 seconds from the very beginning). This property prevents you from including idle damage and idle teeth gain buffs into any active ability combination.
While in Idle Mode, the words “(Idle)” will be next to the DPS as shown in the image below:

Amnesia, Sins, and Illnesses
The 20th pet to unlock is Bug. Bug’s last ability gives the player the option to go through amnesia. Amnesia resets the current game: all pet levels go to zero, and you start at the first room again. However, you earn sins. Unspent sins give a +10% to damage as long as you have them. Sins can also be used to purchase illnesses which give additional bonuses.
Sins can be obtained through two methods: pet level and bosses. Every 2,000 total pet levels gives a sin, and there’s a chance that bosses after level 100 will drop a sin (items and illnesses can increase this chance). If a boss has a red, glowing circle underneath them, then that means they will give sins upon death (amount of sins is based on room number). Remember, before you undergo Amnesia make sure to dump all your teeth into pet levels in order to gain more sins.
The first time you should consider undergoing amnesia is at least room 102. This gives you probably about 3 sins, a piece of equipment (discussed later), and a pet enchantment (discussed later). Using amnesia any earlier than this will not make the next round of leveling as easy.
The first level of each illness is FREE. So when you unlock illnesses, go ahead and buy the first level of each one. This will also encourage you to see the different perks and what they do.
A good rule of thumb is to keep between 75% to 80% of your total sins earned without spending them. This means to go through the first few amnesias without spending any of the sins. By doing this, you ensure you are making your DPS rapidly progress during the beginning stages. If you click the button to go through Amnesia, it will tell you how many sins you will earn. Use this to keep track of your progress.
Important Note: The most important illness to invest in and max out early on is Bulimia (reduces cooldown of active abilities). It is also really cheap to max out. The importance of having quick-cooldown abilities is discussed later. Keep in mind that the maximum cooldown is -75% (achieved through maxing Bulimia). Once you have maxed Bulimia, you can ignore equipment which decreases cooldown rate as they will have no impact on the cooldown.
Equipment
Basics:
Equipment can be earned randomly as drops after beating floors past 101. The level of the equipment corresponds to the floor beaten in order to receive it (e.g. a drop from floor 101 will be level 101, a drop from floor 402 will be level 402). Equipment comes in different rarities and with different abilities. Naturally, equipment also stays with you throughout amnesia progression.
You may also choose to earn equipment by buying the bakckpack through spending crystals in the shop. The equipment obtained here is of a level equal to the highest room you have completed (e.g. the highest room you’ve beaten is 378 so the backpack will drop three pieces of level 378 equipment).
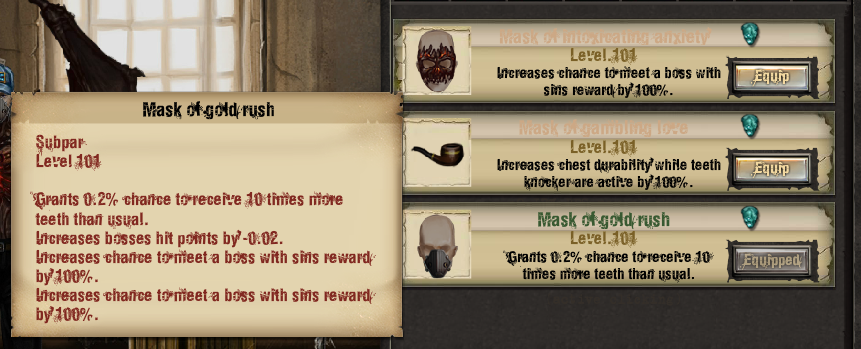
Important Note: Equipment may have more than one perk associated with it. Hover your mouse over the equipment image icon to see the full list of perks. (Thanks to Panda for his PSA regarding this.) Refer to the following picture. Notice how “Mask of Gold Rush” shown in the equipment window only lists one perk, but hovering the mouse over the icon shows a full list of the buffs.
Rarity and Parts:
Each piece of equipment has one of five rarities and can be sold (“reforged”) for parts. These rarities, color code, and part values from most common to most rare are as follows:
- Flawed – Light Gray – 10 parts
- Subpar – Green – 20 parts
- Mediocre – Blue – 50 parts
- High – Orange – 100 parts
- Legendary – Yellow – 250 parts
- Divine – Purple – 500 parts
(*Thanks to foracekryr for correcting the rarity list*)
Keep in mind that rarity has NO impact on the abilities for that piece of equipment; rarity only affects how many parts you recieve if you sell the item.
Reforging an item causes the item to stay the same level but randomizes the perks associated with it. There is a small chance that the item will either increase or decrease in quality. Because reforging requires crystals, do NOT sell and reforge items. There are very few equipment perks that are actually useful, and even these often have associated bugs.
Types and Perks:
There are eight different equipment slots. From left-to-right on the equipment screen, the types are as follows:
- Weapon
- Headgear
- Mask
- Ornament
- Gloves
- Trousers
- Shoes
- Chest
The equipment is named after the first perk (i.e. the first perk listed in its full description). Even if the item has multiple perks, the name remains unaffected. It seems that all perks are available to each type of equipment.
The following table corresponds the name of a perk with its effect. Note: These values correspond to equipment which have these perks as the only one; some of the bonuses change in items which have multiple perks. Additionally, these are the bonuses for level 101 equipment. Higher level equipment multiplies these baseline values.
Pet Enchantments and the Best Pets
READ THIS: Due to a recent experiment from user Umbra, it seems that Jester’s Chest is the BEST minion to spend money and enchantments on. The calculations which follow in this section need to modified to more accurately represent minion efficiency and account for this. I will update the section with more correct calculations when I have arrived at a better solution.
Beginning at level 100, every ten levels yields a random pet enchantment for your minions (100, 110, 120, 130, etc.). You can only get this enchantment once over all amnesias (i.e. you beat level 100 and amnesia – beating level 100 again will not give you a pet enchantment, you must beat level 110 now for the next pet enchantment).
Each level of pet enchantment grants a +50% DPS for the pet. You can use sins to move pet enchantments to other pets:
- 80 sins: Upgrade – takes a random pet enchantment away and adds it to the selected pet
- 3 sins: Degrade – removes a pet enchantment from the selected pet and adds to a random pet
Important Note: Only use the Upgrade option in order to move pet enchantments around. Using the Degrade option may cause the pet enchantment go to a super-late game minion which you will be unable to unlock for quite some time (and you cannot move pet enchantments on locked minions). Additionally, it costs far less time to use the Upgrade option.
The most important minions to enchant and buy levels for follow this order from best to worst:
- Cobra
- Scorpion
- Sundew
- Jester’s Chest
Other minions are just too inefficient compared to Cobra in order to be worth any serious investment.
In the end, you will want all enchantments put on Cobra. However, it does cost sins so rerolling enchantments to any of these minions above is adequate until you start accumulating a large number of sins for relocation. Refer to the justification at the end of this section to see how this hierarchy of minions was determined.
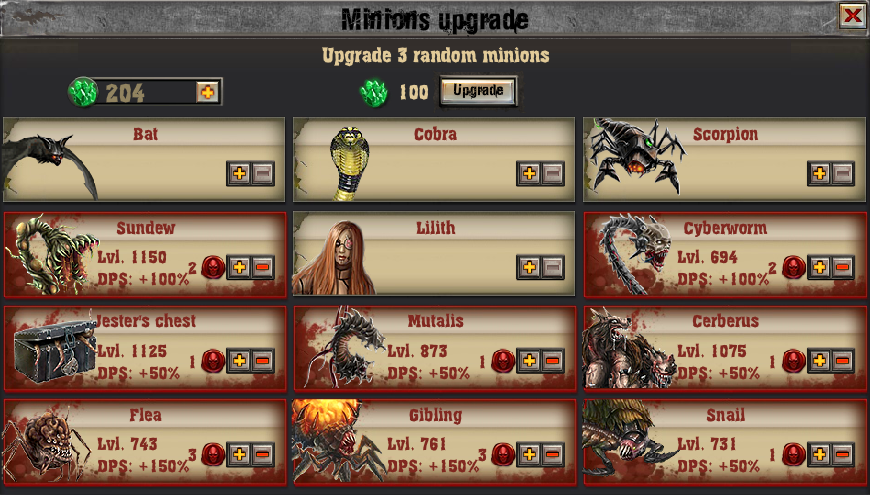
The following image shows the Minion Upgrade screen. The Level refers to the current pet level you have purchased (it has no effect on pet enchantment). DPS shows the total added DPS. The number next to the red icon indicates the number of pet enchantments on the given minion.
For fun, if you want to see a full list of pet costs and skills, check out foracekryr’s guide:
[link]
How the best minions were determined:
As mentioned before, the best four minions from best to worst is Cobra, Scorpion, Sundew, Jester’s Chest. These parameters were determined within a single Amnesia setting. The following steps were taken to ensure proper data calculations:
- All DPS data was taken during Idle mode
- DPS was corrected for pet enchantment bonuses
- All minion skills were purchased prior to data collection
- Same amount of unused sins between all data sets
- Same equipment between all data sets
The below table summarizes the findings. Data was taken at Level 200 as well as Level 1025 in order to determine consistency. The important aspect is “DPS/Cost” – this determines the efficiency of the minion. It essentially marks how much DPS you will gain per tooth invested at that level. Next, each value of DPS/Cost was compared to the highest holder, Cobra. This comparison shows how efficient the given minion is when contrasted with Cobra.
Currently, I will only list the first twelve minions Cobra through Techscarab (take my word for it that the rest of the minions are less efficient than these twelve).
Do notice that the Comparisons taken at level 1025 are ever so slightly higher than those at level 200. To be exact, from level 200 to level 1025, the comparison-to-cobra metric increases by 0.34% across all minions. This may be due to hitting the first x10 multiplier at level 1000, or this could be a property of ratios becoming smaller as numbers increase. Regardless of cause, more data will be taken when I can compare these minions comfortably after the 2000 level mark.
Active Abilities
Active Abilities are very important to efficiency of getting past tough bosses, quickly clearing levels between bosses, and getting past the big wall between Dendroid and Spider. This makes maxing out the Bulimia illness very important as you can implement huge amounts of damage every 15 minutes rather than every couple of hours.
Big thanks to Noodleking for his contributions regarding active abilities. The active ability strategy below is based on his method.
The best order to use active abilities is below (Hotkey Number and Full Name listed):
- 1 (Flurry of Blows)
- 2 (Titan Strength)
- 3 (Weak Spot)
- 4 (Teeth Knocker)
- 5 (Broken Jaw)
- 9 (Mad Hatter’s Clocks)
- 8 (Lens of Darkness)
- 7 (Insane Rage)
- Then use 5 (Broken Jaw) again after 30 seconds
This order is very important. Broken Jaw cannot be buffed to last more than 30 seconds (illnesses can be bought in order to extend all other abilities – the exception being Hellish Ritual). By using Mad Hatter’s Clocks on Broken Jaw, you can effectively double it’s ability time. Use the active ability timers as a reference to know when to activate the second Broken Jaw ability. Continuing, Lens of Darkness buffs the x2 click damage increase of Insane Rage for a total buff of x4 click damage from the Insane Rage usage.
Make sure to use an autoclicker during this time to really see the huge amount of DPS output.
Use Hellish Ritual (6) whenever it is available to add a small amount of DPS. Even if used in conjunction with Mad Hatter’s Clocks and Lens of Darkness, the gain is too small, and it is overshadowed by the raw DPS output of the order listed above.
When you are waiting for your longer cooldown abilities (e.g. Insane Rage, Broken Jaw, Lens of Darkness), use your 1 and 2 in combination to clear out some levels (and maybe even a boss). Depending on how active you are, you may also get in a 1,2,3,4 combo during this time without prolonging your wait to use all active abilities at once.
Note: According to my calculations, using Lens of Darkness + Insane Rage is the most powerful combination for most of the time you will be playing Insanity Clickers. However, if you play long enough to acquire a x250 critical damage bonus, then you should begin changing the active ability order to 1,2,4,5,9,8,7,3, then 5 again after 30 seconds. In this order, you use Lens of Darkness + Weak Spot which will yield a slightly higher DPS.
The following are additional active abilities mechanics:
In the instance of trying to stack abilities by using Mad Hatter’s Clocks (e.g. Insane Rage + Mad Hatter’s Clocks + Insane Rage again), only the last ability will count (the one which was not influenced by the Lens of Darkness buff). Thanks to Corwid for testing this.
Hellish Ritual DOES NOT add ability-buffed DPS – it only adds 5% of the raw DPS. Additionally, he determined that using Lens of Darkness on Hellish Ritual does yield more long-term DPS than using Lens with Insane Rage. However, the DPS difference is small. For long-term play, using the order 1,2,3,4,5,8,6,9,7 is more efficient. Nonetheless, if you are going through Amnesia every 1-2 days or are about to go through Amnesia in the current run, the order in the list shown in the beginning of this section is more than adequate. Thanks to Corwid for calculations and testing.
Using Lens of Darkness + Lens of Darkness does not create a use of a “super” Lens of Darkness, so to speak. Simply, Lens of Darkness cannot buff another Lens of Darkness. This also means that activating Lens of Darkness through clicking a fly will not stack with another fly’s Lens of Darkness or through use of activating the abilitiy yourself. Thanks to Silverblade for the suggestion and to Noodleking for testing.
Progression Tips and Strategy
Note: This section will likely be continually updated for quite a while. Many people have different theories and strategies around managing sins, illness, and amnesias. Feel free to post your own thoughts, opinions, and strategies in the comments or on Discussion threads. (Keep in mind that any method backed up by math calclulations are always taken into special consideration).
Basics:
A lot of the following information is a summary of concepts and ideas previously mentioned in this guide. You can refer to relevant section in order to get more detail.
When all are available. Use all active abilities in the order 1,2,3,4,5,9,8,7, and then 5 again after 30 seconds. Use Hellish Ritual (hotkey 6) whenever it is available. While abilities 5,7,8, and 9 are on cooldown, use 1,2 together and 1,2,3,4 (if you are active enough and won’t delay using all abilities by more than an additional 30 seconds).
Make sure to have an autoclicker active as you use all the abilities in order to ensure a huge burst of damage propelling you forward many levels and potentially more than one boss in each iteration.
Because the burst relies on active abilities, you must invest and max out the illness Bulimia first. This is where your first investments of sins should go. By maxing out the cheap Bulimia illness, you allow for the smallest cooldown time between huge bursts of progress.
Whenever you feel that it’s far too slow to progress or can’t get past a particular boss even when using all your active abilities in conjunction, it is time to undergo Amnesia. Make sure you spend all your teeth on pet levels before you hit the button.
Breaking Through Walls: (Dendroid – Spider)
READ THIS: Due to a recent experiment from user Umbra, it seems that Jester’s Chest is the BEST minion to spend money and enchantments on in the late game. The calculations from which the original efficiency was determined need to be modified to more accurately represent the game mechanics. I will update this section when I have arrived at a better solution for the math. In the meantime, I will leave the following paragraphs as is. Remember: Jester’s Chest is the most efficient minion after you reach level 1000 with Cobra, Scorpion, and Sundew.
Around room 150, you will encounter the first wall. The difference between costs of Dendroid compared to the next minion, Spider, is enormous (this pattern will continue for the rest of the minions). Once you have purchased all skills for Dendroid, stop purchasing Dendroid pet levels. Instead, invest money into the following minions. The list goes from most efficient to least efficient.
- Cobra
- Scorpion
- Sundew
- Jester’s Chest
These minions have the highest DPS per cost ratios. Reaching level 200 with a minion will multiply the DPS by 4. The DPS will also be multiplied by 4 every 25 levels (e.g. 200, 225, 250, 275, etc). Reaching every 1000 levels with a minion multiplies the DPS by 10 (rather than 4). So once you hit level 200 with a minion, you can focus on buying minions in sets of 25 (or 100 if you have lots of teeth). Abiding by this allows your DPS curve to increase whereas just purchasing Dendroid levels will keep your DPS stagnant.
Use this same strategy for the following walls. Next is the Spider-Troglodyte Wall. Purchase all skills available for Spider, then go back to buying sets of 25 levels of the minions listed before.
Illness Investment:
The rule of thumb is to keep between 75% – 80% of your total sins earned without spending them. The next challenge is properly determining which illness are the most important to invest in. This is a very inexact science, but the following shows the different tiers of importance regarding illnesses.
Use a rough “trickle-down” kind of approach in reference to these lists. Invest the most sins into the higher tiers, and invest a bit less for each lower tier. Invest into the lower tiers when it makes practically no difference on your sin count (e.g. you have 4000 sins so you purchase another level of Ludomania for 5 sins).
First Illness:
- Bulimia (reduce active abilitiy cooldown)
Make sure this is the illness you invest in and max out first. I cannot stress this enough to players who have not yet done this.
Top Tier:
- Agoraphobia (Reduce number of monsters per level)
- Autophobia (Decrease pet hiring/level cost)
- Delirium (Increase Chest Finding Rate)
Agoraphobia essentially helps with your active abilities. Fewer monsters between bosses can result you in beating multiple bosses in each active ability run. Notice in illnesses that there are no direct teeth increase buffs (outside of idle). Autophobia and Delirium are effectively teeth gain buffs.
Mid Tier:
- Melancholy (increase Titan Strength duration)
- Neurasthenia (increas Teeth Knocker duration)
- Hysteria (increases Flurry of Blows duration)
- Masochism (increase Insane Rage duration)
- Paranoia (increase Weak Spot duration)
Notice that all of these abilities correspond to increasing active ability duration. Remember, the longer the active ability lasts, the more progress you can make in each active ability burst.
Low Tier:
- Bipolar Disorder (increase critical hit damage)
- Oniomania (increase teeth gain from chests)
- Sadism (increase click damage)
These abilities have no maximum level. Invest a few levels into these here and there, but remember that these abilities will be the key in the endgame. Focus most of your attention on increasing the efficiency of active abilities.
Lowest Tier:
- Ludomania (increase chest durability while Broken Jaw is active)
- Fetishism (Increase teech gain from Teeth Knocker)
- Kleptomania (increase teeth gain while idle)
- Obsession (increase damage while idle)
- Depression (decrease boss health)
- Delirium Tremens (increase chance to find boss with sins)
- Thanatophobia (increase time allowed to kill boss)
Idle buffs yield very little in the grand scheme of things. Invest the sins instead on click damage/critical damage and extra teeth from chests. The rest of the abilities in this list need only a few levels put into them at a time. They can be maxed and have heavy investment once all the basic illnesses are complete.
Endgame Illnesses:
Once all illnesses which have a max level are capped, then it’s a matter of investing into the remaining illnesses which do not have a cap. These illnesses listed from most important to least important are below:
- Bipolar Disorder (increase critical click damage)
- Sadism (increase click damage)
- Oniomania (increase teeth gain from chests)
- Fetishism (increase teeth gain from Teeth Knocker)
- Thanatophobia (increase time allowed to kill boss)
- Ludomania (increase chest durability while Broken Jaw is active)
- Kleptomania (increase teeth gain while idle)
- Obsession (increase damage while idle)
Notice that click damage in the grand scheme of things is the most important trait. You see this clearly when you use all your active abilities and notice the damage implemented by the critcial hit either manually or from Flurry of Blows. This is because click damage is increased by DPS, but DPS is not increased by click damage. Click damage takes a portion of the DPS and multiplies it tremendously with each critical strike.
The Shop and the Best Purchases
There are five different selections which you can spend crystals on:
*Double Damage costs 150 crystals for the first upgrade but doubles in cost for each subsequent purchase.
First thing’s first, do not invest in Forward 3 Days, Torn Backpack, nor 3 Enhancements. These do not nearly yield the bonuses from investing in Double Damage or Instant Ascension. The reasoning is simple. In reference to Forward 3 Days, this is a temporary boost to help only the current run; you want to invest into permanent DPS boosts – not quick money. Torn Backpack is a huge risk. Currently, there are very few equipment pieces which are actually useful. And even then, with updates coming out in the future, these pieces might become obsolete. 3 Enhancements yields at best +150% DPS to the most efficient minions – but not the entirety of your DPS.
So now the next question is as follows, “Which should I buy? Double Damage or Instant Ascension?” Generally, players recommend buying two cases of Double Damage and then begin purchasing Instant Ascension. This is caused by the price increase as you purchase more instances of Double Damage.
My personal recommendation is to use the following quick calculations in order to determine which purchase is the most cost efficient with your crystals. From now on, I will refer to Double Damage as DD and Instant Ascension as IA. Compare the two results from the equations below:
- Percent Gain per Cost of IA = ((SinsGainedFromIA / CurrentSins)*100) / 200
- Percent Gain per Cost of DD = 100 / CostOfDD
The higher value between the two equations is the purchase you will want to make. These calculations compare the amount of DPS gain (in %) compared to the cost of the purchase.
Important Note: Whether you use these calculations or not, if you choose to purchase Instant Ascension next then purchase it at the end of a “deep” run (i.e. keep climbing floors until you cannot climb further).
Misc. Tips and Mechanics
The “Increase Sins Chance” Perk
The perk which reads “Increase chance to meet a boss with sins reward by x%” is currently a useless perk. All bosses drop sins, and bosses drop a linearly correlating number of sins regardless of the perk buff (e.g. the first few bosses drop 1 sin, the next few drop 2, the next few drop 3, etc).
Bulk Minion Level Buying
As is described in the game, you can buy minion levels in bulk. However, they do not list the biggest option:
- SHIFT – x10 levels
- Z – x25 levels
- CONTROL – x100 levels
- Q – Max levels affordable
As of right now, purchasing the maximum number of levels affordable will tell you neither how many levels you will purchase nor the cost for all of those levels.
Numbers System:
Overall, I highly recommend using the exponential number system (you can toggle this in the options menu) over using the “shorthand” default mode. At first, the shorthand is pretty and nice. However, it can require you to do a little bit more mental math as numbers start to increase and the gaps between levels and skills widens. The exponential system is much more straightforward and easier to deal with.
Pet Skills and Costs:
If you are interested in pet costs and their skills, check out foracekryr’s guide:
[link]
Closing Statements
Please comment, provide feedback, and share important information concerning your findings in Insanity Clickers. The developers obviously have a lot more coming up for us. That means a lot of patches and a lot of new content to concisely document.
Players who have contributed to this guide: Adrenaline Rush, compmanben, Corwid, foracekryr, Noodleking, Panda, Silverblade, Umbra