
Overview
I will give you information on where to find and how to install mods made by the community for the Source Engine. You’ll need to own at least one Source Engine powered game before you can follow along with this guide.
Introduction
This guide will give you information on where to find and how to install mods made by the community for the Source Engine. You’ll need to own at least one Source Engine powered game before you can follow along with this guide.
 [link]
Downloading Mods
Whenever you use a third party website for downloading mods always practice safe browsing habits; Steam Support has a great article on this which can be found here.
You can browse and download numerous mods for the Source Engine on the Steam storefront by clicking here. Some titles will allow you to install the mod directly through Steam without needing to manually place the files in the Sourcemods folder.

ModDB is a fantastic website where you can find thousands of fully released and in-development mods for Source Engine games such as Half-Life 2. To begin searching through the database click here.

Some of the most popular mods can be found below. Always check on the mod’s website before downloading to make sure it works with the current version of the Source SDK and with your operating system.
- Half-Life 2 CTF[www.hl2ctf.com]
- Dystopia[www.dystopia-game.com]
- Pirates, Vikings & Knights II[www.pvkii.com]
- Hidden: Source[www.hidden-source.com]
- Black Mesa Source[www.blackmesasource.com]
Installing Mods
Before you begin installing a mod you’ve downloaded, read through the installation instructions. Some mods will require a specific Source Engine SDK to be installed before they will be playable. It’s also important to make sure that the mod you’ve downloaded is compatible with your operating system before attempting to install it.
The main directory of the mod must be installed in the following directories. If the mod you’re installing has an installer wizard, this is where you’d point it to. You will need to have run a Source Engine game or the SDK at least once for the directory to appear.
Program Files/Steam/SteamApps/sourcemods
/Users/Username/Library/Application Support/Steam/SteamApps/sourcemods
~/.local/share/Steam/SteamApps/sourcemods
Once you’ve installed the files into their own folder within the Sourcemods directory you’ll need to restart Steam. Once Steam has been restarted you’ll see the mod in your game library.
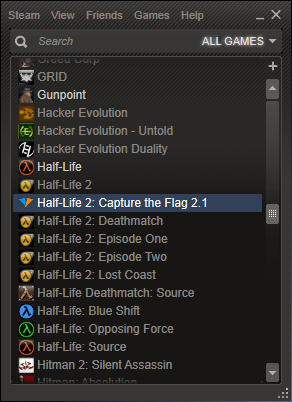
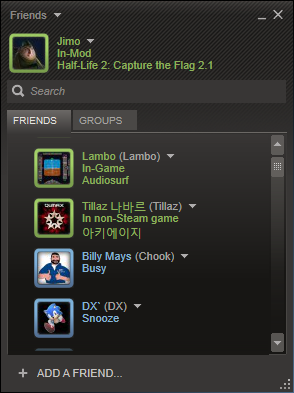
Whenever you’re playing a mod you’ll have access to the Steam friends network and some overlay features such as being able to take and upload screenshots. It will also display to your friends and on your Steam profile what mod you’re playing.
If you’d like to uninstall a mod, return to your Sourcemods directory and delete the folder for the mod you made when installing it. Once Steam has been restarted it will no longer be display in your games library.
Closing Notes