Overview
Provides a walkthough on how to use the web-based interactive Guild Upgrades Editor [fellsealtools.azurewebsites.net]. The Guild Upgrades Editor [fellsealtools.azurewebsites.net] tool lets you interactively pick different buildings and arrange those buildings to get the most optimized configuration. It also has a builtin optimizer that will try to optimize your selected buildings for you.Link to the tool: Guild Upgrades Editor [fellsealtools.azurewebsites.net]
Hovering and Selecting Buildings

Next, move the mouse over the tile that you wish to place the cantina in, and you will see a green highlight. Click to place the Cantina in the middle tile.
If you wish to remove the Cantina, just click the Cantina building cube.
If you wish to move the Cantina, there’s two ways of doing it. The easiest way is to just click on another empty tile. The Cantina will move to that tile.
However, if you currently have another building selected (that other building’s name will be in the “Click a Tile to Place” panel instead of Cantina), then you would just click the Cantina building cube to remove the Cantina (this will also automatically select the Cantina). Then just click an empty tile to move it.
Building Tooltips and Icons

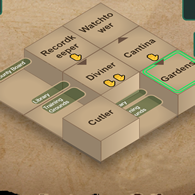
After placing the cantina in the middle tile, you will notice that the editor displays suggestions of what buildings to place in the adjacent tiles. It is suggesting “Gardens”, “Bounty Board”, and “Watchtower” because placing these buildings next to the Cantina will give a bonus to each of those three buildings.
We are going to choose “Gardens”. There are two ways to choose a recommended building. You can just select “Gardens” in the list like you did for “Cantina”, or you can hover over one of the recommended building tooltips. You will see each recommended building tooltip turn bright green as well as another tooltip describing any bonuses the Gardens would receive and from which buildings.


You can see a total of how much each of the buildings will cost in the upper right “Total Cost” panel.
Automatic Optimization


Click the Optimize button, and the buildings rearrange to a better layout.

Customizing and Modding
The editor uses Fell Seal’s modding system that the developer included with the game. It reads the file “dlc1-Missions.xml” from the game folder to create its list of buildings and all the bonuses and upgrades.
If you are using a mod, or if you would like to customize it yourself, you can upload a modded or customized version of the xml file. You can then use the editor for editing building layouts for your current mod!

Your customizations will be loaded instantly.
Changing the Number of Tiles

The tile map will instantly adjust based on the values you enter.
Easter Egg
For testing, there’s a little easter egg. If you click on the word “PLACE” in the “CLICK A TILE TO PLACE” title bar, then the editor will randomly fill your tile grid with buildings. You can then try optimizing them.
Update Log
I’ll be updating this section whenever I make updates to the editor. Let me know what you guys think and if you have any suggestions.