
Overview
In this guide I will explain how to access the contents of the game and repackage any modifications made. This guide is inspired by several games that use UE4 that can be modified normally. Besides being able to offer, at least for now, a solution to the need for a change in the game.Remember that the developers are still working on the game and we have to give them all our supportDISCLAIMER:-You can’t load different maps in the game because you don’t have the programmed entities and tools used in the UE4 editor.-So far it works quite well with retextures, but it hasn’t been tested yet with reskins-You cannot modify aspects programmed internally in the game
Preparation
- Unreal Engine 4.21 from Epic Games platform.
Yes, you must download the Epic Games platform and the Unreal Editor, precisely version 4.21.2
- UEViewer from Gildor’s Homepage[www.gildor.org]

A useful program that will help us to see and export objects in which we are interested
With this we will have the basics for viewing and re-exporting custom content for Earthfall
Unpaking
First we must locate the .pak file of the game, this file saves the assets that were created with unreal engine.
For earthfall, this file will be in this directory:
“…SteamsteamappscommonEarthfallEarthfallContentPaks”

Now once we have downloaded Unreal engine 4.21, we must go to the installation directory you selected and locate the file “UnrealPak.exe”.
the location of this file is as follows:
“Epic GamesUE_4.21EngineBinariesWin64UnrealPak.exe”

Keep in mind that to assign directories or file locations just drag&drop the file to the command window.
To get started you must first know how to run the command to extract the file. This process should be structured as follows:
<“UnrealPak.exe” LOCATION> <.PAK FILE TO EXTRACT LOCATION> -Extract <OUTPUTFOLDER LOCATION>
<“UnrealPak.exe” DIRECTORY>: just open the command window and drag the file “UnrealPak.exe” to the command window. followed by a SPACE.
<.PAK FILE TO EXTRACT DIRECTORY>: We will find the file “Earthfall-WindowsNoEditor.pak” and drag it to the command window, followed by a space and the command “-Extract” and another space.
<OUTPUTFOLDER DIRECTORY>: Create another empty folder where you will save the extracted content and then drag it to the command window

Once everything is ready and looks like the image, you can press ENTER and the pak file will start to be extracted. It will take a while since it’s almost 20GB of content. When the process is finished, you will find all the content in the output folder you created earlier.

NOTE:Don’t try to open the project, you don’t have the source code or the data used by the developers
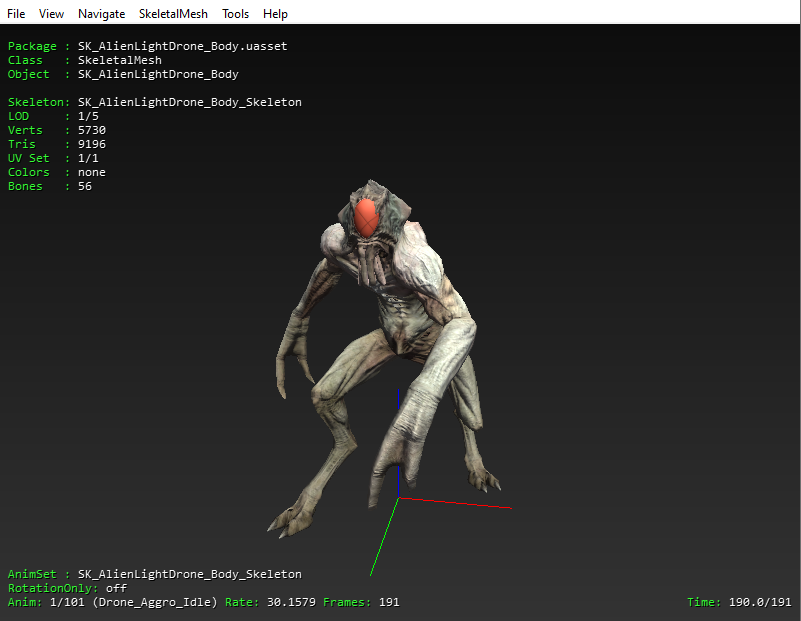
In order to be able to decompile models and textures with their animations and resources, we must use the UEViewer program. This program is intuitive so I guess you won’t have problems using it, you can browse through the game’s files and see its models with their textures and animations,
but remember to use “override game detection” to the version of ue4 that uses the game

From this point you can edit textures and models in 3D editing programs and image editors. Personally I use Blender and Photoshop but you can use the one you find more comfortable.
Custom content preparation
Once we’ve modified what we wanted, it’s time to try it out in the game.
We must take into account that the content of the game is read from the .pak file, but we must not go back to repak all the 20GB content that we had previously extracted. In this process we will only export the content that we have modified and make the game include it when it is executed.

I left the default file name too, now we must convert this texture into the format that UE4 uses to read its ( .uasset, .ubulk, .uexp)
For that we must first open the UE4 4.21 editor from Epic Games and create a new project
Once we have the session ready, we can either drag the new texture into the content browser or use the “import” function and search for the texture

Within that window we can create folders, I recommend creating the folders exactly as the game content was located, for example, this texture was originally in :
“<wherever you’ve stored the unpacked stuff>…ContentCharactersHumansDanny“
This is mostly to make it easier to manage the content you import and maybe necessary for the game to recognize the path of the content.
Once we have the file in its respective folder or not, we will start the packaging process. For that we must go to “File > Cook Content for Windows”.

(Another safer way in case it doesn’t work is the “package project”)

Once the content has been processed, we must go to the project folder which is usually where the UE4 Editor is installed, if not, find the location where you saved your project
once you find it, you should look for the “saved” folder and browse to the following address:
“<PROJECTNAME>SavedCookedWindowsNoEditor<PROJECTNAME>“

NOTE: DO NOT ATTEMPT TO USE THE .pak FILE CREATED BY UE4 EDITOR, IT WILL MAKE THE GAME CRASH
Re-Paking
The final process will now be to create a simple .pak file and have the game recognize it.
We will start by making a new folder called “Earthfall” and inside we will make another one called “Content” so that it looks like this: ( …EarthfallContent ).
You can create the folder in the location you want, for example I created it in the location of the original .pak file where I installed the game.

to be structured in the same way
For example, Danny’s default textures were in: “ContentCharactersHumansDanny“
Therefore, I must create the folders “Characters”, “Humans” and “Danny”, and finally copy the files .uasset, .ubulk and .uexp we created into the Unreal Editor.
For this reason also, I advise you to create a similar structure in the Unreal Editor.
Once we have the same folder structure as the one for the file or files we are editing, in this case a texture, we will create a text file exactly outside the “Earthfall” folder we created.
You can place that text file anywhere you want except inside the folder where our custom content is located.

Inside the text file we will put exactly (including quotes) the following and save the .txt file:
“<LOCATION WHERE YOU CREATED THE “Earthfall” FOLDER>Earthfall” “../../../Earthfall/”
In my case

The location can be copied from the address bar of the windows explorer.

We will look again for the .exe file called “UnrealPak”. The repak process is similar to the previous unpak process but with different commands and syntax. In this case it would be like this:
<“UnrealPak.exe” LOCATION> <NEW .pak FILE NAME & DIRECTORY> -Create= <.TXT FILE>
<“UnrealPak.exe” DIRECTORY>: Just open the command window and drag the file “UnrealPak.exe” to the command window. followed by a SPACE.
<NEW .pak FILE NAME & DIRECTORY>: Specify a location and name for the new .pak file you are going to create. followed by a SPACE.
-Create= : The command that will use the process. Do NOT make any spaces after the “=”
<.TXT FILE>: Drag&Drop the text file you created, in this case “datatopak.txt”

When you have everything ready you can press ENTER and a .pak file will be created.
Installing our custom content
Now that we’ve created our .pak file, it’s time to try it out in the game, but first we need to install it correctly
To begin with, every mod we create for the game must be copied into the folder where the game content is located, i.e. in this location:
“commonEarthfallEarthfallContentPaks”

And then, this is very important, you must change the name of our mod, just like the original file (Earthfall-WindowsNoEditor),
followed by a “_” and the name we want to give to our mod. for example:
“Earthfall-WindowsNoEditor_mymodname”

This way the game will recognize the files we edit, otherwise it won’t
and finally open the game and see if everything is in order…
Voila!!

Clarifications
This process works very well with retextures but has not yet been tested with reskins or different meshes. Personally I didn’t try it because I don’t know much about 3D modeling, so if you have enough knowledge in the field, it would be great if you could relate your experience and results in the comments. The same for people who know how to use very well UE4 Editor.
I say this mostly because I don’t know to what extent the game can be modified more than the basics, like removing effect textures, replacing them or changing them.
Sounds
All sounds are in “.bank” format, used by FMOD Studio. You will be able to extract it with an external tool but you will not be able to create another .bank file.
Therefore, you cannot change any sound unless the developers provide some tool, pre-configured FMOD file or way to customize some sounds, as it happens with another game called “Assetto Corsa”, which uses the same sound system.
For the moment a pseudo solution is to create sound cues in the animations of some model. The bad thing is that the sound will overlap with the original, will not replace it and is not affected by the volume control.
I think that’s it for now, if you have doubts or fail during the process let me know by the comments and I’ll help you when I can 😉