Overview
Drunken Wrestlers 2 mod editor gives players control over basic building blocks of the game. Providing access to the game engine internals and ability to write your own C# code, the editor will be familiar to anyone who had ever used Unity. This guide will walk you through the process of creating and publishing your first mod.
Video Tutorials
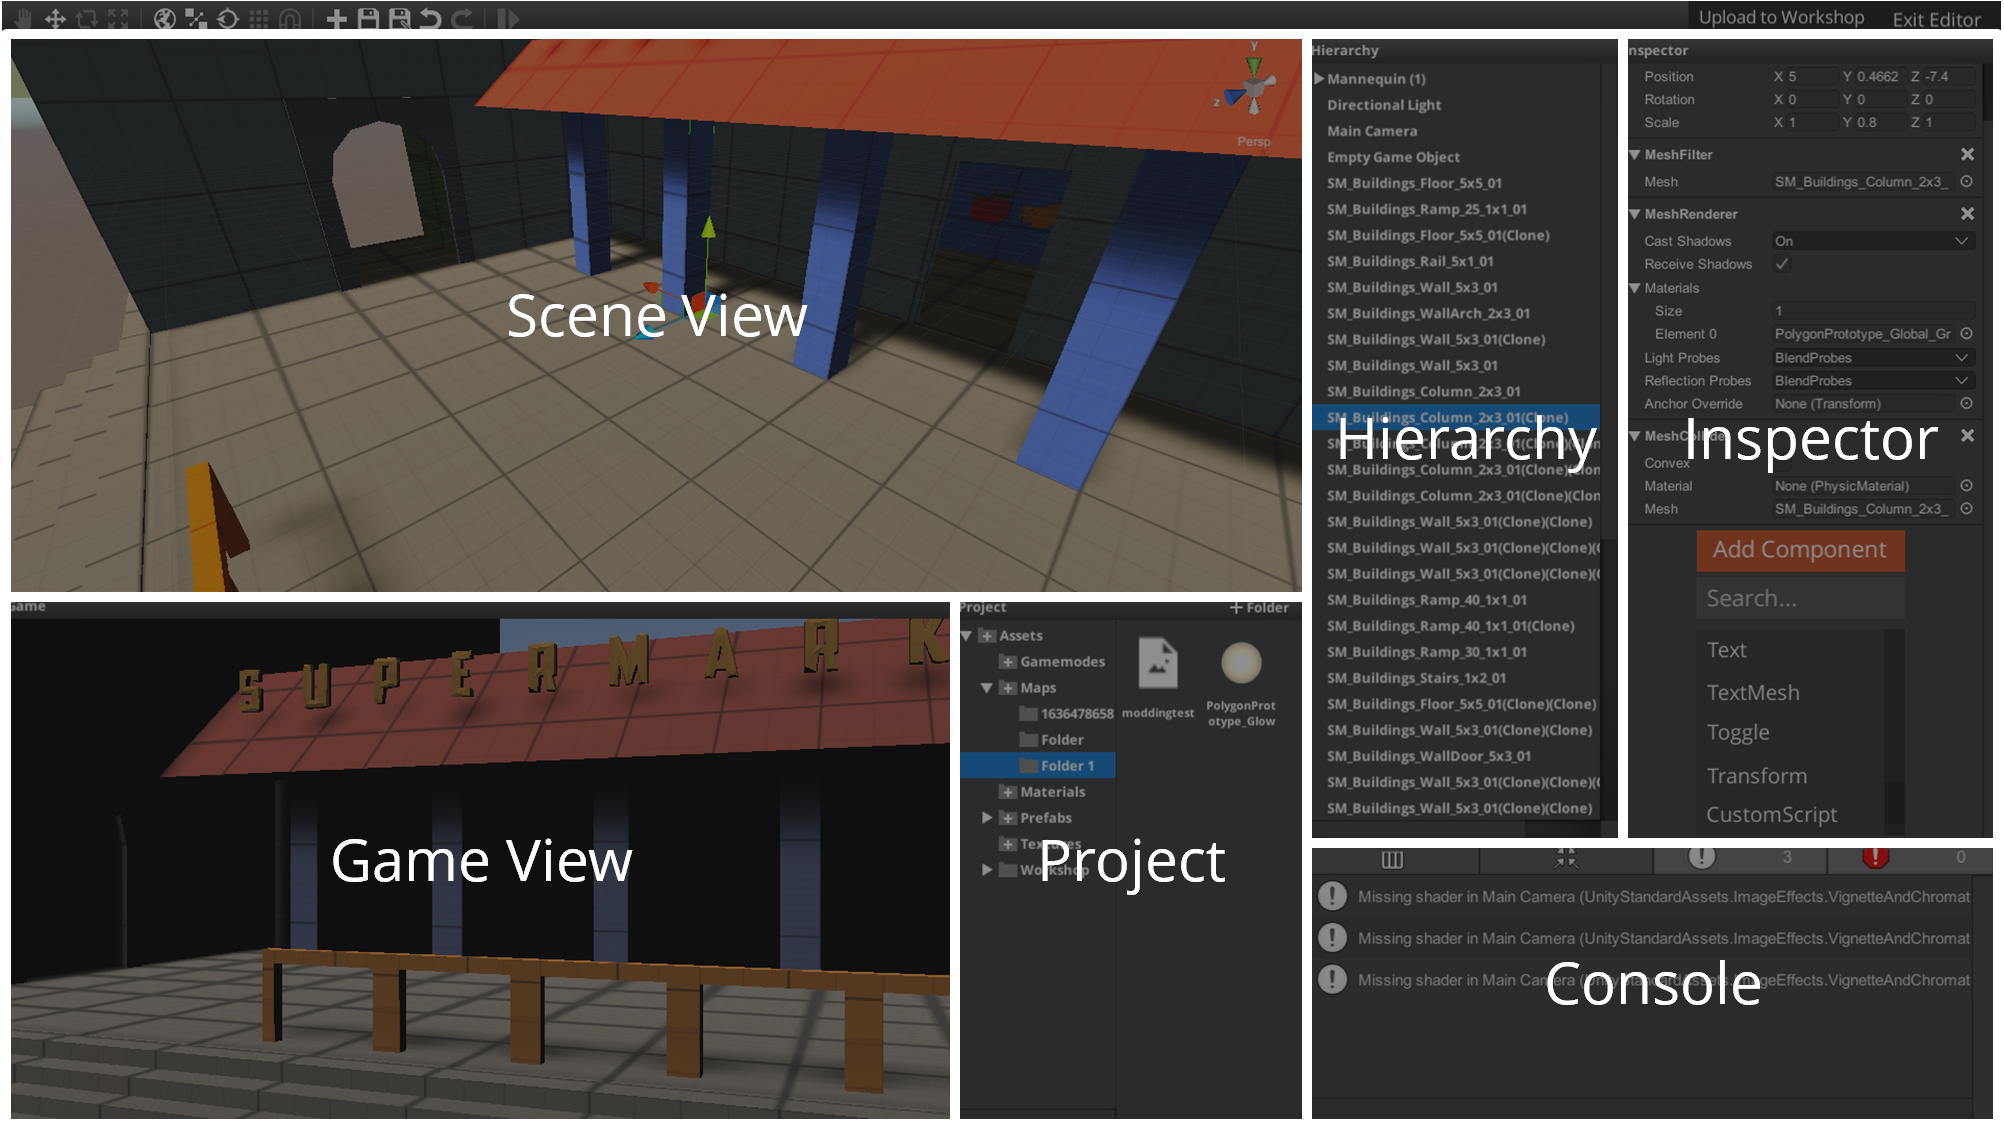
Editor Interface
Mod editor is located under Main Menu>Extras>Mod Editor.
Editor Intarface
- Ctrl+Z
⠀Undo - Ctrl+Y
⠀Redo - Delete
⠀Delete selected - Ctrl+D
⠀Duplicate (where applicable) - Ctrl+P
⠀Enter play mode
Project Window allows you to access and manage game assets.

- Tree view
⠀Displays all folders inside the project - Resources
⠀Displays all assets in selected folder
⠀You can drag & drop resources into the Scene View or Hierarchy to instantiate them in your
⠀scene
The Scene View is your interactive view into the game world. You will use the Scene View to select and position all Game Objects.
To rotate Scene View camera, hold Alt and click&drag with your mouse.
- Toolbar
Toolbar gives you tools to navigate and use in the Scene View.From left to right:
- Pan tool
⠀Allows you to pan around in the scene view
⠀Hotkey:Q - Move tool
⠀Allows you to move Game Objects
⠀Hotkey:W - Rotate tool
⠀Allows you to rotate Game Objects
⠀Hotkey:E - Scale tool
⠀Allows you to scale Game Objects
⠀Hotkey:R - Gizmo rotation
⠀Switches gizmo rotation between Game Object local and world global coordinates
⠀Hotkey:X - Pivot mode
⠀When enabled, multiple selected Game Objects will be treated as a group
⠀When disabled, multiple selected Game Objects will be treated individually
⠀Useful for rotating multiple Game Objects at once
⠀Hotkey:Z - Follow mode
⠀When enabled, the Scene View camera will follow selected Game Object - Unit snapping
⠀When enabled, Game Object moving, rotating and scaling will snap to units - Vertex snapping
⠀When enabled, Game Objects moved will snap to vertices - New scene
⠀Creates a new scene - Save scene
⠀Saves the scene - Save scene as
⠀Saves the scene as new - Undo
⠀Undoes an action
⠀Hotkey:Ctrl+Z - Redo
⠀Redoes an action
⠀Hotkey:Ctrl+R - Playmode
⠀Enters playmode
⠀Hotkey:Ctrl+P
- Pan tool

More info:
Scene View navigation[docs.unity3d.com]
Positioning Game Objects[docs.unity3d.com]
Game View is used when you are testing your mod. It renders view from ingame camera during playmode.
Hierarchy is used to navigate the scene structure. It displays a list of all the Game Objects in the scene.
More info:
Hierarchy[docs.unity3d.com]
The Inspector window displays detailed information about the currently selected GameObject, including all attached components and their properties, and allows you to modify the functionality of GameObjects in your Scene.
More info:
Using The Inspector[docs.unity3d.com]
The Console Window shows messages generated by Unity. To aid with debugging, you can show your own messages in the Console using the Debug.Log and Debug.LogError functions.
- Console buttons
From left to right:- Clear
⠀Clears all the messages - Collapse
⠀Collapses all similar messages into one - Log messages
⠀Enable/disable log messages - Error messages
⠀Enable/disable error messages
- Clear

- Sounds, animations, and etc. are not supported at the moment
Scripting
You can attach custom scripts to your Game Objects by clicking Add Component in the Inspector and searching for CustomScript.

Scripts have to be derived from MonoBehaviour in order to be instanced.
You can use Ctrl+MouseScrollWheel to change font size in the code window.
Visit DW2 Modding API Reference[docs.drunkenwrestlers2.com] to get familiar with the API.
- Arrays are not supported in the Inspector; Use System.Collections.Generic.List<T> instead.
- Serialization of custom type Lists are not supported out of the box; You can use [Battlehub.SerializeIgnore] attribute to disable serialization of such Lists and be able to save your scene.
Setting up your mod
⠀Create a new folder for your mod under Maps, or Gamemodes folder in the Project
⠀window. Mod type is defined this way.
⠀For example, if you want to use custom material, copy a material from Materials folder into your ⠀map folder and then modify it. Original assets should not be modified.
⠀Store all custom assets associated with your mod under that folder. This includes your scene,
⠀custom materials, textures, meshes, as well as workshop preview image and data. This is required
⠀to load all your assets into the game correctly.
Importing custom 3D models, textures and sounds
Is under development 😉
Introduced in build 16.31 (25.05.2019)
⠀With your mod folder selected, click “Open Folder“.
⠀

⠀Place 3D models or image files into the opened folder. Supported file formats are:
- 3D models: TRILIB – ACCEPTED FILE FORMATS[ricardoreis.net]
- Textures: .png and .jpg
⠀Return to the Mod Editor and click “Convert Assets” button.
⠀

⠀With your mod folder selected, click “Open Folder“.
⠀
⠀Currently .ogg is the only supported audio format.
⠀Select a GameObject you want to attach your sound to and add “AudioLoader” component.
⠀Into “FileName” field, type in the name of an audio file you placed without file extension.
⠀For example, if you placed “audioTest.ogg” file, type in “audioTest”.
Saving and publishing to Workshop
⠀Save the scene under the folder you created for your mod.
⠀

⠀Create a preview image for workshop item and place it under your mod’s folder. Make sure it has 1:1
⠀ratio and does not exceed 1MB limit. Supported file extensions are: .png, .jpg and .gif.
⠀Click “Upload to Workshop” button at the top right corner of the editor.
⠀

⠀Clicking “Upload” button will prompt you to pick a scene. Select the scene you
⠀want to publish.
⠀

⠀Fill the title and description fields. Click on white square to select the preview image. Select visibility
⠀setting if desired.
⠀

⠀Once all necessary information is provided, Click “Upload” button.
Mod Approval
To be able to get XP and money while playing your mod, it needs to be manually reviewed and approved by the developer.
- For maps: The preview picture of your map must show the actual map.
- It should be difficult to farm XP using your mod.
Usually new mods are reviewed and approved automatically from time to time, but you can request your mod to be approved in discord.gg/dw2 #modding