
Overview
This is the official guide to using the iRacing camera tool, as written by me, the developer. This covers everything you may want to know about how to customize your view and prepare to broadcast or create custom videos.
Introduction
This is a brief introduction to the new camera tool built into the iRacing simulator. You can enter the camera tool when in replay mode by hitting Ctrl-F12 at any time, hitting escape will exit the tool. Here is a screenshot of the tool in action.
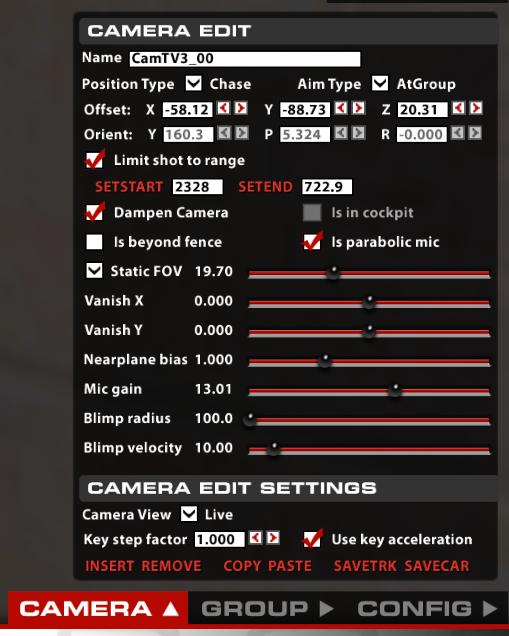
The camera system is broken down into four basic parts: Positioning the camera, aiming the camera, setting the lens up and selecting the active camera for a given moment in time. Let’s break them down one by one.
Positioning the camera with Position Type
There are four ways in which the cameras can be positioned. Statically placed in a fixed spot along the track, positioned relative to the center of the focus car, positioned relative to the car but not fixed to the chassis of the car (the chase and chopper cameras fit this description), or fixed on an independent motion like with the blimp camera. Let’s break each one down in turn.
Fixed – fixed cameras are statically placed in the world, they do not move from frame to frame. Offset sets the position and height of the camera in meters, relative to some arbitrary point near the center of the track.
Blimp – A blimp camera does a circle around the track, by default it centers itself over the track and sets its radius to be just smaller than the widest part of the track. Offset sets the center of the radius and the height of the blimp from the ground. The Blimp radius sets the size of the circle the blimp will travel. And finally Blimp velocity sets the speed of the blimp in meters/second. The blimps position is a function of radius/speed/ and the current time since the simulator started.
Chopper – The chopper camera is dragged behind the car, using a spring/damper mechanism to allow it to wander a bit off course. Position sets the target height and distance from the car, but the Y axis is completely ignored, and the X axis is fixed to always be a negative offset. The chopper will try to maintain the requested distance and height but will drift from the target as the speed and direction of the target car changes.
Chase – A chase camera orients itself a fixed distance (using the offset vector) from the focus car. But it is oriented relative to the direction of travel of the focus car (not the direction the chassis is aiming), and it is locked to a fixed height above the track surface. The chase camera can be set to any angle relative to the focus car, and any height above the track surface. In addition this camera forces the lens to always aim at a fixed point above the track, close to the center of the focus car. This allows the camera to visualize the vertical motion of the car since the track will remain stationary as the car bounces up and down.
OnCar – The on car cameras are fixed to the frame of the car, in the same way the static cameras are fixed to the track. As the car moves, the on car cameras move in perfect step with the car. Position is relative to the center of the car, so a position of {0,0,0} is the center of the car. Oncar cameras force the aiming to be static relative to the chassis. This has to be the case since the camera is attached to the focus car and all other aiming styles require a focus car to aim at.
Aiming the camera with Aim Type
There are three aiming modes for the camera. Aim statically in a fixed direction, aim at a focus car, and aim at a group of cars. In addition dampening can be turned on to add in some error to the positioning and make things appear more natural, like a human operator is controlling the camera. Let’s break each type down in detail.
Static – Static aiming aims the camera in a fixed direction using the orient vector. This vector is made up of Yaw (side to side), pitch (up and down) and Role (rotation). On car cameras set this orientation relative to the car frame. Chase, chopper, and blimp cameras are all relative to the platform that the camera is mounted to. And static cameras set the orientation relative to the world coordinates. Static aiming does not change, and therefore ignores the dampening request.
At Car – This mode aims the camera directly at the focus car, so the car is always in the center of the display. This mode ignores the orientation vector. Dampening can be used to add a bit of variability to the shot.
At Group – This piece of code uses a complicated formula of weights to try and focus not just on the focus car but makes sure that neighboring cars, and track surface are represented by the shot as well. In general this should allow for a more interesting shot over aiming at the car. Again dampening can be used to smooth out the shot and add in some randomness. Note that this shot in particular is very sensitive to cars disappearing from the world, and will jerk around in an unsettling way if cars disappear and reappear and dampening is not enabled to smooth out the motion.
Setting the lens with Static FOV or Zoom
The lens can either be set to a fixed field of view (width) or can dynamically set its view to try and make the focus car take up a fixed amount of space on the display. When you select Static FOV the camera fixes the lens to a given angle using the FOV slider. With Zoom mode the slider represents the percentage of the car that will be visible on the display. At 100% the car will fill the display and at 25% the car will be one forth the width of the monitor. The automatic zoom is limited in range, if the car is too far away or to close the zoom will hit a lock and stop zooming until the car comes closer into view. This is usually an undesirable effect, it is a good idea to zoom the camera in more in order to stop it from occurring.
Shot selection
There are a large number of cameras set up by default in the simulator, in order to better organize the cameras they have been combined into groups, like the TV1 camera set. Each camera in a group has the potential to be used at any time. Some cameras have a limited shot range, they can only see the focus car at certain points on the track. In order to filter these cameras out so they only become active when they have a nice shot, we have the concept of Limit Shot to Range. This sets up a start and end position along the track, starting at the starting line, that when the focus car is between, the camera has a possibility of becoming the active camera. For every frame we check if the current camera has a good shot, if it does not we look at all the other available cameras and randomly pick one with a good shot to display. At any one time there may be several cameras that have a shot, you can hit ‘b’ or ‘shift-b’ to manually select the next camera that has a good shot.
To limit a camera to only be active for a given section of track perform the following steps. Load a replay with a car that travels at least one full lap around the track. This car will be our marker, used to set the start/end points of our shot. Set the replay to a point where the camera you are interested in becomes active, or select your camera directly from the group tab, by double clicking on it. Select limit shot to range, and hit the setstart button. The setstart button will flash and the camera will be locked in place. Now fast forward or rewind the tape until the focus car is at the start of the shot and hit the stestart button again. You have now set the start of the shot. Repeat for the end of the shot using the setend button.

Here is a screen shot of the group tab, it will help to make the camera selection system easier to understand. If you notice, the box on the left represents all the cameras in the active group. The box on the right represents all the cameras not in the active group. The white cameras have a valid shot, and the grey cameras do not. The red camera is the current active camera. The numbers under the ‘Q’ represent the shot quality for each camera, this number is feed into the random shot selection code in order to choose the next active shot for a given time.
Miscellaneous settings
In addition to the above features there are several other settings in the camera tool that are of interest.
Is In Cockpit – this setting turns up the detail inside the cockpit while removing unnecessary pieces of the car model. It is only available with oncar cameras.
Is beyond fence – Sets the sort order between the transparent objects on the car and the transparent sections of the fence, if you find that the fence is being drawn behind the windshield of a car, than toggle this flag.
Is parabolic mic – sets the microphone on the camera to be directional, so that the focus car is louder than the neighboring cars.
VanishX/VanishY – This offsets the view a bit either up and down or left and right. It is convenient to use if you want the car to appear a little lower on the display.
Nearplane bias – This sets up the near clipping plane for the 3D rendering engine. If you find that an object close to the camera, like a piece of fence, is disappearing than adjust this parameter to bring it back into view. Be careful with it, setting it to small will result in strange artifacts in objects that are far away due to an effect known as z-fighting. It is often better to move the camera rather than adjust the nearplane bias.
Mic gain – this sets the volume of the microphone in decibels. There is a small button next to the mic gain slider that will normalize the camera volume based on the current distance to the focus car. If you hold down this button while a car passes, it will set the peak volume for the camera to a reasonable level.
Camera view – camera view can be set to one of live, wide, front, side, top. It is a special mode used to visualize the location of the camera in the world. When set to any view besides live, all the static cameras will be drawn into the world using a simple camera model on a colored stick. Front/side/top just forces the camera to look back at itself in order to accurately place the camera at a fixed track location.
Use key acceleration – When editing the cameras with the keyboard an acceleration curve is applied to the control so the longer you hold down a button, the faster the camera will move in the world. This is desirable when placing a camera, but not when trying to edit a camera ‘live’. You can disable the key acceleration in order to have a smoother pan/zoom experience.
Use key 10x – You can toggle on a 10x acceleration with a hot key of ‘alt-p’. This is useful for rapidly moving a camera across the world without giving up the fine grain control in the process.
Key step factor – This adjusts the default speed at which the camera controls move at when using the keyboard. Increasing this number moves everything faster, decreasing this number moves everything slower. The defaults are set up in such a way that it should not be necessary to change this, but it can be useful for fine tuning cameras, or doing live editing.
Enable automatic shot selection – Turning this off will stop the camera system from switching cameras automatically when a car goes out of view. It gives the operator control over the shot selection.
Use temporary edits – When this is selected, all edits to a camera will be forgotten when the camera looses focus. This is useful in a live event when you want to manipulate a camera temporarily but do not want the changes to be made permanent.
Is scenic group – When the car we are focusing on disappears from the world, the camera system will switch over to a scenic camera group to give the cameras a little life. Setting this to true marks the current group as the scenic camera group.
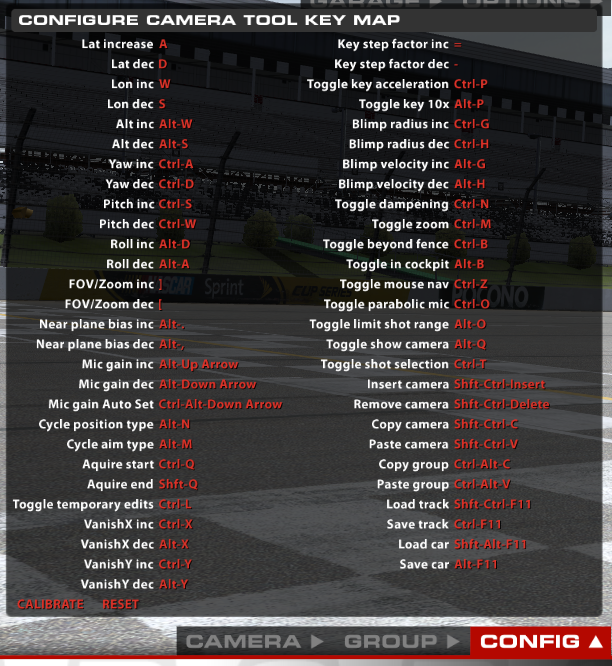
Key Mappings
On the config tab you will find all of the keyboard mappings for the camera controls. Almost every control can be edited with a keyboard short cut. The position (lat, lon, alt), Aiming (yaw, pitch, roll) and zoom controls can also be mapped to an analog joystick for finer grain control during live editing. If you want to remap a control simply click on the red button next to the control and type a key or press a button on your joystick. If you want to cancel a key remap hit escape. And in order to get back the default mappings, simply hit the reset button, this will not affect the calibration of your driving controls. In order to properly support analog devices, there is a calibrate button that will let you calibrate your joysticks. You must calibrate at least once before you can properly assign a joystick to a control.
Mouse Aim Mode
There is a special navigation mode that allows you to use the mouse to aim and fly a camera around the track. You can enable it (once the camera tool is up) by hitting ‘ctrl-z’. Once activated, moving the mouse will aim the camera, and hitting the mouse buttons will move you forward and back. You can hit ‘esc’ at any time to reset the camera back to its default location. Or, if you hit ‘ctrl-z’ again, the camera tool will attempt to update the cameras location and orientation if possible for the camera type selected. You can continue to use the keyboard to control the camera while in mouse aim mode. This can result in very complex motions without much effort from the operator.
Director Mode
In the lower left hand corner of the session screen, there is a helmet and name of the current driver that the camera system is following. Clicking on this helmet brings up a list of all the drivers and lets you select what driver to follow. In addition, at the top of the list are three choices that will enable an automatic director mode. This mode lets the camera system decide who to focus on. The choices are ‘focus on crashes’, ‘focus on leader’, and ‘most exiting’. Most exiting tries to find the cars in the tightest race and focus on them, focus on crashes is similar to most exiting, but if a wreck occurs it will try to jump to that instead. Focus on leader will follow the lead car, or other cars near the leader that are interesting to watch

Track saving and loading
At any time you can hit savetrak or savecar to write your edited cameras out to disk. The cameras are located in ‘[My Documents]iRacingcamerastracks[track name]’ or ‘[My Documents]iRacingcamerascars[car name]’ respectively. These files are your local copy of the camera files, and do not affect the internal camera files already stored with the tracks and cars. You can save multiple camera sets, and load them back up using the load track and load car buttons. From here you can also load the default camera sets.
There are some restrictions on the camera system:
Cockpit – Cockpit is a non editable camera, you cannot make changes, and it is not saved to disk. -edit- you can now edit and save the driving camera, but with a restricted range to keep the camera placed about where a drivers head should be.
Car Cameras – Nose, Gearbox, Roll Bar, F Susp, and R Susp are all on car cameras and will be saved to the car camera file for each car loaded in the sim. Everything else is a track camera and saved to the track camera file. There can only be one car camera in each oncar group.
Miscellaneous Key Bindings
In addition to the keys used by the camera tool, the following hot keys may be helpful when editing camera sets. Keys beginning with a kp_ are key pad keys (the number pad on the right side of your keyboard).
ctrl-f12 – Toggle camera tool on/off.
esc – exit camera tool.
kp_7 – Jump to start of replay.
ctrl-kp_4 – Jump to start of session.
shift-kp_4 – Rewind replay.
kp_4 – Move one frame back in replay.
kp_5 – Pause playback of replay.
kp_del – Stop playback of replay.
kp_8 – Replay toggle slow motion.
kp_6 – Move one frame forward in replay.
shift-kp_6 – Fast forward replay.
ctrl-kp_6 – Jump to start of next session.
shift-kp_3 – Jump to next lap crossing for focus car.
shift-kp_1 – Jump to previous lap crossing for focus car.
ctrl-kp_3 – Jump to next incident in replay tape (may change focus car).
ctrl-kp_1 – Jump to previous incident in replay tape.
kp_1 – Jump to end of replay.
b – Select next camera in current camera group.
shift-b – Select previous camera in current camera group.
c – Select next camera group.
shift-c – Select previous camera group.
v – Focus on next car.
shift-v – Focus on previous car.
ctrl-v – Focus on the players car (your car).
ctrl-c – copy text from the active edit box.
ctrl-x – cut text from the active edit box.
ctrl-v – paste text in to the active edit box.
space – Toggle the session UI on/off.
ctrl-pgup – scale ui bigger.
ctrl- pgdn – scale ui smaller.
ctrl-alt-shift-home – toggle split ui mode on.
ctrl-alt-shift-pgup – shift split in split ui mode.
ctrl-alt-shift- pgdn – shift split in split ui mode.
p – Toggle speed and gear display.
f – Toggle system Meter display.
l – Report Latency.
In addition you can key in a sequence of keys to select both the focus car and the camera group. This is particularly useful when doing video work. To select the car based on car number use the following sequence: *<car number>*<camera number><enter> . To select the focus car based on car position use: /<car pos>*<camera number><enter>. In both cases you can omit either the camera number or car number by simply hitting * or enter instead. This would leave the focus car or camera unchanged while changing the other. Both the * and / keys are located on the top of the number pad.