
Overview
Fixing Perkprogression and Achievements on Linux incl. Cache Extractions Scripts. Some other issues with fixes/workarounds.
Fix Perkprogression/Achievements
Fix Perkprogression/Achievements
You have noticed your Perkprogression always resets after Mapchange or leaving the Server on Linux? And you did not get the Achievements on the beaten Maps?
Here a Guide how to fix it.
– Follow the Guide and do the steps manual per hand
– Or download the package with all whitelisted Mutators
– Or use the Unix-Shell I wrote for extracting the Mutators from the Cachefolder
(Guide is for Mac-Users too, just different paths, they will be written below)
At the end some other issues with the Linux native build and fixes/workarounds.
Some Notes:
#1: This Guide was written with a lot of beer
#2: Linux is the best operating system in the world, as Albert Einstein already said.
#3: Pushing the rate button would be nice
#4: Sharing information to keep the greatest game in history alive
If you join a server which is running any whitelisted Mutator your Steamstats will be immediately disabled.
This means your client will be handled like using a greylisted mutator. You have access to your leveled perks, during gameplay your progression will increase, but after leaving/mapchange your progression resets to the same value which was before. This also disables to gain any Achievement.
The Linuxbuild has a different folderstructure. The game itself can read the hashvalue of files, you get directly a mismatch error of files with different versions. The checkroutine of the implemented whitelistening system is coded bad. The checkroutine doesn’t read/hash the Package-GUID of cached files and your perkprogression is disabled.
You can reread this in your killingfloor.log-file. There will be an entry with:
Log: STEAMSTATS: SECURITY CHECK FAILED – ../System/*****.u
(for ***** is the mutatorfilename written which causes the nonprogression)
#Note: Even if the serverbrowser shows the server isn’t running any mutators, this can be false. This feature is bugged – depends how the server is configurated. Make sure you marked the checkbox “Perks Enabled”, so only servers without mutators or whitelisted mutators will be listed (to 99%)
The different folderstructure:
On Windows you have only one Killing Floor folder within Steam.
“…SteamSteamAppscommonKillingFloor”
On Linux you have two folders splitted with the gamefiles.
1. /home/USER/.killingfloor/
contains Cache-folder including cache.ini and your downloaded serverfiles
contains System-folder with your killingfloor.ini, user.ini, logfile; ucl’s
2. /home/USER/.steam/steam/steamapps/common/KillingFloor/
contains second System-folder with the Game-Binary, dll’s, int’s and so on
contains all the the other folders: Animations, Maps, Sounds, Textures and so on
If you join a server which is running any custom-content (Mutators, Maps, Sounds, Textures…), your client is downloading these files to your cachefolder.
All this files get stored with the Package-GUID as filename and with the fileending .uxx
(uxx is the Unreal Tournament Cache filetype)
Originally posted by Cachefolder (short output):C48089614C255368A6C437AA943EE203-1.uxx
14914BEC4F35A3578EF6C39E7820EAD5-1.uxx
1F126EC14FBC553F61AA0CAA6CBAB571-1.uxx
4D4B098843E4E5E7B12B258AF1CF0851-1.uxx
5F7D5C104E70F82AD6CA1EBE79A116A4-1.uxx
6E4392A041BCEA191255168D475A44D4-1.uxx
Your cache.ini gets automatically an entry from the downloaded file.
With the Package-GUID and with “=” the original filename and fileending.
Originally posted by cache.ini (short output):C48089614C255368A6C437AA943EE203-1=KFDamagePopup.u
14914BEC4F35A3578EF6C39E7820EAD5-1=KF-Doom2-Final-V7.rom
1F126EC14FBC553F61AA0CAA6CBAB571-1=KFDoorMessagesV3.u
4D4B098843E4E5E7B12B258AF1CF0851-1=KFARGChat.u
5F7D5C104E70F82AD6CA1EBE79A116A4-1=KF-Mario_Bunker_ex.rom
6E4392A041BCEA191255168D475A44D4-1=Mario_tex.utx
Now the Mutators have to be edited. Mutators have the fileending .u
Within the cache.ini you can get the information which Package-GUID belongs to what file.
Copy the filename with the fileending .u from cache.ini and rename the specific file located in the cachefolder.
After renaming the file, move the renamed .u file to the folder:
/home/USER/.steam/steam/steamapps/common/KillingFloor/System/
This has to be done with ALL whitelisted Mutators. After a while, joining different servers you will have all files together.
If done, you have no problems anymore in the feature and your Perkprogression and Achievements are working fine.
For the overview which Mutators are whitelisted here two links:
[link]
[link]
Locate to: /home/USER/.killingfloor/Cache/
Open cache.ini
Now we see the entries:
C48089614C255368A6C437AA943EE203-1=KFDamagePopup.u
14914BEC4F35A3578EF6C39E7820EAD5-1=KF-Doom2-Final-V7.rom
1F126EC14FBC553F61AA0CAA6CBAB571-1=KFDoorMessagesV3.u
4D4B098843E4E5E7B12B258AF1CF0851-1=KFARGChat.u
5F7D5C104E70F82AD6CA1EBE79A116A4-1=KF-Mario_Bunker_ex.rom
6E4392A041BCEA191255168D475A44D4-1=Mario_tex.utx
Now pick up the whitelisted Mutators: KFDamagePopup.u; KFDoorMessagesV3.u; KFARGChat.u
Rename the files located in the cache-folder:
C48089614C255368A6C437AA943EE203-1.uxx to KFDamagePopup.u
1F126EC14FBC553F61AA0CAA6CBAB571-1.uxx to KFDoorMessagesV3.u
4D4B098843E4E5E7B12B258AF1CF0851-1.uxx to KFARGChat.u
Move the renamed files KFDamagePopup.u; KFDoorMessagesV3.u; KFARGChat.u to the folder:
/home/USER/.steam/steam/steamapps/common/KillingFloor/System/
Done. Not necessary but for the overview you can delete the specific processed lines from the cache.ini
—————————————-
To speed this up and not have to do this steps manual per hand I packed all whitelisted Mutators to an Archive.
Extract the file and move all the .u files to
/home/USER/.steam/steam/steamapps/common/KillingFloor/System/
[link] w.mediafire. com/file/prs18pnh7qtiyt2/Whitelisted.Packed.New.V54.zip/file
(11.01.2020: Archive updated, added some missing Mutators)
(edited Link duo removing from steam, remove the blank between the “ww w” and after the point before “com”)
If the downloadlink is down, write a comment, i will reupload it.
—————————————-
This Guide is the same for Mac-Users, here the two paths:
1: Library/Application Support/Killing Floor/
The equivalent to Linux: /home/USER/.killingfloor/
2. Library/Application Support/Steam/steamapps/Common/KillingFloor/System/
The equivalent to Linux: /home/USER/.steam/steam/steamapps/common/KillingFloor/System/
If extracting the Package, the files have to be moved to:
Library/Application Support/Steam/steamapps/Common/KillingFloor/System/
Other issues with the Linux Version
At least some Issues with the Linux Version.
Start Steam without fps lock at 60fps
(Only for Mesadriver – radeonsi, i965, iris, noveau….)
Create file with .sh extension and start steam with it.
#!/bin/sh
export vblank_mode=0 steam
1: Yap with OpenGL and Linux you have poor perfomance and on some maplocations huge fps drops, or if a firebug hardcore spams the flamethrower. (Dropping from 90fps to ~13)
2: „tilde“ is not working, you have to rebind the key. It is also not possible to open the console in the mainmenu or in the awaitinglobby.
3: You have no red laser dot with the „mbr“ (m14 ebr), even if projectors are activated in the graphic options.
4: If you copy a IP-Address you cannot paste it in the server browser or in the console. It has to be typed manually.
5: If you change your resolution your game will crash insta. A Workaround for this. Before you change resolution, switch to windowed-mode (disable in graphic options full screen), change resolution and switch back to fullscreen.
Or edit killingfloor.ini in /home/USER/.killingfloor/System/ to desired resolution
[SDLDrv.SDLClient]
FullscreenViewportX=
FullscreenViewportY=
6: Nvidia Graphic Card Bugs only, with ATI cards this glitches doesn’t exist.
Stalkers are not invisible, they have a „metallic terminator texture“.
Some minor graphic glitches in detailing the textures of maps and models.
If you flashlight some textures, textures are gone and you only a see a gray bubble structure.
Carnivore “Securty Officer Thorne” DLC from Nightfall Character Pack has in preview and ingame no skintexture.
On kf_transit you can see only through one side of the window, on other side there’s a milky closed structure.
You can’t adjust brightness, gamma, contrast while ingame, only doable in mainmenu
The closed Nvidia driver per se is very good, but here is to see how wrongly they implements the api-specification of OpenGL.
7: You can‘t change the volume with your keyboard if Killing Floor is running. Workaround for this: Tab to SteamOverlay while InGame, adjust Volume and switch back to Killing Floor.
8: Some mapareas are a lot darker than they should. For this genre it looks nice 🙂
9: White-Blur-Grain (nearly blind) if getting attacked -> Disable Motion Blur
10: If you’re moving your mouse it is capturing out of the screen. I had this problem on one of three systems. The Game starts with wrong “Displaysetting-Information”. (Updating the built fixed the problem). But here a workaround if using Cinnamon.
Restart your cinnamon-session.
At your login screen switch to OpenBox 0x
Your System starts now fully naked with no overlay. RightClick on your desktop -> Open Terminal and start Steam via Terminal. Start KillingFloor as usual with Steam.
Not a problem, just to mention.
The native port of course only works with OpenGL-Rendering.
Even if in the killingfloor.ini the render is set to Direct3D/9, at gamestart while your loadingscreen appears your .ini will automatically be edited to use OpenGL.
If still having trouble the game does not start with OpenGL:
Edit the killingfloor.ini in /home/USER/.killingfloor/System
[Engine.Engine]
;RenderDevice=PixoDrv.PixoRenderDevice
;RenderDevice=D3DDrv.D3DRenderDevice
;RenderDevice=D3D9Drv.D3D9RenderDevice
;RenderDevice=Engine.NullRenderDevice
RenderDevice=OpenGLDrv.OpenGLRenderDevice
(The line without the semicolon “;” is setted (uncomment), the order of lines does not matter)
Or rightclick on Killingfloor in Steamoverlay.
Select Properties. Open “set launch options…” and set parameter: -opengl
Fixing Sound Problems
Fix for Linux/Ubuntu-Systems
Killing Floor uses his own openal.so (Open Audio Library for multichannel 3D Sound)
located in: .steam/steam/steamapps/common/KillingFloor/System/
In some cases you have annoying cracking sound or with some 7.1 systems mono-sound.
To fix it, set a symlink to libopenal.so.1 which comes with Linux.
located in: /usr/lib/i386-linux-gnu/
Option1: Filemanager + Terminal
– Open your filemanager, browse to Steam/SteamApps/common/KillingFloor/System
– Rename the original file openal.so
– Rightclick in the filemanger and open with Terminal; Terminal now opened with your KF-System-Path
– Set symlink to libopenal.so.1: ln -s /usr/lib/i386-linux-gnu/libopenal.so.1 openal.so
Option2: Terminal only
– Open your blank Terminal
– Browse to KF Folder: cd .steam/steam/steamapps/common/KillingFloor/System
– Create a Safety-Backup of openal.so via Terminal: mv openal.so openal.so.bak
– Set symlink to libopenal.so.1: ln -s /usr/lib/i386-linux-gnu/libopenal.so.1 openal.so
Note: If you delete openal.so in the KF-Folder your symlink is gone. Rename the Backup and you can use the original file again.
Script for Soundfix
Or use this Script I wrote for this issue.
It checks the paths if correct
Downloading libopenal.so.1 if not aviable
Creating backup of openal.so
Sets the symlink to libopenal.so.1
Script Mutator Extract
This Script automatically checks if paths are available.
Creates a backup of cache.ini
Renames all cached Mutators to the correct filename and fileending.
Moves Files to the correct folder and removes the specific processed entries from cache.ini for the overview.
Script Maps Extract
If you want to have access to downloaded maps playing on Solo-Mode.
This Script automatically checks if paths are available.
Creates a backup of cache.ini
Renames all cached Maps to the correct filename and fileending.
Moves Files to the correct folder and removes the specific processed entries from cache.ini for the overview.
Script Full Cache Extract
This Script extracts the complete cache folder with all files.
This is for example necessary for some maps to play in Solo-Mode, there is it not enough to copy only the Map (.rom file). Or you just want have all cached files with the original filename and in correct path.
Paths=../System/*.u
Paths=../Maps/*.rom
Paths=../Textures/*.utx
Paths=../Sounds/*.uax
Paths=../Music/*.umx
Paths=../StaticMeshes/*.usx
Paths=../Animations/*.ukx
This Script automatically checks if paths are available.
Creates a backup of cache.ini
Renames all cached Files to the correct filename and fileending.
Moves Files to the correct folder and removes the specific processed entries from cache.ini for the overview.
Mouse Sensitivity
The problem:
Mouse sensitivity is much to high even in the configuration it is set to a low decimal value 0.**
If you don’t want to mess around with xinput/xorg.conf use the feature within the UT2004-Engine. Beside the standard sensitivity setting edit the entry for X/Y-Axes too.
Open user.ini located in: /home/USER/.killingfloor/System
Edit:
MouseX=Count bXAxis | Axis aMouseX Speed=2.0
MouseY=Count bYAxis | Axis aMouseY Speed=2.0
to
MouseX=Count bXAxis | Axis aMouseX Speed=1.0
MouseY=Count bYAxis | Axis aMouseY Speed=1.0
This will slow down your sensitivity enough, so you can increase the standard value of the sensitivity again.
For your perfect ingame experience/aiming you can also set a different value to the x/y-Axes.
Note: Changing MouseX/Y=Count in user.ini does not affect the menu-sensitivity only the ingame sens.
Ultimate Performance Boost
Ultimate Performance Tweak for the native linux port.
The old UT-Engine needs CPU-Power. The power of the GPU doesn’t matter, is nearly not used.
Engine uses only 1 Core of CPU. While on Windows a low-mid CPU is enough to get max and stable fps, the native Linux port runs very bad. Tweaks like disabling precaching, reducemouselag, vsync has nearly no effect to performance.
Closed maps run fine with nearly high and stable fps. Maps like Steamland, Frightyard, Hillbilly Horror, Stronghold will kill your fps, dropping down to 20 or lower fps. If a flamethrower kicks in the game, say goodbye to your frames, no matter which map or spot.
1 Core always run at limit 99% workload, the other cores are chilling at 3-9%.
At spots there the CPU provide 20-80 fps the GPU is about 3% in use.
At spots there the CPU provide 80-120 fps the GPU is about 5% in use
At spots there the CPU provide 100-200 fps the GPU is about 10% in use.
At spots there the CPU provide 200-300 fps the GPU is about 12-17% in use.
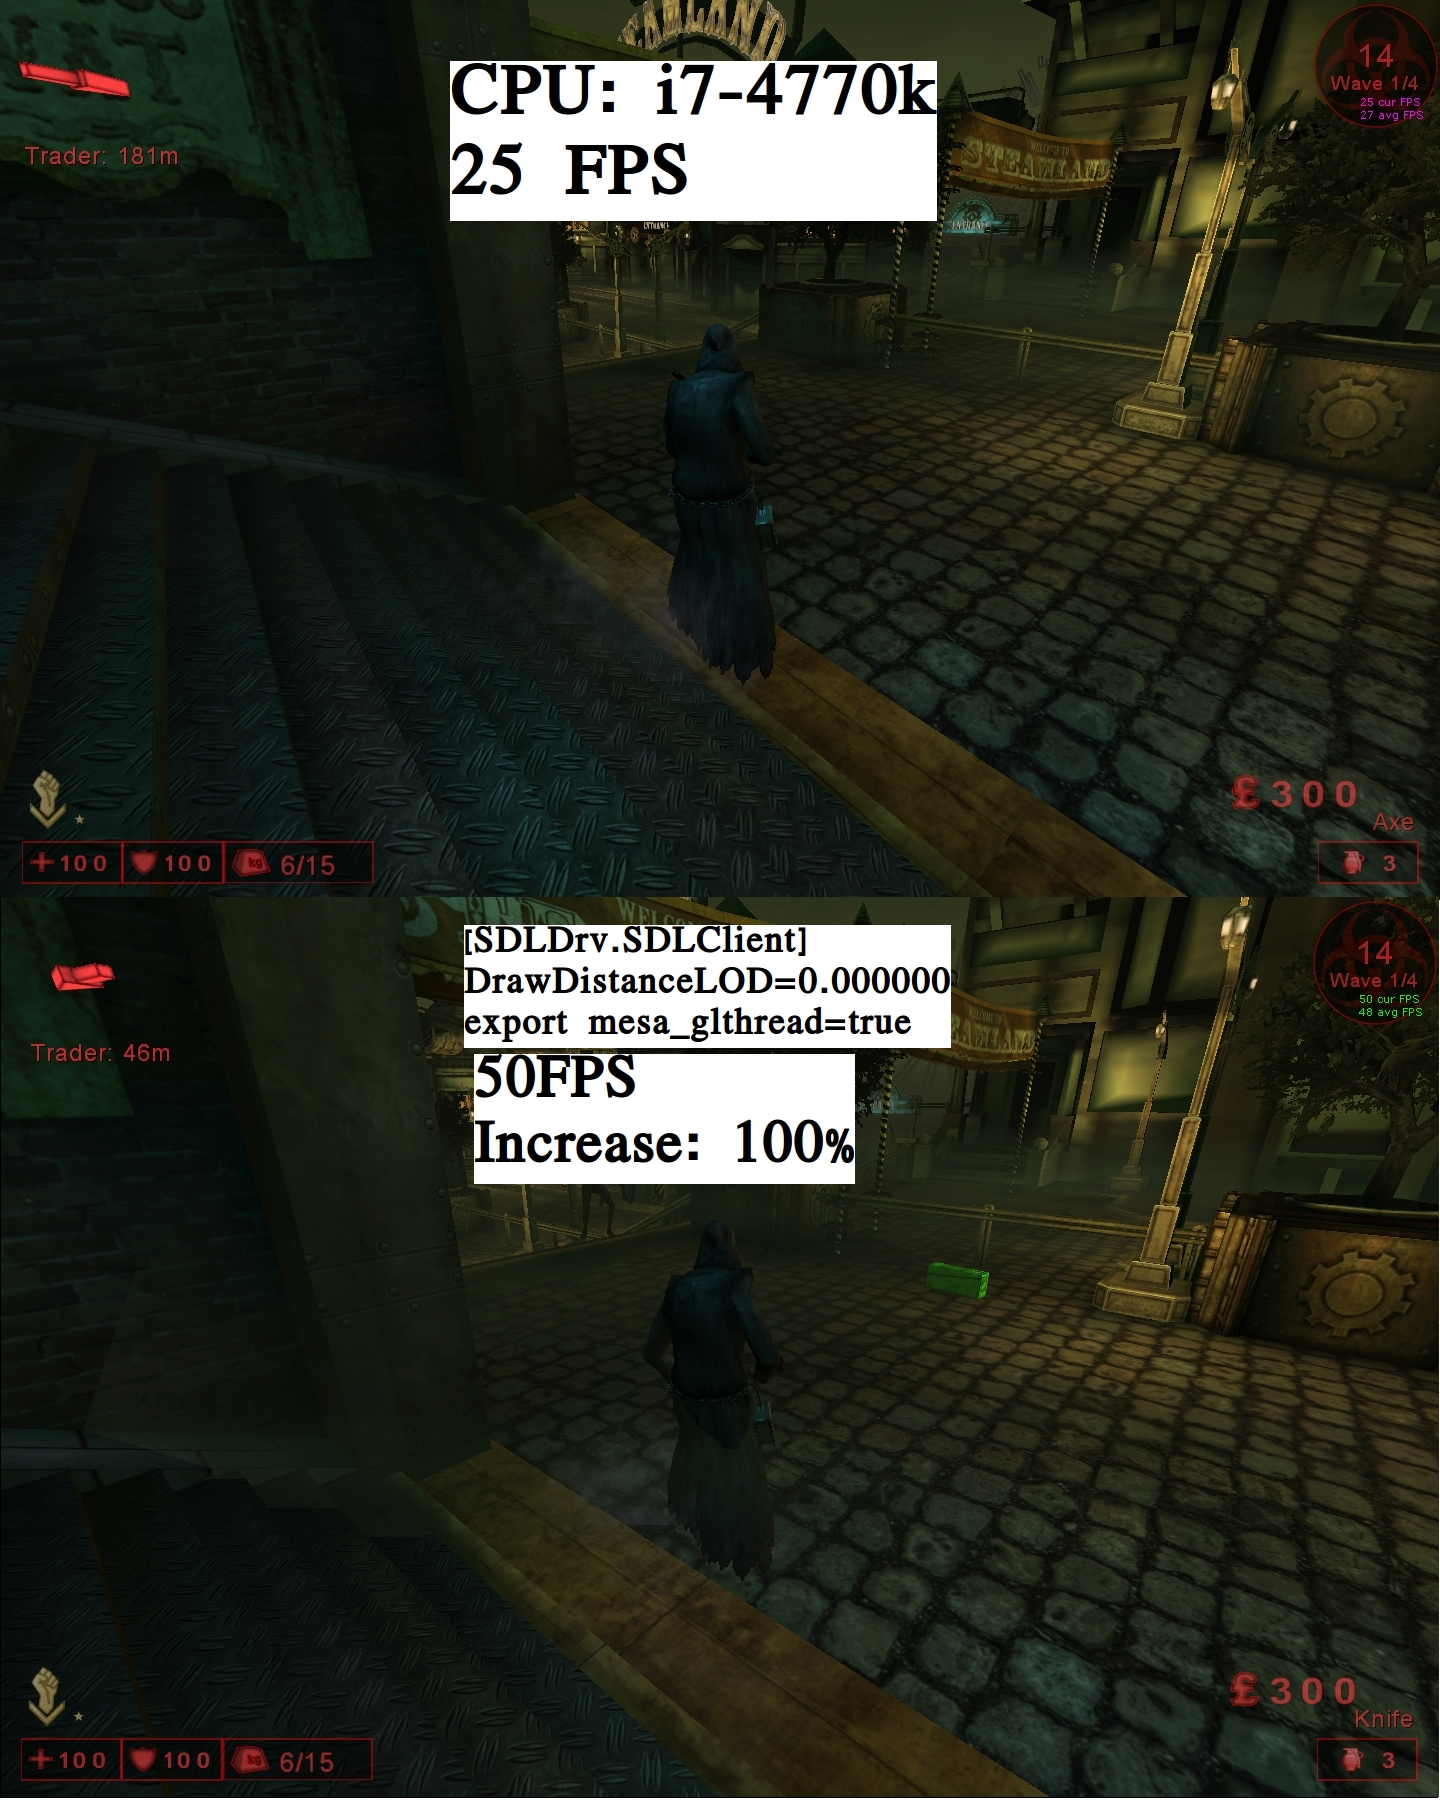
At the Mainmenu the CPU (i7-4770k) provides ~1300fps the GPU is about 37% in use.
(GPU for this results: ATI Radeon RX480 8GB)
(to show fpscounter, open console and type: stat fps)
Deactivate DrawDistance Level of Detail
open killingfloor.ini and edit in Section:
[SDLDrv.SDLClient]
DrawDistanceLOD=1.000000
to
DrawDistanceLOD=0.000000
Save file up.
Activate glthreaded, this will increase the performance a bit too
Command for mesadriver: export mesa_glthread=true
Edit your steam-startupscript.
To have a great overlay to see the workload of your hardware use the Gallium HUD.
Edit the cores with hyperthreading to your CPU.
Tested deactivating Draw DistanceLOD on Windows, but had nearly no effect compared to the peformance boost on Linux. LOD edit for Windows in killingfloor.ini
[WinDrv.WindowsClient]
DrawDistanceLOD=1.0
to
DrawDistanceLOD=0.0
(Edit LOD for Proton/Wine in [WinDrv.WindowsClient] too, will decrease heavy framedrops too. [SDLDrv.SDLClient] is only for the native port OpenGL.)
Set Texture, Character and World Detail to low/lower. You will see no strong difference from low to highest ingame. You only see a difference on “lowest”-setting, but even this won’t give you more fps. Do not compare these settings with Windows-D3D/9, win on low looks terrible, on linux still high detailed.


Proton – Steamplay
The Proton rebuild is preferable to the poor ported native. Great performance.
Killing Floor Proton:
Enable “Force the use of a specific Steam Play compatibility tool”
Select Proton 5.0.9 (At this moment the recent version)
Game is now downloading the Protonfiles.
Killing Floor creates a new clean KillingFloor.ini, User.ini to the folder:
/home/USER/.steam/steam/steamapps/common/KillingFloor/System/
After first gamestart a new KillingFloor.log will be created and if downloading serverfiles a new Cache-folder in:
/home/USER/.steam/steam/steamapps/common/KillingFloor/
-> You have the same filestructure like the windows version, so the Perkprogression-Fix is not needed anymore.
The 2nd folder from the native-port is also not used anymore /home/USER/.killingfloor/
At first gamestart after Protoninstallation your game will maybe crash, without any error message.
Game is set to D3D9 by default. Since Proton 5, without launchcommand DXVK-api is used.
Library for Vulkan are missing. Drivers for 32bit are required too.
Install Vulkan for AMD with mesadriver:
Install Vulkan lib:
sudo apt install libvulkan1 mesa-vulkan-drivers vulkan-utils
Install Vulkan 32bit:
sudo apt install mesa-vulkan-drivers:i386
Install both in one line:
sudo apt install libvulkan1 mesa-vulkan-drivers vulkan-utils mesa-vulkan-drivers:i386
Restart your system after installation!
(Without installed vulkans libs: Game starts with DVXK/DV9K-api only with OpenGL and D3D.
Forcing wine-api “PROTON_USE_WINED3D=1 %command%” game starts with OpenGL and D3D+D3D9.)
Or switch to OpenGL-Render (recommend for low-mid pc)
Open KillingFloor.ini located in:
/home/USER/.steam/steam/steamapps/common/KillingFloor/System/
Change
[Engine.Engine]
RenderDevice=D3D9Drv.D3D9RenderDevice
;RenderDevice=D3DDrv.D3DRenderDevice
;RenderDevice=Engine.NullRenderDevice
;RenderDevice=OpenGLDrv.OpenGLRenderDevice
;RenderDevice=PixoDrv.PixoRenderDevice
to
[Engine.Engine]
;RenderDevice=D3D9Drv.D3D9RenderDevice
;RenderDevice=D3DDrv.D3DRenderDevice
;RenderDevice=Engine.NullRenderDevice
RenderDevice=OpenGLDrv.OpenGLRenderDevice
;RenderDevice=PixoDrv.PixoRenderDevice
Game would start now, but once the killingfloor.ini is opened do some performance/anti-stuttering optimations:
Change
in [WinDrv.WindowsClient]
DrawDistanceLOD=1.0
to
DrawDistanceLOD=0.0
in [ALAudio.ALAudioSubsystem]
UsePrecache=True to UsePrecache=False
in [Engine.LevelInfo]
bNeverPrecache=False to bNeverPrecache=True (important!)
Using D3D-Render:
in [D3DDrv.D3DRenderDevice]
ReduceMouseLag=True to ReduceMouseLag=False
UseVSync=True to UseVSync=False
UseCompressedLightmaps=True to UseCompressedLightmaps=False
Using D3D9-Render:
in [D3D9Drv.D3D9RenderDevice]
ReduceMouseLag=True to ReduceMouseLag=False
UseVSync=True to UseVSync=False
UseCompressedLightmaps=True to UseCompressedLightmaps=False
Using OpenGL:
in [OpenGLDrv.OpenGLRenderDevice]
ReduceMouseLag=True to ReduceMouseLag=False
UseVSync=True to UseVSync=False
(Note: Don’t copy the killingfloor.ini from the native if you favorited any gameservers, the formating of this entries are different and the game won’t start without a error message, or remove this entries.)
Set NEVER
UsePrecaching=True to False in [D3D9Drv.D3D9RenderDevice]+[D3DDrv.D3DRenderDevice] in killingfloor.ini, like other tweak-guides suggest! With Proton u will have heavy lags/stuttering!
Optimations after first gamestart within the Game – Go to Settings:
Game: Change Connection to LAN/T1, Activate Dynamic Netspeed.
Input: Disable Reduce Mouse Lag (if not already done in kf.ini) disable Mouse Smoothing.
Display: Disable Vertical Sync (if not already done in kf.ini).
These are the most important settings. You can test by your own disabling some other features or lowering detail options for performance or stuttering.
Deactivate Projectors in Graphicoptions, if using D3D/D3D9-Render
If flashlight is used by yourself or a teammate your fps can drop to 1-3 fps currenty on potato.
(For decent hardware seldom stuttering/fps drops). Disadvantage you have no red dot with mbr anymore) Flashlight still works with disabled Projectors, coverage of shadows for objects and characters are changed.
If you still want have projectors activated, edit in killingfloor.ini
Set UseCompressedLightmaps to False This reduces the lags but does not fully eliminate it.
Activated Projectors with OpenGL has no negative effect.
Heavy use of flamewthrower-spam can cause huge framedrops for D3D/9 and OpenGL.
Deactivate Dynamic Lighting for this session in display options.
Note: This will deactivate flashlight of weapons, on most maps not really required.
Pro and Cons of the Proton Version compared to the native port:
+ Performance
+ Same filestructure like the windows version – no Perkprogressionfix needed.
+ Console can be opened with tilde and in mainmenu and lobby.
+ Reduced framedrops while someone spams flamethrower (compared to native)
– Stuttering with D3D/D39D, with tweaks above they’re reduced to zero/minimum
– Heavy lags if flashlight is used if bNeverPrecache is set not to True.
On potato there is no difference if set to True or False, you have to deactivate Projectors in settings if using D3D/D3D9. (This removes MBR red dot again)
– Changing Gamma/Brightness/Contrast only works with Vulkan DXVK+D9VK with D3D9-Render.
– While you are in Steamoverlay your mouse is still moving and clicking ingame
(Edit: with Proton 5.13-5 this overlay-bug is fixed)
– With OpenGL still no red dot with mbr even if projectors are activated in options.
Other Bugs:
Sometimes at gamestart the taskbar is still in the foreground. Just go displaysettings, disable Fullscreen and activate Fullscreen again.
Best performance you get if you set no launch command (=DXVK) with OpenGL-Render.
For low-mid PC stay at OpenGL. With decent Hardware every Render works great with highest settings mostly 90fps. D3D/D39D still seldom stuttering – (check on top about flamethrower spaming)
Pro of OpenGL:
+ U do not have to deactivate Projectors in Options, no framedrops if someone uses flashlight.
+ No Stuttering in any Situation.
Disadvantage of OpenGL:
– You cannot change gamma/brightness/contrast
– MBR does not have its red dot, even if projectors are activated.
– With nvidia same texture bugs like in the native port. Metallic stalkers, some other texture bugs.
D3D-Render
Runs great but less performant than OpenGL, best results with no launch command (=DXVK)
Pro: + Looks better than OpenGL
Disadvantage of D3D-Render:
– Activated Projectors in Options causes huge framedrops/stutter if flashlight is used (extremly on non-performant hardware)
– You cannot change gamma/brightness/contrast
– Game may crash random.
(Edit: Crashes was caused if set UsePrecaching to False in [D3DDrv.D3DRenderDevice])
D3D9-Render
Runs the same way great as D3D, (Install 32bit Vulkan lib)
Pro: + By far best looking.
+ You can change gamma/brightness/contrast
Disadvantage of D3D9-Render:
– Activated Projectors in Options causes huge framedrops/stutter if flashlight is used (extremly on non-performant hardware)
– Game may crash random.
(Edit: Crashes was caused if set UsePrecaching to False in [D3D9Drv.D3D9RenderDevice])
Proton – Ultimative Anti-Stutter Tweak
Using the D3D and D3D9-Render can cause heavy microstuttering resulting in short huge framedrops and lags while you have Projectors activated in graphical options. This stuttering gets more worse if you or your teammate use the flashlight.
With tweaks above in Proton-Section the microstuttering is reduced to minimum but still existing.
If you check, you will see that Killing Floor gets adressed over all CPU Cores + Hyperthreading.
Get PID of running Killing Floor: Open Terminal: htop
Check for affinity of KillingFloor: Open Terminal: taskset -cp PIDofKF
-> pid ****’s current affinity list: 0-7 (result for my ryzen 3300X)
Rendering KF with D3D+D3D9 over all cpu cores and threads seems to cause stuttering (ut2004 singlecore engine)
To fully eliminate it – force the game to specific cpu cores.
(taskset options: -c, –cpu-list #//display and specify cpus in list format)
Reducing affinity to only 3-4 cores/threads works better and great for my 4/4 Core Ryzen 3300X
Set Launch Option in Killing Floor Properties:
taskset -c 0-4 %command%
-> With this affinity on my 4 Core CPU Ryzen 3300X every microstuttering is eliminated, even with activated Projectors. Settings set all to highest with max. 8x Antialaising and 16x Anistrophic Filtering at 1080p
Note: Dynamic Lighting has still to be disabled, this would still cause framecrops on flamethrower-spam oder little stutter on some reflections.
You can set x-variations for affinity.
with “-” set range of cores with “,” set specific cores.
A combination as example.: taskset -c 0,1,4-6 %command%
(Actually still little testing for best tasksets results and stability. Some other tasksets seems working great too)
For lower PCs it is still recommended to use OpenGL-Render.
Overheating Laptop
With a non gaming laptop – not optimazed cooling solution your system may shutdown cause of overheating. Duo the fulltime use of the CPU limit at 99% and cpu will run in boost mode.
Deactivate cpu boost with a oneliner.
Create file with .sh extension.
#!/bin/bash
echo 0 | sudo tee /sys/devices/system/cpu/cpufreq/boost
Run file in terminal. Enter systempassword and cpu boost is deactivated.