Overview
This guide is a introduction to the game and its classes Its a work in progress and will get updated as such.NOTE If your class doesnt change or you want to change class you must first click “Change Class” first this will remove any active classes but your progress will still be saved*.*assuming your game save isn’t corrupt/tampered with.
Controls

Hotkey macros that corresponds to the item slot numbers in your inventory.
Press to use or equip items in that slot #
To drop item in your inventory slot #.
Cycle “Specials”.
(Not sure what the key is ment to be for this)
Use Knife.
Enter&Exit Sniper-Mode.
Board up Windows/Doors.;Jump on Desk/Drawers/Fences.
Interact with Objects/NPC.
Unlock&Lock Barricades.
Reload L-R Weapon.
Fire/Swing L-R Weapon.
Use “Special/Special-Items”.
Pick up Items. (Brings up window to select from)
Quick perk-item pickup.
Quick ammo/item pickup.
Sprint(Press and Hold).
Move.
Chat.
The Game
The objective of the game is to survive and kill as many zombies/creatures as possible. Sounds easy but unless you do the following:
-
Get a weapon
-
Get ammo for that weapon
-
Take medical items
-
Pick a class <— HEY this is what this guide is going to talk about
-
Work as a team
-
Know when to Kill & Bail
Yea that sounds a lot like how I play… Oh well back to the basics. you know the controls
So you just started and tutorial has phased away leaving you on your own you want to make your way to the armoury yea you can’t buy any of these weapons/gear till you survive a few rounds.
You start with a pistol as long as you don’t decide to drop it you can get a few kills before you get overwhelmed every time you join a map from the lobby you will get a full box of ammo for the weapon you are carrying.
Some maps will have melee weapons like crowbars, axes & gardening tools… you use these by pressing F like any other melee weapon
When you’re reloading you are vulnerable to attack I strongly recommend you get used to using your knife (That’s the “S” key) you can hold it down and you will auto attack the closest zombie, you will auto-aim to that zombie and it takes between 3-5 strikes with the knife (assuming you haven’t shot at it) your knife is also used to get out of tounger’s special attacks (again just hold the “s” Key) you will free yourself.

-
Bandages (Max stack 2/2)
– Stops Bleeding treats minor wounds
-
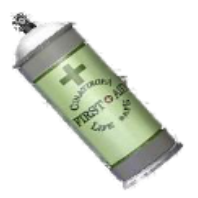
First Aid Spray (Max stack 2/2)
– Stops Bleeding Complete healing
-
Antidote (Max stack 2/2)
– Cures Virus **Does NOT heal/cure poison**
-
Red Herb (Max stack 3/3)
– Useless on its own, can not be mixed with blue herb. Triple’s the effect of green herb
-
Blue Herb (Max stack 3/3)
– Treats Poison only
-
Green Herb (Max stack 3/3)
– Stops Bleeding treats minor wounds
-
Green Mixed Herb (Max stack 3/3)
– Stops Bleeding, Treats wounds
(Stack of 2 = heals twice as effective as one Herb)
(Stack of 3 = same effect as First Aid Spray/ Red+Green Herb) -
Red+Green Herb
– Stops Bleeding Complete healing
-
Green+Blue Mixed Herb (Max stack 3/3)
– Stops Bleeding, treats minor wounds, Cures Poison
-
Green+Blue+Red Mixed Herb (Max stack 3/3)
– Stops Bleeding, Full Recovery, Cures Poison
- If you’re a Medic you heal people
- If you’re a Mechanic you repair doors/shutters/barricades
- If you’re Demo/Pyro/Cryo/Chemist… Yea just blow everything up…
- If you’re NOT ANY class you’re doing it wrong and dont blame anyone for your death.
- If you’re everyone stop shouting at medics for your mistakes
If you join a map before zombies spawn take a good look around the map. Pay attention to ammo spawn locations you will need to go back to get ammo at some point so plan ahead
Every player that join the server increases the amount of starting zombies… so yea 50 players you could be dealing with something over 15k zombies… Yea just work as a team ok you can get through it unless its chaos and everyone does their own thing or die as soon as zombies spawn…
Well when your the last player and know you have a better chance on your own… (Yea right unless the map is large you’re gonna die)
When the number of alive players split into two groups you want to be with the side that has more players. That said you also want to be on the side with your type of ammo so take your pick.
Yea this is a thing if there is a boss on the map chances are is being controlled by a player you can right click your gun and select suicide to kill yourself. But you can rub some salt into the player controlled boss if you can win the round by killing what remaining zombies are needed.
Originally posted by Kro Dragon::It’s only really for before infection hits 100% and you don’t want to crimson head against your team.
You could also just do it to end the round if you need to go back to the lobby immediatly for yourself

The Lobby

You can upgrade most weapon’s capacity, buy clan vouchers and upgrade inventory or storage Space. Upgrading storage/inventory requires $15000 and you upgrade 2 inventory slots every purchase (max 10 slots, 12 with utility perk)
You can initially store up to four items there, but can upgrade storage space to a maximum of 12 (16 with a subscription). Each upgrade you do gives you two extra spaces.
Used to repair any broken melee weapons.
Run through these doors to start your killing spree *Note joining towards the end of a game could end in your untimely death.* (I’ll explain further on)
Can be found on the main floor of lobby. Is a 2-player mini-game. (Click the pieces interact.)
Use the computer to track the players who are playing on the server. You can view stats, what weapons they use and see what class they are too.
When you Die you respawn here!

Items that are dropped in lobby after a round ends by players are gathered here for anyone to use.
Bar for anyone who wants to sit back and relax.
Room of all the enemies in the game.
Where the fresh meat start their adventure. you can also practice your shooting*
(*ammo not included)
Passive Skills
Everything in the Blue box you can use the arrows to change how much in each stat

2.- ‘Infection Resistance’ affects how well you can resist bites/scratches or any kind of damage from the infected.
If infected ‘Infection Resistance’ also affects how long it takes for the infection to reach critical levels(100%).
3.- ‘Thick Blood’ affects how long it takes for you to bleed to death(0%) once you received injury from the infected, if bleeding goes over 50% your stamina will start to drain when you move.
Utility Skills
(You can Choose one Utility Skill) Skills are listed from left to right

-
Duel Wield
– Lets you dual wield 2 guns.
-
Specialist
– Lets you carry 2 special weapons.
-
No Touchie
– 50% chance of escaping tentacle specials and makes you completely resistant to grapple abilities.
-
Outbreak Suit
– 100% resistant to poison and 8x more resistant to acid and fire damage.
-
Rocket Specialist
– Lets you carry 3 special rocket based weapons.
-
Bomb Vest
– A vest that explodes upon death.
-
Critical Hit
– 10% chance of dealing 2x more damage with firearms/melee.
-
Melee Durability
– Melee/Defense items last 2x longer.
-
Extra Pockets
– +2 inventory space.
-
Quick Hands
– Reload firearms 25% faster!.
-
9 Lives
– In the brink of death, you have a 50% chance of surviving the first time, 25% on the second and 12.5% on the third.
The Classes
These are the first Class Slots you can choose one class only
– The ‘Medic’ grants the user the ability to heal teammates(just use healing item near teamate) as well lets the user see the bleeding/infection levels of teamates.

You can use by x2 clicking or pressing the number key will heal in one square radius around you.
– Grants the user a ‘Hammer’ which can be used to fix/repair(drag drop over) barricades/objects.
Originally posted by Zero Final:Repair range is within 1 tile so jump on another barricade to protect yourself.
– Grants the user a ‘Detonator’ and everytime the user joins a new round he/she will always start with 6 c4.
* Fire Damage + 10%
– Grants the user the ‘lighter’ which can be used to light up gasoline trails and everytime the user joins a new round any gasoline cans the user is carrying automatically refills.
– Grants the user a ‘Detonator’ and everytime the user joins a new round he/she will always start with 4 n4.
– Grants the user a ‘Detonator’ and everytime the user joins a new round he/she will always start with 4 a4.
– Grants the user the ‘Tool Box’ which can be used to combine and create things.
Ok, so how this works is you get a toolbox which can only be opened in the battle area. how it works you need to disassemble ammo into gunpowder to which you can make into the ammo of your choosing
- A Red: Handgun ammo
- B. Yellow: Shotgun ammo
- C. Blue: Magnum ammo
- D. Grey: Assault/LMG ammo
- E. Green: Rifle ammo
- S. Purple/Magenta: Explosive/Special ammo (This cannot be disassembled )
You will see a combine box this is where you drop ONE whole stack off ammo to produce gun powder (click and drag ammo) once done click the red arrow pointing towards the result box to disassemble the ammo as a result you will get ONE gunpowder of a certain grade.
(see the list above)
you can stack upto THREE gunpowders (Thats 3 stacks of bullets) with the exception of S powder to which it is only ONE stack.
You can click and drag gun powders ontop of each other to mix
(I haven’t mixed any combinations but that will get updated in time)
Oh important thing you should know:
Classes Continued
Class related skills. These require a certain goal inorder to achive click on the class icons you are playing to get an idea what your targets are.
To get a description of each class click on the ? inside every box

Requirements: Requires the player to heal / cure other players a set number of times.
Requirements: Requires the player to repair baricades/doors a set number of times.
Moving away,Getting grabbed or killed will stop you from repairing the object.
Requirements: set number of Kills with Explosive related weapons/munitions.
Requirements: set number of Kills with Fire related weapons/munitions.
Requirements: set number of Kills with Ice related weapons/munitions.
Requirements: set number of Kills with Acid related weapons/munitions.
Subscriber Classes
Description:
The Melee class of TLC. Riot Specialists are able to protect teammates from melee damage with their Shields and receive reduced damage from all enemies. The shields can be used as a melee weapon by bashing enemies with F, used as a shield for enemies who pursue in front of you or even a barricade!
- Starts off with a shield which can be upgraded later.
Description:
Virologists have a special ability. They can manipulate enemies into becoming their companions to fight for them. Sort of like a pet. The tamed creatures Can also be controlled in a way that it will search and fight for enemies, or defend their master at all costs.

- Gas Canisters act like molotovs except they will work in any weather condition making them more effective.
- Companions can be healed with herbs and F.Aid Sprays by dragging and dropping onto them or using health items next to them.
- You can command a companion to fight or defend using Shift + A.
Description:
Operators are the only class that are able to supply ammunition, explosives and healing items without having to bring them into round. Operators use Radio Vests in order to request Supply Crates and call out offensive operations that are carried out by attack aircraft.
Request Costs: In order to use the radio you will need KP (Kill Points) which are earned through killing enemies.

- Supply Crate – 100 KP
- Air-Strike – 200 KP
- Napalm-Strike 250 KP
Any kills from Air-Strikes or Napalm-Strikes will not earn any KP. This includes the fire kills left over from a Napalm-Strike
Description:
The infiltrator is like a spy, able to quickly sneak past enemies and distract enemies. They are the most mobile out of all classes as they can quickly move using their Hookshot which propels themselves forward. The class only capable of cloaking and becoming unnoticed by enemies.

- Be careful when using the Hookshot as you can propel yourself into a crowd of enemies.
- Hookshot can be used to escape quickly, or kite enemies and bosses.
- Pheromone grenades are useful on bosses as you can attract groups of bosses to escape or attack without it chasing you.
Description:
Technologists have limited amount of special items. However their ability to scout out enemies and collect items anywhere on the map with their RC Cars make up for it. Technologists specialize in electricity based weapons such as the spark shot and drones.

- Technologists start off with an RC Car.
- S – (Can grab up to four stacks of items)
- Alt + S – Drop off items
- E – RC Car Jump
- G / Shift + G – Pick up RC Car
- Tesla Coils work most efficiently 5 tiles apart from each other.
- They can also be used as a way to block enemies from entering into rooms.
Description:
Scavengers can create gun powder to which they can create ammo
- Scavengers start with a Tool Box which can be used to combine and create things.
[/list]
Subscriber Classes Continued

- Riot Specialist – Everytime the user joins a new round he/she will always start with a riot shield.
- Stun Grenade – Everytime the user joins a new round he/she will always start with 8 stun grenades.
- Vest – Melee damage received is reduced by x 4.
- Shield Upgrade – Riot Shield defense is upgraded by 50%.
- Everytime the user joins a new round he/she will always start with 2 Gas Canisters.
- Companion 1 – Everytime the user joins a new round he/she will always be accompanied with a companion which can fight and defend for the user.
- Companion 2 – Everytime the user joins a new round he/she will always be accompanied with a stronger companion which can fight and defend for the user.
- Grants the user the ‘radio vest’ which can be used to radio in air-strikes or supplies.
- Air-Strike – Lets you radio in air-strikes in a selected target zone.
- Napalm-Strike – Lets you radio in napalm-strikes in a selected target zone.
- Everytime the user joins a new round he/she will always start with 6 pheromone grenades.
- Hookshot – Grants the user a ‘Hookshot’ which can be used to propel the user forward.
- Cloak – Grants the user a ‘Cloak Device’ which will render him/her self invisible for 40 seconds.
- Technologist – Grants the user the ‘RC Car’ which can be used as a spy drone or used to collect items.
- Start Drone Planes – Everytime the user joins a new round he/she will always start with 3 drone planes that will fire and protect the user.
- Start Tesla Coils – Everytime the user joins a new round he/she will always start with 4 tesla coils which can be used as static field fences that can stun/damage enemies.
[insert class image here! (But steam won’t allow me to upload new images -_-]
- Gunpowder ABC + – User’s ‘Tool Box’ will be supplied with 3x ‘Gunpowders A, B ,C’ every round.
- Gunpowder DE + – User’s ‘Tool Box’ will be supplied with 3x ‘Gunpowders D ,E’ every round.
- Gunpowder S + – User’s ‘Tool Box’ will be supplied with 1x ‘Gunpowder S’ every round.
How To subscribe
(Premium/Subscriber classes Requires $5 USD Payment )
TLC subscribe [secure.byond.com]
Even if you are playing through steam you are required to register a Byond Account*
The URL provided will take you to the subscibe page for the game**
You can pay via the many ways provided by Byond.
You also can buy subscriber status for another player***
* If you are playing as a guest you will need to register[secure.byond.com] for a byond account
** You will be required to login[secure.byond.com] to byond account
*** if you already have subscriber status you can buy for a friend. This requires that you know that persons Byond username
Byonds terms of service[www.byond.com]
Options
You can access the Options popup by clicking on the spanner icon at the top right next to the eye icon you will then see this window

Raise/Lower volume
This is how you tell which zombie/creature you are shooting at this icon will show over it
You can change the colour by clicking the “Reticle” button.
you can use a maker to draw on players faces
Stretched 32×32 64×64 (recommend streched on large displays
On Off (Switches the locations)
Double-Tap-Move Hold-V Toggle-V
changes the hud colour
(allows you to change character skin)
(Self explains it self)
(Block specific player chat)
(View the server MOTD opens popup also shoes upon login)
(opens the forums)
(subscriber – allows clashing of two text colours)
(sets login starting location)
Save or reset changes
Community & Useful links
Here are some of the places you can go to join the community
Discord [discordapp.com]
The Last Conflict Website[thelastconflict.com]
Game Wiki [www.thelastconflict.com]
Game Forum (outside steam) [www.thelastconflict.com]
Sources, Permisions To do list
Sources used feed back from community members will be mentioned here
Wiki Entrys[www.thelastconflict.com]
Image Permisions ~ Darker Emerald
- Weapons
- Stats
- others
Weapons [WIP]
[link]I will update this into a more friendly tabe for guide in due course