
Overview
Getting the most out of the Engi Class Cruisers – A.K.A. How not to die from drones aiming at the wrong things
You sure like boarding, don’t you…
You’ll discover through these guides that I am advocate of boarding and always like to include it in my strategies. There are 2 primary reasons for this:

The second advantage is that you get better rewards for it. Compared to blowing ships to pieces, you generally get a lot more goodies/scrap/fuel for just killing the crew (who’d have thought!) – So economically, boarding is a lot better in the long run – Even if you intend to go for a more weapon-based approach
Boarding is a fiddly process – And there are many guides out there which cover this in extensive detail (“Boarding for Fun and Profit” by daniu -TLG- is particularly excellent). I’ll cover the brief basics here to get you rolling:

Keeping the boarding crew alive is vital. So beam them out when low on health. Be aware though, the teleporter has a cool-down after use, so you have a window after sending them in where you can’t get them back. If you hit trouble and it’s still charging: Have your guys start running about the ship and keep them changing rooms. The aim is to keep them out of combat until you can beam them back. Don’t be afraid to pause when you do this. Also note you’ll need both in the same room to beam them back at the same time
The main hindrance to your boarding crew will be enemy recovery rooms. These should be top of your hit-list. The general tactic is to knock them out with your weapons then teleport your guys into that very room (to stop any enemies repairing it). Amend your tactics on the room:
If they have a Medbay

Just beware: Once the hacking wears off, the Medbay will heal normally again, so don’t try and board the Medbay itself unless your hacking module is at 3 bars. Last thing you want is the enemy crew suddenly healing again mid-fight!
If they have a Clone Bay

Alternatively, if you hack it: Activate the hack immediately after an enemy dies – It will halt (and hopefully permanently kill) any enemies queued up for regeneration
[Type A] The Torus
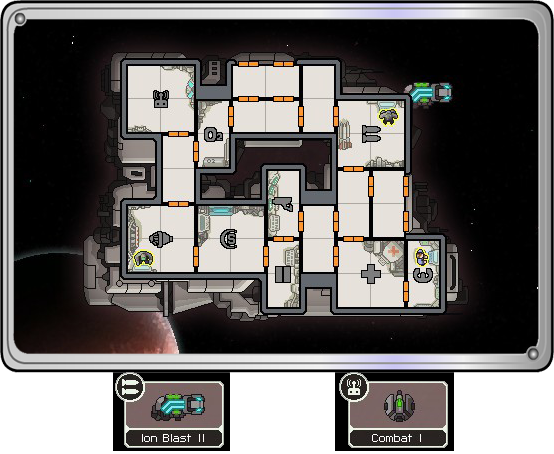
Maybe I just suck at this game, but I found the Torus a difficult ship to use. It comes with some great kit and you also start with a drone room. But you need to be economical, as it’s easy to get carried away trying to upgrade everything
Getting Started
About those repairs…
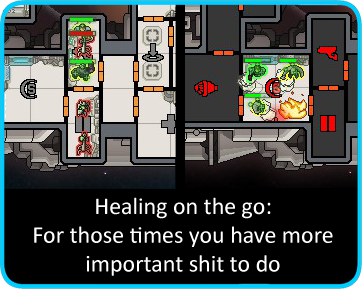
It’s a good thing you have Engi though; your ship is quite vulnerable to fire (especially the engine/shield rooms) – You have limited airlocks, so venting anything in a hurry won’t be easy. The Med-bot add-on also helps if you get caught up firefighting, so keep it powered up. Needless to say, a decent boarding crew are a good call here: Even just to help defend your ship
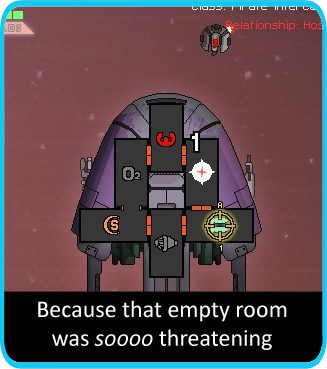
The defining element of the Engi-Cruiser is the Drone Room right off the bat. Personally I don’t like drones. Don’t get me wrong, they’re great and can wreak complete havoc. The problem is that you can’t control them. An enemy ship is pointing a great big missile at your face… and your attack drone is more content shooting up empty rooms. Upkeep is expensive too (8 scrap a throw at stores) if you don’t stumble upon a drone recovery arm, so it can add up. Honestly speaking, I wouldn’t invest more than 1 extra bar into the Drone Room (so a max of 4). Sadly there just isn’t enough scrap to rock epic shields, engines, a killer set of weapons, top-notch boarding crew AND small army of drones. By all means, use them if you find anything cool, but don’t go out of your way to buy them
Don’t get me wrong, drones can kick butt. I once had a Combat I and II Drone going at the same time, plus a Drone Recovery Arm (so was using them for free) coupled with Flak and the Ion Blast II – They shredded every ship I came across in no time at all. The problem was when I hit the flagship. With no strategic angle (boarding crew to take out key systems) it was basically a race of who could out-shoot the other first… one that you seldom win
2 plus 2 is…

Now… the Ion Blast can’t damage ships, and the attack drone doesn’t shoot fast enough to get through shields on its own. I think the synergy is pretty obvious here?
Unfortunately, this is also the big downside to this ship. You are completely dependent on both being online at all times. If your enemy knocks one out, you’re about as dangerous and intimidating as belly-button fluff until you get it repaired
Needless to say, it’s important for you to try and break this dependency. Hull-damaging weapons and a boarding crew are the way to go here. That said, the combo can hold its own quite well, so don’t feel you’re in a huge rush
What to aim for
– +3 Crew (x2 Boarders: Rock / Mantis – x1 Non-Engi)
– Decent Beam/Laser Weaponry (to compliment ion)
– Crew Teleporter
– Hacking Module
– [Optional] Additional drone(s)

[Type B] The Vortex
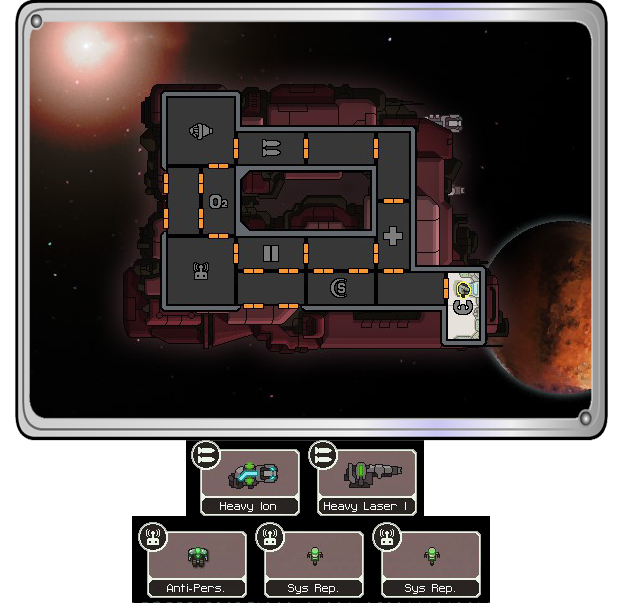
The Vortex is a tough ship. It’s not that it punishes you for silly mistakes… more that it punishes you for having the sheer audacity to use it

1 crew member, 2 basic weapons and a small medbay/weapons room. The redeeming factor (using the term broadly) – 2 repair and an anti-boarding drone. Cancel the fireworks and parade, you’re really up against it with this ship. You have a lot to get and not a huge amount of flexibility to do it with
Before you leave…
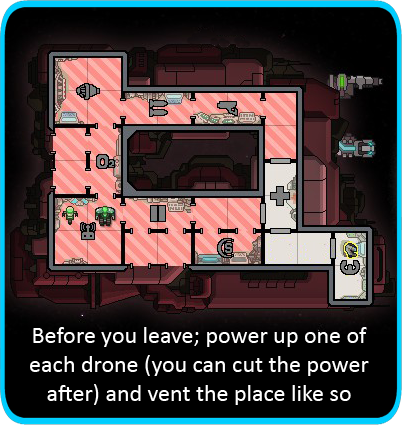
Taken from a superb guide by Poodka (How to avoid losing to “Luck”) – You need to make the most of your drones to actually make this ship half-worth using. Vent the entire thing except the pilot’s room (and maybe a path to and including the medbay) – suddenly fires and boarding crew are considerably less of a threat. Power up a repair and boarding drone. Don’t worry about using drone parts, they ‘stay’ between fights, even powered down. Also switch the ‘order’ so that a repair drone is first – That way even if the drone room gets hit, you should still have enough running to repair it
Weapon troubles
Just to add insult to injury, and then add a little bit more injury – the weapons aren’t so hot. The Heavy Ion is the problem: It takes much longer to charge and the effect isn’t amazing. The heavy laser does nice damage, and when it hits will normally offline most rooms. That’s if it hits, of course. You get 1 shot, so are entirely dependent on the Heavy Ion keeping shields down. Good luck against a ship with 2 shields, that’s all I will say. Needless to say, getting more weapons is vital. Don’t be too picky, just grab something cheap that can even remotely work with the starting set. Even a Burst Laser Mk I does a better job in early sectors than the Heavy Ion, and that’s saying something!

My door is always open – That’s half the problem
If you get some spare scrap – get blast doors. The vented ship won’t help you out much if enemy boarders can just waltz to your pilot’s seat

Drones are ok I guess. Repair drones can fix stuff… but you know what can also fix stuff? More crew. They can also fight, gain exp and won’t wander smack bang into a room full of boarders as it tries to repair your doors… ok, rant over. You really need more of a team sharpish. Your engi is great, but tied to the helm you won’t have him doing much else. Boarders are a must. Don’t be afraid to bypass shield/engine upgrades to get the drop on boarders. The gamble will likely pay off quickly with the increase in scrap you’ll get. Despite the desperate situation though… don’t buy human crew. That’s just silly
What to aim for
– A ship worth flying
If you manage to survive the first few sectors… then you might just stand a chance. But juggling the upgrades to your shields and engines (you did notice they were weak too, didn’t you?) along with getting decent weapons and a boarding crew is no easy feat. Truth be told, I wouldn’t bother greatly with more drones (maybe a defence drone though). You can keep hold of yours and make use of any you stumble upon – but don’t be afraid to sell the Drone Reactor Booster to get that extra scrap for an important purchase. The reliance on the starting drones will largely be lifted once you have a decent crew
You’ll likely to need to replace all of your weapons to get a decent set for the finale. You only have 3 weapons systems, so your hands are a bit tied. Replacing the Heavy Ion is important, as it frees up 2 bars of power for something much better
The extra systems are the standard boarding set. You’ll want boarding early to rake in the extra scrap, as the sheer amount of purchases you need will show their strain very quickly
– +5 Crew (x2 Boarders: Rock / Mantis)
– A completely new set of weapons
– Crew Teleporter
– Hacking Module

[Type C] Tetragon

An unusual, quirky ship. You start with a lot of goodies, but they show their age quickly, so you need to move fast in maintaining a strong offensive
The ship of many doors!
The Tetragon certainly likes it rooms. It’s a compact ship with only three at 2×2 and a crap-ton of doors. Moving around is generally pretty easy, except the pilot’s seat, which snakes around to feed through a single entrance in the Clone Bay. As such, Blast Doors are vital investment early on, especially where your Engi are vulnerable in combat and, unlike the other 2 ships, you don’t have much to appease this. Boarders can quickly rage out of control. However, if they’re stupid enough to beam into the hall of doors at the top, you can largely vent them out with little hassle
Needless to say, boarding crew are a must (or an anti-boarding drone – you have the controller!)

Fending off boarders
The lack of MedBay and predominantly Engi-Crew makes boarding particularly painful for you. No attack drones, no medbay dispersal… just lots and lots of death. But it doesn’t matter how many times your crew dies, your CloneBay will at least keep churning them out. As such, the most important element here is to keep that bad boy online! So station your Lainus there and make sure the oxygen is vented. This should be enough to deter any would-be attackers. It also acts as a nice choke-point – So your engi can still man the engines/pilot’s seat or shields/weapons (depending on the location of the attackers) – Vital if you’re mid-fight. More often than not, starve your enemies of oxygen where possible. You have doors – Use them! (Don’t overlook the sneaky airlock in the Drone Room too)
If all else fails – Vent everything. Your Lainus will feel right at home

The Lainus Problem
Whilst the Lainus is normally a cool addition, it does create a curious quandary: Any room it operates in will be largely unreachable by your Engi – So you trade off the fire/boarding proofing for a reduction in repair speed. Decisions, decisions…
Personally, stick it in the pilot’s seat and vent up to the sensor’s room (so you still have a path to the engines) – The annoying snake-like route means it’s a hassle to get to, and it will have the fewest bars allocated to it (max of 3) so there’s less to repair if it gets hit
It’s all about timing
The weapons are an interesting set. Unlike The Torus, you don’t get an Ion weapon to support your beam drone, but a Dual Laser. This is both a blessing and a curse. The good news is that your ship now actually has some decent attack capability (though you’ll rarely, if ever, want to use the Dual Laser alone). The catch is that you can’t just ion the shields and let the drone tear everything to shreds. What you need is to time your shots carefully to crack enough of a gap to buy your drone a shot (and hopefully take the shields offline)
Timing is everything – Wait for the Dual Laser to charge, then do you know how your drone jumps side-to-side between shots? Open fire at the shields when it’s around 60% to 2/3 of the way through its path. If you time it right, you’ll bust open the shields just as the drone lets rip with its beam. If you’re lucky, you’ll also damage the shields enough to offline them – At which point it’s pretty much feeding time. Kick back and aim the Dual Laser where you feel most diabolical

When in doubt – Hack them out
Don’t feel you need to fight fair – You have a hacking drone… use it! The above is cool, but you’ll struggle with 2 shields. Plant it on the shields (it’s useless elsewhere for now). At 1 bar, it will just take down 2 shields, but they’ll start recharging almost instantly, so have your Dual Laser ready to prioritise on the gap. Time it right and you’ll take it down to 1 shield, at which point rinse and repeat the previous tactic
Moving from the drone to the bottle
If you look carefully at the above tactic, there are 2 problems. Firstly, you’re using 2 drones per fight – That gets expensive. Secondly, you’re aiming everything at your enemy’s shields. As such, little will stop their weapons pounding into your hull. Whilst the beam drone means that any enemy reduced to its knees will seldom get back up… the trouble is kneecapping them in the first place
Grudgingly, you should wean yourself away from it quickly. Keep an eye out for cool weapons and a boarding crew, as they will pay off in the long run. The Dual Laser is pretty cool (for only 1 power) so don’t be quick to sell it. But note that installing extra weapons includes a 40 scrap penalty to get the 2nd bar
If you get boarding early, go ahead and use the backlog of drones to abuse the Hacking module on the MedBays. It’ll give you a decisive edge

The Tetragon does have one little trick up its sleeve… It comes with a Defence Scrambler, which basically renders enemy defence drones utterly useless! It’s vital to keep this around whilst you’re using your beam drone, to stop anti-combat drones taking it out – but even if you don’t use drones: It allows missiles or even just your hacking module to sneak past defence drones: So don’t sell it unless you really need to
What to aim for
– +3 Crew (x2 Boarders: Rock / Mantis – x1 Non-Engi)
– +1 Flak / Laser Weaponry
– +1 Support/Missile/Bomb Weapon
– Crew Teleporter
– [Optional] Support Drones to replace Beam (Defence / Repair)
You only get 1 additional subsystem this time, so the Crew Teleporter should pretty much be your go-to. You’ll need to pick up some decent fighting crew anyway, so why not put them to use trashing your enemy’s ship? You’ll get more goodies that way and it’s wonderful for morale
Thoughts and Suggestions
Anything I’ve missed?
Anything you’d like more detail or explanations on?
Disagree with any of the above and want to challenge me to a duel with foam swords to an over-dramatic soundtrack?
Give me a shout! There’s plenty more to come, so any changes and suggestions are welcome. The awesome ones shall be implemented and full credit will be given to the delightful owner
Happy gaming!
Links to the other Class Guides
Hungry for more? Fear not – The other ship classes are catered for! Just follow the links below:
– Kestrel Class
– Federation Class
– Zoltan Class
– Mantis Class
– Slug Class
– Rock Class
– Stealth Class
– Lanius Class
– Crystal Class