
Overview
Getting the most out of the Federation Class Cruisers – A.K.A. How not to die from waiting for a laser beam to charge
Let’s get this out of the way now
Yes, I know the ship looks a bit like a wiener
When you’re done laughing, we’ll carry on
[Type A] The Osprey
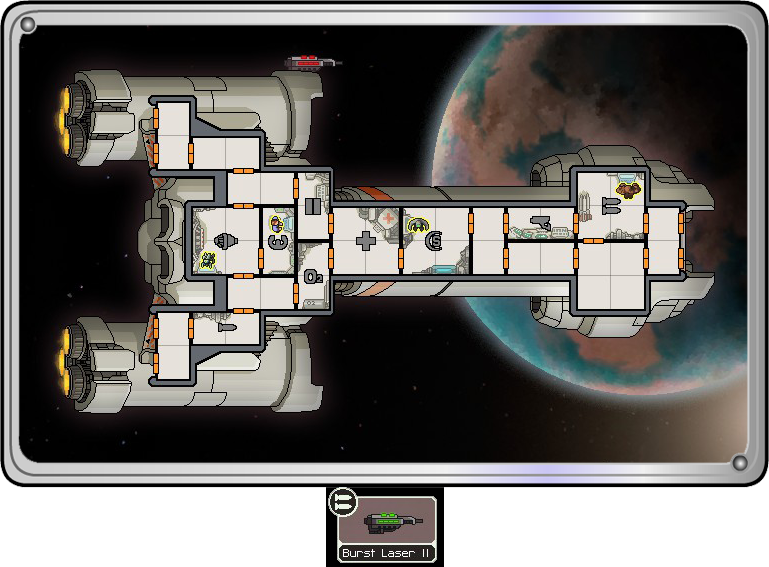
The Osprey is a lot of fun with excellent crew and a superb weapon. The main downside is that you’re slightly more vulnerable in the early phases waiting for the damn thing to charge
Wait… they had shields?
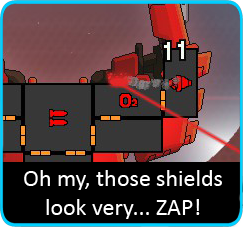
I’m so sorry… that doesn’t normally happen…
The other thing to beware of is that this bugger shoots off its own accord. Great that you don’t have to micro-manage it, but sucks if you have a boarding crew and need the ship in one piece. As such it’s important to remember to power it down when you don’t need it any more (as such, it’s not recommended to keep a Zoltan in the room)

The Burst Laser Mk II is also a cool starting weapon to the ship – Though it can feel a little bare on its own, especially in the early sectors where you’re unlikely to have other weapons to call upon. This makes shields and engines a top priority – as early fights are largely going to be about attrition than a quick, decisive victory. Where the artillery beam ignores shields, you’re generally better off aiming for the weapons (unless they’re not a threat at all) to reduce incoming damage, or engines if they’re trying to make a break for it

In addition to the weapons, the crew is a pretty fantastic! You get a human, engi, rock and mantis. That’s a boarding crew right off the bat and a top-notch engineer to keep the systems online! You’re also in a good position to absolutely rake in the blue text events. You’ll want to post the engi on shields, firstly to put it in the best position to run about, but also as centre of the ship is quite vulnerable to fire where it cannot easily be vented. Luckily the Medbay is also here so shouldn’t become a problem
What to aim for
– +2 Crew (Any)
– +1 Weapon to Compliment Burst Laser Mk II
– +1 Support/Missile/Bomb Weapon
– Full Powered Artillery Beam
– Crew Teleporter
– Hacking Module

Needless to a say, a fully upgraded Artillery Beam is a must by the Flagship. 20 second shots that tear though 4 shields and damage a large handful of systems… it’s hard to find anything not to like about this (okay okay… other than it’s not 10 seconds)
In terms of supporting weapons, the presence of the artillery beam actually makes beam/ion weapons pretty superfluous. What you ideally want is something that synergises with the Burst Laser for maximum ship wrecking. Though ion weapons normally work well with the Burst Laser Mk II, I don’t feel you get the most out of them here … So it’s better to go for flak, bombs or just more lasers
[Type B] Nisos
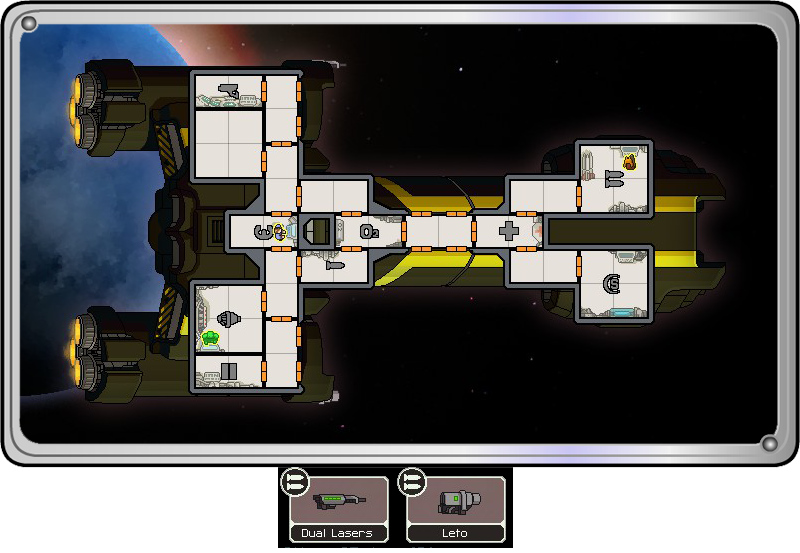
A slightly trickier version of its older brother. But still pretty cool and packs an upgraded Artillery laser
Back to the Beam
To be honest, the Nisos isn’t too different from its Type A counterpart. As with all Federation ships, it comes packed with the Artillery Beam – albeit with more power at the start, only requiring 40 seconds to charge. Don’t get too happy though, as it’s still a long charge-up that leaves you open to many volleys before it can fire
The crew is ok, but lacks the edge of the last ship. Be prepared to hunt for more, especially boarders
Starting Out

The Waiting Game
Your ship upgrades largely fall around what weapons you can get your mitts on. The Artillery beam gives you a solid fallback so can you always at least do something – So don’t feel you need to grab the first weapon available. If nothing crops up: Put it all into shields and engines and just wait out some enemies. You have the advantage here of being able to play both offensively and defensively, so don’t hesitate to be picky

If you haven’t looked at the front of your ship much, the fires will quickly grab your attention. Basically, 2 key rooms (shields, weapons) are stationed right at the front with only 1 path to the airlocks, going straight through your medbay. Venting here is no easy feat, so Engi / Rock crew are vital. It’s also wise to keep your Zoltan stationed at the engines, as its low HP will be useless for firefighting. You might even want to think about Fire Suppression if you see one in a store, as neither room is really one you want going down mid-fight. A Lanius is also a good call if you’re lucky enough to find one, as its will largely render that section fire/boarder-proof

– +3 Crew (x2 Boarders: Rock / Mantis – x1 Engi)
– +1 Flak / Laser Weaponry
– +1 Support/Missile/Bomb Weapon (Replace the Leto)
– Crew Teleporter
– Hacking Module
– Full Powered Artillery Beam
– [Optional] Fire Suppression / Lainus
Truth be told, the final setup for the Nisos will largely be identical to the Osprey. What worked for Type A will work here
[Type C] The Fregatidae
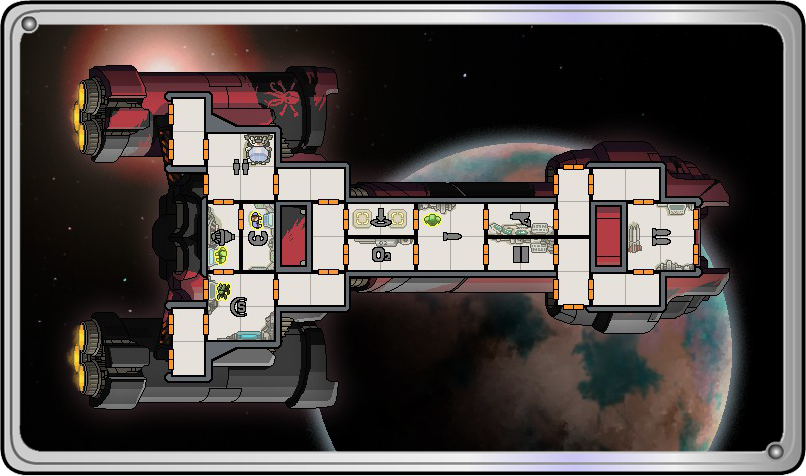
An unusual yet very fun ship to play. Its core tactic relies on repeatedly sending your crew to their death whilst your awesome flak weapon charges… hey, they know what they signed up for
Get out of there…
Ok before we go any further, get that Zoltan out of your weapons room… You have nothing to shoot!
I’m afraid it’s purely down to your boarding and super-weapon this time

Instead of the usual Artillery Beam of the Federation ships – The Fregatidae uses Flak Artillery. This is essentially a Flak II but covers a much wider range – able to hit several systems. It’s a great carpet bomb, albeit takes a whopping 50 seconds to charge again. Like before, you can upgrade it to 4 bars to reduce it to 20. Whilst the question of a 4-bar Flak II (which normally uses 3) could be debated – unlike the Artillery Beam, it hits the shields so carves a nice hole for other weapons to take advantage of! With 7 fragments, you’re largely guaranteed to always get a gap against even 4 shields. When you actually get weapons, be sure to capitalise on this
As you have a teleporter from the off, you might assume you need to power down this bad boy to protect your boarders, right? About that…

The lack of weapons means that you’re entirely reliant on boarding, and the lack of MedBay means that your boarders’ life expectancy isn’t that great either. But it does open a curious boarding tactic…
The Mantis is an obvious boarding candidate, but what about any ally? Throw in a Zoltan!
No, I’m being serious
Yes they have crummy HP, but Zoltans explode on death (dealing around 15 damage to all enemies in the room), which you should normally try to avoid, but hey… you have a clone bay now! Make more of them! As such, the Zoltan makes an unusually fun team. The Mantis shreds enemy HP, and the Zoltan’s death blast will be enough to damage or finish off the stragglers. That said, still teleport them into a 2-square room when boarding, as you can inflict more damage that way before the Zoltan goes boom boom. Let both die, then send them in again

As you board though, you’ll want to keep the Flak Artillery charging. Only switch it off if you are sure that you can win the fight through boarding alone and don’t want to risk destroying the ship (to get more goodies). But if it fires and destroys the ship with your guys on it? Big deal, make more
What about those recovery rooms?
What about them? Send your guys in anyway… Any disruption of the enemy crew is never a bad thing whilst your Flak Artillery charges
That said, once your guys die the first time: Let them regen from the CloneBay and wait for the Flak Artillery to fire – If it manages to offline the recovery room, you’ll want to jump in and try to seal the victory before it gets repaired (or at least sneak a few permanent kills in)
Breathing apparatus
The emergency respirators might seem like a pointless add-on, seen as you don’t have Lanius on board. But it’s your key weapon against Drone ships (the effect continues when you’re on other ships too). It gives you more of a window to knock out systems with your guys whilst the Flak charges. Go for whatever’s most threatening – Weapons or Pilot’s seat. Then take down the shields if you get a chance. The flak will do the rest
If they try to run?

Don’t pick a fight in the Pilot’s Seat. It still counts as ‘manned’ as far as charging FTL goes (unless it’s a scout, in which case: Make it the first thing you trash). The best room is normally the one just outside it (as you can sometimes lure the pilot out) – You might need to kill some of the crew to draw out the pilot, but once you do; try to keep them pre-occupied. Even just running around the ship will do. Anything to stop them returning to their post
If you have trouble though, just leave it and let them run. It’s annoying and might double the fleet jump – But it’s better than losing your boarding crew
What to Aim for
– +2 Crew (x1 Boarder: Rock / Mantis)
– +2 Flak / Laser / Beam Weaponry
– +1 Support/Missile/Bomb Weapon
– Hacking Module
– [Optional] Full Powered Flak Artillery
Much as you’ll need weapons down the line, the boarding and Artillery can hold its own quite well – So don’t feel you need to rush for crummy weapons. Bombs are a really good choice, where they can support your boarding quickly. But lasers and beams to work with the Flak Artillery are also good ones to aim for in the long run. That said, you generally want to upgrade the Artillery last – Always get the better weapons, crew, upgrades first. It’s good, but tends to need other weapons to follow it to really have an edge
Now whether you keep the boarding tactic until the end is entirely down to you. If you pick up another Mantis / Rockman and a Medbay or Reconstructive Teleport, feel free to return to conventional boarding tactics
Of course, if you switch out the CloneBay – You’ll need to remember to switch off that Artillery when you board! It’s very easy to forget
As for the final system, Hacking is likely a must. Whilst the amount of boarding you’ll be doing (with no weapons) makes a drone controller and defence drone very tempting for the legions of missiles you’ll be seeing – only do this if you’re confident you can counter the Flagship’s hacking (a defence drone alone won’t be sufficient)
Thoughts and Suggestions
Anything I’ve missed?
Anything you’d like more detail or explanations on?
Disagree with any of the above and want to challenge me to a duel with sharp sticks and feral raccoons?
Give me a shout! There’s plenty more to come, so any changes and suggestions are welcome. The awesome ones shall be implemented and full credit will be given to the delightful owner
Peace
Links to the other Class Guides
Hungry for more? Fear not – The other ship classes are catered for! Just follow the links below:
– Kestrel Class
– Engi Class
– Zoltan Class
– Mantis Class
– Slug Class
– Rock Class
– Stealth Class
– Lanius Class
– Crystal Class