
Overview
Getting the most out of the Slug Class Cruisers – A.K.A. How not to die when ‘Using guile and cunning” is a euphamism for “This ship is awful”
A Word on Upgrades
It doesn’t take playing FTL for too long to realise that there’s a lot to buy and very little to buy it with. When faced with a ship of several systems, all begging for you to upgrade them… it can be a little daunting at first
Golden Rule: Learn to Save Scrap
One of the big mistakes I made with the game when starting out was to spend scrap as soon as I got it. 50 scrap? Flick open the ship window and see what I can upgrade!
Of course, what happened is that I’d arrive at a store not too long after, and end up staring longingly at all the cool weapons, systems and crew I couldn’t afford

Here’s the key bit: You can upgrade your ship at any time (on the whole) – But stores appear a handful of times each sector (if that) and the selection is limited and largely down to chance. Needless to say, saving up scrap to get cool stuff at stores can make a big difference – So always try to stockpile. Sure, you’ll run around with a slightly weaker ship in the early sectors, but this will quickly subside once you get some cooler kit installed. Plus, it’s better to gamble early on and die, than to play it safe and find your ship outclassed and unable to get past epic shields in later sectors
The only main exception is if you’re about to hit a beacon overtaken by the pursuing rebel fleet. The Elite ships are nasty, and you’ll want every advantage you can get
General Upgrade Structure

In terms of what to upgrade and when, generally use the following 2 questions as a guide: Am I killing things? (your boarding capabilities and your weapons) and Am I being killed? (your shields and engines)
In terms of offense, you have 2 avenues here: Your boarding and your firepower. Boarding involves getting hold of a crew teleporter and suitable boarding crew (rock/mantis). Weapons involve getting hold of weapons and upgrading the weapons room to be able to field them. Ideally you should aim for both, but if one is single-handedly winning you several fights, you can take your time with the other. On the whole, offense comes first – as your defence will largely be negated if you’re spending ages trying to knock out the enemy shields
The important question to ask is “could I cope if they get more difficult?” – Always look to the worst-case scenarios. Here’s a few to get you rolling:
Take the ships you’ve been fighting, can you still win if they have another shield?
Can you beat a ship without oxygen?
Can you beat a ship if it has a Defence Drone? Or Cloaking?
If you’d struggle, then you’ll want to keep an eye out for a counter
Defensively speaking, it’s generally about your shields and engines. Your shields are the biggest investment, but one of the most important. Engines are cheaper to upgrade and should ideally have an additional bar or 2 each time you get a new layer of shields. On the whole, once you have a comfortable offensive capability – look to your defence. Once your defence is good, focus on attack again. The other systems will basically fit around these (and roughly fall under your offensive/defensive capabilities)
[Type A] Man of War
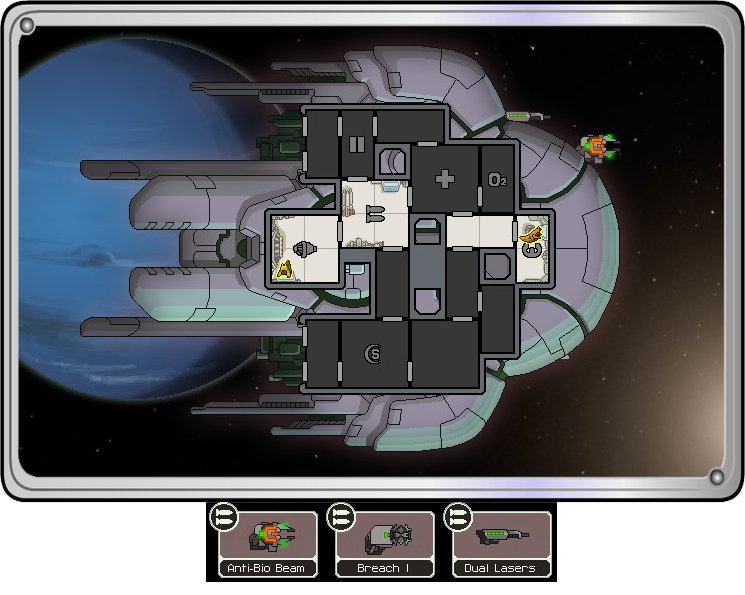
A bugger of a ship to use. Its starting weapons are awkward and require an element of finesse to use properly… or just pausing loads
Imma firin’ ma – wait… what?


Before you even think about upgrading your shields/engines… throw 1 more bar into your weapons. This will let you have all 3 starting weapons live at the same time – This will buy you a lot more breathing space instead of constantly switching out the Bomb/Lasers to supplement the bio-beam
Once you have all 3, the roles are simple: The bomb softens the enemy and draws them into position, then the dual lasers crack enough of a gap in the shields to let the Anti-Bio Beam do its job

Though you want to replace the beam, that doesn’t mean you shouldn’t abuse the hell out of it first. The advantage to killing the crew is more scrap at the end of fights – Something vital where you’ll need to buy so much for this ship. So where possible, kill the crew (except slaver ships, which I’ll come onto shortly…) – It’s a fiddly process, so don’t be afraid to pause often to get the timing right
Though beam weapons damage per room – The Anti-Bio beam damages per tile. In other words, the beam must hit the actual tile which the enemy is on, in order to do anything. It deals 60 damage, which grudgingly means you have to dish out several volleys to actually win, not helped by its painful charge up time… Yeah, I told you it’s awful

Also note that any shields will also block the laser completely, so don’t get complacent. Always wait for it to fully charge before aiming. Leave the shields to your Dual Laser though (unless you’re facing 2, in which case weaken it with bombs first)… the small window gained when it hits them will be sufficient to unleash glowing orange death (or glowing orange moderate wounding… which is truer, but doesn’t sound as cool)
Counting Crew
If weapons weren’t bad enough, you only have 2 crew (though both are slugs)… So it helps to amass some quickly. Bear in mind, when you come across slaver ships – try to and blow up the ship first. If they don’t panic and offer you a crew member, then kill the crew. This gives you the best chance of getting more for your team

Whilst the lack of sensors might seem like a kick in the teeth, the slug’s innate ability to see all enemy crew largely negates this. Additionally, the Slug Repair Gel automatically fixes hull breaches, so it’s only really fire you need to be vigilant for between fights. So with the amount you have to buy, you might want to skip sensors altogether
What to aim for
Once you have a decent set of weapons, you can look to other funky kit. The Breach Bombs and Dual Lasers are only 1 bar a piece, so can certainly be kept if you like. The boarding setup is, as always, a winner – Particularly as you can continue to rake in the better rewards from killing the crew after you ditch the anti-bio beam (you did get rid of that, didn’t you?)
– +4 Crew (x2 Boarders: Rock / Mantis – x1 Engi)
– +2 Decent hull-damaging Weapons
– Crew Teleporter
– Hacking Module
– [Optional] Mind Control
[Type B] The Stormwalker

Another difficult ship to use. You’re reliant on boarding and strategic Healing Bursts to survive until you can bring some decent kit online

Much like the Man of War – The Stormwalker looks fancy… but in reality you have a laughable amount to play with. The Crew Teleporter is cool, but the Artemis is your only offensive weapon, meaning that boarding will be your primary source of victories (unless you have about 50 missiles hidden in your back pocket). Whilst not on par with Mantis/Rock, Slugs are still ok fighters, so ordinarily this wouldn’t be a real problem… That is until you notice the distinct lack of Med/Clonebay…
First Aid

If you’ve never used Healing Bursts – They’re basically bombs that heal all friendly units in a single room (don’t worry, they won’t affect enemies, so you can use them mid-fight). Now be careful, if you haven’t read the tool-tip that comes with them: They can miss enemy ships. Also note that there’s a second or 2 delay to its effect, so don’t cut it too fine
The trick is to squeeze as much health out of your guys as possible. If they’re a bit beaten up from the last fight, send them in (when the burst has mostly charged) and only heal when they’re lower on health (like 30%). If you’re clearly going to win a fight, wait until the end to heal – Also remember to group your guys together where possible to heal as many in one go, even if that means beaming your guys back and grouping them with one who is injured from shots against your ship

Take note, by the way, if the enemy have blast doors… you could get trapped. In these cases, pelt an Artemis at the pilot’s seat before you try to heal. You could also nuke the doors before boarding and have the fight in there (to block repairs) if you want to play on the safe side
What to buy, what to buy…

The next step is to hunt for a boarding crew. They’re the fastest, cheapest way to give your ship an edge. You already have a teleporter and the Artemis is a cool support weapon to knock out key systems – So all you need is the cost of 2 good crew (110 scrap if you buy from stores)
Only other thing to bear in mind – If you pick up a crummy laser/ion/beam weapon… don’t sell it until you get a better replacement. If you hit a Zoltan ship, you’ll want something you can bring their shield down with, as opposed to spending several missiles on it (by which time the victory probably won’t be worth it)
Once you have a source of recovery and a decent boarding crew… you’re finally in a position to take a breather

– +3 Crew (x2 Boarders: Rock / Mantis – x1 Engi)
– +2 Decent hull-damaging Weapons
– Hacking Module
– Mind Control
Once you’re over the first few hurdles… it’s pretty much business-as-usual. Upgrade your shields and engines as you go on the hunt for cool weapons. You’ll be raking in the scrap from boarding, so the starting handicap shouldn’t hold you back greatly. The Artemis is a cheap, but cool, addition worth keeping if you don’t find a decent replacement
If you can afford other systems, the Hacking and Mind Control are always a winning combo to support your boarding efforts
[Type C] Ariolimax
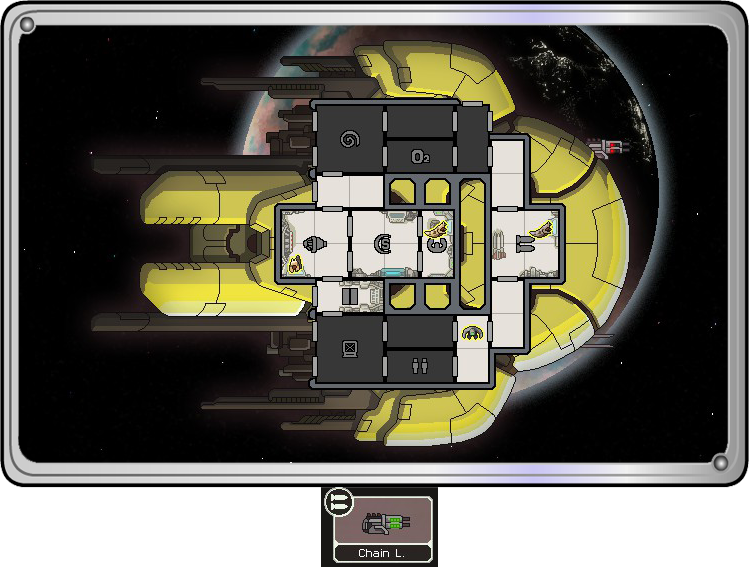
Slug ships just don’t give you an even break do they? With only a pathetic Chain Laser, you have to make use of Hacking and Mind Control to survive long enough to actually get a means of offence. Worse still, they pick a name oh so close to areola… I don’t know what is in the water they drink, but it scares me
Pew pew

Save what scrap you can and try to scout for stores. Aim for beacons with many links, as there’s more chance you’ll find a connected store. Once you find one, try to visit surrounding beacons if possible, just so you go in with as much scrap as possible. Look for weapons or a crew teleporter… grab anything. Honestly, if you find something really good – don’t be afraid to sell off your slug repair gel for it
Mind Games
For its crummy weapons, the Ariolimax does at least give you both Hacking and Mind Control. Once you’re rolling these will give you some excellent combat potential and versatility (they scream for boarding parties)… it’s just getting that far. Though they’re not very powerful on their own, you’ll need to make heavy use of both. That said, it’s generally safer not to focus on upgrading these systems until you have decent weapons and defences first – You’re unlikely to gain enough to make it worth the trade-off
Mind Control is there for disruption. At Level 1 you’re unlikely to see enemy crew killing each other or offlining things (unless they’re Mantis: Always Control them if you get the chance). As such, you have 2 main uses for it:

Secondly, use it to move crew around the ship. If you possess a crewmember, the enemy tends to scramble other guys to them – away from their posts (but not always). This is particularly handy once you capitalise upon this with Hacking (I’ll explain shortly). Note that a possessed crew will rarely leave their room unless they completely offline the system there – so control the person you don’t want to move
Now, as mentioned: If they have Mantis – Possess without any hesitation. Even at Level 1 they can make a nice mess. Also, if the ship has a teleporter: Target any crew running for it. It’ll stop them hopping aboard. You can sometimes let 2 board, then possess 1 – but they don’t always fight. Sometimes your possessed person will run elsewhere to fix or man a system: Placing a soon-to-be-enemy somewhere important! Not cool – Better having them fighting on their own ship (less to clean up)
Technically you could use Mind Control to slowly cause the crew of a ship to kill each other entirely (finishing off the last one with your laser) – But they don’t always make enemy crew fight and it’s a painfully slow process. Seriously, it’s not worth the time or effort. That said, if you get a Crew Teleporter: Feel free to beam a possessed enemy aboard your ship and take them out one-by-one when it wears off (but only if weapons aren’t a threat)

Hacking’s a considerably more strategic toy than meets the eye. Oh sure, it temporarily blasts whatever system it’s attached to… but there’s more: Its doors
If you’ve used hacking before, you’ll know that when powered, it sets up blast doors around the room you choose – Meaning enemies can neither enter nor leave without kicking them in first. But… if you power down your Hacking Module, you return the doors to the enemy ownership, letting them pass. This is considerably useful and a very important quirk to note, to get the most out of this ship
For the most part, in the early fights you’ll want hacking on the Pilot’s Seat: It guarantees your Chain Laser a hit. It’s a short burst at Level 1, so activate it just before the Laser is about to fire. Shoot the shields and you’ll have the enemy ship ready to crumble quickly. Will they try to repair it? Of course. Here’s where you get sneaky…
Latch the Hacking onto the Pilot’s Seat, but power it down – You want enemies to pass through the doors (for now…)
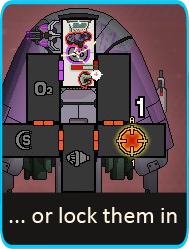
You could also do the flip-side: Control the pilot to draw someone else into the room, then lock the doors. Suddenly they’re locked out from the rest of the ship: Giving you a chance to sink in some damage without immediate repair. This is particularly amazing if you trap an Engi, as they’d struggle to pop a sheet of bubble-wrap – so they’ll be locked in for ages!
If you’re clever with your hacking, doors and Mind Control – It’ll help you make the most of your Chain Laser’s puny damage. Be ruthless with your Support Systems and always use them: You need to snatch that upper hand quickly in fights
If I meet 2 shields?
If you face a ship with 2 shields before you have any real counter to it… then you’re in for a tricky fight here
First of all, latch your Hacking onto the shields. It’s the only way you’re going to get any real hit on the ship. When your Chain Laser is ready to roll – Hit Hack and fire away when both shields drop (be quick, you barely have a window). If you land a hit on the shields, use Mind Control on anyone who tries to repair them. At that point, just keep that Chain Laser going, hack when possible to support any shots and Mind Control anyone trying to be useful. The pilot’s seat might be a good target too, to guarantee further shots
It’s not pretty, and you largely have to ignore their weapons to try and crack a hole in their defences first. Don’t be afraid to jump if you start taking on damage – The reward will unlikely be worth the repairs

– +3 Crew (x2 Boarders: Rock / Mantis – x1 Engi)
– WEAPONS – x2 decent hull-damaging ones and a support bomb will do nicely
– Crew Teleporter
Needless to say, weapons are your top priority here. Once you can comfortably (and reliably) take on 2 shielded foes though, you can kick back a bit. You have a lot of the final systems in place – It’s just methodically upgrading them as you go along. Put everything into weapons/boarding at the start, focus on shields/engines after (to play catch-up) and then think about the Mind Control or Hacking if you get a chance
With only one spare system, it’s generally the Crew Teleporter here. The Hacking and Mind Control are brilliant support systems for your boarding efforts. In fact, if you get Hacking high enough – you can see off pesky Med/Clone Bays without any weaponry at all
[Bonus] Upgrading Systems
Shields

Engines

Oxygen

You definitely want to upgrade this if you enter a slug nebula (the above event is common)
Weapons

Drone Room

Medbay

It’s also wise to boost this to Level 2 if you hit the Mantis Homeworlds and have a crew teleporter (you’ll need it to fully complete the Mantis Ship unlock challenge if you fight KazaaakplethKilik) – You’ll also want Level 2 if you enter Slug Nebulae, to cover against text-event hacking wiping it out
Clone Bay

Crew Teleporter

Once your boarding is underway and you’re happily pounding enemies into confetti, you’ll want to think about Level 2 boarding. This reduces the cooldown, and is vital for fetching your guys back if they hit trouble. This is especially true if you have a MedBay, as any death of your crew is final – so you can’t afford to lose your boarders to a silly mistake
You can tend to hold off from Level 3 until the Flagship. But in that fight you’ll want it maxed out so you can quickly dart between the weapons rooms
Mind Control

Hacking

Cloaking

Pilot’s Seat – No Power Required

Sensors – No Power Required

Doors – No Power Required

Doors are a must if you’re about to enter a Mantis Sector – They’re heavy on boarding (and good at it too) – Nebulae and Lanius Sectors also seem to have a higher number of boarding parties
Backup Battery – No Power Required

Artillery Weapon [Federation ships only]

Reactor
Upgrade the room first: Then the reactor. Always. Only buy what you actually use. Seriously, the only thing that storing large amounts of extra energy will do is have your crew rubbing their hands on it and giving each other static shocks to relieve boredom
Thoughts and Suggestions
Anything I’ve missed?
Anything you’d like more detail or explanations on?
Disagree with any of the above and want to challenge me to a game of chance?
Give me a shout! There’s plenty more to come, so any changes and suggestions are welcome. The awesome ones shall be implemented and full credit will be given to the delightful owner
Happy Gaming
Links to the other Class Guides
Hungry for more? Fear not – The other ship classes are catered for! Just follow the links below:
– Kestrel Class
– Engi Class
– Federation Class
– Zoltan Class
– Mantis Class
– Rock Class
– Stealth Class
– Lanius Class
– Crystal Class