Overview
Hello everybody ! I’ve made this guide because lot of people ask me about how to do things with hammer; i remember all the time i spent on some rubbish videos to understand a lot of things when it could have taken less time. i hope my explanations can helpGood luck 😉
Good Hammer Tutorials
I assume my own tutorial is a bit advanced, so make sure to learn basis with hammer:
Originally posted by P0rtalmaster:[link]
Originally posted by TOPHATTWAFFLE:
Additional guides:
Originally posted by URMarty:[link]
Originally posted by Enderlux:[link]
Warning: the map can crash after buildcubemaps, don’t worry and continue as if nothing happened
Mysterious entities ?
Learn how work entities with Valve Developper community
Custom textures
You have to create 2 files: the .vmt file (how react the texture ingame) and the .vtf file (image in valve texture format)
- Choose the appropriate image you want in the web
OR
Extract an existing texture from Portal2/portal2/pak01_dir.vpk with GCFSCAPE [nemesis.thewavelength.net] - REDESIGN it with:
Gimp [www.gimp.org] (free) , use GMIC[gmic.eu] for more possibilities of creation
Photofiltre7[www.photofiltre-studio.com] (free)
Photoshop[www.adobe.com] (paid) - Make your texture SEAMLESS (or use this keyword to find already seamless textures on internet)
- REZIZE your texture with one of the tools above. If you don’t have Photoshop, i would advice Reshade3.0 [reshade.me], which is the best free alternative to me
Note: Open the tool with admin rights to have the full features
Note2: The pictures you want to modify have to be placed in the tool’s main folderYour texture should be a power of 2 (512*512 = default square texture) to be allowed to be imported in VTFEDIT
You’re going to need CRAZYBUMP[www.crazybump.com] (free trial)
You need Gimp [www.gimp.org] (free) with the plugin Normalmap [registry.gimp.org]
Step1: Reinforcing the relief effect
After importation of your texture in Crazybump, click on “Diffuse tab”, then move the cursor of “3D Crevices” to the value 20. Export it
Step2: Delimitation of outlines
Once you have the Gimp plugin installed, import your texture of step1, then Filters → Map → Normalmap
Use a scale of 3,00000
Export the normalmap
Step3: Making the real normalmap
Go back to Crazybump with your texture of step2, you’re now in the “Normals” tab
Crazybump has given to you default settings depending of your texture. Now change:
Intensity = 20
Very large detail =20
You need Photoshop CS4, 5 or 6
Make your texture in Crazybump, then use photoshop to reinforce the relief with the NVIDIA plugin
as explained in this tutorial: Understanding Settings for Better Normal Maps [iamsparky.wordpress.com]
Note: When you duplicate the texture into layers, the backround texture + 3 layers is enough
Generate your VTF texture with VTFEDIT [nemesis.thewavelength.net]
you should have those parameters (best):
Note: For High quality Bumpmap texture, use RGB888 as normal format during the importation

You need to create a “vmt” file yourself.
Most common way is to use VTFEDIT, then do Tools, create vmt file (what you put inside has no importance), then give it the same name of the main .vtf file (here: customtexture.vmt), then edit it as following:
For a basic texture (minimum required to write):
Special parameters you can add in your .VMT:
- “$surfaceprop” sounds list
- Shader parameters
- Compile parameters
You can replace “LightmappedGeneric” (= the texture is illuminated by lights in your map) by:
“ Unlitgeneric ” (=the texture produce it own lightning) -> antlines, neon textures
If you want a shiny effect (ex: metal texture), ADD:
Tip: You can modulate the intensity & color of the reflection changing the $envmaptint value (RGB format)
$envmaptint .15 .15 .15 = very low shiny (wood, plastic)
$envmaptint .2 .2 .2 = shiny (common textures)
$envmaptint .3 .3 .3 = very shiny (ice, metal)
Note: This is a custom $envmap effect dedicated to custom textures.
It means you still should compile cubemaps for the original textures (as glass material & water) with “$envmap env_cubemap” in their vmts
If you want a relief effect (ex: rock texture), ADD:
Note: The custom_texture_NRM is the texture generated by Crazybump
Ps: Maybe you heard about “ “ssbump 1” as an aditionnal parameter for bumpmapping. I’m not using it, because multiple tries have proven that this parameter destroy a bit the bumpmap effect + darken too much the texture to my taste. But that’s more a personnal opinion
Animated textures (.GIF in Portal 2)
- If you want to make an overlay you can toggle with the entity env_toggle_texture (ex: antlines), your vmt should look like this:
UnlitGeneric { $baseTexture “path_of_your_texture” $translucent 1 $decal 1 Proxies { ToggleTexture { toggleTextureVar $baseTexture toggleTextureFrameNumVar $frame toggleTextureShouldWrap 0 } } }
Convert all of your textures in TGA (avoid to use PNG, it can create white outline artefacts)
Import all of your texture at once (hold Ctrl + click on the textures)
The name of the texture is very important for the order of the importation (ex: 0, 1, 2 …)How to make GIFYou should download this Gimp plugin [registry.gimp.org]) for GIMP (obviously, you need GIMP [www.gimp.org])
-> Follow instructions in readme - Open you .gif in GIMP
- Open File, Export layers then “export layers”
- Open VTFEDIT, then import all your PNG or TGA files at once
Note: the name of the textures is important for the order of the importation - Make a .vmt with those parameters:
UnlitGeneric { $baseTexture “[path] / name of your animated texture” $selfillum 1 %noportal 1 Proxies { AnimatedTexture { animatedtexturevar $basetexture animatedtextureframenumvar $frame animatedtextureframerate 10 } } }
You can modify the animatedtextureframerate to change your animation’s speed, but normal speed is 10 (in ms)
That’s all ! Just Remember your animated texture can have a big size, because composed of multiple pictures
Custom text
- Go to Cooltext [cooltext.com] ; save you image as .TGA
- Go in VTFEDIT, and save your texture keeping parameters of “Add custom textures (basic)” guide
- Make a .vmt with those parameters:
“LightmappedGeneric” { “$basetexture” “path of your texture” %noportal 1 “$translucent” 1 }
Note: LightMappedGeneric can be replaced by UnlitGeneric to have a glowing signage
- In-game, you can:
-Add the text as overlay, you can rotate it with double clic, and move the littles circles. You can use “texture lock” too to asign the overlay to specific blocks
-Make a nodrawed func_detail, and apply the texture in it. Look at the face edit sheet: You must check “Face” flag in ‘Align’ bar (and uncheck “world”), then push “Fit” button in ‘Justify’ bar
-If you want to make a text which appears when you want, make a nodrawed func_brush instead, and Enable/disable it to make the text appears or not
Custom fizzlers
–> You may follow the “add custom textures (basic)” guide before looking at this one
- Make the .vtf texture
- Choose your texture in internet
Note: to have a good visibility, don’t choose a texture overloaded in dtails
Note: your texture must be .png ! - Go in Lunapic [www190.lunapic.com]
- Upload your image, then “Filter”, “Monochrome” (you can invert the selection by “Filter”, “Negative”)
Note: the white part will be visible and the black part invisible - Create the .vtf texture with VTFEDIT
- Choose your texture in internet
- Make the .vmt texture
–> basic example here, modify parameters as you wantSolidEnergy { $basetexture “effects/YOUR TEXTURE NAME” $flowmap “effects/fizzler_flow” // floating effect of the texture $flowbounds “effects/fizzler_bounds” // expresses visibility force of the texture $FLOW_NOISE_TEXTURE “effects/fizzler_noise” // texture’s noise when you’re near it $FLOW_UVSCROLLDISTANCE “0.25” // distance between floating effects $FLOW_TIMEINTERVALINSECONDS “1.2” // time between floating effects $FLOW_NOISE_SCALE 0.02 $FLOW_LERPEXP 1.5 $FLOW_WORLDUVSCALE 0.008 $FLOW_NORMALUVSCALE 0.008 $FLOW_COLOR “[0.025 0.08 0.1]” $FLOW_VORTEX_COLOR “[0.64 2.058 2.56]” $surfaceprop glass // use always glass because the texture has to be translucent ! “%keywords” Portal2 $translucent 1 $additive 1 $FLOW_VORTEX_SIZE 35 “360?$outputintensity” 2.8 “SonyPS3?$outputintensity” .7 “srgb_pc?$outputintensity” 2.3 “!srgb_pc?$outputintensity” 1.7 Proxies { FizzlerVortex { } } }The RGB value between curly braces {} is the equivalent of brackets [] /100
ex: white = {255 255 255} = [2.55 2.55 2.55]To create custom $flowmap: Flowmap Painter [teckartist.com]
- Put the .vmt and .vtf in C:Program Files (x86)SteamSteamAppscommonPortal 2portal2materialseffects
Custom water
1- Choose the texture you want in internet and make your VTF texture with it
2- Make the corresponding VMT with those parameters:
Explanations:
$basetexture ” yourVTFtexture ” is the path of your VTF texture created above
$reflecttint “{ themaincolorofyourtexture }” must be the main color of your texture.
Personally, I use this site [link]
For example if I want a rather blue color for my water, I will put
$reflecttint “{ 0 76 153 }”
You can also change $fogcolor if you want a water darker or brighter
Custom sounds
Choose in the web the sound you want to put in your map; it must be .WAV or MP3
I use myself .mp3 format most of the time because it takes less space than .wav format
The aim is not to exceed 100Mb workshop size limit, so if you want an high quality sound and you think your map fits with workshop constraints, you better use .wav format.
- Go in your Portal 2portal2cfg folder, and duplicate one of the .cfg file you want (fr ex: chapter1.cfg) and rename it “autoexec.cfg”
- Copy/paste this in it:
snd_updateaudiocache snd_update.hammer.mdlcache
Note:
– the first line update your custom sounds, and you will be able to see them in hammer
– the second line update your custom models imported from various websitesIn case you need to change the format of your sound - Use Audacity [www.audacityteam.org]
Note:
– the sample rate has to be 44100Hz to work in P2 engine - Put the sound in Portal 2portal2sounds
Create an “ambient_generic” entity, then “reload sounds” in the sound browser. You can now find your custom sound in the list.
Note:
– you need to put “Raw” in “Sound type” in the ressource sound browser to see it in this case
– Check “Play everywhere” in flags of your ambient_generic if you need to heard your sound in the whole map -
If you want to loop sounds when you spawn/load the map (optionnal):
- In flags of your ambient_generic, uncheck ‘is not looped’
- .WAV format
You must have Wavosaur [www.wavosaur.com]
To loop your sound, just press the button with a “L” in red and save it - .MP3 way
______________________________________________________________________________
In hammer, make 6 entities:
-A logic_auto
-A logic_relay named “relaye”
-A logic_relay named “relay ambiance1”
-A logic_relay named “relay ambiance2”
-A ambient_generic named “ambiance1”
-A ambient_generic named “ambiance2”- The logic_auto with outputs:
- OnLoadGame ; relay ambiance* ; CancelPending ; 0.00
- OnLoadGame ; relaye ; Trigger ; 1.00
- The logic_relay named “relaye” with outputs:
- On Trigger ; ambiance* ; StopSound ; 0.00
- On Trigger ; relay ambiance* ; CancelPending ; 0.00
- On Trigger ; relay ambiance* ; Trigger ; 0.10
- Make now the same number of (logic_relay + ambient_generic) you want sounds in your map
In this example, i use 2 custom musics:
—————————————————————————-
The logic_relay named “relay ambiance1” (start disabled to yes) has outputs- On Trigger ; ambiance1 ; StopSound ; 0.00
- On Trigger ; ambiance1 ; PlaySound ; 0.10
- On Trigger ; relaye ; Trigger ; (put here the exact duration of “ambiance1” sound in seconds)
The ambient_generic named “ambiance1” has outputs
-> In ‘sound filename’, put your custom sound
-> in flags, check ‘play everywhere’ and uncheck ‘is not looped’——————————————————————————
The logic_relay named “relay ambiance2” (start disabled to yes) has outputs- On Trigger ; ambiance2 ; StopSound ; 0.00
- On Trigger ; ambiance2 ; PlaySound ; 0.10
- On Trigger ; relaye ; Trigger ; (put here the exact duration of “ambiance1” sound in seconds)
The ambient_generic named “ambiance2” has outputs
-> In ‘sound filename’, put your custom sound
-> in flags, check ‘play everywhere’ and uncheck ‘is not looped’ECT…
- Then, to play a specific sound (“ambiance1” for example), enable ‘relay ambiance1’, then trigger “relaye”. But you must disable all others “relay ambiance(…)” you don’t want to play now !
ex if you want to press a button to play your first sound (ambiance1):
- On pressed ; relay ambiance* ; disable
- On pressed ; relay ambiance1 ; enable
- On pressed ; relaye ; trigger ; 0.1
…and if you want to play your second sound…
- On pressed ; relay ambiance* ; disable
- On pressed ; relay ambiance2 ; enable
- On pressed ; relaye ; trigger ; 0.1
ECT…
______________________________________________________________________________
- The logic_auto with outputs:
Propper: Models from brushes
Download this working version of Propper Portal2 [www.dropbox.com]
The interests of this technique in P2: To create a custom model of anything you want from brushes
– Creating a grass model (moving with the wind + realistic lighting)
– Creating some gratings which can cast shadows
3D skybox
First of all, you must have finished your map before do that.
You have textured with tools/skybox the locations where you wanted to put the sky
- You can find many skyboxes in Gamebana [gamebanana.com] for example..
- You can create your own skybox from a 360 panoramic picture with this
program[jaxry.github.io]
Skybox should be 1024*1024 to have a good resolution, use Photoshop or Gimp to rescale your texture and avoid the clamp option of VTFEDIT
Keep the VTFEDIT parameters used in the guide in the “how to make custom textures” part as showed in the picture, but change:
-Texture Type: Environnement map
-Tick the boxes (in flags) “Clamp S”, “Clamp T”, “Anisotropic”, “Hint DXT5”, “Clamp U”
Note:
You must place your texture in C:Program Files (x86)SteamsteamappscommonPortal 2portal2materialsskybox
Now, let’s define the 3D skybox::
Go in “Map”, “Map properties” and enter the name of your skybox (without extension) in “Skybox texture name”, that’s all !
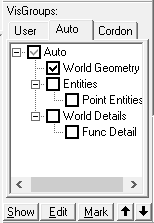
(as seen
- Look at ‘Visgroup’ and check only “World geometry” flag
- Put a sky_camera in the origin of your map
Note: To find the origin, click on “View” tab, then “Go to Coordinates…”, and enter “0 0 0” - Click on “Edit” tab, then “Select all”, and do ‘Ctrl C’ then ‘Ctrl V’ (obviously, outside the map)
- Click on “Tools” tab, then “Transform”, and change the scale to 0.0625 for all axis
- Do ‘Ctrl T’ then “Ok” to convert all the geometry to func_detail, then make all in tool/nodraw
Note: Notice now you must have a nodrawed bloc + a sky_camera, which not have to be moved compared to the nodraw bloc, if you move the whole thing, they have to move together - Make a block (size depending of your nodraw bloc you made before) with tool/skybox surrounding the whole thing
- Select it, then click on “Tools” tab, then “Make Hollow”, and enter “2” (minimum value accepted)
- Think to check all flags in Visgroup tab + delete the first sky_camera you have placed step2, before replaying your map

Note:
– To change the skybox ingame (to have multiple skyboxes), you must put a point_clientcommand saying to the console “sv_skyname nameofyourskybox”
– You can add light_environnement , env_sun and shadow_control to make realistics brightness effects.
-Always remove $ignorez 1 from the vmts of each 6 skybox textures if you’re not using a sun/moon effect
– For a propper sun/moon working in portal2, you need to add $ignorez 1 in the vmts of each 6 skybox textures + to point the env_sun as a target to orient it (old way), because only the old way seems to work
Custom CloseCaptions & Voicelines
Note: finish your map with all your dialogues ready before doing this
1- Create a .txt file with this example code:
Modify the part between the Tokens parenthesis:
- Define the name of your .txt file as you wish, but keep “closecaption_” in it (ex: closecaption_mycaption)
- the title of your sentence (ex: dialogue.announcer) must have a dot in it
- You can add a special format at the beginning of your sentence:
<len:5> how long the sentence will display onscreen (required)
<clr:255,255,255> color of your sentence in RGB format (optionnal)
<B> in bold (optionnal)
<I> Italic (optionnal)Note: in case of multiple optionnal parameters, color parameter should ALWAYS be the first parameter after the <len> one
2- Edit your .txt file with Notepad++, then encode your file in UTF-16LE (encoding tab)
3- Create a .bat file with this code inside:
Note1: The easiest to make a .bat file is to create a .txt file, then to rename the extension
Note2: change the path to captioncompiler.exe in the .bat file if needed
4- Put the .bat and the .txt file in Portal2/portal2/ressource folder,
From there, Drag&Drop the .txt file on the .bat file
Closecaption_mycaption.dat has now been created
5- IN HAMMER, create a logic_auto with a point_clientcommand:
and when you want to display your custom sentence (for ex: from a logic_relay):
WARNING :
– Dialogues should not be too long, or they won’t display entirely onscreen. Just cut them into multiple parts (one sentence to display at the time)
– You will have to pack manually the .dat file only
(i’m writing this part)
Additional advices for map optimization (map size limit = 100Mb)
1- Use Func_viscluster !
Sometimes, hammer is very long to compile your map..
Case 1 : Your map does NOT contain big open spaces with a lot of models
Just Make a giant bloc with “trigger” tool texture just around your whole tes
(only the testchamber, not the instances like arrival or exit elevator, and make it just of the width of your test)
and make it func_viscluster (Ctrl + T)
Case 2 : Your map does contain big open spaces with a lot of models
Use 1 viscluster around each open space (with subdivisions if necessary, see below) to avoid cost performances ingame
Important Note : This is a lazy technique for optimization, and not the propper way to do it too, but it will do the trick considering
- The low quantity of models of Portal 2
- The recent computers of today which should not be be really affected by a drop of performances in this case
WARNING: never cross water surface or glass materials (reflective surfaces in general) with this entity !
-> if you have water in your test, make 2 visclusters instead, one above the water and the other just under the water surface)
-> if you have water AND 3D skybox, don’t make viscluster under water surface (glitch !)
*** If your map is composed of big open spaces with a lot of models (especially the Old aperture & theme), you should use multiple visclusters
2- Optimize with nodraw
If you export your PTI maps into hammer, then check only “World geometry” in VisGroups tab
then go to the main bar menu, and clic “Edit”, “Select all”, then in make all textures in nodraw. Then re-check “auto” in VisGroup to have all elements of your test, and retexture visibles parts (wall, floor, ceiling) of your map
note: world geometry is only func_detail of your test, so you don’t break it 🙂
Full compile HD
Once followed this about the full compile,
I’ve found even better presets matching with portal2:
Replace the 2 lines with $light_exe parameters by:
Add your customizations to your map (VIDE)
Build & run your map in hammer, you can find the bsp in:
C:Program Files (x86)SteamSteamAppscommonPortal 2portal2maps
1- Download VIDE [www.tophattwaffle.com]
Packrat is obsolete…
2- Follow this Tutorial [www.tophattwaffle.com] , it is just perfect
VIDE doesn’t pack automatically:
- scripts
- Additional skybox (in the case of multiple skyboxes)
You have to add manually your custom content after you have done “Apply”
(when you have green files up and oranges files down)
VIDE can’t pack:
- custom particles
- media files
Think to check if all is good: VIDE is very reliable, but sometimes some files are not detected: it’s most of the time materials from models (located in portal2/materials/models most of the time) which cause issues
if you followed all the steps correctly, it works !
Reskin your portalgun
First, you must download GCFSCAPE [nemesis.thewavelength.net]
Download you portalgun textures on Gamebanana [gamebanana.com], or make it yourself with a tool like GIMP, Photoshop…
If you have a folder named “pak01_dir.vpk” in your download link, go to step 5
- Create a folder in your desktop named “pak01_dir”
- Put in it your ‘materials’ and/or ‘models’ folders of your download link
- Go in C:Program Files (x86)SteamSteamAppscommonPortal 2portal2_dlc2maps and COPY the folder ‘soundcache’ in your pak01_dir folder (created in step 1)
- Go in C:Program Files (x86)SteamSteamAppscommonPortal 2bin and look at ‘vpk.exe’ : you must drag and drop your desktop folder (created step 1) in it; after compile, you must have a folder named ‘pak01_dir.vpk’ with your custom in it
- Go in C:Program Files (x86)SteamSteamAppscommonPortal 2 and create a folder named “portal2_dlc3” (so with others dlc). Put you ‘pak01_dir.vpk’ file in it
- Restart Portal2 deconnecting/reconnecting to steam
Have fun 🙂
Custom Portal2 Start menu
Not really relevant to hammer, i find it cool !
Your backround in your start menu is in reality a video looped in .bik format, so you have to convert an image or a video looped in .bik
Download RAD Video tool [www.radgametools.com]
Run radvideo.exe, then select your image/video, then press “Bink it”, “Bink” .. simple !
Now you just have to name it “menu_act01” and replace the old one located in:
C:Program Files (x86)SteamSteamAppscommonPortal 2portal2media
That’s all !!
DOWNLOADABLE CONTENT
- Kwinten’s mappack v1.1 [www.dropbox.com]
- Rocket_turret_2018 [www.dropbox.com]
- Modified Fizzler Fields
- HMW sendificator4 (hammer version)[www.dropbox.com]
- Additionnal signs [www.dropbox.com]
Useful stuffs
Disable laser collision:
Use a logic_auto with “OnMapSpawn” AND “OnLoadGame” that triggers a point_clientcommand with sv_player_collide_with_laser 0 as parameter. Uncheck the “remove on fire” flag of the logic_auto.
Hide “sv_cheats 1” orange text when used
hud_saytext_time 0