Overview
As one of the first players to achieve a legendary difficulty victory, this guide contains strategy help, battlefield tactics, and a few gripes about dubious mechanics. This is my first ever guide, so please be constructive with any criticism. This guide is also still a bit of a work in progress, and doesn’t go further than opening moves for the moment, but I will work on it further shortly.
Proof
Because I’m new to Guide-writing, but not to the nature of the Internet in general…

A Note on Legendary Difficulty, the world of Atilla, and the Sassanids
I have played every incarnation of Total War, from the Original Shogun through to now. I have every expansion and every DLC (bar the Spartan Campaign one for Rome II). Ever since the original Rome, I have played on the hardest difficulty levels, because they provide the most challenge. Much like in Rome II, Atilla’s Legendary difficulty will punish you in many ways; but victory will be all the more rewarding.
First, in your provinces themselves, you will notice a whopping -8 penalty to public order. You are going to have to plan around this. Public Order buildings will be a must, and clever use of governors, troops and agents will be required to prevent constant rebellion.
Secondly, the AI cheats on Legendary difficulty like my Nan used to at Dominoes and cards – that is to say, mercilessly and without a hint of shame. You will typically face at least two stacks of enemies from piddling little one-town states; and rival empires will actually be ridiculously strong (The three main threats to any other player will be the Eastern Roman Empire (ERE), the Huns, and the Sassanids). Even the Western Roman Empire will be a tough opponent in the early game. But you wanted a challenge, right?
Thirdly, the Battlefield itself. On Legendary, you will be unable to issue orders while paused. This means you will fight battles in real time, and your own troops are quite stupid at times. Close attention will be required, and you may end up having to rethink your battle-plan with little or no notice to avoid disaster.
Atilla’s World is very interesting. Atilla: Total War has a fantastic mechanic built in by which the world slowly changes for the worse. Up North, the winters will become progressively worse, sometimes lasting three seasons! Fertility will drop, causing food problems for most factions. In addition, the Huns, the Scourge of God, will systematically raze Europe, creating desolation in their wake, which few factions can compete with. The World as the classical civilizations knew it really is ending, and only you can hold a beacon up; only your empire can be the light that shines in the dark!
How the more fitting then that I chose to use the Sassanids for my first full play through on Legendary Difficulty. After all, Zoroaster is ‘the light in the dark’. But there are good strategic reasons for choosing them. They have an early empire (albeit precarious to internal division), and four decent army stacks. They are financially secure right from the start (the spice must flow!). They are boxed in one corner of the map, reducing the need to protect against all directions, and it just so happens that that corner is the one the Huns will typically avoid! You can watch Europe burn, while slowly expanding your territories in the middle-east. Finally, they have horse archers. If you are playing on Legendary difficulty, the ability to do damage while not receiving any in return, is invaluable. As such, the two best starting factions are definitely the Huns and the Sassanids.
So onward, sons of Ardashir! Carry the flame of light into the world of darkness, and build an Empire that will withstand the eventual onslaught of the Hun!
Prepare for War – Planning our Opening Stategy
As the Title of this first chapter suggests, we are going to use the first 5 years of the game (or 20 turns) to consolidate our empire, and improve our ability to mount foreign expeditions. Unlike many previous Total War games, victory will NOT go to the first player to quickly carve out a mini-empire. It will instead go to the player who practices Total War in all its forms – Campaign Strategy, Diplomacy, Logistics,, Subterfuge, Domestic Politics…oh, yeah, and Battlefield Tactics too!
Now let’s take a moment to look at our existing empire…
Yay, right? Well, kinda… The Strategic Map view shows us large areas of Blue (our vassals) surrounding our own domains (in yellow). We start the game with 8 vassal states, and one of our First Chapter bonus missions is to maintain 9 of them. Should be easy, except we have also limited room for expansion. Our only direct neighbours are the ERE and one of their vassals, the Ghassanids. Lazica, North-West of Armenia, is also a vassal of the ERE. but there are two minor states nearby which have no allies and so might be suitable for easy vassalage; Himyar and Kartli.
Now let’s take a look at our relations with our neighbours, including our vassals…
Oh, bother! Armenia isn’t particularly fond of us, But Parthia and Aria positively hate us! They are both led by men who are ‘Unrelliabale, Rebellious, and Opportunistic’. There is consequently a strong chance that sooner or later they will seek to break free and cause us difficulties on our Eastern borders (usually at the same time as we have just started a war in the West!). These are also states with two territories each, which means that you will need to either capture and occupy one of those regions, before you can subjugate them militarily, or try and wait for a loyal puppet state to do this for you! Either way, on Legendary Difficulty, it will always be useful, although by no means always possible, to have at least two stacks near to potential rebellious states, ready to deal with them.
Finally, let’s look at our early forays into diplomacy…
There’s not much to do here early on, as you are already trading with nearly all of those neighbours you can. The Eastern Roman Empire may have a non-aggression pact with you, but they still hate you, and you’ll eventually want to go to war with them to expand your empire. You could try giving gifts to your more rebellious Puppets, but this might back-fire causing your other puppets to get jealous if they don’t like each other. Instead, I prefer to use diplomacy in this early stage of the game to simply keep an eye on my puppets, and TAKE money from them (by sacking cities and/or obtaining peace deals) when they do attempt to throw off the yoke of my oppression.
My early campaign strategy was thus to prepare for eventual war with the ERE by: 1) Securing my own territories so they are happy, well-fed and making me lots of Shekels (or whatever these latter-day Persians used for currency – probably beard-oil, judging from the portraits), and 2) Expanding to bring Kartli under my dominion as a puppet state, while 3) Making sure any puppet states that turned on me were swiftly brought to heel. Aria and Parthia, I’m looking at you…put that recurve bow back where it came from or so help me…
Prepare for War – Managing our Empire – Supplies, Damn Supplies and Logistics
Time to take a look at what territory we directly control…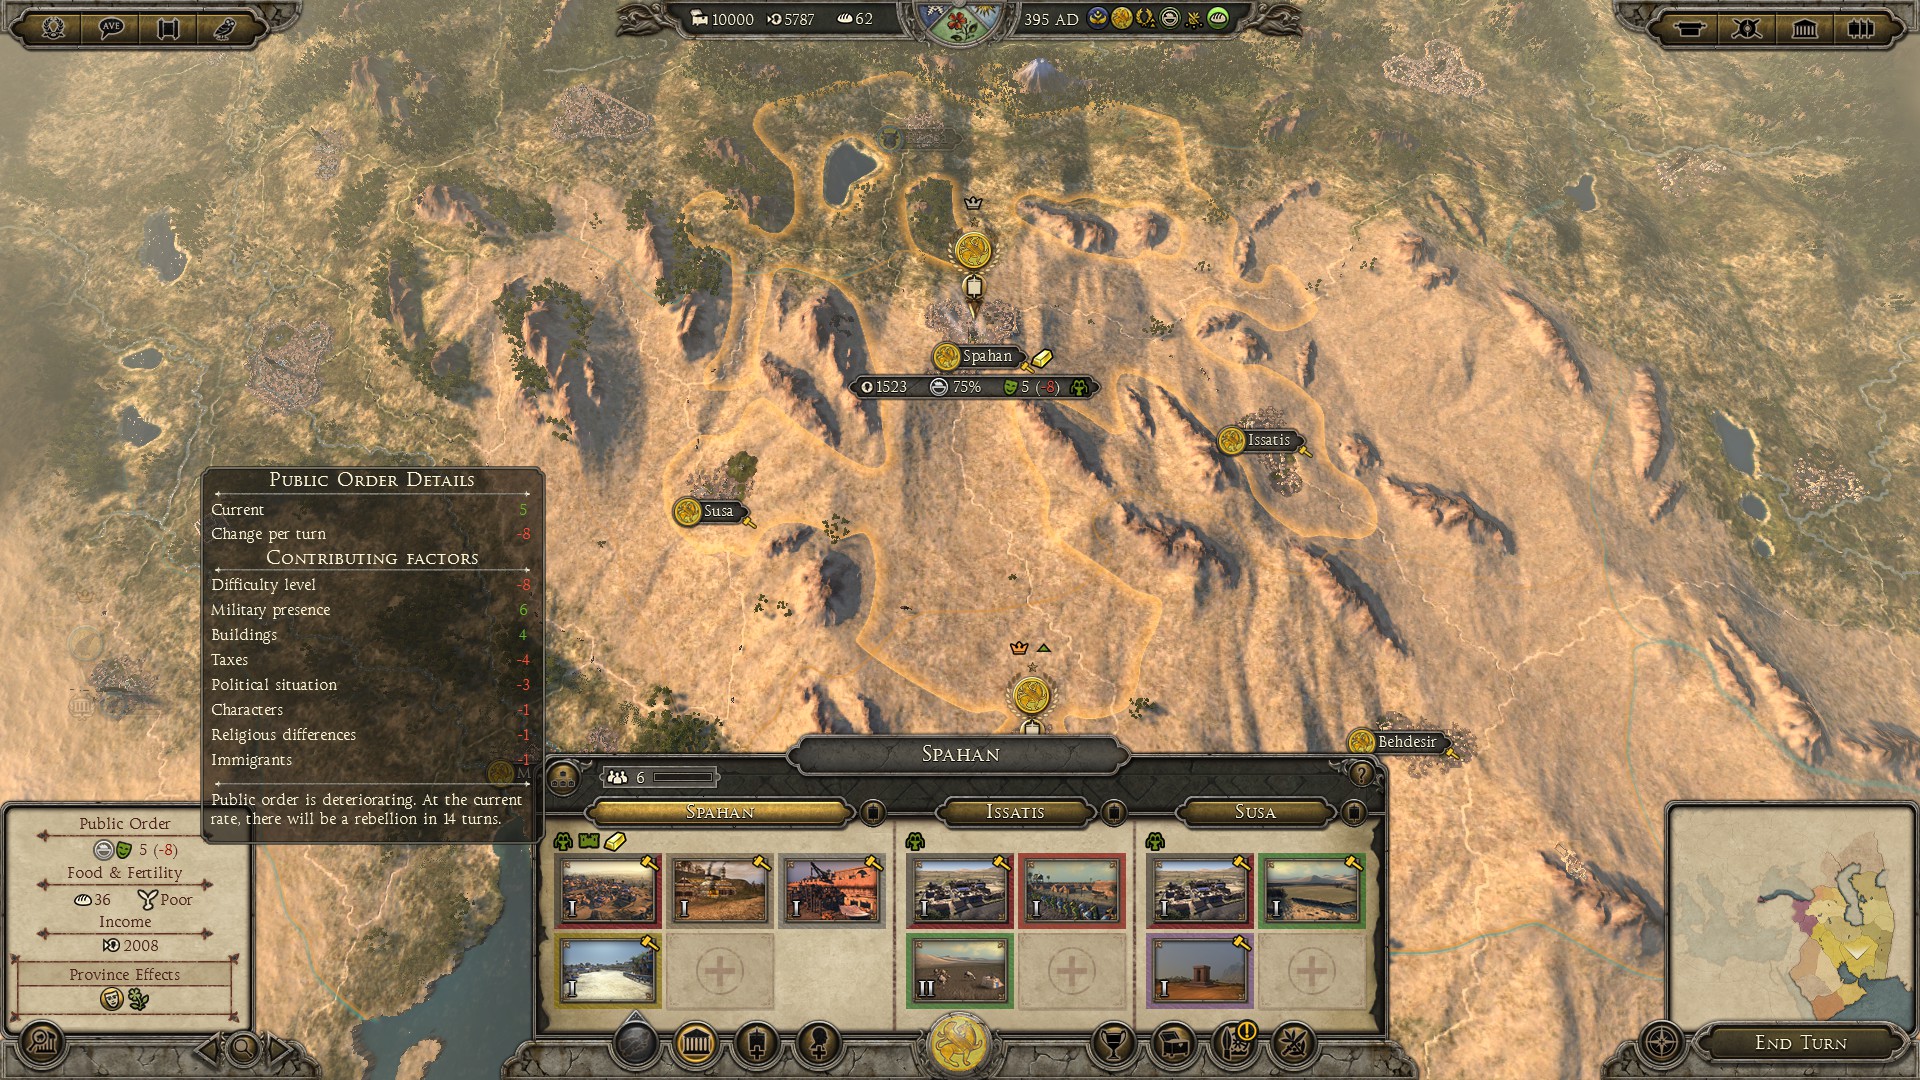
We have three full provinces, and one region of a fourth (shared with the ERE). Each Province (with the exception of our Capital, Asoristan, is in declining public Order, despite the existence of a near-full stack of troops! This screen-shot of Spahan is a good example. Spahan has a Gold Mine, and the Persis province to the South (which has similar public Order problems) has Purple Dye (the most expensive in antiquity, and thus the colour of the Emperors). Upgrading that Gold Mine would yield a lot of cash, BUT it is also one of the worst offenders for public order problems. Instead, we are going to want to upgrade that plaza. In fact, in every settlement, we are going to upgrade communal areas. We are also going to demolish military buildings!
But wait, what about my glorious recruits?! Ok, let’s look at your typical stack…
What we want to build instead is a mixture of food production, happiness buildings, and specialist goods buildings (like the Dye Tubs and the Gold Mine). We’ll keep ONE military building – the Cavalry Coral in Ctesiphon. We do want to be able to recruit more cavalry in due course! We’re also going to plan around the bonuses of those unique goods. The Gold Mine increases Industry wealth, so eventually Spahan will be an Industrial complex. The Dye Tubs increase commerce, and are located in a Province with a port, so this will be a good little trade-hub. I say eventually, because early on your focus needs to be getting positive happiness and positive food production, and then getting positive growth, so you can expand your settlements to include juicy new buildings.
But what about squalor? Have no fear – for every City you control (three at the start), your Sassanid Traditions give you +1 to Sanitation. Couple this with maybe adding the Sanitation chain in cities which provides extra food and you will have few difficulties on this front. By the late game, you should be seeing Provinces with +15 Sanitation, no matter how many dirty buildings you build in them!
So…’Let’s go grow yummy wheat in the desert to feed our empire!’, I hear you say. Seriously?! I’m putting you peasants on the first camel train back to Europe if you keep being as dumb as an Armenian (apologies to any Armenian readers, but they were the bane of my first campaign, rebelling on average once every two years – no matter how many times I killed their entire male population, they somehow produced more armies to send to the slaughter. So yeah, in my game at least, Armenians are dumb as planks).
Sassanids get a lovely little food resource building that actually works in the desert – yes, even in absolutely infertile provinces…the camel harm. They spit, they smell bad, and they’ll bite your face just for the fun of it, but you can have your revenge by eating them. Yum yum. Seriously, you want one of these in every province (possibly two depending on your food needs). Even in Asoristan, where the fertility is high, the camel herd will yield almost as much food as wheat, but with the added bonuses of extra income AND not having to convert the farm later when climate change reduces global fertility! I also built a Horse Breeder in Asoristan. The added speed boost to cavalry recruits is very handy for keeping your horse archers alive when chased by light cavalry, and helping your Cataphracts not rumble around like lame Elephants.
Prepare for War – Subterfuge and Domestic Politics
Subterfuge options are relatively limited early on, because you need certain buildings to recruit agents from, and these might not be the buildings you actually want / need!
However, the agents are all worth their weight in gold, so it’s not a bad idea to try and have just one recruitment building for each type somewhere in your empire, as soon as you can afford the build-slot it will consume.
Priests are incredibly useful. These little guys improve the rate of conversion to your religion and increase happiness within the province to which they are deployed. Deploying them in recently-captured territory is a must if you don’t want your armies to get bogged down maintaining public order for an entire generation!
Spies cannot deploy at Level 1, so you will want to use their Misdirect ability on enemy troop stacks until they advance. Nonetheless, the chief use of Spies (even more useful than their assasination abilities) is as advance scouts. Send them deep into enemy territory to find out where their forces are. Attack when you are strong and the enemy weak; otherwise hold defensive positions or even retreat if the enemy is too strong! This advance knowledge of an enemy’s troop deployment is hugely advantageous!
Veterans / Champions are a nice addition to your troop stacks. They will gradually improve your troops’ experience levels (so long as you don’t keep absorbing enemy troops from victories to replace your losses).
As an aside, adding an agent to a troop stack will typically mean that forced marching stops adding any distance to that you can travel on the campaign map. This doesn’t appear to be a bug, but instead the agent will increase the normal move speed so it is comparative with that of armies on a forced march (at least if their skills are high enough, perhaps). I haven’t fully worked out this theory, so observations welcome!
Let’s take a look at our Family Tree…

We’re going to want to appoint the full three Governors to our three fully-controlled provinces too. Typically, the Edict ‘Teachings of Zoroaster’ is probably the best choice to use, as it gives a slight happiness bonus (through the reduction of religious unrest), but notably a +10 to growth! Clearly, the ‘Teachings of Zoroaster’ at no time advocate for abstinence! Giggity. Or, in Persian, Ghighiti (probably).
Your Faction Leader, Bahram, King of Kings and Boss of Beards (check out his portrait!), would make an AWFUL governor. Take a look at his skills to figure out why (I’m not going to do everything for you, and this is good opportunity to learn what those Authority, Cunning and Zeal levels mean). So he stays a General. This is a shame, as usually Faction Leaders are best placed as Governors, where they will steadily gain influence (most of the time faster than Generals!), without risk of death on the battlefield. His brother, Yazdegerd, is probably best off doing the same due to his ‘Dislike of War’. Perversely, he’ll be less problematic as a General than a Governor due to this trait! In order to make sure they keep generating influence, we can make them the leaders of our cavalry armies, which should see more action than the infantry armies.
It’s worth also mentioning the Offices you can appoint your leaders to. Both generals and governors are eligible for these posts (the only exception being your Faction Leader). The first of these is Castellan…I’ve hovered over it in the picture above. There are two notable things to mention about the Offices tree for Sassanids. First, unlike Romans or Barbarians, there are only two entry-level slots. Secondly, unlike the Huns, those two entry-level offices (Castellan) are best utilised by Governors. They have a massive +5 to happiness bonus, which would be really useful in Spahan and Persis! Higher levels are Military posts.
Unfortunately, your two young family members are too young to be made ‘Castellan’. This is a shame, because ultimately we want them to be Governors, but for now, they will have to wait. Instead, the three Candidates we have hired on are all going to become Governors, and those assigned to Spahan and Persis are going to be made Castellans. Our younger generation family members will lead our Infantry forces for now.
Nota Bene (That’s Latin for ‘Note this well’, you smelly Scythians, and where we get ‘N.B.’ from):
As the two governors of Spahan and Persis are eventually going to replace our younger family members in the field, we are going to keep promoting them to higher positions once they have served their terms. A little tip; you can select them for promotion when they are in turn 8/8 of their two-year term, rather than waiting til the next term for them to leave office.
As Master of Supplies, they will make good generals for your Cavalry Armies, reducing their costs and increasing their replenishment. Masters of Infantry and Masters of Horse are good for recruiting new armies later on. Master of the Guard and Supreme Commander are your ultimate generals (with +10 melee defence to commanded forces and +10 melee attack to commanded forces respectively), as well as other buffs. This means that you will want to keep swapping your leaders around to make the most of them, and an ideal career path will look like this:
Two years as a Castellan, Governing provinces.
Two years as a field commander of an active army (i.e not one limited to garrison duties).
Two years in charge of recruiting some nice buffed out infantry, (by 399BC you should be ready to recruit your next two armies, so let’s make them Infantry ones).
Two years in charge of recruiting some excellent cavalry (by 399-401, you’ll want two more field armies) – you’ll need 4 stacks of cavalry to be able to go toe to toe with the ERE’s Legions!
And then time to bask in glory as you ride out as Master of the Guard and Supreme Commander (hopefully). These two roles best complement each other when Master of the Guard initiates battle (as either attacker or defender) with a tough infantry army, and Supreme Commander reinforces with your best Cavalry Army. Your infantry will pin the enemy in place, hopefully surviving long enough for a nice Cataphract charge to the enemy’s rear!
A final note on Domestic Politics…don’t be afraid to let rebellions happen. If you are struggling to maintain positive happiness, even with garrisoned forces, just move your forces out of the settlements, let the rebellion start, then crush it before it grows too strong! This will help your armies and generals gain experience faster too!
Battlefield Tactics – Stick ‘Em With The Pointy End!
If you are new to Total War, stop reading this guide right now. This is ‘Legendary Difficulty’ we’re discussing. It’s not for Nubians (or ‘Noobs’ for short).
For the rest of you, I’m not going to teach you to suck eggs. You already know the basics:
1) Command the High Ground.
2) Envelop your enemy (don’t let him envelop you!).
3) Paper (Archers), Scissor (Cavalry), Stone (Spearmen).
4) Cut off the head (kill the enemy general)
5) Don’t fight tired.
But here’s a few things to know about Atilla, and about playing it on Legendary:
1) Man on man, like for like, you will loose. I had three units of Nordic Archers face off against one of German Archers, and they only JUST beat him. I have had heavily armoured axemen fail to hold against medium armoured swordsmen. Enemy morale will tend to beat yours every time. Why? Because the AI is cheating again. The only way to combat this in legendary difficulty, is to be the better general. This includes outnumbering the enemy even before the battle starts. Typically, you will want two stacks to the enemy’s one to be sure of victory (at least one that is not so Phyrric that you can’t use your army again for 8 turns while it replenishes!).
2) Legionaries (and swordsmen in general) now suck. ‘What, but the Romans were the best infantry in the World?!’, you exclaim. That was true 400 years earlier. Kudos to CA for getting this historical context right. By the time of the fall of the Western Roman Empire, the world had changed significantly. Rome’s enemies were no longer the unwashed barbarians in smelly tunics of Caesar’s day. Now they are unwashed barbarians in smelly chainmail. The tribes across the Rhine and in Brittania learned much from living next to the Romans for 400 years; chiefly, the value of a good piece of armour. Sadly, over the same period, the Romans forgot what was good about their old gladius – a short, stabbing sword, perfect for the press of the shield wall and for penetrating armour, and replaced it with ‘spathae’ long-swords. These swords will still have an edge against spears, BUT their low armour penetration means they are nowhere near as juicy as a nice axe warband. Thankfully, as Sassanids, you will have access to Sogdian and Dailamite infantry, who are armed with maces (basically the same concept as an axe). Armour is less of a problem for you as a result when you field these troops, although they will still take heavy losses due to being a more ‘offensive’ type of unit than ‘defensive’.
3) Towns (as opposed to cities) now have walls (albeit with gaps instead of gates) but are still more easily defensible. You will usually lose most sieges where you are only defending with the automatic-defence garrison, but, if you pin the enemy down in a slogging match, you can often damage enough of his army sufficiently to mean it is a ‘spent force’ which will either die in the next siege it attempts, or will be easy work for your local troop stacks to mop up when they get on scene. Units which can form defensive formations, such as testudo or spear wall, are great for blocking routes into the center. A few units of Armenian Spears can hold the whole enemy army at bay for a while, giving you a chance to run down their skirmishers, then charge the melee with any cavalry you have.
4) Wardogs are not OP – just different. In my last playthrough as the WRE, I had an Edbadanian army of mostly wardogs throw itself at my piddling garrison (one Cohors, one Comitansis Spears, one Explorates and one Scout Equites). My Cohors and Spears held a choke point against over a thousand wardogs. But as a Sassanid player, you do need to beware of them catching your horse archers.
5) Your generals are easy to lose! You want them near enough to use their abilities, but make sure you chase off any skirmishers who might otherwise snipe at them, and NEVER throw them into melee unless you want them to die. The risk is too great. Use your Cataphracts for close killing, not your poor general.
As an additional observation, the post-battle sequence allows for three options when you win: Sell prisoners, take on volunteers, or kill them all! Selling prisoners yields (some) money, but rarely a lot for Sassanids, who are not a ‘Raider’ faction. It also comes with a hit to Integrity that you might wish to avoid in less leveled-up armies. Taking on volunteers should be used in desperate times only, such as when you know the enemy is going to attach again with another stack the next turn, and you have no-where to run to. Otherwise, the loss of gained experience can easily keep your troops from gaining those lovely chevrons! Killing them all has no negative consequences directly, but will upset friends of your enemies (and your enemies too). Thus not a great option for dealing with rebellious puppet states!
Finally, tips for Sassanids!
1) Use lots of horse archers. 10 per stack is good. They need to be able to severely damage the enemy’s troops, not just be a nuisance.
2) Next up, cataphracts. These heavy lancers are your shock troops. Just before charging, move them into wedge formation, for maximum impact. Just make sure nothing is nearby to shoot them. 4-6 per stack works well.
3) That will leave 3-5 units left in an army, and would use these for light melee cavalry or camel warriors, to be used in anti-skirmish and anti-cavalry roles. Your cataphracts will never catch enemy cavalry that doesn’t want to engage – their job is smashing into weakened units to tip them into a rout.
4) Elephants. You want to spent 1500 Shekels per turn per unit on upkeep?! That’s akin to 2-3 units of cataphracts, and maybe 10 units of basic horse archers. I’d spend the money more wisely elsewhere. I did play with them (including the armoured elephants), but they will attract a lot of enemy heat, particularly from missiles, and typically tended to being wiped out within 1-2 engagements. If you do use them, use them like the cataphracts.