
Overview
Just in caseUpdated with walkthrough (not mine)
Mapping East
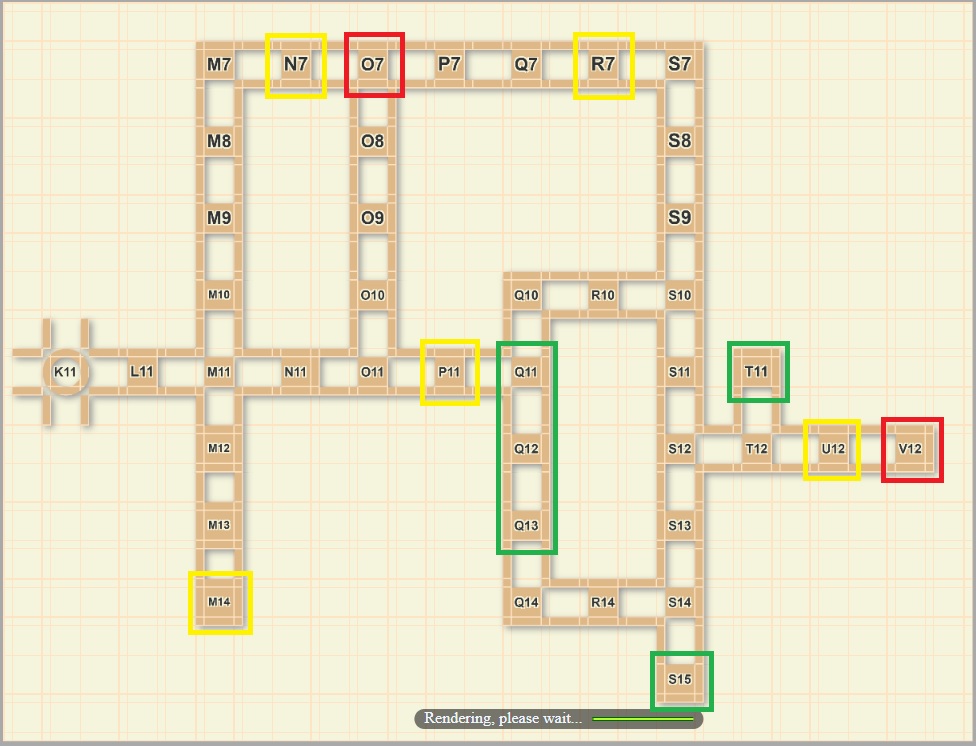
Caves:
U12 – Abandoned Cave (unsafe bed, Lumbering Axe)
P11 – Cave (unsafe bed, Behemoth boss in cellar on cave, relief behind boss’s shrine)
R7 – Underground Lake Cave (Pickaxe)
N7 – Cried Up Well (something is here, but dunno yet what exactly)
M14 – Goblin’s Camp (gobin’s boss)
Interesting buildings:
T11 – Ruined Temple (nun, holy water, Nun’s Sword). Lockpick needed, or make it 3 for sword.
S13 – building isnt interesting, but you can get free Pickaxe there.
S15 – Alchemist’s Shed (alchemist, safe bed, save game). You can get chest outside from north side.
Q13 – Abandoned Village (one of tablets in red chest, unsafe bed, food in bar after defeating thief)
Q12 – Abandoned Village (unsafe bed, save game)
Q11 – Abandoned Village (Lumbering Axe in warehouse)
K11 is Crossroad of Prayer camp, center of island and only place where you can move from one part to another.
Goblins Camp escape – there’s a seacond way to escape. Instead of eating poisonous moss, there might be an action “Coa a knife” that will give you poisoned knife. So once you shout a guardian and brag about gold, Chocolat will backstab goblin. After that you will get 30 skillpoints for escape and free teleport to your Camp. No poison or something, yey. Not sure about triggers for that action, tho, so just check it from time to time.
Mapping West

Caves:
I13 – Abandoned Thief Hideout (unsafe bed, Stone Sword)
I13 – Dried Up Well (relief)
C9 – Desert Bandit Hideout (Pickaxe, Sphinx boss)
Interesting buildings:
I10 – Dark Green Shrine (collecting sape here is first quest for Settlement)
H10 – Drenched Wall – bring all 12 collectibles here
G9 – Galio’s house
G12 – Survivor’s Settlement
F14 – Shrine of Dream Nights
C13 aka Church of Soundless Bell – Shrine of Penitence (weapon master, save game)
B10 – Forgotten Temple (Niko’s quest, Moon, relief on Dungeon 3)
E12 – Old Knight Fortress (nothing interesting here, lol)
E11 – Old Knight Garrison (unsafe bed on floor 2, libraby on floor 3)
E10 – Dungeons
E8 – strange flower
D8 – Saint’s Haven (refief in red chest bihind shrine)
There’s piano riddle in Forgotten Temple, but i just buttonmashed through it, so no solution.
Mapping South
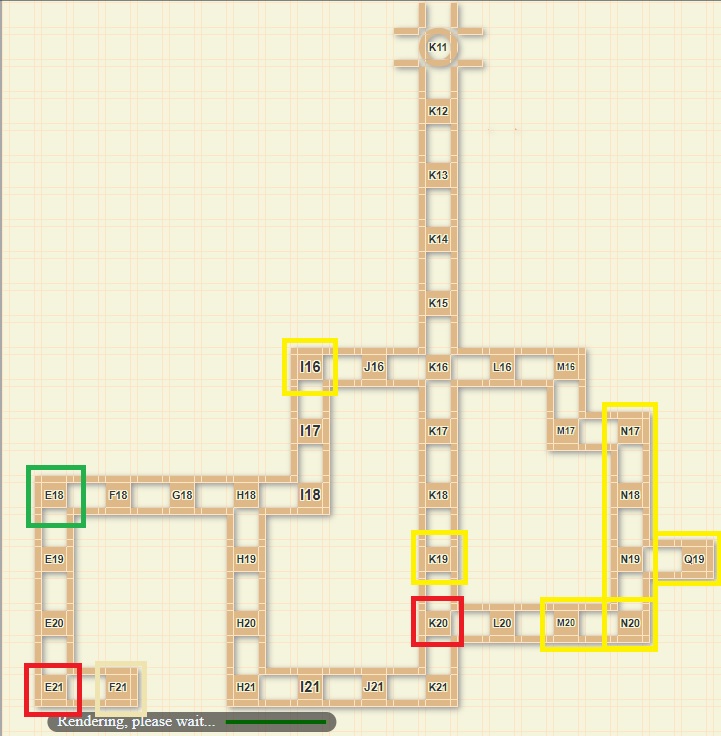
Caves:
I17 – Cave of Ignorance (nothing interesting)
K19 – Moonlight Cave (sailor)
M20 – south entrance to N18-N20 cave
N19 – Cave Entrance (man, boat)
O19 – Slimy Cave (Kraken boss)
N18 – Cave Entrance
N17 – north entrance to N18-N20 cave
Interesting buildings:
F21 – Ocean Temple (relief in red chest inside)
E18 – you will get inside if defeated by thiefs
Man at N19 sells Lumbering Axes and Pickaxes, if you still need those.
To get into O19 you need to fix boat.
Mapping North
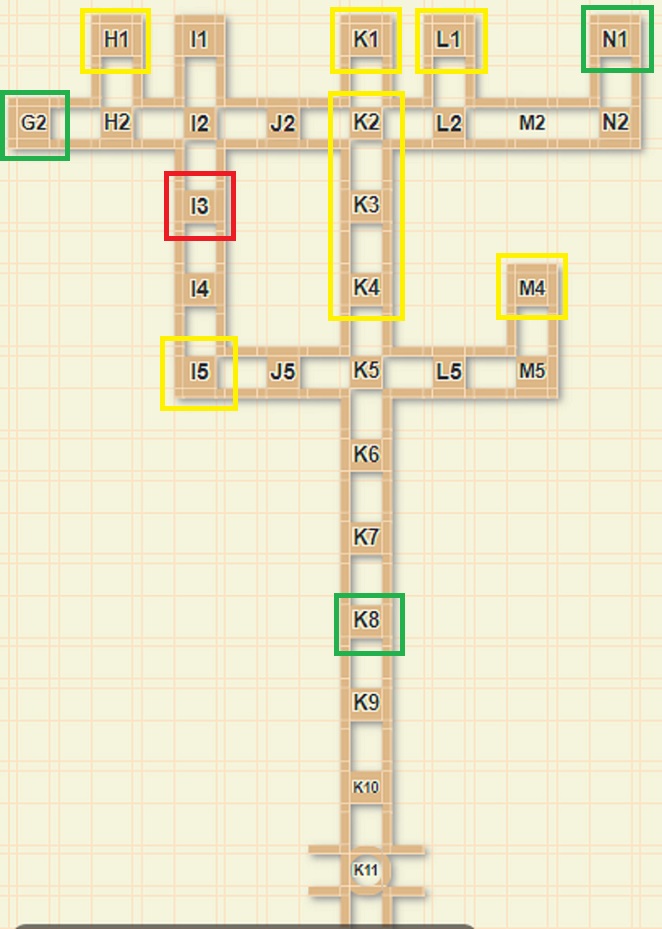
Caves:
M4 – Abandoned Thief Hideout (useless if you dont want 500 Lira, wash yourself or resources)
I5 – Giant’s Cave (Cyclops)
K4 and K2 – entrances to Seeker’s Cave
K1 – Abandoned Thief Hideout (Phoenix boss)
L1 – Dwarf’s Hideout Entrance (dwarf, safe bed)
H1 – Orc Treasury (relief)
Interesting buildings:
K8 – not really a building, but you can find knights here
N1 – Castle of Clouded Light (you can get a key from boss of Forgotten Temple that spaws at night near piano; relief on 1st floor)
G2 – Orc Stronghold
Smallest map with just single camp here.
No real passage between I4 and I3, map is splitted into 2 parts without connecting each other.
There’s a relief in west part of K6, but you can get there only via poisoned land in K5. Would cost ~150hp for you.
You can open door in Orc Stronghold floor 1 with key you get in Castle of Clouded Light, but i didnt added this on map since its too big already and just not worth. There’s just a way without monster to F2 -> E2 -> E1 kill a dragon here. Big yey.
walkthrough
There’s walkthrough on devs site that makes whole idea of making guide what is where, monsters drop etc irrelevant. Cool. Below i’ll split this guide into pieces, so coming content isn’t mine. Those are marked as “walkthrough” and has links on where i get it.
Map is still useful, tho, so wasn’t 100% waste of time ^^
walkthrough – Gameplay Tips
(from [link]
Gameplay tips:
- Make sure to read the attached survival guide.
- The map is divided into a grid, going from A to V horizontally and from 1 to 21 vertically. You can check this by the map name on the lower-right corner of the screen when you travel on a map.
- You can sometimes find items by drawing ocean water. The items you get depend on the place. At V12 and E21 it’s seashells, at K20 it’s corals, and at O19 it’s pearls.
- You can nullify the confusion status inflicted by strong bosses using stance skills.
- If you’re captured by bandits, goblins, or orc and manage to escape, the first time you do so you’ll get +30 skill points.
- Doing sexual acts causes your adaptability to rise, which in turn lets you prostitute yourself to characters who you’re able to negotiate with.
- Torches are really ineffective, to the point that they might be bugged. As such, unless you really have to go out at night, don’t.
There’s new game plus:
- You retain all your items, save for some important ones like keys and event items. You also retain your reliefs.
- For the bosses, they get 5000 lira and gold armor. It’s not possible to get a golden sword.
- A “migratory bird” who sells materials will appear at the western settlement. There you can buy the materials needed to make all (?) weapons and armors.
)New Game+ unlocks after you finished game at first time, but make sure to start new game as New Game+ and save. Otherwise… no yey.)
Rough walkthrough of the main story:
1. Take the wooden sword and explore the cave on the neighboring map. Also, make sure you have enough food by fishing.
2. Gather materials and make leather armor.
3. Walk to the abandoned house where you can obtain a pick axe and then make a stone sword.
4. Gather materials by killing level 2 enemies and then make iron armor.
5. Stockpile some food and water and start heading towards the settlement at the western side of the map. Prioritize movement over looking for items to save energy, and also avoid level 3 enemies as much as possible. Once you find the place, replenish your supplies by gathering items around it.
6. Finish the event at the western settlement. Then prepare food and potions and head to the knights’ stronghold. You are going to have to fight many level 3 enemies, so you’ll want to be carrying a lot of healing items
7. Once you’re able to travel to the orcs’ territory up north, look for materials to make bronze armor. You’ll need to various level 3 enemies all over the place to obtain the necessary materials.
8. Once you finish the armor, go see Noel and hear the information about the dwarf. Then, go meet them.
9. After meeting the dwarf, return to the settlement. Then, after the event, head to the thieves’ underground city. There are no battles there, so you don’t have to prepare food.
10. Once you return from the underground city, meet up with the nun in the east and obtain the anima weapon.
11. To make sure you’re ready to hunt magical beasts, you should first kill a bunch of level 4 enemies and obtain the materials necessary to make silver armor. You’ll also have an easier time if you can make fortissimo as your weapon.
12. Kill 4 magical beasts to fill the anima weapon and then go talk to the dwarf.
13. Make sure you have some amount of potion, and then challenge the final boss. It’ll go down surprisingly easily.
walkthrough – Sub Events
(from [link] )
Injured man:
- Talk to the man next to the treasure chest at the eastern region (R14). You can choose to give him a healing potion, or to take him to Noel’s house.
- If you give him a healing potion, you get 5 SP.
- If you take him to Noel’s house, you’ll get 3 Molotov cocktails, 3 lock picks, and 1000 lira.
If you’ll choose to get him to alchemist’s house, there will be setted “guard mode” which slows you, like, a lot. So you’ll be forced to fight nearly any enemy on your way. No big deal, just dont do that near night.
Niko:
- Meet Niko inside the building at the settlement ruins (Q13).
- Meet Niko at the library on the third floor of the knights’ stronghold, and he’ll make you a request regarding the church of the waning moon.
- Even if you find the church first, you have to revisit it.
- Once you’ve investigated the entrance of the church, return to the library and tell Niko.
- Now when you go to the church, you’ll be able to enter it. After seeing the event, investigate the silver and gold pianos. When you play the right tune, a path will open.
- If you know the tune before hand and play it right away, it won’t work (a flag isn’t set unless you look around first?).
- The tune is do fa so re si (C F G D B).
- Kill the church leader in the basement.
- Talk to Niko right before the last boss inside the church.
(doesnt matter for quest if you’ll go there at day or at night; however ghost boss in church that drops a key to Castle spawns at night, so it might be a good idea to go there at evening)
Alissa:
- Talk to her on the second floor of the house at the settlement, after the underground city.
- Talk to the heavily armored knight near the north entrance, who will then ask you to go search for Alissa who still hasn’t returned from the mountain.
- Save Alissa who has been prisoned in the basement of the orcs’ stronghold (you’ll be transported back to the settlement).
- Collect the moonlight flowers inside the cave at K19.
- Return to the settlement and hand the flowers to Heimdal.
Noel:
- Talk to Noel at her house right before the last boss and promise to bring her an oracle’s heart.
- Enter the church of the waning moon at night. You will find an astrologer sitting on a chair in middle of the floor with the golden piano. Kill them. Once you do, they’ll drop the sun key which acts as a key to the castle.
- Naturally, you’ll need a weapon that works against ghosts.
- The random ghosts near the entrance of the church were much stronger, so be careful as you move there.
- Go to the second floor of the castle and investigate the middle one of the three portraits next to the stairs. You’ll find a secret room. There’s an oracle inside. Kill it to obtain the oracle’s heart.
- Hand the heart over to Noel.
Kinda free Nun’s Sword works as silver/antighost, so you dont really need to craft one.
Ultimate weapon:
- If you bring all available weapons to the weapon master inside the church at C13, you will be able to obtain the ultimate weapon.
- It seems that you also need the nun’s sword from the treasure chest inside the shrine at T11.
- Don’t let the ultimate weapon’s appearance fool you; it really is strong. While not mentioned, it’s also effective against ghosts.
- With this, you’ll be able to beat Apocalypse using three lion moves.
Ghost ship:
- Added in version 1.5.
- To access it, talk to the pirates slightly above the boat that goes to the southern island right before the last boss.
- You will want a weapon that’s effective against ghosts.
- The code for the bilge is 864615.
UPD
>The ghost ship code is 865615, not 864615 (info from ieatyourspamnomnom comment)
walkthrough – Reliefs
(from [link] )
At H10, there is a soaked wall with candles and a door that won’t open. The candles correspond to reliefs scattered in various places around the island.
If you obtain a relief and check the candles, the corresponding one will light up. Once all of the candles are lit, the door will open and you can enter inside.
Kill the Apocalypse inside.
- It’s the strongest enemy in this game, so expect a tough battle.
- You’ll want to equip the bunny head and falcon so you can go first.
- The boss uses confusion attacks, so try to use stance skills as much as you can.
- The breath attack does around 50 points of damage, so make sure to heal if your HP ever falls below that point.
- You’ll frequently get into a position where you have to spend multiple turns just healing. It’s best to play it safe and prepare for a long fight. An attack every 10 turns sounds about right. Make sure you have a lot of healing items in stock.
- The boss doesn’t revive if you switch maps, but it does if you sleep, just like harvesting spots.
walkthrough – Enemies (part 1)
(from [link]
Rat-type:
Jellyfish-type:
Goblin-type:
Plant-type:
Green Oni-type:
Dragon-type:
Demon-type:
Yankee-type:
One of kind (fused “types” with single enemy to make less separate tables)
walkthrough – Enemies (part 2)
(from [link]
Fixed Enemies:
For Cyclops all you need is go North and blow up a rock that blocks entrance.
For Dragon you need a key from Castle’s boss. Then goto Orcs Sronghold.
Swallower is where Kracken boss. Also known as Devourer.
To get access to Apocalypse you need all 12 reliefs.
Magic Beasts:
Fixed Enemies (only ones):
Others:
Ghost Ship Enemies (Version 1.5:)
walkthrough – Recollection
(from [link]
Recollection:
1
Excretion – use the urination skill and masturbate
Bathing – take a bath
Sleeping – go to sleep without burning an incense
2
Goblins’ Cumdump
Orcs’ Cumdump
Thieves’ Cumdump
Slimes’ Cumdump
Defeated by Flowers
Defeated by Gazer
Defeated by Minotaur
Defeated by Cyclops
3
Flower Trap – U12’s flower
Flower Sleeping – E8’s flower
Swallowed Whole – pee into a hole with swallowers
Mimic
Kneeling on the Ground – be defeated by bandits and have them
Wooden Horse – a trap in the castle
4
Physical Examination
Sap Collecting
♥♥♥ Collecting
(Underground City) Underground City Chocolate 1
(Underground City) Underground City Chocolate 2
(Underground City) Underground City Double Blowjob
(Underground City) Alissa’s Drug Sex
(Underground City) Alissa’s Trap
5
Niko’s Footjob
(Prostitution) Anal Sex
(Prostitution) Armpit ♥♥♥♥
(Prostitution) Prostitution (Gallio)
(Prostitution) Titty ♥♥♥♥
(Ghost Ship) Defeated by Pirates
(Ghost Ship) Defeated by Ghost Ship Tentacles
(Prostitution-related are soldier in D13 plus sailor and men in South)
G’bye ^^
I haven’t found 2 of 12 reliefs, missed to mark Drenched Wall as a building and too lazy to make farming spots, etc. You shouldnt make H-games like that where you can rush story in hour or so (if you have a map and know where to get right stuff) but have to farm for 1000+++ hours to craft freakin costumes. Not yey, devs. Not yey.
Actually, farming is only part of this game i can complain about. That, poor costumes and no effect of equipment on surface. Like, only difference between running around full-naked and heavy-armored is stats. No dialogue changes, no reactions etc.