Overview
This guide will provide you the basics of surviving in Lobotomy Corp and how to deal with individual abnormalties, I will try to cover abnormalities that are not commonly discussed here, please give me feedback and I’ll try to improve it in the future. Also major SPOILER ALERT!! *EDIT: This guide is published BEFORE the big lobotomy update, so the managment info here is outdated; You can still have a look at the abnormalities in this guide though 🙂
General Useful Tips in Playing
As many of you may know , Lobotomy Corp is a rougue-like game that involves a lot of trial and error, so it’s understandable that early on in the game it can get quite frustrating. Here are some general tips to make your time at Lobotomy Corp easier.
Another point to note is that a larger proportion of abnormalties deal mental damage instead of physical damage, so it might be wiser to upgrade your employee’s mental training more.
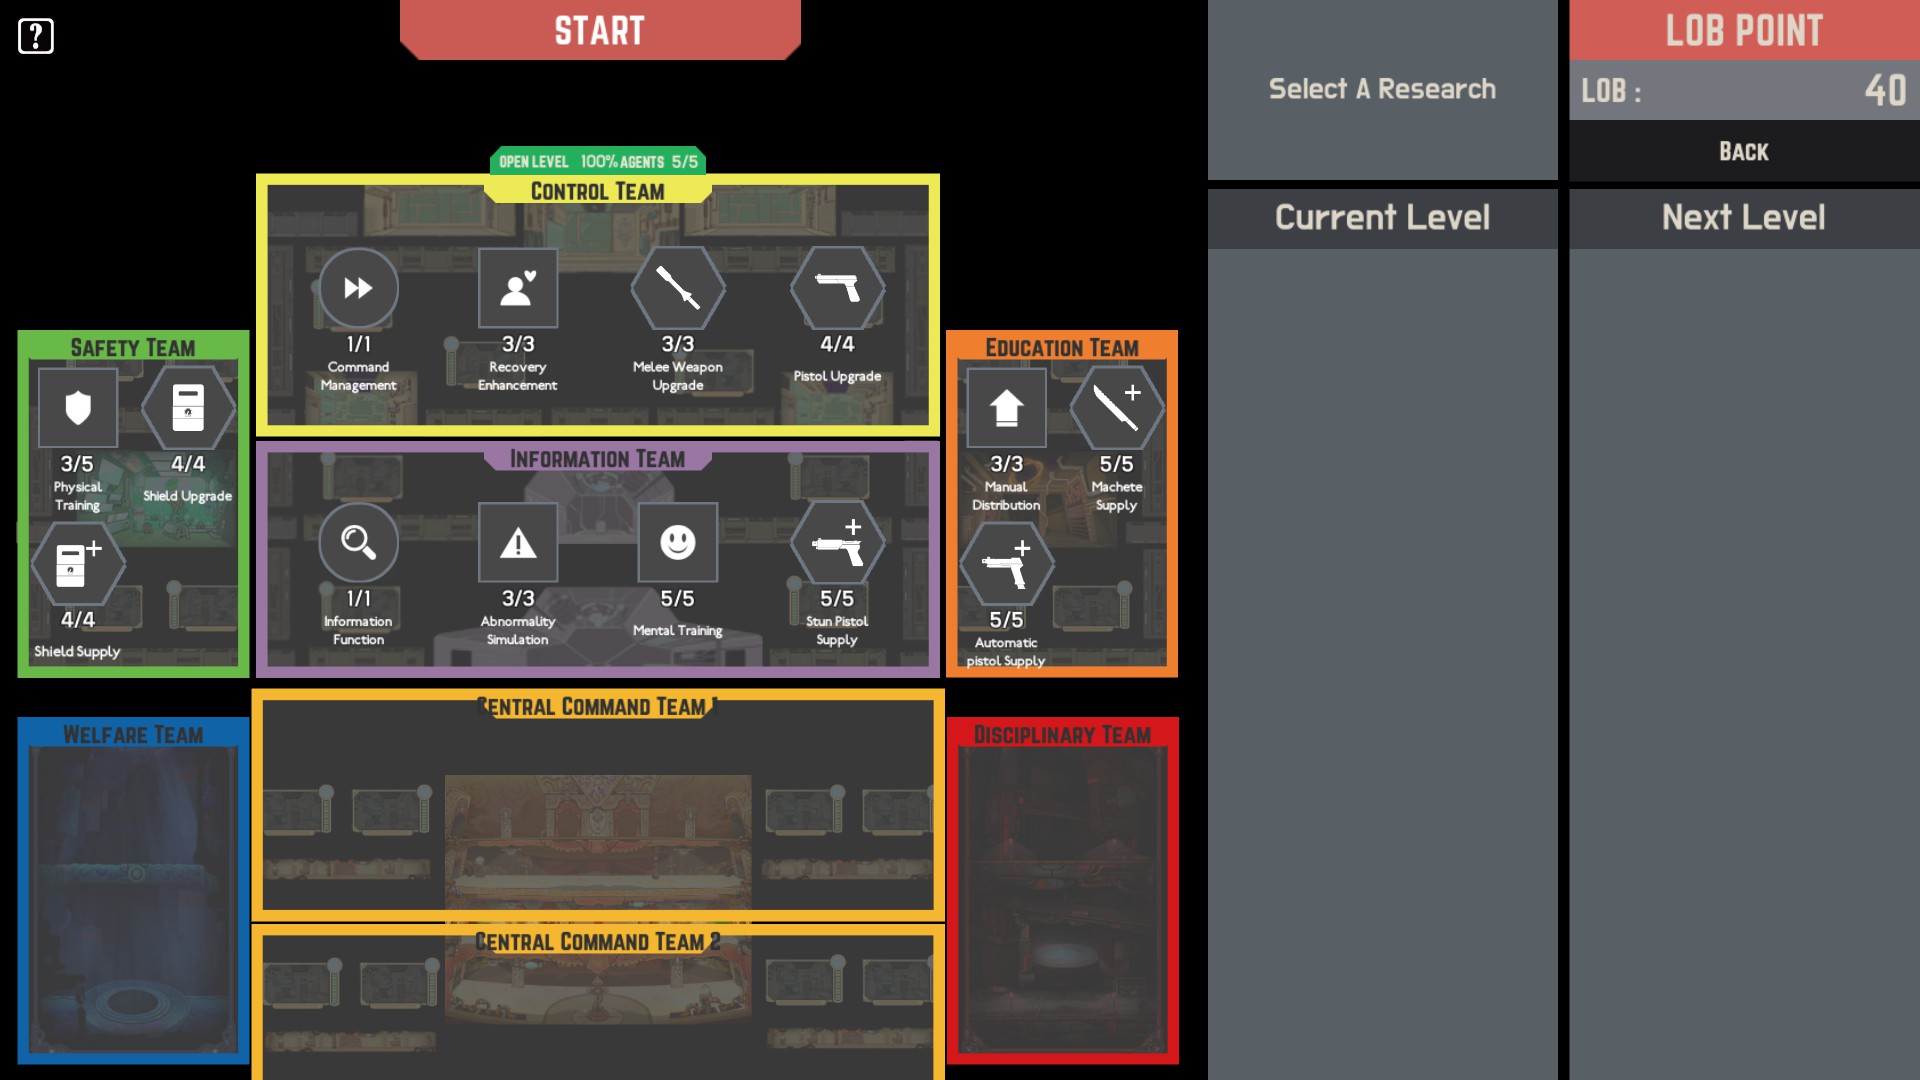
Its is important to reserve agents and some lob points everyday until day 5,10,15 etc.(The game saves at every 5 days) This is beacause you might lose a couple agents in a single day, so it’s vital to keep some backup in case that happens.
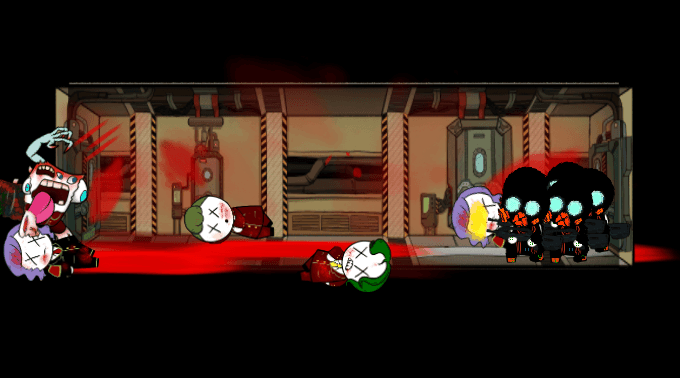
Whatever you do, just remember keeping every escapable abnormality in their chambers, because later on in the game, it is very likey that one single breach will lead to mutiple breakouts, thats when panic will likely occur and thats a gameover for all the hard work you’ve done. Also remember to prioritze containment upgrades than actual weapon upgrades as the latter cost way more and is unecessary if you can keep your monsters contained in the first place.
This is very VERY IMPORTANT! Basically, rushing the game spells ‘doom’ for you, especially if you’re new to the game. It will be lifesaving to pause the game first to allocate work. Without pausing, other abnormalities will have their moods slowly depleted while you’re planning, and I learned that the hard way. Similarly, when experiencing a breach, just pause so you can stay calm and order work on those who(Abnormalities are not humans, right?) have not yet breached and order supression accordingly. Only speed up when you have EVERYTHING planned out.
Not all abnormalities are bad, some of them are actually beneficial. Similarly, agents from low levels to high levels are all useful, and some abnormalities do require low level agents, so remember to always keep a variety of agents of different levels ready.
This is an early access game, so occasionally game files might be bugged or corrupted, if that happens , you can either start a new game or use the reset function in the main screen by clicking the Lobotomy Corp logo at the right hand side.
Okay, now with that out of the way, let’s get on to the GOOD stuff !
Abnormalities

- ZAYIN
- TETH
- HE
- WAW
- ALEPH
with ZAYIN being least dangerous and ALEPH being the most diastrous.
Abnormalties deal different types of ‘work damage'(or none) when work fails, mainly
- Psychological
- Physical
- Compound(Both of the above)
Abnormalities have unique special abilites, their ‘attack type’ ranging from
- White(Mental effects)
- Red(Physical effects)
- Black(Facility effect)Affecting the whole depatment in which the Abnormality is in.
- Blue(Enternal Death)This seems to kill employees, and made them to be not recoverable even if you reload to a previous checkpoint. A bit buggy though.
*Its important to differentiate ‘Attack Type‘ and damage dealt during work failures, the former refers to the damage dealt using the Abnormalities’ special ability, but NOT during work.
Useful tip: When you’re getting a new abnormality, you’ll only get a subject name like O-03-03-Z, by checking the last letter, you can understand its class and danger level: E.g. O-03-03-Z is a ZAYIN class.
ZAYIN

Subject Name: O-03-03-Z
Attack Type: Mental effects
Risk Level: ZAYIN
Description: One Sin is a easy one to manage, just throw in rookies to do Consensus with it, other work except Nutrition will do too. It doesn’t do any damage while working on it, so don’t worry. When it is in a bad mood, it’ll only drain a little bit amount of energy.
Special ability: Forgotten Sin Brings Forth Punishment If One Sin is in a good mood, you can arrange special work ‘Confession’ on it, employees who succeeded in this type of work will get their physical and mental health fully recovered. However, there’s a small chance that it will think the confession made is not ‘real’, dealing both physical and psychological damage. The mood of One Sin will deplete either way.
On escape: It doesn’t escape.
Secret: This abnormality can be used to counter an ALEPH abnormalty, see more below.


Subject Name: O-05-48-Z
Attack Type: Physical effects
Risk Level: ZAYIN
Description: Getting this abnormality is like winning the lottery because its mostly beneficial, you don’t need to work on it unless you want to get observation levels on it(In this case, consensus will be fine), no work damage will be dealt if work fails. Under normal circumstances, it is not accessible nor interactable, but it is still able to produce energy.
Special Ability: Evening Twilight If your facility is experiencing a panic level 2, in which at least 2 abnormalities have breached, the Hammer can be accessed and you can perform special work on it, in which an employee merges himself with the Hammer and becomes a powerful terminator which teleports around the facility and suppresses any breached abnormalities. It can also replicate itself and target more monsters at once. Afterwards, the very employee who worked on it will be sacrificed as a cost of borrowing the Hammer.
On escape: It dosen’t escape unless you use its special ability.


Subject Name: O-01-45-Z
Attack Type: Mental effects
Risk Level: ZAYIN
Description: The Plague Doctor is generally harmless, cleaning is effective followed by nutrition, it doesen’t do any work damage, so using rookies is fine. One point to note is that it can change positions with other abnormalities, so make sure to check the line up of abnormalities each day if it is around, and switch agents accordingly.
On escape: It dosen’t escape until it transforms to WhiteNight
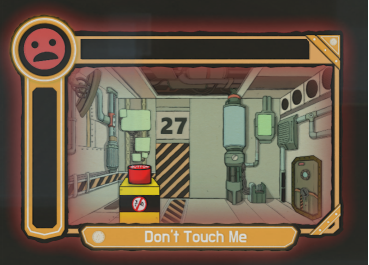
Subject Name: O-05-47-Z
Attack Type: Facility effects
Risk Level: ZAYIN
Description: This isn’t hard to understand at all, like its name stated, just don’t touch it and you’ll be fine, it produces energy regardless of its mood. To trick you into clicking it, it can pop out fake observation icons and change its form into other Abnormalities like Singing Machine, Happy Teddy and One Sin, but its name will remain the same. Just remember, DON’T TOUCH IT!!!
Special Ability: Oh No, Don’t Do That If you’re brave enough to press it, the following will happen:
- If you clicked the containment chamber itself, then all of the employees will die;
- If you clicked the tab for the encyclopedia entry, then every single abnormality will have their mood depleted to zero;
To get its observation, make sure you have saved your game, then press the button three to four times every few seconds, cause doing it rapidly will cause the game to crash. Also, note that the only way to view its encyclopedia entry is during the deployment stage.
On escape: It dosen’t escape.

Subject Name: F-05-52-Z
Attack Type: Enternal Death
Risk Level: ZAYIN
Description: Another great abnormality to have, don’t mind that terrifying attack type for a ZAYIN, as long as you keep it happy, it can be a great assistance in your survival. In general, just clean it with rookies as it dosen’t deal any sort of damage. At a bad mood it will still drain energy though, but that will be the least of your worries.
Special ability: Overworldly Soda! You can perform special work ‘drink’ at any mood rating, the effects are as follows:
- Blue soda heals mental health;
- Red soda heals physical health;
- Purple soda heals both of them;
Remember NOT to drink the purple soda when it is in a bad mood, otherwise Enternal Death awaits…MWHAHAHAHA (No, its like that drink puts employees to sleep and ships them to the middle of the ocean or something…)
On escape: It dosen’t escape.


Subject Name: Bald-is-Aweome!
Attack Type: Mental effects
Risk Level: ZAYIN
Description: This guy is basically a ‘troll’ abnormality released on April Fool’s Day. Doing any work to it is fine as long as he/she is bald or having the hair style similar to the one in its encyclopedia picture, this way any work done will increase its mood and produce energy.
Special Ability: Keep Calm and Go Bald If a non-bald employee performs work on it, it will turn them bald and undergo a mood dercrement. Repeat this and it’ll transform into another form and turn everyone in its department, you gussed it, bald. Totally harmless as long as you don’t care how your employees look.
On escape: It dosen’t escape.

TETH(I)

Subject Name: O-01-12-T
Attack Type: Mental effects
Risk Level: TETH
Description: Old Lady is pretty easy to deal with for a TETH, she deals a little bit of mental damage, so using level one employees can be risky, level 2 agents are just fine though.
Special Ability: Piling Stories, Piling Deaths If you leave granny in her room alone for too long, loneliness will literally accumulate her room as some black mist(seriously?). If an employee enters the room in that state, there’s a chance that the loneliness will ‘cling’ onto the emloyee, the chance increases as more loneliness accumulates. ‘Lonely’ employees can’t perform any work until the loneliness wears off, and constant mental damage will be dealt in this state.
On escape: She dosen’t escape.


Subject Name: T-02-43-T
Attack Type: Physical effects
Risk Level: TETH
Description: Spider Bud is pretty dangerous as she knows how to insta-kill agents, but once you get the hang on how she works, she’s nothing but a breeze. Nutrition is the best,She’s a spider, duh, amusement also works, cleaness work is suicidal. She deals minuscule mental damge, so even level 1 agents are fine.
Special Ability: Bon Appetite It activates whenever a principalist employee performs work or cleaness work is performed, at which she will wrap the employee in a silk cocoon, killing them if they’re a male; strong mental damage will be dealt instead if the employee is a female. Each cocoon serves as a energy boost, with 3 as the maximum cocoon limit. So sacrificial work can actually be plausible…
On escape: She Dosen’t escape.


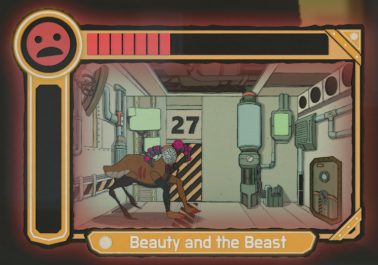
Subject Name: F-02-44-T
Attack Type: Physical effects
Risk Level: TETH
Description: Like spidey, this monster also knows how to insta-kill, so paying attention to it can save your agents. Most effective work being violence, then cleaning, followed by amusement, but bear in mind that violence work in a row spells death, so alternating between violence and cleaning/Amusement work would be more ideal in terms of safety and efficiency. It deals moderate amounts of compound damage, so using level 2 to 3 employees will be safer.
Special Ability: Full Bloom This happens when violence work is performed in a row, Beauty and the Beast by the employee will then be killed and the ‘murderer’ will become the new Beauty and Beast, in other words, dead.
On escape: Strangely, it dosen’t escape.

Subject Name: F-01-02-T
Attack Type: Physical effects
Risk Level: TETH
Description: I think its safe to say she’s the most dangerous TETH if you neglect the insta-kill mechanics in other TETHs, besides that powerful compound damage, her special ability is terrifying as well if you’re new to the game. Violence works best, nutrition also works, best to use level 3 for her as level 2s can be risky.
Special Ability: Why is my Story the Only Tragedy? If match girl is left in a bad mood for some time, she will reach a state of ‘Biggest Match Light’, employees who work her in that state will receive strong physical damage(often killing them), if this is experienced twice in the same day, she’ll breach. Her mood will reach the best rating after returning from a breach.
On escape: Scorched girl will rush to the main room in the department she’s in, ignoring any agents she passes by while dealing physical damage to them. She’ll explode upon reaching the room dealing strong physical damage to everyone in it. It might be wise to arrange low level agents to other areas when she’s breaching to avoid potential death.


Subject Name: F-01-18-T
Attack Type: Mental effects
Risk level: TETH
Descrption: Woman Facing the Wall is fairly easy to deal with, she deals a normal amount of mental damage, just remember not to use optimists as they receive extra psychological damage, She loves consensus/violence and likes amusement, but dont use consensus as this triggers her special ability. For experienced players, it can more beneficial to knock her mood to the bad state by cleaning/nutrition as she produces more energy in that state. You can then knock her back up to the good state to avoid her skill after a while. But honestly, with leveled up agents and upgraded mental defense and recovery, that skill is nothing but a scratch.
Special Ability: Orpheus It is triggered when you try to commune with her, left her in a bad state for too long, send a employee in her chamber when ‘EXERCISE CAUTION‘ is displayed or when you focus the camera on her for too long (is it really worth it for dat booty?), in which she will deliver moderate mental damage to the whole department.(It used to included a creepy jumpscare though…)
On escape: She dosen’t escape.


Subject Name: T-05-51-T
Attack Type: Physical effects
Risk Level: TETH
Description: Bloodbath is a menace if you don’t know how it works, I personally lost a handful of agents to this piece of furniture. Basically, don’t use optimists and rationalists and you’ll be fine; amusement is the best, and cosensus works too, use level 2 agents as it deal a fair amount of psychological damage during work.
Special Ability: Things you Have Forsaken This is where it gets annoying. It can insta-kill any optimists and rationalists agent regardless of their level, making it extra dangerous when you’re paying more attention to other Abnormalities in later levels, so make sure you send in the right agent. Each killed agent will add a hand into the Bloodbath, increasing its damage and energy produced/reduced depending on its mood rating. If 3 hands are reached in the bath, it will kill the next agent who enters its room regardless of their pesonality, while also reseting the hand count to one.
On escape: It doesn’t escape.

Subject Name: T-01-54-T
Attack Type: Physical effects
Risk Level: TETH
Description: This guy is relatively complex compared to the other TETHs, and can be a bit of a threat when he escapes, but in general he just requires a bit more attention. When he is in a good or neutral mood, nutrition works best, followed by amusement. On the other hand, violence and consensus will do the trick if his mood is bad. He does a moderate amount of mental damage, so level 3 agents are recommended, especially when he is in a bad mood.
Special Ability: Expansive Despair As stated above his preferences of work changes along with his appearance if he falls into a bad mood, increasing aggression as well. After some time in that state, he will breach.
On escape: He is fairly weak abnormality, dealing normal physical damage to employees near him, a few level 3 employees can take it down.
TETH(II)

Subject Name: O-02-56-T
Attack Type: Physical effects
Risk Level: TETH
Description: I think this little bird is by far one of the most annoying Abnormality among the TETHs, because this bird breaches a lot. To be clear, consensus and nutrition works best, it also likes amusement. Using level 1s can be risky, as it deals a fair amount of physical damage.
Special Ability: Punishment! It is triggered whenever an employee panics or if the bird is left alone for ‘some’ time. causing it to breach. In the first case, the bird can be beneficial as it has a higher chance of bringing back the emloyee back to normal without killing them(as using employees to supress panicking employees usually ends up with one of them dead); but the latter case is really annoying as the ‘some’ time is simply random, which it can escape seconds after an employee just left. To prevent it from escaping, don’t use Consensus and Nutrition as this can bump it to best mood rating which prevents you from interacting with it, leading to its escape. Do use amusement, then bump its mood back down with cleaning and violence, rinse and repeat to keep the bird busy.
On escape: It will find random employees(prioritizing panicking employees) and attacking them with constant weak physical damage for a set amount of time, which can actually kill low leveled employess. But remember DO NOT SUPPRESS IT! I repeat, DO NOT SUPPRESS IT! Because this turns it to its ‘rage form’ and can kill even MAX level employees easily, I learned that the hard way.
Secret: Its third way to escape is when both Big Bird and Judgement Bird escaped in order to summon a hidden ALEPH. (Details below)

Subject Name: O-05-61-T
Attack Type: Physical effects
Risk Level: TETH
Description: This piece of armor is very interesting and deadly at the same time, just like Bloodbath, it is capable of insta-kill if you sent in a pacifist or shielded employee, so using other employess with level 2 to 3 stats is more than enough as it deals little psychological damage. It loves violence and likes cleaness.
Special Ability: Spirit of Association Besides decapitating those who are pacifists and those with shields, it also grants employees who succeeded in violence work at least 3 times an armor plate which increases their max health and energy gathering rate, if they continue to perform violence work on the armor, the buffs they receive will increase until a certain amount of violence works performed on the armor(about 20 times, I think), then the employee will start getting debuffs, such as max health reduced, and there’s chance that the employee will get decapitated if they work on Crumbling Armor now. As this special trait is irreversible, it is recommended to either avoid violence work or switch the agent with a stage 2 armor plate(half black, half red) to work on other Abnormalties so that they can receive the maiximum buff possible without dying.
On escape: It doesn’t escape

Subject Name: O-03-60-T
Attack Type: Mental effects
Risk Level: TETH
Description: This guy is awesome to have and is very easy to manage, but still, it can be a menace if it gets out. Basically, you can just ignore it as it produces energy in neutral and even more in a bad mood, just make sure its mood don’t reach zero by using violence to send it back to neutral and then rinse and repeat; Using consensus is not as ideal as this may put it in a good mood, which drains your energy and nobody wants that, right? Although it deals more damage in a bad mood, optimists doesn’t get affected, so you can designate a optimist employee to work on it, even a level 1 is fine.
Special Ability: Echoes From Beyond Its triggered when its mood reaches zero or an employee panicks in its room. at which it will change its form and breach.
On escape: Fragment of the Universe will roam around dealing strong psychological damage and weak physical damage to nearby employees. Sometimes it will stop to sing, dealing areal and constant psychological damage to employees in the same room/corridor. Level 3 agents with range weapons is recommended to supress it as its quite strong in close combat.

HE(I)

Subject Name: T-05-41-H
Attack Type: Physical effects
Risk Level: HE
Description: Generally a cute and easily manageable Abnormality, it dosen’t do damage when its in happy mood, so even level 1 agents can be used to perform any work except cleaning and nutrition(obviously…). However, its shape and behavior will become more aggressive as its mood decrease to neutral and bad. Interestingly, whether it escape or not even in a bad mood depends on a chance, but I do not recommend putting it into a bad mood to produce more energy as A.A.H escaping is quite diastrous.
Special Ability: All Around Help A.H.H will escape if a ‘WARNING’ message is displayed on its chamber when its in a bad mood.
On escape: A.H.H will do spin attacks across a room/corridor dealing strong physical damage to agents, although it has comparitively less health than other HEs, its flighty speed and intense damage make it quite dangerous and hard to target, using level 3-4 agents with range weapons in this case will be more effective.


Subject Name: T-04-06-H
Attack Type: Physical effects
Risk Level: HE
Description: You can say its a cuter version of Beauty and the Beast, it can insta-kill your agents under some conditons, just pay attention to its work log and you’ll be fine. Teddy has a special work option ‘Hug’, which is the most effective in rasing its mood(Keep in mind that only pacifists and optimists can perform ‘hug’, amusement is next, followed by consensus and cleaning, but these action needed to be done in a special way.
Special Ability: Old Hugs We Missed This skills suffocates and insta-kills agents upon entering its room, which is triggered in the following conditions:
- Performing ‘hug’ twice in a row;
- Work on it with the same employee twice in a row;
- Send in an employee its mood drop to 0;
- Not performing ‘hug’ in every other action(50% chance);
So its best to alternate between ‘hug’ and amusement/consensus/cleaning with different employees.
On escape: It dosen’t escape.


Subject Name: O-04-08-H
Attack Type : Mental and Physical effects
Risk Level: HE
Description: The shoes is a easy one, but can cause a mess if not monitored correctly. Remember to use MALE employees, DON’T put in the girls!!! It dosen’t deal any kind of work damage, so its fine to use level 1 employees, it likes consensus and cleaning. Designate a employee to it is recommened.
Special Skill: Dancing to the Grave This activates whenever a female employee enters its chamber, this can be done by the player or by the shoe itself. It can summon female employees to its room when its in a bad room with the words ‘EMPLOYEE UNDER SPELL’ on its chamber, the controlled employee will have a pink aura on their face, click them multiple times to free them. If one enters its room, she will be possesed by Red Shoes, allowing it to escape.
On escape: The employee with the shoes will carry an axe and start chopping everyone she sees, dealing strong physical damage and weak psychological damage, until they’re dead, you’ll have to kill the possesed employee to end the breakout. Level 3 agents can defend themselves against her.(I think…)


Subject Name: O-05-30-H
Attack Type: Mental effects(I think it should be physical)
Risk Level: HE
Decription: This piece of machinery is definately a brutal killing machine and have one of the highest kill counts as a HE, but it will give you tons of energy when managed correctly, so its kinda nice to have. It loves nutitrion(weird) and likes cleaning, deals tremendous amounts of mental damage during work, so using level 4 is highly recommended, especially without observation levels. If you don’t have high level agents, its better off leaving it alone as it only drains energy in a bad mood.
Special Ability: Rhapsody of Machine It happens whenever an employee panics in its room, who will be sucked into the machine and be ground into meat chunks. This will also send its mood rating to the best, while bewitching other employees AND CLERKS(the npcs that you can’t control) to bring more employees to its deadly mouth, repeating until every single employee is dead. There’s no way to ‘unbewitch’ employees other than killing them,. Unfortunately, you can’t order supression on clerks, so its best to avoid the whole special abiity altogether.
On escape: It doesn’t escape.


Subject Name: F-02-49-H
Attack Type: Mental effects
Risk Level: HE
Description: I do not like this thing to be honest, because it is really a big problem if it breaches. To begin with, It starts with a neutal mood which drains energy, so you can either bump it up to a good mood with consensus, cleaning or amusement; or send it down to the red with violence or nutrition, which produce triple the amount of energy, but I don’t recommend doing it as this thing escaping is one of the last thing you want, trust me. If your more experienced with the timing of this thing, you can try to hit its mood to the red, wait for a little while, then bump it up again, rinse and repeat. But this is hard to do in later levels.
Special Ability: Rudol-ta is Coming to Town This skill is activated when it breaches, which happens if its left in a bad mood for some time.
On escape: It moves slowly around the facility, dealing psychological damage to all employees in the same room/corridor, it will also ‘deliver’ ‘Rudol-Ta’s Gift’ to nearby employees, which increases attack avoidance while decreasing max mental health and movement speed. This thing has LOADS of health, and can readily drive even level 3 employee crazy with that mental health debuff, so I recommend either try avoiding it or supressing with a large number of agents.

HE(II)

Subject Name: O-02-40-H
Attack Type: Physical and Facility effect
Risk Level: HE
Description: What I can say is, this bird dosen’t like to kept in a cage, it is very likely to escape. Amusing this bird works best while nutrition and consensus also works. It deals moderate mental damage during work, so agents who are at least level 3 are needed. Big bird escapes when its mood reaches zero.
Special Ability: For the Perpetual Peace This ability allows Big Bird to escape when 2 or more Abnormalities have escaped, even if its mood is above zero, it won’t escape this way if its mood rating is at best. This ability also allows it to perform all sorts of ‘tricks’ during its breach.
On escape: Its ability will turn off all the lights of the department it is in. It will also stop and bewitch employees to come near it, only to get their head bit off by Big Bird. The player can click on the bewitched employees several times to free them, similar to the employees under a spell by Red Shoes. Upon freeing them, some psychological damage will be dealt. As it can’t hurt your employees by directly dealing damage, you can just bombard it with all your employees in the department its in at once to turn the lights back on.
Secret: Big Bird breaching is one of the required conditions to spawn a hidden ALEPH.


Subject Name: O-01-15-H
Attack Type: Physical and Facility effect
Risk Level: HE
Description: This baby is a real pain, always keep an close eye on it, as you really woudn’t want it to cry. It loves amusement and nutrition, like every other child. As it only deals minor psychological damage, level 2 and 3 employee works just fine. Apparently, using female employees have a higher working success chance.
Special Ability: Where’s Mommy? The Fetus cries when is left in a bad mood for some time, which is totally normal, what’s abnormal is those cries cause constant mental damage to all the employees and continuous mood degradation of all Abnormalities in the department its in, which is very dangerous especially if you got some deadly abnormalities in that department as well. At that point, only sacrificial work can be done, in which a random agent or clerk will be chosen by a roulette to feed the fetus, which kinda suck if one of your best agents got killed in that way. So please pay extra attention to this troublemaker for the sake of your employees.
On escape: It dosen’t escape.


Subject Name: O-01-55-H
Attack Type: Physical effects
Risk Level: HE
Description: This little boy here is actually very beneficial to your facility, it likes everything and deals a moderate amount of mental damage. With referencing to his skill, designating a max level employee for it will be the best.
Special Ability: Your Universe If an employee enters his room twice in a row, he/she will receive a pebble(will be gone at the end of each day), which allows its holder to constantly heal heath and mental health, and is very freakin’ powerful, it basically making them immortal, allowing them to take down tough Abnormalities by themselves if their max health and mental health is high enough, thus using max agents for the pebble will be more beneficial. However, if the pebble holder enters another containment chamber or get killed by an other Abnormality, the childs mood will decrease moderately and greatly respectively. If his mood is totally depleted, some mist will cover his chamber and after some time in that state, all the current pebble holders will die and the energy refining process will be prevented even if you got enough energy, a ton of energy will also be drained constantly. At this case, you’ll need to send in an employee into his chamber to sacrifice him so as to get the child out of that state.
On escape: It doesn’t escape.

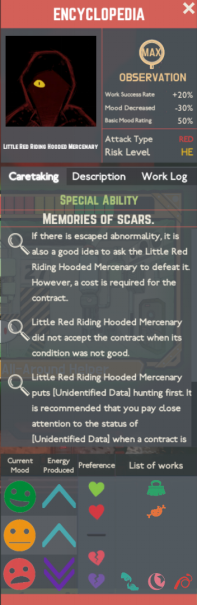
Subject Name: F-01-57-H
Attack Type: Physical effects
Risk Level : HE
Description: Another fanatastic Abnormality to have, as her name goes, she is a mercenary that can help you suppress breached Abnormalities as long as she’s not in a bad mood. Cleaning works best, nutrition also appeals her, she deals moderate physical damage, so its better to use at least level 3 agents to work on it.
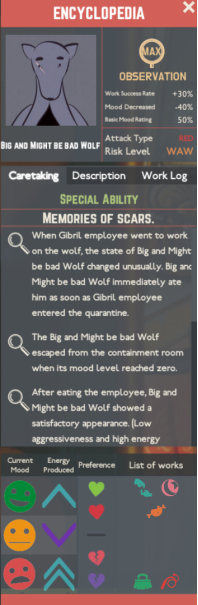
Special Ability: Memories of Scars This allows Little Red to suppress escaped Abnormalities with a specific energy cost, she is actually pretty strong and effective various HEs and TETHs, but it takes a lot more time to take down WAWs and ALEPHs. Be aware that friendly fire is on with this girl, your employees can get totally destroyed between two fighting Abnormalities. Upon successful suppression, she will go back to her chamber and rest for a bit.
Be aware if she goes near Big and Might be Bad Wolf‘s room on her way to suppression, she will cause the wolf to breach and focus to just fighting him, causing a lot of physical damage across the room they’re in, and she’ll only return to the contract once the wolf is defeated.
On ‘escape’: Under a ‘contracted’ escape, it will run straight towards the target if not interrupted by the wolf, attacking it with a ranged gun attack and a melee axe attack, both dealing strong physical damage to Abnormalities and employees. She’ll also escape when Big and Might goes near her chamber.


Subject Name: O-02-62-H
Attack Type: Eternal Death
Risk Level: HE
Description: Quite dangerous and sensitive for a bird, like its cousins Punshing Bird and BIg Bird, he is very likely to breach, so keep an close eye on him. Consensus works best, followed by cleaning and nutrition, use level 3 employees as he deals moderate mental damage.
Special Ability: Judgement It triggers when its mood has depleted to zero or more than half of the Abnormalities in the same department as him reached a bad mood, causing him to breach. If the other Abnormalities in the same department as Judgement Bird are required to be in a bad mood to produce energy(e.g. Alurine), reloading the game to the last checkpoint might be more safer in the near future.
On Escape: Judgement Bird walks around the entire facility, stopping sometimes to mark random employees in the same room with a golden balance which immoblizes them. He will then walk towards them, hanging them, granting enternal death. The only way to save the marked employees is to defeat Judgement Bird. As he doesn’t do actual damage besides hanging, it is recommended to suppress him with all the idle agents you have in that department before causing too many deaths.
Secret: Judgement Bird breaching is one of the conditions to summon a Hidden ALEPH.

HE(III)

Subject Name: O-05-65-H
Attack Type: Eternal Death
Risk Level: HE
Description: I really, REALLY HATE this bloody clock for the fact that it punishes people for playing the game carefully. Only violence and amusement make this thing happy, it deals moderate
psychological damage, so using level 3 agents will be good enough. It drains energy at a good mood, so ideally use violence or amusement to bump it to about the top of neutral(its got a long neutral bar), then just keep it there using nutrition. It produces more energy in a bad mood, but I don’t agree on doing that at all.
Special Ability: The Thirteenth Bell(Really annoying…) Whenever you pause the game when its in a bad mood, a roman number will appear on its chamber, and an employee will be dead after you unpause the game, do this for 12 times(the counter is saved across different playthroughs, good luck), a roman number ‘XIII’ will appear on its chamber, and 13(WHAT?!)employees will die in a similar fashion consecutivey. However, if you don’t ever pause the game, ths clock will be just like a ZAYIN to you, just ignore and let it produce energy.
On escape: It doesn’t escape.


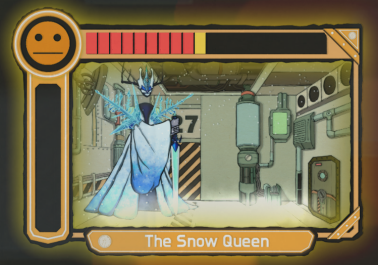
Subject Name: F-01-37-H
Attack Type: Eternal Death
Risk Level: HE
Descripion: A fairy easy Abnormalty to manage,THANK GOD! She only likes consensus, and like most of the HEs, deals moderate mental damage, so again with the level 3 agents.
Special Ability: Third Kiss There’s a chance that Snow Queen will ‘kiss’ the employee that finished working on it regardless of work type or its mood, leaving an ice shard on them(will be gone at the next day), increasing their max health and mental health. However, whenever a ‘kissed’ employee enters her chamber again, they will get frozen, rendering them ‘out of control’, and the queen will experience faster mood degradation. If her mood reaches zero and an employee is frozen in her chamber, she’ll freeze the energy bar, preventing you from entering the energy refining process. In this case, you’ll need to send in a employee, preferably level 4 to 5 with a lot of health, to ‘duel’ against her as a kind of special work. If the employee wins, him/her and the frozen employee will be released, removing the ice shard in the process. On the other hand, the employee will lose the duel if their heath is depleted, causing both employees to die. Regardless of the results, the frozen energy bar will disappear after a duel. In order to avoid all the duel crap, make sure you don’t send in employees with a big, obvious ice shard stick on their body.
On escape: It doesn’t escape.
WAW(I)

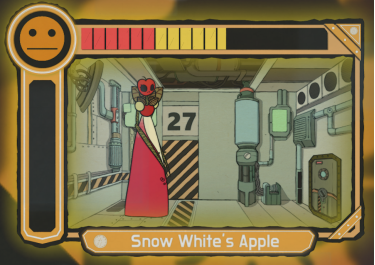
Subject Name: F-04-42-W
Attack Type: Physical and Facility effects
Risk Level: WAW
Description: Frankly, I quite like having the apple around. Although she’s super dangerous after her escape, but she’s fairly easy to manage. She drains energy at green, produces energy at neutral and escapes the moment her mood reaches to the red part(NOT ZERO!!). Fortunately, she starts at a neutral mood, so you can ignore it until her mood is left to about 3 yellow bars, at which you just need to send in a level one employee to feed it to bump its mood back up to yellow but NOT green to produce energy continuously, she doesn’t do any kind of work damage so don’t waste your higer-ups on her.
Special Ability: Where’s Him? This is triggered when her mood reached a bad state, in which she will escape INSTANTLY.
On escape: She can’t move directly, but rather teleports to different corridors, spreading her vines all over them. Employees who walk on them will walk slower and will receive almost constant strong physical damage when Snow White’s Apple is in the exact same area with them. The vines won’t disppear even if the apple’s been defeated, it’ll be cleared in the next day though. As the apple has a lot of health and deals a insane amount of damage, I don’t recommend suppressing it if it is in a less crowded area as even level 4 employee struggle against her. Little Red Riding Hooded Mercenary works, but it just takes a long time, more breakouts will occur if the apple teleports near Big and Might be Bad Wolf’s Room and little red follows her there.

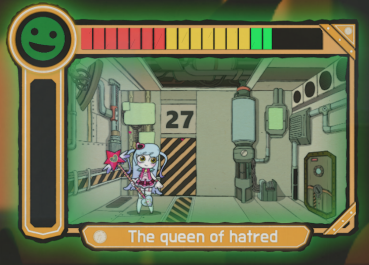
Subject Name: O-01-04-W
Attack Type: Physical effects
Risk Level: WAW
Description: Previosly known as ‘Magical Girl’, this fan-favourite is bascially just a deadlier version of the Abandoned Murderer, its work preference changes when her mood decrease from good to neutral and bad. In a good mood, she only deals minor psychological damage and actually helps employees recovers mental health, so using level 1 and 2 employees to perform consensus and amusement will do the trick. However, in a neutral/bad mood, she’ll deal moderate to great compound damage as her mood drops, so using at least level 3 agents would be wiser, she likes cleaning, nutrition and violence in this state. What’s more, you can perform special work ‘anesthesia’ with principalists and rationalists employees when she’s neutral or unhappy to sedate her for about a minute, in which her mood can’t decrease and she can’t escape. But overusing anesthesia(about 3 times) will lead to her mood depletion, leading to her escape.
Special Ability: In the Name of Love and Hate When the Queen of Hatred remains in a bad mood for some time, she’ll transfrom into a snake like creature and breach.
On escape: She as a snake will roam around the facility, attacking employees and other breached Abnormalities with a ranged beam attack, dealing constant physical damage. I recommend using level 3 to 4 agents with melee weapons as she can’t actually hit employess that are in close range.

Subject Name: T-04-50-W
Attack Type: Physical effects
Risk Level: WAW
Description: Another troublesome queen. To begin with, it deals a ton of psychological damage, so its best to use level 4 employees as level 3s can be risky. Nutrition works best, followed by cleaning. Although it produces the same energy when its neutral or happy, I rather push it up to best mood, as its ability is hard to deal with.
Special Ability: Spore When you send in an employee into her room while she’s unhappy, the employee will get some of the bee’s spores on their face, which deals constant weak psychological damage for quite a long period of time. If the employee’s mental health is depleted this way, instead of falling into panic, a worker bee(0-00—000—0-2) will crawl out from the victim’s body and proceed to attack other employees, each killed employee will give rise to a new worker bee, making it very hard to control as worker bees are quite strong and can insta-kill clerks. The bee will also spread the same spores mentioned above around its chamber and infecting nearby employees when is left in a bad mood for some time, doing this pushes its mood rating to max.


Subject Name: T-04-53-W
Attack Type: Mental effects
Risk Level: WAW
Description: I’m sure that more than half of the community will agree this thing by far the most annoying and least manageable abnormality in the game, she is very likely to escape and its very dangerous, so first of all I wish you all good luck if you got this Abnormality. To manage this thing, you’ll only need to know what it dislikes and what has no effect on it.To begin with, Alurine escapes when its mood reaches zero or when its happy for a short period of time, she also drains energy when in a neutral, annoying, right? Here’s a guide to try manging it. It starts at neutral, but her mood increases by default, so first you need to wait until its mood reaches about 5 and a half yellow bars, then use violence to try knocking its mood rating back down to red, but not zero; To do that, using level one to two employees is strongly recommended, as any level higher will have a greater work success rate, which might deplete her mood entirely, leading to its escape. Fortunately, Alurine is less likely to deal psychological work damage when she’s neutral or happy, so your low level employees will survive. After that, you can just keep using nutrition/consensus/amusement to keep Alurine in a bad mood to produce energy and prevent her from escaping. (‘Neutral’ work will not increase or decrease an Abnormality’s mood)
Special Ability: Born of Earth, It returns to Earth When Alurine is in a good mood for some time, have her mood totally depleted or having a panicking employee in her room, her escape will be imminent.
On escape: She will teleport around the facility, although unable to walk, it can deal strong mental damage to everyone near it, once their mental health is totally depleted, Alurine can then insta-kill them by covering them with her leaves. If you can spam click the employee fast enough, then they will not be killed and will have their mental health replenished to max. Level 4 employees are strongly suggested in this battle, as level 3s just can’t stand that intense damage. However, if you’re skilled enough, you can just keep on saving your employees by clicking on them, removing the need to send them away to heal.

WAW(II)

Subject Name: O-05-31-W
Attack Type: Mental effects(It should be physical though)
Risk Level: WAW
Description: One of the worst Abnormalities to have, I do think its sole purpose is just to torture you and your employees. It doesn’t produce energy at a good mood, and activates its skill when you send in an employee when its in a bad mood, but if you ignore it while it is unhappy, it drains LOADS of energy, so this damn book is nothing but harm to your facility. The book will have its own preference of work, visible as a icon in its chamber, doing its prefered work will increase its mood, not doing so will decrease its mood while producing a batch of energy, I don’t recommend doing so as it being unhappy is very undesirable.
S
pcial Ability: As Written in the Scenario Curtains will appear at both sides of Screenwriter’s Note’s chamber and will start to advance to the centre whenever a not preferable work was performed or it is left in a bad mood. The ability will be triggered when you send in an employee at the point that the curtains are fully extended, which involves turning 5 AGENTS(not clerks) into actors in a scenario where one of them murders the other four, nothing except ending the day can interrupt this event, after the four victims are killed, you have the option to either kill or save the ‘murderer’, do the latter as he/she can still be of use in the next day.
On escape: it doesn’t escape.

Subject Name: F-02-58-W
Attack Type: Physical effects
Risk Level: WAW
Description: Like normal wolves, this thing is very deadly when he escapes. Saying that, his relatively easy to contain. Just talk or play with him using level 4 employees as he deals quite a lot of physical damage and level 3s might be killed. Big Bad Wolf drains energy at neutral, produces energy when happy and gives even more energy in a bad state. Generally, he can’t be put into a best mood status.
Special Ability: Memory of Scars Wolfy can randomly eat employees regardless of the action performed or guaranteed to eat an employee when they perform violence on him, an obvious black aura will appear beneath him when he’s about to eat en an employee, so cancel the current work if you see that. Employees eaten are not considered ‘dead’, but rather ‘out of control’; they can be released after successfully performing nutrition on him. The wolf will enter a ‘satisfied’ state after eating an employee, with a changed face expression, alleviated aggresion and increased energy production. He can be put into a best mood in this state. After quite a long time in this state, he will change into a distressed state, which increases its aggression and mood decrease rate. When his mood reached zero, he’ll breach. He’ll also escape after eating 3 employees or if Little Red Riding Hooded Mercenary is near his chamber. If the eaten employees got spit out by the wolf after a successful nutrition or suppression after his breakout, they’ll receive a special trait ‘Lamb’, which increases their max health and attack avoidance, but lowers their max mental health. If the breached wolf is not suppressed at the end of the day, the employees eaten by him will be gone in the next day.
On escape: It will run around the facility, doing four main things:
- A basic slash attack(Physical damage);
- A charged pounce attack(Strong physical damage);
- An area attack(Strong physical damage, really nuts);
- A howl(nullifies all damage intake for some time);
I recommend using level 4 – 5 agents with lots of health and ranged weapons(stun pistols will be the best) as this thing is fast and very damaging, its health is not that signicant though. You can also let Little Red deal with him, but they usually fight in the main rooms, which results in a lot of unnecessary deaths.


Subject Name: O-01-64-W
Attack Type: Physical effects
Risk Level: WAW
Description: First of all, please keep this king in this throne with all costs, cause she is definitely the King of Insta-Death. Bascially, she drains energy when her mood is good and produces energy when her mood is bad; then after some time in a bad mood she’ll escape. She’s not as tough as the other the WAWs, but you need to keep all your attention on her if you want your agents to live while she’s breaching. She starts with about few bars in the green, so I’ll usually hit her to the red with cleaning or consensus, wait for a bit, then hit her back into green with nutrition or amusement. This is a bit risky, but can be a viable way for it to produce energy. It deals moderate and have a low work success rate, so its better to use level 3s to bring down her mood and use level 4s to do the opposite.
Special Ablity: In the Name of Love and Greed When her mood is left in a bad mood for too long, her ability will be triggered, leading to her escape.
On escape: She will travel from one end of a room/corridor to the other end in one direction , instantly killing anyone that touches her mouth, rendering her extremely dangerous. I’ve seen high level employees got instantly killed the moment they got out from another chamber as the King of Greed is right there too. She’ll avoid passing through any doors and lifts, teleporting to a new area instead going to the adjacent area. Depending on her direction, agents will get insta-killed if they suppress her on the mouth side, while not getting any damage in the ‘butt’ side. As I mentioned above, her stats are comparitively weaker, so even level 1 agents can help out as long as they’re on the ‘butt’ side.
* I think that the AI cauculate a shortest travel path for agents, so if you see an agent walking straight towards the king’s mouth, just cancel their suppression or order a work for them in a chamber that is the opposite direction of their current path.

WAW(III)

Subject Name: O-04-66-W
Attack Type: Physical effects
Risk Level: WAW
Description: Another very annoying one to have. Basically, if one employee worked on the prince for about 3 times in day, they have a chance to activate his ability, so using different employees for him is more ideal. He likes amusement, consensus and violence; deals moderate psychological damage, so use at least level 3 agents for him.
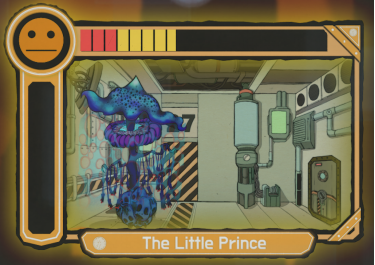
Special Ability: The Only Piece of Rosein the World When the Little Prince is left in a bad mood for some time, he will try to summon an employee to its room, the possesed employee will have a obvious spore cloud on them and can be freed by clicking on them several times, similar to the Red Shoes Possesion. If the possesed employee enters the prince’s room, his chamber will be covered in mist and the employee will be turned into a fungi-like monster after the mist clears, Little Prince-1, which will roam outside the corridor just outside the prince’s room, attacking employees(which doesn’t do any actual damage) and filling the corridor with fungi spores which will deal constant weak mental damage to the ones in the corridor. The ones that have their mental health depleted by this will be turned into a smaller fungi monster, Little Prince-2, which can also attack employees but cannot infect corridors. Unlike its bigger counterpart, this one moves around the facility and is independent to Little Prince-1, meaning it will still remain after Little Prince-1’s defeat, the same applies to the infected corridors, but they will be reverted next day. The Little Prince’s minons are pretty easy to kill, using level 3 agents will be okay.
On escape: It doesn’t escape.
ALEPH(I)

Subject Name: T-03-46-A
Attack Type: Enternal Death
Risk Level: ALEPH
Description: Its kind of a special ALEPH to get. To get it, you must allow the Plague Doctor to use his special ability Violet Colored Baptism on 12 different employees, which will lead to his breakout, upon entering a next day/new game, Plague Doctor will be transformed to WhiteNight. He’s easy to manage, just use level 4/5 employees(level 3s can be risky) to amuse or perform violence on it, then it’ll be fine. It does moderate to signaficant mental damage. Still, don’t EVER, EVER let it escape, cause this spells ‘doom’ for you.
Special Ability: Rapture It takes a long time for it to breach even if his mood is totally depleted, during this wait a special work ‘pray’ can be performed in three different stages, identifiable by the color of his chamber.
- Blue means he WILL heal the employee and will max out his mood;
- Purple means he will either heal or ‘erase’ the employee(Those who’re killed this way can’t be recovered even if you reload the game to last checkpoint);
- Red means the same as purple;
After the red stage, he will escape.
On escape: He will turn 11 of the employees into Apostles, which are indestructable human slaughtering machines, the twelfth employee will just remain as a normal, controllable employee with a plague doctor mask on(refering as ‘the Twelfth‘ below, allowing him/her to not be targeted by the apostles. At this point, you won’t be able to pause, fast foward and open the option menu by pressing ‘Esc’. About 2 of the Apostles will be in the same room as their leader, WhiteNIght, which will just be floating stationarily and do nothing in the main room of the department its kept in; the others will roam around the facility killing everyone. Trying to suppress WhiteNight is unwise as the Apostles guardng him can easily kill even max level agents. The two normal two ways of defeating WhiteNight are
- Using the Twelfth to supress WhiteNight as the Apostles ignore him(but this takes a long time);
- Performing special work ‘Confession’ on One sin and a Thousand Good Deeds with the Twelfth, this instantly defeat WhiteNight at the expense of the Twelfth employee;
Either way, the Apostles will kill themselves after WhiteNight’s defeat.


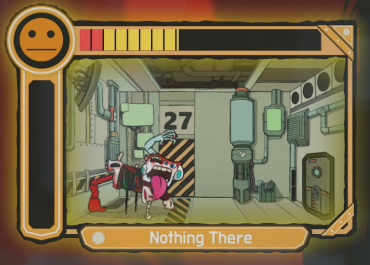
Subject Name: O-06-20-A
Attack Type: Physical effects
Risk Level: ALEPH
Description, Without a doubt, this…thing is definately the strongest Abnormality when it comes to physical damage, so try your best keep its door shut. It loves consensus and likes amusement/nutrition, it does some crazy compound damages, so use at least 4 agents, max agents will be more ideal though.
Special Ability: Take Off Your Clothes This happens when an employee panics or gets killed while working on Nothing There, which it will kill them and ‘wear’ their skin i.e. looks the same as the employee, its mood will also be raised a bit by doing this. This form will last until the next employee enters the room, in which it will return to its original form, giving the employee strong psychological damage. In addition to this, when you send in an employee while its in a bad mood, it will instantly kill them and wear their skin(Again?), your whole screen will then be covered with organ like materials, blocking your view while nothing there in employee form tries to hide within the crowd of employees. Moments later, you will enter a disposal mode of about 10 seconds(You can’t pause in this state), where you’ll need to identify the employee that is used by Nothing There and kill him/her with a bullet(you’ve only got one shot). Should you succeed in doing so(which is really hard), Nothing There will return to its room; Should the timer runs out or you missed it, Nothing There will appear in its monster form and start his rampage. *It will also escape if left in its bad mood for too long, so don’t ignore it.
On escape: It’ll run around the facility dealing some strong physical damage, allowing it to insta-kill level 1 and 2 employees if no shields or physical upgrades are researched. Saying that, this stage is your best shot at suppressing it, as after a minute or so in that form it regenerates all its health and hide itself in a cocoon, which has even more health than the monster itself. i’ve tried to pound it with five to six high level employees with some of the Hammer of Light minions, but that still didn’t kill it in time before it transforms to its final form — a humanoid monster which has even MORE health and insane damage(thats an ALEPH for you…). It has penetrating ranged attacks and melee attacks that can hit multiple targets. At this point, you should just leave it alone and concentrate on producing energy with other abnormalties in order to get through the day. However if you’ve got the Hammer, Little Red AND the Child of Galaxy, then you might stand a chance, send in the Little Red and the Hammer Bros first (Beware that friendly fire is on for them). After they’re killed, which they will, send in your strongest employees(best if stun pistols are equipped), including the one with the Child’s pebble(which allows him/her to have constant health/mental regeneration) to attack it at once, then you have a chance of bringing it down. All in all, good luck with this guy.
ALEPH(II)

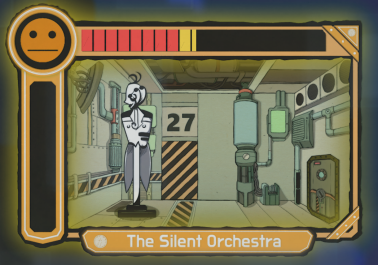
Subject Name: T-01-55-A
Attack Type: Mental effects
Risk Level: ALEPH
Description: One of the new ALEPHs being added into game, although being considered as ‘The Weakest ALEPH’ in the game currently, he is still pretty darn strong. Basically, he escapes when left in a good or bad mood for some time, but is really easy to manage. As his mood start at neutral, which is only the stage where he actually produce (a lot of)energy, so just use level 4 employees to beat him again, again and again as he deals quite a lot of psychological damage.
Special Ability: Silent Symphony No. 19 The ability triggers when he is in a good or bad mood for some time, at which curtains will start to emerge from the sides of his chamber. When those curtains are fully closed, another set of curtains will cover YOUR screen. At the moment they open, the camera will already be panned to the breached Silent Orchestra at the main room of his department.
On escape: He will start to conduct the Silent Symphony No. 19 which include five stages:
- Movement one: Gives constant psychological damage to everyone in the room.
- Movement 2: HP fully regenerated; Immune to melee attacks; Constant psychological damage are also given to employess in the adjacent corridors to the main room.
- Movement 3: Immune to ranged attacks but vunerable to melee attacks; Cause panicked employees(Mainly clerks and low level employees) to attack the sane employees with strong physical damage.
- Movement 4: Vulnerable to all attacks; Constant psychological damage extend to the whole department.
- Finale: Any employee having thier mental health less than half of their max mental health will have their heads exploded and die.(obviously…)
The Silent Orchestra will then return to his room. Regardless of being subdued or returning to his chamber voluntarily(when he finishes his play), he will reset the energy gathered back to ZERO.
This Guy although is not crazy in terms of health and damage, he can still kill agents fairly easy with his constant psychological damage, so it might wise to just leave him alone and send away your employees if they’re mostly low leveled or your energy gathering is almost done.