
Overview
This is a guide showing the locations to some of the unique weapons in FNV
Introduction
Thanks for reading this guide, comment and rate ect ect…
This only covers the LOCATIONS to them, not the stats.
All-American
The All-American is located in Vault 34’s armory, on an oveturned table.
The armory is locked, so you have to head to the Overseer’s Office to unlock it, however, the Overseer’s Office is locked, too so keep exploring untill you find flooded stairs.
Swim into the radioactive water and loot a dead Vault Technician for a password, soon you will find another flooded stairway, do the same as you did last time and loot that dead ghoulified Vault Tech.
Go around the vault and find a terminal, this terminal will open the Overseer’s Office.
Once in the Overseer’s Office, prepare for a fight as you enter a propped-up door and load some AP Rounds into a weapon of your choosing and pummel the overseer untill he is dead, then loot his password.
The overseer’s terminal will open the Armory Door, allowing you to advance towards this semi-automatic gem, and you also get an armory load of weapons/armor, including a Riot Shotgun!
Also just a quick note – Bring lots of Rad-X, Rad-Away, Stimpaks and ammo, the vault is radioactive and there are lots of ghouls roaming the place.
CZ-57 Avenger
The CZ-57 Avenger is located in The Devil’s Throat, east of Ranger Station Bravo.
Bring some Rad-X and a good weapon, you’ll be fighting Centuars and their evolved counterparts.
The weapon is located next to a dead prospector inside the blue truck, making this one of the easiest unique weapons to get.
Q-35 Matter Modulator
The matter modulator can be found inside the REPCONN HQ after doing another collect-the-keycard-and-get-the-weapon stuff we had to do to get the All-American, this time with much less shooting (that’s if you don’t kill the robots and get the correct I.D ‘s).
Or you can hack a very hard computer terminal or pick a very hard lock to get this gun. Either way works to get this powerful energy-based rifle
Gobi Scout Campaign Rifle
This rifle if located in the Sniper’s Nest, found in a very hard footlocker, west of Cottonwood Cove.
Don’t take pot-shots on the Legion at cottonwood, though, you’re outside the cottonwood cove map cell, causing the legion not to render, and thus, unsnipable
Lucky
You will find lucky in Primm’s Bison Steve Hotel, first floor in the gift shop’s floor safe, which is an Very Hard lock (100 lockpick skill required)
NOTE: I call this revolver Critz, because it has a high critical hit chance
Mercy
You may want to stack up on medical supplies, because for this overpowered weapon, you need to head to Dead Wind Cavern, or the home of the Legendary Deathclaw.
I suggest using a Fat Man or some high-damage weapon and hotkey-ing stimpaks to find this weapon
Why is the weapon guarded by some of the most deadliest creatures in the wasteland? Because it is the most overpowered weapon in FNV.
In the cave, you will have to search for a dead BoS paladin, once you find him, you should find the weapon right next to him
Note: If you’re playing on XBOX, the gun can dissapear from the game.
Annabelle
Found on Black Mountain, this is by far, the easiest unique to find, as you just have to kill the Nightkin Sniper, who is on the radio tower, and loot his corpse.
Oh, Baby!
I consider this weapon the best melee weapon in the game.
This world-of-pain super sledge is found in the Charlstone Cave, next to a dead nightkin deep within the cave, on the west side.
Dinner Bell
This unique hunting shotgun is carried by Red Lucy, to get it, you must jump through every hoop she sets for you, in the end, she gives you the shotgun and gets your character laid.
The quest I am talking about is “Bleed Me Dry”
Do what the quest does and you’ll be getting this shotgun for your collection.
Maria
This is probably the easiest unique… if you have the Mister Sandman
Warning, spoilers.
Later on in the story, Benny invites you into his penthouse.
Wait until he gets to bed and then slice his throat.
Then you just loot him
Easy, eh?
Euclid’s C Finder
We warned, this weapon is useless unless you power the ‘Archimedes II’ via the “that lucky old sun” quest, and it will be much less awesome.
You can get this gun off a kid in freeside, if you have 45 barter, you can buy it for 20 caps, or, if you don’t have a barter skill, you can buy it for 1000 caps, or, much more easily, pickpocket it from him.
What does this gun do?
Orbital laser that destroys everything.
‘Nuff said.
La Lounge Carabine
You get this rifle off Coproral Sterling located at Camp McCarran, but killing him would make the NCR pissed at you. Really. They’ll kill you on sight. I mean, killing NCR may be fun, but if you’re going the NCR way in the campaign killing him is not advised
YCS/186 and the Alien Blaster
You find these guns at a mercenary camp/alien landing site east of Brooks Tumbleweed Ranch.
You can’t get both of these guns in one playthrough, as the Alien Blaster is obtained with the Wild Wasteland trait, YCS/186 is obtained without it
So, what’s more powerful?
Neither!
They are equally OP!
Alien Blaster has 1 shot, so does the YCS
Alien blaster kills most things in 1 hit, so does the YCS
HONEST HEARTS DLC SECTION!
This has ALL honest heart unique weapons.
Because I’m nice.
She’s Embrace
Gotten from White Bird after “Rite of Passage” and bad trip.
A Light Shining in Darkness, Salt Upon Wound’s Power Fist
Found in a storage locker at the end of the DLC, along with the armor of said characters who own the guns.
Survivalist’s Rifle
Found at the Red Gate in the Survivalist’s Duffle Bag, beside his unlootable remains.
Compliance Regulator
Located in Fallen Rock Cave, at the makeshift outpost within.
The conclusion of this DLC Section
Big Boomer
Well, this is an easy unique.
You find this shotgun carried by Old Lady Gibson, or as I know her, that scrapyard owner.
Not much to type on how to obtain it, but I’ll make a step-by-step instruction.
Step One Find the Old Gibson Scrapyard, north of Novac (just keep following the road north).
Step Two Once there, introduce yourself, after all, you’re a dapper gentleman.
Step Four Pick a weapon of your choice.
Step Five Draw your weapon.
Step Six With that weapon you have chosen, enter VATS and select her head.
Step Seven Press accept.
Step Eight Loot her corpse, do not take clothes, after all, you have respect for the dead.
Step Nine Profit.
Also, killing Old Lady Gibson fails the ED-E My Love quest.
This Machine Part One
The quest for this is unmarked, and you need to be a master of patience to get through it.
For this quest though, I will be just posting paragraphs from the wiki.
For this part of the quest, info on This Machine and Siding with Lt. Boyd.
This Machine is a unique-unique, for one, there’s no non-unique variant, unless you download GRA.
For second, this gun is really hard to get going Contreras’s way, doing errands and fetch quests..
Siding with Lt. Boyd
You can start this quest by either speaking to Lt. Boyd in the Camp McCarran terminal building or by proceeding directly to Sgt. Contreras’s computer (marked “NCR Supply Database”) in the Camp McCarran supply shack and hacking it (Science 50 required). The Supply Shack is located in the back of the terminal building via the Camp McCarran concourse; enter the terminal and go up the escalators then down the hallway to the concourse. When in the Concourse bear left down a ramp, and bear right to the door of the supply shack. Contreras’s computer will be on the upper level of the supply shack.
Downloading the weapons manifest and returning it to Lt. Boyd will complete the quest. She will reward you with This Machine and you will receive NCR fame. By turning in Sgt. Contreras you will drastically decrease his weapon, ammunition, and apparel reservoirs and he may be found in the far right un-openable holding cell. However, he can still be interacted with if you aim at him in V.A.T.S. first without attacking. Since he is one of the best weapon merchants in the game, and since the quest reward (the unique battle rifle, This Machine) is awarded to you in two of the three possible conclusions (siding with Keller will not earn you This Machine), you should think carefully before siding with Lt. Boyd. Note that if you have killed Isaac at the Gun Runners either intentionally or accidentally, you will have no choice but to side with Lt. Boyd.
You can also complete this quest if you have sided with Contreras or even Keller. If you downloaded Contreras’s manifest, or ran his errands and noticed that his “medical supplies” could be used to make chems (Medicine 25 with Contreras or Blake), then you can bring either of these to Lt. Boyd at any time to complete the quest and receive This Machine. Sgt. Contreras will wind up in a prison cell as a result, and he will still act as a merchant though he won’t restock like other merchants.
Next Part
This Machine Part Two
Continuing from Part One.
Siding with Sgt. Contreras
Note: Players may find that there is no dialogue option to initiate this quest when speaking with Contreras, and that the only two dialogue options are to either buy his merchandise or say goodbye. Though the reason for this is unconfirmed, it is believed that completing previous quests with Lieutenant Carrie Boyd or Colonel Hsu may bar players from completing this quest through Sgt. Contreras. The quest can still be completed by downloading the weapons manifest, as detailed in Siding with Lt. Boyd.
If you decide to side with Contreras, start this unmarked quest by finding him in the Camp McCarran supply shack. The supply shack is at the back of the terminal building via the Camp McCarran concourse. Enter the terminal, go up the escalators, down the hallway to the concourse. When in the concourse bear left to a down ramp, and bear right to the door of the supply shack.
Speak to Sgt. Contreras about his supply which will lead to a Speech/Barter check of 50. You also have the option to pay 50 caps. Contreras will then ask you to speak to Isaac outside of Gun Runners.
Isaac should be located near or at the reloading bench to the right of the Vendortron at the Gun Runners storefront (If Isaac isn’t there, he may be in his house directly to the east of Gun Runners, behind the Hostetler home. If he isn’t there either, check the Bugs section for this quest). Speak to Isaac and you’ll either have to pass a Speech/Barter check of 80 or you can give him 100 pieces of junk metal (tin cans, hot plates, metal pots, pots, pans and scrap metal). If you must scavenge the metal pieces, the Aerotech Office Park (suite 200) has over 100 tin cans (bent and regular). Boulder Beach campground and Broc flower cave each have around 50 tin cans (bent and regular combined); the latter area’s tin cans can be found in a corner of the makeshift lab where the Ratslayer is found. REPCONN test site has around 30 tin cans and 40 scrap metal. Once you’ve gathered enough, return to Isaac.
Contreras’ next errand will be to obtain medical supplies from Blake in the Crimson Caravan Company. Blake can be found around the center of the camp, next to the shelves with items on them, during daylight hours. With 25 Science or Medical skill you can observe for Contreras that the supplies he’s acquiring could be used to make chems, or you can point the same thing out to Blake; however, doing so to either man will have no effect on the quest whatsoever. Once you have the supplies, return to Contreras. At this point you can tell him about the chems and threaten (no Karma loss) to tell the NCR and he will give you 100 caps to keep your mouth shut, after you give him the medical supplies he’ll tell you he needs a “couple days” before he has another mission for you. Waiting for 26 hours is sufficient to trigger the next quest.
Contreras will then ask you to deliver the medical supplies to a man named Price in Miguel’s Pawn Shop. He’ll also give you a pass phrase: “I’m looking for some betting advice” to speak to Price, and he’ll tell you what pass phrase Price should say to you in return. When you enter the pawn shop though, Price is nowhere to be found; instead, speak the pass phrase to Keller. Keller will not know the correct response. From here, you have a few options:
End the conversation immediately with “Um, well… Nevermind.” Return to Contreras to inform him of Price’s absence/Keller’s ignorance of the pass phrase. Regardless of which you tell him, Contreras will tell you to kill Keller and he’ll take back the medical supplies (which you wouldn’t otherwise be able to remove from your inventory as they’re marked as a quest item). When you return to Keller, you can enter into dialogue, but your only option is to say “Goodbye.” You must kill him to complete the quest.
Inform Keller he said the wrong response. With a Perception AND an Intelligence score of 7 (which always fails), Keller informs you that Price is in custody and attempts to place you under arrest for being involved.
With a hidden speech check of 70 you can bluff your way out of the dialogue. When you expose him to Contreras afterwards, he will ask you to kill Keller.
Give Keller the package. You can do this immediately, or after attempting the INT/PER check above. Once Keller has the package, he exposes himself as an undercover NCR ranger attempting to shut down Contreras’ operation and threatens to place you under arrest. If you want access to Contreras’ inventory or This Machine, your only option now is to kill Keller. You can do this at virtually any point in the conversation, as there is always a <Draw Weapon> option from this point on.
Passing a Speech check of 60 will convince Keller you are innocent and he will let you go. With an additional Speech check of 80 or a Barter of 70 (and 250 caps), you can convince Keller to work with Contreras to take down the drug ring.However, this option will not award you with This Machine or access to Contreras’ extra inventory.
Kill Keller before returning to Contreras. This saves a trip back to Contreras. Choosing this option will not remove the medical supplies from your inventory and Contreras’ dialogue will say that you worked things out with Keller instead of killing him.
If you return to Contreras before killing Keller, you can get 150 extra caps upfront with a Barter
If you don’t make a deal with Keller, you will be forced to kill him to finish the quest in Contreras’ favor. Killing him will result in NCR infamy. To avoid this:
Attack Keller then leave the shop. Lure him somewhere where there will be no witnesses to his death (the pile of vehicles outside and to the left of the shop is ideal for this). Alternatively, you won’t receive infamy if your companions kill Keller.
Sneak while behind him and reverse pick-pocket a grenade or kill him quickly with a silenced weapon so that Miguel doesn’t notice.
Return to Contreras after killing or making a deal with Keller.
Settling things in Contreras’ favor, he’ll award you with This Machine and the next time his inventory restocks he’ll have a wider selection of items.
I don’t claim any of this work as mine. All information here belongs to the respective owners.
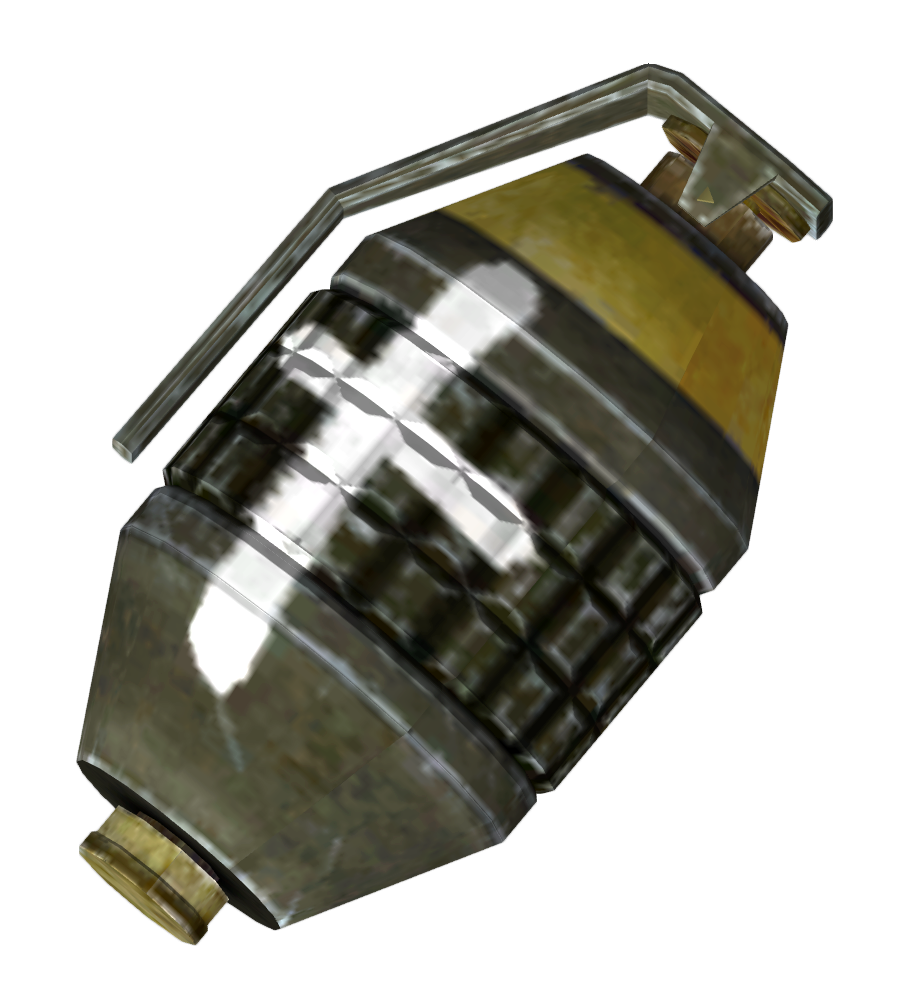
The Holy Hand Grenade of Antioch
THE WILD WASTELAND TRAIT MUST BE TAKEN IN ORDER FOR THESE TO APPEAR
Well, the Fallout series were weird, involving with aliens, but a cross on the side of a grenade makes it nuclear? Well, then.
Anyway, you find three of these grenades at Camp Searchlight, another radioactive place, like Vault 34, located here:
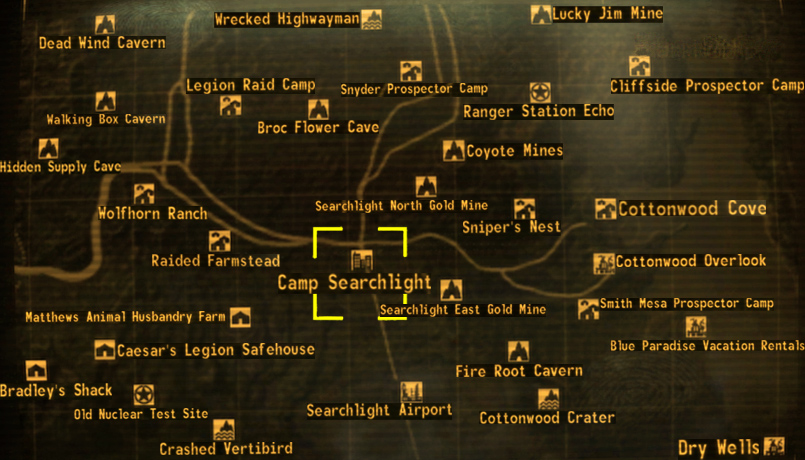
Unlike other places, there is a small group of NCR Troopers warning people of radiation in the area. Unlike a sane person, you will run into Camp Searchlight, and fire wildly. As always, follow the guidelines when going into a radioactive area, pop some Rad-X, run in, pop some RadAway when you’ve finished/about to die of radiation.
Once you are in the church, you’ll either find Logan, a scavenger, or some Geckos.
If you find Logan, that’s the wrong church basement, so run to the opposite end of the town and find another church.
If you find Geckos, then you’re in the right basement! Dispatch the geckos and then loot the Hand Grenades, or the Mini-Nuke in your Pocket, as it is simply a nuclear explosion. Do not use with splash-damage! Blast radius with splash damage is absurd!
Here’s an image of what they look like.
Pew Pew
Protip : The gun name is the sound it makes
To business, you want to know where to find it, and I know where to find it.
So, you’ll find it at the Sunset Sarsparilla headquarters around west of South Vegas, but make sure you find 50 Sunset Sarsparilla Star Bottlecaps, otherwise you’re going to have to run around the wasteland, looting every structure and drinking all the sarsparilla you can find to get 50 of the damn things.
Once there, give them to the broken-down animatronic in the corner of the lobby. Robots might try to attack you, but they’re probably protectrons and won’t stand up against the firepower you would’ve packed by now. Once you talk the Festus the Animatronic and he’s decreed that you are allowed to enter the Prize Vault, you must fight your way through the bottling facility, following the eternal guide of the Quest Marker, to the entrance to the Prize Vault. When you get there, it’s a simple matter of prying the gun from the dead guy in the corner of the room, and looting all of the deputy stars to sell them.
Then you can do what you want with it! Sell it, break it, launch it off into space, call down an orbital strike upon it, or, you know, shoot someone with it.
Conclusion
I’ll be adding more soon (hopefully)