Overview
Make your own command panel with all commands that you need without binding them to keys!May be useful for configuring listen servers and activating scripts.
Introduction

The command panel (or command menu, I’ll be referring to it as panel) can be used to run some commands quickly and in more convenient way than binds (though binds can be accessed instantly).
This guide assumes that you are familiar with basic scripting in GoldSource (or at least Source) games.
Creating the panel


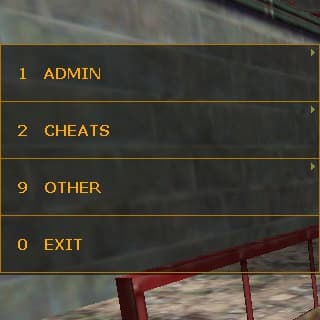
Syntax
To have your commands in the panel, you have to edit commandmenu.txt in a proper way.
Here’s some information about the syntax from TFC menu:
Originally posted by commandmenu.txt of Team Fortress Classic:// Command Menu definition // // Basic Format: // “<Bound Key>” “<Button Text>” “<Command sent to server>” // // Or you can check for a specific class: // <Class> “<BoundKey>” “<Button Text>” “<Command sent to server>” // Where <Class> is one of: SCOUT, SNIPER, SOLDIER, DEMOMAN, MEDIC, HWGUY, PYRO, SPY, ENGINEER // // Or you can check for a specific map: // MAP <MapName> “<BoundKey>” “<Button Text>” “<Command sent to server>” // Where <MapName> is the name of the map, without the “.bsp”. // // Or you can check for a specific team: // TEAM1 “<BoundKey>” “<Button Text>” “<Command sent to server>” // TEAM2 “<BoundKey>” “<Button Text>” “<Command sent to server>” // TEAM3, TEAM4 work as well // // Buttons can also open up submenus, as follows: // { // “Some More Options”, // { // … // } // } // // Class can be any of the following: // SCOUT, SNIPER, SOLDER, DEMOMAN, MEDIC, HWGUY, PYRO, SPY, ENGINEER // Buttons prepended with a class name will only be seen if the player // is that class. // // Buttons preceded with “CUSTOM” are handled in special ways. They can only be moved // around or deleted. // // // Limitations: // Maximum of 40 menus. // Maximum of 100 buttons per menu.
So basically the panel consists of buttons:

…and submenus:

Some buttons and submenus can be specified to a map so they only show up when you are playing on that map:


To add a command that requires user input, use messagemode command_name. For example, messagemode impulse will open a chat box, but “say” will be replaced with “impulse”, and if you type a number the game will execute impulse <number>

It seems that positions of brackets don’t matter. You can code the submenus the other way:
To exit the panel you can add a button with slot10 command at the end of the file:
Some uses
- Administration: changing maps (messagemode map/changelevel), executing RCon commands (messagemode rcon/rcon_address/rcon_port/rcon_password)
- Quick chat responses without the need to remember what each key sends
- Executing custom configs
- Recording (messagemode record/playdemo and stop)
- Spawning entities