
Overview
Complete with icons for all items that can be picked up over the course of the game for both Leon & Claire (Work in Progress) Also a mini guide on herb and ammo crafting
Herb & Ammo
Herbs Combined and what they do
1 Green – Standard Healing Effect
2 Green – 2x Healing Effect of 1 Green Herb
3 Green – 3x Healing Effect of 1 Green Herb
1 Blue (Cures Poison)
1 Red – (Does nothing on its own)
1 Green + 1 Blue – Standard Healing Effect (Cures Poison)
2 Green + 1 Blue – 2x Healing Effect (Cures Poison)
1 Green + 1 Red – 3x Healing Effect
1 Green + 1 Red + 1 Blue – 3x Healing Effect (Cures Poison)
Ammo Combined and what It makes
1 Gunpowder + 1 Gunpowder – Handgun Ammo
1 Gunpowder + 1 High-Grade Gunpowder (YELLOW) – Shotgun Ammo
1 High-Grade Gunpowder + 1 High-Grade Gunpowder (YELLOW) – MAG Ammo


All Pouch Locations
Pouch #1:
1F West Office – Inside the safe in the small office. Input the code 9-15-7 to unlock it.

Pouch #2:
3F West Storage Room / 1F Main Hall – On a desk in the back of the area. Next to a note. Alternatively, in B-Scenario, appears on the reception desk in the Main Hall.
Pouch #3:
Underground Facility, Operator’s Room – In the locker, next to the typewriter.
Pouch #4:
1F Safety Deposit Room – Locate the two Portable Safes and find the parts to repair the terminal. Input 2 and 3.
Pouch #5:
Sewers Workroom Lift – Use the T-Bar to raise the shutter, then ride the lift up. The pouch is located in the room above.
Pouch #6:
Laboratory Nap Room – Restore power to the Nap Room, and you’ll find the Pouch in the bunk to the back-right. This same bunk also contains a Mr. Raccoon.
Where to find the Roll Film: “Hiding Place”
In the Sewers, after you get the T-Bar Valve Handle, open the door in the Lower Waterway. Take the elevator up in the Workroom Lift room, and you’ll find yourself Workroom.
The Roll Film: “Hiding Place” item is on a table in front of you when you walk in.

Back to the Main Hall
As you explore the Sewers, you’ll find the Sewers Key hanging on a wall in the Lower Waterway. Use that to unlock the door to the Workers’ Break Room in the hallway outside of the Workroom.
Push the cabinet on the wall to reveal a hidden passage. Take that path to its conclusion, and you’ll find yourself in the Hidden Room — the place where you left the Police Station. Use the T-Bar Valve Handle to open the door back into the Main Hall.
Roll Film: “Hiding Place” (Key Item) locations
Now that you’re back in the Police station, there are three places you need to go. Darkroom


Press Room
Make your way back to the Press Room (to the east of the Main Hall). Open the drawer in in a table to the let of the podium with the microphones. As Claire, you’ll get Needle Cartridges x7. As Leon, you’ll get Fuel for your Flamethrower.

All Notes, File Locations

Leon A-Story 40/58 Files
[File #1] [LEON EXCLUSIVE] Orientation Letter
Automatically in inventory from the start of the game. You can read it after exiting the shopping area. Open the inventory and read it
[File #2] Officer’s Notebook
Police Station 1F, Watchman’s Room: Automatic Story Pickup in Police Station, unmissable when you free the officer.
[File #3] Record of Events
Police Station 1F, Operations Room: North-West of the station.
[File #4] [LEON EXCLUSIVE] Uses of Gunpowder
Police Station 1F, West Office: On Desk. Please note that Claire also has a file called “Uses of Gunpowder” in the same place, but hers is counted as a different Collectible. This is because she has different weapons and can craft different ammo so the content of the file is also different. Don’t worry, the Claire Exclusive one will be pointed out again later when we gather her Collectibles on the 2nd playthrough. Just know that there are two separate “Uses of Gunpowder” files in the game (one per character). Keep playing as Leon and we’ll grab Claire’s on the second playthrough.
[File #5] Operation Report
Police Station 1F, West Office: On side of long desk
[File #6] Rookie’s First Assignment
Police Station 1F, West Office: At end of the long desk
[File #7] Storage Locker Terminal Memo
Police Station 1F, Safety Deposit Room: Next to the code terminal.
[File #8] Medical Benefits or Herbs
Police Station 1F, Dark Room: On box next to typewriter save point.
[File #9] Portable Safe Instructions
Police Station 2F, Shower Room: in the room with the steam where you’re supposed to place a valve.
[File #10] To any survivors
Police Station 3F: At the dead end of a hallway, before entering West Storage Room.
[File #11] Some Guy’s Scribblings
Police Station 3F, West Storage Room: On the same table as the inventory upgrade.
[File #12] Guide Pamphlet
Police Station 2F, Waiting Room: On the counter.
[File #13] Art Article “The Red Stone”
Police Station 2F, Art Room: On a chair in the room with the statue.
[File #14] Internal Memo
Police Station 2F, S.T.A.R.S. Office: Behind a desk, just next to the Battery Key Item.
[File #15] [LEON EXCLUSIVE] Memo “Jail Power Panel”
Police Station B1, Jail: Next to Ben’s Cell. It’s at the end of the Jail.
[File #16] Autopsy Record 53477
Police Station B1, Morgue: Inside Morgue (after going through Kennel).
[File #17] Equipment Disposal Notice
Police Station B1, Firing Range: Inside the Firing Range on table.
[File #18] A Message From Mr. Raccoon
Police Station B1, Firing Range: On the counter.
[File #19] Confiscation Report
Police Station 1F, Observation Room: On a shelf.
[File #20] Letter to S.T.A.R.S. Members
Police Station 2F, S.T.A.R.S. Office: Armory in STARS Room. To open it you need the S.T.A.R.S. Badge (which was our last Key Item). Examine the badge in your inventory to find a button on its back that turns it into a USB Dongle. Then put the Dongle in the PC of STARS Office. Now interact with the Screen to unlock the Armory. A weapon is also inside.
[File #21] Repair Plan
Police Station 3F, Clock Tower: When you enter the clock tower it’s in front of you. You get here through the library by using the Tool (previous collectible) on the Jack and putting 3 bookshelves together so that you can walk over them on the third floor.
[File #22] [LEON EXCLUSIVE] Ben’s Memo
Police Station B1, Jail, Ben’s Cell: Use the two Electronic Parts to fix the Electronic Door Panel in the Jail. Fix the circuit to open the door to Ben’s Cell, where this file is on a table.
[File #23] [LEON EXCLUSIVE] Interview Transcript
Police Station B1, Jail, Ben’s Cell: Automatically from Ben’s Corpse
[[u]b][File #24][/u] [LEON EXCLUSIVE][/b] Sept. Inspection (Week 1)
Ada’s Sequence: While playing as Ada, after hacking twice, in the room where you encounter first Zombie with Ada.
[File #25] [LEON EXCLUSIVE] Sept. Inspection (Week 2)
Ada’s Sequence, Incinerator Room: While playing as Ada, in the Incinerator Room where you need to pull a lever up the stairs.
[File #26] Copy of Emails to Umbrella HQ
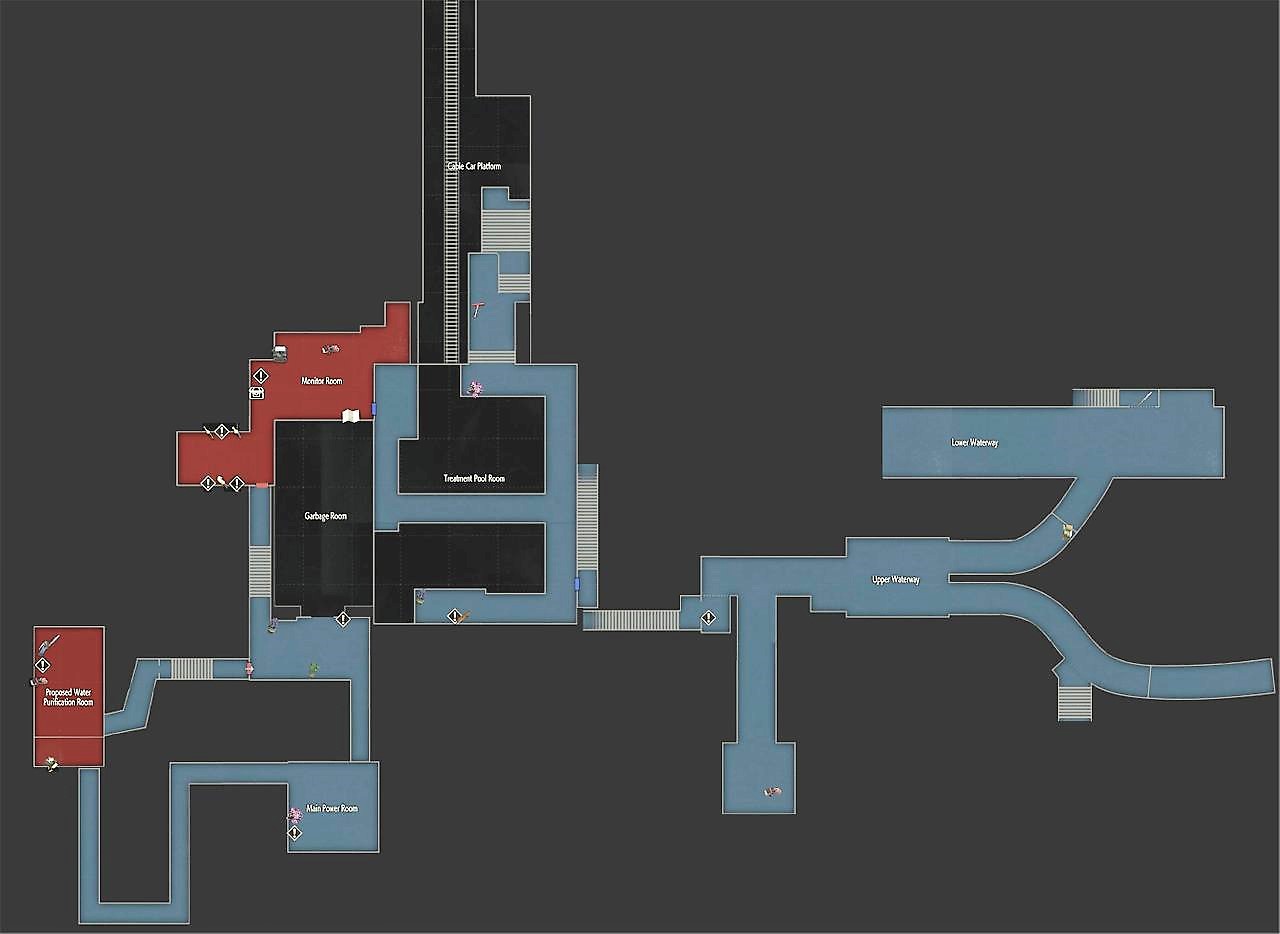
Sewers (Upper), Control Room: On table in the Control Room.
[File #27] Sewers Company Pamphlet
Sewers (Middle), Monitor Room: This is a room with a typewriter save in it.
[File #28] Unlocking the U-Area Door
Sewers (Middle), Monitor Room: This is a room with a typewriter save in it.
[File #29] Delivery Receipt
Sewers (Middle), Cable Car Platform: In the north of the Treatment Pool Room, head down the stairs to see this on a box.
[File #30] Jazz Festival Flyer
Sewers (Upper), Workers’ Break Room: Use the Sewers Key (which we picked up earlier) to open the door.
[File #31] Nap Room Log
Laboratory, Reception: In the reception hall of the Laboratory. You come to the Laboratory (new area) after using the cable car in the Sewers (cutscene).
[File #32] ID Wristband
Laboratory, Reception: In the room with typewriter and item box (save point), on the whiteboard.
[File #33] Special Forces Recording
Laboratory, North Area: After passing through the door south of the Reception (next to typewriter room), it’s on a corpse. Where you use your ID to open the bridge.
[File #34] Herbicide Synthesis
Laboratory, Drug Testing Lab: On table.
[File #35] Somebody’s Note
Laboratory B1, Room south of Lobby: After going through the underground section you’ll get to go upstairs into what looks like a storage room with the lights turned on (connects to Lobby via door). There’s a small note on a chair.
[File #36] Wayne Li’s Inbox
Laboratory B2, Low-Temp Testing Lab: On the PC of the Lab. To open the door, examine the Signal Modulator and to put it on the MURF frequency, then line up the graph and insert it in the Circuit Box of the Lounge.
[File #37] Byron Cartwrights Inbox
Laboratory B1, Presentation Room: After getting the Senior Staff Wristband you can access the PC in the Presentation Room.
[File #38] Wayne Li’s Note
Laboratory B1, Nap Room: Same as above.
[File #39] William Birkin’s Inbox
Laboratory B1, Biotesting Lab: After turning on the power in Biotesting Lab (via Signal Modulator), you can view this on the PC.
[File #40] Research Diary
Laboratory B1, P-4 Level Testing Lab: Interact with PC to read this.
Claire’s A-Story includes:12/58 Files
[File #41] [CLAIRE EXCLUSIVE] Letter from Best Friend
Automatically in inventory from start of Claire’s campaign. You can read it after exiting the shopping area, open inventory check it and read it.
[File #42] [CLAIRE EXCLUSIVE[/b]]Uses of Gunpowder
Police Station 1F, West Office: It’s in the exact same place as Leon’s “Uses of Gunpowder”. The document is called the same as Leon’s but has different contents (in Claire’s case it explains how to craft Acid Rounds and Submachine Gun because she has different weapons). This counts as a different file from Leon’s even though it has the identical name, so be sure to pick it up.
[File #43] [CLAIRE EXCLUSIVE] Raccoon Monthly, June Issue
Police Station B1, Elevator Controls Room: After interacting with the card reader in the garage, the door to this room will be open (where the cop came from).
All Notes, File Locations Part 2
[File #44] [CLAIRE EXCLUSIVE] Copy of Emails to Chief Irons
Police Station 2F, Chief’s Office: You come to this office after using the Diamond Key on the Elevator Controls Room and restoring power to the elevator.
[File #45] [CLAIRE EXCLUSIVE] Taxidermy Log
Police Station 2F, Chief’s Office: In the middle of the room.
[File #46] [CLAIRE EXCLUSIVE] Repair Shop Letter
Police Station 2F, Private Collection Room: On a shelf.
[File #47] [CLAIRE EXCLUSIVE] Sally’s Diary
Sherry’s Sequence: While playing as Sherry, in the hallway outside bedroom (immediately after exiting bedroom where you start with Sherry).
[File #48] [CLAIRE EXCLUSIVE] Tom’s Diary
Sherry’s Sequence, Front Hall: While playing as Sherry, in the big front hall after going downstairs.
[File #49] [CLAIRE EXCLUSIVE] _____’s Diary
Sherry’s Sequence, Director’s Room: Next to the typewriter (save point).
[File #50] [CLAIRE EXCLUSIVE] Letter from the Director
Orphanage 2F, Bathroom: Inside the Bathroom in which Irons washed his face during Sherry gameplay sequence (you enter through the Nursery).
[File #51] [CLAIRE EXCLUSIVE] Report About “G”
Sewers, Office: After finding Sherry in the Orphanage, Mr. X will hunt after you. Then you land in the room called “Office” on the map, which is one small save room with a typewriter and item box in it. The note is on the whiteboard.
[File #52] [CLAIRE EXCLUSIVE] IMPORTANT NEST-Wide Alert
Laboratory, Security Room: On the PC where you put Sherry in bed
Leon’s B-Story includes:4/58 Files
[File #53] Scrap of Paper
Police Station 1F, Watchman’s Room: On table in Watchman’s room.
[File #54] Notebook with Missing Page
Police Station 1F, Main Hall: Where Marvin (cop) used to sit in A-Scenario Story.
[File #55] [LEON B EXCLUSIVE] Claire’s Memo
Police Station 2F, S.T.A.R.S. Office: In the STARS Office. This is only available in Leon’s B-Scenario Story. When you play Claire’s B-Scenario there will be Leon’s Memo in the same place (which we’ll collect on the next playthrough).
[File #56] [LEON B EXCLUSIVE] Claire’s Note
Sewers (Middle), Treatment Pool Room: Next to the Cable Car, on the same table where you pick up the “T-Bar Valve Handle” Key Item. In Claire’s B-Scenario there will be Leon’s Note in the same place (which we’ll collect on the next playthrough).
Claire’s B-Story includes:2/58 Files
[File #57] [CLAIRE B EXCLUSIVE] Leon’s Memo
Police Station 2F, S.T.A.R.S. Office: In the STARS Office. This is only available in Claire’s B-Scenario Story. Same place as Claire’s Memo in Leon B-Scenario.
[File #58 – Final] [CLAIRE B EXCLUSIVE] Leon’s Note
Sewers (Middle), Treatment Pool Room: Next to the Cable Car, on the same table where you pick up the “T-Bar Valve Handle” Key Item. Same place as Claire’s Note in Leon B-Scenario.

Leon – Police Station, 1F

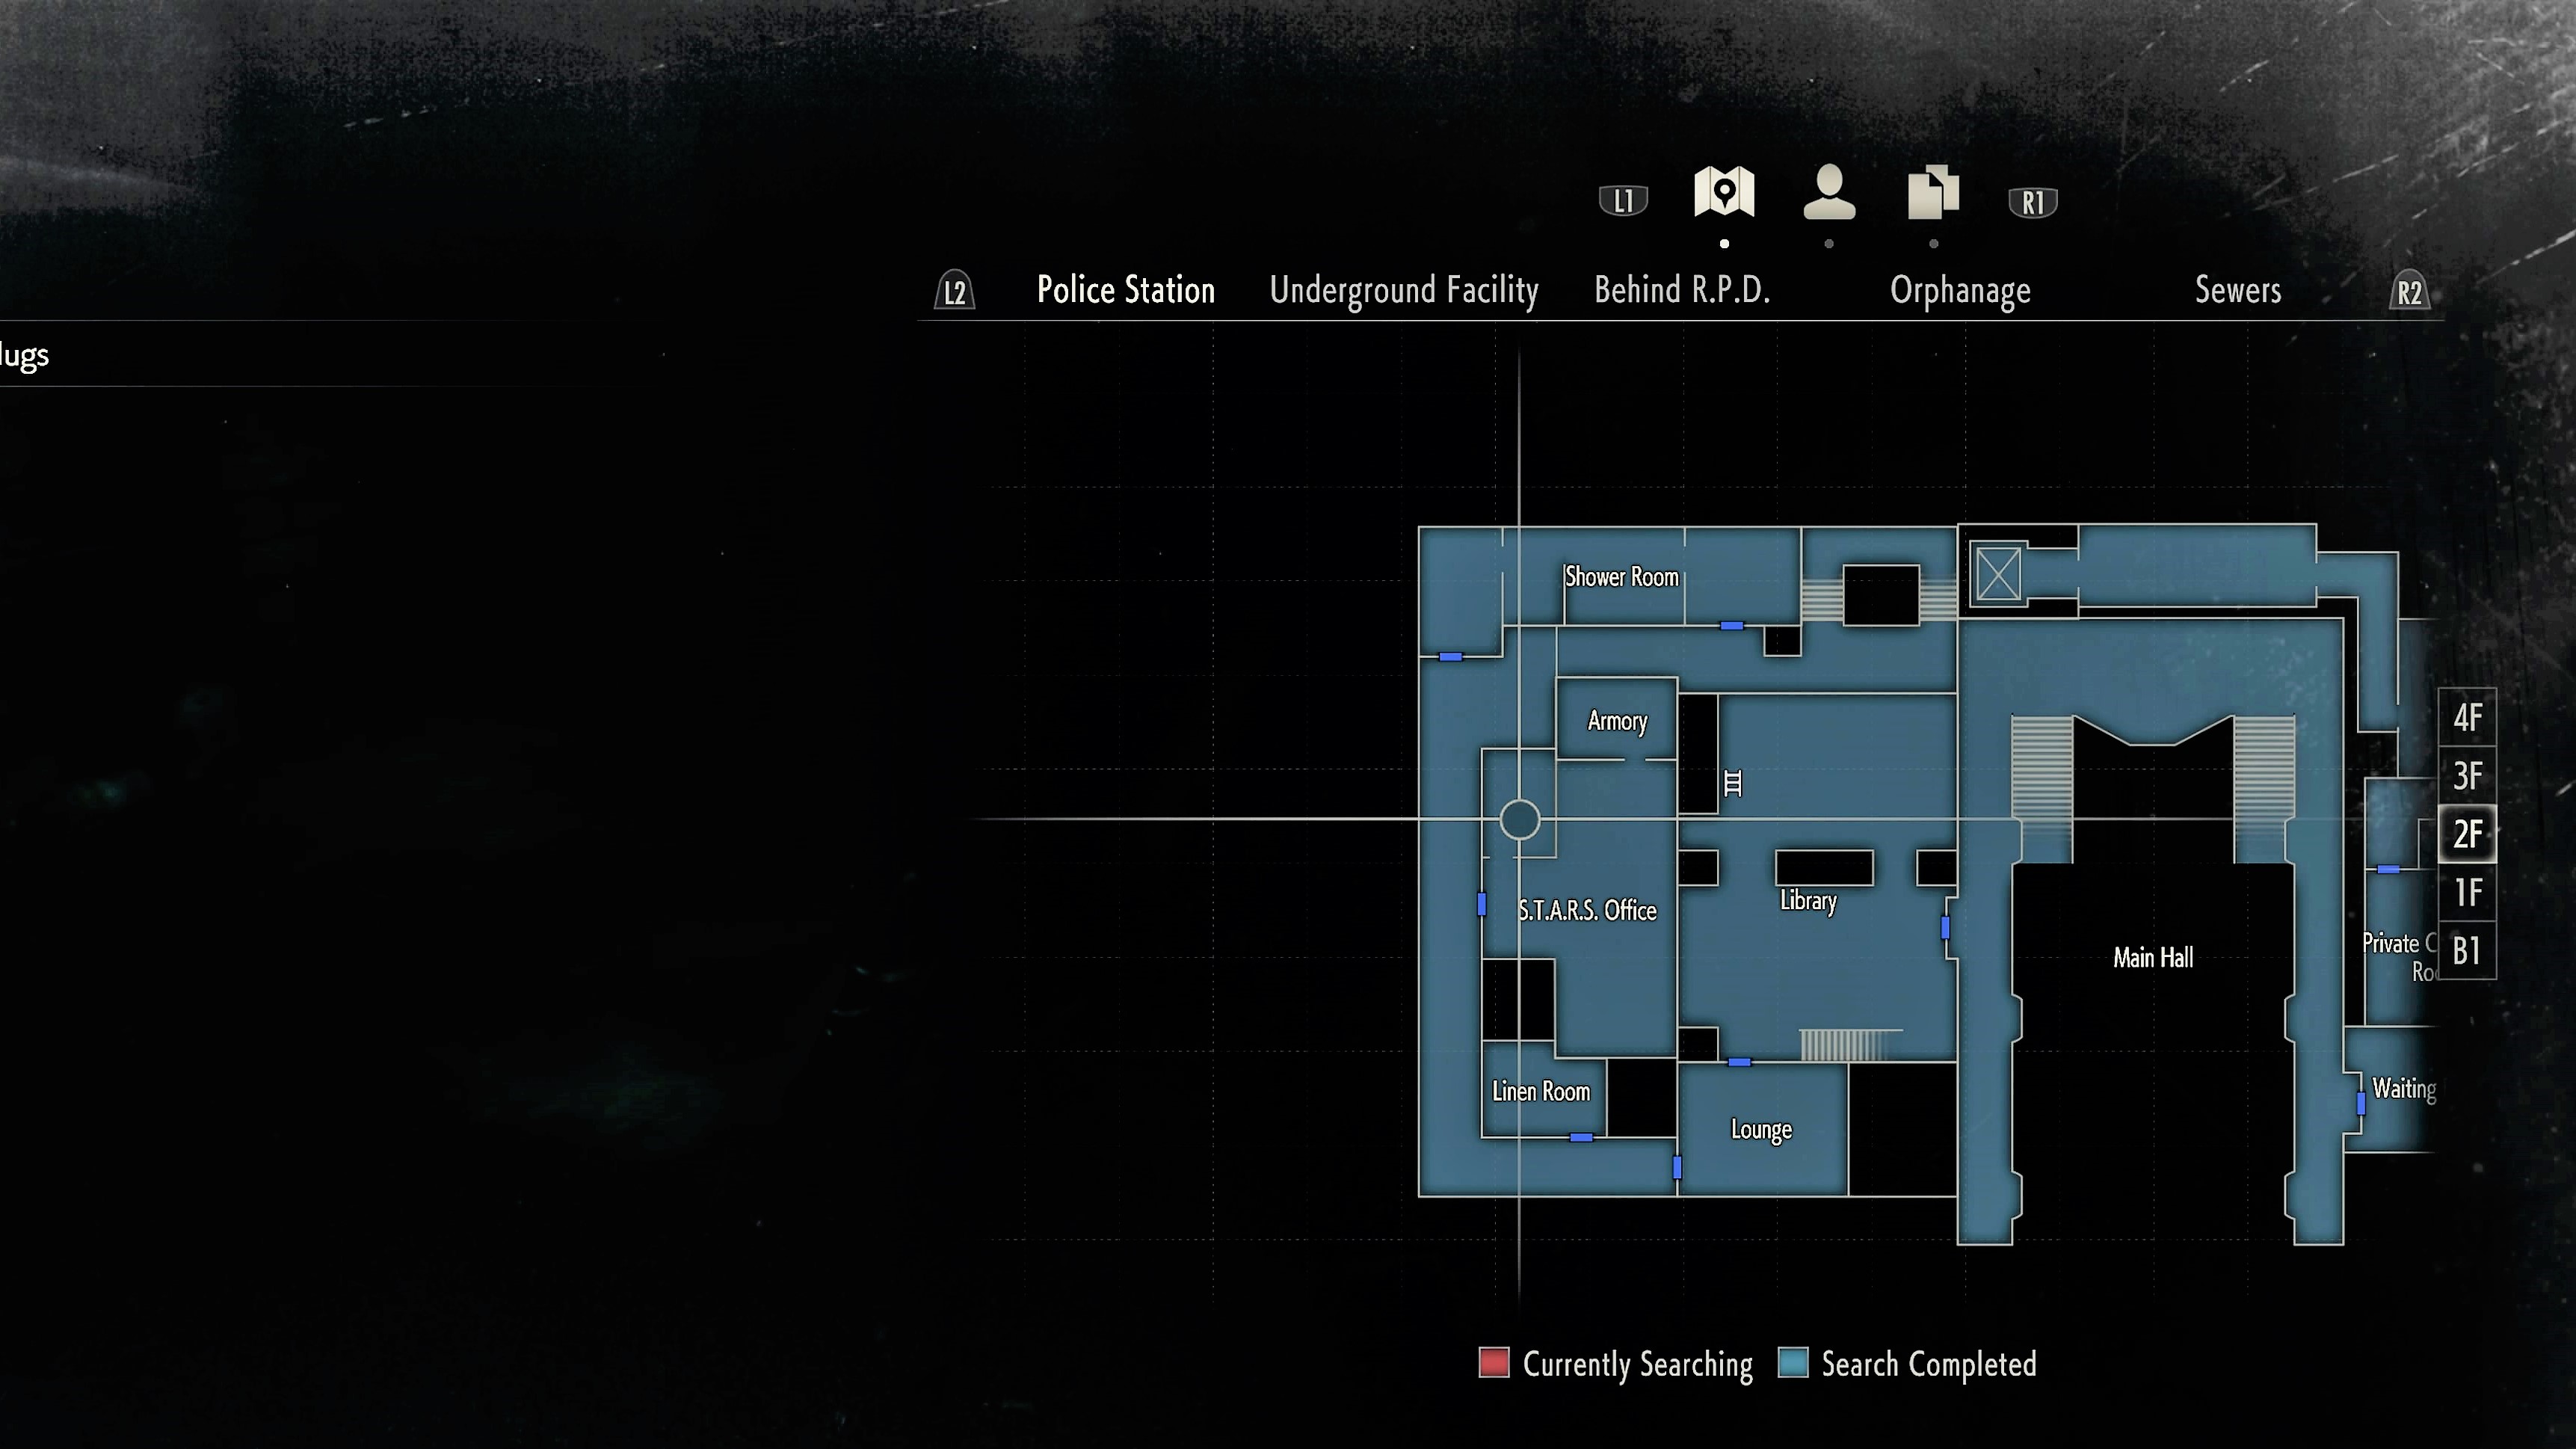
Leon – Police Station, 2F

Leon – Police Station, 3F (+4F)

Leon – Underground Facility

Leon – Police Station B1

Leon – Streets Behind R.P.D.

Leon – Sewer Entrance

Leon – Upper Sewers

Leon – Middle Sewers
Leon – Bottom Sewers
