Overview
A guide for players who want to take their strategic map knowledge to the next level.Topics covered: All strategic UI views / elements.Clearing the map.Scouting.Stack movement considerations.Modding units.The Adjacent Hex Rule and using it to take favorable fights w/ examples.Avoiding bad engagements.Other relevant mechanics.Topics not covered: building up colonies / an economy / an army, diplomacy, tactical combat, etc.
Introduction
Welcome to Mastering the Strategic Map.
This guide is for players that know the basics but have questions about the game and the strategic map in particular. I’ll be going over the strategic map interface in quite a bit of detail. Better strategic map play will allow you to get information more easily, decides which areas to go, and to pick better engagements.
For topics I’m talking about I’ve often included images giving a brief description of what everything does. The numbers in the images will generally be in the top right of what they point to. Below the images are more detailed tips or analysis that couldn’t squeeze into the images.
Main strategic map view
This section will go over the actual UI for the strategic map, what the parts of them do and what they’re good for.
Analysis:
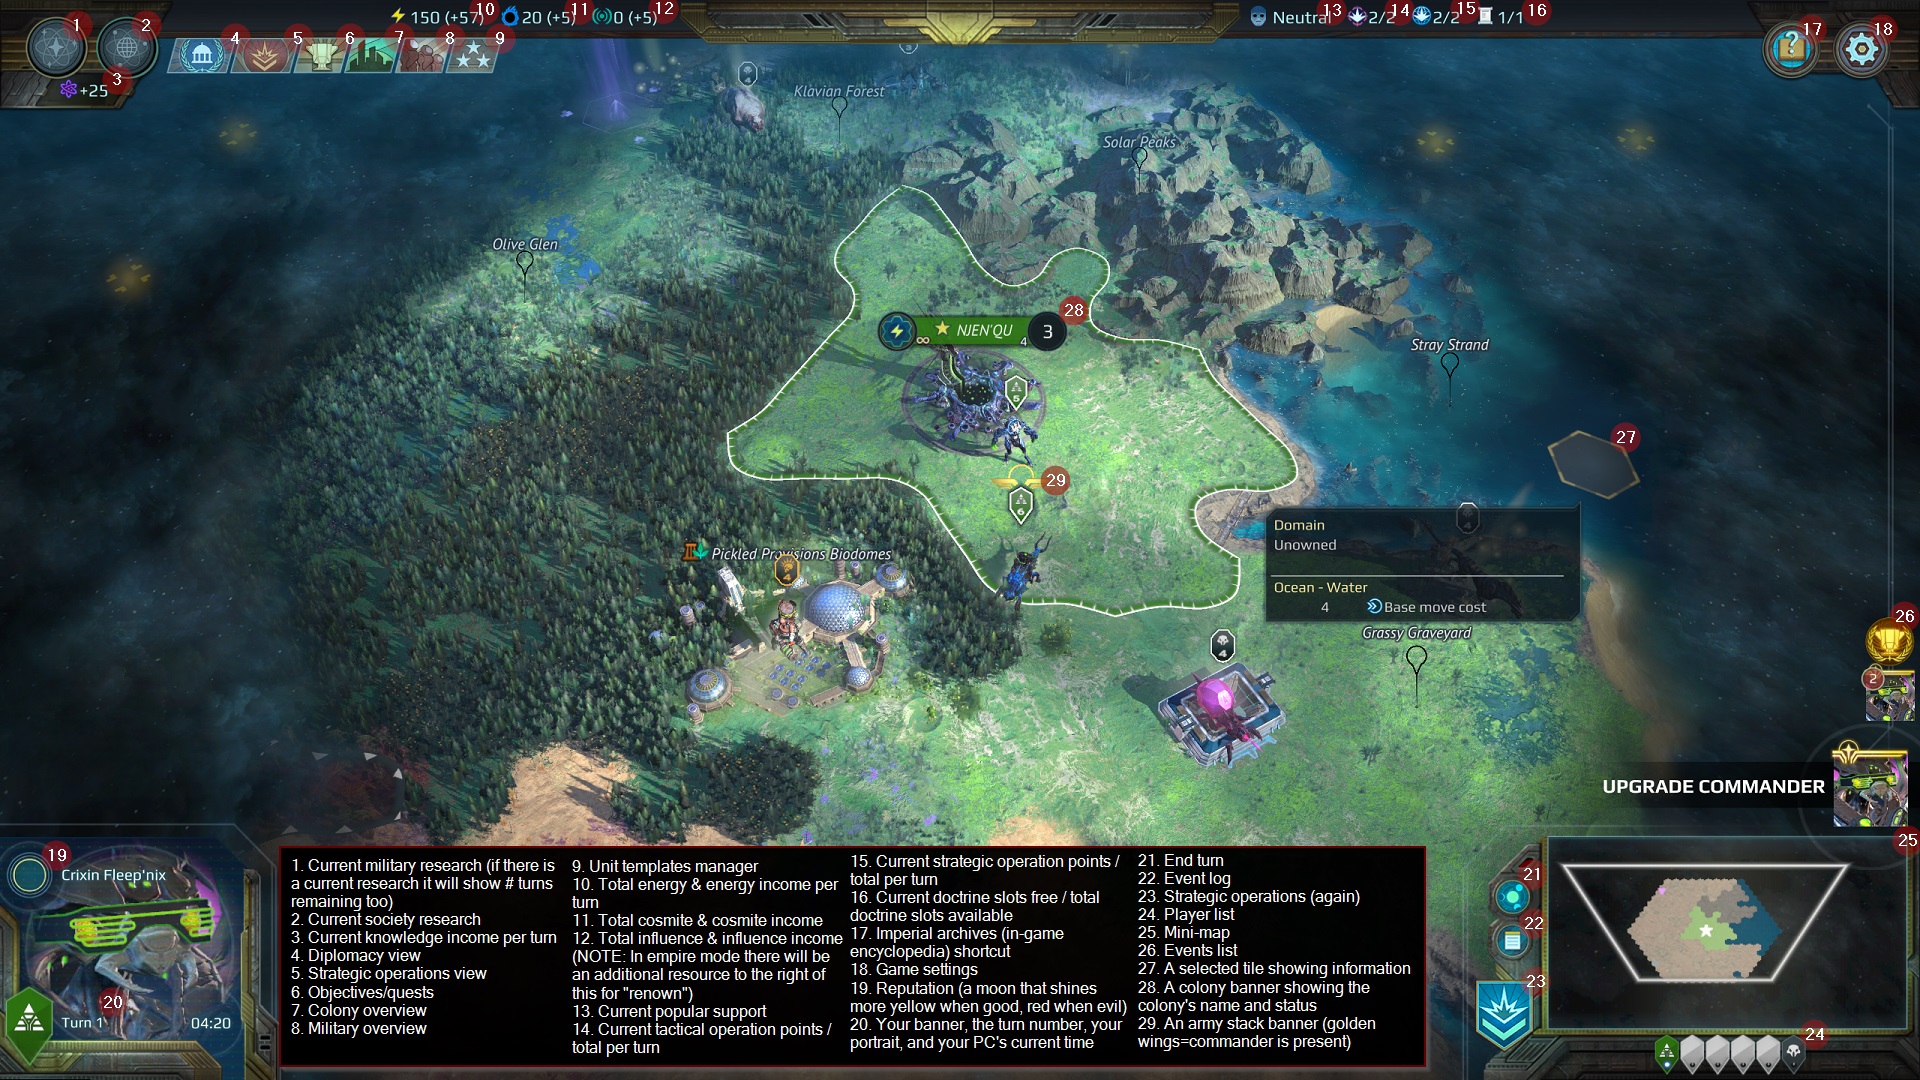
- Popular support (#13):
This will tell you what bonuses / penalties your popular support level is giving you (hover over it). This is the main area of the game you can tell this status. Popular support level modifies unit upkeep costs, unit production costs, & colony happiness incomes. Your popular support is tied to what wars you enter and whether or not you’re “justified” (i.e.: do you have cassus belli or not). The icon is a face (happy face = more popular support, sad face = less popular support). - Reputation (#19):
The circular “moon” icon will be yellow if you’re “good” or red if you’re “evil”. How full the moon icon is means how “far” along that alignment you are (e.g.: full moon+yellow = virtuous) - Event log (#22):
A rough list of the events that happened in the game within your vision. This list isn’t detailed or comprehensive it seems, but it comes in handy sometimes if you forget when something major happened. You can also view previous combat replays from here, which is handy if you forget what mods/units an enemy is using when forming a strategy. - Player list (#24):
The player list, listed by banner. The little circle at the bottom of the banners lights up when it’s that player’s turn. If there’s an invasion on the planet, the players that take the side of the void bringers will have a red decoration around their banner. The last banner always represents the marauders. - Colony banner (#28):
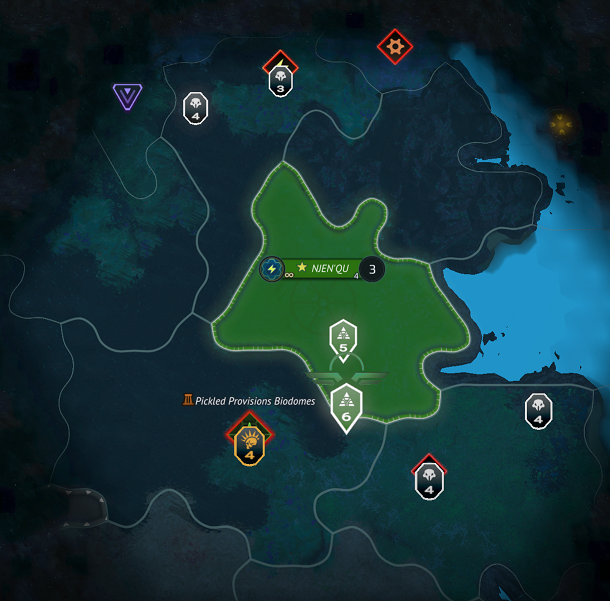
The first icon and number indicate the colony’s current production and how many turns until it’s finished. The star icon indicates this colony is the player’s HQ. Njen’Qu is the colony name. The next number (the 4) indicates there is 4 turns remaining before the colony gains a new colonist. The next number (the 3) indicates there are currently 3 colonists total in the colony. - Army stack banner (#29):
This shows stack owner’s banner, and the number of units currently in the stack (in this case 6). If the player’s commander is in the stack, you’ll see the “golden wings” accompanying the banner. If a hero, but not a commander is in the stack, you’ll see “silver wings”. Keep this in mind when hunting enemy heroes/commanders. - Note on Empire Mode:
If you’re playing a game in empire mode, a new resource type, “renown” will appear to the right of your influence income. Your player portrait will also gain a second banner in the top right of it indicating the banner for the empire as well. You can click both these things to bring up the Empire Mode-specific quests and requisitions.
Vision, sensors and camouflage
There are three states of vision for hex tiles in Age of Wonders: Planetfall.
Generally your unit and domain vision ranges determine what you see, as well as your allies’ if you have a shared vision treaty.
Also note that you can see certain map changes through the fog of war still, mostly related to the sector status in general:
- Colonies founded / razed, population level changes
- Neutral settlements being bought, moved, etc.
- If an anomalous site is being explored (example) or is completed.
- Spawner locations will be removed if they’re cleared.
- Sectors getting annexed, razed or terraformed. Also ownership changes.
- Sectors adding / removing upgrades (exploitations, specializations and doomsday buildings)
- If resource nodes, exploration sites, landmarks are cleared or occupied.
In addition to vision on your units and domain, there is “scanning range” (also called “sensor range”). Scanners show information in both fog of war and unexplored hexes, view the image to see what it looks like.

- For units and heroes, scanning range can be increased via mods.
- Your colonies’ sensors can be upgraded in the covert ops tree twice. Intelligence Gathering gives increased range, whereas Sensor Technologies gives faction information next to the sensor markers (e.g.: here).
Side note: the Imperial Archives entry on scanning has confusing wording about “static” vs. “dynamic” armies. My actual in-game tests show that the yellow cross simply means the stack hasn’t moved in sensor range, while a red cross means the stack has been seen moving since last turn.
Camouflage (or “concealment“) is a unit property that prevents other players / factions from seeing the unit on the strategic map.
- There are generally 5 ways to reveal camouflaged units:
- Stand on a hex directly next to the unit (obviously this isn’t a reliable way to find them :P)
- Use an operation that grants you vision on the enemy (universal data siphon in the covert ops tree)
- Share vision with the player in a treaty
- Give your unit a mod that grants “detection”. Units with detection can see concealed units in their vision range.
- Build a “high energy scanning station”, which is an energy sector specialization that grants “true sight” (detection) in your colony’s visual range.
Warning for newer players: you’ll occasionally see stacks of say 3-4 Syndicate or RPR units that look weak, but when you get next to them oops! They had camouflaged units in there, and the stack is much stronger than anticipated.
Zooming out: military, economic and operations
When you zoom out on the strategic map with mouse wheel, you’ll be presented with an overview of the planet and 3 different views in the top middle to choose from: military, economic, and operations.
This view gives you a bird’s eye view of all units within vision and sensor range, as well as various map nodes relevant to military affairs.
(Note: I refer to observe mode a bunch here, it’s the setting that makes the game automatically pan the camera to other factions’ units moving within your domain’s vision when it isn’t your turn)

- Analysis
- I recommend getting into the habit of glancing at this overview during most of your turns, instead of relying on eyeballing the map zoomed in or observer mode. It shows where units are at a glance far more clearly, especially on large / late game planets with dozens of areas of interest.
- This view also shows you at a glance all moving stacks in sensor range, while Observer Mode doesn’t, so you potentially gain extra warning for forces moving toward your domain. That can make the difference between being prepared or not.
- You can click on teleporters in this view and “show destination” to gain a quick overview of where teleporters go, it’s much quicker than doing it zoomed in.
- There are many icons in this view and an extensive list is a bit beyond the scope of this guide, but here is another example screenshot showing some more of the common things to watch out for in this view.

- Analysis
- It’s important to know the “partial reveal trick“: in this view you can mouse over a hex in a sector that is not fully revealed, and the game will tell you all features / bonus nodes on it even if you haven’t seen them yet. See the image above for an example. Keep an eye out for high value economic structures like cosmite nodes or landmarks.
- This guide won’t go into building an economy, but all the sectors’ resource “pips” can be seen here and used for economic planning. If you’re manually clicking each sector zoomed in to see what they give you economically, you’re doing it wrong.
- Some icons, such as the ones for resupply and charge stations, change between the military and economic views (even if they’re the same node). Not super important, just be aware of it.
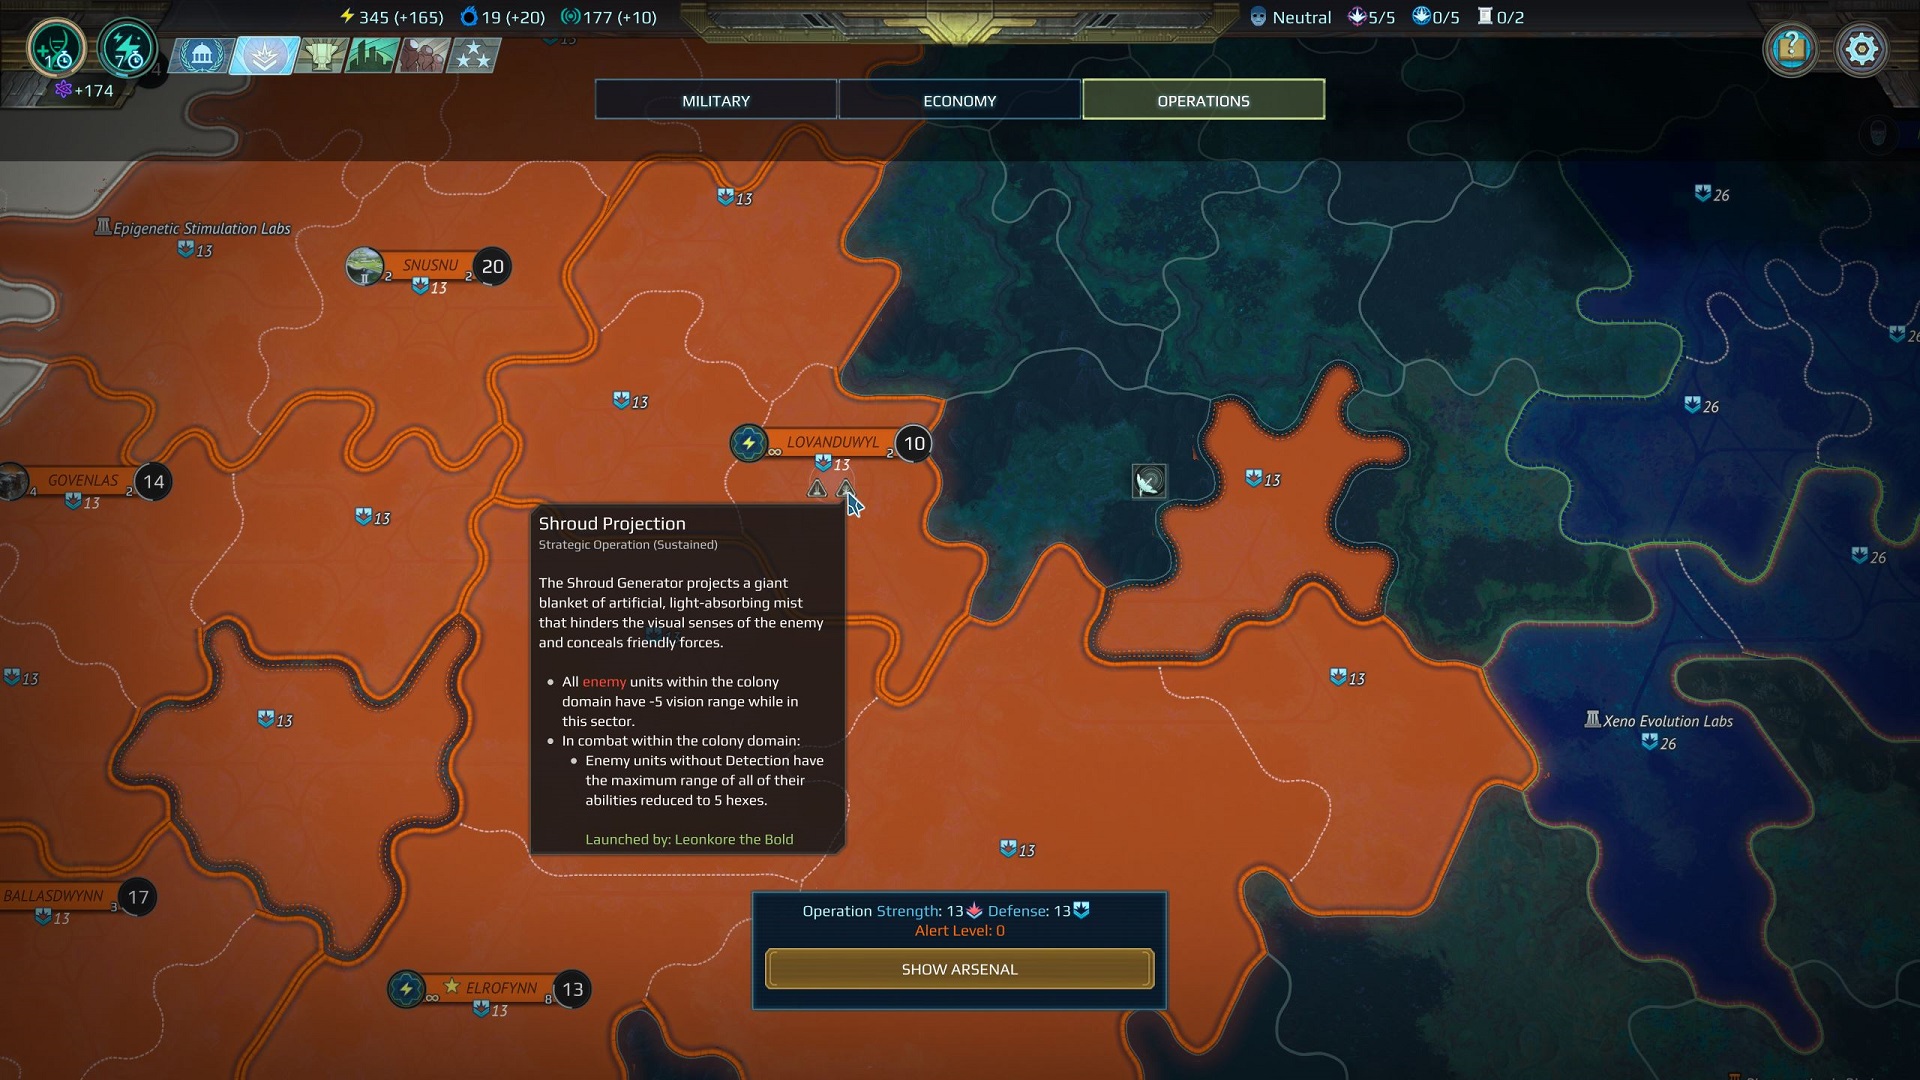
- Analysis
- Lets you see each sector’s operational defense
- Show active, known operations at a glance including ones cast on colonies, sectors or standalone in the world (such as monitoring stations), etc.
- If you click show arsenal and click on some of your currently running operations, this map view will quick snap to where it is on the map if relevant.
- Used less than the other 2 views typically
Army stacks and unit cards
- Analysis:
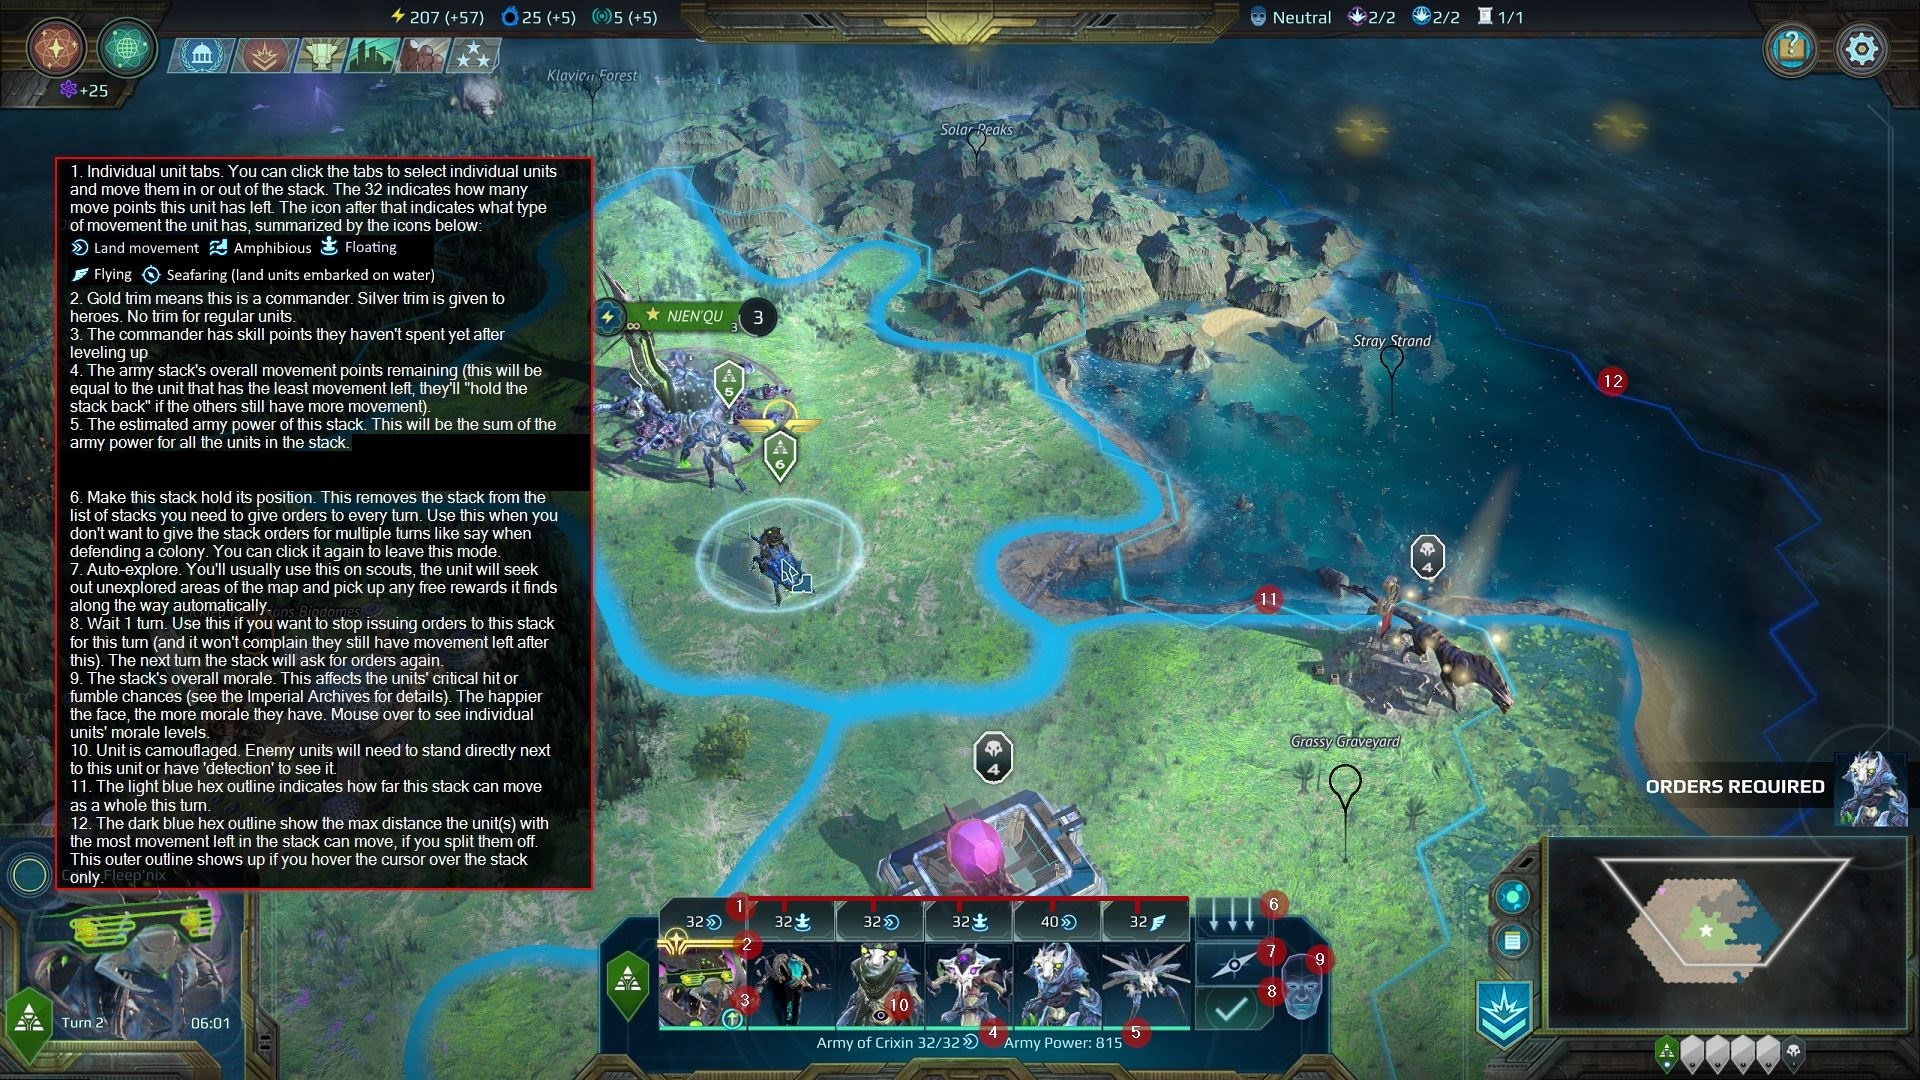
- Individual unit tabs in the stack (#1):
It’s important you learn how to split up / combine units and stacks if you don’t know already. If you click a tab over specific units when you have a stack selected, it will select just those units in the stack. You can then move with the selected unit(s) and split them off from the stack. Likewise, if you have a stack that isn’t a full 6 units then move other units onto it, it will combine them into a stack (as long as it isn’t over 6 units). The following images show an example of selecting 2 scouts from an army stack, moving them away & splitting them into their own 2 unit stack, then re-combining them with the original stack. If you select individual units in a stack then right click, it will invert your selection. - Army power (#5):
This is an estimate of how strong the army stack is. The individual units have an army power (you can mouse over the individual portraits to see). The stack power is just the sum of all the units’ powers. Unit army power is determined by unit tier, rank, current health, and what tier mods they have. For heroes, hero level and weapons are factored in as well. Army powers are just an estimate and don’t necessarily determine how a battle will go, but it’s often a good guess especially if using auto-combat. - Stack morale (#9):
Average morale score given all the units’ morale in the stack. If you have units with very poor morale the game will warn you in the events list (and show a crosshair icon you can click to locate them). If you mouse over a stack’s morale icon, it will break down each individual units’ morale. Things like poor race relations with that unit’s race and environmental hazards can lower a unit’s morale and lead to possible desertion! It will also sometimes cause your units to fumble in combat. You can see individual morale details about units by opening their “unit cards” (see below). Note that there is a 3 turn grace period before units will roll to desert, and heroes will not desert. - Other unit indicators:
In addition to #3 and #10, there are other icons. If the unit is currently changing their mods it is indicated by a wrench icon. Units changing mods have their mods disabled and do -25% damage for 1 turn (or 2 if using simultaneous turns mode). The globe icon means the unit has a special, strategic map only ability (e.g. colonizers “founding colony” or prospector’s “prospect sector”)


- Analysis:
- Disband, unit tier, upkeep (#1):
Clicking the X left of here will disband the unit. Some reasons to disband a unit would be to save their upkeep if they are no longer needed, or to prevent doomed units from getting attacked and giving an enemy free XP. - Rank/XP (#3):
Units will gain ranks through XP from combat primarily, but can also gain ranks through other means (e.g. perks, military innovation center, doctrines, etc.). XP calculation is detailed in the Imperial Archives. Generally every rank will add a bonus stat to the unit such as +hp. Prime rank usually unlocks an additional, more powerful bonus as well. It’s usually worth mousing over the ranks to see what a unit will get at each one (some units can even evolve into stronger units at prime rank). - Morale (#4):
Hover over this for a breakdown of what’s increasing/decreasing a unit’s morale currently. This is handy to know if you have units with low morale (and desertion is possible soon), and need to see why. - Unit health (#5):
You can mouse over this element to get an overview of a unit’s health regeneration per strategic turn. This is important to know if you want to estimate how many turns until your units are healed, and is often relevant to how fast this stack can clear the map without taking a break to heal. - Mod slots (#10):
The symbols on the right side of the mod will summarize what ‘general bonuses’ the mod gives. Crossed swords for +%dmg, a heartbeat icon for +hp, a yellow shield icon for armor, a blue shield icon for shields. The roman numeral value beneath the icons specifies “how much” for the general bonus (dmg% = value*10, hp = value*5, armor/shield = value*1). The +%dmg general bonus will apply to all abilities even if the mod doesn’t target them specifically. - Common modding pitfall:
A common mistake is applying mods to a unit or hero expecting it to work on their primary abilities since it equips fine, but in fact the mod applies to some secondary ability/weapon instead.In this example we’ve applied Flechettes (adds bleed to kinetic attacks) to a hero but his arc projector doesn’t have bleed. What happened? Well, the hero could apply the mod because his secondary pistol is of the kinetic damage channel (his projector is arc dmg channel); the bleed effect only works on the pistol attack here! (though we get 10% general bonus to all attacks still)
- Confirming the mod applies to the right ability:
So how do you make sure not to make the above mistake? You can preview what mods do to units/hero ability before hitting the button to pay for the mods. I recommend you do this always if you’re newer.Example: You want to apply acidic composite mod to a huntress’s Bio Arrows ability. Notice how both the mod and Bio Arrows show the “biochemical” keyword, which means this mod applies to this ability. Also notice in the second screenshot how after the mod is equipped (but before we hit confirm / pay) the Bio Arrows ability now shows correctly that armor melt is applied to it.
Adjacent Hex Rule & picking favorable engagements
Every tile in the game is a hex. To help visualize how the images below apply to the strategic map in the actual game, you may want to turn on “Show Hex Grid” under Settings -> World UI.
The Adjacent Hex Rule determines which units get sucked into combat whenever one faction attacks another on the strategic map. The attacker/defender will be referred to as the “main combatants” below.
What’s an “adjacent hex”? The blue hexes here are adjacent to the red hex:

The adjacent hex rule works as follows:
- All unit stacks adjacent to the hex being attacked that belong to the main combatants get sucked into battle.
- Third party factions allied to one side but not the other on adjacent hexes can be sucked in and help their allies, see details below.
- If the defender’s hex is on or adjacent to a colony center hex or other building with militia, the militia will assist them if they own it.
- If the defending hex is a building (or center hex for colonies), and the militia has already been killed this turn, the building will still call in adjacent hexes to combat before the attacker can capture the building.
There are several rules for if adjacent allied stacks help in combat or not that rarely come up so I won’t expound them here, but I’ve provided a google doc[docs.google.com] with the rules.
The following two demonstrations give detailed illustrations of the Adjacent Hex Rule in action and how to take favorable engagements when you’re within striking distance of an enemy:
Often times getting into a position to even utilize these moves is half the battle. Here are my best tips about positioning on the strategic map (Note: some of these only apply to single player):
- Don’t forget you can see a preview of your stack’s movement range by clicking on them and looking for blue hex outlines (see: the image under “Army stacks and unit cards”, #11-12). I’ll refer to these as “movement range previews” below.
- If you see enemies coming into visual range toward you make sure to click them, you can see movement range previews for enemy stacks as well! Use this information to stay at a safe distance from enemies with your own units.
- The AIs will often move through territory and attack non-colonies along the way while getting units killed. If your defense is weak, feel free to intentionally let them take some of your buildings and suffer attrition before mounting a better defense later.
- If you need to use the above strategy, confront them with your defenders only when you gain the upper hand in army power or you absolutely have to. Retaking your stuff after winning is better than losing your army by confronting too early and having no recourse when they capture colonies.
- The AI is pretty bad about keeping their stacks in good defensive formation, so if you shadow them by staying just outside their movement range with your own armies, they’ll often stop within striking distance of your stacks with a gap in formation that lets you take favorable match ups (see the imgur demonstrations above for how to spot / utilize these).
- When marching multiple stacks together, you’ll also want to stay in a good formation to avoid unfavorable adjacent hex rule match ups if the enemy attacks. You can do this by moving your slowest stacks first so you don’t accidentally move out of range of your others resulting in gaps or sub-optimal formations. You can also use movement range previews to aid you in seeing where your stacks can reach before moving them.
- Always be careful about moving weak stacks adjacent to otherwise strong formations, it’ll give the enemy an easy “in” to do adj hex rule shenanigans as seen in the above demonstrations. It’s sometimes even preferable to move weaker stacks so there’s a 1 hex empty space between them and the strong formation to avoid this.
Scouting
While the exact number of scouts to build is up for debate, most players I’ve talked to tend to try to keep around 3-5 at any given time. The exploration and free pickups scouts provide make them valuable assets in every game.
Tips:
- Auto-explore is viable and saves a lot of time (but is not optimal). Whether you want to lose an extra scout here or there due to auto-explore’s stupidity (it won’t actively avoid enemies) in order to save time is up to you. In a competitive game you’ll probably want to manually control them.
- One of the biggest threats to scouts is wandering marauders, keep an eye out including watching your sensors for movement before deciding to move a scout into an area.
- Move 2-3 hexes at a time max to prevent yourself from over extending into a dangerous area.
- Use the “movement preview” world UI setting to help gauge how much movement you have left.
- Marauders generally don’t go from land->water or water->land so hugging any coastlines you see is a great way to keep scouts alive. Use your vision/sensors to see any marauders in the area and either move to land or water before you run out of movement (whichever one they’re not on).
- Syndicate Runners (universal) and Shakarn Recons (in water) have camouflage, so they are less susceptible to being picked off. The Syndicate Runners especially are safer to use auto-explore with.
- If you can’t hug a coastline try to look for rough terrain such as mountains to stop your turn on. Scouts can generally lose marauders by moving through these rough areas. You can even stand next to NPC faction units if you’re friendship+ with them for defense.
- Parking scouts on things like other commanders’ resource nodes (especially cosmite) is a great way to goad them into war with you without you declaring first as it denies them that resource bonus.
Water
Units that have amphibious, flying or floating as their movement type don’t get any penalties for entering/exiting water hexes, nor in combat. For everyone else:
- Aquatic Deployment must be researched for land units to traverse water, build ships and to annex water sectors. It also lets you cross rivers with land units faster.
- When a land unit enters a water hex, they must have 12+ movement points left. All remaining movement is used “embarking” (they will now appear on a ship). This means a land unit can’t attack a unit in the water in a single turn if they start on land.
- When a land unit goes back onto a land hex, they must “disembark” which costs 6 movement points on top of however much movement the land hex requires for you to move onto it. It does not simply remove the remaining movement points like embarking does.
- Land units suffer -3 to all resistances when fighting in water. Certain land abilities won’t work in water combat either, but an exhaustive list is out of scope. Fight in water with land units at your own risk.
- Naval units are extremely cheap for the stats they give, and annihilate land (due to -3 all resistances) and air (because all racial ships besides oathbound have anti-air attacks) units.
- Going heavily into naval units is generally not advised though since they are limited strategically by the fact they can’t use teleporters, participate in land combat, or go to certain areas of the map without cruising around landmasses first.
World UI settings
In the game settings there’s a section called World UI with options mostly relevant for the strategic view of the game. Most of them are pretty self explanatory or you can try them on your own, but below I have some comments on a couple less obvious things.
- Observe mode: this option specifies if the camera will pan to units moving through your domain when other factions are moving. I personally use “Observe mode: Never” since I use the military overview often to see what’s in my domain and I don’t like the camera jumping around, but it’s a matter of preference.
- Play movement animation: you can disable this to speed the game up a bit
- Skip turn confirmation: when checked this will warn you before ending your turn if you still have things you can do, recommended on.
- Army movement confirmation: I like having this unchecked. I move stacks over multiple turns constantly and having to confirm it every time slows my turns down.
- Movement preview: recommended on. Adds a green movement range outline inside your normal blue one when you have a stack selected. The new outline specifies what your movement range remaining this turn will be if you first move to where you’re pointing. Handy for answering things like: “if I grab that pickup 3 hexes to the side, will my scout still have enough movement left to reach the charge station this turn?”
Other info
If you have further questions I recommend the Planetfall discord: [link]
Also be sure to use the Imperial Archives (the in-game encyclopedia) often, 80% of questions can be answered in there. Also a tip: you can often bring it up even if the button isn’t on the screen you’re in by hitting F1.
Other mechanics: I’ve compiled a bunch of info about lesser known PF mechanics here[docs.google.com] (topics like reputation, race relations, settlement buy costs).