![[Mega Guide] [ENG] Fallout Shelter Tips and Tricks. (Updated) for Fallout Shelter](https://steamsolo.com/wp-content/uploads/2021/07/mega-guide-eng-fallout-shelter-tips-and-tricks-updated-fallout-shelter.jpg)
Overview
This guide will show you some tips and tricks in Fallout Shelter.
Getting Started. Credits to the reddit wiki.
Leave a like and don’t forget to favorite!
Link to the reddit wiki: https://www.reddit.com/r/foshelter/wiki/index
EDIT: Thank you all who liked my guide, now it has 5 star rating! Thanks for your big support!

Early game, the tutorial has you set things up close together. Follow this tutorial, and after you finish, start making floors. Devote a floor to a task – living, food, power, etc. Leave the couple in the room that the tutorial has you put in living space. They will be your go-to baby makers.
When you make a new floor, start out with one room. Do not place another of the same room type right beside the previous room right away, as it will merge the rooms into a bigger room. These merged rooms consume more power. The best way so far, is to place one room, select it, and upgrade it by clicking the arrow where the hammer usually is. Rooms can upgrade three times. When you are need more of a resource, put a new room beside the upgraded one. Once you have the power requirements to handle the merged room, upgrade the room until they merge.
Send the person with the highest Endurance to explore at the start of the game, you need them to find items. Just keep an eye on them and pull them back often using recall until you feel comfortable leaving them out there based on the gear they have equipped. You need to use what they find. Every few hours pull them back and then send them back out. Keep an eye on them too, they might run into something that kills them. If they die, you can revive them with caps. Later in the game you want the explorers to have high Endurance and Luck.
When you have a few weapons, and a few people strong in the Strength stat, leave two of them at your vault door, and upgrade the door. The door upgrades three times.
As soon as the med bay is available, put someone with high I in it. Second to that, put someone with high I in the science lab too, as your explorers can use them to stay out longer.
After the labs are set up, radio opens to try to grab people from the wasteland. Put your best C people in there. Try to get a couple people in there right away, then open the bar so you can get another radio up. A few radios going with maxed out Charisma will pull in a couple people every few hours.
After you work your way through the 30 people range, set up the Gym, Athletics Center, and Armory. Those three add S.P.E.C.I.A.L stats to people you assign there. ALWAYS have someone training there, because they train the most important stat there. Afterwards when you have a classroom, put people there too so they can gain the I stat to work in the labs.

The Basics.
Each dweller has a S.P.E.C.I.A.L stat, very similar to the ones in Fallout series. They seem to fall in an order like this:
S – Strength: Dwellers strong in S are specialists for power.
P – Perception: Dwellers strong in P are specialists in water production.
E – Endurance: Dwellers strong in E are great explorers. These people should be the wasteland wanderers. (not to be confused with the Lone Wanderer from Fallout 3).
C – Charisma: People strong in C are the ones you want in the radio station, as they bring in wandering people from the wasteland.
I – Intelligence: People strong in I are the researchers. Put them in the med lab or the science center.
A – Agility: These guys can handle carrying food around. They belong in the cafeteria.
L – Luck: Luck is a stat that doesn’t have a job that I’ve found (will update if proven otherwise). However, people with higher luck improve rushes.
From here out, S.P.E.C.I.A.L stats will be listed with the letter only!
How you gain items:
The game has two methods of obtaining items, lunchboxes, and wasteland exploration. Exploration requires someone with high E (Endurance) stat, but they can find some treasures.
The second method is lunchboxes. These contain five cards which have a mixture of caps (the currency to everything), the three priorities (explained below), outfits, and weapons. They also contain rare characters which were NPCs from the Fallout games. The NPCs has high S.P.E.C.I.A.L stats, use them where appropriate.
Note: Lunchboxes are available through in game quests or real money purchase. Buy if you want, but I won’t discuss spending hundreds of dollars.
Outfits: They are important, even to people IN the vault! For example, Military Fatigues give S+3. Put that on your guys in the power generator, and they produce power faster. Put the gear with the appropriate stat to the room they are in, and the speed at which they finish the job gets faster.
Weapons: While they aren’t important early game (within the first few hours), as you level up, you need people to defend the vault from raiders and rad roaches. Explorers can provide decent early game weapons. Equip these on high S (Strength) guys, as the S (Strength) adds to the attack they do. Later in the game, you need bigger weapons for attacks, as roaches and raiders have more health and attack.
The order of importance: Power is THE PRIORITY. I cannot stress this enough. Without power, all other rooms cannot run. Power stations must have your strongest S (Strength) people.
Food is the second in my opinion at the moment. Without food, they die. Sure, without water they die too, but water is also essential to much more than ingesting it. So, water is the third on the list.
Always have the person with the highest E (Endurance) stat to explore, as soon as the game starts. You need them to find weapons. Just keep an eye on them and pull them back often using recall until you feel comfortable leaving them out there based on the gear they have equipped. You need to use what they find. Every few hours pull them back and then send them back out.
As soon as the medbay is available, put someone with high I (Intelligence) in it. Second to that, put someone with high I in the science lab too, as by this point people will start feeling the radiation from the wasteland.
In between waiting for the labs to open, leave the couple in the living quarters that the tutorial has you set up. They are baby makers. It’s OK if their stats suck, that will be fixed later.
Whenever the game says you need a new living quarter, make a new level for it. Devote that level to living space. Strangely enough, one guy will spread his seed to multiple women in the same quarters if there is room for all of them (polygamy is a thing in this game?). However, family members will NOT reproduce, so you need people outside the family chain when setting up a new living quarter. You can’t emulate Craster’s keep from Game of Thrones here. However, more research is needed to find out where the boundaries are, given people live in a vault with limited space.
After the labs are set up, radio opens to try to grab people from the wasteland. Put your best C (Charisma) people in there.
After you work your way through the 30 people range, set up the Gym, Athletics Center, and Armory. Those three add S.P.E.C.I.A.L stats to people you assign there. ALWAYS have someone training there, because they train the most important stat there. Afterwards when you have a classroom, put people there too so they can gain the I stat to work in the labs.
Vault Layout:
After a few hours, start making floors. Devote a floor to living space, power, food, etc. However, until you have the power to handle it, do NOT make rooms of the same type at the same level. I have found that water pumps at the same level that merge into one room consume more power than a level 3 room beside a level 2 room. Makes sure power is good before merging. This was also a failure in my first play through, do not merge until the power can handle it. Until you know power can handle it, put a lower level of the same kind of room between higher level rooms of the same type.
Increasing Population.

Sadly, you cannot put couples with high S.P.E.C.I.A.L stats in to make a baby with high stats. However, the way people are reporting it works, is that it will always give at least one stat with a 3, and this is based on the average of the stat between the parents. It will pick the highest of the average and make that stat the high one in the child.
Note about pregnant dweller mechanics: They can still work, however, if there is a fire, rad roach attack, or a raider attack, they run to another room.
When you have a pregnant dweller, make sure you have extra space for the baby. If you are unsure if you have room, tap the gear in the upper left to bring up the list of everyone. It will say x/x. If you are maxed out in room, she will not have the baby until there’s room. It typically takes between 3-4 hours real time to have the baby, and the same for the baby to become an adult.
The other primary way to gain people is the radio room. Put a couple people with high C in the radio, and they will have a chance to have another person from the wasteland show up at the door. Luck increases the chance as well.
The last way is through lunchboxes. They will include common people, or rare people, some of which you may recognize.
As mentioned above, family members will not breed together, however, there is a generational gap that allows it:
- It appears the family line is drawn after three generations.
- As long as the siblings share ONE blood parent, the siblings will not “dance.”
- It appears the Uncle/Aunts and Nieces and Nephews are not off limits either as Eugene Cook (son of Amy Cook and Lawrence Moore) has laid with Megan Moore (daughter of Margaret Harris and Peter Moore (son of Lawrence Moore and Kathleen Duncan and half-brother to Eugene Cook).
Story: So, in Vault 000 I am keeping track of who breeds and what they breed, etc.
Starting with two outside dwellers, Terry White and Patrica Boyd, they had a baby named Hannah White. Even though I knew this wasn’t going to happen, I had Terry White lay his best line on his daughter. She refused him. So Hannah got to mess around with Jeffery Hill (another outsider). They had a daughter name Janet Hill.
Terry, being the old-man perv he is, also tried to lay his best moves down on his grand-daughter. She also refused saying “I enjoy spending time with family.” Well, as the vault needs to grow, Janet slept with Bobby Clarke (son of Arthur Clarke and Kimberly Taylor) and they had a daughter; Brenda Clarke.
Well, Terry is never one for “No’s” so he is off chancing tail again. Well someone forgot to tell Brenda they are related… Terry dumped his seed and she is now carrying.
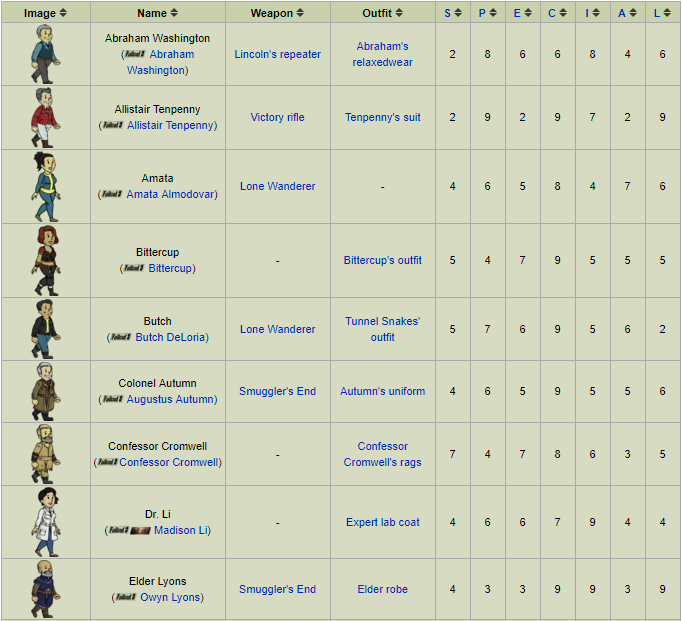
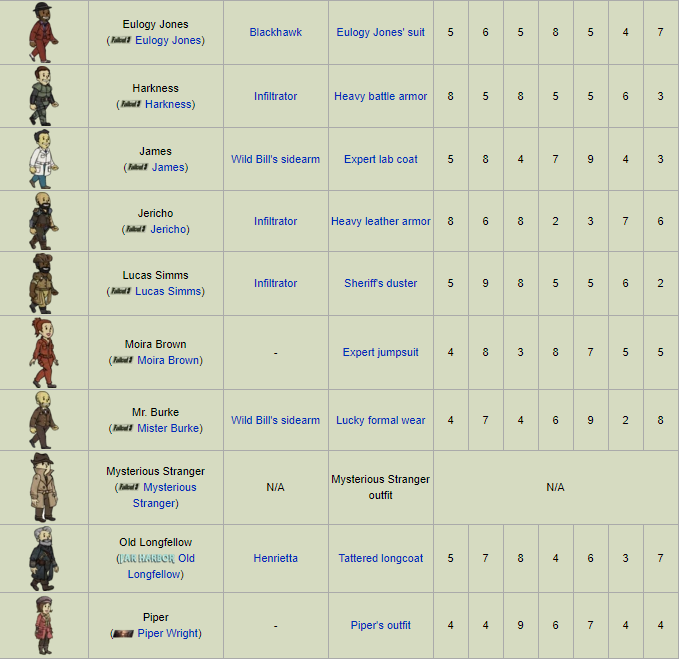
Legendary Dwellers.
Lunchboxes provide a chance for rare and legendary dwellers. Below is a table with each Legendary dweller. There are 23 Legendary dwellers in total. All information was taken from Fallout wiki[fallout.wikia.com]

Room List.
This is still a work in progress, please be patient!
There are 19 different rooms, excluding the elevator, that you can add to your vault. Each has a specific purpose:
Note: All rooms can be merged with three rooms of the same type, and all can be upgraded three times.
Vault Door:
This room has no production purpose, however, it can be upgraded three times, and can hold two people. Put people with high strength in here to defend the vault from attack.
Living Quarters:
Purpose: For this room, add a male and female to it to breed new dwellers. The stat you want for this room is Charisma. Higher Charisma means the couple will breed faster. Note: you can put more than one woman in the same room with one man, and he will breed with all of them.
Production rooms:
Power Generator and Nuclear Reactor:
Power Generator is the main room until the nuclear reactor (although some math is being done to see the cost versus potential the nuclear reactor, which will be posted when it’s done). The stat for these are Strength.
Diner and Garden:
Diner is the main room until the Garden (although some math is being done to see the cost versus potential of the Garden, same as the reactor, which will be posted when it’s done). The stat for these are Agility.
Water Treatment and Water Purification:
Water Treatment is the main room until the Water Purification room (although some math is being done to see the cost versus potential of the Water Purification room, same as the reactor, which will be posted when it’s done). The stat for these are Perception.
Nuka-Cola Bottler:
This is a combined food and water producer. However, keep in mind you will still need some normal water production to keep away radiation. The stat for this room is Endurance.
Medbay:
The Medbay produces Stimpaks. The stat for this room is Intelligence.
Science Lab:
The Science Lab produces Rad-X. The stat for this room is Intelligence. Keep in mind that Rad-X does not heal, so you will need to use a Stimpak after getting rid of the radiation.
Radio Studio:
Radio Studio attracts new dwellers to the vault. You want high Charisma dwellers in this room. Keep in mind that this is a chance to attract a new dweller, versus the 100% chance of pregnancy.
The breakdown for production looks like this:
- Strength: Power Generator, Nuclear Generator.
- Perception: Water Treatment, Water Purification.
- Endurance: Storage Room, Nuka-Cola Bottler.
- Charisma: Living Quarters, Radio Studio.
- Intelligence: Medbay, Science Lab.
- Agility: Diner, Garden.
- Luck: Increases rushes in each room and increases chance of getting caps when collecting the produced item.
Training Rooms:
Each room trains a certain stat. Keep in mind you want the maximum number of people in the room to speed up training. Upgrading the room also helps speed things along. For a one-section room, it’s two people max, two sections is four, and three sections is six people max.
The breakdown looks like this:
- Strength: Weight Room
- Perception: Armory
- Endurance: Fitness Room
- Charisma: Lounge
- Intelligence: Classroom
- Agility: Athletics Room
- Luck: Game Room
- Each room costs 100 caps plus 25 caps times how many of that room type you already have.
- Timer is based on total number of stat for that S.P.E.C.I.A.L.
- A dweller with a 5 Stat is equal to a two dwellers that have a combine stat of 5, and so forth.
- When upgrading conjoined rooms, the upgrade cost is base.
Miscellaneous Tips.
Misc ideas and tips:
If names are not a priority, you can rename people to what they do, i.e. Power, Cook, Bartender, etc. This will help if you need them to go do something else for a little while.
You can see the timer when a child is going to be fully grown in the dweller list. Sadly, this does not show when pregnant women will have their baby:
If a dweller is really sad, intercourse usually works as a good pick-me-up.

OP training without hurting yourself: Have a S.P.E.C.I.A.L training room. Let’s say Strength since it’s the 1st one you unlock.
- Step 1: Make sure your power is at a level where after you turn off the game it will be ok (Timer is 3 minutes I believe).
- Step 2: Move all but one from the power rooms that you have and place them in the training area (Combo 3 to be able to place 6 in there).
- Step 3: Wait a minute or few seconds then close the game down, Level 1 room training to train level 2 S to three should take 1:15h long (Not sure of the time is right but check if you’re unsure).
- Step 4: Come back to your game when the level up happens then collect all your resources and level up your character then wait a bit and turn it off again. (Level 3 to 4 is around 2:30h and again check to make sure you know the timer).
- Step 5: Repeat step 4, Infinite training of stats while having high resources at all time and never having to worry about being in trouble while training your stats up. You won’t be able to mirco manger the game at all and lose out on rushing quest and getting a quest for a lunchboxes but on the plus side you can get good amount of stats on your character that will pump your resources well when you want to go back to micro manger the game once again. If you get let’s say 5-6 S you won’t have to worry about power for awhile.
Donation.
[link]
If you want to donate me something, just send me a trade offer.
You can donate me any items you want.
Top donators will be posted here.
TOP Donations:
1.UnassumedGender (Trade offer was declined for some reason).
The End.
Thank you for reading my guide!
Leave a like and don’t forget to favorite!
EDIT: Thank you all who liked my guide, now it has 5 stars rating! Thanks guys for your big support!
Check out my other Fallout Shelter guide!
EDIT 2: 200 favorites milestone!
EDIT 3: 400 likes milestone!
EDIT 4: 500 likes milestone! Thank you so much!
EDIT 5: 400 favorites milestone! Thank you again!
[link]
