Overview
A guide to modding,covering most if not all aspects of current modding,icluding alternate weapons,advanced reloads,and the like
Introduction
So,after being a modder for about 2 years,one day i decided to make a guide so that more people could start doing this.Now,like 4 months ago,i am finally doing this.
Currently the only reliable guides to modding gunsi have found are Joe the Pirate’s,and those are somewhat outdated to current modding as it is.
Before starting,special thanks to all the people i regularly work with,Erazer,Jay,Krev,Hans,Martino,Galahad,2k and Slippy
Requirements,starting up,Step 1
Every journey begins with a single step.This is step one
To clarify,this guide is not gonna teach you to model,but i will try to show you guys how to animate your gun (the basics),and the differences there are between animating,for example,an assault rifle and a grenade.
First of all,if you don’t have blender,you can get it here (Version 2.79,as 2.8 has problems):
[link]
You’ll also need Unity 5.6.7.1f/p,which you can download here:
[link] (It’s in the 5.x page,Unity 5.6.7)
Last but not least,the Ravenfield modding tools,which are maybe the most important part of this:
[link]
Now,before animating anything,let’s open unity and set up the weaponslab scene so you don’t have to do it later.After opening unity,you’ll have to open the toolspack as a project,this is relatively easy as you just select it’s folder (It can take a moment to open)
After this is done,click on “File”,”Open scene”,and navigate to Scenes (In the Assets floder),then select weaponslab and open
Now click on Ravenfield Tools,Set Game executable,and find your Rf installation folder.Click on accept


Now that the base in unity is set,press ctrl+s to save the scene (you’ll do this a lot in the future so it’s better to get used to it)
I assume you already have a model for your gun/melee/grenade/ect,if you don’t you should learn to model or collab with someone who can model.
Once you have your model,search in the toolspack folder (Assets-Models-Character-Hands),and click on file and save as.Place the new saved (with the name you want,preferably the name of the thing you are making) in the Models-Weapons folder for easier storage,though in reality you can place it anywhere,it’s better to be tidy.
Now,Ctrl C Ctrl V your weapon to the new file you made that has the hands.
You’ll usually have something like this:

Now,if everything is parented (select child,select father,press control P and click object) this should be easy,just select the top parent and scale it down until it fits the hands.If you want to be accurate,use the dimensions setting and set it to the real life counterpart (usually only the length is needed,then you copypaste the scale value on the axis you changed to the other ones)

After the weapon is scaled,select the main parent,press ctrl a and set it to scale (rotation and scale if the rotation isn’t 0),this will make it so the scale (and rotation) values are set to 1 for the new scale,which is very important in animating.
With this,now do the same to all children (parented objects) of the main parent,to make sure everything is set back to scale 1 1 1
With all set to scale,now click on the bones of the rig (they’ll highlight in yellow),and click on “Object mode”,set it to pose mode


Now everything is set to make the idle,the first step in making a gun
Animating,Step 2 (idle)
Now you have your weapon set to scale,your bones are actual bones now,and you are wondering what to do.Fear not my friend,first of all,select one of the hands

And go to the menu on the right,selecting the little bone with a chain

Here,click on add bone constraint,and select child of

Now click on target,and select the mesh you want that hand to follow

Usually,the left hand follows the magazine for the reload animation,and the right hand just follows the main body of the gun,sometimes a bolt (though if you are making a bolt action rifle with clips,i recommend the right hand follows the clip)
Now both of the hands are parented,which means this should be ready,right?
No,first you need to setup a base pose,how the gun will be when you are not doing anything,the idle
The first step would be placing the gun where you feel it’s comfortable,usuallty offset to the right from the center,and in the lower right corner,like this

Now begins the boring process of setting the hands to be where they should.I can’t really help you that much with this,as it’s up to personal preference,but make sure you can’t see the back side of your arms (the holes) in 120 FOV.To check,click on the camera (if you are in first person view,which you enter pressing 0,click on the outline),go to the little camera icon on the right,select fov,and set it to 120,which is the max in game.Set it back to 96 after doing the comprobations

When everything is set,click on the little red icon on the bottom of the page so it looks like this

Now,click on the tips of the fingers (the orange bone),and click on the movement directions,without moving them.With this you are creating a keyframe for the whole finger.Now do the same with the hand bones,elbows,arms,and all the pieces of the gun.When everything has it’s keyframe,you’ll be able to see them opening the dope sheet.
To open it,click and drag to the right this icon on the top left of the view

And click on the bottom left icon,set it to dope sheet

Here you should press A to unselect all keyframes,and now click on the topmost keyframe (the jewel icon),and press shift d to duplicate it.Make sure both the keyframes are on frame 1 and 2
You should also set the length of the animation, in the icon below,to about 800 or 1000,depending on your preferences (500 works too if you are starting small)

Once you feel both hands,fingers,joints and everything else is in the correct place,it’s time to move on to Step 3,Rain fire
Animating,Step 3,basic animations
Now that you have the idle set up (remember you can click on the top most jewel icon of the keyframe to select a whole keyframe,then press shift D and drag it with the mouse to duplicate the new keyframe,click to set it the where you moved it to),it’s time to start animating
Now,i cannot really tell you how to animate your guns,but i can tell you the animations you’ll need and the basis of making them
First of all,the whole list,with descriptions of each animation:
-Idle (you already did this one)
-Aim->Duplicate your idle,set it to about frame 20 or something (to zoom in the dope sheet use the mouse wheel),and place the gun in X=0.You can do this with the menu on the right.Make sure it’s not rotated,unless you want to be fancy
To make the transition to that,you can, in the empty keyframes between both,maybe rotate the gun or move it a bit so that it’s not a 100% smooth boring transition
-Fire animations->In the case that your gun is a pistol,or just has moving parts,you need a fire animation.As always,duplicate the idle keyframe and place it after the aim.Do it a gain and move it a bit to the right of the first one you duped. In this one,move whatever moving part there is,this doesn’t really need much explaining.Just make sure that in the last keyframe you make for the animation it’s back to idle

-Idle states->If your gun has an empty state,like a pistol’s slide being back,make a set of keyframes to mark it.Usually 2 keyframes next to each other with the regular state,and then the same but with all parts that are there when empty in such state

-Run->Do as always,duplicate keyframes (i’ll stop saying that now i swear),and the last frame of the animation is what you’ll be seeing the most when running,usually the gun tilted towards you,close and down on the screen
-Draw->To start this one,set the camera FOV to 120.Now place the gun under the line of the camera so that you can’t see it before it’s drawn.Now just make it go up in a somewhat natural motion.You can do it fast and agressive,slow,or however you want.Usually what i do is at the end have the last keyframe preceded by one which is the same,except the gun is a bit lower and tilted down and forwards or backwards,to give it a more natural transition
-Kick->Usually for this one i tilt the gun and move it to the side,because in blender you of course cannot see the leg,so what you do is leave space for it to show up in game
-Squad animations (Send and call squad)->Animations for the squad commands.Usually some kind of hand movement pointing forwards or towards the ground,this one is pretty free to decide your own style

BONUS POINT
If later on you want your gun to display different ammo counts inside the magazine, make more idle states, each one having 1 more bullet hidden (you can downscale them and hide them in the magazine). Treat them like the previous idle states, make sure the bullets are hidden inside whatever is their parent, as when you reload they’ll follow it.

Now for step 4,more complex animations
Animating,Step 4,bolts
Now you have all the animations i call “basic”.If your blender is starting to lag,i recommend you go to file,save as,and create a new file,such as “(gun name) bolt animations/reloads”.Then delete all the keyframes in this new file except the idle or the ones you’ll use (like aiming if it’s a bolt action,you’ll need that too).This also works for shotgun pumping
Now,for the bolts,i usually have 4 animations,with my “personal” names being bolt hip ammo,bolt hip empty,bolt aim ammo,bolt aim empty
I cannot really tell you how to do them,except to make sure there’s as little clipping between parts as possible,and also that the movement is not too exaggerated,as that looks weird.
I usually just make the regular bolt,which includes chambering the bullet,then duplicate the whole animation (select all the keyframes,you can do this by clicking on the sheet at a certain moment,then place your mouse to the left or right of the mark and press ctrl a to select that side of the sheet)


Now you have a bolt animation done (i hope),duplicate it and this time make sure you can’t see the bullet being chambered (move it out of view inside the gun or something),this is your “bolt hip empty” animation
Now duplicate them both again,and go back to your aim pose.Click on the body of the gun and on a movement icon,and it’s keyframe will be marked.Duplicate it and bring it to the 2 bolts you duplicated,place it on all the keyframes the gun movement was at by your last animation there,and now make the movement again,but this time as if you were aiming (which you are).These are the aiming bolt animations

Now go to your aim animation,move it in this new file to the end of the current keyframes done,and duplicate it so you have 2 1 frame apart from each other,like you did with the idle states.This is your “aim frame”,which will be useful for when we mod this
BONUS POINT-ADDITIVE BOLT ANIMATIONS
If you want to have a single bolt animation that works no matter if you’re aiming, in blender, add empty, plain axes, place it in 0 0 0, and parent BOTH the weapon’s top parent (generally the body) and the armature (click on the hands, and on the corner where it now says “pose mode”, click and set it to “object mode” again, now like normal, parent it to the empty; you can set it back to pose mode now).
You will notice that moving the gun works as normal, the hands follow it. Moving the hands is just normal too. Moving the empty object will move ALL, the armature and the gun.

Now, when you make the aim animation, instead of moving the gun, move the empty object. This will move the entire group, it’s a bit harder to do precisely than moving the gun itself, but trust me, it’s necessary if you want the additive animations. Don’t move the empty object for anything else, every other animation should be done as normal, only use it for the aim if you want this method.

Animating,Step 5,reloads
Now we need to reload the gun,this is probably the lengthiest part of making an animation,as the reload is the most important part of a gun after the idle,as you’ll see it a lot
Start by laying out the base.Just make the load animation,but without gun movement,only the hands moving as they need to and the magazine (or whatever is loaded).This by itself will look very crude,but it lets you go step by step and add more detail to this part
When you are done making the base for the animation,it’s time to add gun movement.If this is your first time animating,you should try to copy other games,i used to copy things like call of duty or battlefield for the movement,as it makes it easier to learn what you like and what you don’t.This is really the most subjective step,as everyone has a different taste in reloads.For starters i recommend you don’t wave the gun around the whole screen or make it tilt a lot every time you change mags.
Another tip is to add both kinds of movement,this means rotation and translation,don’t just rotate the gun,make it go up and to the right,and stuff like that

Remember that,if you want to do advanced reloads,you need at least 2 animations,one for the regular state,and one for when empty.
For this i recommend you duplicate your reload and just select the parts on the empty animation that will be there (for example,a pistol’s slide being back),and paste that keyframe to override the ones in the reload you duped.
Now just add more keyframes where you make it go back to normal,for example,racking an slide on a pistol,or pressing a button


If you are making advanced reloads,for example a shotgun or bolt action rifle with clips,make sure the reload is “split” into sections,opening the bolt and going to the start of what will be the loop,the loop itself,and closing and going back to idle.Just make sure that the loop ends and starts in the same way,which is also the way the start ends,and the end starts

Animating,Bonus,grenades and melee
Beginning with grenades,if that’s what you want to do,the animation set is practically the same as in a regular gun
-Idle
-Aim
-Run
-Draw (Make sure the frame where it’s out of the screen is duplicated like you do with empty states,this will be the “out of frame” animation
-Kick
-Send/Call squad
-Throw->For a grenade,you need a throw animation.This is usually removing a pin and just throwing,but some advice,first of all,make sure when you do the throw motion of the hand,that the grenade is nowhere to be seen,it should be behind the camera
You should also make it so the throw animation ends in the first frame of the draw,when it was outside of view


Now for melee weapons,the set is exactly the same as the grenades,except instead of throwing you hit.I usually make several hit animations to be able to randomize it in unity,or at least to be able to select which one i prefer

If your gun has a bayonet,just make sure you add a hit animation at the end of it’s regular keyframes,you won’t really need more

Unity,Step 1,importing
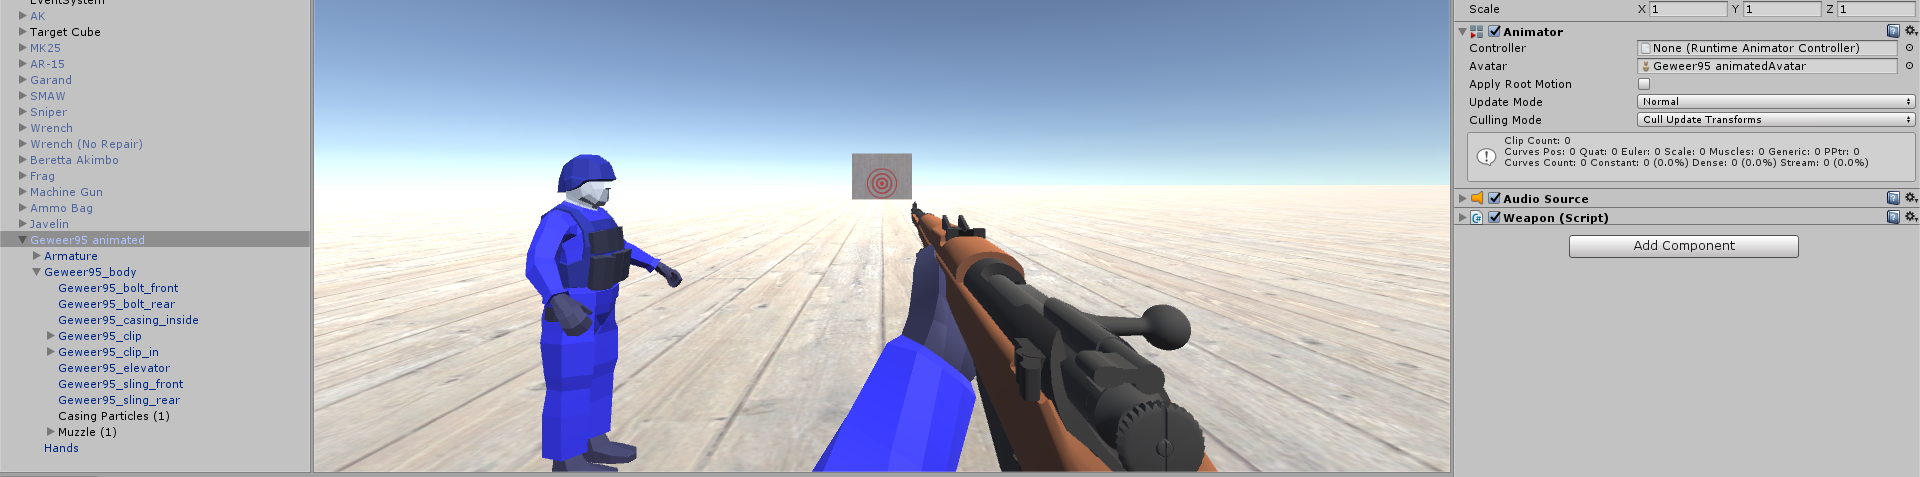
Now everything in blender is set.Go back to unity (or open it),and search for the folder you saved your gun at,usually Models->Weapons.Find your gun,and drag and drop it in the hierarchy on the left

Now,with the model in the bottom menu still selected,go to the menu on the right,click on ArmatureActiona,and click on the + symbol to duplicate it.Give it a name,usually a key name for each gun (I usually ctrl c the name for easier importing)

To import the animation,just set the values in the boxes to the values in blender,make sure that if blender says “42” in the keyframe,you set it in unity to 41,aka the “Blender-1” rule

When yo uget to animations in which only a certain part moves,for example a pistol’s slide,go down and click on “mask”,now set it to “create from this model”.There,make sure only the moving parts of the animation (this is done for the fire animations of guns with slides and for the idle states,empty and normal) are selected

This is only valid for advanced reloads:
When you get to the reload animations,open the “events” tab,and click on the little icon on the left of the timeline.This will add an event.Click on it and call it “MotionDone” without the quotation marks,and drag it to almost the end of the timeline


Now create another one,call it “ReloadDone”,again,without quotes,and drag it closer to the end than MotionDone

MotionDone makes the game update the ammo count on the reload,ReloadDone lets you do stuff again (aim,fire,etc)
If you have an overheat animation of sorts,or just want the gun to not be able to shoot during a certain animation,add the event LockWeapon on that animation,and the event UnlockWeapon at the end of said animation

If you have an animation that loops on itself,or that should,like a breathing idle,make sure to tick “Loop Time” on the top of the menu you see there

When everything is done,click on Apply

BONUS POINT-Additive bolt animations, continuation
This is really simple, when you import the aim animation that you made using the empty object, mask it, and in the mask section, create from this model, and select the empty object. For now, the additive animations are well on the way, the continuation of this will be at the end of the bonus section in the animation controller part.

Unity,Step 2,making the weapon a weapon
After importing all animations comes making the weapon be an actual thing instead of just a mesh

First of all,click on the “Hands” in the hierarchy (open the gun’s hierarchy by clicking on the arrow),and on the right you’ll see a menu.Where it says material,you’ll see an small circle.Click on that and on the searchbar type “Blue” or “Red”,and select the arm material

Now,the easiest way to do this is going to another one of the guns in the hierarchy.Open them up and you’ll see they have a thing under the mesh called muzzle and casing particles

Select both of them (if your gun is a melee weapon,use the one in the wrench,if it’s a grenade or throwable,use the one in the grenade from the hierarchy),and press ctrl d to duplicate them.
Drag them so they are under the hierarchy of your gun,specifically under the main mesh

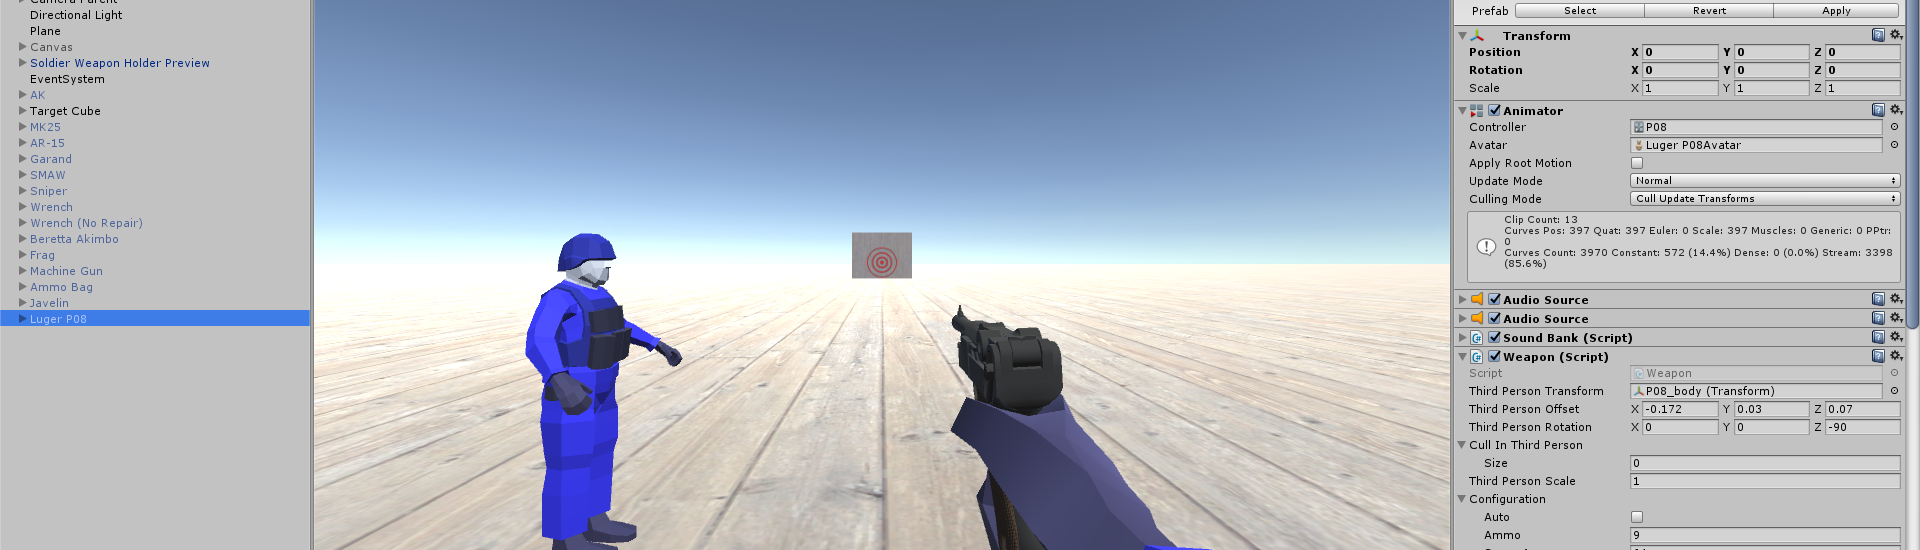
Now go back to any of the guns,the one closer to how yours will behave.Right click on the weapon component,copy component.Go to your weapon,right click on the first component you see (the animator one) and click on paste component
Do the same for the audio component

Now,add the muzzle and casing particles.To do this,open the weapon component by left clicking over it,search for “muzzle” and “casing particles”,and drag yours accordingly to those spots

Now,set up the third person transform.To do that,drag the model of the gun (the top parent of the meshes,the parent of the casings and muzzle),to where it says third person transform

Now you can fiddle with the values at hand,the most important being the first and second sections.
In the first side you can customize the base,that is,the ammo,the coodlown between shots (rpm/60,1/result of that),the loaded ammo,and all that juicy stuff.I’ll leave that up to you

Now the second section,involving recoil and spread,i’ll also leave it to you because it’s your gun after all

To make it so the hands actually work in game,drag and drop the “Hands” mesh in the hierarchy to this place at the bottom of the weapon script.You can also setup the UI icon over there,though i won’t be covering how to make one

When you add your UI icon to the nice easy to organize folder (Assets->Materials->Textures->UI->Weapons),make sure to click on it,where it says “Texture type”,set it to Sprite,2D and UI

To make your weapon have different aim animations (you need a controller too),scroll to where it says sight modes,and place the number you want,usually 2.You can also name them
For advanced reloads,tick on advanced reloads,and set the allowed reloads to all the bullets that can be reloaded.For example,an StG44 holds 30 bullets,so it needs to have 30 allowed reloads,from 1 to 30 individually.If you wanna make a weapon with a bullet in the chamber,set the allowed reloads to,for example,30,and then the ammo count to 31.This means if you reload partially you load to 31,but if you load from empty you load to 30

Now on the top you’ll see something that says “animator”,and controller.The controller is what will make the animations play.I this case i’ll use one made by myself,which at the end will be linked with a set of resources through google drive.To set it up,just click on the circle and search for your controller

If you don’t have one,go to Assets->Animations->Weapons,and find a controller there.Select it and press ctrl d to duplicate it.Change the name by pressing F2 with the thing selected.Now just add that one.The best one to use is the Garret’s,as it has lots of things setup,but as i said i’ll leave some of mine which are probably easier to use as their as already setup in their final form
If you want the weapon to have reload/bolt/misc sounds apart from the fire,click on add component and search “audio source”,add en empty one.Now add another one,this time a “Soundbank”


Now,drag that empty audio source to where it says “audio source” in the soundbank.Drag it to where it says “reload audio” in the weapon component

You can also set all the sounds in the soundbank now

Unity,Step 3,animation controller and reload sounds
Now,as i said,i will be leaving some of my controllers for you to use,so i won’t get deep into making controllers,but i’ll show you how to use them
Go to Animations->Weapons and select your controller,and click on “Animator” in the tabs at the top

This will show you the animation controller, in this case one that i’ve already set up.
If you click on an state you can create transitions with left click->add transition,click on another state so that the previous one transitions to that one.Clicking on the arrow,on the right menu you’llsee an options dropdown.Open it and you’ll see how to customize the transition.For example,you can click on the plus and minus to add conditions,which will make it so the transition only happens if you do certain actions,like aiming or reloading

To setup your animatiosn in the animator,click on an estate,and then on the little circle next to “motion”.Now a searchbar opens,that’s why we gave the animations of the gun a code name.Just search the code name (i usually copy paste it),and click on the animations for each estate,idle for idle,reload for reload,you get the point

To customize a controller,the main thing is parameters and conditions.
To add a transition,right click on an state,create transition,and click on where you want it to go to.
In the menu on the right you can customize things like exit time (the game will wait X until it plays another animation from the controller) or transition time (unity adds “keyframes” to transition from one animation to another,useful for going out of certain things like running or aiming)
Now let’s go to parameters.If your controller does not have “loaded ammo”,add a new parameter with the + icon,and call it exactly that,make it an int.If you want to randomize animations,add one called “random”,make it a float.You can use that one on transitions,for example “random less than 50″ will play one reload,”random more than 49” will play another one
For advanced reloads,what you do is have 2 reload states,with the difference being one has “loaded ammo greater than 0″ and another,”loaded ammo equals 0”
For sight modes,you have several aim states,usually 4,with transitions like they are showcased in the controllers i provided.You just have “sight mode” as condition for them
Make sure your masked animations are on their own layer,the Fire Layer,as if they aren’t it’ll cause severe problems

Now,when you’re done here,let’s head on to the next step,reload sounds
I assume your soundbank already has sounds,so make sure you know which is which,for example,magout is set in the first place,it’s element 0,and thus that’s the key for the sound.
Go to the importing tab for the animations,and click on an animation you want to give sounds
Add an event and call it “PlaySoundBank” without quoting marks.Move it to roughtly the point in the animation you want to hear it,and set the Int value to the element number of the soundbank.The first sound is 0,the second is 1,and so on

Remember to click on apply when you do this
EXTRA SECTION-AMMO STATES AND ADDITIVE ANIMATIONS
Ammo states are, as the name implies, animations (or well, “states” literally) for certain bullet counts. If you aren’t a deranged psycopath, ammo states are only essentially for pistols, to make the slide stay back after it’s empty.
To make normal ammo states, it’s relatively easy. Take your “idle empty” and “idle full” (or however you wanna call them) animations, and put them in the fire layer. Rmemeber that they have to be masked.
What i usually do is have the fire animation go to idle full, and the fire last (if you have one, if you want to have one, just set as conditions “fire” and “ammo equals zero”) go to idle empty. You can also set the transition from idle empty to idle full, making it “ammo greater than 0”, and the opposite, “ammo equals 0”
If you are a completely mentally unhinged person, you will wonder, “can i make every single bullet in the magazine visible and animated”. Yes. It’s actually quite easy, but it is somewhat tedious.
For this, during the animation process, you have to make individual ammo states.
For this you will definitely need advanced reloads (“ReloadDone” and “MotionDone”)

These are just 2 frames (a single one duplicated), where the relevant bullets are hidden, normally you can scale them down and hide them in the walls of the magazine, make sure to hide them inside of it since, as they’d be parented to it, they’ll follow it during the reload animation.
Make sure the bullets are only animated in these ammo states, do not animate or mask them in other layers or there will be unexpected consequences.

Once in unity, there’s a trick to quickly export the animations. I generally make the file with the ammo states a separate one, “(Gun name) ammo states”, for easier importing. In your unity hierarchy, right click->create->avatar mask
Name it conveniently, click on it, click on the arrow where it says transform, and click on the circle next to “none (avatar)”. Now, search for the name of your ammo states file and click on it.

Now, simply click on import skeleton, and select whatever should be masked (in this case, the bullets). Now, when you import the ammo states, click on mask, copy from other mask, and select your avatar. Whenever you select “copy from other mask” in the next states, it’ll automatically select the avatar, so you only have to add the avatar to the mask once.

Now, in the animation controller, create a new layer (simply click on the + sign next to the layers label in the animation controller section), make it the bottom one, call it whatever you want (i generally call them “ammo layer”, set it to “override” by clicking on the gear, and weight to 1.

On this layer, create an individual state for every ammo count you made, set the transition to each one to “ammo equals X”, and make sure exit time and transition time are 0. If the masks were applied correctly, now your gun displays every bullet.

Now, if your MotionDone in the reload animation is at the end, you’ll notice the bullets suddently pop up there, and not when they should. To fix this, go to your reload animation, and move the MotionDone to roughly after the magazine goes off screen. The bullets will be added to the gun befor you insert the magazine (which can be exploited by avid players), but your reload will accurately show bullets being added.

This will work even after your reserve ammo is less than a magazine. If you tell the game to show X bullets, it’ll show X bullets, so if you had 2 loaded and 5 in reserve, when the new magazine comes, it’ll show 7 bullets, which is really neat.

Unity, Step 3, Bonus-Additive aim animations
THIS IS COMPLETELY OPTIONAL AND MOSTLY ONLY RELEVANT TO BOLT ACTION GUNS
Remember where you left off? Now you have an aim animation that has a mask, so it should’t go on the regular layer. This is quite simple to solve, just make a new layer (+ button next to the layers label), set it to additive (not override), and weight to 1.

In this layer, create an state, don’t add any animations to it, and set it as default (right click, set as layer’s default state).

Now make another state, call it “aim” or however you want, and add a transition from the empty one to aim. Set it to “aim true”, like if it was in the default layer. If you don’t wanna complicate things, make a transition back from aim to empty and set it to “aim false”.
If you wanna get a bit complex, create another aim state, and set speed to -1.

Now set the transition from aim to aim stop, “aim false”, and from aim stop to the empty state. Set transition time and exit time to 0 on this last transition, or it’ll look weird. Now, when you stop aiming, you will have an animation to make it less “weightless”, which is kind of how the regular transition feels.

If you’ve followed the steps, your gun should now be able to perform the regular bolting animation even while aiming, and it will allow quickscopes (quick transition from aiming to not aiming, while still doing the bolt animation).
Remember to have the bolt animation not set to “aim true”, just to “fire” and the other relevant conditions (ammo quantity, random parameter, etc).

Unity,Step 4,testing the gun in the lab
To test the gun,and potentially the sounds you added,click on the play icon on top.To stop testing,click again.

Here you can fire,aim,run,test the animations,and most importantly,test the recoil,accuracy,and sounds.
If the sounds aren’t correctly set (reload sounds),you can go back to the previous step and just arrange them differently in the timeline until they sound right
This is overall an step you will be going back to dozens of times,as you try to make the gun,sounds,and feel,just right
Unity,step 5,melee weapons and grenades
For grenades the main difference will be you take the throwableweapon script,usually from the grenade in the hierarchy

You also need to make sure the throw animation has the event “SpawnThrowable” without quotations,that is quite literally what spawns the projectile
For melee weapons,the main thing is that it uses a melee weapon script.The options are the same,except at the end you get a set of values to change how it behaves as a melee weapon,like swing time (time for the hit to register) or range

Unity,Step 6,projectiles
You will have notice that so far the gun you are making has the default “tracer” of the gun you copied
To make your own projectiles,go to Assets->Prefabs->Projectiles,select one you fancy as a base,and duplicate it,then change the name acordingly
Here you can modify a variety of values,including speed,damage,knockdown damage,range,and the like

To add the projectile to your gun,just go to the weapons script,search “Projectile”,click on the circle,and search yours (by name is easier)
If what you want are rockets,you’ll need to do the same,except you duplicate the default rocket.Make sure you have a mesh (you can change the default one to yorus in,again,the circle icon next to the mesh render of the projectile).The values are basic too,so nothing really fancy to explain.This guide doesn’t cover making custom particles as that is out of my area of expertise

For a grenade,you do as always,duplicate the default grenade and set your own values.If you want to do a grenade that detonates on impact,set it to “only detonate on ground”,set “lifetime” to a low number (like 0,1),and set ground detonation speed to something like 2000

(The following knowledge has been provided by Krev)
Proximity fuses,targer seeking,and the like need a light script (component) on the projectile’s prefab,we do not know why,but otherwise the seeking effect doesn’t happen and the projectile breaks
Unity,Step 7,alternate weapons
If what you want to do is have a bayonet,grenade launcher,or any other alternate weapon that you may prefer,i’ll leave some controllers for it (so you don’t have to set them up like i had to),and explain the modding side of things.
If you want to set it up yourself, you can create 2 layers on an empty controller (right click over the emptyness of it), and make transitions from one another, setting the conditions to “alternate weapon equals X (0 or 1)”.If you want to see how these controllers work, you can check the patriot GL’s one in the vanilla toolspack, i can’t really get much deeper since it’s all up to you. If you have specific doubts don’t be afraid to DM me on Steam or Discord
First of all,go to the hierarchy of your weapon and select one of the children meshes,i prefer to select the one that the weapon is (for example the bayonet),but you don’t really have to,i do it for organization’s sake

Now,add a weapon script/melee weapon script,or whichever you want,add the sounds,soundbank,and everything you did for the top weapon.Do not set up an animation controller for it,it uses the parent’s,which as i said i’ll link some.You also need to setup a muzzle and casing particles (if it has those),that’s done like in a regular gun

Now,every important,at the bottom you’ll see “parent weapon”.Drag and drop the top parent (where the weapon scripts are) there

If you want to have multiple alternate weapons,you do that by having several weapons parented to the top parent,with an animation controlelr that supports that (sadly i don’t have one of those)
Unity,Step 8,Freedom (Or how to make your weapon a prefab)
Now you have your weapon completely set up in the hierarchy.But it’s not something you can add to the game yet.The tooslpack works with prefabss,that is “packets” that have everything from the gun and are easy to access
To make your weapon into a prefab,go to your prefered folder (In my case,Assets->Prefabs->Weapons),drag and drop your weapon from the hierarchy to an empty spot there

Now you can safely delete the weapon from the hierarchy,as long as you don’t delete the prefab it’s alright.If you want to test it again,just drag it from prefabs to the hierarchy and it’ll be “duplicated”
Step 9,Scape Unity
Now your weapon is a prefab.Great,you have a piece of 1’s and 0’s in a folder.But you need to make it into something the game can read.
Go to Assets->Content
There you have example files,duplicate the example weapons mod,and change it’s name to your prefered one (FOr projects i usually add [ProjectName] before the actual name,for easier management)

Now set the size to 1 if it isn’t,and there you can select your weapon’s prefab with,as always,the little circle.If you select something and the name shows an small white square next to the blue cube,you selected a mesh and not a prefab,so try again and get accurate

With the prefab selected,you can now customize the name and tags,you can set as many tags as you want but i recommend you don’t for your first weapons,usually set it to first the default tag (Assault,Marksman,etc),and you can set the slot it will belong to,for example large gear or secondary.
You can also set how bots will use the gun,though for most that’ll be “normal”

When everything in the content file is done,select it from the hierarchy,click on Ravenfield Tools on the top,Content,Export content mod.This will export the file to an rfc in 2 places,first,the export folder of the toolspack,and second,your Ravenfield Tools Export folder, in your install direction of the game.This second file allows you to test the mod even before uploading it.If you wanna sub to your own mod,delete it from here because it’ll cause conflicts if you have 2 of the same

To upload it,click on Ravenfield Tools and Publis to Steam workshop

There,click on create new item if that’s your intent (if you are updating a mod,just click on the dropdown menu to search for it,and click on load item)

Set a title (you can set the description on Steam),set a thumbnail,set the rfc to upload from the list,do not click on make public,and if you want to add a changelog

Now,click on Publish,wait a moment (Remember to be online on steam),and click on Ok.That will get you to your mod’s steam page.It’s currently private,you can mess around,set a description properly,add screenshots,add it to collections,and finally,click on visibility,and set public (if that’s your objective)
Congratulations,you’ve just released a mod 🙂
Thanks for reading (Or skipping to the end)
Well,i hope this guide has somewhat helped at least one person getting into modding,or at least improving their content (or their view of modders,we aren’t mystic beings after all).
As a final note,i’ll leave the link to a google drive folder with several animation controllers that are already setup
[link]
Link to a compressed folder with a lot of controllers for very different guns and situations,including bolt action rifles,rifles with alternate weapons,grenades,melee weapons,and more
If you liked this guide,or just have any feedback,write a comment to let me know.You can also i guess try my mods (i already showed lots of stuff in the screenshots) if you want,and if it has been useful to you,share the guideor at least raise awareness about it i guess
Thanks for reading
-Mellamomellamo