Metalworking (Blacksmithing) A to Z [B42]
Metalworking Basics

This guide will be useful for anyone who wants to start interaction with the Metalworking system but finds themselves confused. Those who already have some experience interacting with the Metalworking system can also find some use out of this guide, mainly in "Most efficient way to level up (Part II)" for some math. In any case, hopefully, this guide will be helpful for you.
Metalworking is an essential skill that allows for the crafting of a wide range of mid- and top-tier weapons, armor and general utility items like buckets, cups, etc. With so many items to craft and acquire, one might just get lost as to where to begin with in order to end up being a knight in rusty shiny armor. This guide will give you a general direction on what exactly you need to become a true blacksmith and help you get that metal armor or sword that you are looking for. As primitive survival is unavailable at this point in B42, it is assumed you have access to buildings in the area you are spawned in. All values required by craft/building recipes, experience gain and so on are not final and (probably) be updated until B42 reaches stable release.
Getting started
To begin your journey with metalworking, you need to build one Forge:Forge Name
Items Required to Build
Total resources
Skills Required
 Primitive Forge
1 Bucket of Clay Cement
10 Stone
1 Stone Anvil
10 Stone
1 Stone Anvil
10L of water
2 Clay
1 Sack of Sand
10 Stones
1 Hammer
1 Crude / Mason's Chisel
2 Clay
1 Sack of Sand
10 Stones
1 Hammer
1 Crude / Mason's Chisel
Masonry 2
 Simple Forge
1 Mason's Trowel
30 Stone Blocks
1 Bucket of Clay Cement
1 Blacksmith Anvil
1 Wooden Bucket
1 Log
30 Stone Blocks
1 Bucket of Clay Cement
1 Blacksmith Anvil
1 Wooden Bucket
1 Log
10L of water
30 Clay
1 Sack of Sand
70 Stones
12 Planks
9 Nail
10 Charcoal
16 Steel / Iron Bar Half
1 Wire
1 Small Handle
2 Iron Band (Small)
1 Log
1 Tongs
1 Saw
1 Hammer
1 Mason's Trowel
1 Crude / Mason's Chisel
30 Clay
1 Sack of Sand
70 Stones
12 Planks
9 Nail
10 Charcoal
16 Steel / Iron Bar Half
1 Wire
1 Small Handle
2 Iron Band (Small)
1 Log
1 Tongs
1 Saw
1 Hammer
1 Mason's Trowel
1 Crude / Mason's Chisel
Masonry 1
Carpentry 2
Carpentry 2
 Advanced Forge
1 Mason's Trowel
30 Stone Blocks
1 Bucket of Clay Cement
1 Blacksmith Anvil
1 Wooden Bucket
1 Log
1 Large Bellows
30 Stone Blocks
1 Bucket of Clay Cement
1 Blacksmith Anvil
1 Wooden Bucket
1 Log
1 Large Bellows
10.3L of water
30 Clay
1 Sack of Sand
20 Planks
19 Nails
6 Long Sticks
2 Twine
2 Tree Branches / Wooden Rods / Large Handles OR 1 Plank
10 Charcoal
16 Steel / Iron Bar Half
1 Wire
1 Small Handle
1 Animal Brain
1 Bowl
1 Medium Leather (Pigs, Deers, Sheep etc.)
2 Iron Band (Small)
1 Tongs
1 Bone Fleshing Tool / Fleshing Tool
1 Saw
1 Hammer
1 Mason's Trowel
1 Crude / Mason's Chisel
30 Clay
1 Sack of Sand
20 Planks
19 Nails
6 Long Sticks
2 Twine
2 Tree Branches / Wooden Rods / Large Handles OR 1 Plank
10 Charcoal
16 Steel / Iron Bar Half
1 Wire
1 Small Handle
1 Animal Brain
1 Bowl
1 Medium Leather (Pigs, Deers, Sheep etc.)
2 Iron Band (Small)
1 Tongs
1 Bone Fleshing Tool / Fleshing Tool
1 Saw
1 Hammer
1 Mason's Trowel
1 Crude / Mason's Chisel
Masonry 1
Carpentry 2
Carving 2
Carpentry 2
Carving 2
Simple and Advanced Forge's total resources include resources needed to build all necessary crafting stations like Simple Furnace and Hand-Operated Press or, in addition, Butchering Hook/Softening Beam/Tanning Barrel/Medium Leather Drying Rack in case of Advanced Forge.
You will also need one Furnace. What you need to know is that in order to build Simple Forge and Advanced Forge, you will need at least Simple Furnace as it can craft Blacksmith Anvil.
Furnace Name
Items Required to Build
Total resources
Skills Required
 Primitive Furnace
6 Clay
4 Stone
1 Bucket of Clay Cement
4 Stone
1 Bucket of Clay Cement
10L of water
8 Clay
1 Sack of Sand
4 Stone
8 Clay
1 Sack of Sand
4 Stone
None
Simple Furnace1 Mason's Trowel
40 Stone Blocks
1 Bucket of Clay Cement
40 Stone Blocks
1 Bucket of Clay Cement
10L of water
2 Clay
1 Sack of Sand
40 Stones
1 Hammer
1 Crude / Mason's Chisel
1 Mason's Trowel
2 Clay
1 Sack of Sand
40 Stones
1 Hammer
1 Crude / Mason's Chisel
1 Mason's Trowel
Masonry 1
 Advanced Furnace
1 Mason's Trowel
40 Stone Blocks
1 Bucket of Clay Cement
1 Large Bellows
40 Stone Blocks
1 Bucket of Clay Cement
1 Large Bellows
10.3L of water
30 Clay
1 Sack of Sand
6 Long Sticks
2 Twine
12 Planks
11 Nails
1 Animal Brain
1 Bowl
1 Medium Leather (Pigs, Deers, Sheep etc.)
2 Medium Handles (2 Tree Branches / Wooden Rods / Large Handles OR 1 Plank)
10 Charcoal
16 Steel / Iron Bar Half
1 Tongs
1 Saw
1 Hammer
1 Mason's Trowel
1 Crude / Mason's Chisel
30 Clay
1 Sack of Sand
6 Long Sticks
2 Twine
12 Planks
11 Nails
1 Animal Brain
1 Bowl
1 Medium Leather (Pigs, Deers, Sheep etc.)
2 Medium Handles (2 Tree Branches / Wooden Rods / Large Handles OR 1 Plank)
10 Charcoal
16 Steel / Iron Bar Half
1 Tongs
1 Saw
1 Hammer
1 Mason's Trowel
1 Crude / Mason's Chisel
Masonry 1
Carpentry 2
Carving 2
Carpentry 2
Carving 2
Finally, to craft a Simple and Advanced Forge, you will need a Blacksmith Anvil. You can craft it using Simple or Advanced Furnace. Here is how you do it:
- Craft Wooden Blacksmith Anvil Mold, it requires you to have level 2 in Carpentry.
- Build a Hand-Operated Press.
- In Hand-Operated Press, you will see a recipe for "Press Blacksmith Anvil Mold". Craft it, and you will get Clay Blacksmith Anvil Mold (Unfired).
- Build Advanced Kiln, and you will see a recipe for "Fire Clay Blacksmith Anvil Mold". Craft it, and you will get Ceramic Blacksmith Anvil Mold.
- Build Simple or Advanced Furnace; you will see "Cast Blacksmith Anvil". Craft it and you will get a Blacksmith Anvil.

 =
=  +
+  + 4
+ 4  + 1
+ 1 

 = + 8
= + 8 

 = +
= +  +
+  OR =
OR =  + + 10
  + 16
+ 16 
Total resources per Blacksmith Anvil:
4 Planks (Once)
1 Nail (Once)
8 Clay
1 Log
10 Charcoal
16 Steel / Iron Bar Half
Metalworking Process Setup
By this point in time, you know exactly what materials you need and how to craft a Simple Forge / Furnace. However, in order to take full advantage of the Metalworking crafting system, one must aim to build an Advanced Forge and Advanced Furnace.
To do this, casting a Blacksmith Anvil is not enough; as you know by now, both Advanced Forge and Furnace require Large Bellows in order to be built.
To craft Large Bellows, you will need to take quite a lot of steps and build quite a lot of crafting stations that are outside the Metalworking crafting system itself, so instead of going in depth on it, here are your simple steps that will lead you to getting this beast:
With this out of the way, you have got yourself a Medium Leather (Tanned, Crude).
Total resources per Medium Leather (Tanned, Crude):
1 Sheep / Pig / Deer
0.3L of Water
1 Bowl
6 Planks (Once)
8 Nails (Once)
6 Long Sticks (Once)
2 Twines (Once)
1 Ball Peen Hammer
1 Saw
1 Fleshing Tool
Right after Medium Leather is ready to be used in a Large Bellows recipe, you can craft them using these resources:
1 Ball Peen Hammer
1 Saw
2 Planks
2 Nails
2 Medium Handles
1 Medium Leather (Tanned, Crude)
= + + 2 + 2 + 2 +
+ 
And now, given you have all required resources, with Large Bellows among them, you can build yourself an Advanced Furnace. Mind the order in which you build your metalworking paradise.
Start by building an Advanced Furnace before anything, if you have access to at least 2 animals that can provide you with Medium Leather, that is. If you find yourself in a situation where you can hardly come by one of them animals OR you just want to save resources, build a Simple Furnace. As of right now, there is NO difference between what they allow you to craft, but that may change in the future.
After you have built yourself a Furnace, be it a Simple or Advanced one, build an Advanced Forge. Just like in the case with a furnace, if you are short on animals, go for a Simple Forge. But you do NOT want to save on resources this time, as some high-tier recipes are available only in Advanced Forge.
The third and final step that you need to make in order to secure everything you need to set up your metalworking area — is to build a Charcoal Burning Barrel OR Charcoal Burning Pile if you have the right tools. With this crafting station, you will be able to convert Logs into Charcoal and let me tell you, you will need a lot of charcoal as every recipe in the forge uses it.
Everything is set now; it is time to start your journey from zero to hero in the world of Metalworking. Below you will find a couple of buildings that have been mentioned in this and previous section.
Advanced Kiln
 Charcoal Burning Barrel
To do this, casting a Blacksmith Anvil is not enough; as you know by now, both Advanced Forge and Furnace require Large Bellows in order to be built.
To craft Large Bellows, you will need to take quite a lot of steps and build quite a lot of crafting stations that are outside the Metalworking crafting system itself, so instead of going in depth on it, here are your simple steps that will lead you to getting this beast:
- Build a Butcher Hook.
- Build a Softening Beam.
- Build a Tanning Barrel.
- Build a Medium Leather Drying Rack.
- Find and kill one Sheep, Pig or Deer, attach their corpse to the Butcher Hook.
- Gather leather from an animal (leather should be Medium).
- Gather the animal's head and slice it in order to get Animal's Brain.
- Using a Softening Beam, remove flesh and fur from the leather using the Fleshing Tool.
- Craft a Bowl of Brain Tan using Animal Brain you just gathered.
- Using a Tanning Barrel, tan leather.
- Using Medium Leather Drying Rack, dry leather on the rack.
With this out of the way, you have got yourself a Medium Leather (Tanned, Crude).
Total resources per Medium Leather (Tanned, Crude):
1 Sheep / Pig / Deer
0.3L of Water
1 Bowl
6 Planks (Once)
8 Nails (Once)
6 Long Sticks (Once)
2 Twines (Once)
1 Ball Peen Hammer
1 Saw
1 Fleshing Tool
Right after Medium Leather is ready to be used in a Large Bellows recipe, you can craft them using these resources:
1 Ball Peen Hammer
1 Saw
2 Planks
2 Nails
2 Medium Handles
1 Medium Leather (Tanned, Crude)
= + + 2 + 2 + 2 + And now, given you have all required resources, with Large Bellows among them, you can build yourself an Advanced Furnace. Mind the order in which you build your metalworking paradise.
Start by building an Advanced Furnace before anything, if you have access to at least 2 animals that can provide you with Medium Leather, that is. If you find yourself in a situation where you can hardly come by one of them animals OR you just want to save resources, build a Simple Furnace. As of right now, there is NO difference between what they allow you to craft, but that may change in the future.
After you have built yourself a Furnace, be it a Simple or Advanced one, build an Advanced Forge. Just like in the case with a furnace, if you are short on animals, go for a Simple Forge. But you do NOT want to save on resources this time, as some high-tier recipes are available only in Advanced Forge.
The third and final step that you need to make in order to secure everything you need to set up your metalworking area — is to build a Charcoal Burning Barrel OR Charcoal Burning Pile if you have the right tools. With this crafting station, you will be able to convert Logs into Charcoal and let me tell you, you will need a lot of charcoal as every recipe in the forge uses it.
Everything is set now; it is time to start your journey from zero to hero in the world of Metalworking. Below you will find a couple of buildings that have been mentioned in this and previous section.
Building Name
Items Required to Build
Advanced Kiln1 Mason's Trowel
20 Clay
20 Clay
Charcoal Burning Barrel1 Orange / Light Green / Dark Green Barrel / Metal Drum
4 Stones
4 Stones
From Zero to Hero
Leveling up Metalworking skill, just like any other in Project Zomboid is a pure nightmare and a sign of poor design choice. To really get any use of the Metalworking system, you will have to level up to at least level 4 in order to be able to craft all kinds of Hammer Heads, Hatchet Heads, some (but not all) armor pieces, etc. Every other level above 4 will unlock more and more recipes that will allow you to craft more advanced items in each category, like a full metal armor set at level 6-8 or all kinds of swords from level 5 to 9.
SO, how do you grind your way through Metalworking levels with ease while spending as little resources as possible? Well, it goes without saying: find and read Metalworking Book for your appropriate level before you start grinding your Metalworking level. This option is (mostly now) not available, because fun in this game is not allowed, so reading books is not required but will speed up your grind, especially at higher Metalworking levels.
Before you start grinding, you first must secure resources needed for crafting 8740 spoons, because that is how you master blacksmithing items that give you the most xp for as little resources spent on them as possible. Let's take a quick look at what you will need and what you should look for while doing your looting runs.
MUST HAVE tools; having these tools will allow you to craft pretty much anything:
Optional tools (nice to have), will be required for some recipes:
These resources will be the backbone of any item you would want to forge; having them in vast quantities is vital:
Now that you have an understanding of what items you need to craft pretty much any item, it is time to learn the easiest way to get them in large numbers. The easiest and most efficient way to get most of the items (not tools, mind you) is to start dismantling car wrecks. To do that, you will need to find three items:
These items can be found in garages, storage units and warehouses. Propane tanks can also be found in barbecue grills near some houses and near some restaurants. One full propane tank will allow you to dismantle 16 car wrecks. The result of dismantling a car wreck will look somewhat like this:
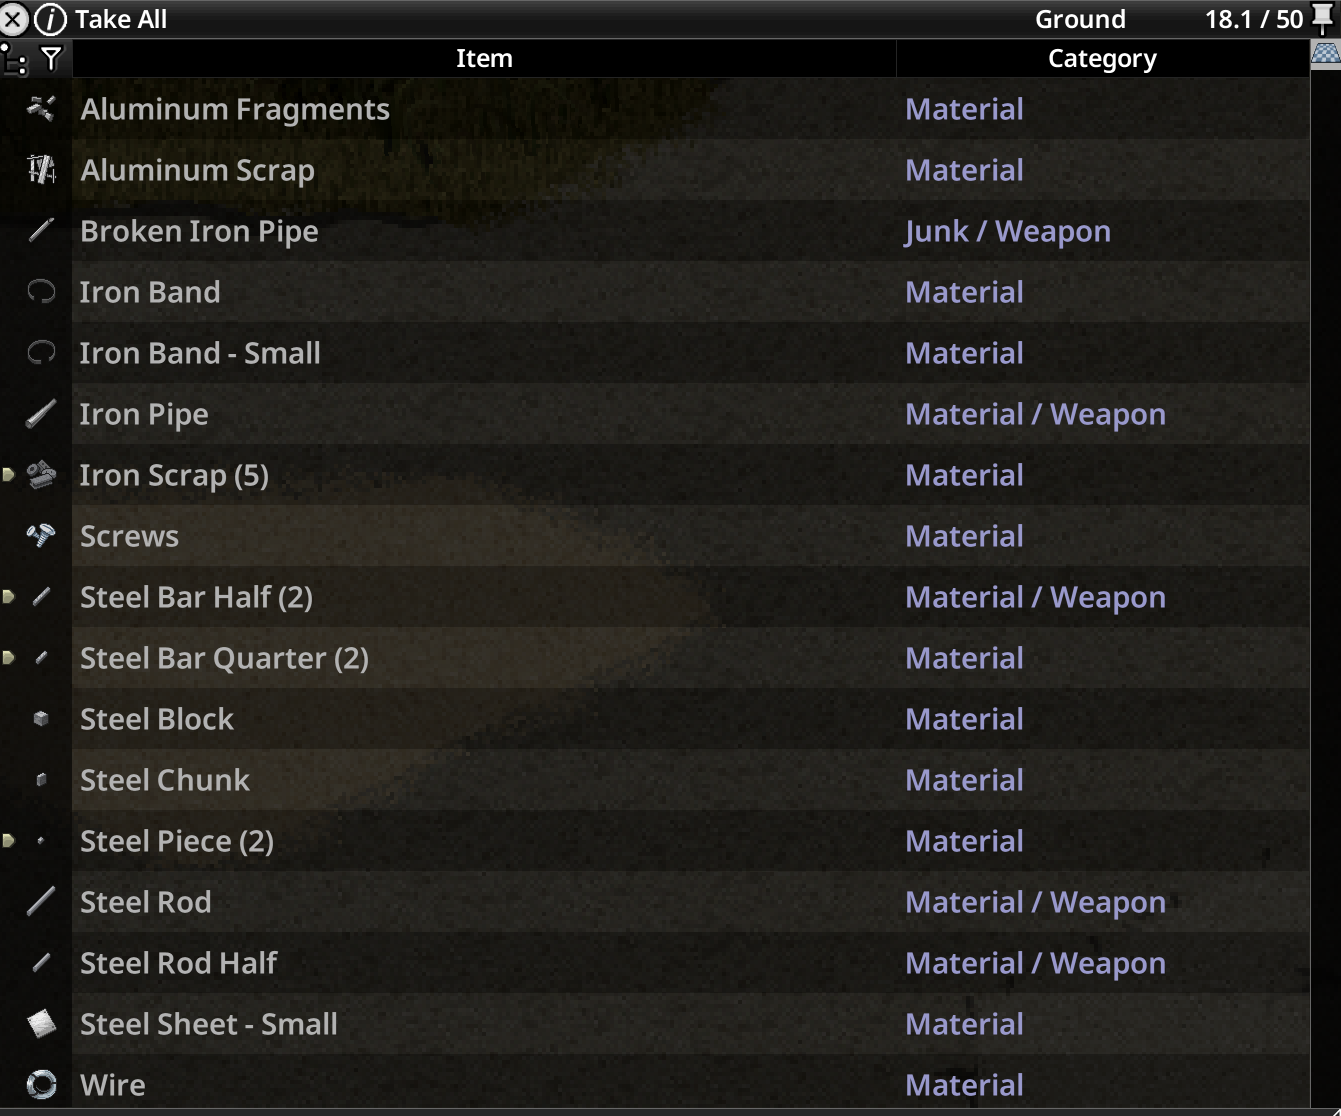
With prior knowledge, you should be able to easily identify what you should grab first and what you can leave behind, as it is not important. The first thing we are looking for is Steel or Iron Bar / Half / Quarter as they are used up by recipes quite frequently; Steel Sheet - Small is a nice to have item, so is Wire and anything else is at the bottom of the priority list but can have its uses.
With that, you have your tools ready and resources stockpiled. Hopefully, you got lucky and got yourself a Metalworking Skill Book. It is time to start leveling up your Metalworking Skill, but what should you craft in order to be the most resource efficient while getting as much experience as you can? Well, in the next section you will find a simple walktrhough that you can follow that shows an item with most XP gain and least resources used up per Metalworking level.
SO, how do you grind your way through Metalworking levels with ease while spending as little resources as possible? Well, it goes without saying: find and read Metalworking Book for your appropriate level before you start grinding your Metalworking level. This option is (mostly now) not available, because fun in this game is not allowed, so reading books is not required but will speed up your grind, especially at higher Metalworking levels.
Before you start grinding, you first must secure resources needed for crafting 8740 spoons, because that is how you master blacksmithing items that give you the most xp for as little resources spent on them as possible. Let's take a quick look at what you will need and what you should look for while doing your looting runs.
MUST HAVE tools; having these tools will allow you to craft pretty much anything:
-
-
1 Metalworking Pliers / Vise Grips / Tongs
-
1 Metalworking Punch
-
1 Metalworking Chisel
Optional tools (nice to have), will be required for some recipes:
-
1 Heading Tool
-
1 File
-
1 Small Punch and Chisel Set
These resources will be the backbone of any item you would want to forge; having them in vast quantities is vital:
-
-
Steel / Iron Bar, commonly used. However, they can be cut into halves or quarters and this is important. (!) DO NOT mess them up with Iron / Steel RODS.
-
-
Steel / Iron Bar Quarter, vastly used.
-
Steel Sheet, used mainly to craft armor / cookware.
-
Wire, used in some recipes.
Now that you have an understanding of what items you need to craft pretty much any item, it is time to learn the easiest way to get them in large numbers. The easiest and most efficient way to get most of the items (not tools, mind you) is to start dismantling car wrecks. To do that, you will need to find three items:
-
Welder Mask
-
Welding Torch
-
Propane Tank
These items can be found in garages, storage units and warehouses. Propane tanks can also be found in barbecue grills near some houses and near some restaurants. One full propane tank will allow you to dismantle 16 car wrecks. The result of dismantling a car wreck will look somewhat like this:
With prior knowledge, you should be able to easily identify what you should grab first and what you can leave behind, as it is not important. The first thing we are looking for is Steel or Iron Bar / Half / Quarter as they are used up by recipes quite frequently; Steel Sheet - Small is a nice to have item, so is Wire and anything else is at the bottom of the priority list but can have its uses.
With that, you have your tools ready and resources stockpiled. Hopefully, you got lucky and got yourself a Metalworking Skill Book. It is time to start leveling up your Metalworking Skill, but what should you craft in order to be the most resource efficient while getting as much experience as you can? Well, in the next section you will find a simple walktrhough that you can follow that shows an item with most XP gain and least resources used up per Metalworking level.
Most efficient way to level up (Part I)
To unlock most of the recipes and make use of the Metalworking system, one must find and read Magazines listed below. Leveling up quick and efficiently is not possible without them, as you will see in a table below listed Magazines.
 Magazine: Blunt Forge
  Magazine: Everyday Smithing - April 1993
  Magazine: Everyday Smithing - May 1993
  Magazine: Everyday Smithing - June 1993
  Magazine: Small-Scale Smithing
  Magazine: American Bladecraft
 Forge 2 Spoons 1 Charcoal
1 Steel Bar Quarter
 1 Smithing Hammer (! Have a slight chance of damaging tool)
1 Metalworking Pliers / Tongs (! Have a slight chance of damaging tool)
 1 Crude / Metalworking Chisel
  Forge Forks 1 Charcoal
1 Steel Bar Quarter
1 Smithing Hammer
1 Metalworking Pliers / Tongs
1 Crude / Metalworking Chisel Forge Heading Tool (! Magazine: Everyday Smithing - June 1993 is required in order to unlock this or Tools Schematic that teaches you this recipe. Use Fine Butter Knives instead as alternative.) 1 Charcoal
1 Steel / Iron Bar Quarter
 1 Hammer
 1 Crude Tongs / Metalworking Pliers / Tongs
 1 Metalworking Punch / Small Punch and Chisel set
  Forge Fine Forks 1 Charcoal
1 Steel Bar Quarter
1 Ball Peen Hammer
 1 Metalworking Pliers
1 Metalworking Chisel  Forge Sheep Shears 1 Charcoal
1 Steel / Iron Bar Quarter
1 Smithing Hammer
1 Metalworking Pliers / Tongs  Forge Fine Scissors (! Requires Tools Schematic to unlock a recipe. Alternative is using Jar Lid or Hinge) 1 Charcoal
1 Steel / Iron Bar Quarter
1 Ball Peen Hammer
 1 Metalworking Pliers
1 Metalworking Punch / Small Punch and Chisel set  Forge Axe Head (Alternative would be Spade Head or just keep forging one of the items in Level 5 category!) 1 Charcoal
 1 Steel / Iron Block (Pierced)
1 Ball Peen Hammer
1 Tongs
1 Metalworking Punch
Magazine Name
Recipes Unlocked
Magazine: Blunt Forge- Forge Claw Hammer Head
- Forge Crowbar
- Forge Sledgehammer Head
- Forge Ball Peen Hammer Head
- Forge Club Hammer Head
- Forge Pick Axe Head
Magazine: Everyday Smithing - April 1993- Forge Steel Sheet
- Forge Small Steel Sheet
- Make Metal Drum
- Forge Saw
- Forge Spade Head
- Forge Gardening Trowel
- Forge Gardening Hoe Head
- Forge Hand Scythe Head
- Forge Sheep Shears
- Forge Scythe Head
- Forge Saw
Magazine: Everyday Smithing - May 1993- Forge Kitchen Tools
- Forge Cooking Pot
- Forge Roasting Pan
- Forge Saucepan
- Forge Baking Tray
- Forge Baking Pan
- Forge Frying Pan
- Forge Bucket
- Forge Corkscrew
- Forge Kettle
- Forge Goblets
- Forge Cup
Magazine: Everyday Smithing - June 1993- Forge Tongs
- Forge Heading Tool
- Forge Draw Plate
- Forge 5 Nails
- Forge Smithing Hammer Head
- Forge Masonry Chisel
- Forge Masonry Trowel
- Forge Metalworking Chisel
- Forge Metalworking Punch
- Forge Metalworking Pliers
- Forge Fireplace Poker
- Make Improvised Whetstone
- Forge File
- Forge Drill
Magazine: Small-Scale Smithing- Forge Tweezers
- Forge Forceps
- Forge Scissors
- Forge Doorknob
- Forge Hinge
- Forge Straight Razor
- Forge 4 Fishing Hooks
- Forge Needle
- Forge Buckle
Magazine: American Bladecraft- Forge Meat Cleaver Blade
- Forge Hunting Knife Blade
- Forge Machete Blade
- Forge Hatchet Head
- Forge Wood Axe Head
- Forge Axe Head
- Forge Small Knife
- Forge Large Knife Blade
- Forge Fleshing Tool
Metalworking Level
Recipe Name
Base XP Gain
Items Required
0
Forge 2 Spoons3.75
1 Charcoal1 Steel Bar Quarter1 Smithing Hammer (! Have a slight chance of damaging tool)1 Metalworking Pliers / Tongs (! Have a slight chance of damaging tool)1 Crude / Metalworking Chisel1
Forge Forks6.25
1 Charcoal1 Steel Bar Quarter1 Smithing Hammer1 Metalworking Pliers / Tongs1 Crude / Metalworking Chisel2
Forge Heading Tool (! Magazine: Everyday Smithing - June 1993 is required in order to unlock this or Tools Schematic that teaches you this recipe. Use Fine Butter Knives instead as alternative.) 10
1 Charcoal1 Steel / Iron Bar Quarter1 Hammer1 Crude Tongs / Metalworking Pliers / Tongs1 Metalworking Punch / Small Punch and Chisel set3
Forge Fine Forks10
1 Charcoal1 Steel Bar Quarter1 Ball Peen Hammer1 Metalworking Pliers1 Metalworking Chisel4
Forge Sheep Shears11.25
1 Charcoal1 Steel / Iron Bar Quarter1 Smithing Hammer1 Metalworking Pliers / Tongs5
Forge Fine Scissors (! Requires Tools Schematic to unlock a recipe. Alternative is using Jar Lid or Hinge)11.25
1 Charcoal1 Steel / Iron Bar Quarter1 Ball Peen Hammer1 Metalworking Pliers1 Metalworking Punch / Small Punch and Chisel set6
Forge Axe Head (Alternative would be Spade Head or just keep forging one of the items in Level 5 category!)17.5
1 Charcoal1 Steel / Iron Block (Pierced)1 Ball Peen Hammer1 Tongs1 Metalworking PunchMost efficient way to level up (Part II)
Metalworking Level
Recipe Name
Base XP Gain
Items Required
7
 Pick Axe Head
18.75
1 Charcoal1 Steel / Iron Block (Pierced)1 Ball Peen Hammer1 Tongs1 Metalworking Punch8
 Wood Axe Head
22.5
1 Charcoal1 Steel / Iron Block (Pierced)1 Ball Peen Hammer1 Tongs1 Metalworking Punch9
 Doorknob
25
1 Charcoal1 Steel / Iron Bar Quarter1 Ball Peen Hammer1 Metalworking Pliers1 Small Punch and Chisel set 1 Multitool / Small File Set
To sum it up with some math on the theoretical amount of resources you will need to level up from level 0 to 10 in Metalworking (assuming you have not read Skill Books):
If you stick to crafting purely Spoons, to reach level 6, you will need:
- 1540 Spoons, which are 385 Steel / Iron Bars or 770 Steel / Iron Bar Half.
- 20 Spoons to reach level 1, which is 5 Steel / Iron Bars or 10 Steel / Iron Bar Half or 20 Steel / Iron Bar Quarters.
- 24 Forks to reach level 2, which is 6 Steel / Iron Bars or 12 Steel / Iron Bar Half or 24 Steel / Iron Bar Quarters.
- 30 Heading Tools to reach level 3, which is 8 (7.5, but let's round it up to 8) Steel / Iron Bars or 16 Steel / Iron Bar Half or 32 Steel / Iron Bar Quarters.
- 75 Fine Forks / Heading Tools to reach level 4, which is 19 (18.75) Steel / Iron Bars or 38 Steel / Iron Bar Half or 76 Steel / Iron Bar Quarters.
- 134 (133.3) Sheep Shears to reach level 5, which is 34(33.5) Steel / Iron Bars or 67 Steel / Iron Bar Half or 134 Steel / Iron Bar Quarters.
- 267 (266.6) Fine Scissors to reach level 6, which is 67 (66.75) Steel / Iron Bars or 134 (133.5) Steel / Iron Bar Half or 267 Steel / Iron Bar Quarters.
- 139 Steel / Iron Bars or 278 Steel / Iron Bar Half or 556 Steel / Iron Bar Quarters.
- 550 Charcoal.
See the difference between 385 Steel / Iron Bars used up by crafting 1540 Spoons and *just* 139 Steel / Iron Bars used up by crafting items that give you the most XP on your current Metalworking level? That is right, focusing on items that give you most XP per level is 93.89% more efficient! Resource wise, you save up 246 Steel / Iron Bars and 990 Charcoal (165 Logs!).
Now let's take a look at the same progression with Skill Books boost at every level up to 6:
- 7 (6.6) Spoons to reach level 1, which is 2 (1.75) Steel / Iron Bars or 4 (3.5) Steel / Iron Bar Half or 7 Steel / Iron Bar Quarters.
- 12 Forks to reach level 2, which is 3 Steel / Iron Bars or 6 Steel / Iron Bar Half or 12 Steel / Iron Bar Quarters.
- 14 (13.5) Heading Tools to reach level 3, which is 4 (3.5) Steel / Iron Bars or 7 Steel / Iron Bar Half or 14 Steel / Iron Bar Quarters.
- 29 (28.5) Fine Forks / Heading Tools to reach level 4, which is 8 (7.25) Steel / Iron Bars or 15 (14.5) Steel / Iron Bar Half or 29 Steel / Iron Bar Quarters.
- 42 Sheep Shears to reach level 5, which is 11(10.5) Steel / Iron Bars or 21 Steel / Iron Bar Half or 42 Steel / Iron Bar Quarters.
- 76 (75.3) Fine Scissors to reach level 6, which is 19 Steel / Iron Bars or 38 Steel / Iron Bar Half or 76 Steel / Iron Bar Quarters.
- 47 Steel / Iron Bars or 94 Steel / Iron Bar Half or 188 Steel / Iron Bar Quarters.
- 180 Charcoal.
Crafting items that give you most XP available at your Metalworking level while reading all appropriate Skill Books is 98.9 (or just 99)% more efficient than crafting items without Skill Books XP boost. Resource wise, you save up 92 Steel / Iron Bars and 370 Charcoal (62 [61.6] Logs!).
Let's sum up everything you have learned so far.
- Get Metalworking Magazines to unlock as many recipes as you can.
- Try and get a set of metalworking Skill Books before you start grinding your levels.
- Get everything you need to start dismantling car wrecks and dismantle as much as you can to get enough resources for forging.
- The most efficient way to grind metalworking is as follows:
- LVL0 - Spoons
- LVL1 - Forks
- LVL2 - Heading Tool
- LVL3 - Fine Forks / Heading Tool
- LVL4 - Sheep Shears
- LVL5 - Fine Scissors / Sheep Shears
- LVL6 - Axe Head
- LVL7 - Pick Axe Head
- LVL8 - Wood Axe Head
- LVL9 - Doorknob
- LVL0 - Spoons
In sections below, you will find most of the available recipes in the game related to the Metalworking system (Notice: sections will be added and updated with time and B42's development cycle [probably]).
Tools (Part I)
Recipe Name
Level Required
XP Gain
Items Required
Heading Tool2
10
1 Charcoal1 Steel / Iron Bar Quarter1 Hammer 1 Crude Tongs / Metalworking Pliers / Tongs1 Metalworking Punch / Small Punch and Chisel set
 Large Hook
2
5
1 Charcoal1 Steel / Iron Bar1 Hammer 1 Crude Tongs / Tongs
 1 Whetstone / File
 Masonry Chisel
3
11.25
1 Charcoal1 Steel / Iron Bar Half1 Hammer1 Crude Tongs / TongsMetalworking Punch3
11.25
1 Charcoal1 Steel / Iron Bar Half1 Hammer1 Crude Tongs / Tongs1 Whetstone / File Bucket
3
10
1 Charcoal1 Steel Sheet1 Smithing Hammer1 Tongs1 Wire Fishing Hook
3
5
1 Charcoal1 Wire1 Ball Peen Hammer1 Metalworking Pliers Fleshing Tool
3
5
1 Charcoal1 Steel / Iron Bar Half1 Ball Peen Hammer1 Tongs1 Metalworking Chisel Mason Trowel
3
5
1 Charcoal1 Steel / Iron Bar Quarter1 Hammer1 Crude Tongs / Metalworking Pliers / Tongs 1 Small HandleNails
3
5
1 Charcoal 1 Iron Chunk1 Smithing Hammer1 Metalworking Pliers / Tongs1 Heading Tool
 Hatchet Head
4
12.5
1 Charcoal1 Steel / Iron Block (Pierced)1 Ball Peen Hammer1 Tongs1 Metalworking Punch Ball Peen Hammer Head
4
11.25
1 Charcoal1 Steel / Iron Chunk (Pierced)1 Smithing Hammer1 Tongs1 Metalworking Punch Clawhammer Head
4
11.25
1 Charcoal1 Steel / Iron Block (Pierced)1 Ball Peen Hammer1 Tongs1 Metalworking Punch1 Metalworking ChiselTools (Part II)
Recipe Name
Level Required
XP Gain
Items Required
 Club Hammer Head
4
11.25
1 Charcoal1 Steel / Iron Block (Pierced)1 Smithing Hammer1 Tongs1 Metalworking PunchFile4
11.25
1 Charcoal1 Steel / Iron Bar Half1 Smithing Hammer1 Crude Tongs / Tongs 1 Hacksaw / Metalworking Chisel
 Fireplace Poker
4
11.25
1 Charcoal1 Steel / Iron Bar1 Smithing Hammer1 Tongs Forceps
4
11.25
1 Charcoal1 Steel / Iron Bar Quarter1 Ball Peen Hammer1 Metalworking Pliers1 Metalwiorking Punch / Small Punch and Chisel set1 Heading Tool Garden Hoe Head
4
11.25
1 Charcoal 1 Steel / Iron Chunk (Pierced)1 Smithing Hammer1 Tongs1 Metalworking Punch
 Gardening Trowel
4
11.25
1 Charcoal1 Steel / Iron Bar Quarter1 Smithing Hammer1 Metalworking Pliers / Tongs1 Small HandleMetalworking Chisel4
11.25
1 Charcoal1 Steel / Iron Bar Half1 Smithing Hammer1 Crude Tongs / TongsMetalworking Pliers4
11.25
1 Charcoal1 Steel / Iron Bar Half1 Ball Peen Hammer1 Metalworking Pliers / Tongs1 Metalworking Punch / Small Punch and Chisel set 1 Metalworking Chisel1 Heading Tool Saw
Saw4
11.25
1 Charcoal1 Steel / Iron Bar Half1 Smithing Hammer1 Metalworking Pliers / Tongs1 Metalworking Chisel 1 File1 Medium Handle
 Scissors
4
11.25
1 Charcoal1 Steel / Iron Bar Quarter1 Smithing Hammer1 Metalworking Pliers / TongsSheep Shears4
11.25
1 Charcoal1 Steel / Iron Bar Quarter1 Smithing Hammer1 Metalworking Pliers / TongsTools (Part III)
Recipe Name
Level Required
XP Gain
Items Required
 Smithing Hammer Head
4
11.25
1 Charcoal1 Steel / Iron Chunk (Pierced)1 Smithing Hammer1 Tongs1 Metalworking PunchTongs4
11.25
1 Charcoal1 Steel / Iron Bar Half1 Hammer1 Crude Tongs / Metalworking Pliers / Tongs1 Crude Chisel / Metalwroking Chisel / Metalworking Punch / Small Punch and Chisel set 1 Heading Tool Tweezers
4
11.25
1 Charcoal1 Steel / Iron Bar Quarter1 Ball Peen Hammer1 Metalworking Pliers Buckle
4
10
1 Charcoal 1 Steel / Iron Piece1 Ball Peen Hammer1 Metalworking Pliers
 Drill
Drill5
12.5
1 Charcoal1 Steel / Iron Bar Quarter1 Smithing Hammer1 Tongs1 File1 Small HandleFine Scissors5
12.5
1 Charcoal1 Steel / Iron Bar Quarter1 Ball Peen Hammer1 Metalworking Pliers1 Metalworking Punch / Small Punch and Chisel set Hinge
Hinge5
12.5
1 Charcoal1 Steel / Iron Bar Quarter1 Ball Peen Hammer1 Metalworking Pliers1 Metalworking Punch / Small Punch and Chisel set Jar Lid
5
12.5
1 Charcoal1 Steel / Iron Bar Quarter1 Ball Peen Hammer1 Tongs1 Metalworking Chisel Scythe Head
5
12.5
1 Charcoal1 Steel / Iron Bar Half1 Smithing Hammer1 Tongs1 Metalworking PunchAxe Head6
17.5
1 Charcoal1 Steel / Iron Block (Pierced)1 Ball Peen Hammer1 Tongs1 Metalworking Punch Spade Head
6
17.5
1 Charcoal1 Steel / Iron Block (Pierced)1 Ball Peen Hammer1 Tongs1 Metalworking PunchTools (Part IV)
Recipe Name
Level Required
XP Gain
Items Required
 Needle
6
2.5
1 Charcoal1 Wire1 Ball Peen Hammer1 Metalworking PliersPick Axe Head7
18.75
1 Charcoal1 Steel / Iron Block (Pierced)1 Ball Peen Hammer1 Tongs1 Metalworking Punch Sledgehammer Head
8
22.5
1 Charcoal1 Steel / Iron Block (Pierced)1 Ball Peen Hammer1 Tongs1 Metalworking Punch1 Metalworking ChiselWood Axe Head8
22.5
1 Charcoal1 Steel / Iron Block (Pierced)1 Ball Peen Hammer1 Tongs1 Metalworking Punch Crowbar
9
25
1 Charcoal1 Steel / Iron Bar1 Ball Peen Hammer1 Tongs1 Metalworking ChiselDoorknob9
25
1 Charcoal1 Steel / Iron Bar Quarter1 Ball Peen Hammer1 Metalworking Pliers1 Small Punch and Chisel set1 Multitool / Small File Set Straight Razor
9
12.5
1 Charcoal1 Iron Chunk1 Ball Peen Hammer1 Metalworking Pliers1 Small HandleCookware (Part I)
Recipe Name
Level Required
XP Gain
Items Required
Spoon0
3.75
1 Charcoal1 Steel / Iron Bar Quarter1 Smithing Hammer (! Have a slight chance of damaging tool)1 Metalworking Pliers / Tongs (! Have a slight chance of damaging tool)1 Crude / Metalworking ChiselFork1
6.25
1 Charcoal1 Steel Bar Quarter1 Smithing Hammer1 Metalworking Pliers / Tongs1 Crude / Metalworking Chisel Fine Butter Knives
2
8.75
1 Charcoal1 Steel Bar Quarter1 Smithing Hammer1 Metalworking Pliers / Tongs Fine Spoons
2
8.75
1 Charcoal1 Steel Bar Quarter1 Smithing Hammer (! Have a slight chance of damaging tool)1 Metalworking Pliers / Tongs Precious Metal Butter Knives
2
8.75
1 Charcoal 1 Gold / Silver Sheet1 Ball Peen Hammer1 Metalworking Pliers / Tongs
 Precious Metal Spoons
2
8.75
1 Charcoal1 Gold / Silver Sheet1 Ball Peen Hammer1 Metalworking Pliers / Tongs Baking Pan
2
8.75
1 Charcoal1 Steel Sheet1 Ball Peen Hammer (! Have a slight chance of damaging tool)1 Metalworking Pliers / Tongs (! Have a slight chance of damaging tool)1 Metalworking Chisel (! Have a slight chance of damaging tool) Baking Tray
2
6.25
1 Charcoal1 Steel Sheet1 Ball Peen Hammer (! Have a slight chance of damaging tool)1 Metalworking Pliers / Tongs (! Have a slight chance of damaging tool)1 Metalworking Chisel (! Have a slight chance of damaging tool) Roasting Pan
2
6.25
1 Charcoal1 Steel Sheet1 Ball Peen Hammer1 Metalworking Pliers / Tongs1 Metalworking Chisel Frying Pan
2
5
1 Charcoal1 Steel Sheet1 Ball Peen Hammer1 Metalworking Pliers / Tongs1 Crude / Metalworking ChiselFine Forks3
10
1 Charcoal1 Steel / Iron Bar Quarter1 Ball Peen Hammer1 Metalworking Pliers1 Metalworking ChiselCookware (Part II)
Recipe Name
Level Required
XP Gain
Items Required
 Precious Metal Forks
3
10
1 Charcoal1 Gold / Silver Sheet1 Ball Peen Hammer1 Metalworking Pliers1 Metalworking Chisel Cooking Pot
3
6.25
1 Charcoal1 Steel Sheet1 Ball Peen Hammer1 Metalworking Pliers / Tongs1 Metalworking Chisel1 Wire Cup
Cup3
6.25
1 Charcoal 1 Gold / Silver / Steel / Copper Sheet (Small)1 Smithing Hammer1 Metalworking Pliers / Tongs
 Goblet
3
6.25
1 Charcoal1 Gold / Silver Sheet1 Ball Peen Hammer1 Metalworking Pliers / TongsFAQ
This section is reserved for Frequently Asked Questions about metalworking / guide contents.
Found an error or mistake in one of the table's values? Let me know.
Found an error or mistake in one of the table's values? Let me know.
More Project Zomboid guides
- Modding Policy★ 5 (397)133k views208 ♥9 minUpdated Nov 8, 2022
- 80 tips and tricks for Project Zomboid (If you have over 100 hours in this game some of these will probably be new to you too)★ 5 (1.6k)82k views3.1k ♥28 minUpdated Aug 29, 2021
- Топ 100 лучших модов на "project zomboid"★ 5 (415)68k views1.1k ♥10 minRussianUpdated Jul 28, 2024
- [B41] Лучшие места для базы★ 5 (477)61k views1.3k ♥6 minRussianUpdated Nov 30, 2025
- Первая помощь ❤★ 5 (628)49k views1.4k ♥5 minRussianUpdated Jan 20, 2025
- The Basics of Base Building★ 5 (704)48k views1.5k ♥17 minUpdated Dec 24, 2021





This guide was created by its original author on the Steam Community. Are you the author and want it removed? Request removal.