Overview
Ever wanted to run Skyrim with MO2’s virtualization, through Steam? This guide allows you to do just that!
MO2 through Steam – A Guide to Creating Virtualized Steam Shortcuts
So you know how you can run SKSE64 through Steam by renaming “skse64_loader.exe” to “SkyrimSELauncher.exe”? This guide allows you to do the same thing, but allows you to have MO2’s virtualization as well. I had to figure out a solution after finding out that Steam doesn’t open up Shortcut files, only .exe files. I have SKSE64 and Skyrim SSE, so this guide is tailored to that experience, however you can use this same process to create virtualized Steam shortcuts for Classic Skyrim, or without SKSE. Here’s how to do it:
0) I’ll assume that you’ve already installed SKSE64, MO2, and Skyrim properly up to this point. There are other guides available for issues with installing those. Once they work harmoniously, proceed.
1) Create a folder on your desktop. Name it something like “MO2Runner”.
2) Open MO2. It should have automatically created a path to running SKSE with virtualization. Select the box under “Run” that says “Shortcut”, then click “Desktop” to add the SKSE64 shortcut to your desktop.
3) Right click on the SKSE shortcut you just made. Click “Properties”, and then copy everything from the “Target” field under the “Shortcut” tab. It should look something like this:
“C:My ProgramsMO2ModOrganizer.exe” “moshortcut://SkyrimSE:SKSE”
The first part will vary from person to person, depending on where you installed MO2.
4) Open up Notepad. Type in “START “” “, and then paste in what you copied from step 3. What you’ve typed in should look something like this:
START “” “C:My ProgramsMO2ModOrganizer.exe” “moshortcut://SkyrimSE:SKSE”
Go under “File” and click ‘Save As”, and save the file into the folder you created in step 1. Name the file “SkyrimSELauncher.bat”. The name must be exactly that, and note the “.bat” at the end of the name!!! The file must be saved as a batch file!
5) Now comes the fun part! First, you have to install this little .exe written by some guy named Islam Adel. Go to bat2exe.net and click “Download Now”. Run it and give it admin permissions. It will now prompt you with the “source” folder. Make that folder the folder you created in step 1, and click OK. Then for the “target” folder, make that your desktop. After clicking OK again, it should run for a split second and then bam, you have the .exe on your desktop!
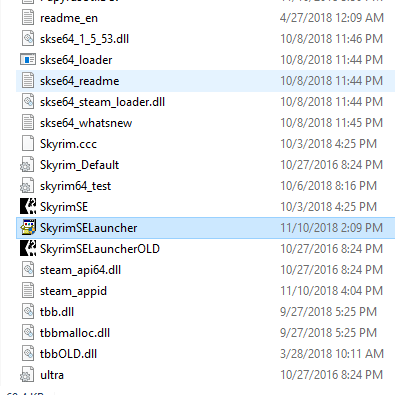
6) Go to your main Skyrim installation folder. Rename the original Skyrim launcher from “SkyrimSELauncher.exe” to something like “SkyrimSELauncherOLD.exe”.
7) Drag the new .exe into your Skyrim installation folder.
8) You’re done! You can test its functionality now by clicking “Play” in your Steam library, or by starting it from the recently played games list under Steam on your taskbar.
I hope this guide has helped you, and that your modding goes well!
Sidenotes: The only downside I have found is that when starting Skyrim with the newly created .exe, it asks for Admin permissions every time. I’m unsure how to resolve this minor issue. Maybe there’s a little checkbox somewhere? Or an option in Bat2Exe?

