Overview
A guide for converting most types of mods from Skyrim LE to Skyrim SE, for newbies and experienced people alike. Includes installation of related tools, quick and simple summaries as well as detailed explanations with examples and pictures.
Introduction
!!! THIS GUIDE IS A WORK IN PROGRESS !!!
TODO:
- Finish text formatting
- Fleshing out detailed sections
- Rebalancing levels of detail between quick and detailed sections
- Adding all the images and examples
The purpose of this guide is to teach you how to convert mods from Skyrim Legendary Edition, the old version of Skyrim, to Skyrim Special Edition. The guide is aimed for people new to conversions as well as more experienced people who simply need to learn how to convert a new type of mod. The guide will tell you how to acquire and use the necessary tools and how to use them to convert your mod.
The guide is not meant to teach you how to mod the game. It is assumed that someone wanting to convert a mod is at least somewhat familiar with installing and using mods before attempting to create or convert mods of their own. Therefore, the guide will not go into detail with the use of mod managers or other general modding tools, except for tools or functions that a majority of mod users are likely unfamiliar with.
Finally, please be aware that mods with Skyrim Script Extender scripts is not within the scope of this guide. SKSE scripts need to be updated by re-compiling them in Visual Studio, so knowledge in C++ programming is required. While it would be possible to detail the process of simply loading up the script and re-compiling it, that would almost certainly be an unreliable solution due to changes in SKSE versions. Even if a script might compile and run succesfully, running does not equal stable. The script might bear unseen and niche compatibility problems. Furthermore, even if the process works with the current SKSE version, that cannot be guaranteed for future versions. The script would need to be carefully reviewed, which requires time and understanding of the script and C++. However, anyone willing to attempt it can use the following link as a starting point:
SKSE Plugin Creation[www.creationkit.com]
Skyrim mods come in many varieties and may contain various types of files which require different steps to convert. Some mods require a lot of work while others need you to do just one or two little things. Some mods work in Special Edition without requiring any changes.
This guide is broken down into sections. The first details how to acquire and setup all the tools and applications you need to convert mods. The following sections detail how to convert the various types of files within a mod. Each section tells you what sorts of mods need to perform the detailed steps. Because mods can sometimes surprise you (for example, texture replacers could also modify the actual models), the guide also mentions how you can identify that your mod needs to perform the steps. If your mod doesn’t match the condition, you may skip the section. The section then lists a quick summary of steps you need to take to convert the related files, good for a quick reminder, for the curious, or for more proficient users. Finally, the section repeats those steps in a detailed fashion for users trying to learn the process.
Each section of the main guide contains links for skipping to the next section. Use them if you determine you don’t need that section or if you wish to skip the detailed part of that section. You can also use the index on the right to navigate the guide.
Before using this guide, you should do your best to familiarize yourself with the mod you’re converting. You should know and understand what the mod is and does, so you have an idea of the steps you’ll need to take.
I claim no responsibility for the use of this guide. While various sources were used to collect the information written here, this guide was written entirely by myself. The information is presented to the best of my ability and as far as I know is safe, barring user error. The decision to use this information and the accompanying responsibility are yours. Properly familiarize yourself with the tools you use and the mods you convert, and follow instructions carefully.
Proper feedback and general questions about converting mods are appreciated. If you notice something wrong or lacking with the guide, please let me know. Improper comments will be deleted.
Please don’t send me friend requests. I ignore requests from unknown people and block repeat attempts. Please don’t ask for help with the conversion of a specific mod. Start a thread in the public discussions with such requests.
When converting a mod, please be aware of the permissions given by its author. You can convert mods for personal use, but if you wish to distribute your converted work, you must have permission to do so from ALL the creators of the original assets.
Distributing without permission is copyright infringement, and while it rarely goes that far in modding circles, is grounds for legal action. Any modding assets are automatically the intellectual property of their creator, who has the legal right to control their distribution. Ambiguity, not knowing the author, failure to get in touch with the author or the retirement of the author do NOT give you permission. If there is ANY doubt, assume that you do not have permission.
Before converting a mod, please check if a converted version of the mod or a suitable replacement is already available. This can save you from wasted time, effort and user error. Also make note of any prerequisite mods and their conversion status. Carefully read the instructions of the mods and the tools you use. Keep backups of things you modify in case of potential mistakes.
Tools and Setup
Source – [link]
Used for – Extraction and compression of mods
Summary of installation:
- Open the source link above. At the top of the page, select the .exe download for your Windows version (32-bit or 64-bit) in the first download list. Don’t pick the alpha version below it.
- Run the downloaded file. Change the install folder if desired and click Install. Close the window when done.
Additional details:
7-Zip was added just in case, although a majority of people probably already have this since many mods use it. In case you are unfamiliar with it, 7-Zip is a free open source file compression tool. It handles most commonly used archive types such as .zip and .rar and provides its own compression format, 7z. 7-Zip is able to pack files into zip format 2-10% better than other zip programs, and 7z can compress files 30-70% better than zip format.
Source – Bethesda Launcher[bethesda.net]
Used for – Updating plugins
Summary of installation:
- Install the Bethesda Launcher from the source link above and run it.
- Select Creation Kit: Skyrim from the launcher and install it.
- Run the Creation Kit once and unpack the script source zip when prompted.
- Navigate to the Skyrim Special Edition folder and open a file called CreationKit.ini in your text editor. Add the following two lines somewhere under the [General] heading:
bAllowMultipleMasterFiles=1
bAllowMultipleMasterLoads=1Save and close the file.
Additional Details:
- If you don’t have the Bethesda Launcher, open the source link above. Click the “download for free” button, then run the downloaded installer. Follow the on-screen instructions.
- Run the Bethesda Launcher. Scroll the list of icons on the left until you find Creation Kit: Skyrim. Click on Install. Check the box for reading the EULA and click Accept. Verify that the installer has correctly selected the Skyrim Special Edition folder to install to. If it hasn’t, change the path to your correct game folder. Check the boxes for desktop shortcut and start menu shortcut if desired and click Install.
If you don’t know where the game folder is, go to your Steam library, right-click the game and select properties. Go to the local files tab and click on browse local files. The game folder will open in an Explorer window.
- When you run the Creation Kit for the first time, either from your shortcut or by clicking Play in the Bethesda Launcher, you may get a notification about a new script source zip. Click yes to unpack it. Once the Creation Kit finishes loading, you just go ahead and close it.
Source – [link]
Used for – BSA archives, meshes, textures, animations
Summary of installation:
- Open the source link above. Click on the files tab, then click manual download on the main file.
- Move the downloaded archive to your modding folder. Then right-click the archive and select 7-Zip -> Extract to “archive’s name”. You can then delete the 7z archive.
Source – [link]
Used for – converting master files, removing HDT High Heels records
Summary of installation:
- Open the source link above. Click on the files tab, then click manual download on the main file.
- Move the downloaded archive to your modding folder. Then right-click the archive and select 7-Zip -> Extract to “archive’s name”. You can then delete the 7z archive.
Source – [link]
Used for – mesh editing
Summary of installation:
- Open the source link above. Scroll down to the version listed as “latest release” and click on its title link. Scroll to the bottom and click on the 7z-package with the latest date to download it.
- If you don’t have the VC++ 2015 Redistributable installed on your PC, scroll back to the top of the page and click on the link there, then select your language and click on Download. Run the downloaded file to install it.
- Move the downloaded archive to your modding folder. Then right-click the archive and select 7-Zip -> Extract to “archive’s name”. You can then delete the 7z archive.
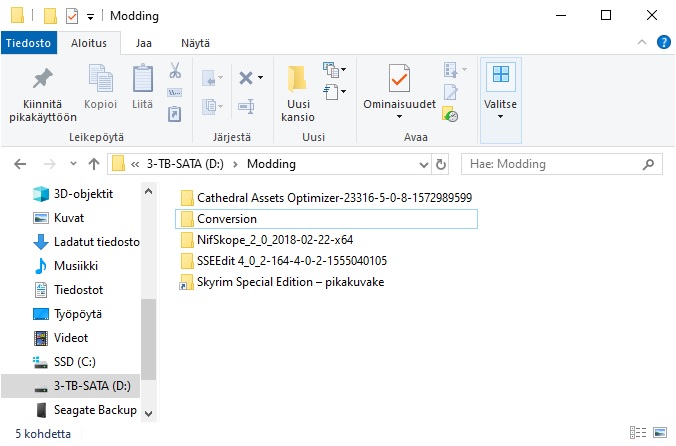
Optional, but I recommend setting up a work folder for mod conversion. If you convert in a location separate from your game and mod archives, you’re less likely to damage your game by mistake. Technically, most the tools used in this guide can be placed anywhere, but it is convenient having them close to the folder you have the mod that’s being converted, so you’re able to access the tools and files with a minimum number of clicks. I also recommend adding a shortcut to the game folder (or Mod Organizer’s Override folder, for example) for temporarily placing plugin files where the Creation Kit can see them.
Below is how I set up the folder. All the tools are in their folders. Conversion is the folder where I extract the mod to be converted.
1. Mod Placement
Needed by: All mods
- Download the mod from your preferred site if necessary. Make note of any required mods and download those too.
- Copy the mod archive to your work folder (but not the prerequisite mods). Be sure to leave a backup.
- Right-click on the archive and select 7-Zip -> Extract Here to unpack it into the work folder.
Delete the archive. - Many mods (especially old ones) are packed with one or more pointless folder layers, usually with the archive’s or mod’s name. If this was the case with your mod, dive into the folder structure until you find the Data folder, or files and folders intended to be in the Data folder, or multiple folders including a Fomod folder. Move those out into the work folder, then delete the pointless folder layers.

Additional information:
Extra folder layers within the mod archive can prevent mod managers from properly identifying the mod’s structure and can cause them to install the mod incorrectly. Ideally, the root folder within the mod archive should be the Data folder, meaning that plugins should be there and the only folders should be ones that are supposed to be inside the Data folder.
The exception are mods which have a Fomod installer. With such mods you have the option to keep all the Fomod functionality, in which case you’ll want your work folder to contain the Fomod folder and all the folders containing the mod’s various options. Alternatively, if you don’t want to keep the options, you can install the unconverted mod into your mod manager using your choice of options from the Fomod, and copy the installed files into your work folder.
In Mod Organizer, right-click the installed mod in the left pane and select Open in Explorer to find the files. In Vortex, leave the installed mod disabled and find its files in the mod manager’s Mods folder.
2. BSAs, meshes, textures and animations
Needed by: Mods which contain a BSA archive, meshes, textures or animations
- Run the Cathedral Assets Optimizer
- Click on Open Directory and select your conversion folder as the file path. Select One Mod conversion on the right.
- If your mod contains a BSA archive, select the Extract BSA and Delete Backups options in the BSA tab.
- If your mod contains meshes, select the Process Meshes and Necessary Optimization options in the meshes tab. If you find that your finished mod doesn’t work for some reason, you can try unpacking it again and re-running this step in the CAO using Medium or Full Optimization.
- If your mod contains textures, select the Process Textures, Necessary Optimization and Compress Textures options in the textures tab. If you want, you can also select the Generate Mipmaps option, which will improve performance at the cost of higher disk and vram use.
- If your mod contains animations, select the Necessary Optimization option in the animations tab.
- Click the Run button, and you’re done! The log tab will display a list of what was done, including potential problems. Note that the CAO won’t touch any files that didn’t require conversion or optimization and won’t display such files in the log.
Additional information:
This used to be a lot more complicated before the release of Cathedral Assets Optimizer, which combines and simplifies many of the conversion processes. If you see people still using old tools, please make them aware of it!
Some follower mods include skeleton.nif or femaleskeleton.nif and sometimes they will not convert properly – if you get ctd after converting a mod with these files, you can sometimes delete them. If that doesn’t help, try leaving them as is.
3. HDT High Heels
Needed by: Mods which have HDT High Heels as a requirement
A. Remove any HDT High Heels tags with SSEEdit from relevant plugins
- Install your backed up copy of the (unconverted) mod archive into your mod manager and enable the mod. Also install all of the prerequisite mods that have plugins. Specifically, you want SSEEdit and the Creation Kit to see all of the plugin files. If you’re not using a mod manager (Start using one!), copy all the plugin files into the game’s Data folder.
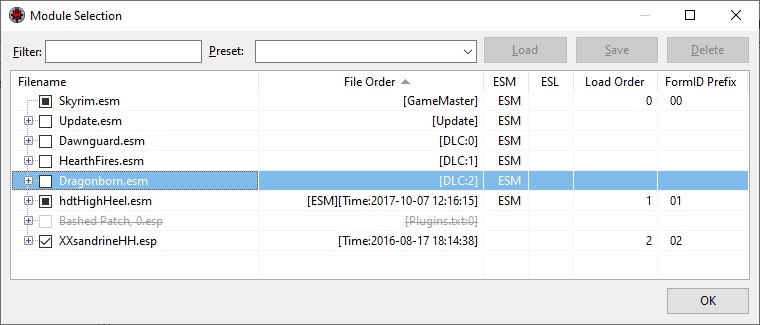
- Run SSEEdit. In the module selection window, right-click anywhere in the list and choose “Select None”. Then, add a checkmark into your mod’s checkbox and click OK. Wait until the right side window gives you the message “Background Loader: finished”.
Note: SSEEdit loads the prerequisite plugins along with your mod’s plugin. If you haven’t installed prerequisite plugins, you’ll be unable to activate your mod and it will be grayed out.
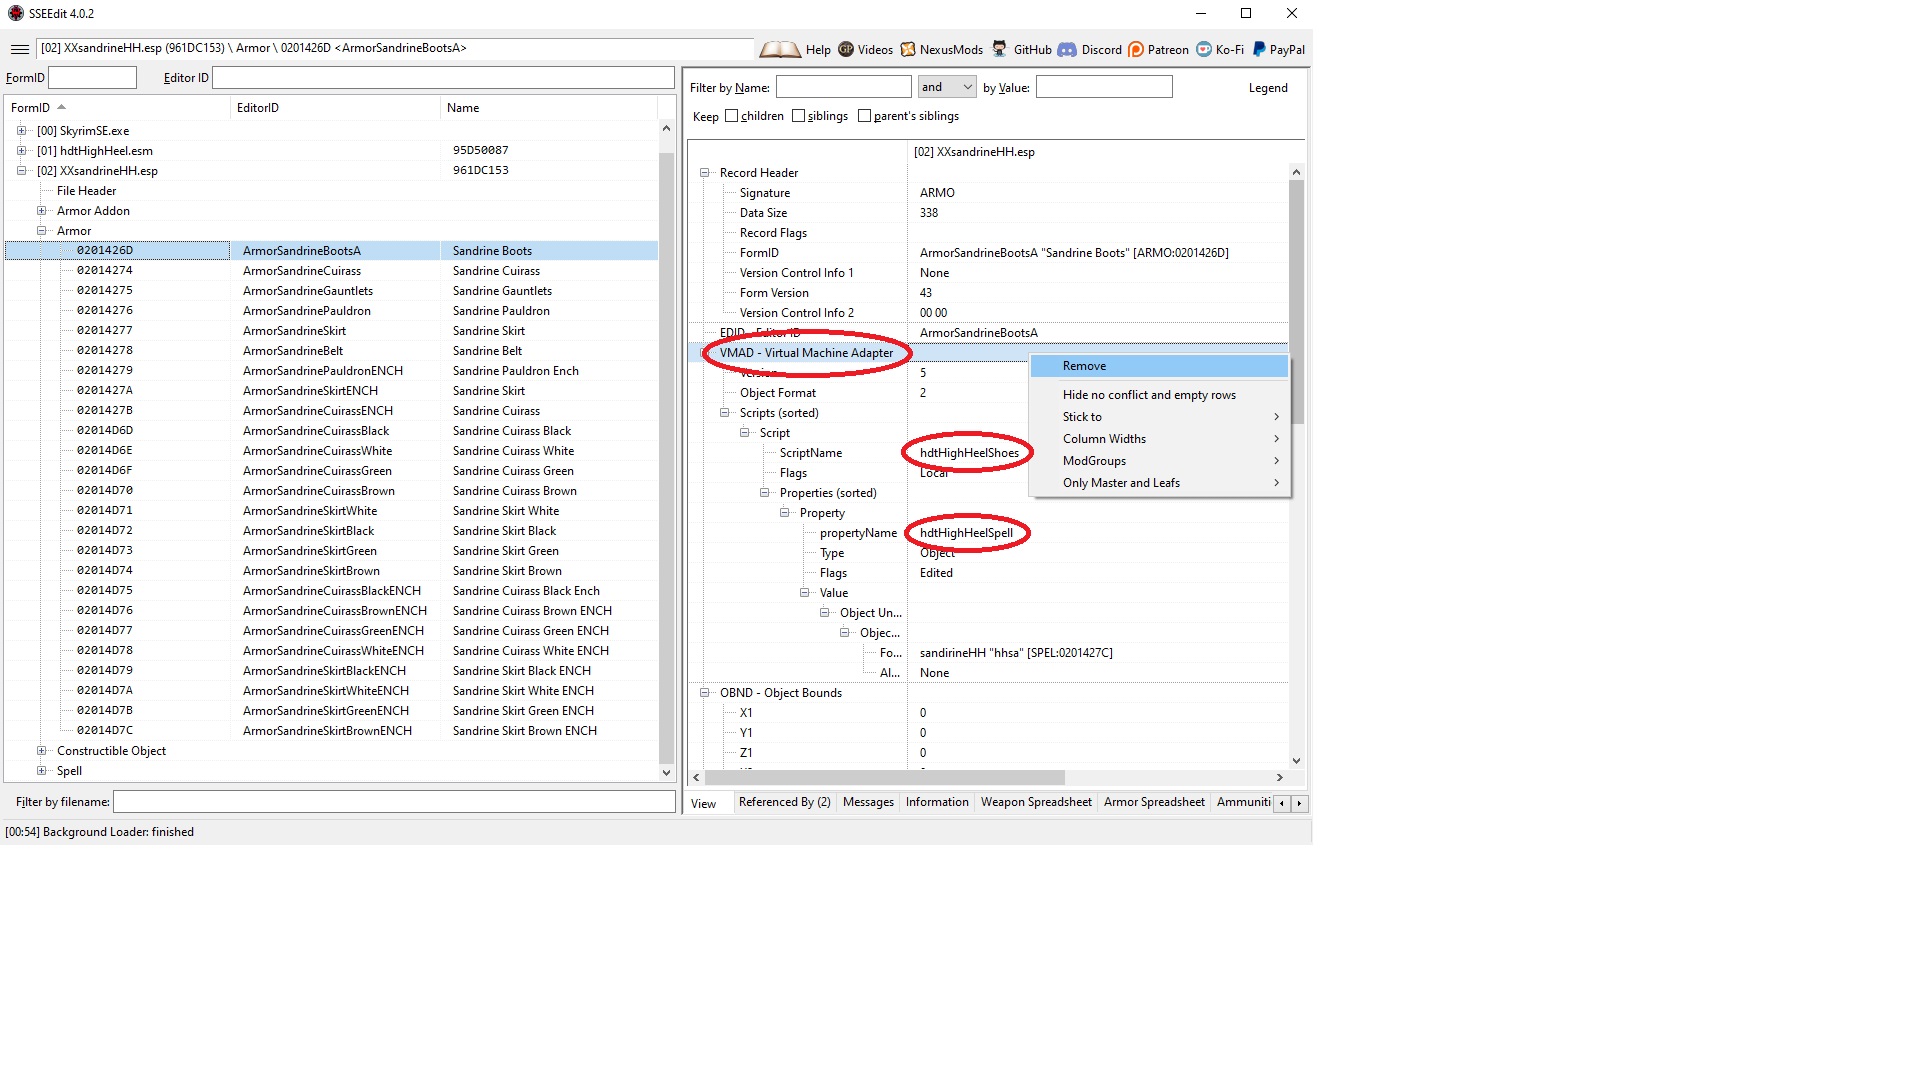
- In the left side list, click on the plus sign next to your mod’s plugin to expand it. Then expand the Armor section. In the list of armors added by the mod, click on the first item that’s for a set of heeled boots. In the right side window, look for an entry called “VMAD – Virtual machine Adapter” with properties related to HDT High Heels. Right-click on the VMAD entry and select Remove. Agree to the warning popup once its safety timer runs out. The VMAD entry will disappear, leaving behind a greyed-out entry. Some mods use multiple HDT High Heels entries on their items. Scroll down the right side list and if you notice any other HDT entries, remove them too.
- Repeat step A3 for every other set of heeled boots in the mod.
- In the left side list, collapse the Armor section and expand the Spell section. Look for spells which list a HDT High Heels related effect in the right side window. Write down the effect’s numeric magnitude for later. Right-click on the spell in the left window and select Remove. Repeat for any other spells with HDT High Heels effects. The Referenced By tab on the right can also be used to find any remaining armors that use the effect.
- In the left side list, click on your mod and take note of the Master Files list in the right side window. Right-click on the mod and select Clean Masters. HDT High Heels should disappear from the Master Files list. If it doesn’t, there’s still a reference to it somewhere. Look through the armors and spells again to locate and remove the remaining references and try again.
- Click on the icon with three lines at the top left and select Save. With your mod selected in the Save Changes window, click OK. Close SSEEdit.
NOTE! You’ll need to leave the plugins installed for plugin conversion in the section 4. Don’t remove them until then or you’ll lose the changes you made here!


B. Add High Heels effects to relevant boots meshes with NIFSkope
- Go to your conversion folder. Look under the meshes and CalienteTools folders for each and every mesh that contains the mod’s heeled boots, including the high weight (_1.nif) and low weight (_0.nif) meshes but NOT including any GND meshes, which are just for items lying on the ground. Open one of them in NifSkope. If this is your first time opening a nif file, go ahead and associate NifSkope with the nif format.
- Right-click on one of the NiTriShape or BSTriShape entries in the left side list and select Block > Insert, then NiF… > NiStringExtraData (singular String, not plural!). A new block will appear in the list with an automatically assigned number.
- Left-click to select one of the NiTriShape or BSTriShape entries. In the block details window below, find the entry “Num Extra Data List”, double-click on the number, increase it by 1 and hit enter.
- Left-click on the green double arrows icon on the “Extra Data List” entry. An arrow should appear to the left. Click it to expand the entry. Double-click on the new empty “Extra Data List” entry and type in the number of the NiStringExtraData block you added in step B2.
- Click on the arrow next to the TriShape to expand it. Click on the NiStringExtraData block to select it. Click on the small Txt icon of the “Name” entry in the block details list. Type in SDTA and click OK.
- Click on the Txt icon of the String Data entry and type in [{“name”:”NPC”,”pos”:[0,0,9.1]}] but replace 9.1 with your mod’s heel height modifier from step A . Make sure you get the brackets right. I recommend copy-pasting the string from this guide. Click OK when one.
- Save the changes from the File menu or with Ctrl+S and repeat the process for every other boots mesh.


Additional information:
This conversion method is compatible with Racemenu High Heels SE, which uses the same method but a different metadata tag. It is also compatible with Lazy Heels. When Racemenu and Lazy Heels are both installed, you should leave the heels’ height value as zero in Lazy Heels. If Racemenu is not installed, you can set the value in Lazy Heels instead.
NOTE: I believe Hydrogen, the author of SMP, has also published a HDT High Heels mod for SSE. I do not support that solution, because I believe that getting rid of HDT HH as a hard requirement is a better solution and I haven’t seen anyone actually use it.
4. Plugins – esp and esm files
Needed by: Mods which contain .esp or .esm files
- If you didn’t already do so in chapter 3 of the guide, install your backed up copy of the (unconverted) mod archive into your mod manager and enable the mod. Also install all of the prerequisite mods that have plugins. Specifically, you want SSEEdit and the Creation Kit to see all of the plugin files. If you’re not using a mod manager (Start using one!), copy all the plugin files into the game’s Data folder.
NOTE! The following steps are for ESP files. If your mod only contains ESM files, you can skip ahead to step 5!
- Run the Creation Kit. Once it finishes loading and all the windows appear, click on File -> Data. Find the first plugin of your mod in the list (not master!), double-click it to add its checkmark, click on Set as Active File, then OK.
- Wait for the CK to finish loading. Press Yes to All for any warnings (The button may be Cancel for some localizations, as opposed to Yes and No). If you get a Multiple Masters error and the CK stops loading, you need to refer to the CK installation section for allowing multiple master loads. Once loading finishes, click on File -> Save, or press Ctrl+S.
- Repeat steps 2 and 3 for any other esp files in the mod. Remove all checkmarks before selecting the next plugin, and be sure to set the plugin you’re opening as active. When you’re done with all the esp files, close the Creation Kit.
- In Explorer, go to the folder containing your converted plugins and cut + paste them into your conversion folder, overwriting the unconverted files.
NOTE! The following steps are for ESM files. If your mod only contains ESP files, you can skip the rest of this chapter!
- In Explorer, go to the folder containing your installed master files. Set Explorer to show file extensions (View tab -> Show/Hide -> File Extensions). Click on your master file(s) to select them, then again to change their name, and change their file extension to esp. Click yes on the “are you sure” prompt. Do this for every master file.
- Run SSEEdit. In the module selection window, right-click and choose Select None, then add a checkmark to your mod’s first master file. Click Ok. Wait for the right xEdit window to display the message “Background Loader: finished”.
- Expand your master file’s structure in the left window by clicking on the plus icon. Click on File Header. In the right window, find the row which reads “Record Flags (sorted)” and right-click on “ESM”. Select Edit. Wait for the safety prompt’s timer to run out and click yes. In the editing window, remove the checkmark from ESM. Click OK. Save with Ctrl+S or by clicking on the three lines in the top left, then Save. Click OK in the popup window. Close SSEEdit.
- Repeat steps 7 and 8 for any other master files. Then update all of them by re-saving them in the Creation Kit. The process is the same as before. Refer to steps 2-4.
- Once all masters have been updated in Creation Kit, run SSEEdit again. Following the process in steps 7-8, but this time edit the Record Flags row and re-add the ESM flag. Save and repeat for every other master file.
- Reversing the process from step 6, go back to the master files in Explorer and change their file extension back to esm. Then copy-paste the converted master files into your conversion folder, overwriting the old files.
- Clean up the temporary files from your mod manager / game folder by uninstalling the mod and its prerequisites.
Additional information:
There is a lot of discussion and misinformation going around regarding plugin form versions. People often say that form 43 mods MUST be updated to the new form 44 to make them work in SSE. Some say they don’t need to be. I’ll try to present the relevant facts to the best of my knowledge, as explained by experienced members of the community including people from the USSEP team and xEdit team.
Not only does a mod as a whole have a form version in its header, each of its records also has one. The mod’s form version states the version of the environment it was saved in. Saving a mod in Creation Kit updates its main form version and the form versions of all of its records to the newest available version.
It has been mentioned that console versions of SSE require a mod to be form 44, but in theory the PC version should support older form versions as well. In practice there are recorded cases, also verified by me, where a form 43 mod didn’t work, but did after being resaved in form 44 despite no visible errors or changes when compared in xEdit, other than the form changes.
In most cases resaving a mod means that all of the records of a form 44 mod will also be form 44, but this isn’t always the case. Not all record types were recently updated and some records may keep their old versions. In fact, skyrim.esm has records as old as form 14. Dragonborn.esm on the other hand only comprises of form 43 and 44 records.
The form version of a record tells the engine what that record’s expected structure is. Therefore, manually editing a record’s form version is a horrible idea. If a record’s expected structure is different from the actual structure, the engine will read the record incorrectly leading to unpredictable results, possibly including CTDs or even data corruption.
The differences between form 44 and form 43 records are as follows.
New records in Form 44:
* LENS
* VOLI
* SPGD (Fallout 4)
Changed records in Form 44:
* MATO – changed Directional Material Data (L9895-L9929)
* STAT – changed Direction Material (L12783-L12797)
* WATR – changed Visual Data (L12920-L13041), added Flow Normals (L13057)
* WTHR – added volumetric lighting (L13426-L13432), added LENS flare reference (L13442)
* WEAP – changed Critical Data (L13159-L13183)
Changed subrecords in Form 44:
* VMAD – added “large references”
If a plugin includes any of the above records or subrecords, it must be updated. Otherwise, unknown/unpredictable problems may occur with the game engine.
5. Mesh compatibility for SMP physics
Needed by: BBP (Breast and Butt Physics) compatible outfits
- Go to your conversion folder. Look under the meshes and CalienteTools folders for each and every mesh that contains the mod’s chest armors, including the high weight (_1.nif) and low weight (_0.nif) meshes but NOT including any GND meshes, which are just for items lying on the ground. Open one of them in NifSkope. If this is your first time opening a nif file, go ahead and associate NifSkope with the nif format.
- Identify the 3d-model’s “base shape”, which is the character’s naked body. In the block list on the left side you can see a list of TriShapes and NiNodes under a Scene Root node. The TriShapes are the various parts of the armor. The NiNodes make up the model’s skeleton. Each one has a Value which is that shape’s or bone’s name.
Click a TriShape in the list to highlight that shape in model window on the right. Click each shape in turn until you find the character’s naked body. This shape is often easily identifiable by its name BaseShape, Body or something similar, but sometimes it can have an obscure name.
NOTE: In some rare cases modders place the base shapes in outfit pieces other than the chest armor. If you find that your mod’s chest armors don’t have a base shape, you’ll need to check through all other armor pieces and rename the base shape wherever it may be. In extremely rare cases the mod does not have a base shape at all, but the armor is still properly skinned to the skeleton and is made to fully cover the body. In such cases you should be able to get away with renaming any one of the chest armor meshes’ shapes.
- Select the base TriShape. In the Block Details below the Block list, click on the small Txt icon in the “Name” entry. Type in a new name (see note below!) in the box and click Ok. Press Ctrl+S or click on File -> Save to save the change. Close NifSkope.
NOTE: For outfits that use the CBBE body, the name must be “CBBE”. For outfits that use any UNP body, the name must be “UNP”. For other body types, refer to your body’s mod page, author or SMP configuration for its naming standard.
- Repeat for all other meshes.
6. Custom physics files
Needed by: mods which contain an xml file for custom HDT physics (hair, cloaks, skirts, etc.)
NOTE: Mods which don’t need this step should skip to chapter 7
A. Replacing the mesh metadata
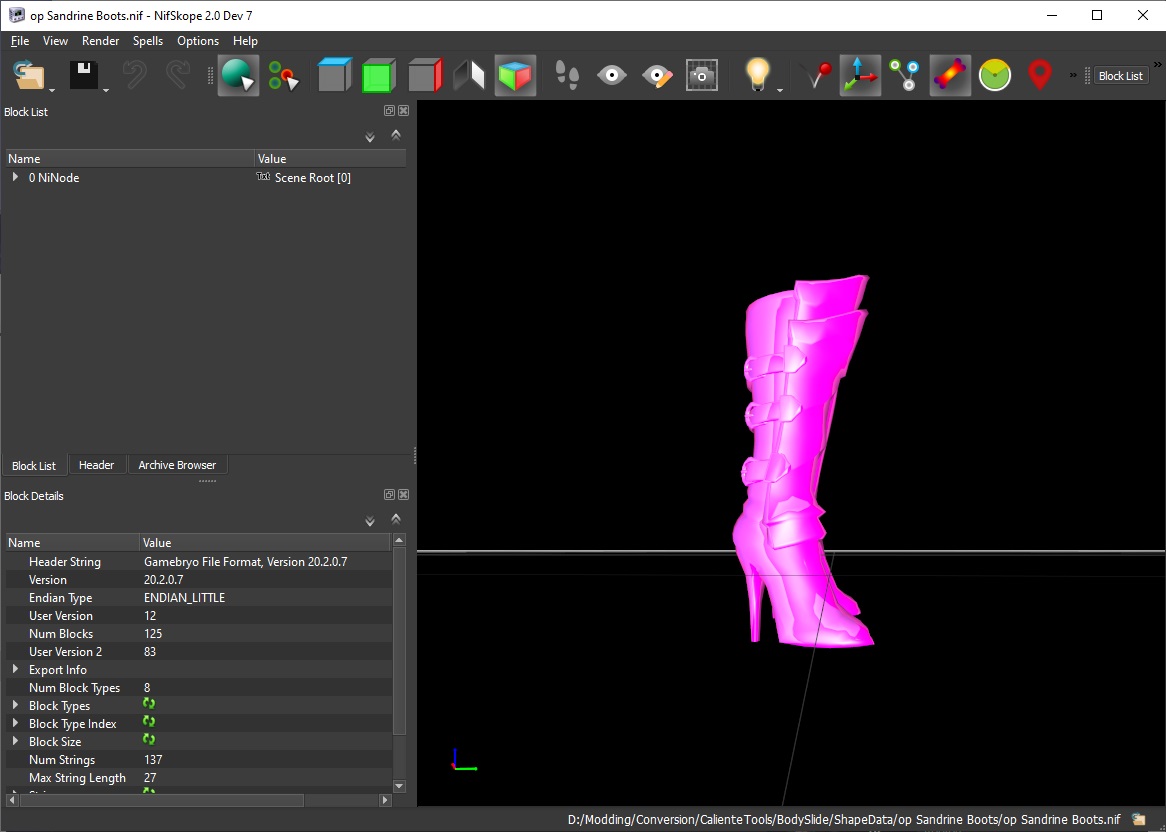
- Go to your conversion folder. Look under the meshes and CalienteTools folders for each and every mesh that contains the mod’s custom physics, including the high weight (_1.nif) and low weight (_0.nif) meshes but NOT including any GND meshes, which are just for items lying on the ground. Open one of them in NifSkope. If this is your first time opening a nif file, go ahead and associate NifSkope with the nif format.
- In the Block List on the left, right under the NiNode called Scene Root, there should be a NiStringExtraData entry. If you click it, the Block Details list should display the name “HDT Havok Path” and String Data should be the path to the mod’s custom physics file. Click on the small Txt icon in the Name entry. Replace the name with “HDT Skinned Mesh Physics Object”. Click OK. Save and close the mesh.
- Repeat steps A1 and A2 to all the other custom physics meshes.
B. Rewriting the xml file
NOTE: This is the most complicated part of the guide. You need to be able to use your mesh file to understand the structure of its skeleton and skin, as well as its rigging. If you’re doing this for the first time, refer to the detailed sections starting with 6.1. to learn all the relevant terminology, how to find what you need in a mesh as well as the details of writing the script. The following summary is for reference only.
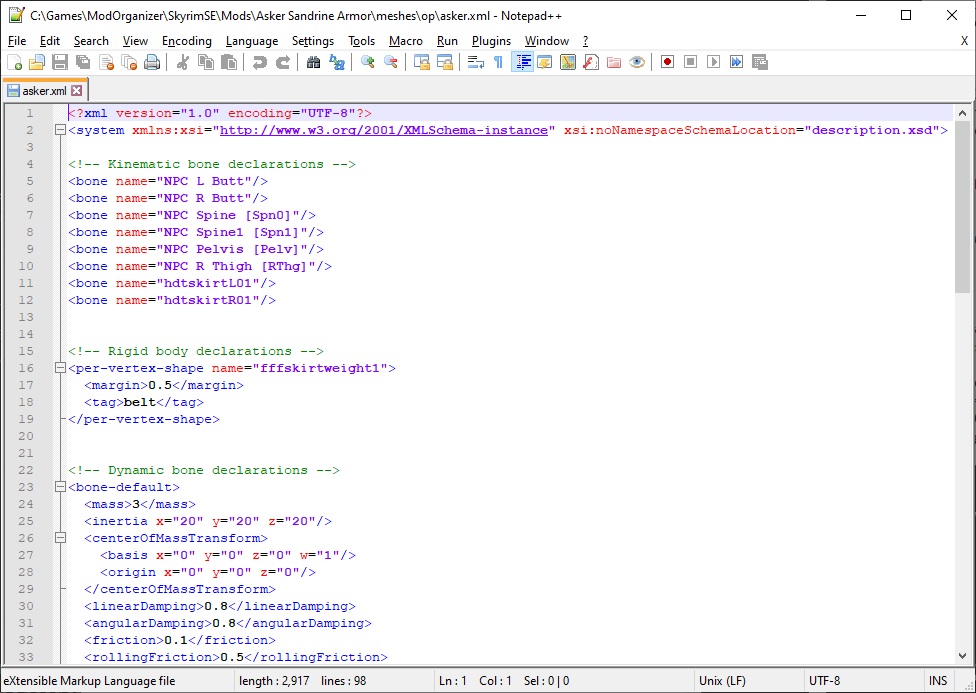
- Open the mod’s custom xml file in your xml editor. If you don’t have one, Notepad works but I recommend downloading and using Notepad++.
- Delete all of the old code.
- Type in the xml header tag and system tag at the beginning of the file, and the closing system tag at the end.
- Open one of the meshes that uses the xml file in NifSkope. Determine which of the shapes are dynamic and which are static. Determine which are the anchor bones of the dynamic shapes.
- Write declarations of all kinematic bones within the dynamic shapes.
- Write collider declarations for all static shapes.
- Write declarations of all dynamic bones along with their physics values.
- Write collider declarations for all dynamic shapes.
- Write constraint declarations along with their physics values for each dynamic bone and their attached parent bone.
- Save and test in-game. Adjust physics values as desired.
6.1. Rewriting the xml file
Open the mod’s custom xml file in your xml editor. If you don’t have one, Notepad works but I recommend downloading and using Notepad++.
The benefit of Notepad++ over regular Notepad is that it comes with many features useful for writing code. It has auto-complete for existing variable names which makes re-writing things easier and safer, and it automatically colors text elements if it recognizes them as code, which makes it easier to distinguish between comment text, code tags, variables etc.
The colors also make it easier to notice mistakes. If code is receiving a wrong color, you might’ve missed a closing tag or made a typo somewhere and the rest of your code is still being considered part of that tag. A mistake which would break the entire script.
Once you’ve opened your mod’s xml file, select the entire code with your mouse or by pressing Ctrl+A, and delete it. Then, copy-paste the following two lines to the beginning of the file:
Then write the following line which must remain at the end of the file:
These are xml tags, which are always written within angle brackets. You always start with these two tags, the <xml> tag and the <system> tag. They declare the format and typeset being used in the code, telling the engine how to read the code.
Tags are usually written in one of two ways, either as a pair of an opening tag and a closing tag, or as a single tag. The closing tag always contains a slash. A single tag also contains a slash and thus acts as its own closing tag. The <xml> tag is the only exception. It is a single tag with no closing slash, and has both an opening and a closing question mark instead. A tag can also contain data, either inside the tag itself or between the tag pair. Examples:
It’s also possible to write comments into the code, to remind yourself and notify anyone else reading the code of any important details. Anything written within a comment tag will be ignored by the game engine.
The <xml> tag is a single tag. The <system> tag is a paired tag. Everything else you write in the xml file must be between the <system></system> tag pair!
6.2. Getting to know your mesh
3D-models in Skyrim are made up of a so-called skinned mesh. They are composed of two parts. The skeleton, also known as the rigging, defines the joints of the character and is used to animate the character. The skin is the visible surface geometry of the model. This geometry can all be in a single part or divided into multiple parts, called shapes.

The model’s textures are placed onto the skin like stickers to a model airplane, known as the UV-mapping. Parts of the skin are tied to the skeleton in what is called skinning. Each vertex (or point) of the skin is “skinned” or “weighted” to one or more bones, which are the points the skeleton is made up of.
When the skeleton is animated, the skin follows this movement according to the weights of each skin vertex. For example, the vertices of a character’s calf might be skinned to the skeleton’s knee and foot, with the vertices further up more heavily tied to the knee (and thus following it more closely) and vertices further down more heavily tied to the foot.
In regular Skyrim meshes, the skin follows this weighting precisely. In other words, the skin moves with the character’s animations. With the addition of physics effects however, additional forces are applied. From the perspective of physics, bones and shapes which only follow the animations are static, also called kinematic. Conversely, bones and shapes which can be moved by physics are dynamic. To properly add physics to the model, we need to identify which parts of the skin are meant to have dynamic motion and which bones that dynamic motion is tied to. We do this in NifSkope.
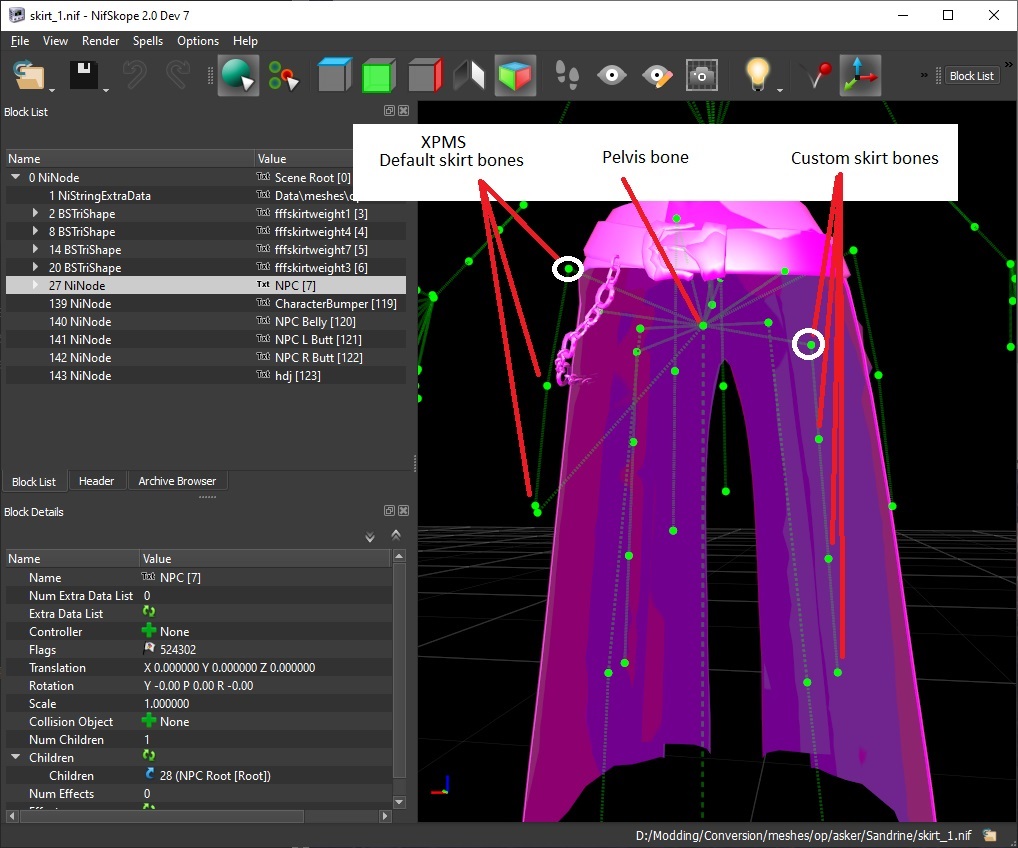
As an example, below is the skirt mesh of the Sandrine armor in NifSkope with its skeleton visible. In the Block List on the left we can see that the skin is made up of four shapes (the BSTriShape blocks) called fffskirtweight1, fffskirtweight3, fffskirtweight4 and fffskirtweight7. The mesh also has a skeleton (NiNode block) called NPC. It also has five unstructured bones (NiNodes without an expand arrow), which don’t interest us since they can never be dynamic. They would just fall to the floor.
The skirt is obviously the skin which is intended to be dynamic. By clicking on the TriShapes in the Block List we can determine that the cloth section is made up of shape fffskirtweight4, while fffskirtweight1 is the belt, 7 is the chain and 3 are the straps in the back. To determine what bones the skirt is skinned to, we expand the structure of fffskirtweight4, seen below.
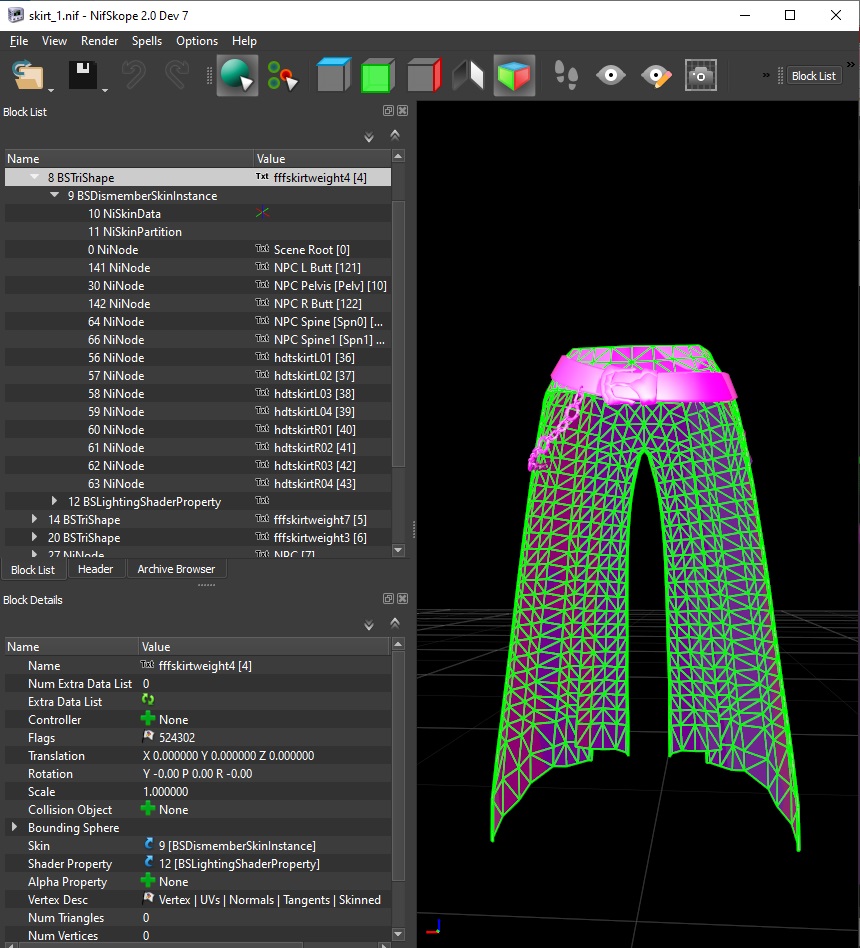
Within the TriShape block we find a BSDismemberInstance block. Inside it are two blocks which contain the shape’s geometry data and a list of NiNodes, which are the skinned bones of this shape. The bones with NPC in their name are some of Skyrim’s default bones. They are part of the character’s body and as such are all kinematic bones. The rest are hdtskirt bones, which are custom and as such are clearly meant to be the dynamic bones. When examining a shape’s bone structure, you can click on each bone to highlight it and display the structure of its child bones, which are the bones which only connect to the root node through it .
As seen in the Skirt and skeleton image above, in this example the NPC pelvis bone is a notable joint, with several strings of skirt bones tied to it as children. Four of these strings are confusing because none of the shapes are skinned to them. This outfit was clearly made using the XPMS skeleton, because those skirt bones are default bones of its expanded skeleton structure. One of these strings is marked in the above image. While these bones exist in the mesh, since they are unskinned we can ignore them.
Cases like these are common. Sometimes the outfit uses the default bones, sometimes it doesn’t. The skinning (BSDismemberSkinInstance block) tells us that this outfit uses the hdtskirt custom bones instead, also marked in the above image.
When physics are applied to bones, they tend to fall due to gravity. Therefore they need to be kept in place by an anchor bone. The anchor is a kinematic bone from which the dynamic bones hang like beads from a crystal chandelier. This is usually the first bone of the dynamic bone string, shown in the above image with a white circle. If the pelvis parent bone was used as the anchor instead, the skirt bones would fall through the body, unless stopped by properly implemented collisions. Even with collisions enabled, the external anchor reduces the amount of constant collision calculations.
Now that the dynamic bones have been identified, we need to identify the dynamic shapes. These are any shapes that contain the dynamic bones. By expanding each shape in the Block List, we can see that fffskirtweight1 is only skinned to default NPC bones and is therefore a kinematic shape. The other three shapes are skinned to the hdtskirt bones, and thus are all dynamic shapes. Image below.

6.3. Kinematic declarations
Once we understand the mesh, we can start writing the code. One important thing we need to do in the script is to declare all the bones in the mesh, which tells the physics engine their properties. All properties start with default values, which are zero for everything except friction (0.5) and margin-multiplier (1). More on those later.
When the value of a default property is changed, it remains at the new value for all subsequent declarations until it is changed again. If anything remains undeclared at the end of the script, it gets auto-declared with the last valid default values.
The important thing to keep in mind for now is mass. Anything with the default mass of zero is unaffected by physical forces and is therefore kinematic. That is why the simple starting point is to declare all kinematic bones. Since there’s no need to change properties for them, simply mentioning the bone with a tag suffices. The bone will be assigned the default bone values. The below example tag declares a bone whose name is x.
The bones which need to be declared as kinematic include all the kinematic bones found in the dynamic shapes. Each bone should only be declared once, because a second declaration causes an error which stops the game from reading the rest of the code, leaving the outfit static or with broken physics.
NOTE! Scene Root is not a bone and never needs to be declared. It is simply a structural point to which the first bone in the skeleton attaches to.
In our Sandrine skirt example, our dynamic shapes are fffskirtweight3, fffskirtweight4 and fffskirtweight7. We start by declaring the kinematic bones from fffskirtweight3, which are all the default NPC bones and the two anchor bones of our skirt, so we declare the following:
Shape fffskirtweight4 has the same kinematic bones so no new declarations are needed. fffskirtweight7 has one new bone.
Bone names must be written precisely. If you’re worried about getting a bone with a difficult name right, such as the NPC bones with their brackets, you can always copy-paste the name from the mesh in NifSkope by clicking on the Txt icon next to the bone’s name and copying from the editing box.
Next we declare all the kinematic shapes as colliders, meaning that they will obstruct any dynamically moving objects. Without a collider declaration, objects will simply clip through the shape.
Similarly to bone declarations, collider declarations start off with kinematic default values and changes to default properties persist once changes are made, which is why it’s best to do kinematic colliders first. Also, declaring a shape automatically declares all of its bones which have not yet been declared, using current defaults. This is why bones of kinematic shapes don’t need to be declared separately, and also why individual bone declarations should be done before collider declarations. Declaring individual bones after a collider’s auto-declaration can easily lead to a double declaration, a code error and non-functional physics.
Colliders can be declared as per-vertex or per-triangle shapes. Per-vertex is more simple, less resource intensive and less accurate. “Dumb colliders” like earrings, limbs and weapons, which can be mentally simplified into straight lines are best declared as per-vertex. Per-triangle shapes more accurately calculate collisions with their skin surface, but their calculations are much more intensive. Per-triangle shapes are best used for colliding surfaces like the character’s body.
When deciding between per-vertex and per-triangle, consider how important accurate collisions are. Also, consider which other objects the shape will collide with, including fast turns or contorted animations such as jumping or crouching. Kinematic shapes don’t need to consider other kinematic shapes though, since they will never collide due to physics. Try to keep collisions as vertex vs. vertex, or vertex vs. triangle. Triangle vs. triangle is by far the most intensive combination and should be avoided when possible.
The relevant tags for kinematic colliders are as follows:
For our skirt example, we only have one kinematic shape to declare. fffskirtweight1 is the belt, which we don’t expect to collide with the skirt itself. We don’t expect the presence of other dynamic objects, but if there ever were any, we might want them to collide. Accuracy is not important, so we declare the belt as per-vertex. We give the shape a nametag of its own and assign a pretty standard collision margin. Declaring this shape does not auto-declare any new bones. It only contains the same kinematic bones that were declared from the dynamic shapes earlier.
Finally, we need to consider non-collision tags. The kinematic belt shape is so high up in the mesh that the swinging skirt bones shouldn’t bring any of the dynamic shapes into collision with it. Also, all three dynamic shapes all swing around by the same dynamic bones, which means that they are moved by the exact same forces and shouldn’t ever collide with each other. Their possible collisions only include external colliders like the legs and ground. Therefore, to reduce the amount of collision calculations, we can declare the three other shapes as non-collision shapes for all of the shapes. This isn’t always the case! Consider your mesh carefully!
Note! It’s good coding practice to indent rows within a tag, which makes the code easier to read.
6.4. Dynamic declarations
Next we need to declare the dynamic bones, but while doing so we need to give them their physics properties. To do so, we change bone property defaults. Any new values we declare will apply to all subsequent bones until values are changed again. Unmentioned values remain unchanged. As mentioned earlier, all default values are zero except friction (0.5) and margin-multiplier (1). Default values are changed with the <bone-default> paired tag. The tags of any properties being changed must be written inside the tag pair.
The procedure here is to first declare new values for bone defaults, then declare any bones that use those values. If some bones are to use different values, the process is repeated. Declare new values, then the bones themselves.
When grouping up bones under various bone default declarations, consider the particulars of the outfit. For example, a cloak of uniform cloth might use a single defaults declaration for everything. A skirt with heavy gems at the end might declare bones in rows, with less mass on the cloth and more mass and possibly higher dampening on last row of bones to account for the gems. A skirt with narrow side strips and a broad back section could declare the bones in columns, with different values on the strips and the back.
When tags refer to local coordinate axes, positive x is left, positive y is up and positive z is forward. For rotation x is pitch, y is yaw and z is roll. Distance units are quite small and you should be able to work with values under 10. Angular values are in radians, so 1.57 equals 90 degrees.
Bone defaults use the following tags, displayed with their default values:
For the skirt example, we will use a single defaults declaration for all the skirt bones. We only declare the values we wish to change:
Next up are the dynamic collider declarations. At this point of the code all bones should be declared, and these collider declarations should no longer result in any auto-declarations. If you’ve missed any bones, they’d get declared with the latest dynamic bone values with undesirable results. The collider declarations themselves are identical to the earlier kinematic collider declarations. Simply declare all of the dynamic shapes here.
Our skirt example has three dynamic shapes declarations, listed below. We give each a nametag and a margin. Nothing special there. The chain and the straps are quite simple shapes and can be safely declared as per-vertex.
The skirt itself is made up of two strips of fairly narrow cloth, which also feels fine to declare as per-vertex. If it was a single wide strip, per-triangle might be a serious consideration. However, when considering the things the skirt might want to collide against, possibilites include the character’s legs and the ground, and the former would preferrably be a per-triangle shape, so to avoid triangle vs. triangle collision events, we have even more reason to declare as per-vertex.
Here are the example declarations:
6.5. Constraint declarations
At this point, bones are affected by physics but they stretch to insane lengths and bounce weirdly against any colliders they encounter. The last thing we need to do is add constraints which limit the acceleration and movement of bones, preventing infinite stretching, explosive spasms and the like. Similarly to bones, constraints have default values and we use declarations to change those defaults for assignment to various constraint groups.
Each constraint is declared as the relation of two bones linked in the skeleton. Similarly to bones, defaults for all the constraint values start at zero, which means that the relationship of those two bones always exactly follows the animation. In other words, the deviation from the animation is constrained to zero. Specifying non-zero values allow the physics to affect dynamic bones up to the specified limits.
You can think of a constraint as a spring (like in a car’s suspension) between bones A and B, where bone A is the dynamic bone whose movement is being constrained by the presence of parent bone B. The spring can twist, stretch, contract and bend. The first parent bone in the chain is of course the kinematic anchor bone which keeps the whole thing in place, and the series of constraint springs starting from it keep the dynamic bones from falling or going crazy.
Here are the various tags for constraint properties:
The declarations for our skirt example are quite simple. We’re not doing anything fancy with the centers of mass, we don’t need stiffness and we’re doing the damping on the bones. All we need are the limits. We don’t want the fabric to stretch or contract, so linear values shall be zero.
The angular constraint values greatly impact what our material feels like. I’ll provide two examples for the values, one for a cloth-like feel, one for a more leathery skirt material.
In our case, the x axis allows the cloth surface to twist. For the cloth we use a value high enough that the cloth starts to wrap around the leg when colliding with it. It can also start to lump up during some motions. The value used for leather here leave the material pretty stiff and straight.
Our y axis allows the skirt to swish side to side, easily demonstrated by yanking the mouse left and right with a weapon in hand. The value used for cloth is quite bendy while the value for leather only allows it to bend a little due to the fabric’s thickness along that axis.
Our z axis allows the skirt to fold with the character’s forward/backward movement, and these should be the highest values. The cloth can easily bend over 90 degrees, but the values I use are not super flappy. A lightweight strip of cloth could use even higher values. The skirt is still supposed to be armor though, so I went for a feel of fairly heavy cloth. The leather is stiff, but since this is the fabric’s thin axis, I used a value that allows it to bend about 35 degrees (3 springs, 0.2 radians each)
Cloth example:
Leather example:
Now to declare the constraints themselves, which is almost as simple as declaring bones, except we declare it for two bones.
In our example we declare constraints for the left and right side dynamic bones, with bone 2 hanging from the anchor, bone 3 hanging from the second and bone 4 hanging from the third.
And that’s it! The last thing that should be in the code is the closing system tag. Don’t forget to save your file!
TIP! Various bone and constraint values can be tested fairly easily while the mod is installed. Just open both the game and the script, see how the outfit behaves in-game, tab out to the code, change values and save, then tab back in and re-equip the armor to reload the script.
The complete script for the Sandrine skirt example is available under the following link. Feel free to use it for reference when creating your own script.
[link]7. Finishing up
Needed by: All mods
- Optional: You can repack the mod’s assets into a BSA archive.
For general compatibility I ONLY recommend doing this step if the mod specifically says it has a BSA for load order reasons. In other cases loose files are easier to manage and troubleshoot.
Open the Cathedral Assets Optimizer. Click Open Directory and select the conversion folder. In the BSA tab, only select Create BSA. In the other tabs, remove the Process Meshes, Process Textures and animations Necessary Optimization options. Click Run.
- Compress your converted mod into a 7-zip archive.
Go to your conversion folder. Select everything in the folder. Right-click on any of the selected files and choose 7-Zip -> Add to Archive. Type in a name for the archive, with the .7z extension. Click OK.
- Store your new mod and clean up files from the conversion folder.
And you’re done!
About scripts and SKSE scripts:
No action is required for regular script files. There has been no change to the script format. All that is required is to update the plugins that use the scripts.
SKSE scripts are compiled from C++ code with Visual Studio, and require long term maintenance. As new SKSE updates appear, scripts need to be recompiled using the new source code. As such, SKSE scripts are beyond the scope of this guide.
Credits
I’d like to give thanks to all the people who have helped provide the tools, guides, discussions and support necessary to realize this guide, including:
Bethesda
Jonwd7
ElminsterAU
Hlp
Zilav
Sharlikran
G_k
Treota
Arthmoor
Bchick3
PrZ
Smr1957
Avrie
As well as everyone I’m forgetting.