Morrowind: Vanilla ENHANCED (OpenMW, Graphics & Lighting, Bug Fixes, Fixed Leveling & Magicka Regeneration, etc)
Introduction
Features:
- Enhanced Textures
- Enhanced Lighting
- Better View Distance
- Countless Engine, Stability, & Bug Fixes
- Quality of Life Fixes
- Fixed Leveling & Magicka Regeneration
- All vanilla-friendly changes that make the default experience better, not add stupid things that make Morrowind into a completely different game.
- Enhanced Lighting
- Better View Distance
- Countless Engine, Stability, & Bug Fixes
- Quality of Life Fixes
- Fixed Leveling & Magicka Regeneration
- All vanilla-friendly changes that make the default experience better, not add stupid things that make Morrowind into a completely different game.
Installing Mod Organizer 2
Mod Organizer 2 is a popular application for managing Morrowind mods, and is what we will be using in this guide.
The link will take you to the Skyrim: Special Edition page for Mod Organizer 2, but that's just where the main download for Mod Organizer 2 is hosted on Nexus Mods. It works for lots of other games than just Skyrim.
Step 1
Before you install it, make a new folder in C:\Program Files (x86)\Steam\steamapps\common\Morrowind called "Mod Organizer 2 - Morrowind" (without the quotation marks).
Double click the Mod Organizer 2 .exe file you downloaded to begin the installation. When it asks you "Where should Mod Organizer be installed?" click "Browse.." and find the "Mod Organizer 2 - Morrowind" folder you just made so it will install to that one. Then click "Next" twice and check the box next to "Don't create a Start Menu folder". Click "Next" another two times and then click "Install". When it's done installing, click "Finish".
Step 2
If Mod Organizer 2 did not automatically start upon you clicking "Finish", just go to the "Mod Organizer 2 - Morrowind" folder you made and double click "ModOrganizer2.exe". It will come up with a window asking you to create a new instance. MAKE SURE YOU SELECT "Create a portable instance". On the next page, scroll down until you find "Morrowind" (if it doesn't show up, try checking the box next to "Show all supported games"). Click it and then just click "Next" a few times and then click "Finish".
Mod Organizer 2
DOWNLOAD[www.nexusmods.com]The link will take you to the Skyrim: Special Edition page for Mod Organizer 2, but that's just where the main download for Mod Organizer 2 is hosted on Nexus Mods. It works for lots of other games than just Skyrim.
Step 1
Before you install it, make a new folder in C:\Program Files (x86)\Steam\steamapps\common\Morrowind called "Mod Organizer 2 - Morrowind" (without the quotation marks).
Double click the Mod Organizer 2 .exe file you downloaded to begin the installation. When it asks you "Where should Mod Organizer be installed?" click "Browse.." and find the "Mod Organizer 2 - Morrowind" folder you just made so it will install to that one. Then click "Next" twice and check the box next to "Don't create a Start Menu folder". Click "Next" another two times and then click "Install". When it's done installing, click "Finish".
Step 2
If Mod Organizer 2 did not automatically start upon you clicking "Finish", just go to the "Mod Organizer 2 - Morrowind" folder you made and double click "ModOrganizer2.exe". It will come up with a window asking you to create a new instance. MAKE SURE YOU SELECT "Create a portable instance". On the next page, scroll down until you find "Morrowind" (if it doesn't show up, try checking the box next to "Show all supported games"). Click it and then just click "Next" a few times and then click "Finish".
Installing OpenMW
OpenMW is a the best way to play Morrowind in the modern day. It lets Morrowind run on an open-source, 64-bit engine (the default engine was only 32-bit, which limits modding capabilities), with many graphical and quality of life enhancements built-in (enhanced lighting, shadows, & fog, MUCH larger view distance, better navigation mesh for NPCs/creatures, etc).
For Windows users, the file you are looking for is "OpenMW-LATESTVERSION-Windows-x64.exe".
Step 1
Before you install it, make a new folder in C:\Program Files (x86)\Steam\steamapps\common\Morrowind called "OpenMW" (without the quotation marks).
Double click the .exe file you downloaded to begin the installation. When it asks you to "Choose Install Location" click "Browse.." and find the "OpenMW" folder you just made so it will install to that one.
Step 2
Go to Mod Organizer 2, click on where it says "Morrowind" to the left of the "Run" button, and then click <Edit...>. Click the little + sign near the top left on the window that pops up and then click "Add from file...". In the File Explorer window it brings up, navigate to:
C:\Program Files (x86)\Steam\steamapps\common\Morrowind\OpenMW
Left click the "openmw.exe" file once and then click "Open" at the bottom right of the File Explorer window. In the "Title" box, name it "OpenMW". Check the box next to "Force load libraries (*)", then click Apply and then click OK. This will add Open Morrowind as a .exe that can be run from within Mod Organizer 2.
Now, do the same thing but with the "openmw-launcher.exe" file so the launcher is also added, which we will need later for settings and to help set up the mod load order for OpenMW. For the "Title" box, name it "OpenMW - Launcher".
OpenMW
DOWNLOAD[github.com]For Windows users, the file you are looking for is "OpenMW-LATESTVERSION-Windows-x64.exe".
Step 1
Before you install it, make a new folder in C:\Program Files (x86)\Steam\steamapps\common\Morrowind called "OpenMW" (without the quotation marks).
Double click the .exe file you downloaded to begin the installation. When it asks you to "Choose Install Location" click "Browse.." and find the "OpenMW" folder you just made so it will install to that one.
Step 2
Go to Mod Organizer 2, click on where it says "Morrowind" to the left of the "Run" button, and then click <Edit...>. Click the little + sign near the top left on the window that pops up and then click "Add from file...". In the File Explorer window it brings up, navigate to:
C:\Program Files (x86)\Steam\steamapps\common\Morrowind\OpenMW
Left click the "openmw.exe" file once and then click "Open" at the bottom right of the File Explorer window. In the "Title" box, name it "OpenMW". Check the box next to "Force load libraries (*)", then click Apply and then click OK. This will add Open Morrowind as a .exe that can be run from within Mod Organizer 2.
Now, do the same thing but with the "openmw-launcher.exe" file so the launcher is also added, which we will need later for settings and to help set up the mod load order for OpenMW. For the "Title" box, name it "OpenMW - Launcher".
Mods: Engine Tweaks & Patches
Download each mod by pressing "Manual download" on the Nexus Mods page. Once it has downloaded, go back to Mod Organizer 2 and press the "Install a new mod from an archive" button (it's the 2nd button from the left on the top, the one with a little disc in the corner). Select the .zip file you downloaded and then press "OK" to install the mod.
If at any time you want to check what order the mods need to be in in Mod Organizer 2, check the Load Order picture included near the bottom of this guide.
- Fixes some issues with displaying distant objects in OpenMW like objects popping in or out.
Note: When installing, Mod Organizer 2 will give an error saying "The content of <data files> does not look valid". For this mod, just ignore this message and click OK.
- The main unofficial patch for The Elder Scrolls III: Morrowind. Fixes 9000+ bugs still present in the game left unfixed by Bethesda.
- The Official Plugins for Morrowind were official addons made by Bethesda that added additional content to the game. They were originally available for free download on Bethesda's website, but have since been taken down and are not automatically included with the game (even Game of the Year Edition). This mod is an all-in-one package including all of the Official Plugins that also fixes some bugs with them. To see what content each plugin adds, click this link[en.uesp.net].
Note: Just download the Main File and when installing, choose the following options:
Merged or Individual - UMOPP Merged
Merged Version - Compatibility
Install Better Armor Compatibility? - No
- Improves the game's performance while fixing lots of issues with broken meshes (shading errors, collision, UV mapping, etc).
Note: When installing, select the Core, Lake Fjalding Anti-Suck, Weapon Sheathing Patch, Chuzei Fix, & Graphic Herbalism Patch modules. Don't select Better Vanilla Textures because we will be replacing them later anyways with higher quality versions.
- There a few issues with how Bethesda implemented Morrowind's expansions; Tribunal & Bloodmoon, which this mod fixes. Originally, assassins from The Dark Brotherhood will attack you as soon as you start the game, which lore wise makes absolutely no sense, but the reason why is spoilers so I won't say here. This mod changes it so the assassination attempts don't start until it makes sense lore-wise for them to start, among fixing other issues.
- During the quest "A Cure for Vampirism", a character will tell you to go to caverns of Dubdilla under Mount Assarnibibi. The problem is, Bethesda accidentally placed Dubdilla in a completely different part of the map from where it is supposed to be and the journal entry related to the quest even pointed the player to this spot, which contradicted the spoken dialogue. This mod moves Dubdilla's entrance to where it is supposed to be and changes the journal entry to reflect the accurate location.
- There are a few buildings in Morrowind that were set up like inns where you should be able to rent rooms, but Bethesda forgot to add the ability to rent rooms there. This mod makes it so now you can rent rooms at those locations.
Note: When installing, just select the Core module.
The next 10 mods all deal with fixing various lore inaccuracies found in the game. These include issues with dialogue, written notes, and more. I recommend installing all of them.
If at any time you want to check what order the mods need to be in in Mod Organizer 2, check the Load Order picture included near the bottom of this guide.
Distant Fixes
DOWNLOAD[modding-openmw.gitlab.io]- Fixes some issues with displaying distant objects in OpenMW like objects popping in or out.
Note: When installing, Mod Organizer 2 will give an error saying "The content of <data files> does not look valid". For this mod, just ignore this message and click OK.
Patch for Purists
DOWNLOAD[www.nexusmods.com]- The main unofficial patch for The Elder Scrolls III: Morrowind. Fixes 9000+ bugs still present in the game left unfixed by Bethesda.
Unofficial Morrowind Official Plugins Patched
DOWNLOAD[www.nexusmods.com]- The Official Plugins for Morrowind were official addons made by Bethesda that added additional content to the game. They were originally available for free download on Bethesda's website, but have since been taken down and are not automatically included with the game (even Game of the Year Edition). This mod is an all-in-one package including all of the Official Plugins that also fixes some bugs with them. To see what content each plugin adds, click this link[en.uesp.net].
Note: Just download the Main File and when installing, choose the following options:
Merged or Individual - UMOPP Merged
Merged Version - Compatibility
Install Better Armor Compatibility? - No
Morrowind Optimization Patch
DOWNLOAD[www.nexusmods.com]- Improves the game's performance while fixing lots of issues with broken meshes (shading errors, collision, UV mapping, etc).
Note: When installing, select the Core, Lake Fjalding Anti-Suck, Weapon Sheathing Patch, Chuzei Fix, & Graphic Herbalism Patch modules. Don't select Better Vanilla Textures because we will be replacing them later anyways with higher quality versions.
Expansion Delay
DOWNLOAD[www.nexusmods.com]- There a few issues with how Bethesda implemented Morrowind's expansions; Tribunal & Bloodmoon, which this mod fixes. Originally, assassins from The Dark Brotherhood will attack you as soon as you start the game, which lore wise makes absolutely no sense, but the reason why is spoilers so I won't say here. This mod changes it so the assassination attempts don't start until it makes sense lore-wise for them to start, among fixing other issues.
Dubdilla Location Fix
DOWNLOAD[www.nexusmods.com]- During the quest "A Cure for Vampirism", a character will tell you to go to caverns of Dubdilla under Mount Assarnibibi. The problem is, Bethesda accidentally placed Dubdilla in a completely different part of the map from where it is supposed to be and the journal entry related to the quest even pointed the player to this spot, which contradicted the spoken dialogue. This mod moves Dubdilla's entrance to where it is supposed to be and changes the journal entry to reflect the accurate location.
The Publicans
DOWNLOAD[www.nexusmods.com]- There are a few buildings in Morrowind that were set up like inns where you should be able to rent rooms, but Bethesda forgot to add the ability to rent rooms there. This mod makes it so now you can rent rooms at those locations.
Note: When installing, just select the Core module.
The next 10 mods all deal with fixing various lore inaccuracies found in the game. These include issues with dialogue, written notes, and more. I recommend installing all of them.
LDM - Context Matters
DOWNLOAD[www.nexusmods.com]FMI - The Role They Were to Play
DOWNLOAD[www.nexusmods.com]FMI - Nice to Meet You
DOWNLOAD[www.nexusmods.com]FMI - Legion Dialogue
DOWNLOAD[www.nexusmods.com]FMI - NotAllDunmer
DOWNLOAD[www.nexusmods.com]FMI - Current Councilors
DOWNLOAD[www.nexusmods.com]FMI - Sane Ordinators
DOWNLOAD[www.nexusmods.com]FMI - Hospitality Papers Expanded
DOWNLOAD[www.nexusmods.com]FMI - Note from the Archcanon Fix
DOWNLOAD[www.nexusmods.com]Accurate Madstone
DOWNLOAD[www.nexusmods.com]Mods: Engine Tweaks & Patches (Cont.)
Cantons on the Global Map
DOWNLOAD[www.nexusmods.com]- Makes it so Vivec and Molag Mar actually appear up on the global map, instead of where they are just looking like empty water.
Tab for Inventory OpenMW
DOWNLOAD[www.nexusmods.com]- Makes it so tab actually just opens and closes the inventory properly, instead of tabbing over to the inventory search bar before closing the inventory (which requires you hitting tab a second time to close the inventory, very annoying).
Note: When installing, Mod Organizer 2 will give an error saying "The content of <data files> does not look valid". For this mod, just ignore this message and click OK.
Fractal42O's Containers x20 Capacity (OpenMW)
DOWNLOAD[www.nexusmods.com]- The containers in Morrowind (chests, crates, barrels, etc) have very limited storage space. The only "containers" that have infinite storage space are dead NPCs, which forces players to do weird things like, infamously, storing all their items on the dead body of Ralen Hlaalo (which doesn't despawn) if they want enough space to store everything. This mod increases the capacity of all containers 20 times, so now you can actually use the containers around the world to store your items.
Note: When installing, Mod Organizer 2 will give an error saying "The content of <data files> does not look valid". To fix this, first click the drop down arrow next to the main folder, then 00 Core, then Data Files. Then click and drag "containers_x20-create.py" and "readme.txt" to the Data Files folder, and then right click the Data Files folder --> Set as <data files> directory. When you are done it should look like this:
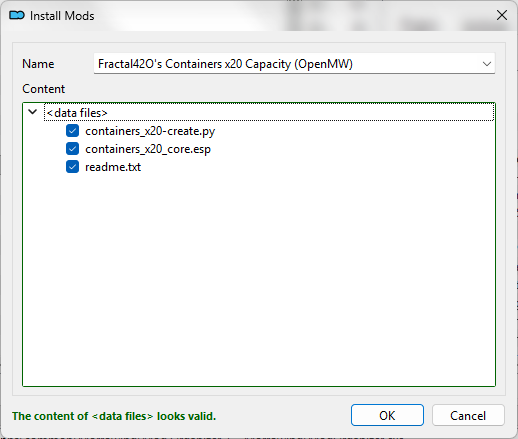
Then just click OK.
Jammings Off - Simple Version
DOWNLOAD[www.nexusmods.com]- Fixes the BoundBox/collision issues with the playermodel and NPCs. Now collision is actually accurate to what the models look like, so if it looks like you should be able to fit through it, you can.
Note: Just download the "Simple_version" from the Optional Files.
OpenMW Impact Effects
DOWNLOAD[www.nexusmods.com]- By default, when you hit objects with a weapon like rocks, trees, buildings/walls, metal, etc there is no impact noise and no visual impact effect (like sparks flying if you hit metal, for example), which isn't very immersive. This mod makes it so now each object/material has it's own accurate impact sound and visual impact effect.
Weapon Sheathing
DOWNLOAD[www.nexusmods.com]- By default, when unsheathe your weapon it just appears out of nowhere, and likewise when you sheathe your weapon it just completely disappears, which isn't very immersive. This mod makes it so your equipped weapon will now have a sheathe on your body that your character will draw it from when you ready your weapon, and return it to when lowering it. Shields and arrow quivers (if using a bow or crossbow) will also now be displayed on your back.
Note: Download the file for OpenMW, NOT MWSE. When installing, Mod Organizer 2 will give an error saying "The content of <data files> does not look valid". To fix this, first click the drop down arrow next to Data Files. Then click and drag the "Extras" folder and "WeaponSheathing.txt" to the Data Files folder, and then right click the Data Files folder --> Set as <data files> directory. When you are done it should look like this:
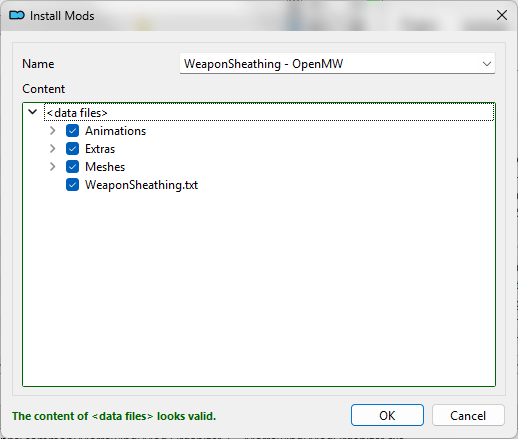
Then just click OK.
Improved Thrown Weapon Projectiles
DOWNLOAD[www.nexusmods.com]- By default, when you use throwing weapons they don't actually fly the correct direction. While they will fly forward, they will do it with the handle end towards the front instead of the blade end and they won't rotate like they should. This mod makes it so the throwing weapons fly how they should, with the blade end towards the front and if they are supposed to rotate in the air they will now rotate.
Note: When installing, Mod Organizer 2 will give an error saying "The content of <data files> does not look valid". To fix this, first click the drop down arrow next to Data Files. Then click and drag "ReadMe.txt" to the Data Files folder, and then right click the Data Files folder --> Set as <data files> directory. When you are done it should look like this:
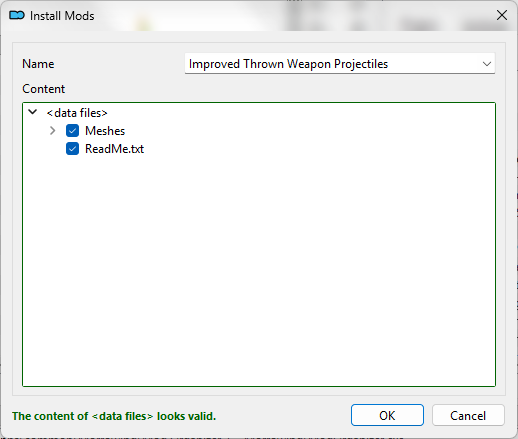
Then just click OK. If you did it correctly, the Patches folder should NOT have installed along with the rest of the mod, since those patches are for different mods that are not being used in this guide.
Mods: Leveling & Stats
Ben's Skill-Independent Level-Up Multipliers
DOWNLOAD[www.nexusmods.com]- Morrowind's leveling system is flawed in that it forces you to play a very specific way if you want to get the most out of each level up, which is a nightmare for OCD people (and really just anybody trying to enjoy the game). For example, in order to level up you have to increase any of your chosen Major or Minor skills 10 times. It could be one skill that you leveled up 10 times or ten different skills that you each leveled up only 1 time, or any variation of that. As long as you gain 10 skill levels, you will level up.
Fine so far, right? Well, the problem comes when you actually go to level up. On the Level-Up screen, you can choose 3 of your Attributes that you want to increase. How much each Attribute will increase (it can be from +1 to +5) is based on how many times you leveled up a Major or Minor skill "governed" by that Attribute. Each skill has a "governing Attribute", like for example Long Blade is governed by Strength, Medium Armor is governed by Endurance, Destruction is governed by Willpower, etc. If you didn't level up Long Blade (or other skills governed by Strength) at least 5 times during that level, you won't be able to get the maximum +5 increase to Strength when you level up. This makes it possible to level very inefficiently and miss out on points to your Attributes unless you go way out of your way to level exactly what you need for +5 in all 3 Attributes you want to increase on the Level-Up screen.
That a was a lot, hm? Yea everybody else who plays the game thinks so too. This mod fixes the entire issue by just making it so you will always get the +5 to all 3 Attributes you choose on the Level-Up screen, no matter if you leveled up any skills governed by that Attribute or not.
Note: On the Level-Up screen it will show them as only being +1, but once you confirm the 3 Attributes and leave that screen they will update to be +5. This visual discrepancy is just because of a limitation with OpenMW scripting at the moment.
Talrivian's State-Based HP Mod
DOWNLOAD[www.nexusmods.com]- The leveling system also screws up the amount of health your character will have, unless like I said above you leveled absolutely perfectly, which at that point means you won't be enjoying the game. By default, your starting maximum health is determined by adding Endurance + Strength and then dividing by two. Your maximum health then increases by 10% of your Endurance every time you level up. This makes it so unless you got the +5 increase to Endurance every single level, you will end up with less maximum health than you could have had otherwise. Another nightmare for OCD people. This mod changes the way health is calculated so it doesn't matter when you choose to increase your Endurance, your health will always be properly calculated, even in retrospect.
Fair Magicka Regen v2B
DOWNLOAD[www.nexusmods.com]- If you started with the later Elder Scrolls games before playing Morrowind, you will be surprised and mildly annoyed to find that Magicka DOES NOT REGENERATE in this game. You either have to 1) sleep in a bed (just pressing T to wait doesn't count) or 2) constantly use Restore Magicka potions in order for it to regenerate, which is not only annoying but it's inaccurate to Elder Scrolls lore and ruins the experience of being a Mage or using spells as you will constantly find yourself out of Magicka. This mod adds balanced Magicka regeneration to the game, bringing it in line with the other Elder Scrolls titles and enhancing the experience of using spells.
Note: Magicka regeneration will still be disabled if you chose the Atronach Birthsign during character creation (the Atronach sign greatly increases your maximum magicka with the tradeoff that it prevents Magicka from regenerating at all. The only way to fill it back up is to drink Restore Magicka potions or other, similar methods).
Mods: Textures & Meshes
Morrowind Enhanced Textures
DOWNLOAD[www.nexusmods.com]- The #1 texture mod for Morrowind. Every texture in the game, faithfully upscaled, for much greater visual clarity and detail.
Note: Make sure you also download the Interface and Main Menu[www.nexusmods.com]addon from the Optional Files.
Normal Maps for Everything
DOWNLOAD[www.nexusmods.com]- Adds normal maps for lots of different mods, including Morrowind Enhanced Textures. Normal maps are a type of Bump Map that allow you to add surface details like bumps, grooves, scratches, etc to models, which will then catch light as if those surface details are a part of the real geometry of the model, even though they aren't. Basically, they increase the level of detail of textures on models, making the textures look better and less "flat".
Note: Scroll to the bottom of the page and only download the "Morrowind Enhanced Textures Normal Mapped" file. you don't need any of the other ones since they are for completely different mods.
TrueType fonts for OpenMW
DOWNLOAD[www.nexusmods.com]- Adds much higher quality fonts to the game (still the same fonts, now just not blurry as hell). This greatly increases the visual clarity of menus, the journal, books, the NPC dialogue window, things written in Daedric, etc. Anywhere fonts are displayed will look much better.
Note: For the mod to actually work so the game won't just show the original, blurry fonts you need to:
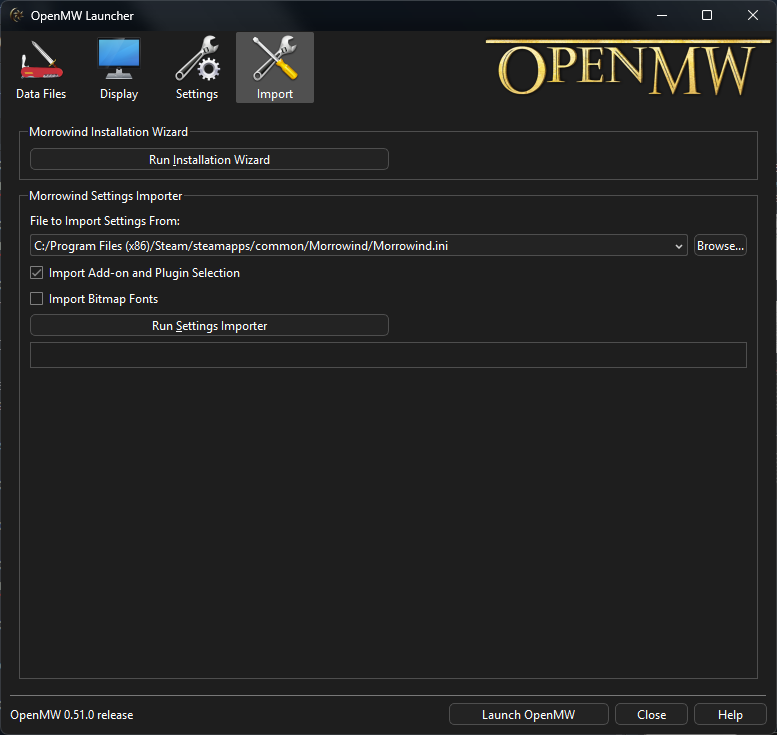
1. Run the OpenMW Launcher and go to the "Import" tab.
2. UNCHECK "Import Bitmap Fonts" and then press "Run Settings Importer".
3. Launch the game and you should now see the improved fonts!
You can do that now if you want but I'll also remind you later once we start adjusting things in the OpenMW Launcher.
OpenMW Upscaled Inventory Icons
DOWNLOAD[www.nexusmods.com]- Upscales all the item icons in the inventory, so they will look just as high quality as the rest of the textures when using Morrowind Enhanced Textures.
Real Signposts
DOWNLOAD[www.nexusmods.com]- Makes signposts actually have the names of the towns and locations on the signs, instead of just being unintelligible scribbles, with the real names displayed in a text box above the signs that appears when you get close.
Real Signposts - High Res and Bump Mapped
DOWNLOAD[www.nexusmods.com]- Higher quality textures and bump mapping for Real Signposts, so the quality will match the rest of the high quality textures in Morrowind Enhanced Textures.
Familiar Faces
DOWNLOAD[www.nexusmods.com]- Fixes weird modeling issues with the heads/faces of NPCs and your player character, while making them look a bit better (but still vanilla-friendly).
Properly Smoothed Meshes
DOWNLOAD[www.nexusmods.com]- Smooths many of the meshes in the game, making various items, furniture, etc appear higher-quality since the meshes are less choppy/block-looking.
Note: When installing, only select the "00 Core" module.
Project Atlas
DOWNLOAD[www.nexusmods.com]- Increases performance in Morrowind by reworking meshes to be much less unnecessarily demanding. If you want a more in-depth explanation, check the mod description.
Note: When installing, choose the following options:
Textures - Morrowind Enhanced Textures
Addons - Leave everything unchecked
Patches - Check all 3 (Glow in the Dahrk, Graphic Herbalism, Improved Lights for All Shaders)
BC Mushrooms - None
Graphic Herbalism - MWSE and OpenMW Edition
DOWNLOAD[www.nexusmods.com]- By default, when you harvest a mushroom or something off of a plant, those things don't actually disappear which makes it very hard to tell when mushrooms and plants have respawned and can be harvested again. Graphic Herbalism makes it so plants visually now match whether they have been harvested or not. Now if you pick leaves off of a plant, the leaves will actually disappear from the plant and then reappear once they have re-grown. If you pick mushrooms, they will disappear and then reappear once they have re-grown, etc.
Note: When installing, choose both the "00 Core + Vanilla Meshes" and "01 Optional - Smoothed Meshes" modules.
Mods: Lighting
Improved Lights for All Shaders
DOWNLOAD[www.nexusmods.com]- Adjusts every light mesh to enhance the effects of other shader and lighting mods (like OpenMW), making all light sources look better.
Note: When installing, choose both the "00 Core" and "01 Smoke and Steam Emitters" modules.
Glow in the Dahrk
DOWNLOAD[www.nexusmods.com]- Makes window lighting much immersive and realistic. From the outside, windows will now glow at night (from the light on the inside of the building) and on the inside sunrays will shine through the windows during the day. Interior lighting will also dynamically adjust to time of day and weather, among other additions.
Note: When installing, choose the following options:
Game Engine - OpenMW
Optional Files - Hi Res Window Texture Replacer, Raven Rock Glass Windows, & Nord Glass Windows
Telvanni Dormers on Vvardenfell - Include Tel Uvirith
Telvanni Tower Interior Glow - OpenMW
Luminous Atronachs
DOWNLOAD[www.nexusmods.com]- Adds glow maps to Atronachs so certain parts of them will glow, more like how they do in the later games.
Load Order
When you're done installing everything, your mod load order should look like this:
NOTE: MAKE SURE BOTH THE LEFT AND RIGHT LISTS OF MODS HAVE EVERYTHING ORDERED LIKE BELOW
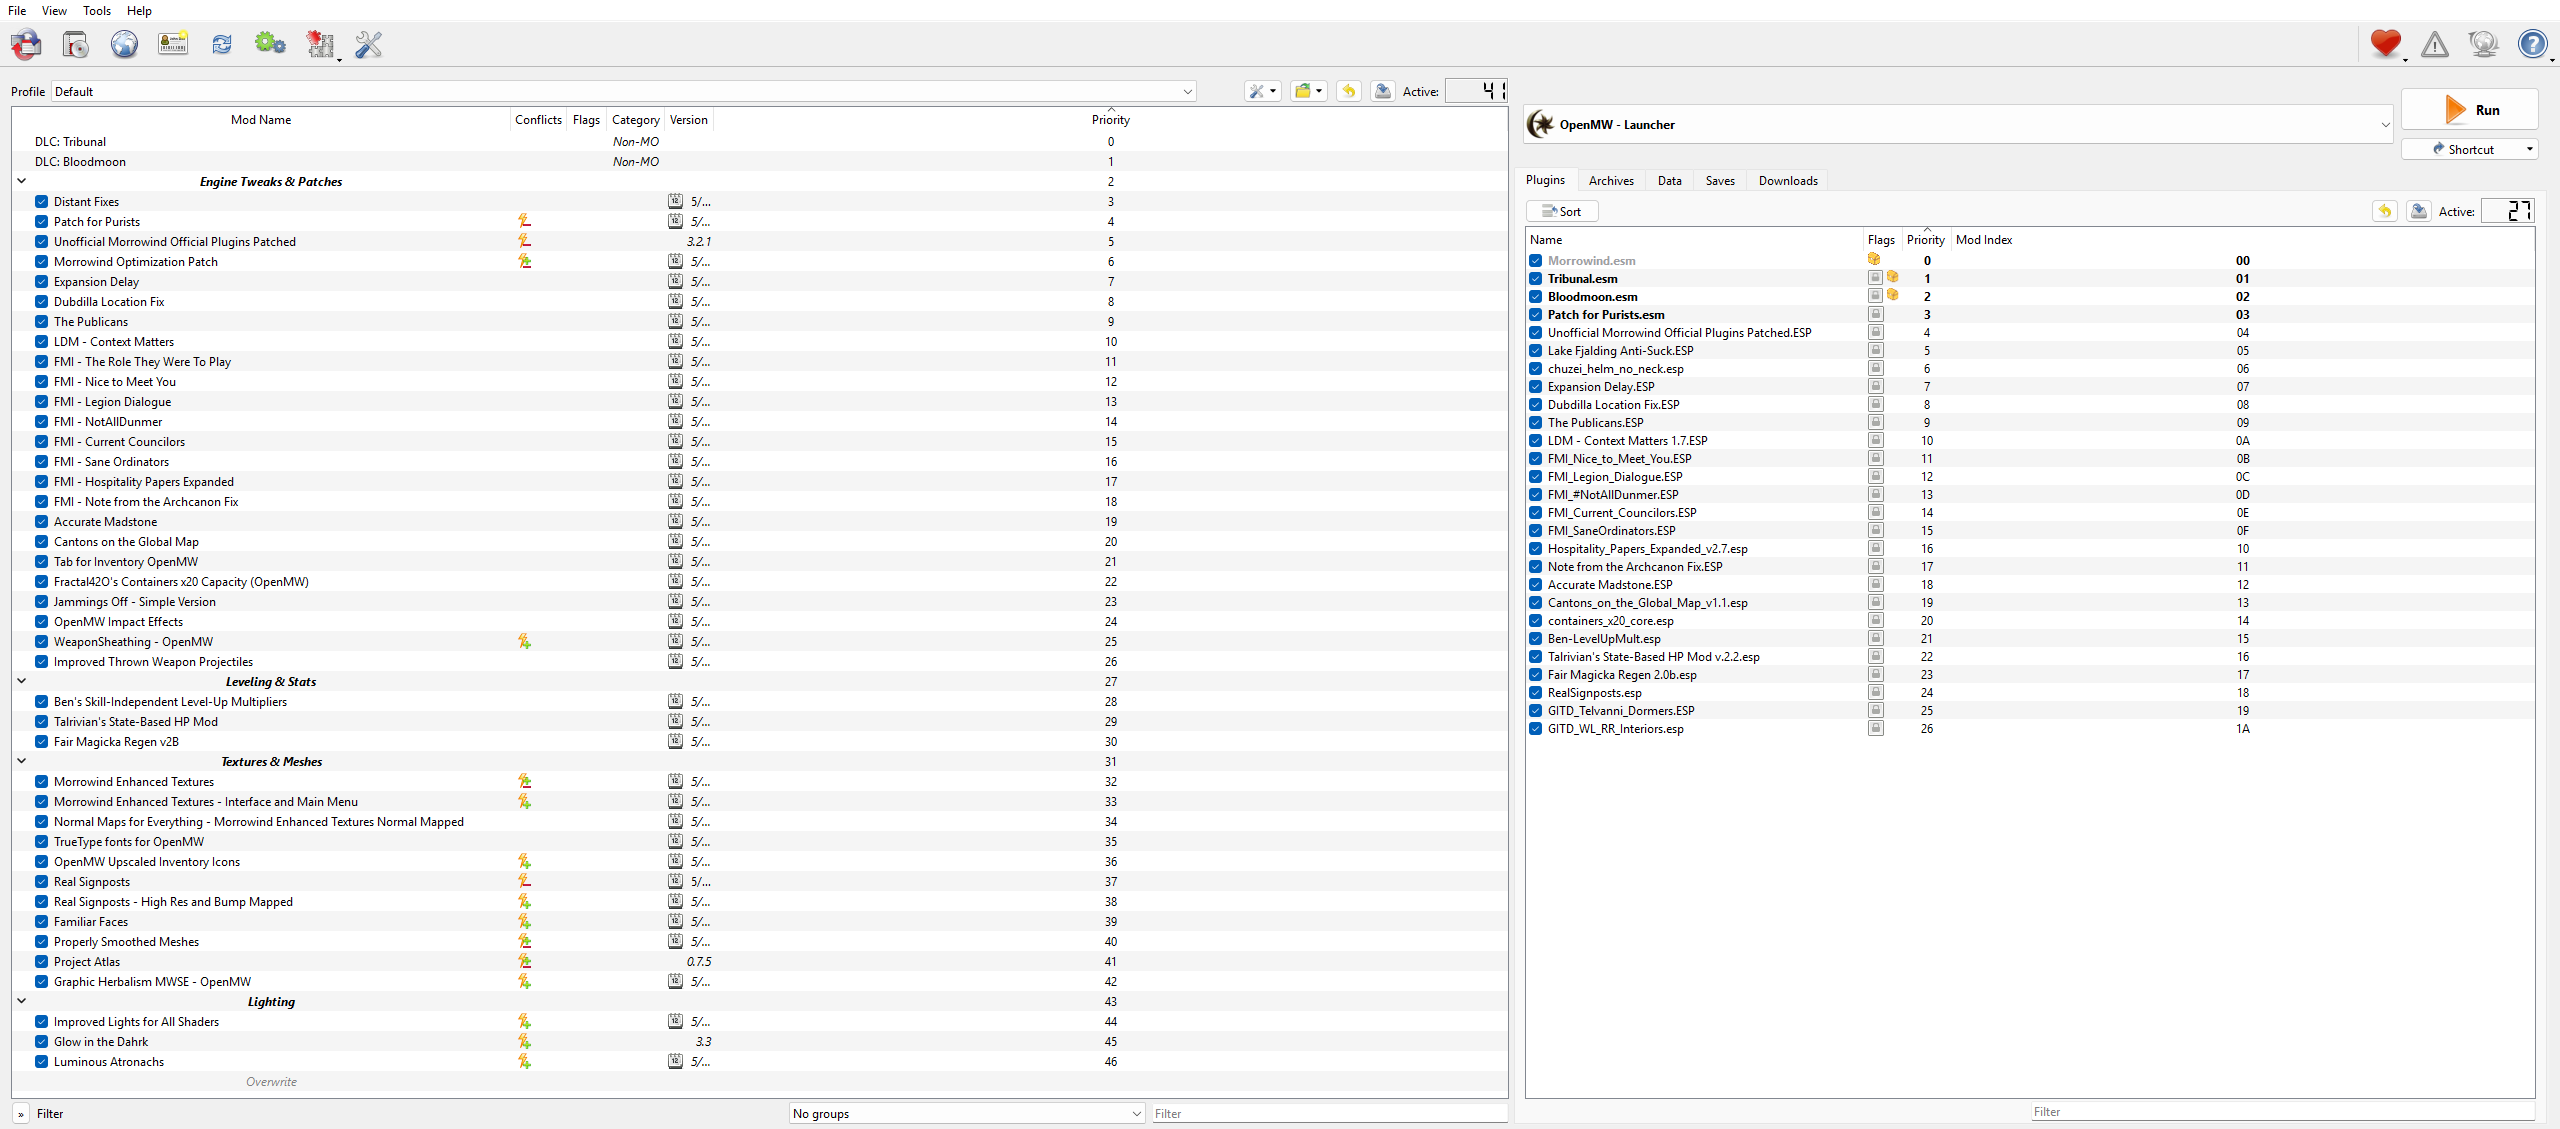
If your stuff is named differently than mine that's just because I right click mine and rename them so everything is more uniform. If you want the little dividers I have on mine, click the little wrench and screwdriver icon and click "Create separator", which you can then name whatever you want. Separators just help visually organize the mod list and won't screw anything up, just make sure you don't accidentally change the order of the mods.
I also recommend clicking one of the mods in the right mod list and pressing CTRL + A to highlight all of them. Then Right Click --> Lock load order. This will lock all of the mods on the right in their current position so they won't accidentally change positions if you do any more modding, which they have a tendency to do.
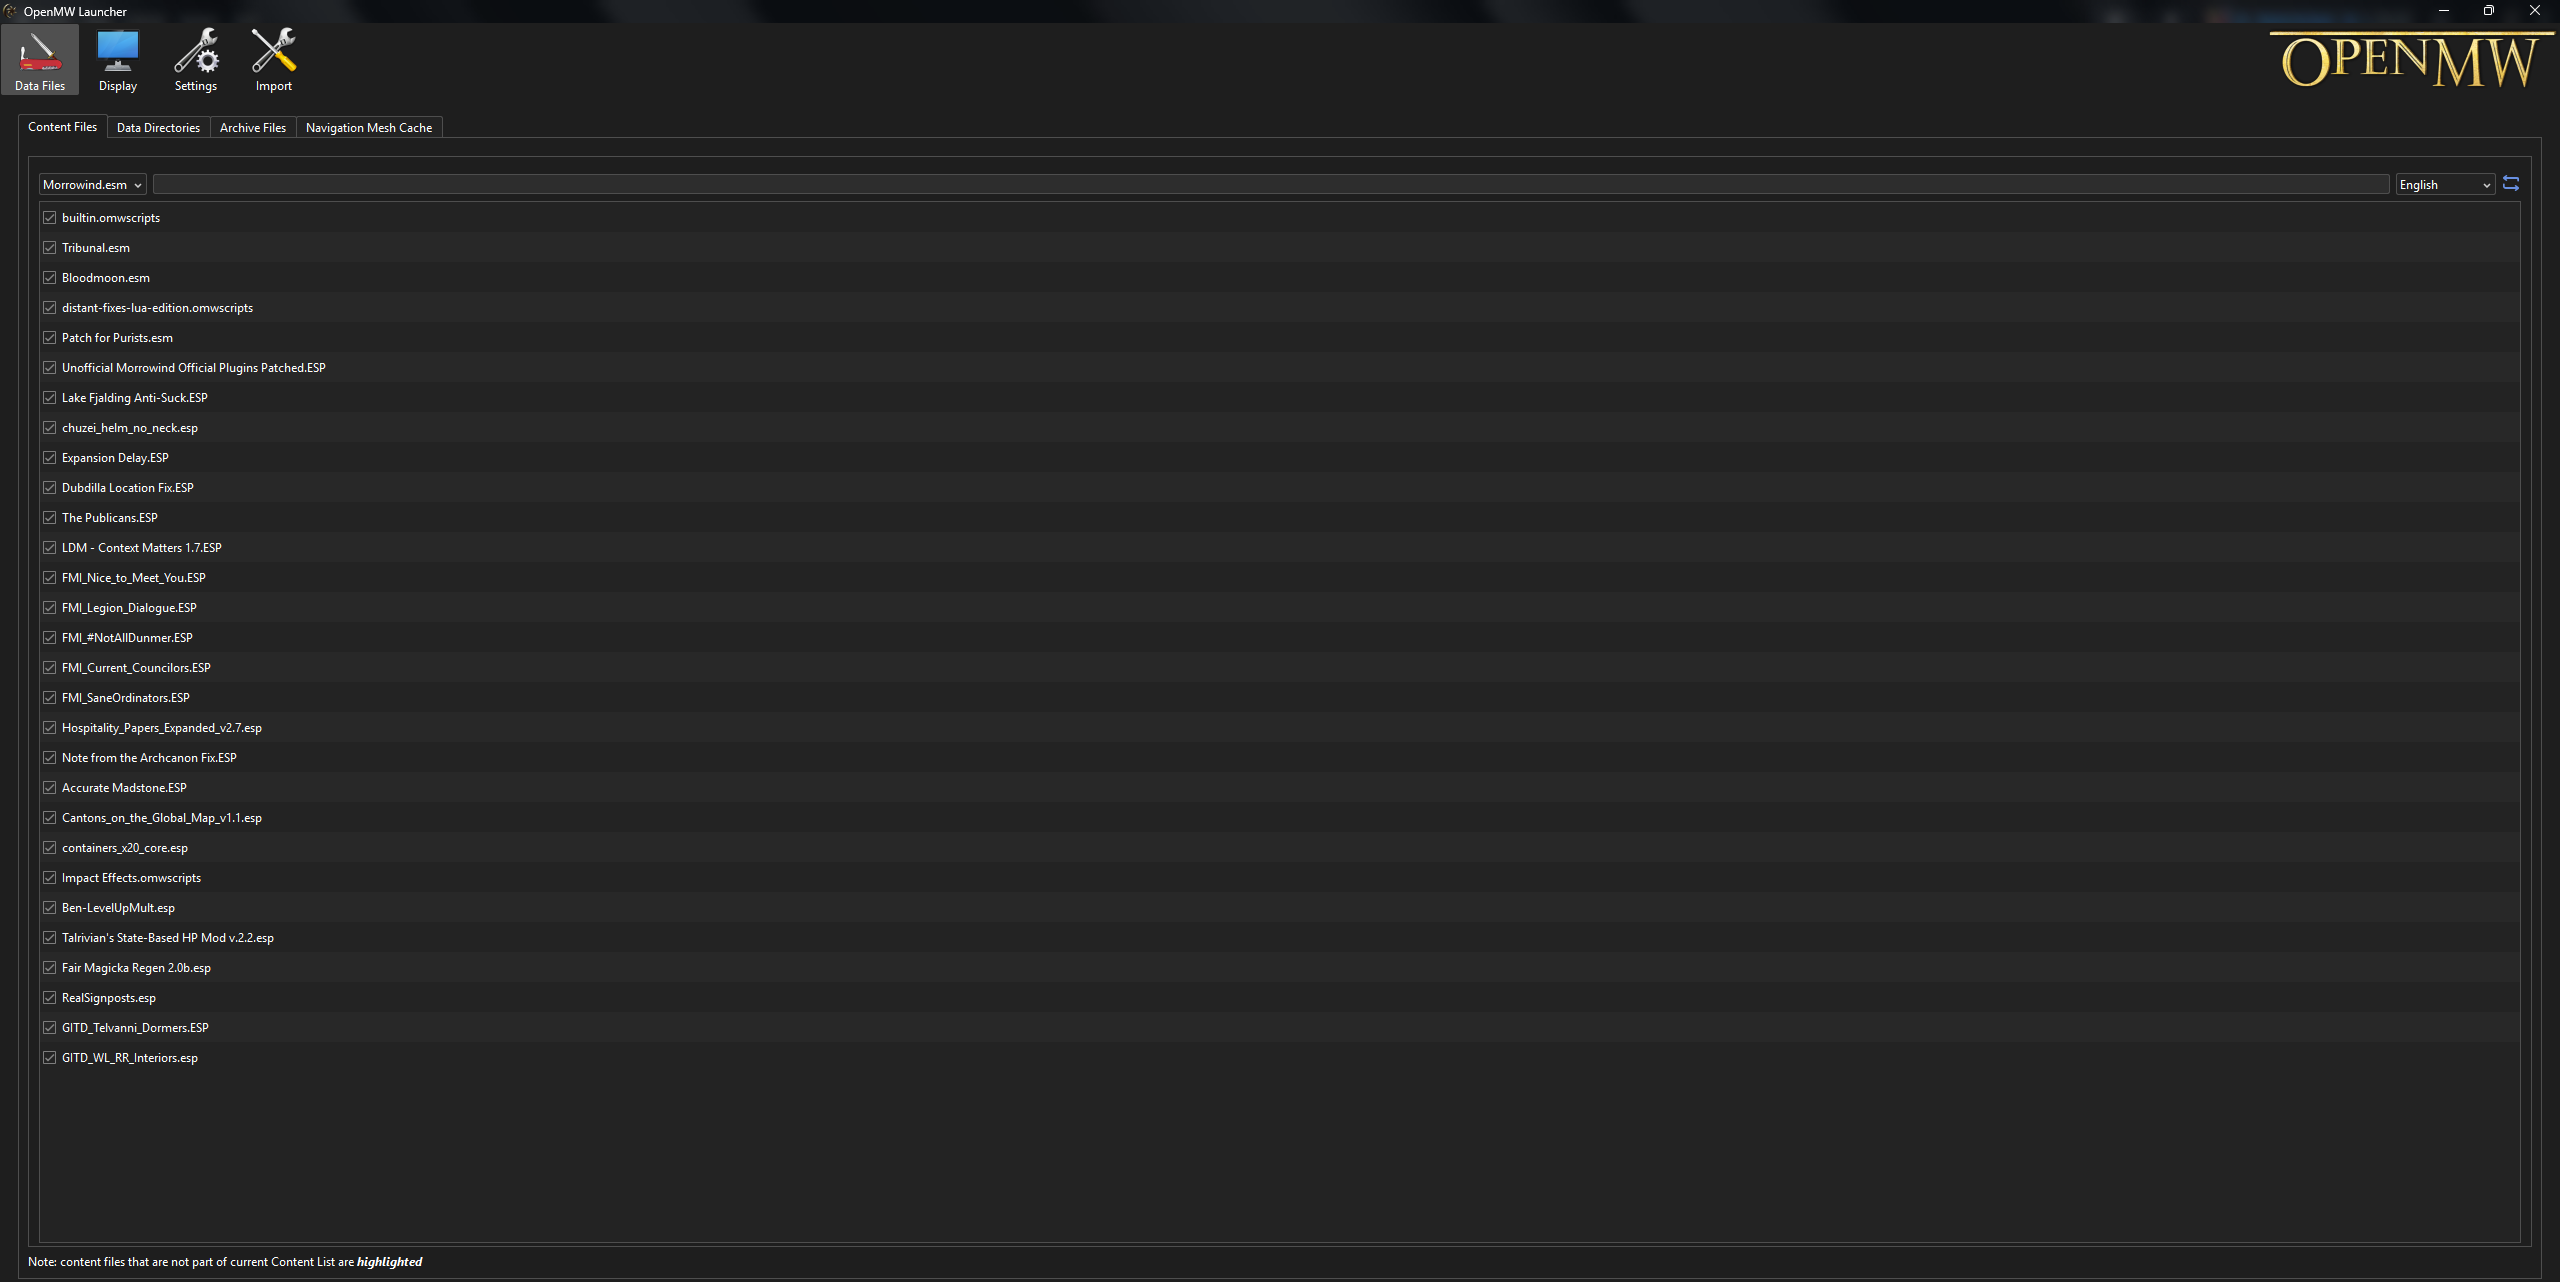
Once your Mod Organizer 2 load order is correctly set, make sure you have the Open MW - Launcher selected from the "Run" drop-down menu and then press the "Run" button to launch it. Make the load order here match the image below:
NOTE: MAKE SURE BOTH THE LEFT AND RIGHT LISTS OF MODS HAVE EVERYTHING ORDERED LIKE BELOW
If your stuff is named differently than mine that's just because I right click mine and rename them so everything is more uniform. If you want the little dividers I have on mine, click the little wrench and screwdriver icon and click "Create separator", which you can then name whatever you want. Separators just help visually organize the mod list and won't screw anything up, just make sure you don't accidentally change the order of the mods.
I also recommend clicking one of the mods in the right mod list and pressing CTRL + A to highlight all of them. Then Right Click --> Lock load order. This will lock all of the mods on the right in their current position so they won't accidentally change positions if you do any more modding, which they have a tendency to do.
Once your Mod Organizer 2 load order is correctly set, make sure you have the Open MW - Launcher selected from the "Run" drop-down menu and then press the "Run" button to launch it. Make the load order here match the image below:
OpenMW Launcher - Settings
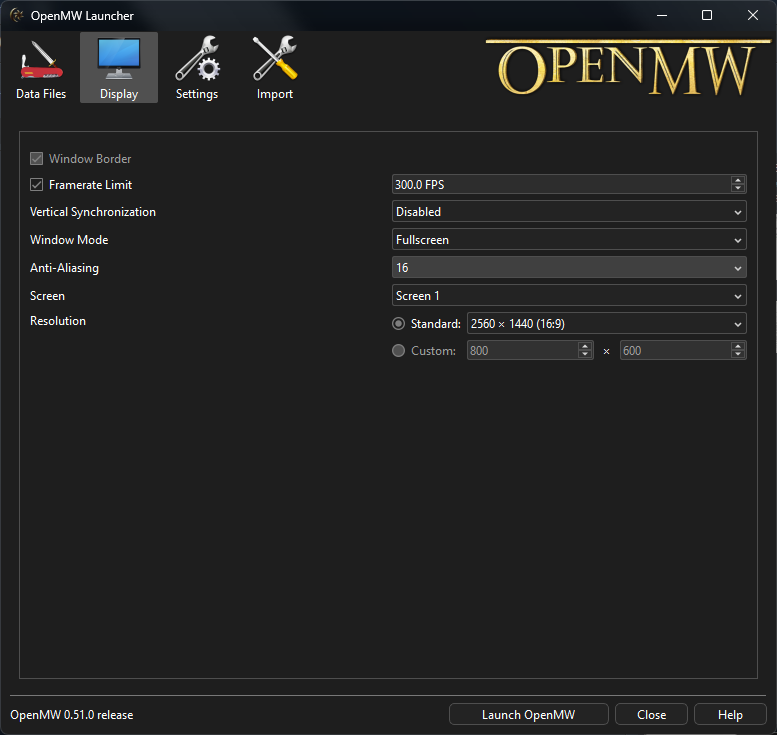
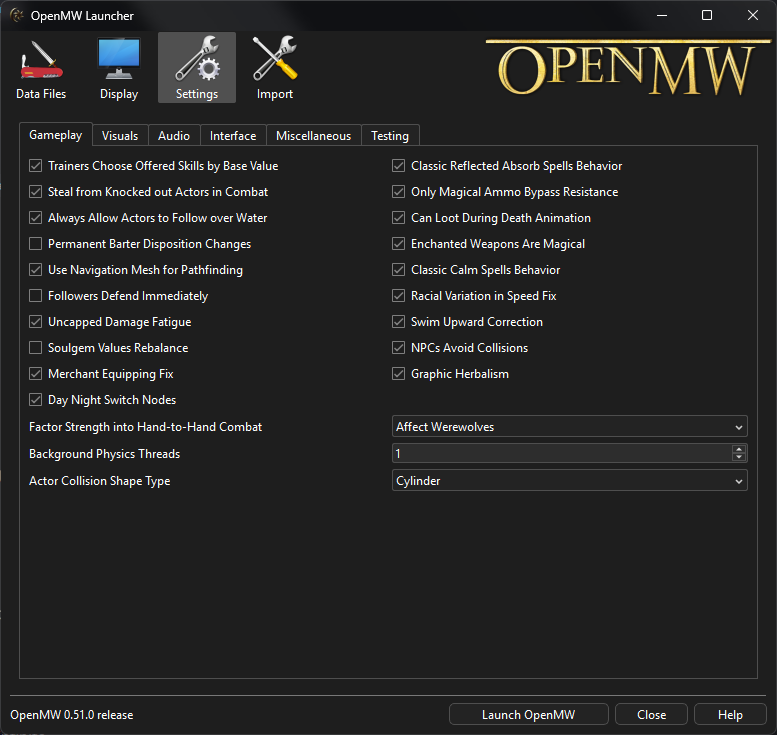
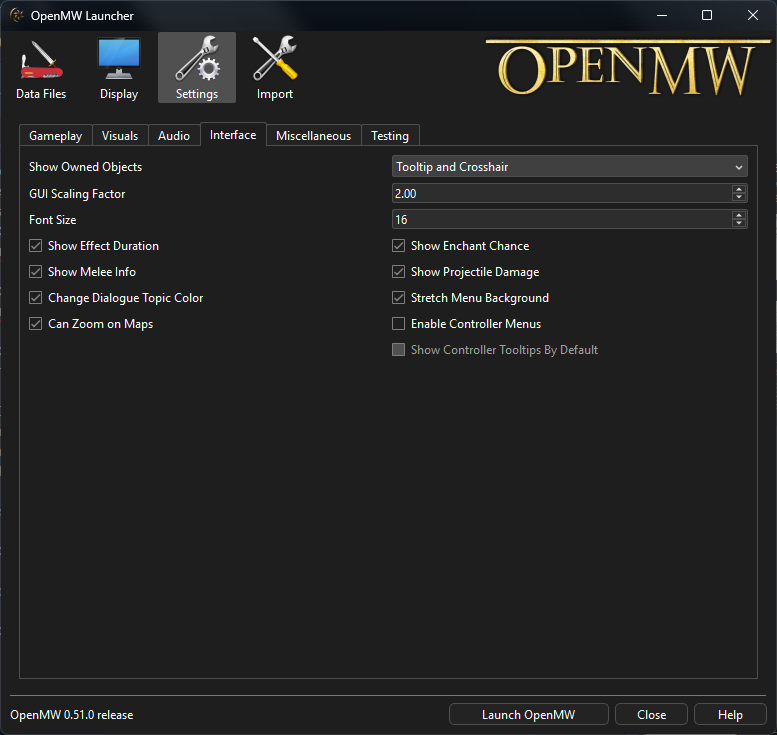
I recommend putting your OpenMW settings for each tab to what I have below unless your specific setup requires differences (like for example, your resolution would be different from mine if you don't use a 2560x1440 display).
- Don't check "Enable Indoor Shadows" on the "Shadows" tab. Morrowind has a limitation where it will show shadows through the floor in multiple-floored buildings and dungeons, so you will see weird shadows for NPCs that are on the floor(s) above you if you enable this feature. It's better to leave it off.
Also, on the "Shaders" tab, change the "Lighting Method" to "Shaders".
If you didn't already do the steps to make "TrueType fonts for OpenMW" work, do them now.
When you're all done click "Launch OpenMW" to start the game.
Display
Settings - Gameplay
Settings - Visuals
Check every box in all the tabs under "Visuals" except:- Don't check "Enable Indoor Shadows" on the "Shadows" tab. Morrowind has a limitation where it will show shadows through the floor in multiple-floored buildings and dungeons, so you will see weird shadows for NPCs that are on the floor(s) above you if you enable this feature. It's better to leave it off.
Also, on the "Shaders" tab, change the "Lighting Method" to "Shaders".
Settings - Audio
You can leave everything here at the default settings.Settings - Interface
Settings - Miscellaneous
I recommend setting "Maximum Quicksaves" to 3 (or higher if you want).Settings - Testing
You can leave everything here at the default settings.Import
If you didn't already do the steps to make "TrueType fonts for OpenMW" work, do them now.
When you're all done click "Launch OpenMW" to start the game.
OpenMW In-Game Settings
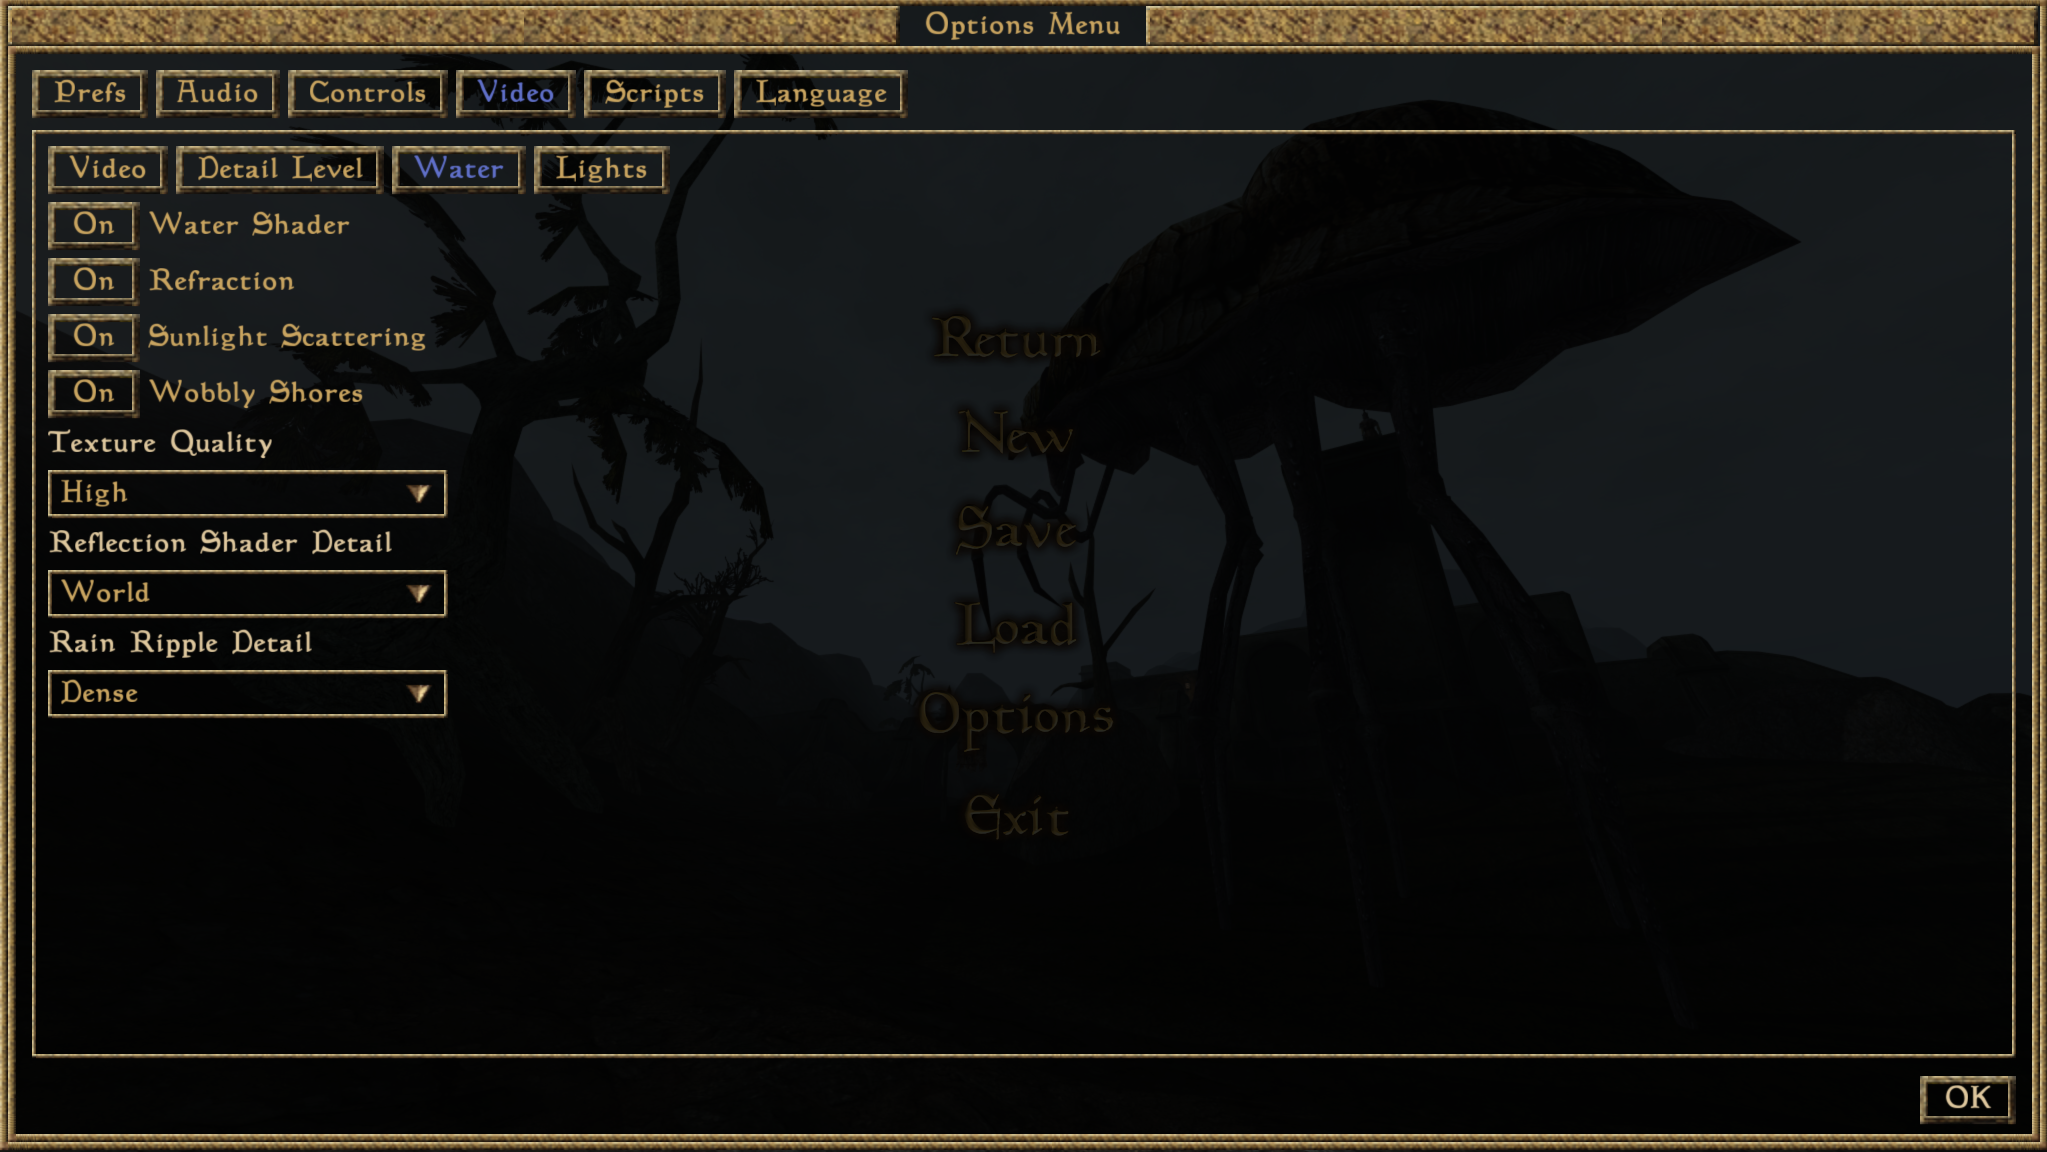
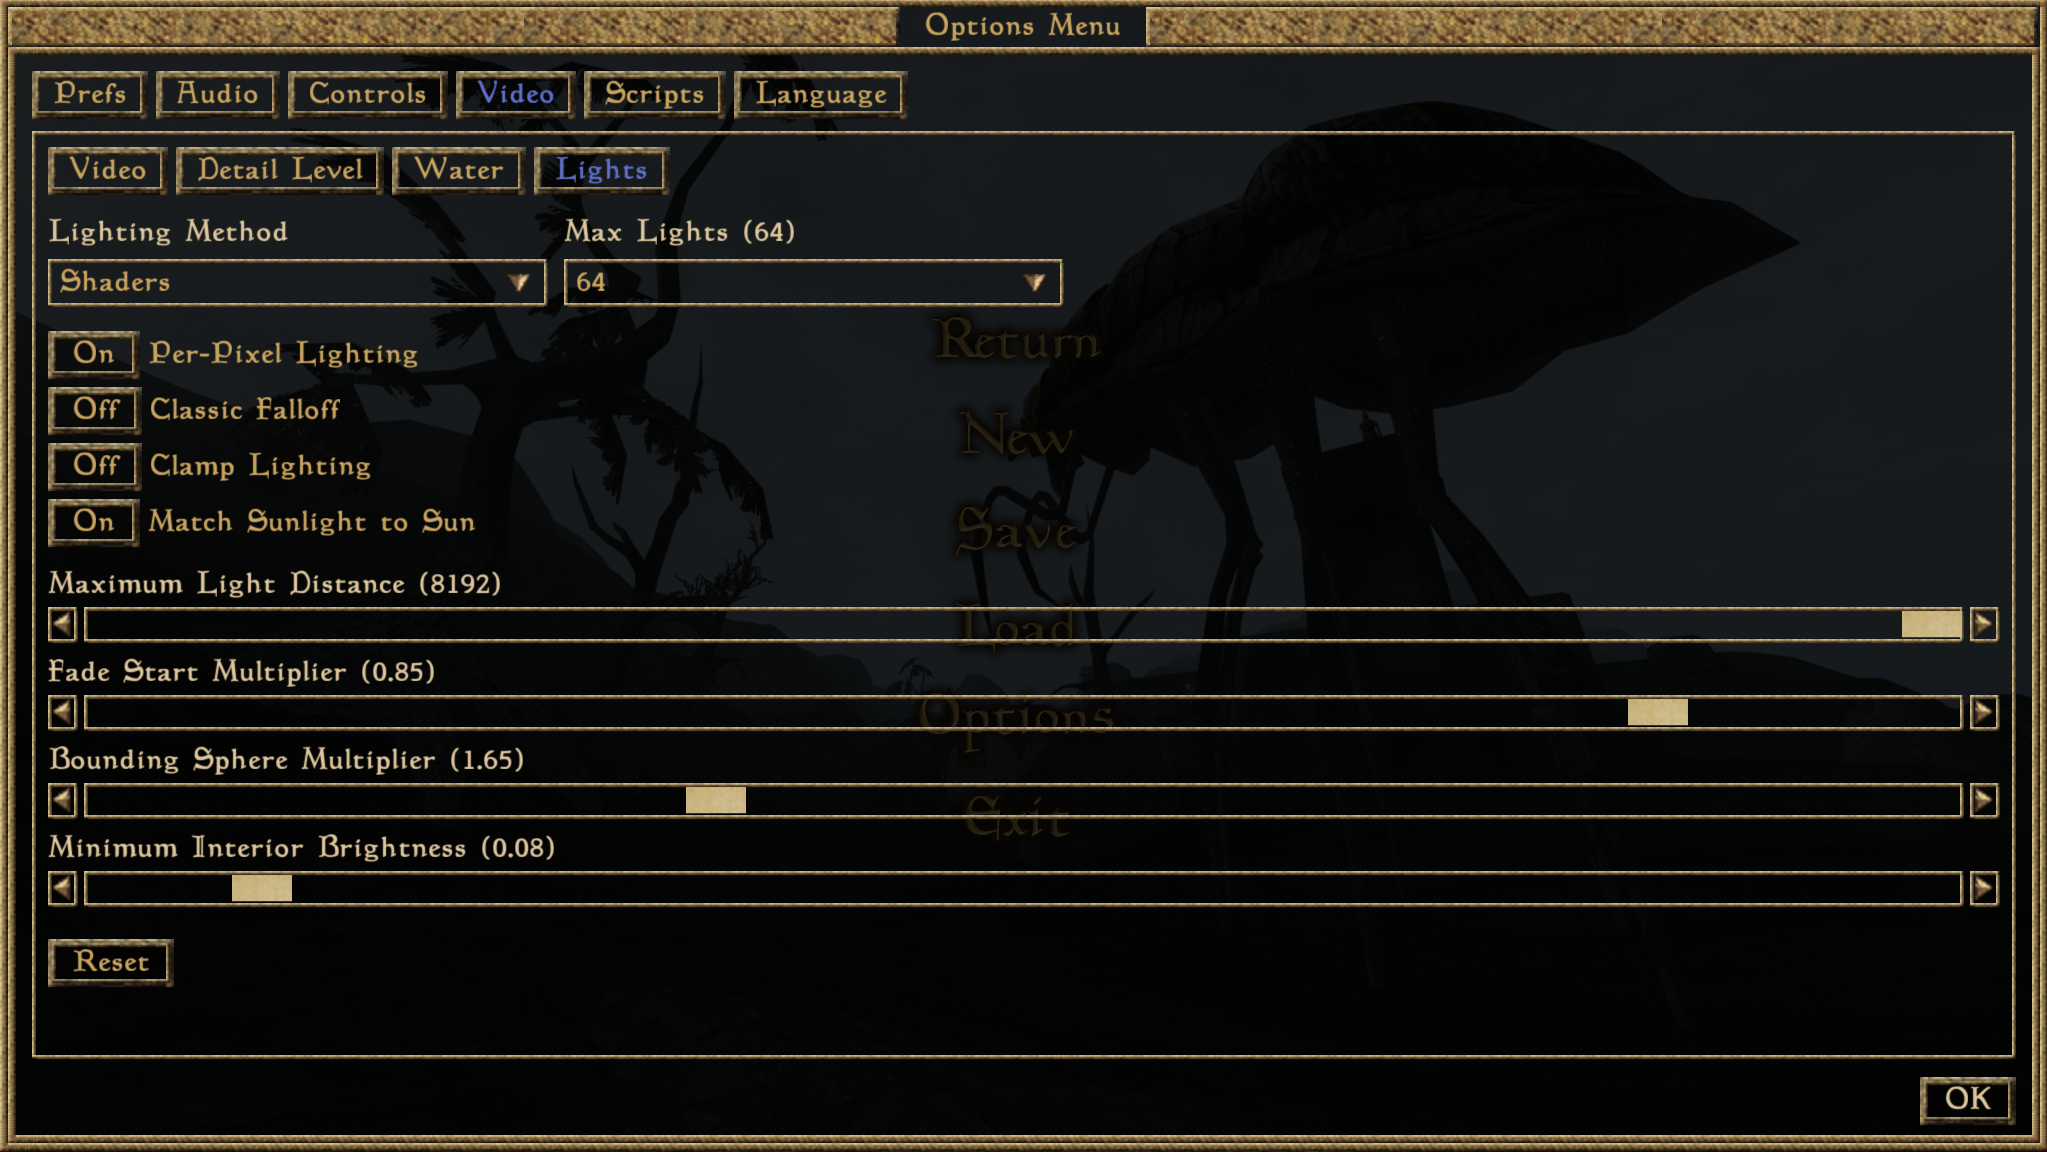
These are my recommended settings in-game using OpenMW. Anything not mentioned here you can just set to whatever you want.
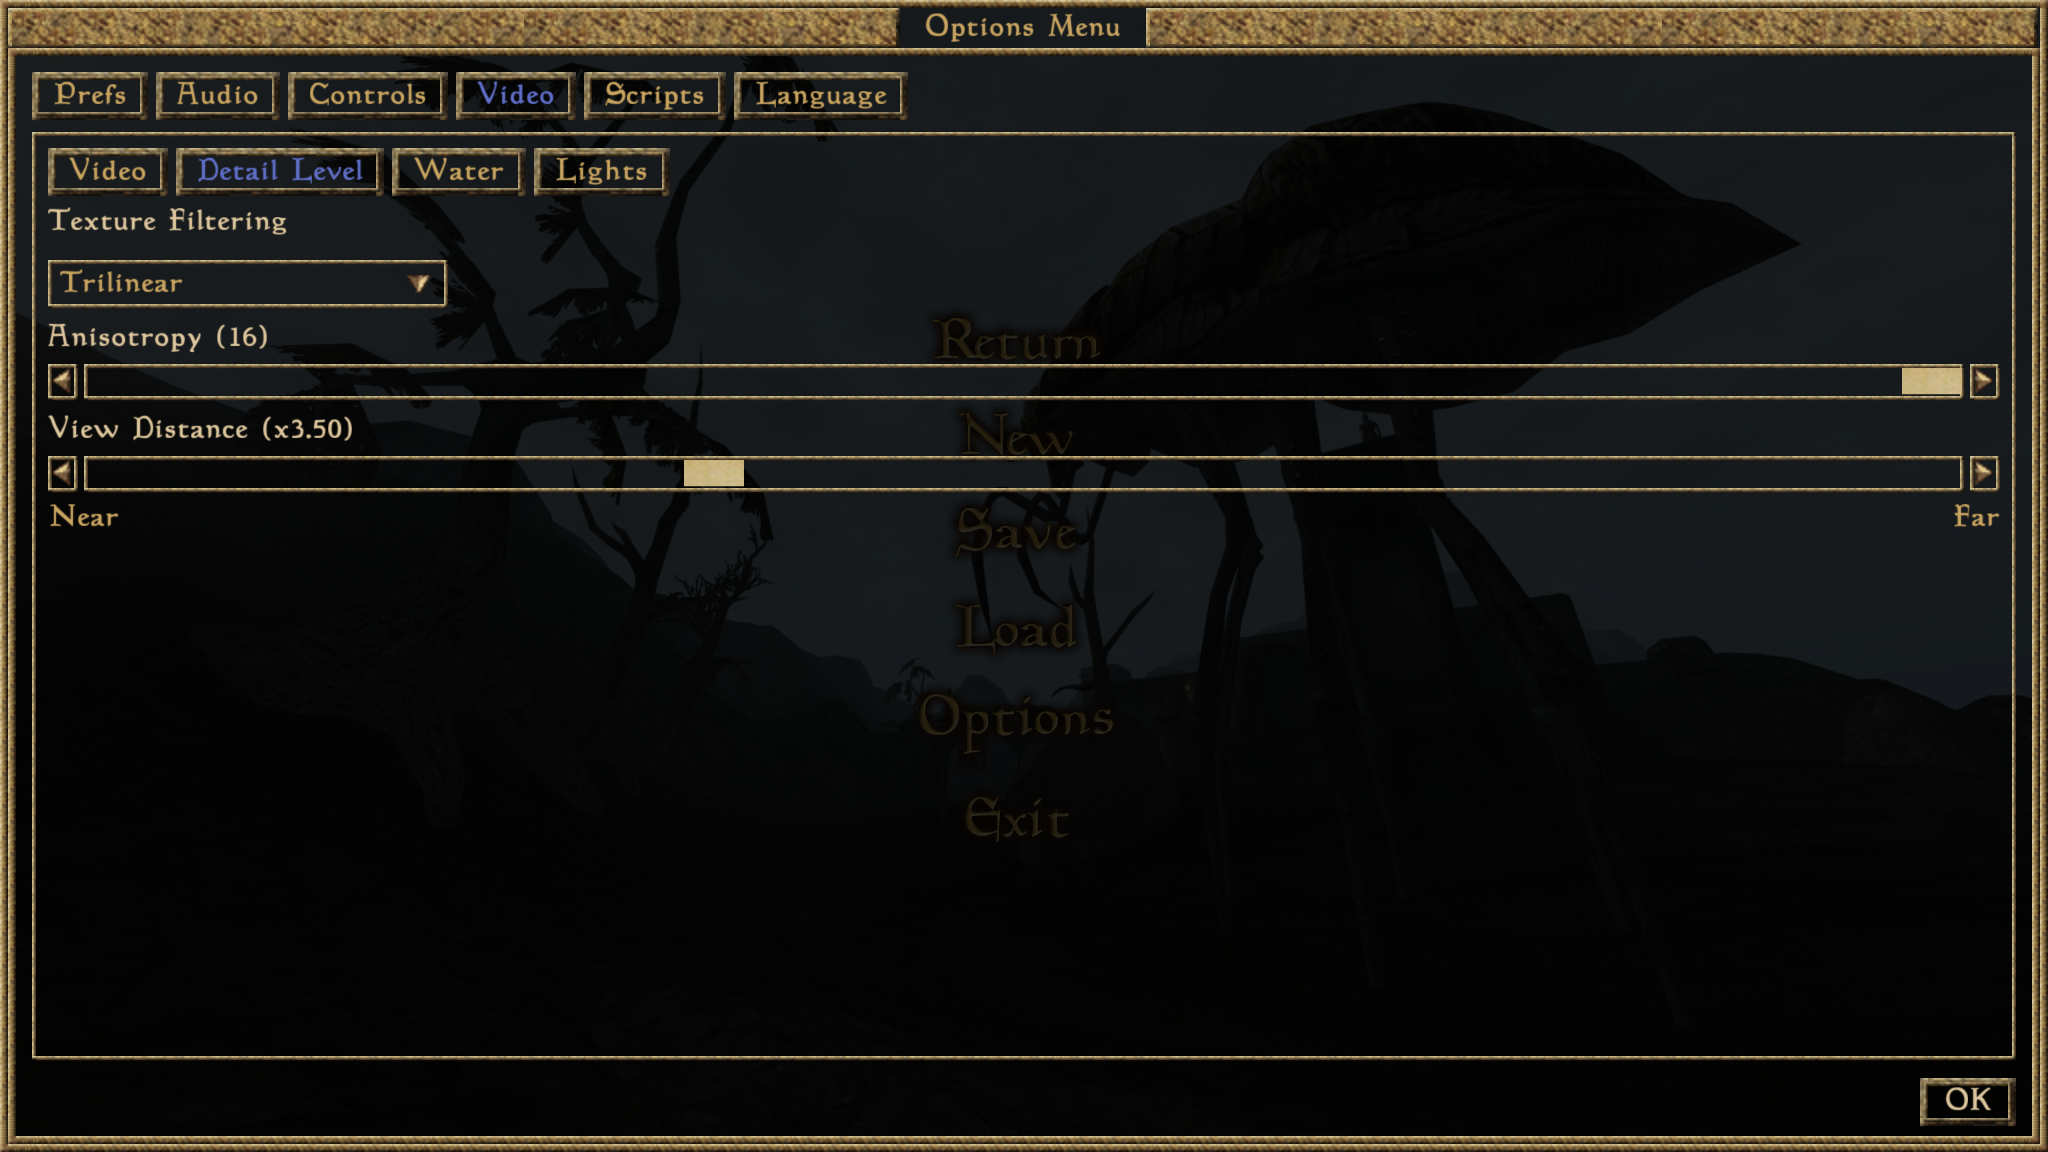
You can turn up the View Distance even more on a strong PC, but x3.50 is around the best balance of view distance and FPS. View Distance is very graphically demanding, and if your computer is struggling to run the game, this is the first thing you should turn down.
Water
Lights
Prefs
Actors Processing Range: 5002Video
Detail LevelYou can turn up the View Distance even more on a strong PC, but x3.50 is around the best balance of view distance and FPS. View Distance is very graphically demanding, and if your computer is struggling to run the game, this is the first thing you should turn down.
Water
Lights
Make Modded Morrowind Launch when you press Play on Steam
Once you have all your mods set up, you don't want to have to open Mod Organizer 2 from the files and press "Run" from there every time you want to play Morrowind, so instead we will make it so the Steam "Play" button will directly launch your now modded version of the game.
Open Steam and go to Morrowind in your Library. Click the Settings cogwheel to the right of the Play button and click Properties --> General --> Launch Options --> copy and paste this into the text box:
"C:\Program Files (x86)\Steam\steamapps\common\Morrowind\Mod Organizer 2 - Morrowind\ModOrganizer.exe" "moshortcut://:OpenMW" %command%
Now whenever you press play on Steam, it will instantly launch your Mod Organizer 2 modded version of Morrowind!
Alternatively, if you want a desktop shortcut, open Mod Organizer 2 and directly under the "Run" button, click Shortcut --> Desktop. This will put a shortcut to run modded Morrowind onto your desktop.
Open Steam and go to Morrowind in your Library. Click the Settings cogwheel to the right of the Play button and click Properties --> General --> Launch Options --> copy and paste this into the text box:
"C:\Program Files (x86)\Steam\steamapps\common\Morrowind\Mod Organizer 2 - Morrowind\ModOrganizer.exe" "moshortcut://:OpenMW" %command%
Now whenever you press play on Steam, it will instantly launch your Mod Organizer 2 modded version of Morrowind!
Alternatively, if you want a desktop shortcut, open Mod Organizer 2 and directly under the "Run" button, click Shortcut --> Desktop. This will put a shortcut to run modded Morrowind onto your desktop.
All done!
That's everything! Now you can enjoy a Vanilla ENHANCED Morrowind experience that greatly improves the game while retaining it's original aesthetics and charm!
If you have any questions or need any help, free to ask in the comments below and if there are any issues with the guide let me know so I can update it. :D
If you enjoyed this guide, be sure to check out my similar guides for Skyrim: Special Edition and Oblivion here:
https://steamcommunity.com/sharedfiles/filedetails/?id=3714414131
https://steamcommunity.com/sharedfiles/filedetails/?id=3718355944
If you have any questions or need any help, free to ask in the comments below and if there are any issues with the guide let me know so I can update it. :D
If you enjoyed this guide, be sure to check out my similar guides for Skyrim: Special Edition and Oblivion here:
https://steamcommunity.com/sharedfiles/filedetails/?id=3714414131
https://steamcommunity.com/sharedfiles/filedetails/?id=3718355944
More The Elder Scrolls III: Morrowind guides
- Morrowind 2024 Essential Modding Guide★ 5 (570)46k views1.7k ♥26 minUpdated Jul 31, 2024
- Русификатор The Elder Scrolls III Morrowind® Game of the Year Edition★ 5 (980)46k views2.1k ♥2 minRussianUpdated Jul 29, 2020
- Integrate OpenMW with Steam (the better way)★ 5 (1.1k)45k views1.9k ♥6 minUpdated Jun 16, 2025
- [FullRest] Улучшение графики, русификатор и оверлей★ 5 (1.1k)39k views2.7k ♥11 minRussianUpdated Oct 25, 2025
- How To Become OP Before Level 2★ 5 (550)34k views1.4k ♥4 minUpdated Jul 4, 2017
- The Morrowind Questing Guide★ 5 (1.6k)33k views3.4k ♥208 minUpdated Mar 27



This guide was created by its original author on the Steam Community. Are you the author and want it removed? Request removal.