
Overview
This guide will share all secrets and tricks about mortars in Squad.
About the mortar
A mortar can be a really useful tool in the right hands and a complete waste of time and resources in wrong hands. There are 3 factors that have a big impact in your ability to hit a target.
First the mortar has to be constructed on perfectly flat ground, even a small deviation will make you miss the target by 25-150m depending on the range you are shooting at.
Second you will have to use a Mortar Calculator I would advise you to use the [link] Calculator. But that won’t be enough you will need to add a Sub-Sub key to the location that you will see on the map when you are hovering over the target aria (this will be explained down below).
And finally third you will have to use spread when bombarding a Flag so you can hit a bigger aria and you don’t waist ammo because you are using focus fire (this will also be explained down below).
I would highly advise you to use a Smart Phone for the Calculator it will make everything much easier, when you don’t have one, use the Windows key to Tab out of the game and don’t use alt-Tab because it tends to crash the game !

Mortar basics
A mortar can be constructed in a 150m radius around the FOB like any other place able structure or tool. It is really important that you place a mortar on flat ground any slight deviation will affect your accuracy. One mortar shell costs 30 ammo a volley of mortar shells consists of three mortar shells that cost 90 ammo. When you fire a volley of mortars in to a target aria they will fall randomly in a circle of 20m. Usually one mortar will fall really close to the middle of that 20m circle one a little away from the middle and one closer to the 20m mark. The kill radius of a mortar is 18m at 20m you will still have a chance to stop the bleeding but you need to start bandaging yourself 1-2s after the mortar impact. So it is safe to say that the effective kill radius of a mortar is 20m because most players will blead out. Up to 25m is the bleeding range of the mortar anything beyond that will not affect a person. Mortar travel time is 22s at any range. It is important to know that 20 milliradian (MIL) is 50m, 10 MIL is 25m but to avoid mistakes only use MIL when you are talking with your team.
How to effectively use the mortar
The first step is to scout and find the target. Second step is to mark the target aria with a SL attack marker. That way the mortar can quickly orientate on the target aria. That information that you get from that marker is not accurate and should not be used for other reasons as to quickly orientate to the target. It is really hard to quickly orientate to let’s say 125° and the marker will be really useful for the person who is using the mortar. Now we come to the most important third step, use a calculator, when you won’t you are wasting your time. We will use the calculator from “[link]“ because it can be easily used on a smart phone. The calculator has two squares the left one is your mortar location and the right one the target location. Now where do we get the locations from ? Zoom in on the map hover over the target aria with your mouse and you should get the coordinates on the right bottom of the map. That coordinates will be something like that “A5-KP6-5” now you need to imagine that the square that you are hovering above with your mouse has a grid to. In our case the target is in the NW side of that square so we need to add a sub sub key 7. Now we should have the exact target location “A5-KP6-SKP5-SSKP7” now we need to set that information in to the calculator like that “A5657”. It is important that you add the sub sub key for the mortar location to otherwise you won’t be accurate. Adding the sub sub keys will be the difference (10 MIL – 25m) between killing your target or just scaring it away. In our case the fire solution is 1127 MIL and the bearing 109°, it is important to use the calculated bearing because the marker is not accurate. Now for the end I would like to stress out that you can only hit a target when your spotter doesn’t makes a mistake for the sub sub key.
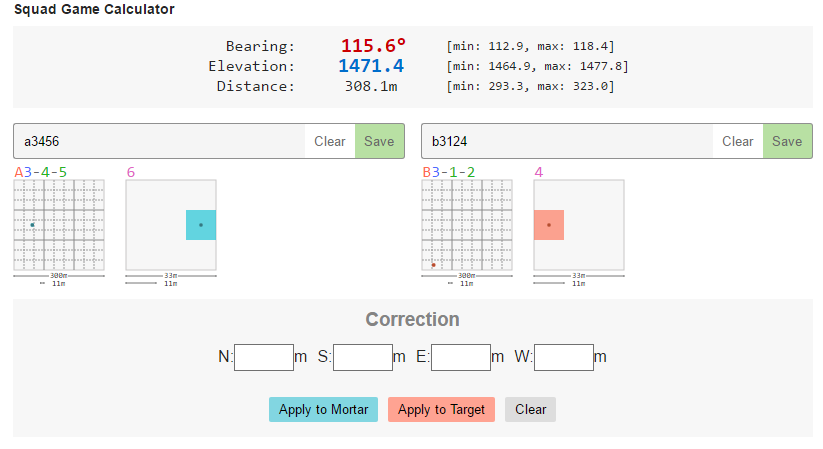
Here you can see the Squad calculator. It displays all input as it is on the grid and has a correction tab that is a game changer in calculation. Try it out and see for your self what a big difference the sub-sub keys make. Squad Calculator[squadcalc.com] Try it out and see which difference the fourth number-SS key makers on the target location and the mortar.
There are at least two different fire modes focus fire (all three mortars at the same position) or you spread those mortars (normal fire). Focus fire is really good for stationary targets and it’s the fire mode that everybody knows to use because it is the easiest. Again I need to stress the importance of a good spotter and the sub sub keys because the difference will be 10 MIL. To destroy a defensive target you will need X amount of volleys: FOB 5, Mortar 4, HAB 12, MGN 10, IFS 9 and IFS+FOB 9. Don’t forget that you will need 60 seconds from the point the SL will mark the enemy position until the firs mortar will hit the target so you don’t hit friendly units.
By normal fire we spread those mortar rounds horizontally or vertically per one mortar. I already tested the best dispersion horizontally between mortars per range: 300m – 4°, 500m – 3°, 800m – 2° and 1000m – 1°. Vertically the offset is for 10 MIL at any range. It doesn’t matter when you start from right or left, + or – MIL just make sure that 0° is the middle. For 500m – 3° you would shoot horizontally like that for three mortars “-3°,0°,+3°” and five mortars “-6°,-3°,0°,+3°,+6°” and vertically like that “+10 MIL, ON TARGET, -10 MIL. Normal fire is really god against infantry but you need to know where your target will be in the next 60 seconds. When you send three mortars to the same position whitout the spread you are throwing two away so please use the spread and send those same three rounds to almost same position, but with a bigger area of effect.
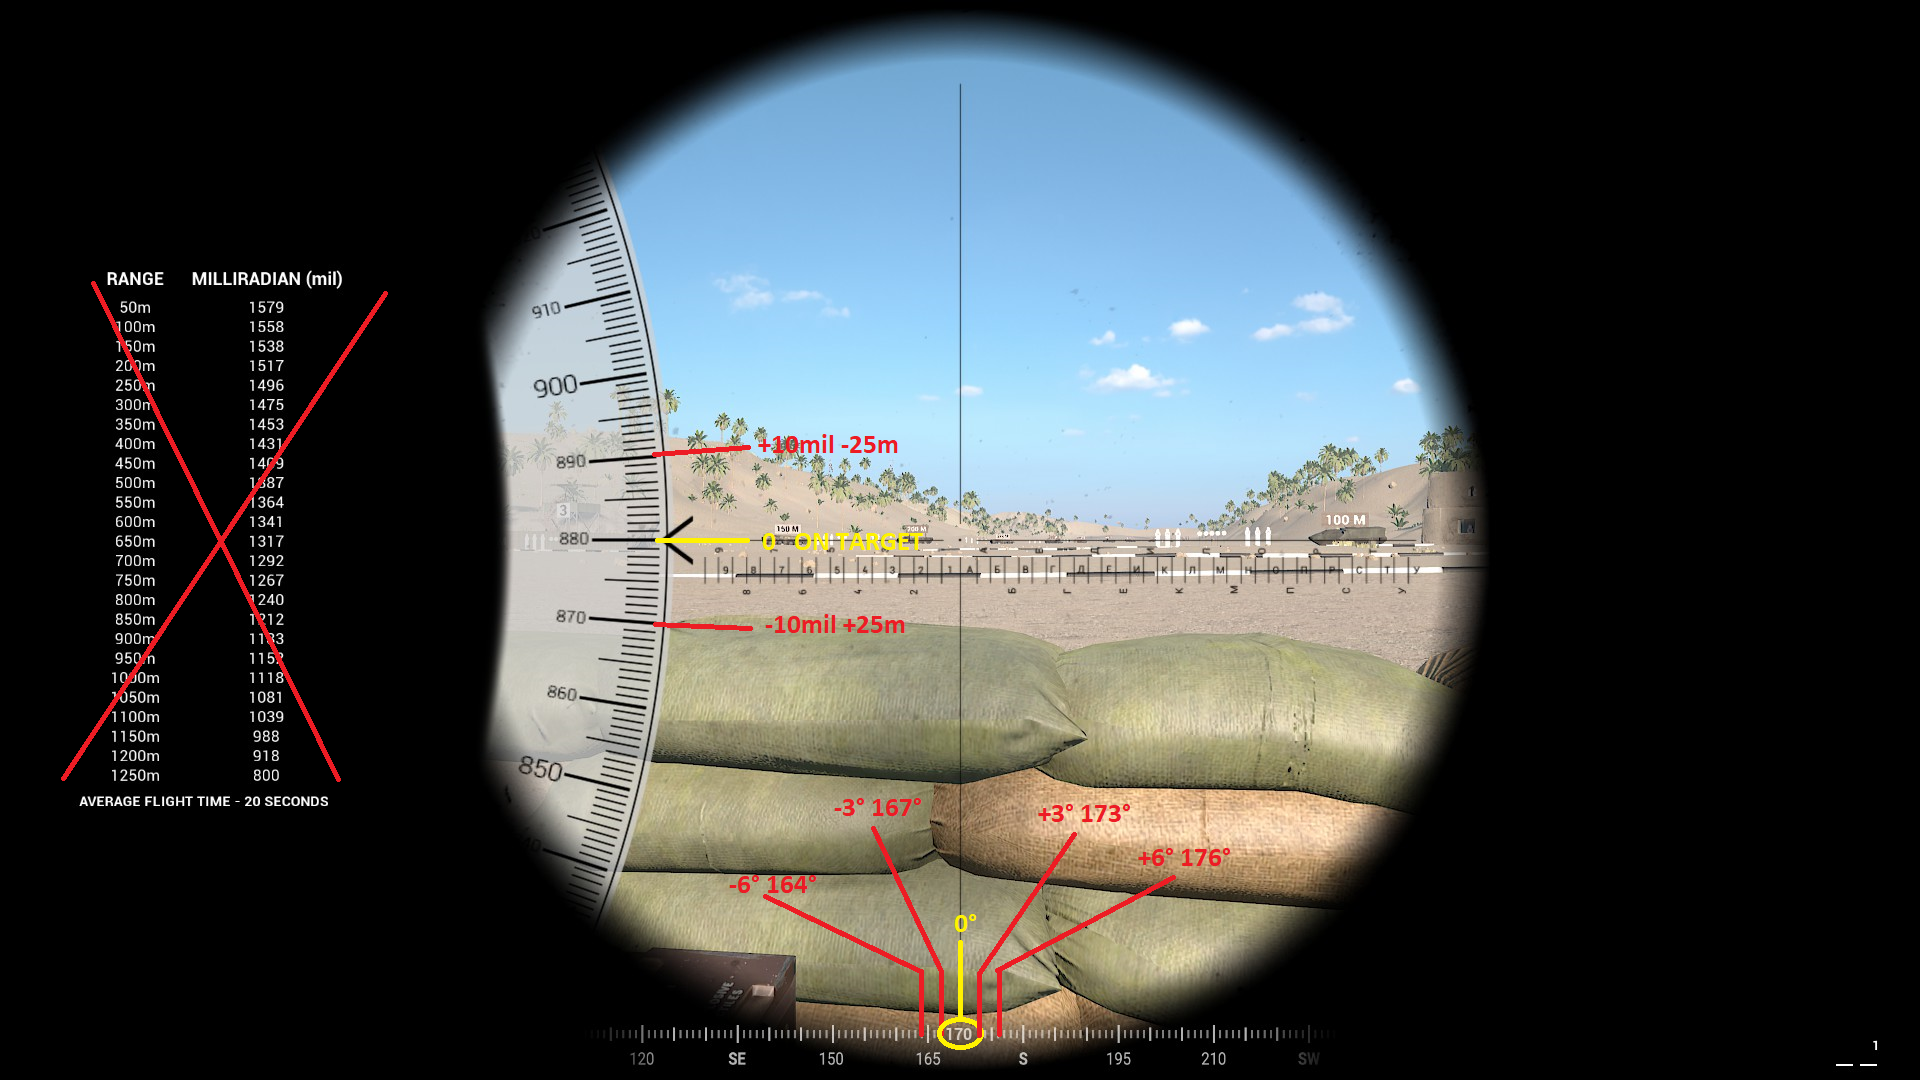
The picture represents the horizontal and vertical spread. Note that you fire only one morter per marker, all in all 5 mortars horizontally and 3 vertically. Click on the picture for better detail.
Mortars rely on a surprise attack and when you miss your target because you didn’t use the sub sub keys than you will louse that surprise attack and the enemy could get away.
You will need to spend at least 30 min on the Training server to figure it out ! You need to trust your ability to hit the enemy without any feedback !
Positioning and defence
First of all let’s make it clear that you need to put your team first, there is no space for selfish SL in squad. You dont own the Logistical truck and unless you want to supply other FOBs to dont make a Mortar squad. You won’t need more than 4 people to be effective and more people will only make your team weaker.
Before we go to positioning let me advise you to never put a HAB up when you are setting a mortar emplacement. On the smallest maps you will have no choice but to put it on the same position, on the biggest maps there should be no problem and on the middle maps put it 400 m behind your lines and let the space for FOBs with HABs. Yes you will lose those 400m but you will be in a more defensible position. The biggest problem is the sound that a mortar makes that can be heard through almost the whole map.
The best place for a mortar is in a village with a wall. The cracks in the wall you can than close with the Hesco Wall 45s and Razor Wire 7s deconstruction time which buys you min 50s before the enemy can breach and destroy your FOB. When you immediately start to destroy the FOB you can destroy it before the enemy gets in and takes 20 point from your team. In most games you will need to move from one position to the other to keep up with the changes on the map. And I highly advise you to move at least once per game to avoid losing your FOB – 20 points. Btw. the Hesco Wall can’t be penetrated by vehicles and is the best defence structure that you have.

Tips and tricks
I mentioned already that I am using only 4 players including me in a mortar squad. I would advise you to make sure the the Logy driver is a medic so he can heal himself when he gets shot. Than you need somebody on the mortar (who knows how to use it) and a second scout so you can set the relay points when you are scouting.
When you decide where to shoot you need to decide how to shoot to. A big help for it is the 100m indicator on the right bottom of the map. With the two finger metode you can take that 100m and measure the target aria. Now you can decide how you will shoot. Is the target aria wide enough to use 5 mortars or 3 horizontal or should you use the vertical pattern. This depends from the mortar and target location to.
I would advise you to shoot at a capture point from the bottom with the correct spread and then only use -10 mil 4 times (5 volleys) to hit a aria of 100m. When you are trying to hit infantry that is moving you need to know where that target will be in the next 60s but that can be difficult. I would advise you to shoot first on target (where the target will be in 60s) and than +20 mil -50 m when the target is moving in the direction of your mortar. That way you will have a bigger chance of hitting the target and don’t forget to use the correct spread.

The fifth volley is missing – the picture is for demonstration !
Smoke mortars
Smoke Mortars arrived and they are balanced and worth using. But of course you need to use spread and you need to continuously fire them in a line 2-3 times so your friendly units can advance. Smoke Mortars have a 40 s deployment time and cover a circle of 15-20 m. I seen whole squads charge a point after Mortars were deployed before those same squads couldn’t get close for 5-10 min. Which means the Mortars are fulfiling there job with flying colers and I am thenkful for such a implementation. Now Mortars not only destroy but also protect which makes tham more useful and worth using.
