Overview
A guide to save-file editing using the MSCeditor app
The savefiles explained
MSC stores your savefiles in the application data folder located at “%USERPROFILE%AppDataLocalLowAmistech“.
Appdata is a hidden folder by default. Here’s a quick overview of the different files:
- defaultES2File.txt : contains data for all carparts and tools, the player and the world.
- meshsave.txt : contains cosmetic damage data for the satsuma bodywork. Deleting it will repair your bodywork upon reloading.
- item.txt : contains data for all the items that can be bought at the store.
- graveyard.txt : contains data of all your dead (permadeath) characters
- trophies.txt : trophies
protip: setting meshsave.txt to read-only will prevent any bodywork damage from saving.
However, when trying to start a new game, you’ll have to remove the read-only flag or you’ll be stuck in the loading screen.
App overview
MSCeditor is an open-source[github.com] app that allows you to open, edit, save and backup your safe-files. Anything that is saved by the game can be edited.
A few things worth mentioning:
- IMPORTANT: extract the archive before trying to run the app!!
- The app doesn’t need to be in a specific folder to run. It works anywhere.
- Make sure “msce.ini” (was “data.txt” in previous versions) is in the same folder as the app, as it holds important data for the app to use. It will start without it, but with reduced functionality.
- MSC doesn’t need to run when editing, in fact, I recommend closing the game or at least having it in the main menu when editing.
- On initial startup, the app will check for updates. This can be disabled in the options.
- The app is not meant to assemble an entire car. It’s easier to just download a save for that purpose.
You can find a download-link for the app on this steam community thread.
Getting started
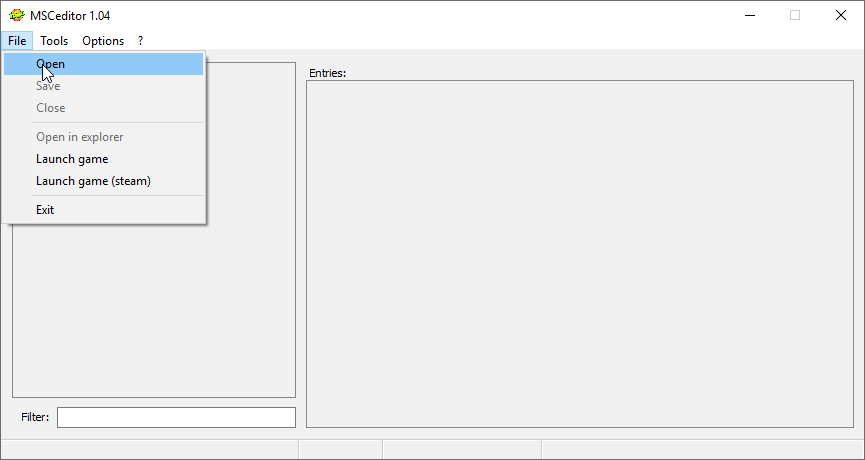
After launching the app, you’ll want to open a file first. To do that you navigate to the “File” menu and click Open:
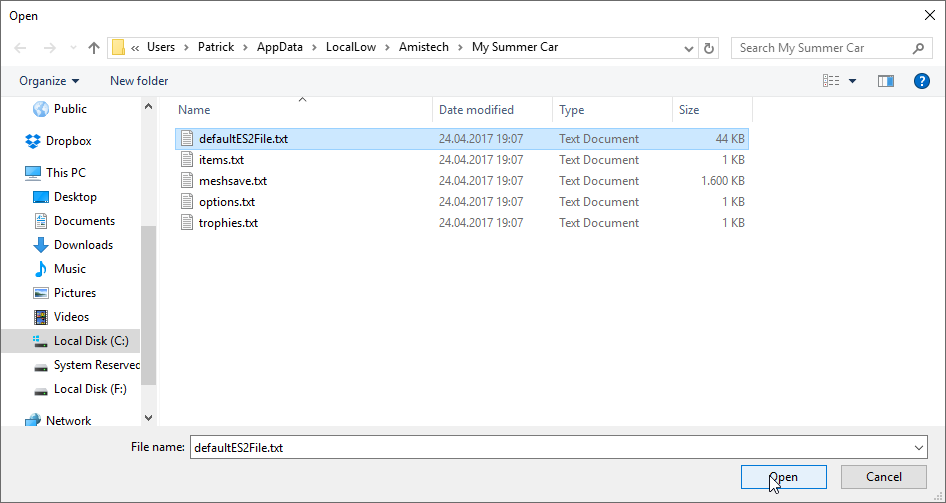
You’ll be greeted by a Open file dialog, where you select the file you want to edit and then press Open. Here, we open “defaultES2FIle.txt“.
Upon opening a file, it will look somewhat like this:
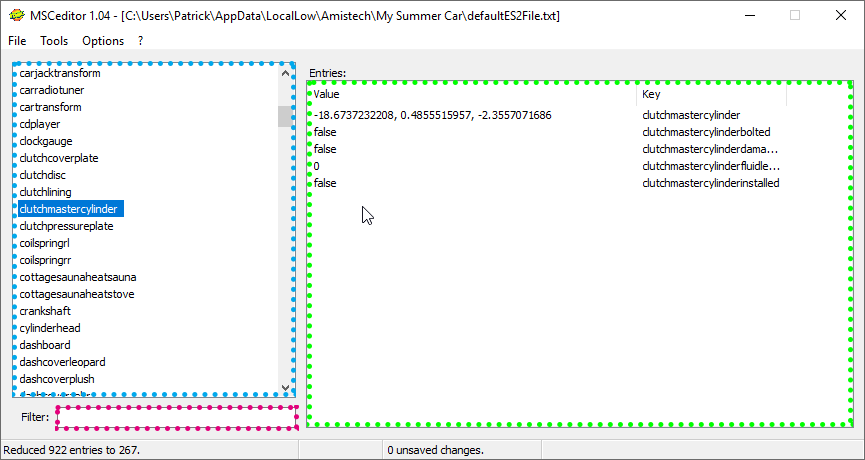
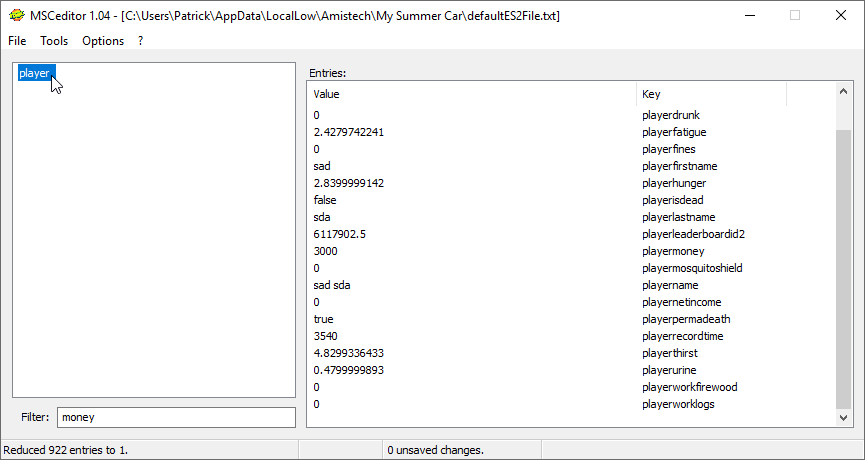
On the left side (blue box), you have the categories. A category holds all entries (green box on the right) that share the same name. Using the bottom left box (red) you can filter by categories that hold entries matching the entered string. Here we’re going to filter by “money” and click the category that shows up.
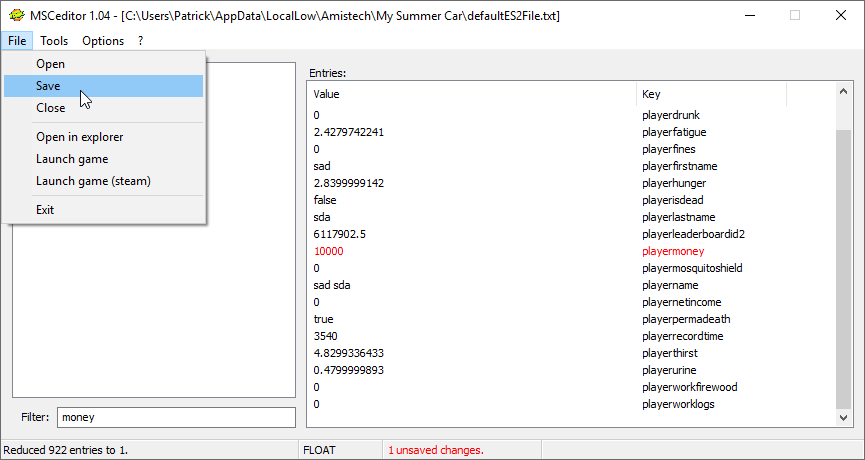
After improving our financial situation by clicking the value for the “playermoney” key and editing it, the entry will show up as red. All entries that have been modified are automatically highlighted by the app. Now the only thing left to do is save the file. To do that we once again navigate over to the File menu and click Save. Tip: When closing the app and there’s unsaved changes, the app will ask you what to do with the changes.
Backups
Every-time you save a file and the Make Backup option is enabled, the app will store a backup in the same folder as the file you edited, so nothing can be lost.Backups with a higher number will be newer. MSCEditor does not remove any backups. You as the user are responsible for their maintenance.
To roll back to a backup, you can simply remove/rename the defaultES2File.txt that is currently in use by the game, and replace it by a backup by renaming it to “defaultES2File.txt“.
Tip: You can easily open the folder in file explorer by clicking Open in explorer in the file menu.

Important:
Make sure you change the file extension. Here’s how:
[link]
If you accidentally changed something you didn’t mean to, you can right click the entry and press Reset. It will reset the entry to its file state.

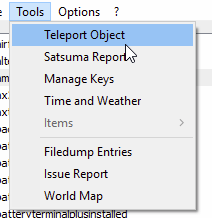
Teleporting objects
MSCeditor comes with a teleport tool
that can be found in the Tools tab.

The “Where to teleport?” drop-down list will present you with a few pre-defined places to chose from (Garage Table for instance), as well as every other object in the world with a transform. So you can either teleport it to a place, or to the position of another object.
Changing the “Height offset” allows you to change how far above the chosen position the object will spawn (in meters). Setting a negative value will make it spawn below.
Unchecking “Keep original rotation” will reset the objects rotation.
You can add your own places by editing msce.ini.
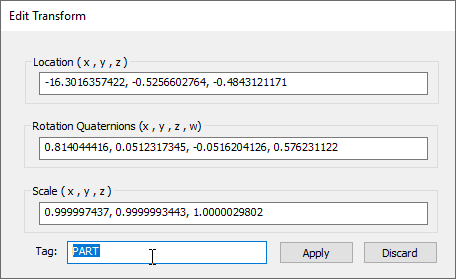
If you chose so, you can edit an objects transform manually by opening it’s transform property.


If you want to reset an objects location to where it was when you started a new game, you can delete the transform property in the entry list by right clicking it and clicking Delete. Removed entries show up gray until they’re saved.
The Satsuma report

You can open the Satsuma report by navigating to the Tools menu and selecting “Satsuma Report“
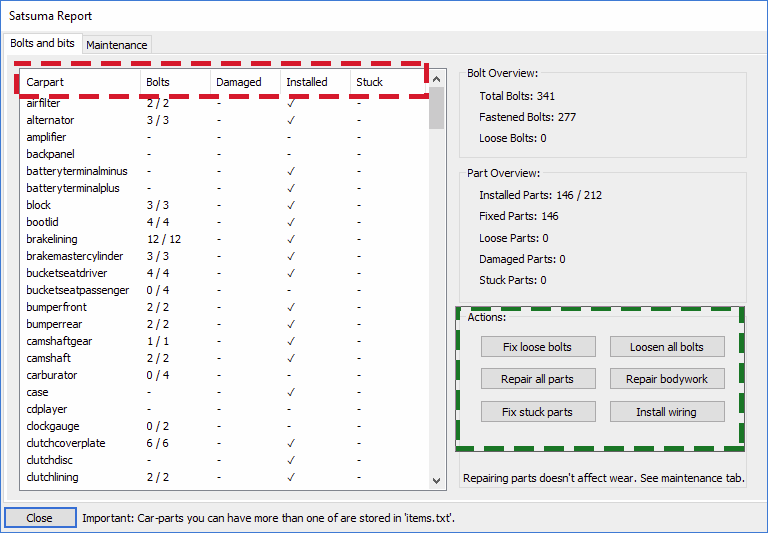
The table header (red box) allows you to sort by a category you chose. Here we filtered by “Installed” to see what parts are installed.
- Carpart : Name of the car part.
- Bolts : Fastened bolts / Amount of bolts on the part.
- Damaged : Specifies if the part is damaged. Not to be confused with bodywork damage, which is purely cosmetic.
- Installed : Tells you if a part is installed. Installed doesn’t imply all bolts are fastened, just that it’s currently attached to the car. A check-mark means the part is installed, a question-mark means the part has no “installed” property.
- Stuck : A part gets highlighted as stuck when the tightness of all bolts are higher than the maximum amount of turns of all bolts on that part combined.
The actions (green) box on the bottom right presents you with a range of batch actions you can take.
- Fix loose bolts : Fastens all bolts on car-parts that are currently installed.
- Loosen all bolts : Loosens all bolts on car-parts that are currently installed.
- Repair all parts : Repairs all damaged car-parts. Doesn’t take wear into consideration.
- Repair bodywork : Restores the car’s bodywork and buffs out all dents. Works by removing “meshsave.txt“. Grayed out when said file isn’t present.
- Fix stuck parts : Fixes stuck parts. A part is considered stuck when the tightness of all bolts are higher than the maximum amount of turns of all bolts on that part combined.
- Install wiring : Installs all wiring components. Not a perfect feature by any means. Can sometimes miss bolts related to the battery terminal.
Spawning items
When the app detects items in a file, it will enable the Items option. This is usually the case when opening the file “items.txt“.
Clean up empty items isn’t implemented currently.

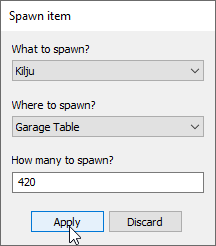
By setting “What to spawn?” you’re specifying what item to spawn.
Just like in the teleport dialog, “Where to spawn?” lists all the locations you can spawn it at.
“How many to spawn?” is the amount of items you intend to spawn.
The world map
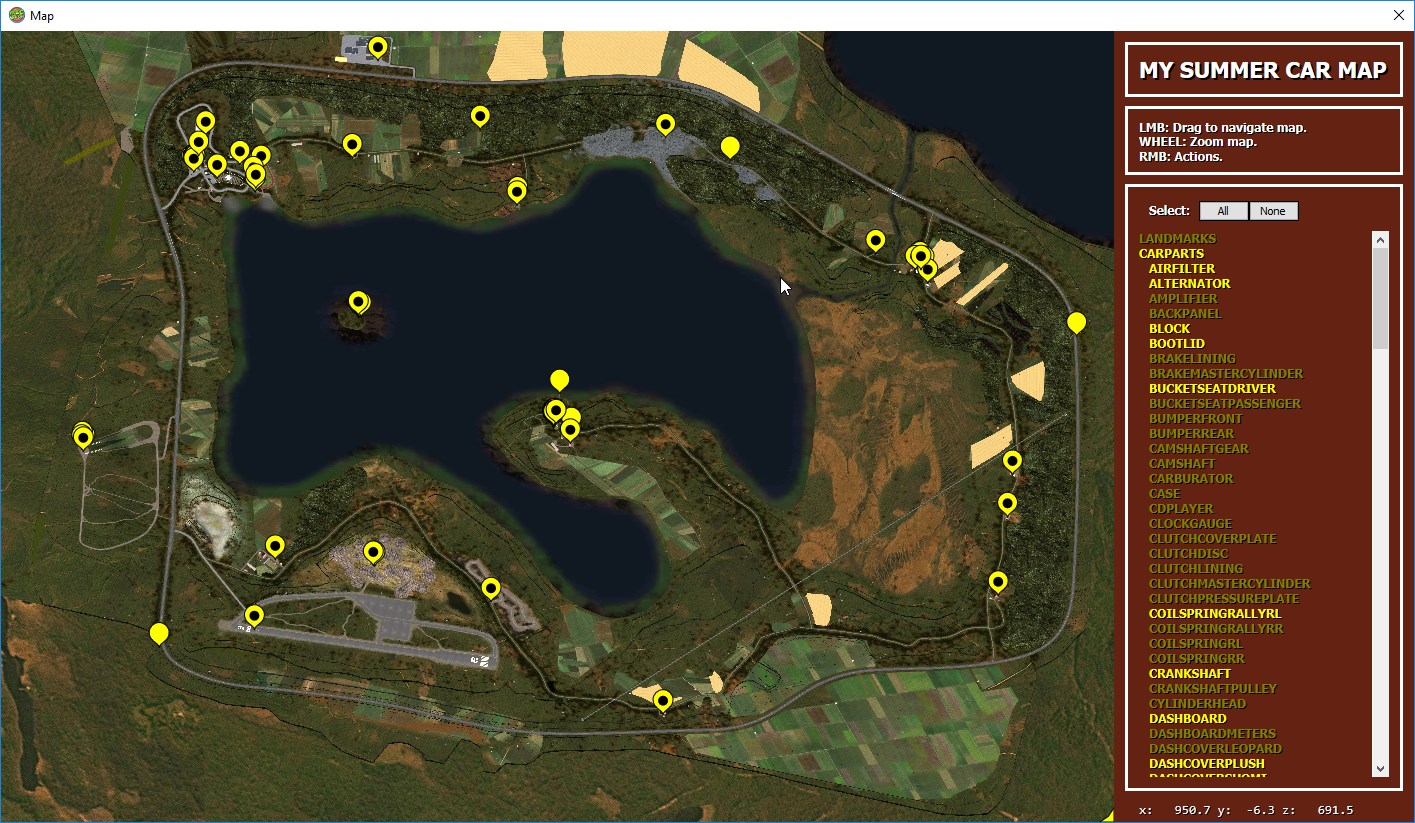
To navigate the map, you hold down the left mouse button and drag to move your view. The mouse wheel will zoom you in and out. You right click on a point on a map to open the “Actions” context menu. You can not move your view outside the boundaries of the map. To show and hide objects, you select them from the sidebar. All objects are hidden by default and sorted into the three categories Landmarks, Carparts and Rest.
You can also press the two buttons above the list to either hide or show all markers. At the bottom, the location on the map that you last hovered over with your mouse is displayed (y being the estimated height).

Copy coordinates to clipboard
Will copy the game world coordinates of the location you right clicked on into your clipboard, so you can paste them somewhere else.
Teleport an object here
Opens the teleport dialog from tools, with the coordinates you right clicked on already filled in. Just select and object to teleport.
Measure distance
Allows you to measure the distance between points in world space. Adds two new options the next time you open the context menu. “Distance to here” will add another way-point, while “Clear measurement” removes all.
An alternative way of finding an object on the map is selecting the location of it in the main window, then right clicking it and pressing “Show on map”. This will show the marker on the map.

For advanced users
When trying to edit a car-part it is important to understand what every property does. Different parts have different amounts of properties. For instance, the battery doesn’t have a “tightness” or “bolts” property, since it doesn’t have any bolts. At the same time, a part that isn’t attached but actually has bolts, will sometimes not have a tightness” or “bolts” property either until it’s attached. This is part of the reason why there is no Attach part function in MSCeditor.
Anyway, here’s a quick overview based on the hood car-part:
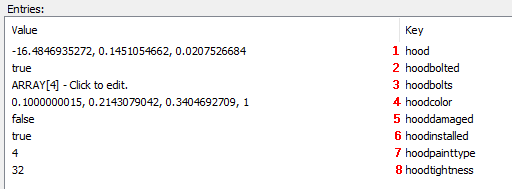
The tag of an attached part is “Untagged“, while a seperate part will have “PART“.
Now that you have a basic understanding, you’ll notice that the hood is properly attached. It’s installed, bolted and the tightness equals 4*8. Now, what if we want to uninstall that part for some reason? It’s not an easy task, as it varies from part to part. But let’s stick to the hood example here. First we’re going to open the transform property and set the Tag to “PART“. This will make sure we can pick it up when it’s detached.
Next we set bolted and installed to “false” and tightness to “0“.
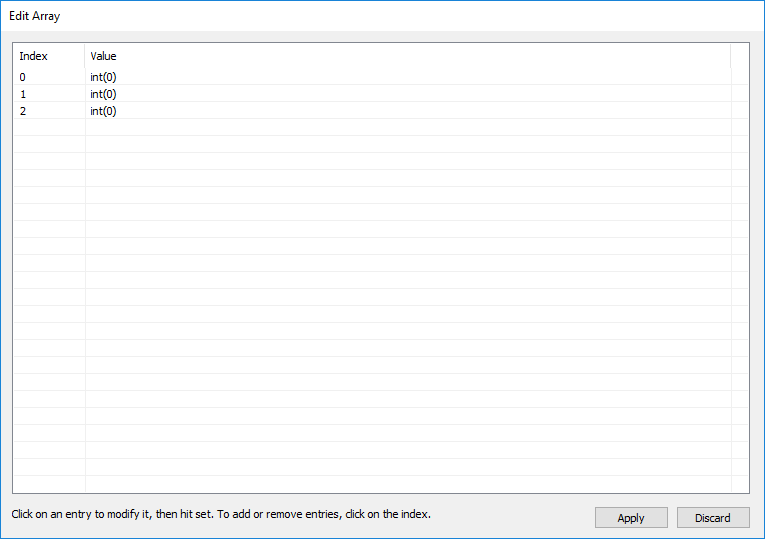
The only thing left to do is open the bolts and set everything to 0.
When loading up the game, the part should now be detached. When attaching a part, it’s the same process, except you set the Tag to “Untagged“, bolted and installed to “true“, tightness to “Number of bolts * 8” and then inside your bolts array you set everything to “8“.
FAQ
Filter by “player” and set “playerpermadeath” to “false“
Filter by “envelope” and set “envelopetimecurrent” to a high number like 5000