
Overview
How to set a custom FPS cap, and other options for increasing smoothness and reducing latency. Mostly for powerful PCs, but some steps may help anyone. Appreciate translations since I would rather not insult anyone by using Google translate.
480 FPS limit? But how?
Very concise summary if you just want the lowdown: Download RTSS, and use that to set your framerate cap with it (ingame)unlimited and in RTSS (to any value <=300) and not on vsync ingame, don’t use nvidia’s limiter or another program. RTSS will be the most smooth and consistent. Disable all framecounters or benchmarking features, use low application detection level. The following is a more detailed explanation of why and how for those that are unaware of this.
Set in your steam overlay settings the top left fps counter so you can keep track of where the FPS is at and whether it’s behaving correctly;

Use the table of contents to the right to skip to direct instruction if you don’t want the explanations.
Request: someone to translate this into Japanese/Korean/Chinese without google translate since most of the player base seems to be east Asian and I am just a humble western casual player that can’t keep up but does know about optimization.
Some people may not know how to properly cap your FPS when sufficient tools aren’t available in-game (unlimited is not acceptable when the game doesn’t even power limit itself), and especially in games with very low performance requirements (such as Muse Dash) which don’t even attempt to save power, doing so is very important when you want to not have stutter, a smooth experience, without resorting to v-sync specifically.
Without a limiter, unlimited on a very powerful system tends to do this…
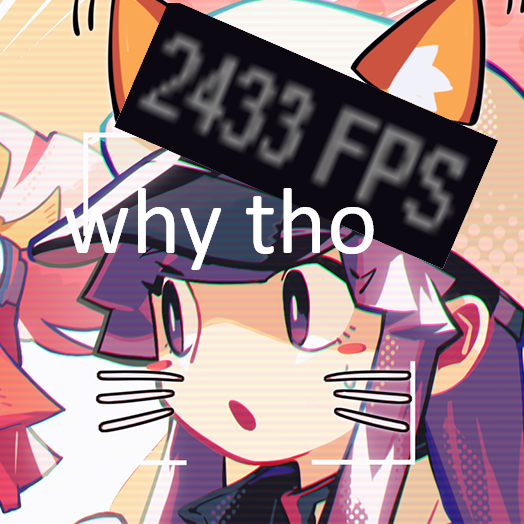

Even 240 fps limit, or your respective refresh rate, can have sudden drops from things in the background. Instead, I present a way to play the game with a higher cap but not unlimited, letting you have a buffer zone of FPS without also going into ridiculous territory we need to wait for 1000hz monitors to really take advantage of… or that one 360hz one.. or whatever, this is applicable to every monitor, but higher than 300fps you will need to use scanline sync instead.

You can easily change between 480 or 250 or any other number you want. The 480fps example here is scanline sync, taught to me by a friend and specifically explained here[forums.blurbusters.com] (link to BlurBusters), however, I do not think scanline sync or x2 scanline sync is useful.
So here is how to set your own FPS cap without using nvidia’s control panel or some other driver-level limiter, which introduces 2 frames of delay, instead of RTSS’ CPU-level limiter, which adds only 1 frame of delay. If you are happy with the ingame limiter, use that instead, as in-game limiters do not add any frames of delay. I would prefer to have at least a 250fps cap, and even used that aforementioned 480 for a while, but felt it dropped too often to be consistent- 250 is perfectly consistent and even if it drops slightly, it won’t cause visible stutter since it stays in my refresh rate range.
Setting Up Rivatuner Statistics Server
You can find RTSS (Rivatuner statistics Server) on Guru3D or packaged with Afterburner which is a GPU monitoring software. You can use RTSS without Afterburner, and vice versa, and I prefer to install them separately since it’s honestly annoying having RTSS always open when I don’t want it with Afterburner too.
RTSS Download Page, Scroll to the bottom and get the recommended version[www.guru3d.com]
Once you install it, you will want to hit the green ‘add’ button, and find musedash.exe in your system folder
C:Program Files (x86)SteamsteamappscommonMuse Dash
or wherever you installed the game, and add MuseDash.exe

disable the onscreen display, and the onscreen display support for global and for it. You don’t really need it, and you want to minimize any injections into the game, and only use the framerate limiter. ‘Low’ is enough but ‘none’ will mean it won’t even use a limiter. Disable all other frame counting and stats options unless you want to actually do tests, inwhich case you probably don’t need to be told any of this.
The most difficult step, putting a number in the framerate limiter field
Now, in framerate limit, as you may have figured out by now, put a number. Note that it will limit you to 300. If you use Scanline sync, as described in the first segment, you can make it higher, but some adjustments must be made for screen tearing issues that may be apparent on some panels.
Short scanline sync description: it’s a type of vsync which allows you to control where the tear line on your monitor is. This is more useful for properly 3d games.
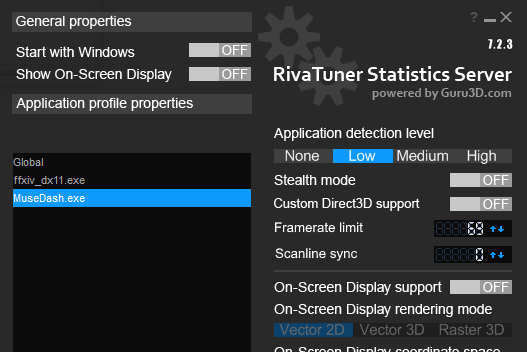
Here I set it to 69.
I think simply setting the FPS cap (Framerate limiter, leaving scanline sync to 0) to your refresh rate +10 or 20 is more useful than messing around with the complexity of scanline sync- so for
0 in the framerate limiter box is the same as ‘unlimited’.
60hz – 70fps cap, maybe more if your PC can handle it but you only have a 60hz monitor
75hz (some monitors can overclock from 60, my secondary can) – 85fps cap
120hz – 130fps
144hz – 154fps
200hz is an option if you want to create a custom resolution, but that’s another bag of worms.
240hz – 250fps or even 300fps if you feel like it.
Of course this is up to your monitor and your desire; there is no best or worst, but a higher refresh rate offers more clarity on the screen. Blur reduction may also be an option if your monitor supports it. I noticed motion was a lot clearer (less of a jumbled mess of pixels), but inputs were bit wonky on fast songs with motion blur reduction (MBR) on my 2540.
250 may be the best if you have 240hz monitor since most keyboards run at a 125hz polling rate if you are using a keyboard to input commands, since 125 x 2 = 250 so every two frames you can be afforded one key input. Another argument can be made to simply use 125hz and 125fps capped so that every frame is a possible key press. Overall, I’m not that serious about it, and I’m sure people are doing much more with much less. This is mostly for fun and considering possibilities for optimizing perfectly responsive input which is already a bit handicapped via using a keyboard; but using less than 3 keys is impossible on a 9+ song anyway.
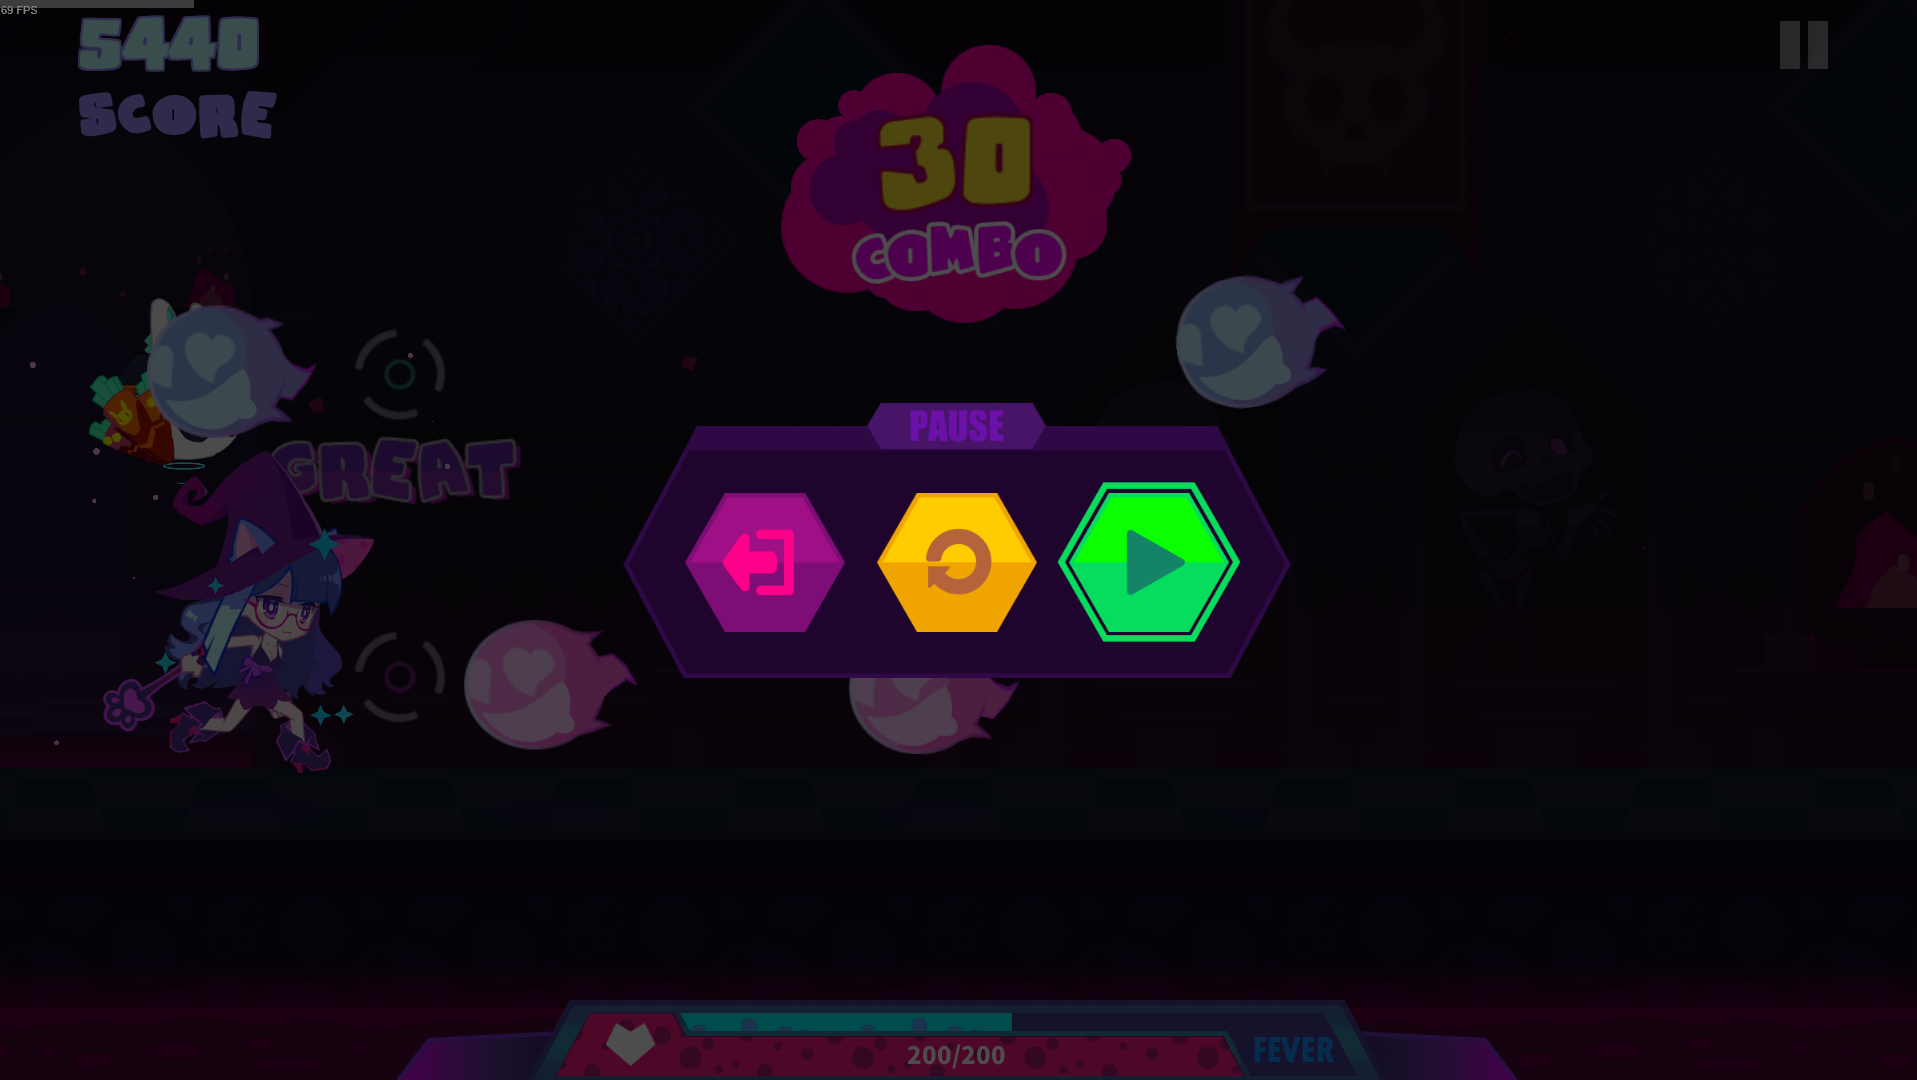
Now my FPS cap is at 69. Note you need to disable vsync and set to unlimited. The ingame limiter setting WILL override it, since it’s a step below CPU level and has likely 0 added frames, where RTSS will have 1 and nvidia’s limiter will have 2, and other limiters will have 2-3 or worse. Make sure it’s on unlimited!

Final words
Use third party programs at your own risk. RTSS is not dangerous nor does it change any properties of the game, and is used for many, many games to improve FPS cap smoothness. It works well for some, not for others, and your mileage may vary. I am doing this on a very overpowered system for this game, so it’s kind of needed unless I want to be stuttering all over with the FPS fluctuating by hundreds based on single interrupts happening in the background, but while also staying above refresh rate (240).
Sorry if this was too long of a guide but I wanted to be thorough and make sure everything was understood well and the benefits of it. Have fun with this cute game.

I’ve been using RTSS to lock to 250 or 480 the whole 20 hours I’ve been playing without issues, but if a developer finds an issue with using RTSS to lock frames, please add + contact me and I can remove the guide or change anything within it.
Thank you!
~ Feli / フェリ / 펠리
pelli is my favorite translation.
Bonus: Nvidia Control Panel Settings (NVCP)
If you have an Nvidia GPU (I don’t know AMD sorry, sold my 7970 sadly a couple years ago so can’t even try to mess with adrenaline) then you can make sure you’re getting the most by setting some options in NVCP, though this is usually already done, you can specify it for Muse Dash to compliment RTSS.
If you don’t know how to add it to change specific settings, it’s just 1-2-3.

Also, I set gsync OFF, since you want to be above refresh rate and the FPS will not fluctuate considerably like games that benefit from gsync ON. So fixed refresh rate is better by far.

These are likely the most important, but up to discretion, and feel free to experiment with all the options. I am using a slightly older driver (445.87) though I usually used (441.41), so sometimes the options may look different, but those main few are rather consistent. Setting vsync to always off at the bottom can be useful too, but not crucial.
That’s it. You should be able to tailor your experience more precisely with this. Thank you! All information in this guide is free and can be distributed without any crediting, as none of this is uncommon knowledge but not always intuitive.
My PC specs: [link]
8700k is overclocked to a set 4.8ghz with hyperthreading ON for multitasking (typically I turn it off but HT on has helped me recently with multitasking so it’s on anyway)
the 2070 super is voltage locked to 1037 with only a +30 core and +0 memory with the rest unlocked for stability purposes (VR is very touchy sometimes, and I usually am playing VR)