Overview
Since there isn’t a cohesive guide on Steam, I thought I’d make one and save everybody some time from having to look up each individual task separately. There are a total of 50 achievements and only one is missable, so avoid selling quest-related items and ninja tool ingredients. You can 100% the campaign in less than 30 hours, with the exception of titles, since you’re going to have to grind for each character separately. Lots of these tasks are connected to one another, so you’ll be working towards acquiring multiple achievements over time, rather than unlocking each of them separately. Unlocking everything can take you somewhere between 30 to 50 hours; it all depends on how you pace your playthrough. The difficulty setting does not affect your completionist run.Note: Although glitches are extremely rare and mostly occur on consoles, I cannot provide you with any solutions if you happen to encounter a specific bug that prevents you from progressing or acquiring your achievement. Your best bet is to look elsewhere for assistance or get another save and retry your task.
Story Mode
Each of the following achievements will unlock when you complete one of the eight story mode chapters. Simply finish the main campaign and you’ll unlock all of them.

You’ve cleared the Prologue.

You’ve cleared Chapter One.

You’ve cleared Chapter Two.

You’ve cleared Chapter Three.

You’ve cleared Chapter Four.

You’ve cleared Chapter Five.

You’ve cleared Chapter Six.

You’ve cleared Final Chapter.
Achievement count: 8 out of 50
S-rank Boss Battles Part 1
Getting an S-rank on any mission is measured mostly by how much health (HP) you have left at the end of the match; you’re more likely to get an S-rank if you are above 80% of your base HP. There are no healing items that you can use, however, successfully chaining quick time events (QTEs) will restore some of your HP. Ninja tools and bentos can also be used to damage enemies from long range, temporarily slow them down or give you a brief stat boost (damage, defense, etc.). Keep in mind that all bosses are immune to your ultimate abilities. Beating all of these opponents shouldn’t be too much of a hassle, but you can always lower the game’s difficulty if you’re having trouble with a boss as it will not affect your overall rank. If you’ve taken too much damage to get an S-rank, simply restart the round from the pause menu and try again. If you don’t get it on your first try, you can always recover the boss battle crystal at the location where you encountered the boss the first time and retry again at Tsunade’s (Hokage’s) office.

You’ve seen all secret factors.
Each boss battle has a secret factor that will play automatically at the end of a fight if the player has collected a specific amount of stars for each boss. This is done by successfully chaining QTEs as fast as possible in order to unlock the player character’s secret factor. You don’t have to get every single star in the mission in order to unlock its secret. Viewing all 9 of them will grant you the aforementioned achievement.

You’ve acquired S Rank in “The Bell-Stealing Drill”.
Phase 1
Kakashi’s straight forward and will rarely evade your attacks. Attack head-on and call up Sakura once or twice to quickly initiate his QTEs.
Phase 2
Hit Kakashi with a shadow clone barrage and chain your Rasengan with basic attacks. Avoid his water dragon; its spawn is clearly telegraphed and don’t forget that it’ll dive back towards you. Occasionally, he’ll spawn another water dragon or try and electrocute the entire playing field. If the latter occurs, simply stand on one of the platforms to avoid it. Once he jumps back onto his perch, use Sakura to knock him down then continue with your combo before finishing off with one more QTE sequence.

You’ve acquired S Rank in “Sand and Art Blast”.
Phase 1
Since Deidara opts for aerial assault, you’re gonna have to keep your distance and use your throwables (you can also power them up with your chakra) to deal minimal damage whilst avoid his attacks. Eventually, he’ll try to dive bomb you. Dodge to the side and proceed to wear him down with your basic attacks whilst chaining a jutsu. Eventually, you’ll trigger a short QTE.
Phase 2
This time around, the combat shifts to on-the-rails aerial shooter with you chasing Deidara around the Sand Village. You’re going to have to avoid incoming airborne clay bombs by dodging to the side or destroying them to gain additional chakra. Your best bet is to use charged up shots for maximum damage. On lower ground, you’ll have to avoid Deidara’s explosive mines that cause a volcanic-like eruption shortly before concluding the fight with one final QTE.

You’ve acquired S Rank in “Sakura Dances”.
Phase 1
Same as the other ones, quickly wear him down before initiating a short QTE.
Phase 2
Quickly dash towards him and interact with the cord to pull him down, as indicated by the sign prompt. Once you knock him down, he’ll be stunned for several seconds, giving you enough time to get in a few hits. When he recovers, Sasori will put up a wall of puppets to prevent you from knocking him down. You can either circle around his incoming attacks till he eventually comes down to you or you can summon Chiyo to disperse his defense and pull him down again. Whichever option you choose, your second encounter with Sasori will lower his HP enough to trigger the final QTE.

You’ve acquired S Rank in “Forbidden Fury”.
Phase 1
Like the rest, try to wear down Orochimaru as quickly as possible to trigger the QTE. Avoid his head on snake attack as you cannot block it.
Phase 2
This one is basically an arcade shooter. You will have to manage shooting Orochimaru while avoiding his snake projectiles and summons. The snakes linger in the open long enough for you to gun ’em down and even if you get hit, they’ll barely scrape your HP, which can be restored later with QTEs. You can also use a charged up shot that will consume your chakra in exchange for a very powerful beam attack. Occasionally, Orochimaru will summon a giant snake that you’ll have to shoot down before it takes a decent chunk of your health. Finally, the game will shift camera angles and fire one large volley towards you before concluding the fight with a QTE.

You’ve acquired S Rank in “Showdown Between Best Friends”.
Phase 1
Wear him down to trigger the QTE, but watch out for his fireballs and substitutes.
Phase 2
The second portion of the battle continues without any drastic changes to the gameplay, with the exception of switching between past and current fights between Naruto and Sasuke. Keep in mind that pre-timeskip Naruto handles differently than timeskip Naruto and that PTS Sasuke has more aggressive attacks. Like before, simply wear him down to trigger the second QTE.
S-rank Boss Battles Part 2

You’ve acquired S Rank in “Sturm und Drang”.
Phase 1
Kakuzu will constantly block your dash attacks and frequently use substitutes to get behind you, but even then his first phase isn’t too much of a hassle. Wear him down to trigger your first QTE.
Phase 2
The second phase starts with Kakuzu in his awakened state. Avoid getting caught in his combos or you’ll suffer severe damage. When you wear him down to his last two health bars, Kakuzu will wrap himself between two nearby trees with his threads and hurl long range attacks towards you. These include:
- Three vertical air shots that travel across the ground towards you. Simply stay in between the shots to avoid them.
- 3 to 5 individual fireballs that you’ll have to continuously dodge by jumping away at the last second
- A downward slam from a giant whip that will later swipe towards the player. There’s a long wind up to this ability, giving you enough time to dodge to the side and later jump over it.
- Several lines of threads that Kakuzu will bury beneath the ground to launch a surprise attack. The threads will swiftly creep towards the player before rapidly emerging from below. These attacks are telegraphed by the rising dirt and a dust cloud and can be avoided by simply circling around them.
- His fifth and final attack consists of him combing fire and wind to create a giant beam that’ll slowly move towards Naruto’s location. To avoid it, stand on either the far left or right side of them and run in the opposite direction.
Once all of his attacks are exhausted, Kakuzu will be temporarily stunned, allowing you to dash towards the nest and pull him out of his threads in order to chain a few attacks. Once Kakuzu recovers, he’ll dash back to his threads and start chaining all the aforementioned attacks in rapid succession, excluding his giant beam, before merging back with his nest. The gameplay process, along with his attacks, keeps repeating until you wear him to a third of his last health bar, at which point the final QTE will be initiated, concluding the battle.

You’ve acquired S Rank in “The Two Uchiha”.
Phase 1
Itachi will either block or avoid your attacks all together, as the AI tends to keep its distance. Be mindful of his substitutes, as he’ll often combo it with a throw. Throwing chakra shurikens at the AI will cause it to respond with the same attack, triggering a short optional QTE. Winning the exchange will inflict decent damage to your opponent. Once you wear him down the main QTE sequence will be triggered, moving the fight outside of the, now destroyed, Uchiha Hideout.
Phase 2
Susanoo acts independently of Itachi and will attack you regardless of Itachi’s status (i.e. stunned or knocked down). Right off the bat, you’ll have to move to the side and avoid a swing from its giant blade, then dash towards Itachi and follow it up with a quick attack. Even if Itachi’s blocking, his guard should break easily, allowing you to chain a combo and use a prompt to trigger a stun before Susanoo gets a chance to swing its blade again. Susanoo will then lower its shield to push you out of Itachi’s range and defend him against long range attacks. Pending on its sword stance, Susanoo will either hurl a storm of boulders in your direction or follow up with three consecutive sword attacks; two from top-to-bottom vertical strikes and one horizontal slash. The boulders’ locations are telegraphed by the falling shadows, allowing you to evade them ahead of time. The two sword strikes can be dodged by dashing to the side and you can avoid the horizontal slash by jumping over it. The final attack is a shockwave, generated from Susanoo’s blade after it stabs the field’s center. Like with the slash, you can simply jump over it to avoid taking damage. Attacks from this point loop until you’ve done enough damage for Itachi to trigger the final QTE.

You’ve acquired S Rank in “Battle Between the Sage God”.
Phase 1
Stand to the side of Pain’s crab and freely spam your attacks. Keep an eye out for when it dives back underwater. Your camera will point towards the crab’s spawn point before it resurfaces and the area will be indicated with splashing water. Make sure to stand aside and avoid this attack, as the crab will fully surface and attempt to tackle Jiraiya. Continue your side attacks on the creature until Pain triggers a mini QTE. Completing it successfully will temporarily stun the crab. The pattern will keep repeating itself until Pain takes enough damage to initiate the main QTE.
Phase 2
While controlling Sage Mode Jiraiya, you’ll need to take out all 3 Pains at the same time or they’ll keep coming back with replenished health. Your best approach is to get all of their health bars as low as possible than use the two toads to stun the 3. Once they’re knocked out, you’ll need to use one final prompt to initiate the final QTE.

You’ve acquired S Rank in “Earth Shatter”.
Phase 1
Pain is the only boss that you’ll have to keep an eye out for, as he will actually fight and counter your attacks. Nevertheless, it’s still relatively simple. Wear him down to initiate the first QTE.
Phase 2
Pain will summon a barrier surrounded by debris. You need to break through it with Nine Tails’ long range shots, which will stun him allowing you to get in a few powerful, close range hits. When he recovers, Pain will levitate himself on a platform above the playable area and hurl boulders at you. Like before, you need to dodge these whilst chipping away his HP with your long range shots from the distance. Once Pain’s HP is low enough, he’ll propel nearby debris into the sky, leaving it to fall your way like a meteor. The meteors’ landing locations are clearly telegraphed with large shadows and red heat markers on the ground. Simply run in circles till they appear and run towards the opposite direction. Once the meteor shower has stopped, shoot Pain a couple more times to knock him off his platform and melee him to initiate the second QTE.
Phase 3
You’ll start of with Sage Naruto (without his cloak) against an awakened Pain. Same thing applies to him as with the Phase 1 fight; watch for his attacks and don’t get caught in his combos. As you’re about to chip his second to last health bar, Pain will be stunned, allowing you to initiate a penultimate QTE. After which, your character will be swapped again to normal Naruto. Once you take out his remaining health, the final QTE will trigger, and with that, you’ve completed all of Storm 2’s boss battles.
Achievement count (both parts): 10 out of 50
Fragment (Killer Bee Arc)

You’ve cleared Fragment.
In order to get this mission, you first need to complete:
- Story Mode
- Find all of Tonton’s pearls (for more information, see Tonton’s Pearls elsewhere in this guide)
- Complete the “Cursed Dolls” request (for more information, see Cursed Dolls elsewhere in this guide)
Sometime after you’ve met all the requirements, a messenger bird will give you a “Routine Update Letter“. Go and see Tsunade in her office. Once their discussion concludes, you’ll be awarded with a short cut-scene before switching over to Taka Sasuke to face Killer Bee. The first fight will be against Bee in his regular form and the second in his awakened state. Both of these battles should be easy; for the second one, if you’re having trouble, merely keep your distance and spam your jutsu. Alternatively, you can stack up on bentos if you need an additional boost. The achievement will unlock after the player character swaps back to Naruto.
Achievement count: 1 out of 50
Unlockable Characters Part 1
All characters, excluding Hokage Naruto (an alternative costume for Sage Mode Naruto) and a few support types, require a certain amount of Storm Points (SP) before they can be unlocked, although some characters will also be awarded to you by beating story mode. These points cap at 999,999 SP and are only awarded to you by winning battles. The amount you earn is determined by your performance; the higher your rank is at the end of a round, the more points you get. They are not an in-game currency and cannot be exchanged for anything else. Additional unlocks for obtaining maximum amount of points include titles, ninja info cards and support types for your characters. The support types that cannot be unlocked with SP are unlocked through Friendship Events in Ultimate Adventure mode (For more information, see All Friends Here! achievement).
This is something you wanna leave for the end and focus on finishing everything else first, as you will acquire a lot of SP and Ryo (in-game currency) simply by doing main missions and side quests. If you’ve beaten everything and you still don’t have enough SP or Ryo, simply go to Vs. mode without any supports and do the following:
- Lower enemy A.I. to the easiest difficulty.
- Max out the handicap in your favor (A.I. will take more damage this way).
- Pick a character with a lock-on Ultimate ability, a random opponent and start the match.
- Use your Ultimate twice in a row and you should finish your match within a few seconds. This will guarantee you a quick and easy S-rank and you will be awarded a decent amount of Ryo and SP. Merely repeat this process until you’ve acquired your desired sum.
List in order of required Storm Points:
Unlockable Characters Part 2
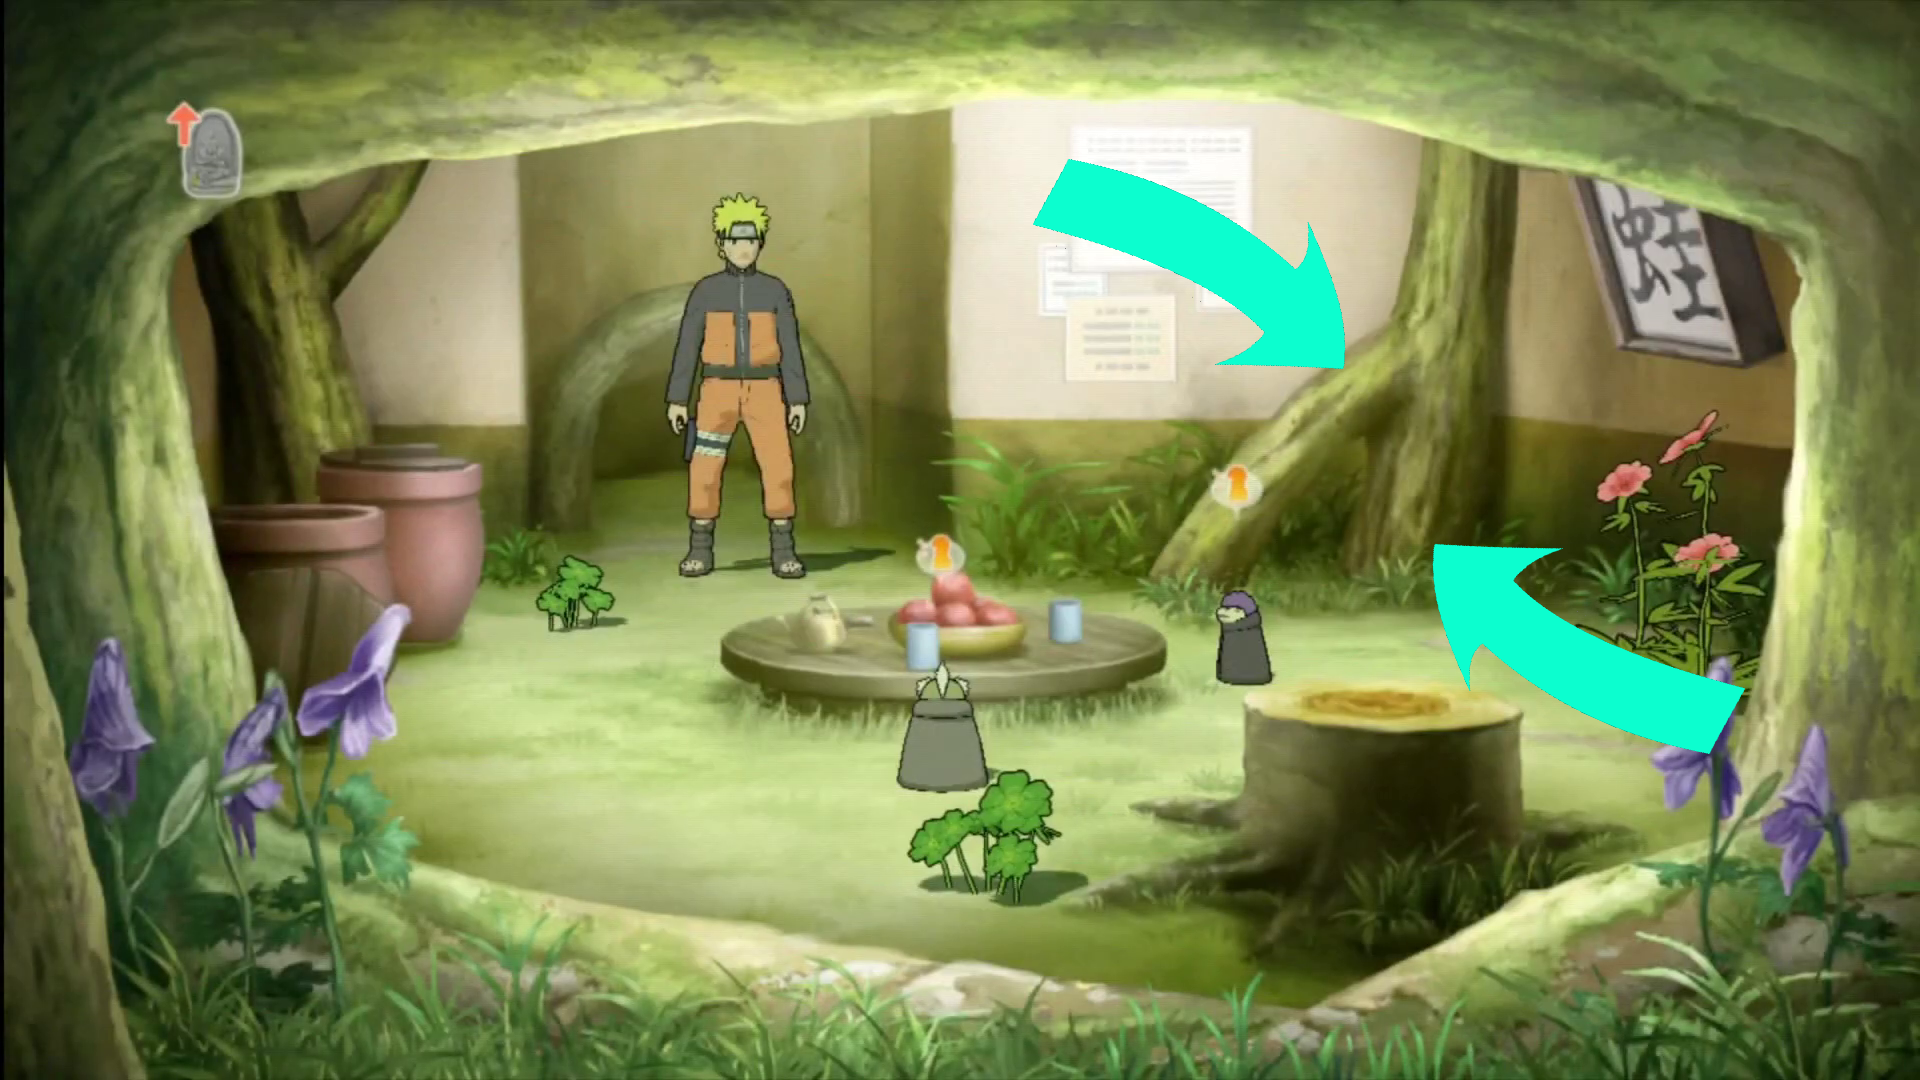
Hokage Naruto is an alternative costume for Sage Mode Naruto and is the only one that cannot be obtained with SP. To unlock him, you first need to finish the main story mode. When done, talk to a toad in front of Hokage’s (Tsunade’s) Residence and he’ll teleport you to Mount Myōboku. Once there, go over to Shima and ♥♥♥♥♥♥♥♥’s house and on the right side of the room, you should see a statue. Walk up and pray to it and Hokage Naruto will be unlocked.
I’ve already acquired Hokage Naruto, so the statue doesn’t show up anymore on my end and I couldn’t find a photo of it anywhere online. This is just a crude visual indicating where the interactive object’s suppose to be.
Note: You do need to save your game before existing story mode or else you’ll have to go back and redo the aforementioned steps.

You can now use members of Naruto’s generation.

You can now use Kakashi, Yamato, Guy and Asuma.

You can now use Gaara, Kankuro, Temari and Chiyo.

You can now use Jiraiya, Tsunade and Orochimaru.

You can now use all members of the Akatsuki.

You can now use Sasuke, Suigetsu, Karin and Jugo.

You can now use Lars.

You can now use all characters.
Achievement count (both parts): 8 out of 50
Collecting Scrolls
When you’ve beaten a specific part in the story, numerous scrolls will spawn in that designed area. There are 3 types of scrolls, collecting each type will acquire the following:
- A story mode cut-scene
- A battle replay, allowing you to revisit story-related fights (including Boss Battles)
- A memory scroll that serves to recap the story from Part I of the series. These fragments are stills from the original series with voice overs.
Scrolls are easily noticeable as they’re fairly large and will hover over the ground. Each story-related area you’ve cleared will have corresponding scrolls distributed around the map for you to pick up. Collecting these goes hand in hand with various side activities, especially with the Cursed Dolls quest (for more info, see the aforementioned section), as you will have to backtrack through all of these places in order to do additional side quests and hunt down cursed dolls. It’s best advised to manually explore each area first instead of using teleportation items (can be purchased at the Village’s shop) to skip to your destination and miss out on a handful of scrolls. Remember to exit and reenter some of these areas, as not all scrolls will be present at once if you’ve completed multiple story-related missions in a single location. You can look up your scrolls by interacting with an NPC at the Hokage’s Office. If you’re missing some, review the ones you already own and see which one should come before or after the missing scroll and where would that specific event have taken place (for example, if you’re missing “Gaara & Deidara 1” story scroll, remember that the fight took place at the Sand Village on top of Kazekage’s lookout, which is where you’ll find this specific item).

Collected 100% of the stories.
Once you’ve collected all 108 story scrolls, go over to the NPC at the Hokage’s Office and open up the story section. This will trigger the achievement.

You’ve seen all memories.
Once you’ve collected all 15 memories, go over to the NPC at the Hokage’s Office, open up the memory section and view each one of them. You don’t have to sit through them, so feel free to exit out right after. Once you’ve opened up all 15, the achievement will unlock.
A complete list of all story and memory scrolls can be found here.[docs.google.com]
Achievement count: 2 out of 50
Side Missions/Requests

You’ve cleared all requests.
There are a total of 26 requests and 4 missions. You’ll find most of them out of order and some of them will be completed alongside each other. Others, like the “Cursed Doll Retrieval“, will require you to meet certain conditions before you can finish the final task. You only need to finish requests to earn “Request Master“, but you will need to complete the remaining missions in order to get Conquered all events! achievement. The 4 missions are tied to the main story and cannot be missed. The following quests are listed in a numerical order:
1. Curse Doll Retrieval: See “Cursed Dolls” section for a detailed guide.
2. Konohamaru’s Worry: Konohamaru asks for 3 Gale Seeds, 3 Shape-up Herbs and 3 Ninja Pills. You can collect these simply by progressing through the story and picking up stuff from around the world. Once you’ve collected your stuff, go back and talk to him to complete the quest.
3. Find Lost Child: Go to the Card Shop and you’ll find the child in front of the store entrance.
4. Hide-and-seek Match: Go to the left side of the Leaf Village Cafeteria and you’ll find Konohamaru with his back turned to you. Interacting with him will complete the quest.
5. Hide-and-seek Revenge: Konohamaru will have you look for Sai, Shino and himself. Sai is in the open next to the BBQ place, Shino will be near the entrance to the Hidden Leaf Village and Konohamaru is across the Ninja Tool Shop, slightly obscured.
6. Repay Debt 1: Go left of the flower shop and talk to a man and pay 5,000 Ryo to bail him out of his debt.
7. Repay Debt 2: Same thing, but now you have to pay 10,000 Ryo.
8. Repay Debt 3: This time, it’s 50,000 Ryo.
9. Repay Debt 4: When you return for the 4th time, he will disappear with everyone’s money. Go and find him beyond the Tenchi bridge. Once you’ve located him, you’ll return to the Hidden Leaf Village and conclude the quest.
10. Collect Ninja Tools 1: You’ll find The Ninja Tool Freak across the Ninja Tool Shop. Interact and show him 10 ninja tools in your possession.
11. Collect Ninja Tools 2: Same thing and place as before, but now you’ll have to show him 30 ninja tools.
12. Collect Ninja Tools 3: This time he asks you to show him all 48 ninja tools. This is the maximum amount you can collect in the game. For more information, look up “I Love Ninja Tools!” under “Miscellaneous Achievements” section.
13. Find Tonton’s Pearls: See “Tonton’s Pearls” section for a detailed guide.
14. Messenger Bird Hunt: See “Messenger Birds” section for a detailed guide.
15. Make-Out Code: Go in front of the Collection Store and talk to Ebisu. He’ll give you a code that you have to decipher in order to find the next one. The first location is on top of the Hokage’s roof, the second item is across Amaguriama Store and the third one is in front of the bird communication tower. Once you collect the three, go back and talk to Ebisu, then go and meet him at the training field. Once a short dialogue scene plays out, the quest will be complete.
16. The Adored One: Win the match against Sakura at the training field.
17. Training with Lee: Located in the area before the training field. Just like with Sakura, all you gotta do is win the fight against him.
18. Spectacle Match 1: Go in front of the Collection Shop and talk to a man hosting a tournament. Win a fight against your opponent and collect your reward.
19. Spectacle Match 2: Same as before, but this time the tournament takes place in the Sand Village. Defeat your opponent and collect your reward.
20. Spectacle Match 3: Go back to the Hidden Leaf Village and face off against Tsunade in the same tournament.
21. Hunt for Favorite Pen: You will get this request on your way to the training field. Tsunade will ask you to find her favorite pen, but Naruto will break it by accident. Pick an option to not tell her about the broken pen and head over to the ninja tool shop to have it fixed. The shop owner will ask you to get a “Well-made Pen Nib“, found across the Hidden Leaf Cafeteria, and a “Well-made Pen-Shaft“, located at the top of the communication tower. Go back to the shop, pay 1,000 Ryo to have it fixed and exit the shop to find Tsunade standing outside the store. Talk to her and the quest will be complete.
22. Hot-blooded Training: Defeat Might Guy at the training field.
23. Team Training: Defeat Ino and Choji at the training field.
24. Promised Flower: You’ll encounter Sakura in front of the Hidden Leaf Village, who will ask for you to go and look for a missing girl. Head towards the Uchiha Hideout and you’ll run into her. After a brief conversation, you return to the Hidden Leaf to complete the quest.
25. Karenbana: At the Hidden Sand Village, talk to a nearby merchant after Temari finishes her conversation with him. Then, head for the Northern Hideout and on your way there, you will run into Shikamaru and Choji. Defeat them, take the flower and complete the quest.
26. Ten Trials: See “The Ten Trials” section for a detailed guide.
1. Advice Session: After finishing Kakashi’s boss battle, head back to the Hokage’s office and talk to Tsunade about your next assignment. The first one will specifically ask for Naruto to go to the Hidden Leaf Forest where he will encounter a copy of himself. Once defeated, Naruto picks up a doll left behind by a copy then heads back to the village before being intercepted by a man who asks to see it before giving you a list of cursed dolls for you to retrieve for him (see “Cursed Dolls” section for more details). Go back to the Hokage’s office and talk to Tsunade to complete your mission.
2. Licensing Work: Once you complete the first mission, you’ll be given the second one to distribute licenses around the Hidden Leaf. Talk to Shizune then head over to BBQ, General Store Bandai and the Card Shop in that order to talk to each store’s manager. When you’re done, go back and talk to Shizune, standing at the entrance to the Hokage’s Office and your mission will be complete.
3. A Certain Match: Once you’ve completed “Gaara Rescue Arc”, Tsunade will give you a mission to head over to the training field and battle Kiba with Hinata and Shino as his supports. Defeat the group once and you’ll complete the mission.
4. Secret Mission: At one point in the story, Tsunade will give you a mission to head beyond the Hidden Leaf Forest. There, you will run into an elderly woman who will give you a secret code for you to get past a man that’s blocking your way. The code is: “Grains of the desert, gathered in the wind, a desert rose“. Once you get past the guard, Gaara will challenge you to a sparring match. Defeat him and the mission will be complete.
Achievement count: 1 out of 50
Tonton’s Pearls

You’ve retrieved all Tonton’s pearls.
There are a total of 30 pearls scattered across too many areas and hard to describe spots, so this one’s best explained with a proper video guide, showing you all of their exact locations. Use teleportation scrolls (you can buy them from a Village’s shop) to save yourself some time. Once you collect all of them, go and talk to Izumo at Hidden Leaf’s Entrance and he’ll take you to Hokage’s office to give you your reward. Credit for the video guide goes to GamingBrosification.
Achievement count: 1 out of 50
Cursed Dolls

You’ve retrieved all cursed dolls.
After finishing Kakashi’s boss battle, Tsunade will give you a request asking for Naruto to go to the Hidden Leaf Forest where he will encounter a copy of himself. Defeat it and then head back to the Hidden Leaf Village’s bridge where you’ll meet a Curse Jutsu Master. Once you’ve taken on his request, he’ll give you a list of 37 cursed dolls for you to retrieve. These dolls are scattered throughout the world (you can look through your “Wanted List” to find their exact location) and take the form of numerous playable characters, highlighted with an ominous red glow. Once you’ve defeated all available opponents, go back and give the dolls to the Master at the gate leading towards the Hokage’s Office and he’ll give you a minor reward for the dolls you’ve collected so far. As you collect more dolls, additional ones will be added to the list via messenger birds till all 37 are discovered. The difficulty will also start to rise over time as the enemy dolls become more aggressive, but even then, they shouldn’t be too much of a hassle. As you progress through the story, you’ll run into most of these dolls along your way, so missing them isn’t too much of a problem. You can also use teleportation scrolls (you can buy these from your Village’s tool shop) and teleport to a specific location to save yourself some time.
Once you’ve collected all 37 dolls, go back to the Jutsu Master and he’ll reveal his true colors, forcing you to fight 2 sets of opponents with 2 supports each. When you defeat the two, he’ll run away and a short dialogue scene will take place at the Hokage’s Office. After this, you’re going to have to complete Fragment (for more info, look up “Fragment” elsewhere in this guide) and collect all of Tonton’s pears (for more info, look up “Tonton’s Pearls” elsewhere in this guide). When you complete the two, Tsunade will summon you to her office and task you to take out the Jutsu Master at Orochimaru’s old hideout. Assemble your team, gather your items and head for the hideout.
Once there, you’re gonna have to fight through Sai, Killer Bee, Deidara, Jiraiya and finally Sage Mode Naruto (although this one’s in black and white). Sage Naruto’s attacks will inflict poison damage and your chakra will drain by itself over time. Once you’ve defeated the final curse doll, the mission will conclude and you will be transported back to Hokage’s office to collect your reward, thus unlocking your achievement.
Achievement count: 1 out of 50
The Ten Trials

You’ve cleared the 10 trials.
Once you’ve completed the Cursed Dolls quest (for more info, look up the aforementioned section), you can find an old man in front of the gates that lead to the Hokage’s Mansion (where the Cursed Dolls man used to be) and he’ll give you a task to fight off Orochimaru with Kabuto as a support. Once you’ve beaten them, you’ll be taken to Tsunade’s office where she explains that Grandpa Gen wants you to take on the 10 trials on top of the Hokage’s rooftop. These 10 trials consist of you fighting an opponent with two supports each time. All of them are much more aggressive compared to your average A.I. opponents, as they frequently utilize substitution and support which powers their support gauge faster and have additional boosts that give them faster chakra recovery, attack and defense power ups, attacks that poison you and easier guard break. In rare instances, you’ll be fighting them whilst your chakra is continuously being depleted (you can still charge it back, but you need to be more careful with your management this time around). The 10th and final battle will have you facing off against Jiraiya while he continuously regenerates his health, so you’re gonna have to take him out quickly.
Each battle lasts only a single round and it gives you time to prepare for the next one by healing up, assembling your team in the Hokage’s Office and buying additional items, such as attack/defense power-ups and bentos, that you can use before the battle to boost your stats. All of these can be purchased from various shops around the Village. You’re not required to use any of these items to win (most of these are simply quality of life upgrades) and can take out your opponents by bursting them down as quickly as possible or by keeping your distance and spamming long range jutsus and ultimate jutsus (such as Sai’s abilities). It’s usually best to pick the characters you’re most familiar and comfortable with.
Once you’ve beaten the final trial, a short dialogue scene will play out before receiving your achievement.
Achievement count: 1 out of 50
Messenger Birds

You’ve collected all messenger birds.
This achievement can be acquired after you’ve beaten Adventure Mode. The associated quest, “Messenger Bird Hunt” – Request Mission #14, will be given to you at the Message Station in the Hidden Leaf Village. To completely finish it, you must collect a total of 10 messenger birds scattered around the world. All areas they can appear in include:
- Training Field
- The Hidden Leaf Forest
- The Forest of Death
- Tenchi Bridge
- Desert of Wind
- The Forest of Quiet Movement
- The Forest of Dead Trees
- The Akatsuki Hideout (Land of Rivers)
Keep in mind that their spawn locations are randomized, so your best bet is to use a teleportation scroll (you can buy a set in a Village’s local shop) and teleport to each of these specific areas. Since there are more than 8 birds, you’re going to have to exit and reenter the area to have them reappear (this also applies for the birds you fail to catch, their spawn locations don’t change if you mess up). When you stumble into the messenger bird area, the song que will shift and you will be able to clearly see the bird in the center of the map with a speech bubble hovering above its head. To capture one, gently lean on the left thumbstick to make Naruto walk slowly behind the bird; walking up to the bird from the front will scare them off. If they get suspicious of your presence (indicated by a “?” speech bubble), simply stand still for a few seconds and they’ll lose interest. Once you get close enough, press the interactive prompt that pops up above their heads.
A gauge will then appear and you must place the cursor within the colored mark. The more birds you acquire, the smaller the colored area becomes. If you mess up, simply exit and reenter the area and the bird will respawn in the same place.
Note: This task cannot be cleared without a controller, since there’s no way for you to actually sneak up behind the birds without gently tilting the thumbstick. You can use any controller, since Steam has a compatibility option for them.
Achievement count: 1 out of 50
Ninja of Letters

You’ve cleared all correspondence events.
At one point, you’ll be given a mission to collect messenger birds (for more info, look up Messenger Birds elsewhere in this guide). Once you retrieve your first bird, you’ll be able to send scripted messages between Naruto and his comrades. You have to complete at least a single task with each individual before you can message each other. Alternatively, you can give them gifts to increase their heart meter, which maxes out at 5. Heart meters are also increased with each successful reply you give to your friends, amounting to 3 extra hearts each. If you happen to respond with a wrong message, you’re gonna have to either complete another mission with them (if available) to receive an additional heart or find them somewhere in the village and give them a specific gift; “Ninjutsu Reference Guides” for males and “Beautiful Bouquet” from Ino’s Shop for females. Their locations are static and never change throughout your run. If you’ve ever watched/read Naruto you’ll be able to successfully respond to these by yourself, as each message is in-line with those from the series. Receiving messages will take some time, so your best bet is to walk around the village for a while or do other quests while waiting on a response.
Note: You can’t have any of your friends on your team if you want to keep receiving messages from them.
When you’ve exchanged all possible messages with your friends, a merchant will start to appear near the Hidden Leaf’s main gate. Over time, he’ll sell you 4 books in total, one for each of your meetings. Each book will remind you of your past game-only encounters with Midori, Princess Kasumi, Aoi & Tsubaki and Tsukino. After reading each book, you’ll start receiving messages from the aforementioned characters. Reply with whichever response you prefer, since these ones don’t change anything. Once you’ve received the final letter and gift, the achievement will unlock.
Achievement count: 1 out of 50
Friendship Events

You’ve seen friendship events for everyone.
Continuing from Ninja of Letters (for more info, look up the previous section), you should be close to maxing out everyone’s heart meter (maxes out at 5). To acquire the missing hearts for your meter, either complete additional missions with a specific character (if they’re available) or buy gifts for them; “Ninjutsu Reference Guides” for males and “Beautiful Bouquet” from Ino’s Shop for females. Each gift counts for a single heart, so you can keep gifting them the same item till the meter maxes out. Character locations are static and never change throughout your run.
When maxed out, an individual or a group can be found somewhere in one of the two villages (Hidden Leaf and Sand) standing in front of a shop or a restaurant. Interacting with each of your friends will prompt them to ask you for a meet up which will be followed up by a short dialogue scene between all present characters. Completing these side activities will award you with various support types and additional items.
Note: You can’t have any of your friends on your team if you want to meet up with them.
Amaguriama:
Sai, Neji & Hinata
Hinata & Sakura
Tsunade
BBQ:
Rock Lee, Might Guy & Choji
Shino & Kankuro
Tsunade & Yamato
Cafeteria:
Kakashi & Yamato
Choji, Kiba & Rock Lee
Shikamaru, Kiba & Shino
Dumpling Shop:
Sakura, Ino & Tenten
Sai & Ino
Shikamaru & Temari
Sunagimo Estate (at the Hidden Sand):
Gaara, Kankuro & Temari
Might Guy & Kakashi
Neji, Gaara & Tenten
Once you’ve finished your final meetup, the achievement will unlock.
Achievement count: 1 out of 50
Titles
I’ve complied a complete list of titles here[docs.google.com] so as to avoid flooding the guide with excessive detail. There are a total of 157 titles.

You’ve gained 50 titles.

You’ve acquired all titles.
Achievement count: 2 out of 50
Ninja Info Cards
There are a total of 200 ninja info cards. You will earn all of them by completing the following tasks:
- Beating Adventure Mode
- Finishing all side quests (for more information, see Side Missions/Requests)
- Maxing out Storm Points (SP) (for more information, see Unlockable Characters Part 1 of the guide)
- Buying all boosters from Card shop (you outta leave this one for last, since you’re going to be working towards Wealth to move nations! achievement. Once you acquire that one, you’ll accumulate enough money to buy out the entire store)

Edited a Ninja Info Card.
Self explanatory. Simply open up the ninja card editor, save your changes and you’ll unlock this achievement.

You’ve acquired all Ninja Info Cards.
Achievement count: 2 out of 50
Online Achievements

You’ve won 1 time in online Ranked Match battles.

You’ve won 10 times in online Ranked Match battles.
The following applies for both online achievements. Keep in mind that both players need to run the game at the same frame rate in order to play; either 30 or 60 FPS. If the two of you are out of sync, the match will automatically shutdown. If one of you can’t achieve 60, simply have the former lower their FPS via Steam settings, since there isn’t an in-game option. Another thing I’ve seen on forums, but wasn’t able to confirm is that the game won’t let two people from different regions que up together. I don’t know how true this is, so I’m including it as a rumor. To join an online match, simply have one person make a ranked lobby and have them invite another player to it via Steam.
Seeing as how there’s no one playing this game online, you’re going to have to find another person that’s willing to help you out with this one, since there’s no way for you to achieve these two by yourself. Fortunately, Steam’s Storm 2 forums are fairly active and you can always ask people on the community hub for assistance. If you can’t find anyone in the foreseeable future, your best bet is to buy your friend a copy of the game on sale and have them help you out.
A small reminder that, if you’re already grinding online achievements, you might wanna work towards earning Titles as well, since you need to win 50 and lose 20 times in ranked to earn the remaining Titles (assuming you already collected all the other ones) and receive Which name shall I use? achievement. For more information, look up the aforementioned achievement elsewhere in this guide.
Note: Please, do not leave requests for online play on my guide. There are plenty of active Storm 2 forums on Steam’s community hub for people to help out each other.
Achievement count: 2 out of 50
Miscellaneous Achievements

You’ve picked up 500 items.
This is something that will naturally occur over time. Collecting items off the ground or finding them inside breakable objects is a good way to stock up your inventory with decent equipment. Items you don’t need can be sold later to various merchants around the world (although, keep in mind that each vendor accepts items only relevant to their business) and several side missions have you scavenging the area for quest based items. Each location will replenish its random items over time. It’s advised to do this from the very start of your playthrough.

You’ve saved up to 999999 Storm Points.

Saved up to 999999 Ryo.
The following applies for both Storm Points (SP) and Ryo achievements. As you progress through the story and various side missions, you’ll accumulate large quantities of SP and ryo. Similarly to character unlocks, you should leave this one for the very end of your run as you’ll probably get it by simply 100% the main story. While SP cannot be traded for in-game currency, ryo can be used to buy various items. Avoid excessively spending your money until you’ve reached the required amount, as you won’t be needing too many items and you’ll be able to find useful ones along the way or will be awarded some at the end of your missions. You should also save up ryo for other achievement-related collectibles for the end of your playthrough. If you’re still lacking money, refer to the SP/Ryo farm guide under “Unlockable Characters Part 1” section.

You’ve collected all collection items.
This is best done at the very end when you’ve finished the main story (so that all of the items are available for purchase), the fragment (Killer Bee arc), unlocked all characters and saved up enough money to earn “Wealth to move nations!” achievement first. After which, go to the General Store and buy all Ultimate Jutsu videos, the Boss Battle Scenes and the game’s Music. If the achievement doesn’t pop up after you’ve purchased everything, simply toggle through the menu or try saving and reentering the game.

You’ve acquired all battle items.
There are a total of 48 different battle items in the game. You need to pick up as many items as possible throughout the campaign, complete the story mode and finish all of your requests and side activities. The most commonly missed materials are:
- Bell Flower
- New Moon Flower
- Sparking Rikorisu
- Leaf from the tree of life
- Viper Fang
The first four are obtained from completing Ninja of Letters side activity (see the aforementioned section for more info). The final one, Viper Fang, is a bonus condition for the Sasuke vs Killer Bee (Transformed) fight from the Fragment Chapter. You will have to go to the Hokage’s Office and talk to the NPC there in order to replay this fight. If you’re missing the replay, you will have to find its replay scroll (for more info, see “Collecting Scrolls” section).
Once you’ve given all the materials to the ninja tool shop owner and created every single battle item, you will have to purchase one of each. Before buying out the shop, make sure you save up enough money for the “Wealth to move nations!” achievement.
Note: This is the only missable achievement in the entire game. Do NOT sell your quest-related items and ninja tool ingredients before you’ve earned this achievement since some of these items are unique and have no replacements. If you’ve lost a crucial item needed to complete this quest, then you’ll have to start over or get another save file.

You’ve cleared all events.
For this achievement, you need to complete the following tasks:
- Story Mode
- Fragment/Killer Bee Arc (See Fragment for more info)
- All Requests & Side Missions (See Side Missions/Requests for more info)
- Responded to all letters/messages (See Ninja of Letters for more info)
- All Friendship events (See Friendship Events for more info)

Your total play time is over 30 hours.
The actual timer only measures your time spent in the main story mode. You will probably 100% the entire adventure mode before you even hit 20 hours. Your only solution is to leave the game running in the background for a few more hours to grind out the achievement.

You’ve acquired all trophies.
This one will unlock automatically when you’ve earned all other 49 achievements.
Achievement count: 8 out of 50
Conclusion
Hope this helped you out. Feel free to correct me if I’ve made a mistake or left something out.