Overview
(Update: Now includes a section on finding un/loader machines at each station) This guide is intended to help new players plan their routes and even experienced players who are taking a haul down an unfamiliar line. It includes suggested speeds, the default directions of switches and wyes, and where you can find specific locomotive spawns. Comments/critiques/suggestions and anything I might have missed are by all means welcome. Accurate as of build #64.
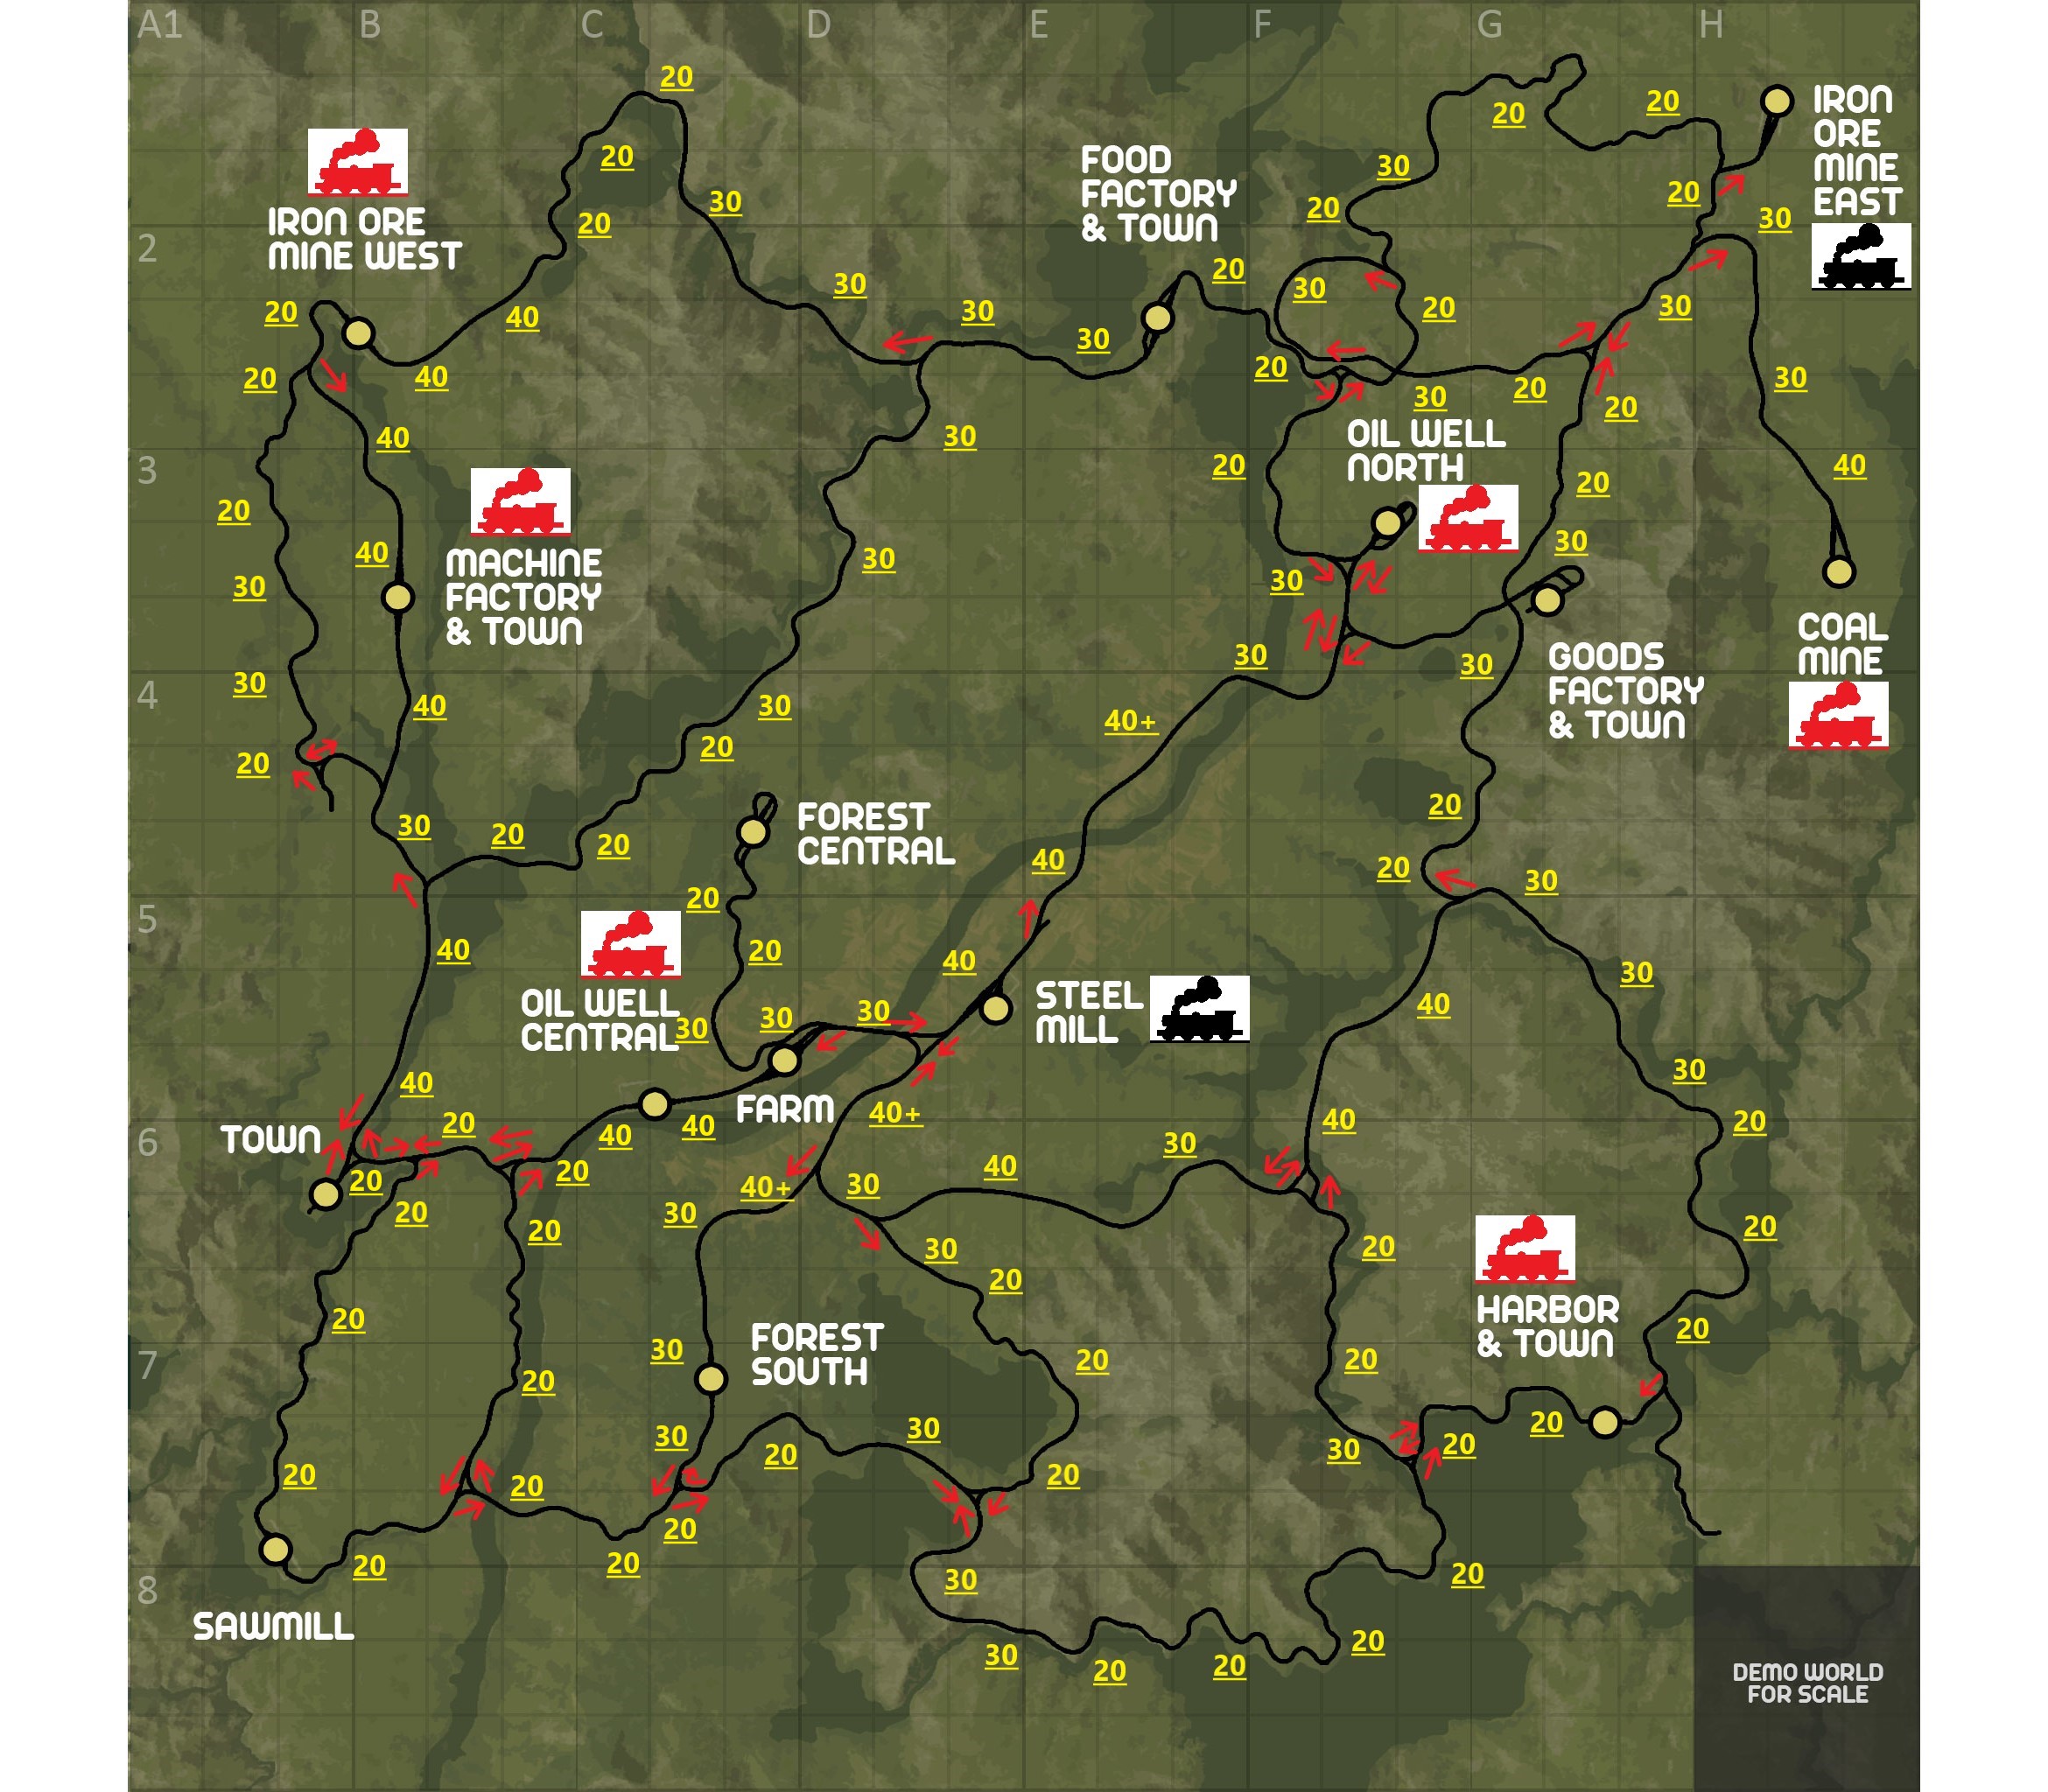
Speed Limits
Thankfully, in their development roadmap, the devs have outlined that they intend to add speed limit and gradient signs along the line. In the meantime, I have taken the time to travel each route in the game and put together what I believe to be good starting speed limit suggestions for new players or players who may be unfamiliar with a particular route (labeled in yellow numbers on the included map). As I’ve said these speed limits are merely suggestions. There are doubtless many sections of track that I’ve labeled where a player could easily travel much faster depending on their skill behind the brake/throttle or the load that he or she may be pulling. However, if you’re pulling a high paying load that you absolutely want to make sure does not derail, and you’re not particularly familiar with the track you’re traveling on, I believe the speed limits I’ve included are good guidelines to aim for until you get a better feel for the route. Also keep in mind if you’re carrying particularly heavy loads or cars that are a bit prone to derail (such as empty flatbeds) it may be necessary in some places to go even slower than the suggested speed limit. Gradients are, unfortunately, beyond the scope of this guide.
Note on stations, switches and wyes: The mainline track through most stations usually quite straight and the track through the station itself can be taken at high speed, however, you should pay close attention to whether the tracks entering/exiting a station make a sharp turn and adjust speed accordingly. You should plan on going through almost all switches and wyes down the main line at 20km/h regardless of the “speed zone” it may be in. Most of them have pretty sharp turns regardless of the direction you’re taking, even if they look straight on the map. There are two main exceptions: The wye directly south of Steel Mill can be taken at high speed if it is set towards Harbor instead of Farm. The first switch south of that same wye can also be taken at high speed if it is set straight towards Forest South instead of Harbor.

Default Switch Directions
On the map with red arrows, I have labeled all wyes and switches down the main line with what direction they are set to by default whenever you spawn into the game. This can help you plan ahead and know what switches you will have to change and what switches you can just cruise through and not have to worry about.
Stations: All stations (except for stations with loop tracks) are automatically set for you to travel straight through them on the main line. You will only ever need to change switches at these stations if you have cars to pick up or drop off at that particular station.
Stations with loop tracks: There are five stations in the game (Forest Central, Goods Factory, Oil Well North, Iron Ore Mine East, and Coal Mine) that are located at the end of a line and so, have a loop track for turning a train around. The default switch setting for those stations is as follows:
Forest Central-You are set to go around the loop to the right when you enter the station.
Goods Factory-You are set to go around the outside of the loop to the left, however, on the other side of the loop, you are set to go left and into the station on the center track instead of coming back around the loop.
Oil Well North-Here you are set to go straight into the station instead of around the loop.
Iron Ore Mine East-You are set to go around the loop to the right when you enter the station.
Coal Mine-You are set to go around the loop to the right when you enter the station.
Motive Power Spawn
Of course, right now we have the handy dandy spawn function available to us so if we need to, we can plop down whatever locomotive we need whenever and wherever we need it. However, if at some point the devs decide to remove this function or if you’re just trying to play hardcore style, it will be necessary to know what locomotives you can find in what location. The spawn points for the two types of locomotives currently in the game are explained below.
The 621 “Osica” diesel-electric shunter, is capable of spawning at every station on the map and usually does so with a few exceptions that I’ll explain in a moment.
The SH282 “Mikado” steam locomotive does not spawn at as many stations and there are only a couple of places where it is guaranteed to spawn, so it can be more difficult to find. On the map, the black locomotive icons indicate stations where the Mikado will spawn every time you start the game without exception. You will always be able to find a steamer there. The red locomotive icons indicate a station where the Mikado will frequently spawn, however, it usually will not immediately spawn there if you spawn into the game or respawn near that station. You typically have to travel to that station from another location in order to be able to find one there.
Exceptions with the shunter spawn: There are a few stations (such as Oil Well Central and Coal Mine) that only have one locomotive spawn point, but can spawn both types of motive power. If you spawn or respawn near those stations, you will usually find the Osica there, however, if you find that the Mikado has spawned there instead, you will not be able to find the Osica at that location.
Note on the save file: With the updated save file from build #64 the game saves the positions of all locomotives and other rolling stock within the players vicinity. Because of this, regardless of what station you are in, whatever locomotives were nearby you when you quit the game will spawn in the same position when you start the game again. You can use this to your advantage to help ensure that whatever locomotive you need is where you need it when you start your next session. Let’s take Coal Mine for example. If you happen to be near coal mine and you click “Respawn to Nearest Station” you will likely find the shunter there instead of the steamer. However, if you teleport over to Coal mine from somewhere else and find the steamer, you can quit the game in Coal Mine and when you come back later, you’ll find the steam locomotive in the same place.
Un/Loader Locations
I’ve noticed that at least a few people are having a little trouble finding the un/loader machines and sometimes they can be a bit inconspicuous so I decided to add a section to help you find the un/loader at each station (obviously the time you have to spend running around trying to find the unloader is time ticking away at getting that bonus money)
-City South West: on track S02 in front of the station office.
-Coal Mine: on track L04 (labeled L07 on the schematic) near the coal hoppers.
-Farm: between tracks L01 and L02 in front of the big concrete silos.
-Food Factory: on track L10 in front of one of the ware houses.
-Forest Central: in front of the building on the south end of track L05.
-Forest South: on track L01 in front of the only buildling next to the track.
-Goods Factory: on track L04 in front of the building with the large blue doors.
-Harbor: on track S09 in front of the station office.
-Iron Ore Mine East: on track L08 under the red building.
-Iron Ore Mine West: on track P09 under the red building.
-Machine Factory: on track L13 in front of the building with large blue doors.
-Oil Well Central: on track S02 in front of the station office.
-Oil Well North: on track L06 in front of the station office.
-Sawmill: on track L08 on the NW corner of the building on the NW end of the track (near a pedestrian bridge that crosses the track overhead.
-Steel Mill: between tracks L06 and L05 in front of the red building.