
Overview
(Notice: This is a reworked version of my tutorial for Dishonored, heavily edited for Prey.) Do you feel like playing Prey again? Have you gained the endings you want to achieve and now want to play the game solely for fun beyond what its story offers? This guide offers a way for you to play Prey in a ‘New Game Plus’ way by utilising Cheat Engine, I will do my best to explain to you how you can get all your powers fully upgraded, how to give yourself a lot of materials, as well as ammunition for your weaponry, and health kits and suit repair kits. This is NOT for first-time players unless you fully intend to cheat through your playthrough, I highly advise that this guide should only be followed by people who want to play Prey again with all their powers intact as they had it when they finished Prey, OR to fully upgrade everything for the sole purpose of having fun.UPDATE: 11/06/18: Since Bethesda’s E3 2018 conference, they have added an official New Game Plus!
Introduction.

This article may contain spoilers for the story of Prey.
As mentioned in the brief, this guide is a reworked version of the same guide I wrote for Dishonored, it is also for people who want to restart the campaign with all the skills they had when finishing Prey previously. But of course, it’s also for people who have played Prey before and just want to upgrade all their powers to the max, get a lot of materials, ammunition and health/suit repair kits. I personally wouldn’t recommend this for those who have not completed Prey yet, as I feel you would not appreciate the game as much playing it in the way this guide suggests. If you have not played or completed Prey, I strongly recommend you do so before following this guide, the game is amazing and deserves to be played the way it is designed to be played. I can’t stop you if you haven’t, of course. That is just my advice. You won’t be able to have these values changed at the start of the game, some progression will be required before such values can be modified.
I’m sure some people have already made cheat tables for Prey, this would be easier to utilise, however for those who are unfamiliar with Cheat Engine or would rather modify the values manually, this guide is for you. I will walk you through how to simply modify values inside Prey using the free software, Cheat Engine. If you have heard of, or used Cheat Engine before, you may well know what you are doing already. If not, this guide will help you as well as users who have not used it before, to do so. I recommend that you do this in WINDOWED mode, it will save you a LOT of time, alt-tabbing in and out can be time-consuming.
While this isn’t a true New Game Plus, it’s the closest we can achieve without an official system or community made mods. The guide will include modifying how many neuromods you have, how much material you have, how much ammunition you have, as well as how many medkits and suit repair kits you have. My instructions do not have to be followed strictly, you may use your own values that you’d like to use, or the values that you know you had from your previous stats in Prey before completing the game. This guide won’t help with getting you fabrication plans, unfortunately.
In the next section, I’ll talk about the basics of Cheat Engine for those of you who are unfamiliar with it.
Cheat Engine.
First off, you must launch Prey and be aware that some progression is needed before any changes can be made. Once you have retrieved four or five neuromods, you will be able to move forwards with modifying that value. You can attempt to modify the value when you have two neuromods, bear in mind that this will take more time for Cheat Engine to identify the value you are looking for. Once this is done, switch out of Prey with alt+tab, this is fine in fullscreen and windowed mode. (It saves time to work in Windowed mode while you are doing this.) Go into Cheat Engine and this is how the layout will appear with version 6.4. The latest version is 6.6. (Not sure why I have an outdated version!)

For new users, you will see an icon at the top left-hand corner of the software that looks like a computer with a magnifying glass, this has a square that glows around it that changes from green to red. Press this button and a window will pop up.
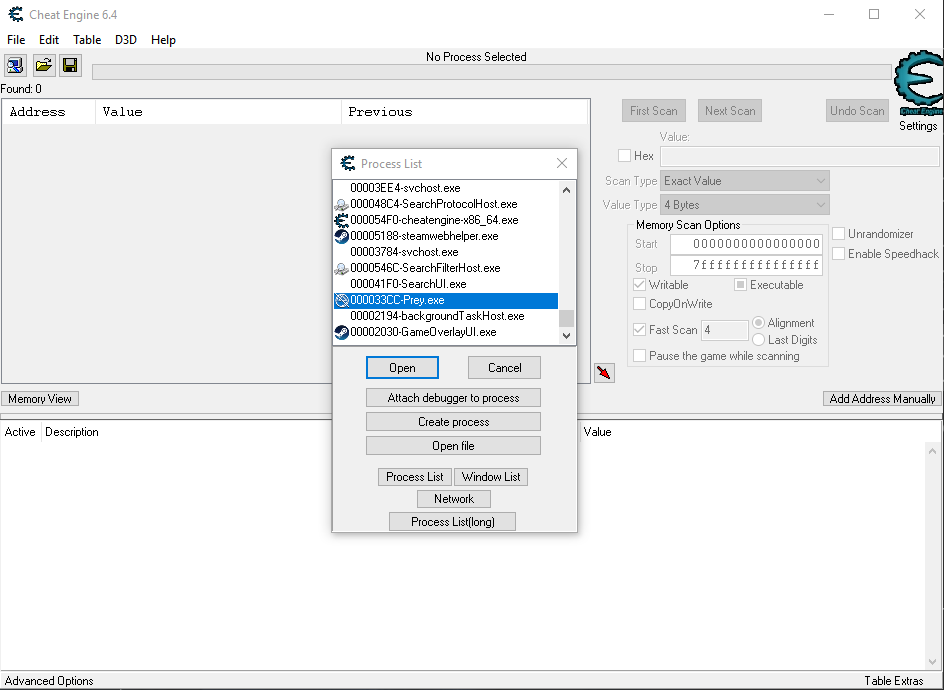
This window will have a list of all your processes, the applications that are running on your computer. In this list, Prey will be there as ‘Prey.exe’ You may either double click on ‘Prey.exe’ or single click on it then click ‘Open’. You have now linked Cheat Engine with the Prey process.
Let’s move onto the next section, where I’ll discuss adjusting the number of materials you have.
Recycling is the future.
Since you need at least 3 or 4 Neuromods before you can adjust how many Neuromods you want, you may prefer to modify how much materials you have first, this is probably the most difficult value to adjust, especially since you have multiple types of materials; organic, mineral, synthetic, and exotic. This can be done from the first time you get access to a recycler in the game, this’ll most likely be the one in your office. So once you’ve woken up in your bedroom for the second time, collect everything that you can.
While you can adjust the number of materials you have, you’ll need to have enough material first. You’ll want to find multiples of the same item, these should be items that will result in procuring the materials listed above. Since the values of the actual materials aren’t absolute values, I am unsure of how to edit the value of the materials themselves, therefore what we’ll be doing is editing the value of a number of items you have. For example, if we find four banana peels, we’ll edit it into 500 or more, this will then result in the recycler giving you a bulk of organic materials. The same process will be done for items that will give you the other materials.
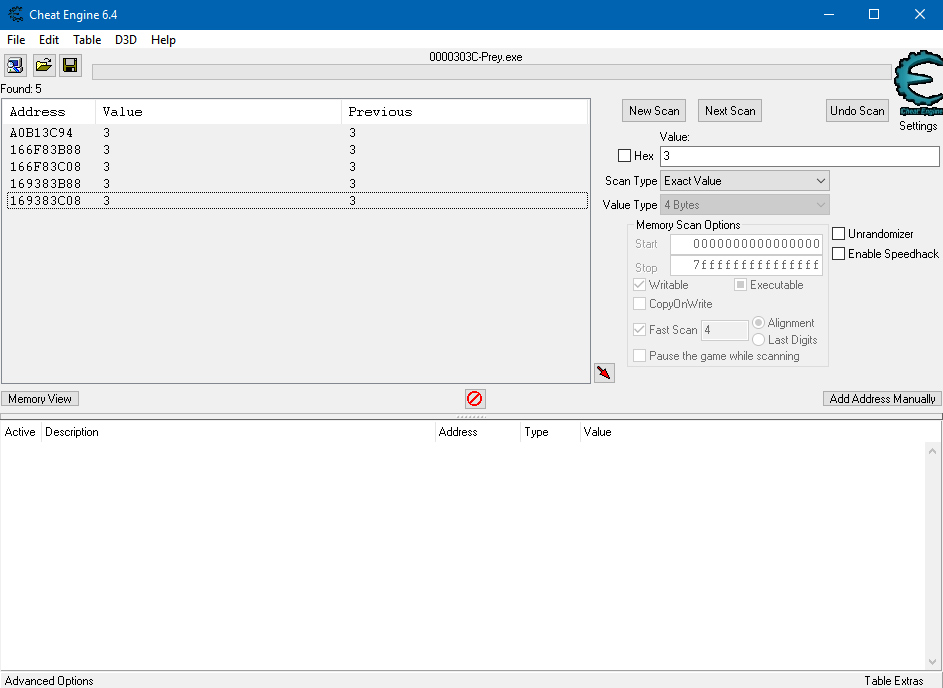
Once you’ve exited the simulation room, go to the Simulation Debriefing room. Climb on top of the device to your left (To the right of the whiteboard) and get your first Medkit and the Disruptor Stun Gun from the briefcase.

You can also unlock the Debriefing Room Safe with the code: 5150. You’ll find 3 Psi Hypos in there, as well as the fabrication plan for it. You’ll also get 600 of the Exotic Material. Your inventory will list this at 6.00 and not 600.

Go into Cheat Engine and click “New Scan” – type in 600 and click “First Scan”.

Go into your inventory and split the Exotic Material in half, and place the newly created half elsewhere in your inventory.

Now type in 300 and click “Next Scan”, you should only see one result.

If not, merge the Exotic Material together and search 600 again and repeat until you have one result remaining. Double click the result, and it will go into the table at the bottom. Click that, and press enter. You can now adjust the value to whatever you like. To save space in your inventory, you can set this to a maximum of 10,000,00 per inventory slot. You can set it to whatever value you like, but if it’s higher than 10,000,00, it may automatically be split at some point, taking up more space in your inventory than you may like it to.

Now we have enough Exotic Material to last us for the rest of the game. The next thing we need to do is get some of the other materials and repeat the same process. Otherwise, there is another method, and it involves duplicating items in our inventory using the same method above so that we can recycle an insane amount and get a giant number of materials back.
While we’re working our way towards the first Recycler in our office, find as much scrap and items as you can, you can never have too much!
You can read the next sections and return to this one when you have reached the first Recycler.

Now that we’re at our office, we’ll find a bunch of scrap next to our Recycler and Fabricator. There’ll also be materials there, which you should take. You can find the values for any of the scrap using the methods described above, and then adjust them to whatever you like and place them in the Recycler to give you a lot of materials. For example, I’ll take my Used Plastic Tubing and search how many of those I have (Which is 7).

I’ll then halve it, and search 4.

Now the value has come up, and I’ll make it 30,000 for example. (This will yield us 9,900,00 Synthetic Material) Because this number is above the maximum amount designed for this item, pressing and holding F/X to transfer junk will reset the item to its default maximum amount, so be sure to put the item in manually yourself!

I can place it into the Recycler and get a bunch of materials. Now I have just as much Synthetic Material as I do Exotic Material. This only leaves us with the Mineral and Organic Materials.

As mentioned before, repeat the same process again (Leave out the decimal point when searching the material values. I am unsure if you need to have more than 1.00 of the material, I haven’t scanned for anything less than 1.00, it’s possible a material value of less than one may not scan properly.) So in my case, I’ll need to search 548 for the Mineral Material, split it and search again, then adjust the value. Then I’ll search 205 for my Organic Material, rinse and repeat.

On the next section, we’ll talk about modifying the amount of Medkits, Suit Repair Kits, Spare Parts, Psi Hypos and Ammunition you have in your inventory!
Ammunition, Spare Parts, Kits. Lots of them.
The method for editing your ammunition, spare parts, medkits, suit repair kits and weapon upgrade kits is almost the same as editing the values for your materials, so follow the same steps as seen in the previous section to get an idea of how you can change the values of your ammunition and your medkits/suit repair kits. If you’ve come across any medkits or suit repair kits, try to save them and not use them! The more, the better.
Inside Transtar’s Testing Facility Reception, you’ll find your second Medkit. You can now press “New Scan” – Enter 2 into the value table and hit “First Scan.” – Continue playing the game until you find your third Medkit.

Once you’ve seen the Mimics multiply for the first time, you’ll see your third Medkit. There will also be the first Suit Repair Kit in a locker behind you.

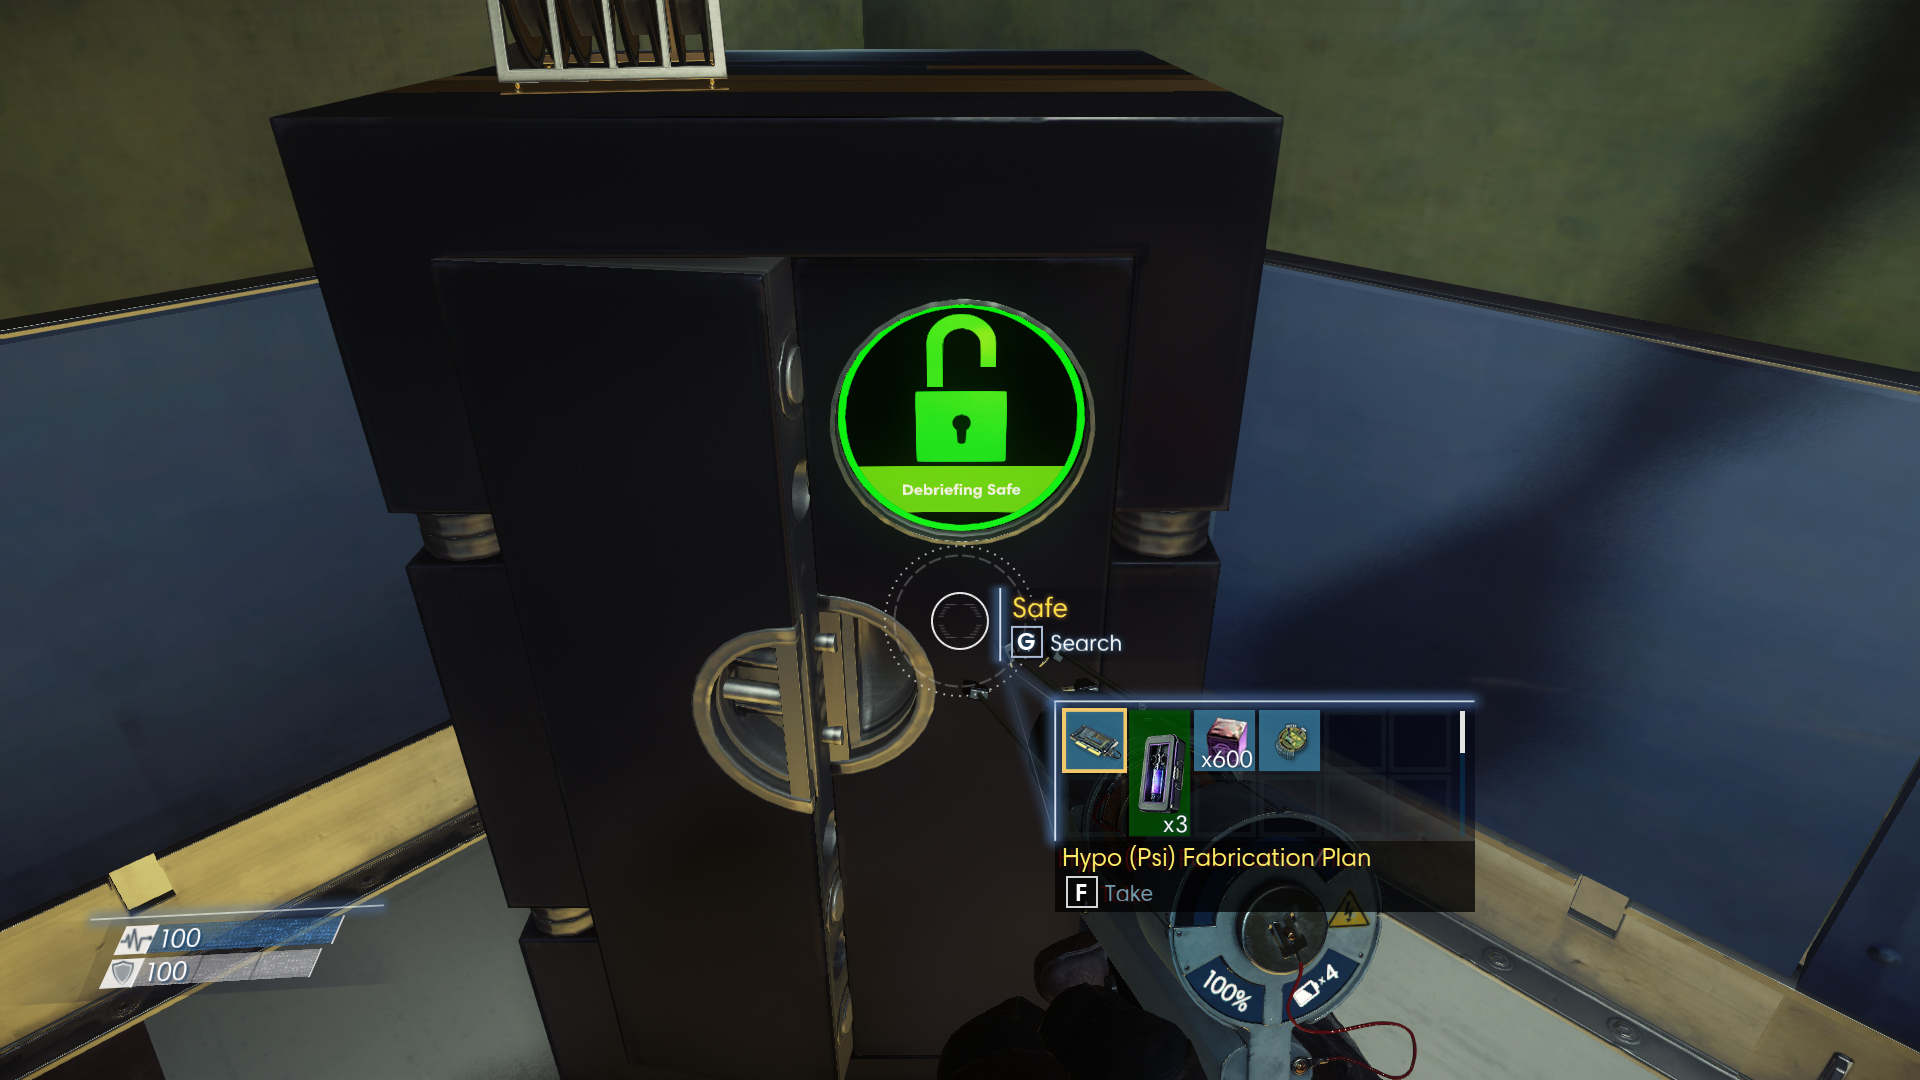
Now you can return to Cheat Engine, and enter 3 into the value table and hit “Next Scan.” You may still have a bunch of results. Split your Medkits, and continue searching for its value as explained in the last section. Once you’ve narrowed it down to about 5 results, you’ll find that you have repeating values. In fact, they’ll be different numbers before literally mimicking the same value of your health kits, etc. Not a pun, by the way. Not a pun. What you’ll see is the first image with duplicate numbers.
If you check Cheat Engine quickly enough (Or have it next to your Prey window) – You’ll actually see different numbers very quickly. This’ll tell you which value needs modifying. It may also be the case that the real value’s address starts with a letter and not a number, so you know that this one is the odd one out.

You can then adjust the value you’ve found to give yourself as many Medkits, etc as you’d like! The maximum numbers for each of these items vary. You can have a maximum of 1,000 Medkits per inventory slot. (Remember, Medkits take up two inventory spaces.) As mentioned in an earlier section, if you give yourself more than the allocated number per slot, the game may separate them at any given point, most likely during a level transition, this can clutter up your inventory. I don’t know what will happen if it exceeds your inventory space, either the game will simply delete those files, drop them in front of you or even crash the game. Just a warning!
Once you have enough Suit Repair Kits, Spare Parts and Weapon Upgrade Kits, you can repeat this same process we used for adjusting the number of Medkits we have. Bear in mind that the strange mimicking may occur again in Cheat Engine, this is why I prefer to fabricate mine once I have an almost limitless amount of materials. This is just the method to get you the most amount as soon as you possibly can. If you’re a little more patient, you can wait until you get fabrication plans and then craft as much as you like! You can have up to 50 Spare Parts, 10 Suit Repair Kits and 10 Weapon Upgrade Kits per inventory slot. (Weapon Upgrade Kits take up two inventory slots.)
You can find your first Spare Parts on the second floor of the Neuromod Division by climbing to the second floor using the Gloo Gun. You can find the first Weapon Upgrade Kit in the in-built wall locker in your office.
We picked up three Psi Hypos earlier on. We can scan for those three (Remember to start a New Scan beforehand!) and split them until we find the right value. What I did was split it until it became 2, scanned for 2, then split the original one again until it became 1, scanned for 1, then merged them all back into the original one and scanned for 3 and I had the right value found. You can have a maximum of 1,000 Psi Hypos per inventory slot. (Psi Hypos take up 2 inventory slots.)
After this area, you will pick up the Gloo Gun and some Gloo Canisters. You can use the same method from the last section, split and identify the value that you need to edit in order to change how many Gloo Canisters you have.
Alt-tab out of Prey into the Cheat Engine, it will STILL be registering your previous scans of your last search(es), so you’ll need to hit “New Scan” above the value bar. Remember to do this every time you need to look for a new value entirely. Once you have done this, put in the value of your Gloo Canisters into the value table, and hit “First Scan”. I have 329, so that’s what I’ll enter.

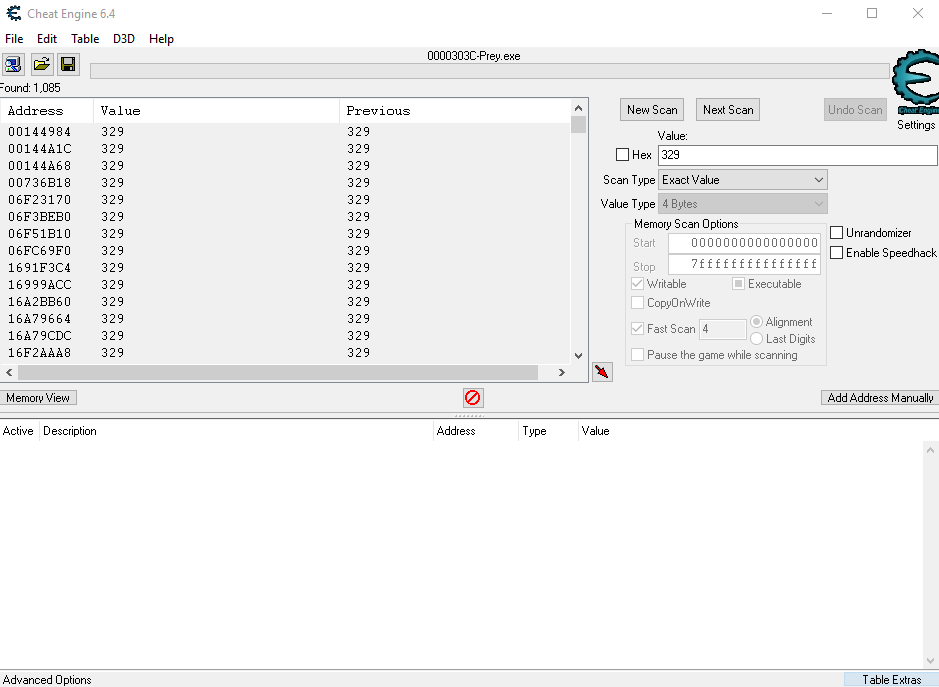
Again, go into your inventory and split the item, place the split components elsewhere in your inventory, just don’t merge it with the existing item! This means I now need to search 165. Because it’s such a specific change in numbers (Instead of a change in value by 1s or 2s) its found the exact match.

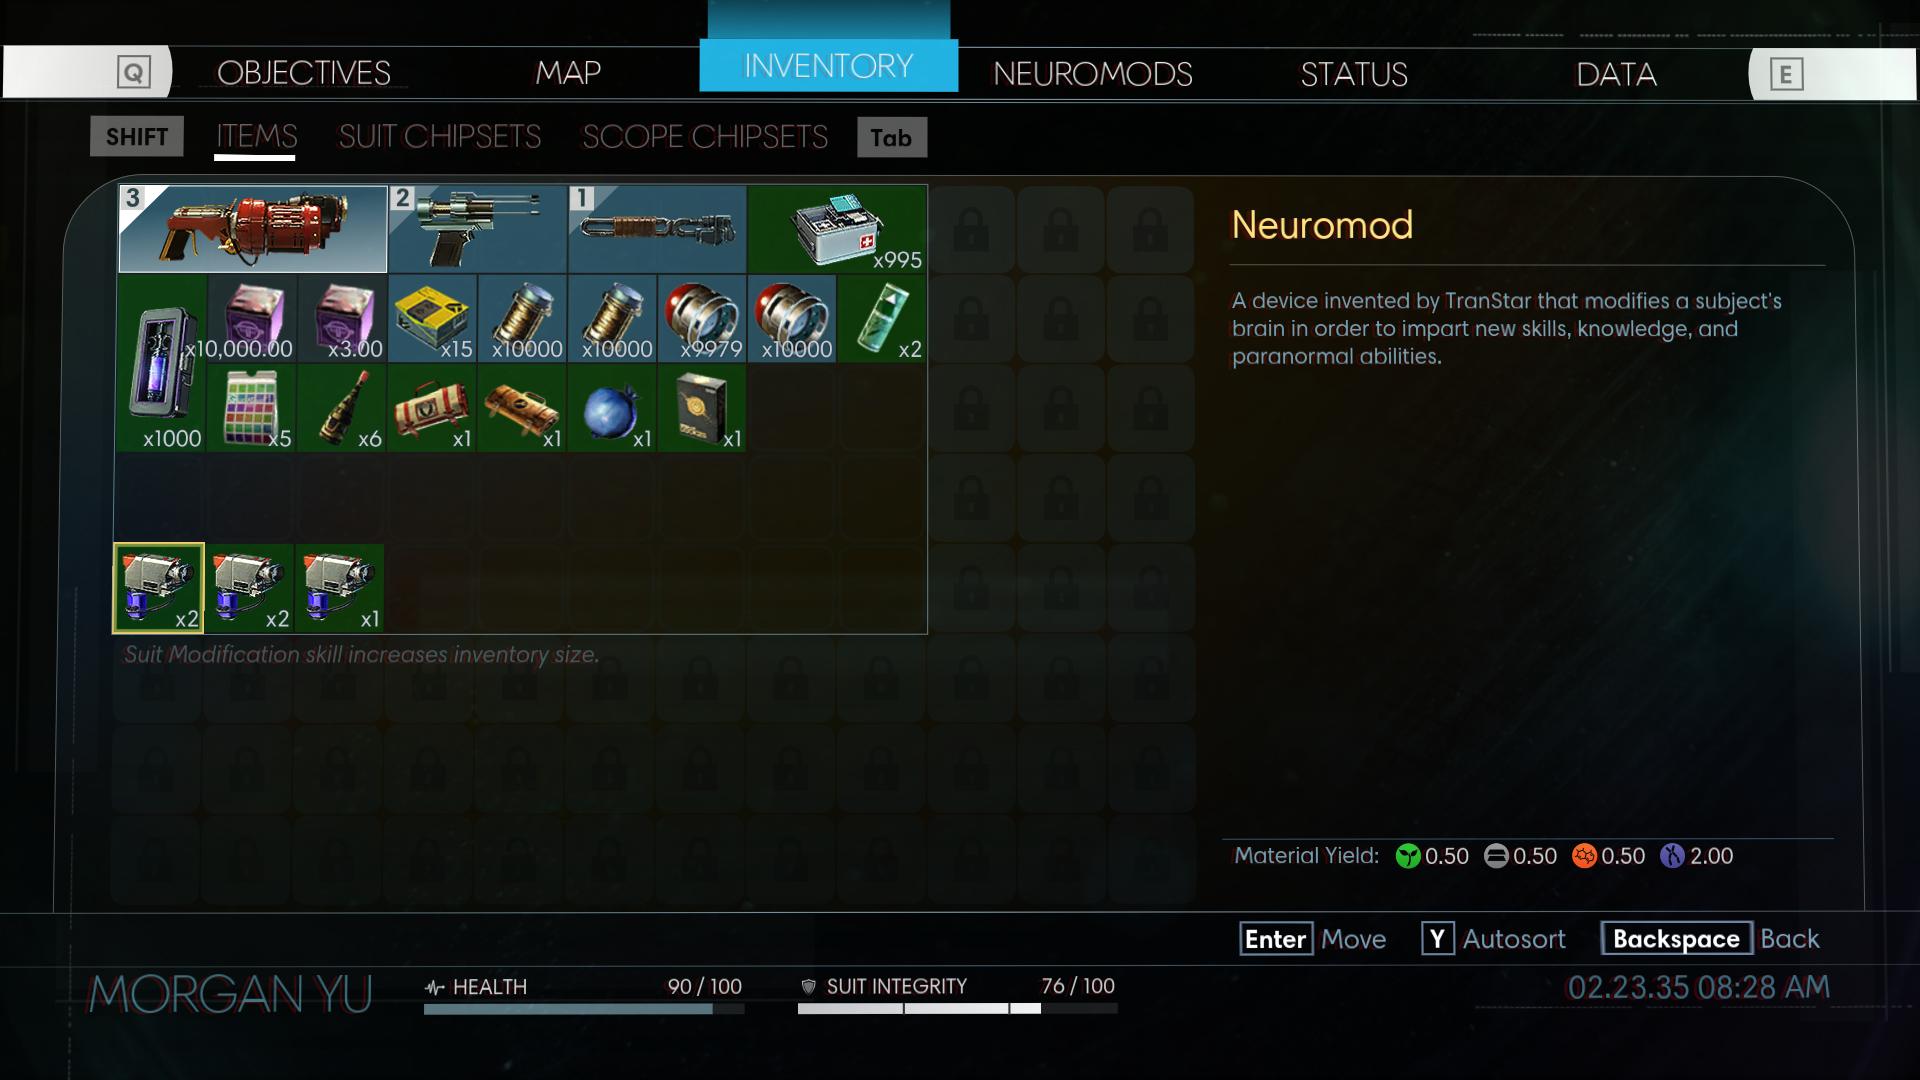
You can now adjust this to whatever value you like. You can have a maximum of 10,000 Gloo Canisters per inventory slot. We found 500 Disruptor Batteries earlier, so we can start a new scan for 500. Split the batteries and scan for 250 and the result should be there. You can have a maximum of 10,000 Disruptor Batteries per inventory slot. You can repeat this process for your other ammunition when you obtain them later on in the game.
For Shotgun ammo, you can hold a maximum of 48 Shotgun Shells per inventory space.
For Pistol ammo, you can hold a maximum of 90 Pistol Bullets per inventory space.
For Q-Beam ammo, you can hold a maximum of 10,000 Q-Beam Cells per inventory space.
For Huntress Boltcaster ammo, you can hold a maximum of 50 FlexiFoam Bolts per inventory space.
For EMPs, Typhon Lures, Recycler Charges, and Nullwave Transmitters, you can hold a maximum of 10 of each per inventory space.
On the next section, we’ll finally delve into getting as many Neuromods as we want.
Neuromods.
It’s finally time to come to the part I’ve been talking about since the beginning. It’s time to modify how many Neuromods you have. Now I’d like to remind you that this guide is here to allow players to keep the same amounts of content that they had in their completed game, but for those who want to have some fun, feel free to go as wild as you like.
You’ll find your first Neuromod in the Neuromod Division, but try not to use it! You’ll need at least 2 or 3 to really begin your search for the correct address. More would be preferable and would result in a quicker search, but we’re too impatient for that. At this point, we want to embrace our inner Typhon.

You’ll find your second Neuromod in the Transtar Exhibit room in the Lobby. Be careful, there’s a Phantom lurking nearby and we’re pretty powerless right now.


I think I might be dead.
If you wanted to, you could begin your search now by searching 2, splitting them and searching 1, merging them and searching 2, rinse and repeat, but this will take a long time since the numbers aren’t changing enough. I would encourage you to wait until you get to your office, where you’ll find a container of 3 Neuromods on your desk. This is where we’ll be able to handle the search easily.

We should now have 5 Neuromods. This may be limited to the pre-order bonus, I cannot confirm, but in your locker, there’ll be an additional 3 Neuromods. This will definitely help to narrow down the correct address even quicker. However, just in case this is limited to the pre-order bonus, I’ll stick with the 5 that I have.

Since I have 5 Neuromods, let’s search for the number 5.

When the scan has completed, let’s split the Neuromods and search for 3. (Remember, you’re still scanning the item that is in the ORIGINAL position, not the one that has been created when split, this would be an entirely different address)

Now if we still need to continue searching, let’s split it one more time, and search for 2.
We should now see the proper address in Cheat Engine. You can now modify this value to whatever you like to ensure you can get all the power-ups you desire. Not that you’ll need this many, but you can have 1,000 Neuromods per inventory space.

Now we can upgrade everything that can be upgraded at this moment in time!

Ouch.
Once you progress in the game, you’ll be able to unlock more abilities as they become available. All the upgrades together cost a total of 374 Neuromods. (Unless I made a mistake while adding everything up.)
Reminder: You won’t be able to access some upgrades until you receive the Psycoscope, as well as scanning different Typhon with the Psycoscope.

The next section will contain my concluding thoughts on this guide!
“I keep having this… dream.”
As mentioned earlier on, whenever you set a value for a specific item above the maximum programmed value, you risk the items becoming separated in your inventory. I don’t know what will happen once this exceeds your inventory space, whether it’ll simply delete the items, drop them at your feet, or crash your game.
While it would be easier just to download a Cheat Table for Cheat Engine, this guide is for those who are either unsure about Cheat Engine, want to do it manually, or at least feel like they’ve put a bit of effort into getting what they want! I enjoyed my first playthrough without any of this, and it was a tense and rewarding ride. I encourage that anybody who has yet to play this game from beginning to end to ignore this guide until you have completed the game at least once, but of course, that’s entirely up to you.
I hope that my guide was simple and easy to follow, I also hope you enjoyed finding out how to retrieve your values from your previous game or to simply have fun while playing Prey once again with maxed out powers/ammunition and such. These techniques can also be used for many other games.
Interestingly enough, the original guide I made was for Dishonored, and Dishonored 2 has a New Game Plus. Perhaps then, Prey 2 also might. (Both were developed by Arkane! Thanks to them for such an incredible game.) Thank you all very much for reading, and I hope everything in this guide was straightforward enough! Have a great time playing Prey. Please don’t hesitate to leave a comment, a question, or even a tip on how to improve my guide.