Overview
If you are new to Planet Coaster, please take a look at the following tips. This guide is intended to cover the bare basics of the game, and help get the player started with the game, as well as leading them to other useful resources, made by the community at large.
The Main Menu
You should start off by creating your Avatar which can be changed at anytime by clicking the icon in the top left corner of the games Main Menu, by your name. After that, you will be given 4 options to choose from:
Career Mode – this is just a random assortment of premade parks with various objectives, such as building rides or maintaining guests. The first 5 scenarios are very easy, and if you are new to the game they will help you understand the basics of the game.
Sandbox – this is a blank flat piece of land with unlimited money for you to build freely. Certain aspects of the management are disabled, but staff can still quit and rides can breakdown.
Challenge Mode – this starts off with limited money and requires you to research new rides and objects before you can build them. There’s 4 difficulties, Easy, Medium, Hard and Harder, which will lower your income and require more patience to build your park.
Scenario Editor – this is the same as sandbox, except with many more options to create the perfect settings, and guest behavior, and even make your own objectives. The best part is getting to share your work online for others to play!
Basic Strategy Walkthrough
Career/management Guide:
– Only build the necessities (coffee will not sell if you have lots of benches, dont hire entertainers)
– 1 drink, 1 food, and 1 toilet (and maybe 1 atm) is needed for about every 5rides so if u have 7-8 rides you probably only need 2 drinks maybe 1-2foods and 1 toilet 1 atm, or if you have 12 rides maybe do 3 drinks 2 food 2 toilets 2 atms
– you dont always need an atm if you can beat the scenario quickly, but on harder scenarios you should get the atm asap
– only build first aid if you have rides with extreme nausea and lots of vomit is in the area
– build rides in groups, I try to keep 3-4 rides with all the queue entrances close together next to each other, and rides exits leading out the opposite side of the entrance (or vice versa with exits all near each other)
– try to keep paths in simple loops around the rides so that you can have intersections with the food stalls all near each other, like say you have 3-4 rides on one side, 3-4 on the other, you could essentially get away with less shops if you place them accordingly in between
– never research shops/scenery unless you absolutely have to (use the scenery trick if you want to save money)
– you have to make paths wide so guests dont get clumped up in groups (plan for traffic jams)
– only buy 1 cheap advertisement at a time never anymore, buy a different demographic now and then (teens for a few months, then adult)
– only research a few select rides, mostly intense rides, no slow track rides, I try to stay away from too many family rides
– set parks hours to be open 12am-12am
– using infinitys guide to set prices helps achieve objectives even faster [link]
– the shop prices are not as important as I just left everything on default [link]
– maximize scenery with less money [link]– the only really challenging objectives are the coaster related ones (which can be downloaded via blueprints)
– if security is enabled, make sure to research cameras asap and place cameras every 30meters and set a few guards to stand on patrol as close to your park entrance as you can with many more walking around on their own, even with 100+guards you will still get pickpockets (its not a big deal unless your park rating goes down)
– you can disable staff management features (such as the need to rest) in the options
Challenge Mode Guide:
– if playing challenge mode on the harder/hardest difficulty, the most challenging aspect is watching the age of your rides (or Reputation) which means that any rides which are between 5-20 years old will not be able to make money as no guests will ride them (not even if they are free) but once you have a few classic rides you have essentially beaten challenge mode as you will become super rich
Workshop Downloads
Please check out my other guide which contains collection of Blueprint Downloads!
[link]
Other Tutorial Videos
Heres some more tutorials,
if these Youtube videos do not load, you have to enable script access in your browser:
Camera Controls
There are many keyboard shortcuts that make building and maneuvering around Planet Coaster a breeze. They can easily be divided into three categories: Camera Controls, Building Controls, and Path Controls.
- W, A, S, D, Arrow Keys, or Right-Click and Drag – Pan the camera.
- Q, E – Rotate the camera left or right. In Freelook Camera, pans up and down.
- Middle-Mouse-Button and Drag – Rotate the camera.
- Scroll Wheel or Page In, Page Out – Zoom in or zoom out.
- T – Switch Freelook Camera on or off.
- Shift – Accelerate Freelook Camera
Basic UI Guide
The user interface (UI) sent me running to Google faster than the controls could have. In retrospect, I’m not even sure why — Planet Coaster’s UI design is so simple a monkey could navigate it.
Problem is, as soon as you start diving into menus, you find screens filled with all sorts of customization options that you might feel like you need a manual to understand. Luckily, Frontier has been giving Planet Coaster’s UI a nice tooltip makeover the past few updates, so I expect all these spiffy-looking options to be explained more clearly soon. Be sure to hover your mouse cursor over UI elements if you’re looking for more information.
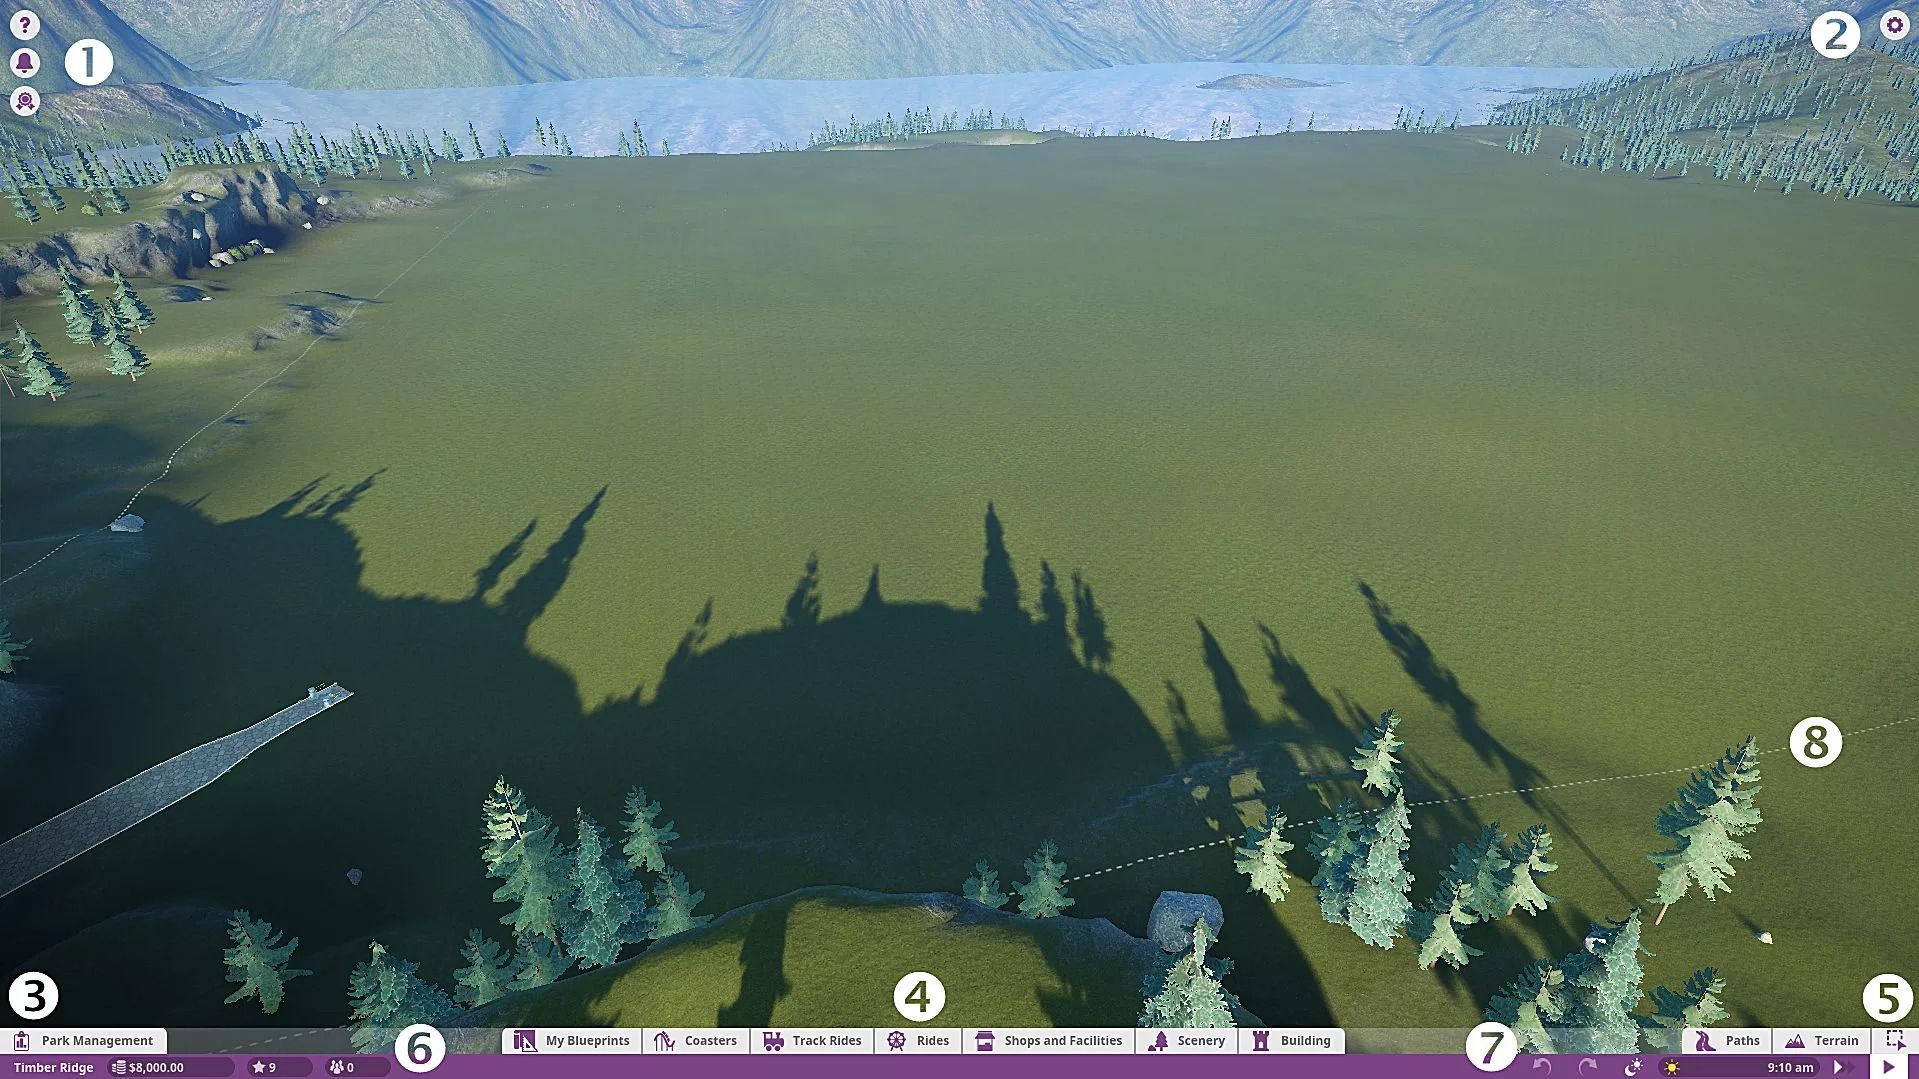
Now, let’s take a closer look at the UI you see upon loading up a park in Planet Coaster.
1. Notification Center (from top to bottom)
- Help [F1] – Displays a small selection of Planet Coaster’s basic controls.
- Notifications – Displays park notifications. Allows you to keep track of things like ride breakdowns and guest needs.
- Objectives / Challenges – Objectives are your goals in Career mode, while Challenges are simply optional achievements to work towards while you’re building a park. Challenges generate after spending a certain amount of time playing with your Challenge Mode park, while Objectives are static throughout each Career Mode scenario.
2. Options [Esc] – Pulls up the options menu where you can save or load your game, adjust in-game settings, and exit back to the main menu.
3. Park Management – Click this button to pull up the Park Management menu. Everything you need to know about managing your park is found here. You can check on your finances, research new rides and shops, set up marketing campaigns, hire new staff, check on your guests, and keep tabs on your attractions.
4. Building Toolbar (from left to right)
- My Blueprints – This is where you can find your custom blueprints — including blueprints downloaded from the Steam Workshop. If you’re a newbie, don’t worry about this.
- Coasters – This is where all the roller coaster magic starts. Once you choose and place a coaster, you may edit it however you like within its capacity.
- Track Rides – A similar concept to Coasters. You can build and place them much like any other roller coaster, but they often have key differences which make them unique. Things like monorails and and log fumes are found here.
- Rides – Every other ride under the moon is found here. They don’t have the same kind of customization as Track Rides or Coasters, but they serve the all important role of giving your park that bit of extra definition. Teacups, carousels, and other, more thrilling rides are found here.
- Shops and Facilities – Your guests will get hungry and thirsty while visiting the park. Some of them may even need to use the bathroom. Some may have forgotten their all mighty wad of cash, and some may have even scraped their knee. No matter what your guests need, you can provide for them through Shops and Facilities.
- Scenery – Having a park full of scenery is an important part of Planet Coaster. Your guests will get bored standing in long lines with nothing to look at. Hell, they’ll get bored walking through your park if there’s nothing to look at. Make it pretty for their sake. (And for the love of all things sanitary, please remember to include the trash cans and park benches found in this section.)
- Building – Think of this section as a natural extension to Scenery. It’s all about combining a series of items together into a unit called a “building”. The tools and props included in this section allow you to crank creativity up to 11 and make a park that’s truly your own.
5. Terraforming Tools (from left to right)
- Paths – You’ll find paved paths, natural paths, and ride queues here. Your guests cannot get anywhere if you don’t have paths. They’re like the perfect civilians that never step on your lawn.
- Terrain – That’s right, you can edit the terrain any time on the fly. Make mountains, valleys, lakes, rivers, islands in the sky — whatever you can imagine.
- Multi Selection – This tool lets you select multiple items for blueprinting or deletion. Unfortunately there aren’t any keyboard shortcuts for this like you’d expect on other simulation games.
6. Park Info (from left to right)
- Park Name – The name of your park. You can edit this in Park Management.
- Finances – How much money you currently have to spend. Hover over it for more information on your monthly profits.
- Park Rating – Shows the total rating of your park. Hover over it for more in-depth reviews.
- Total Number of Guests – How many guests are currently in your park. Hover over it for details on guest happiness and demographics.
7. Time Manipulation Tools (from left to right)
- Undo [Ctrl + Z] – Undo last action. You can undo a good number of actions, but there is a cap.
- Redo [Ctrl +Y] – Redo last action. Only works after undoing an action. This tool could easily be utilized to gather a before an after perspective.
- Set Lighting – A wonderful tool that lets you set the daylight lighting of your park without pausing time entirely. Entirely useful when building.
- Time – The in-game time of day. Hover over it for the date.
- Change Simulation Speed [O] – Use this to increase or decrease the speed of simulation. You may wish to pass the time quicker when you’re lacking on construction funds or waiting on new research to come in.
- Toggle Pause [P] – Pause or unpause the simulation.
8.Park Border – The edge of your park. You cannot build beyond this border.
Whew, that’s a lot of information just sitting on the main screen. Of course, that’s not everything.
Clicking on a person or object opens up the Selection Panel on the upper right side of the screen. This lets you tweak different settings on objects such as color, ticket prices for rides, salary for employees, and plenty more.
That’s it for UI elements in Planet Coaster. Like I said, it’s pretty simple. They ingeniously found a way to fit all of the information you’ll ever need in nothing more than a handful of boxes. Thank King Coaster for modernization.
Path Controls
Path and Terrain controls differ a bit from the regular building controls. Think of this as a subsection to building.
- U, J or Left-Click and Drag – Raise or lower path.
- Z – Hold and drag mouse to adjust junction angle. Tap for auto acute adjust.
- Ctrl – Disable path joins and junctions.
- Right-Click or Delete – Delete paths.
- -, + – Shorten or lengthen paths. Decreases and increases brush intensity in Terrain edit mode.
- [, ] – Decrease and increase path width. Decrease and increase brush size in Terrain edit mode.
Making Paths
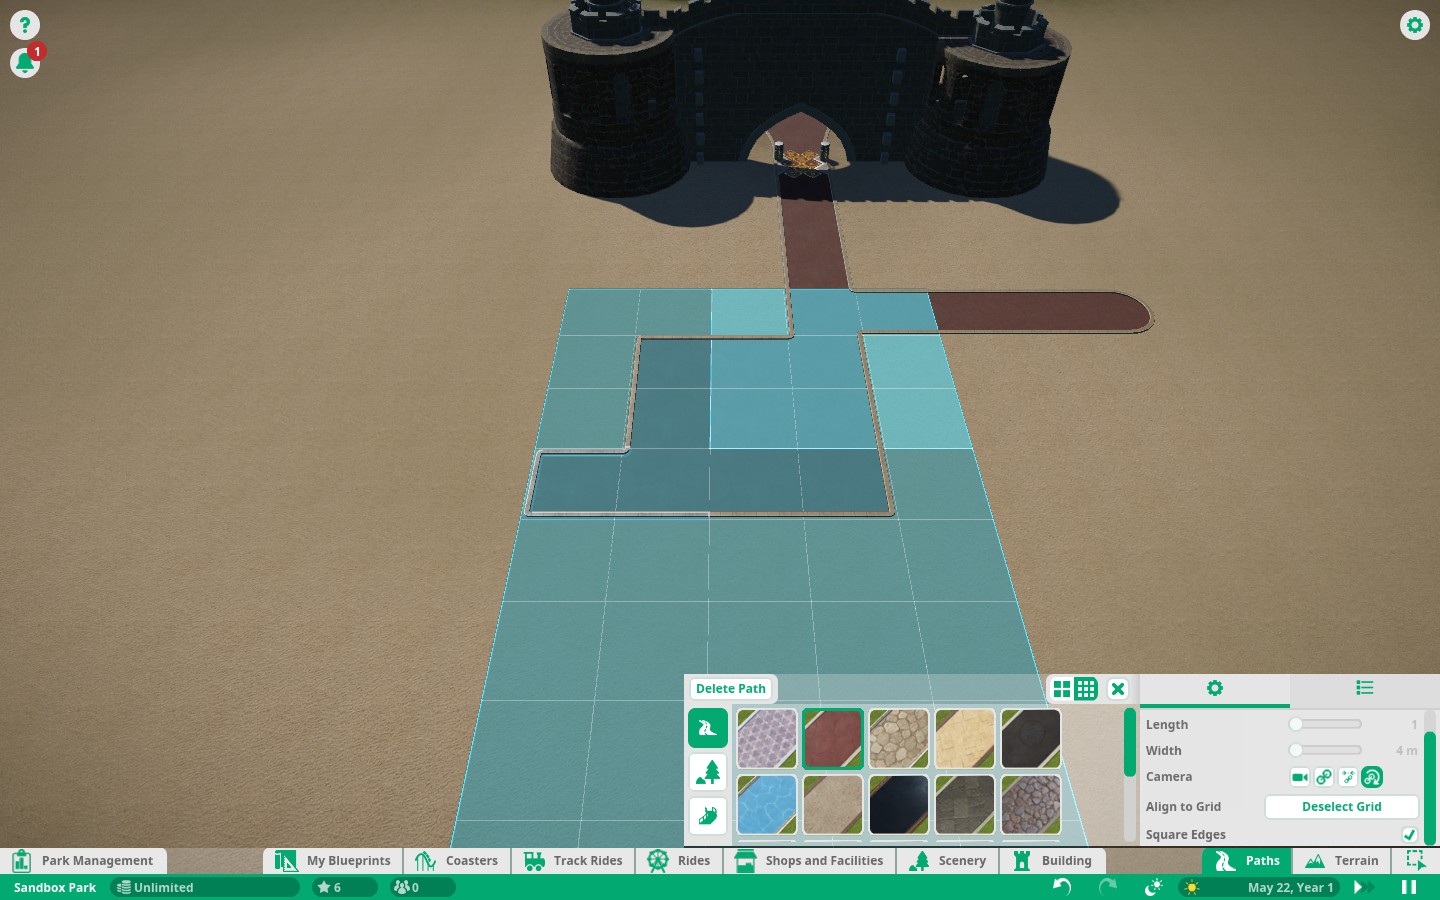
All parks need to start with a path. The path tool is also pretty simple to use. Simply click the paths button, and the type of path you wish to use, and then simply click on the ground where you wish to place a path.
If you wish to create a staircase or ramp, you must click AND DRAG your mouse up or down until the path changes to the desired type.

Afterwards, you are most likely going to be placing down a flat ride, in the case of a challenge mode scenario, but in the sandbox, the type of ride is completely up to you. However, it’s suggested that the “best” (eg, highest prestiege) rides are further back in the park if possible, so plan that accordingly.


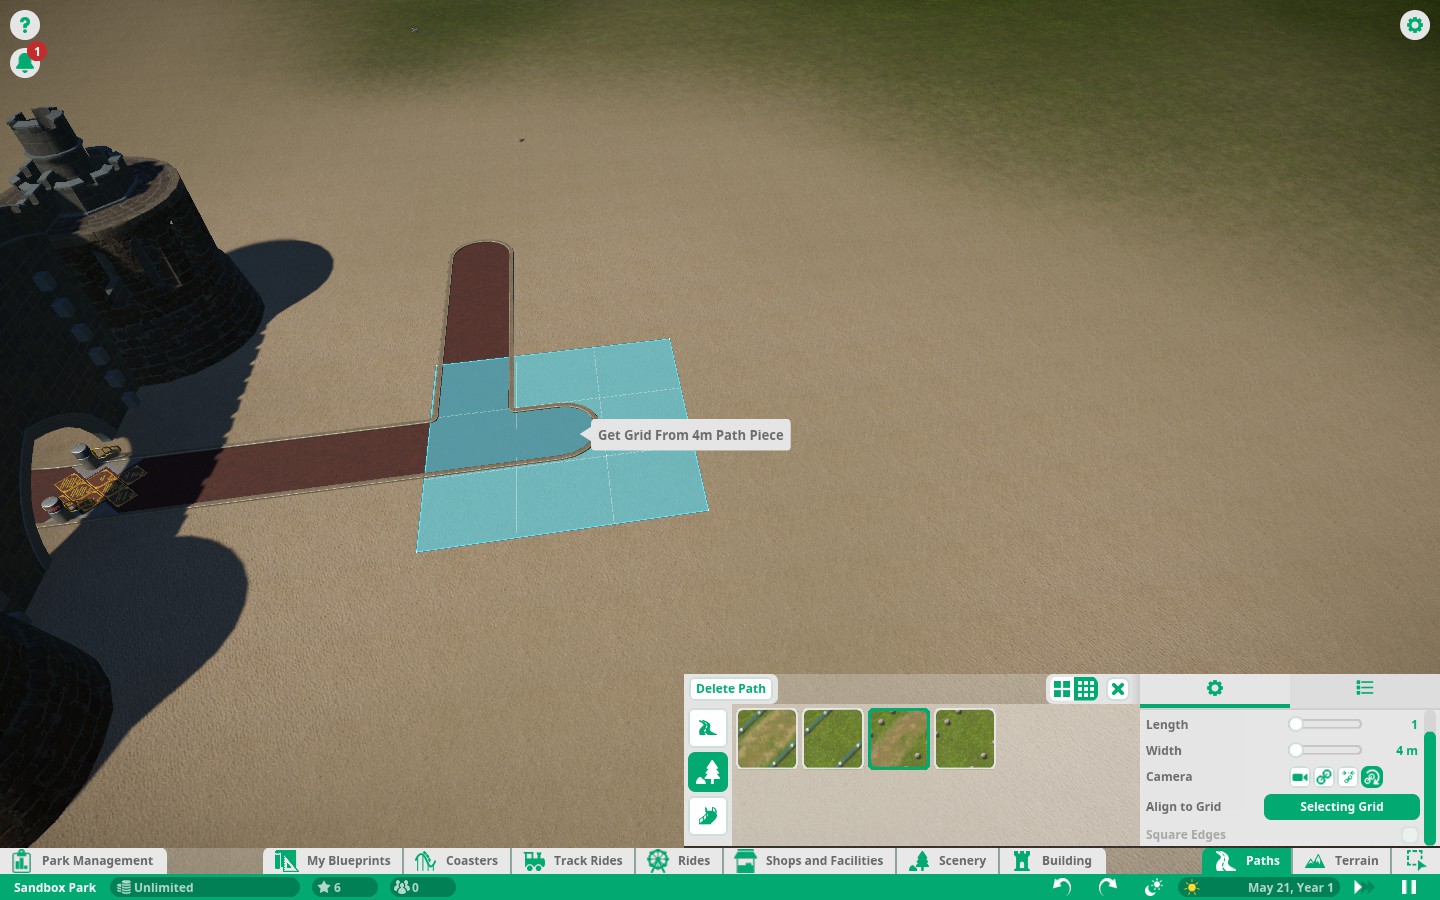
There are a variety of tools available in the bottom right corner of the screen, which may be of use in a variety of situations, such as path wideness, snapping to angles of the previous piece, and generic length of the specified path piece to be placed.
Another optional tool is the “build path by grid”. This more or less uses the same grid to build buildings, for the placement of paths, and this mode also allows you to make square edges of your paths as an option, instead of rounded edges.

A generally good idea is to have the frot end of the park have as wide as possible of paths, so people can move about and not feel crowded. You can narrow down the paths as you get deeper into the park if you so wished, though keep in mind that adding a ride to a path down the line will increase traffic flow to the area.
Building Controls
- Z – Tap to rotate object 90 degrees. Hold Z and drag the mouse around for finer precision
- Space – Toggle Angle Snap on or off.
- Shift – Hold to raise or lower object elevation. Tap to return to ground level.
- Ctrl – Hold and drag the mouse to place objects at the same elevation as the ground level you began holding Ctrl at.
- V – Toggle surface lock for objects.
- X – Toggle advanced move and rotate. This allows for precision positioning on the object’s XYZ axis.
- M – Returns to regular movement from advanced. Also enables movement of selected objects.
- Ctrl + D – Duplicates selected object.
- L – Auto-flatten terrain on or off.
- F – Snap decoration to center of wall (in building mode only).
- Right-Click or Esc – Cancel placement.
Making Your First Coaster
A majority of the coasters you are going to build while playing PC are unassisted, non-launched coasters. This means that these rides are powered, largely by one thing. Gravity. We won’t cover tweaking specific rules on lift chain speeds, nor station entry/exit speeds, or any of the other slightly more advanced track options, like brakes (much), and bank offsets.
Basic Controls
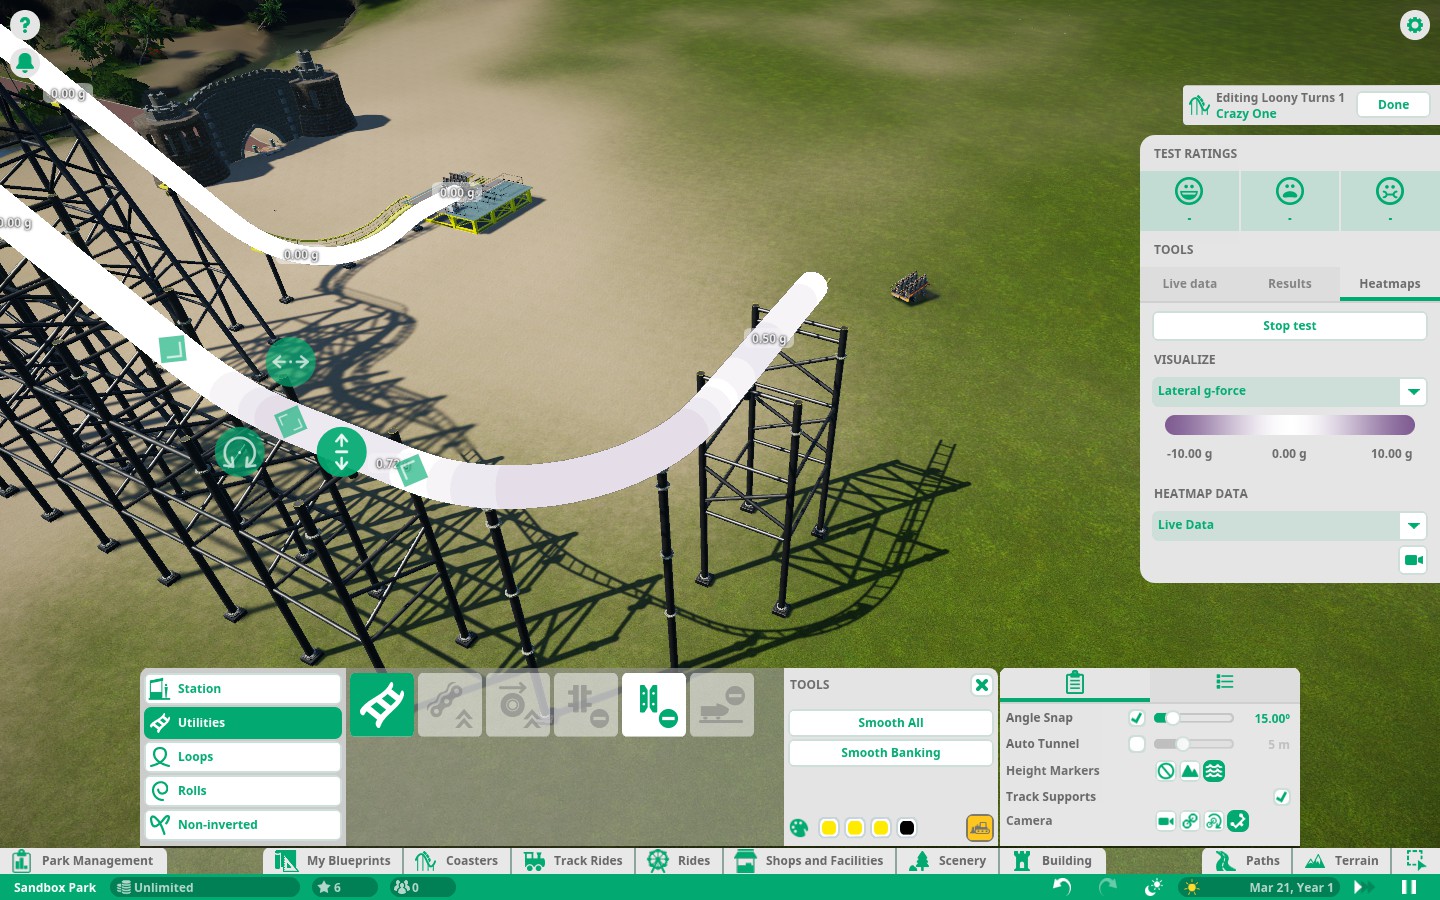
Each piece of track you place will have a variety of “buttons” on screen around the track which you can “pull” to shape the track to your liking.


The last tool you’d use for track placement is the “banking” tool. This “banks” or otherwise “tilts” the track one direction or another. Banking is a key factor on most rollercoasters in making sure you manage G Forces properly. Any moderately high speed (25 mp/h+) ride should have banking, as a ride without banking induces high lateral G loads, and as a result, severely impacts the Fear rating of the ride, which is usually a bad thing.


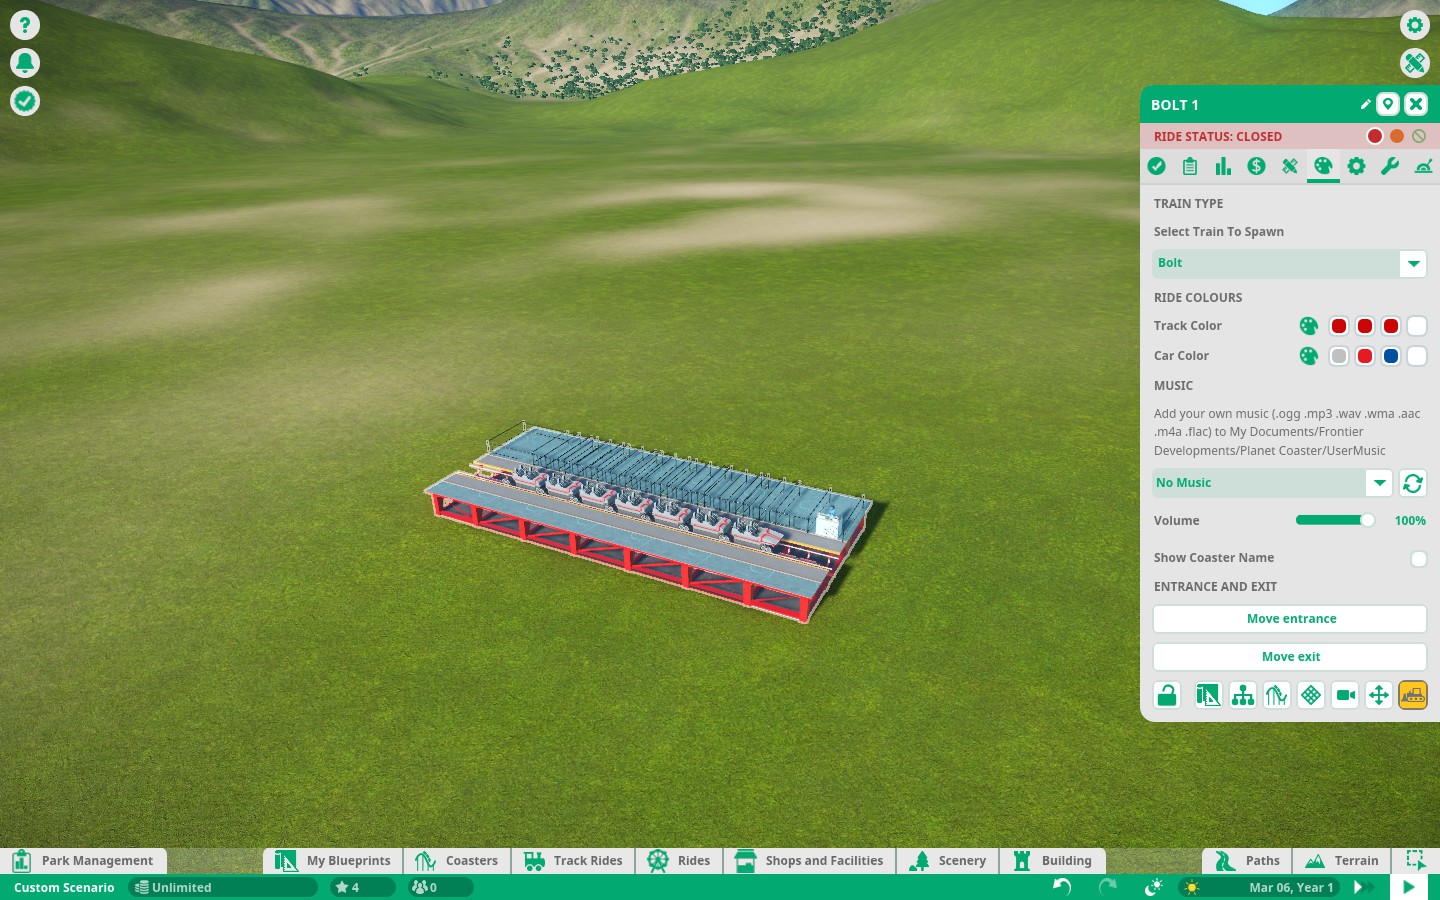
The first step, on literally every ride you make, is placing a station. This is where people get on, and off a ride.
A station will need to have an entrance and exit connected to it’s respective side, before you consider adding pathways. However, I suggest adding any extra building around the station before adding the entrance and exit (buildings will be covered at a later chapter).
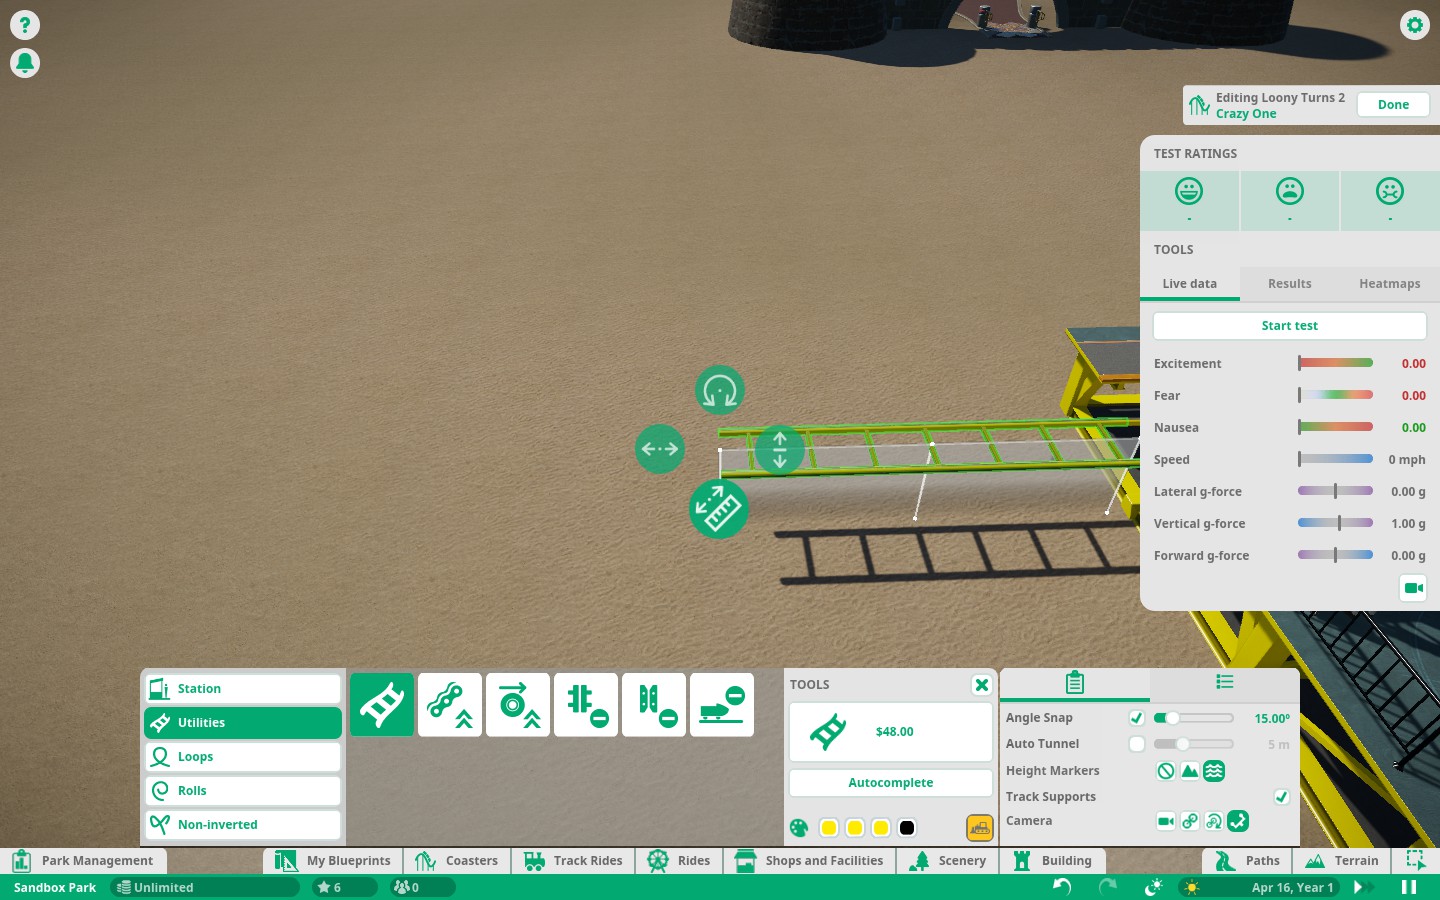
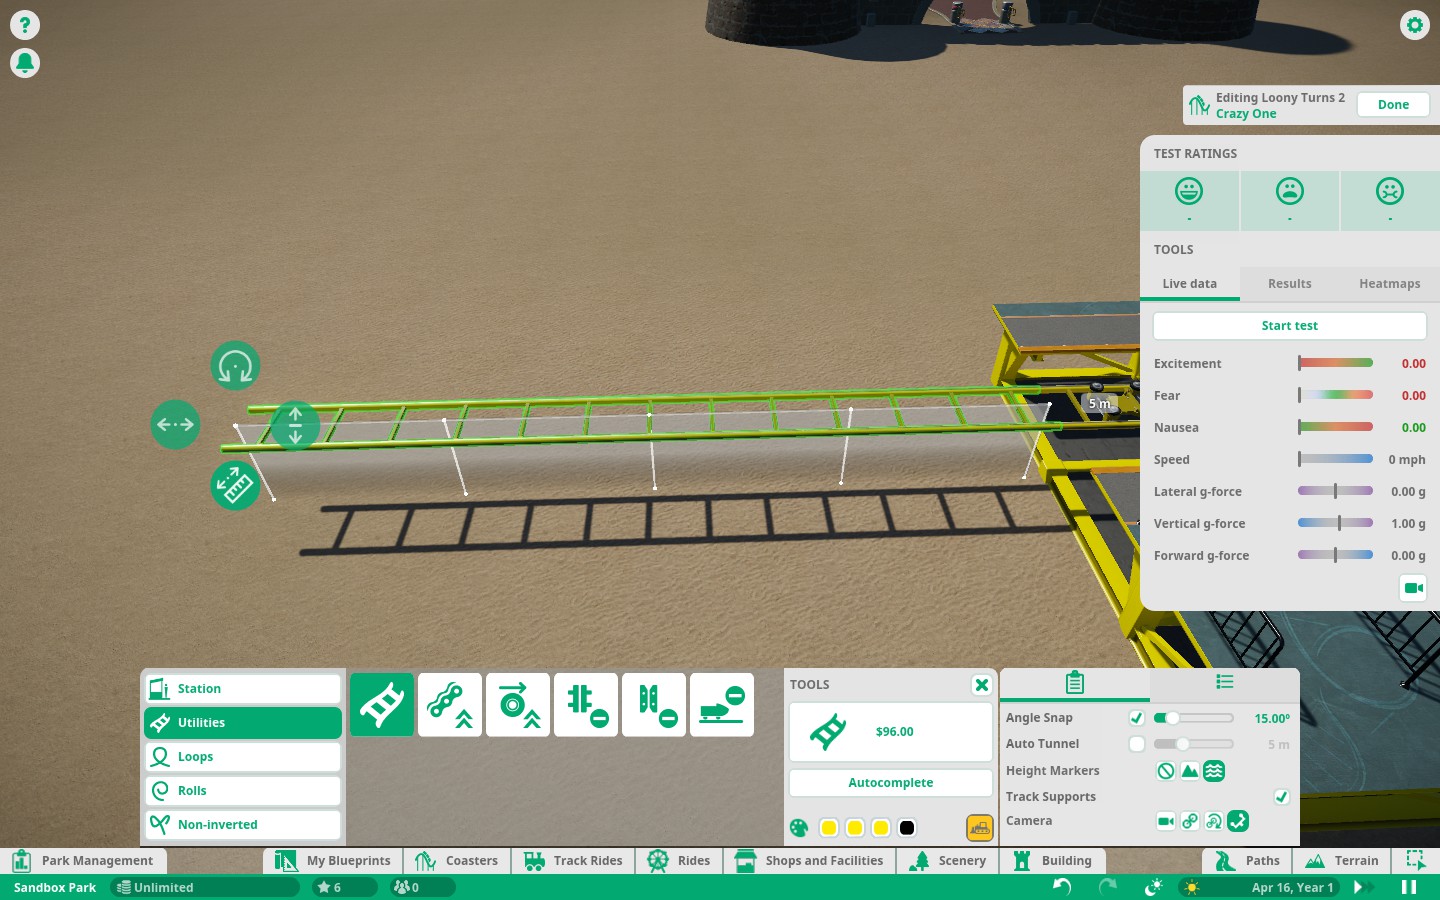
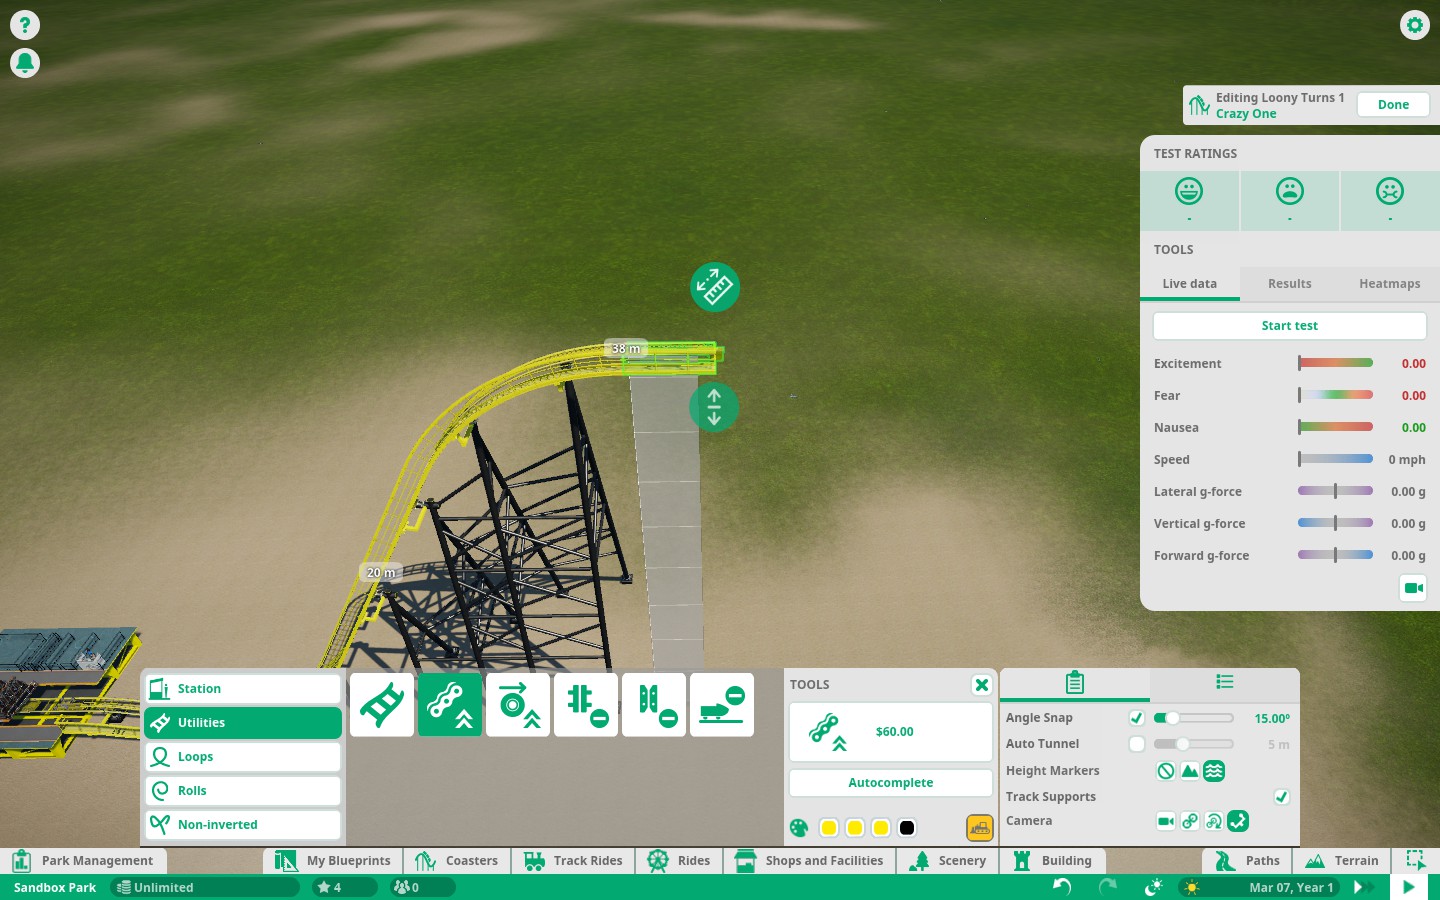
The second step, would be adding the lift chain (or friction wheels, if it’s a Junior coaster). These components will “lift” the coaster up the hill you create.
You can stop at virtually any height you desire (or until the map says you can’t), but for your first ride, until you get a handle on the controls, try to not go above 40 meters, as then you’re generally going to have to deal with above average speeds, unless you’re building a coaster in the Hyper/Giga classification (these usually use “cable lifts” too), which do preferably get built up to around 80/200 meters. As long as one car catches the lift, it will be taken up the hill.
After that, send the track downwards, and provided the car can make a complete loop around the track, it will be considered a valid ride. Making it “good” will be the hard part. For some slightly more advanced coaster building, refer to this guide. [link]
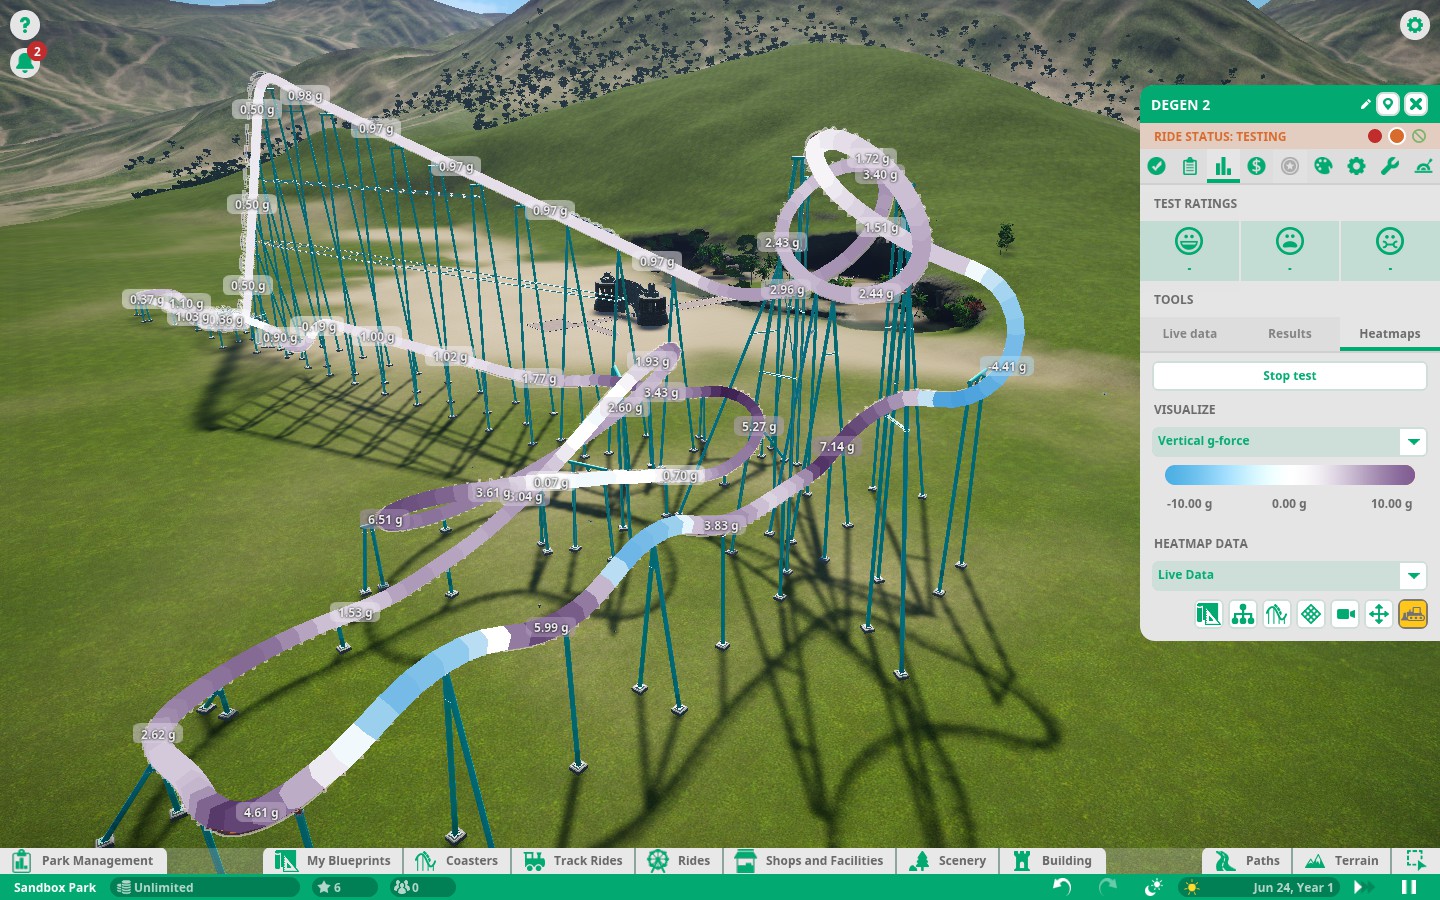
This is the first coaster i’ve ever made in this game, and it’s terrible. Why? Because G Forces.
This is almost always the primary reason your fear/nausea ratings go through the roof, and excitement dies down to the 3 or lower territory.
Solving G Force
Solution 1. Bank turns.
Banking turns is a great way to turn one type of force into another, or generally reduce the amount of force being applied in general.
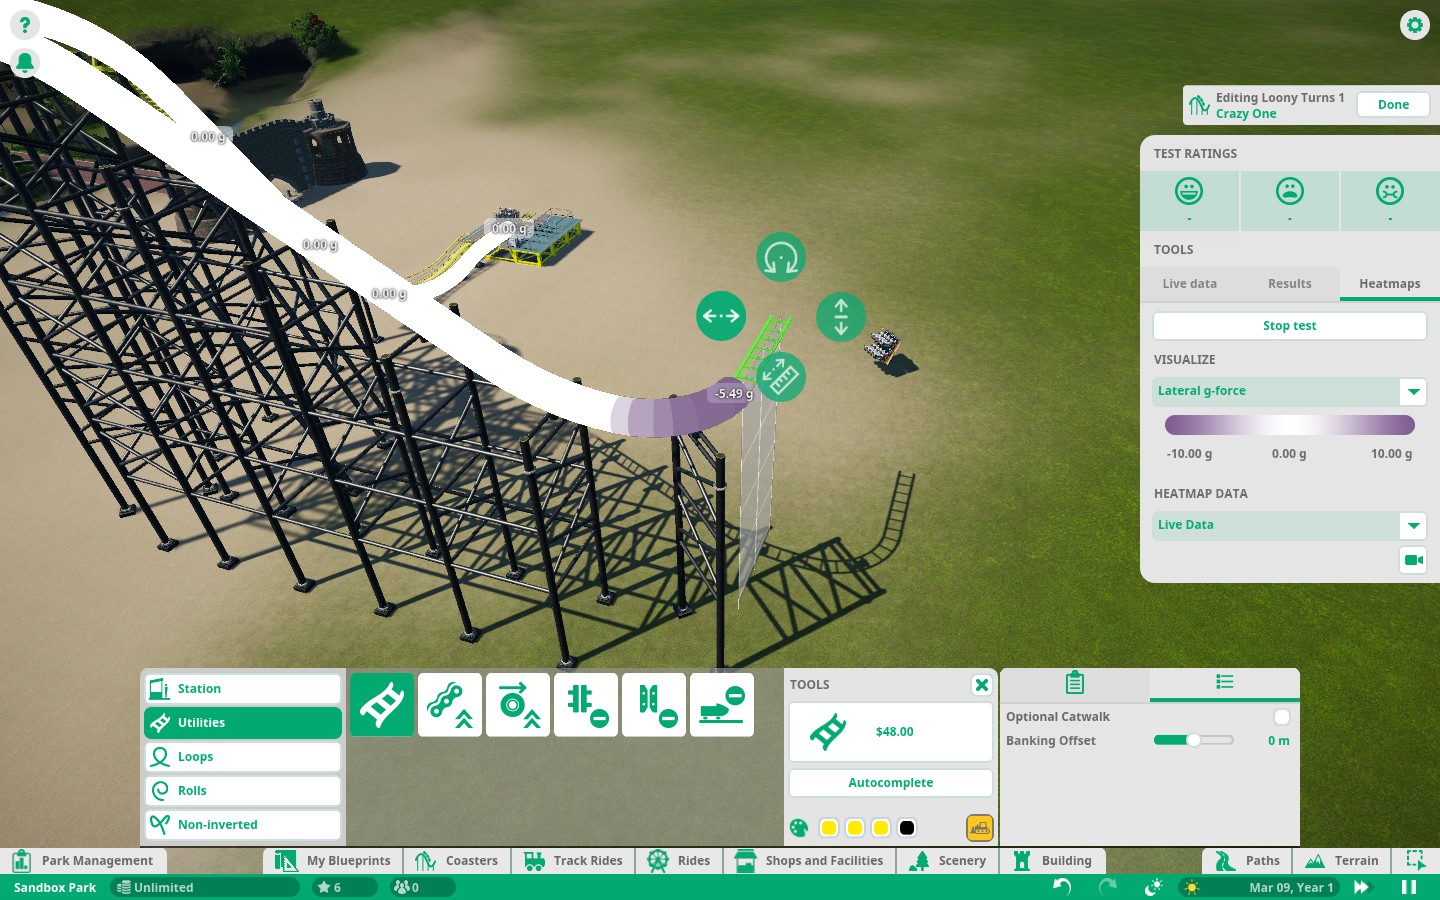
As an example, here is an unbanked, sharp turn following immediately after a drop, the car is going a measly 35 mph. Note how there are 5 lateral G’s applied to the car. This means people will be flung to the side of the car with 5 times the force of earths gravity. Now watch what happens when I bank that track piece 90 degrees to the left.
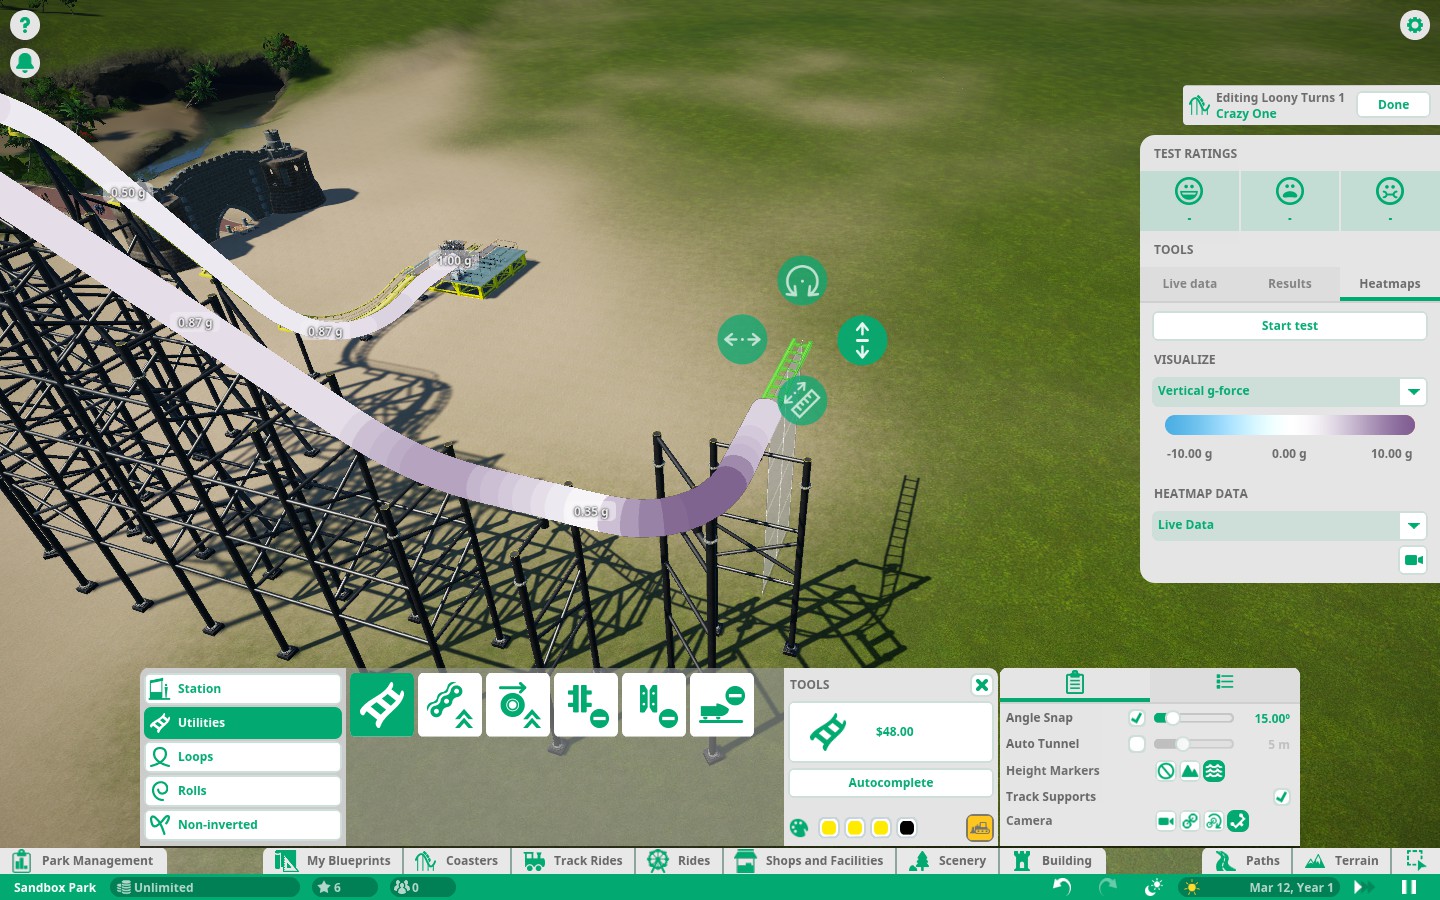
Solution 2. Make the track piece in question longer.
In most cases, if banking isn’t an option, you will need to make a portion of the track longer, so forces can transition more evenly, and slower. A longer track piece is less jarring than an extremely short piece, and this means in general, less G force.
Solution 3. Slow down.
For the same reasoning as above, a slower car can move it’s force around much easier. The best solution to this is to usually add trim brakes before the shift in question. Trim brakes slow down a car just a little bit, but can be put almost anywhere. You can also use friction brakes, which will slow down a train HARD (imparting negative forwards G forces significantly if overdone (think car crash type of G force)), but they need a straight, completely unbanked track to be used.
Solution 4 (the best solution). Combine all three of the above.
This is a solution to the turn which does option 1 and 2, since we still need speed for the rest of the ride. The track is banked 45 degrees, and the turn is 4 times as long.
Simple Building Tutorial
Placing buildings is pretty simple, and is started in one of three ways.
Placing a building component on the fly on the map will create a building and use that first piece as the “grid”.
Option two would be to place a shop, which by default creates a new building UNLESS the shop is added within another building, in which case, those multiple shops will be a part of the same building.
The last option would be to create a new building using the “station grid”, which is usually done upon completion of a ride, so the station would be covered. This is also typically used to make the ride entrance “thematic” as well as boosting queue scenery percentile, which in turn boosts prestiege
All buildings have a grid in which they must follow, for the placement of walls. You can change the size of the grid to be as little as 1m squares, but all walls must be placed as a part of the grid. Other addons, like lampposts, and general other wall additions of various types can be added to walls ignoring the grid.
In this example, i’m just going to build a very simple building above the station of this coaster on the station grid, which I somewhat hastily slapped together for this tutorial (it’s a decent ride too). [link]
For the sake of simplicity, and generic theme, since the ride is a wooden coaster hybrid, i’m going to build the structure with wood walls and a steel roof.
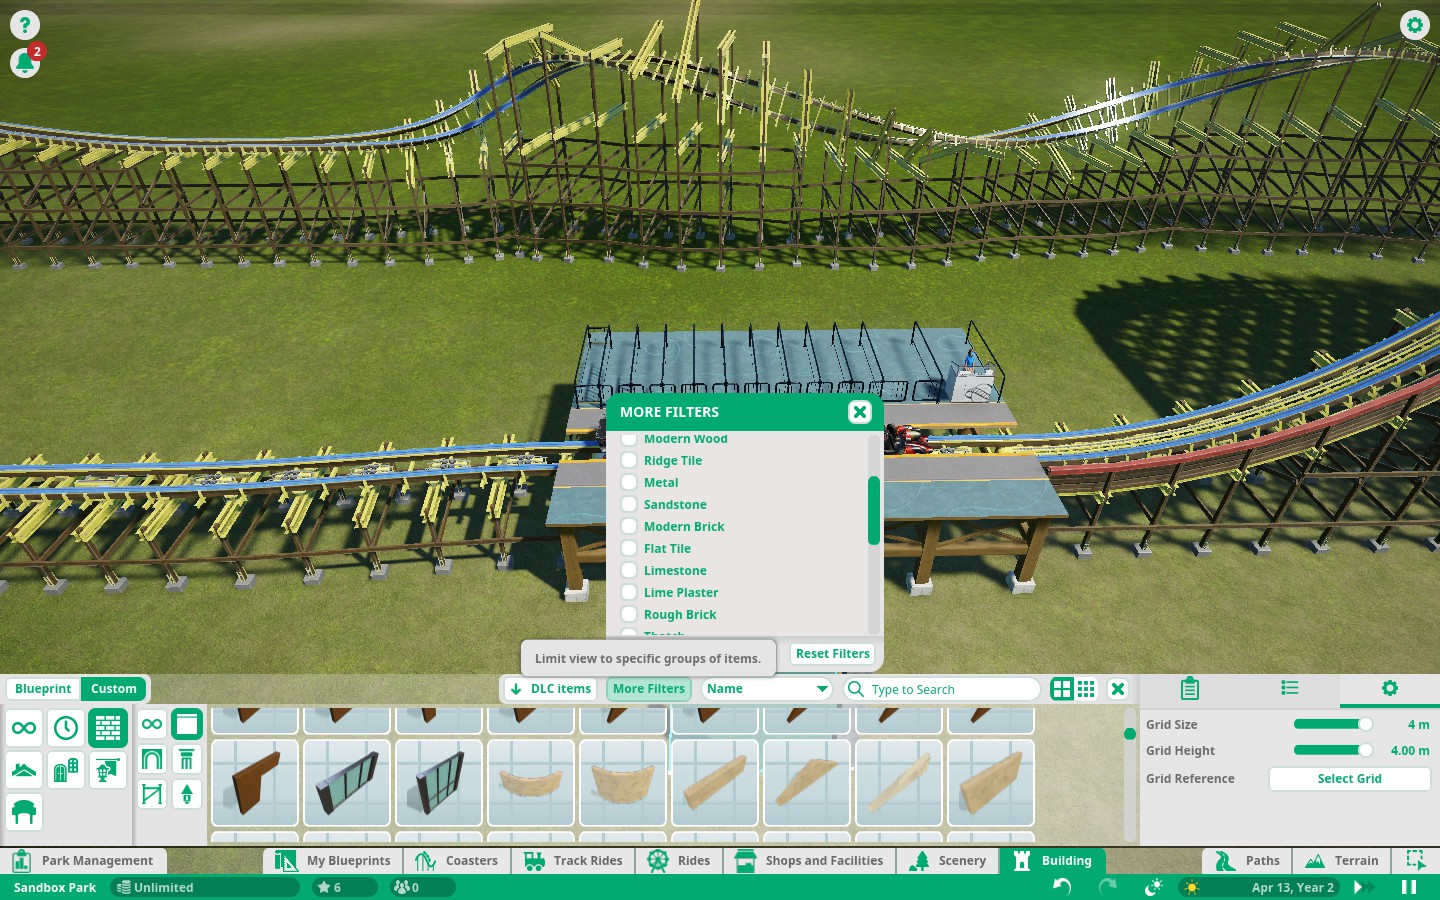
First thing i’m going to do is filter the objects down to walls specifically on the left side, then i’m going to also open the more filters tool, and check off the “modern wood” walling, since this ride is a “modern update” of a wooden coaster.
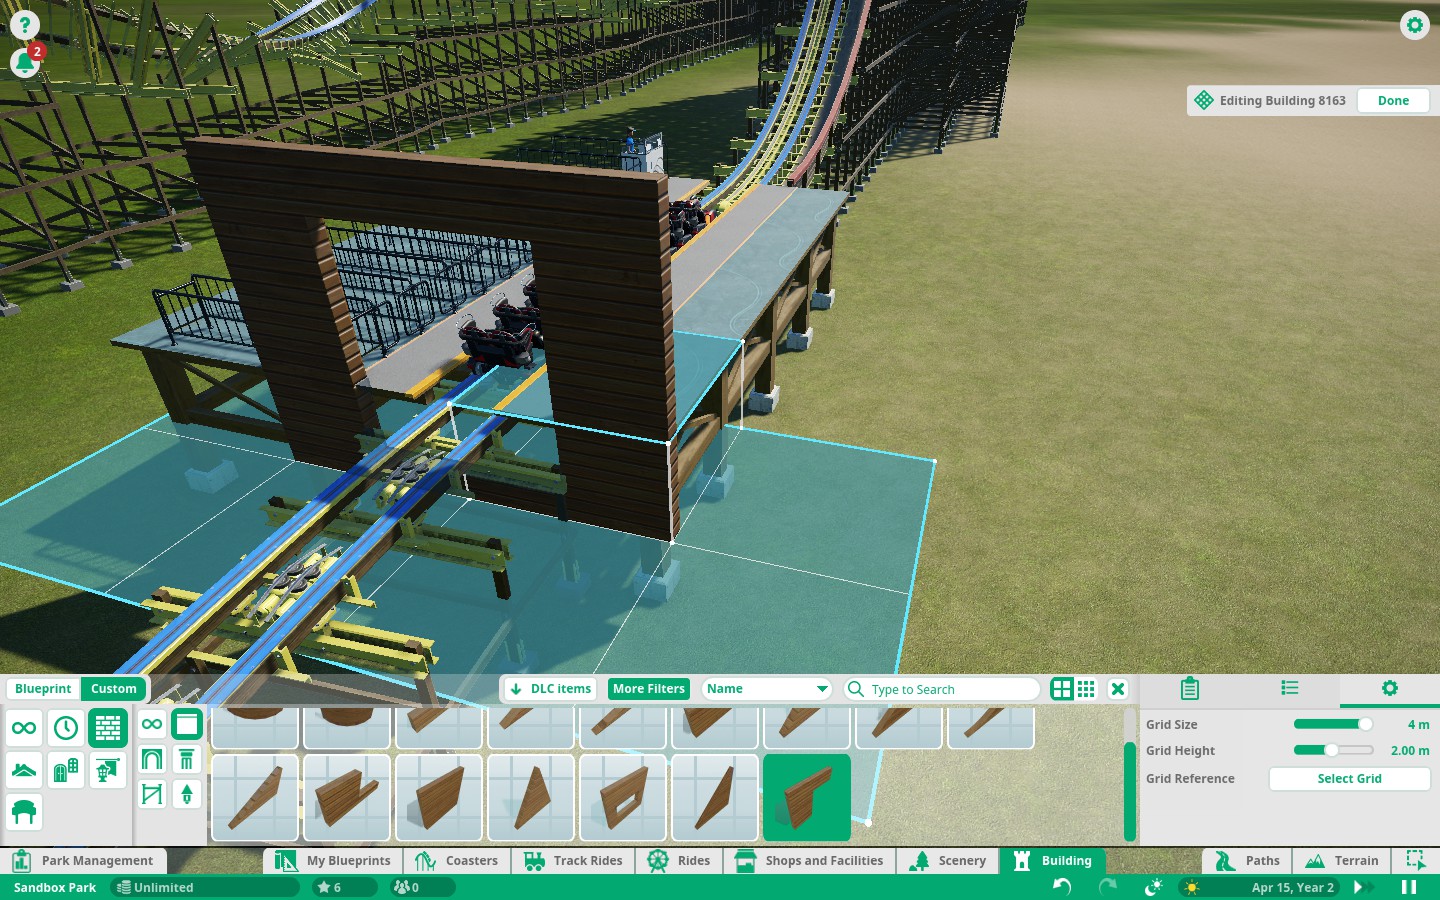
Next i’m going to add the station entry/exit enclosure with “station surround” walls, this way the car has clearence to enter the station. By default, if you build a wall in the same “grid space”, the walls will stack on top of each other (assuming the “auto stacking” stack walls checkbox is enabled). If you need to increase or decrease the height of a specific wall placement, hold shift, while dragging the mouse (not while clicking, like paths) up or down, this will move the wall piece up or down in the respective direction.
Now that all of the exterior walls have been added, we can plan out where the ride entrance/exit should go.
In this case, I used additional “station surround” walls in order to make space for the entrance and exit paths respectively, which I then added afterwards. (Note: I enabled curved slopes in the path options for the exit to get the spiral staircase.)
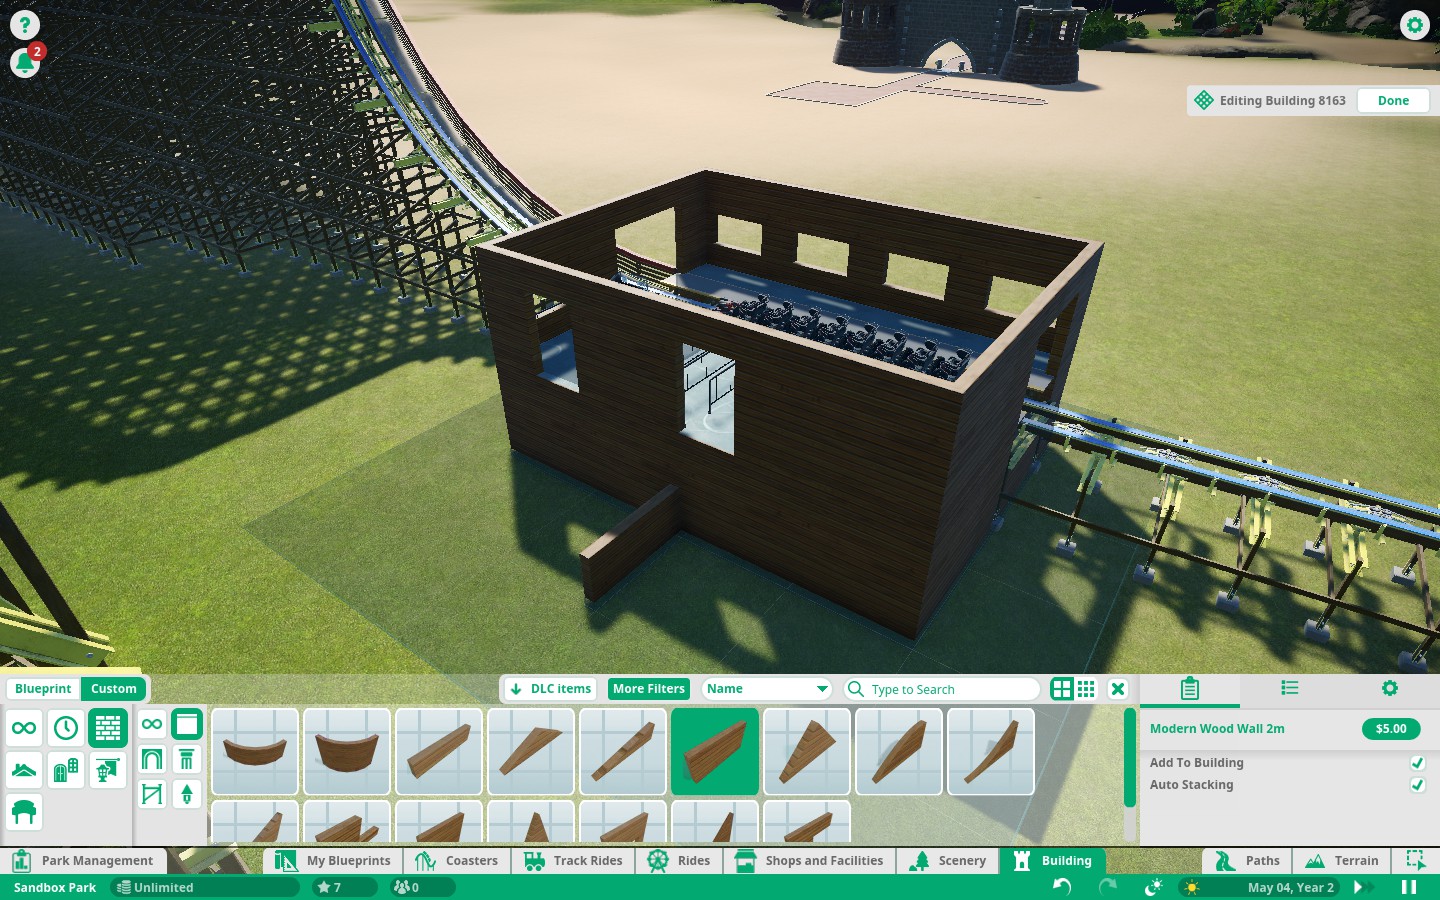

The last step is to be adding the roof, and any other extras you’d want to attach to the building.
Since i’m a bit lazy, and this is just a tutorial, i’ve gone with generic flat fiberglass roofing. You can spruce up your building however you wish to suit your creativity. One thing to note though is that sometimes the game really struggles with you telling it to install a roof, and you should make sure that the roof is being built evenly using the Shift+Drag function if the roof is placed too high, or more likely too low.

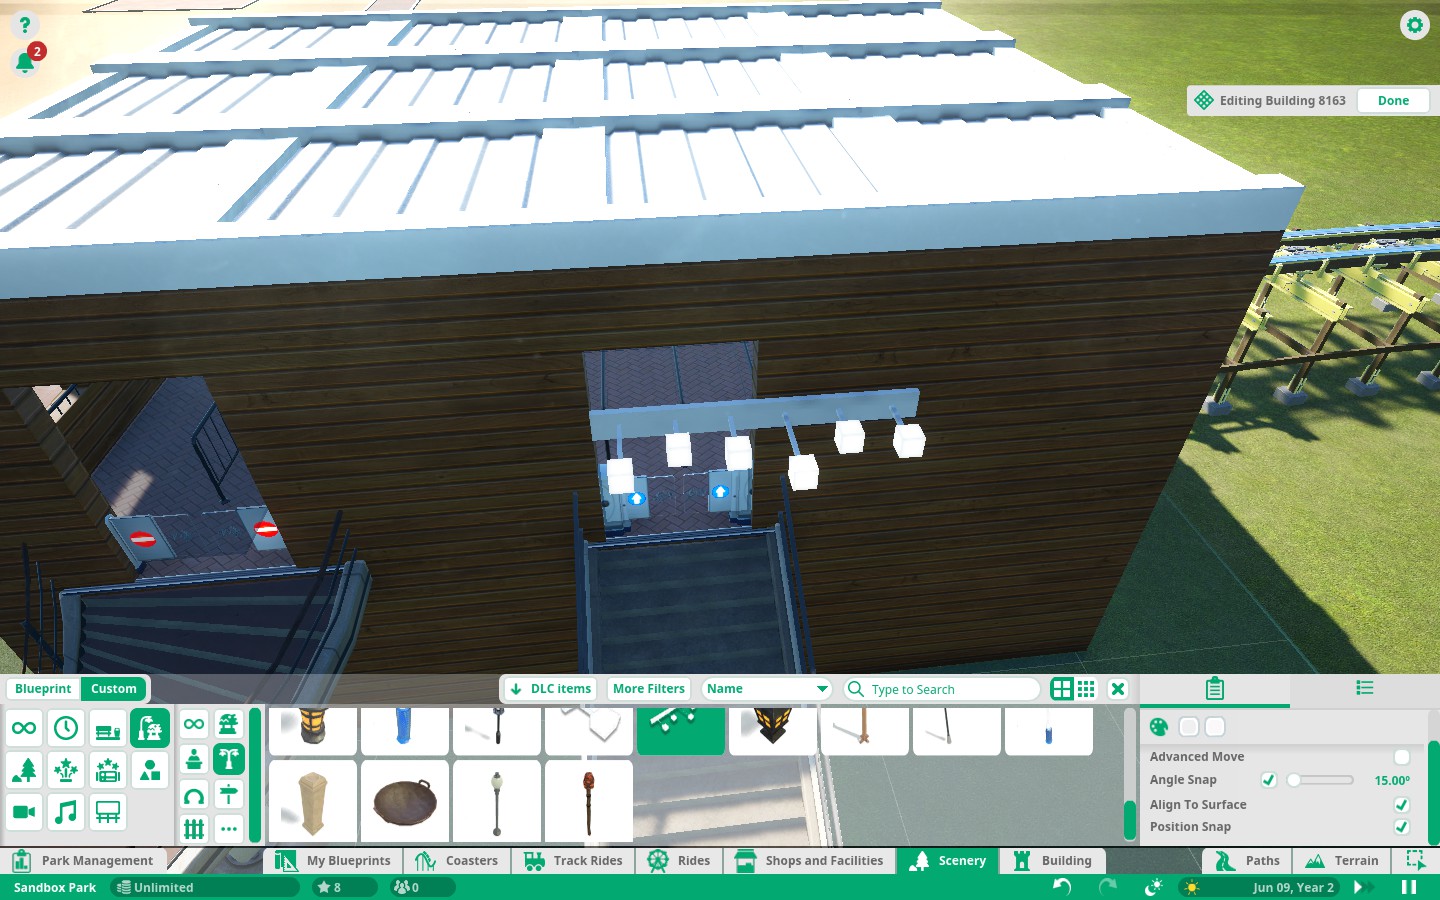
Scenery tends to not follow the rules when it comes to basic placement, especially when it comes down to buildings. Objects tend to get shoved through walls, float, or otherwise, look generally wrong. This is usually only relavent for specific decorators not under the buildings tab. To access the tool, hit the X button while placing a scenery object.
For example, this lamp set essentially refuses to be placed specifically where I want it to, in surface move mode. So, what I’m going to do is hit X.

Conclusion
Always visit the official Planet Coaster forums for more information (the Steam forums are not as active)
[link]