Overview
There is no simple Tutorial episode in UG:CW. You’re asked to make some decisions, and then thrown right into the first (hard!) battle with no explanation on how to move, shoot, detach skirmishers, hire recruits, etc. As a frustrated (no longer!) Newbie playing the game for 3 weeks, and reading discussions, and watching YouTube videos, I’ve put together a step-by-step guide from the very beginning of the game to shorten the learning curve of others.
Introduction
First, one of my favorite old PC war games was Civil War Generals 2 by Sierra Online, and I was very sad when it stopped working on later Windows machines (I wasn’t about to install a virtual machine to try to get it going again.) This game is the closest I’ve seen to recapturing that past enjoyment, but I was totally frustrated and mystified at the start. There is no simple Tutorial episode here ala other games like Rome: Total War. And the first battle isn’t easy, either.
So, I’ve been playing for three weeks now and I have some things that I’ve finally figured out, and some I’ve discovered while watching videos and reading the discussions. Some things, especially the best strategies to use, I haven’t figured out yet. Hopefully these tips will help others who are starting new to this game. I apologize if some of these tips are a bit long and/or totally obvious, as this is my first attempt at making a guide. And I welcome any corrections and or additions.
This guide is meant for people first starting out, and not meant to go into all the various intricacies of the game, and there are many of them. Good luck, and good Generaling!
UPDATE
Due to the number of people complaining that they cannot get past the initial difficult battle, I’ve put two of my saved game files in dropbox. These will give you the Camp after the first battle. These are from campaigns I did with the vanilla game (no mods) but will work with the mods if you’ve installed them.
Here is the CSA Post Potomac Camp:
[link]
Here is the Union Post Train Station Camp:
[link]
Place the files here:
Disk C > Users > [your name or session id] > AppData > LocalLow > Game Labs > Ultimate General Civil War > Save > CampaignBattle
If you do not see the above folders in File Explorer, click on the View tab, then select the checkbox for ‘Hidden Items’
Here are things you cannot change as the options are chosen before the first battle:
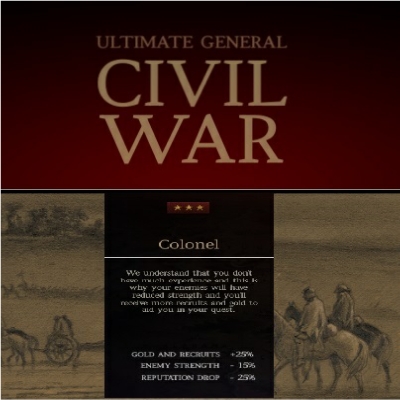
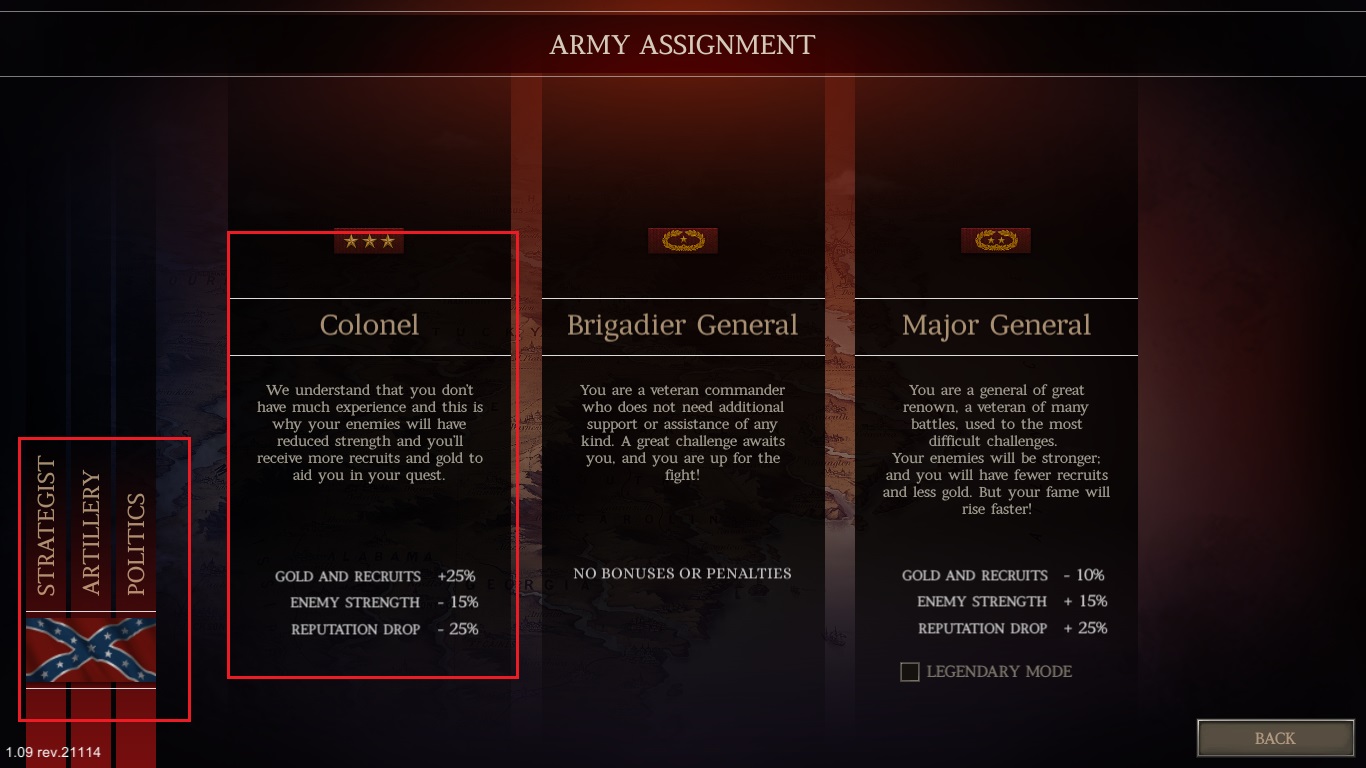
- These are COLONEL (easy) difficulty. You can’t change the difficulty level.
- As the CSA your General is called “Bobby Lee”
- As the Union your General is called “Lee4North”
- The starting Career options are fixed to whatever I happened to pick when I played these.
After you get through a few more battles for practice, I would suggest starting a new campaign. (Do you really want to go all the way through without having won the first battle?)
Getting Started: Career Options
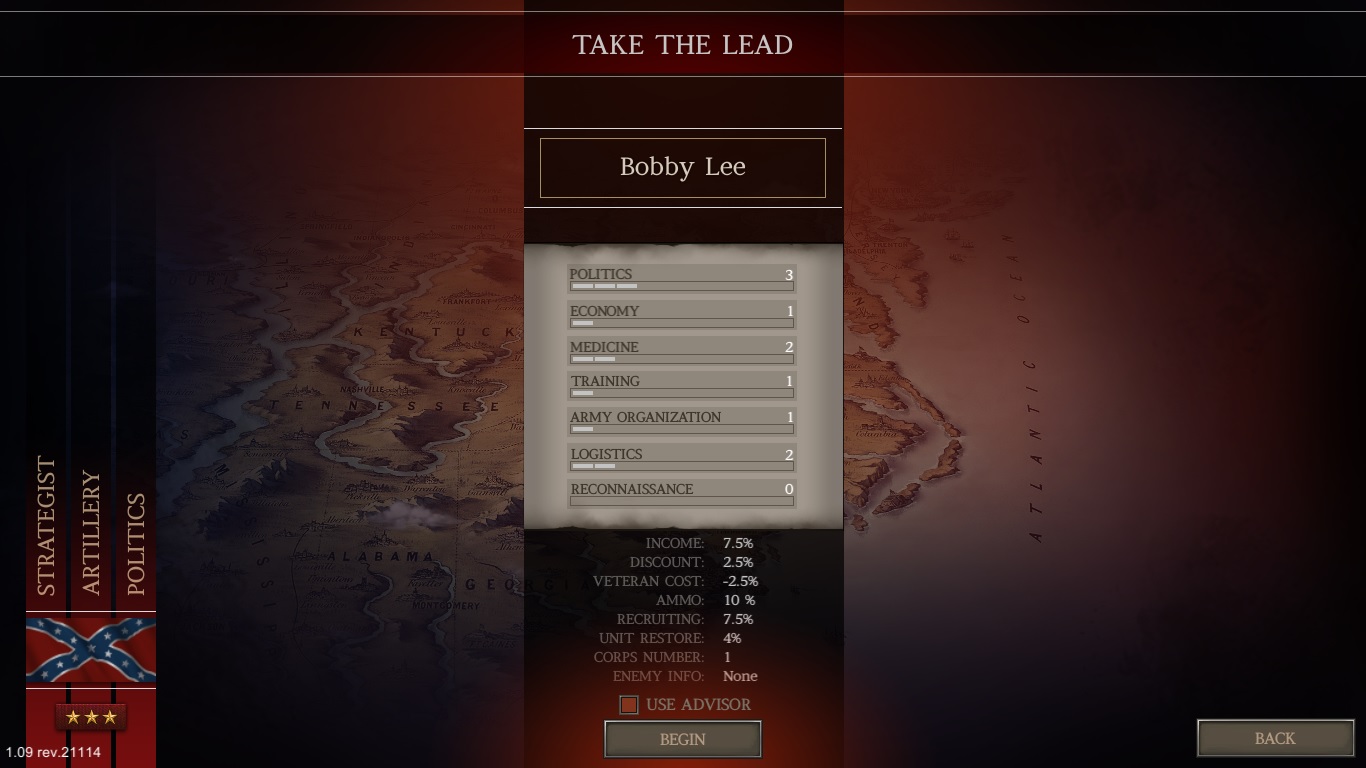
You are presented with a sequence of screens asking you to choose from options that increase certain traits, but they haven’t been defined. What are good options to start the game? I’ve already forgotten what I used, but here are what the various career options influence:
- Politics: # recruits and $ you get after battles
- Economy: Weapons cost discount
- Medicine: % of Casualties restored after the battle
- Training: Reduces cost of hiring veterans
- Army Organization: Maximum size of your army (# corps, # divisions/corp, # brigades/division, maximum brigade size)
- Logistics: Starting ammo of your units
- Reconnaissance: Information about the enemy size, # units, etc.
Here you see my own recommendation, which may or may not match your personal style.
Mostly I avoid selecting any Reconnaissance options at the start as unhelpful.
I picked:
- Strategy (gives Army Organization+1 and Training+1 attributes),
- Artillery (gives Logistics+2 and Medicine+2),
- Politics (gives Politics+3 and Economy+1).
Needless to say, pick Colonel difficulty to start unless you’re a masochist. I repeat, this game has no tutorial episode, and the first battle is NOT easy.
Here is the result after typing in a name for myself.
NOTE: Since I’ve mostly played as the Confederates (CSA in future references in this guide), you’ll see these tips from that perspective.
The First Battle: What do I do first?
Pause
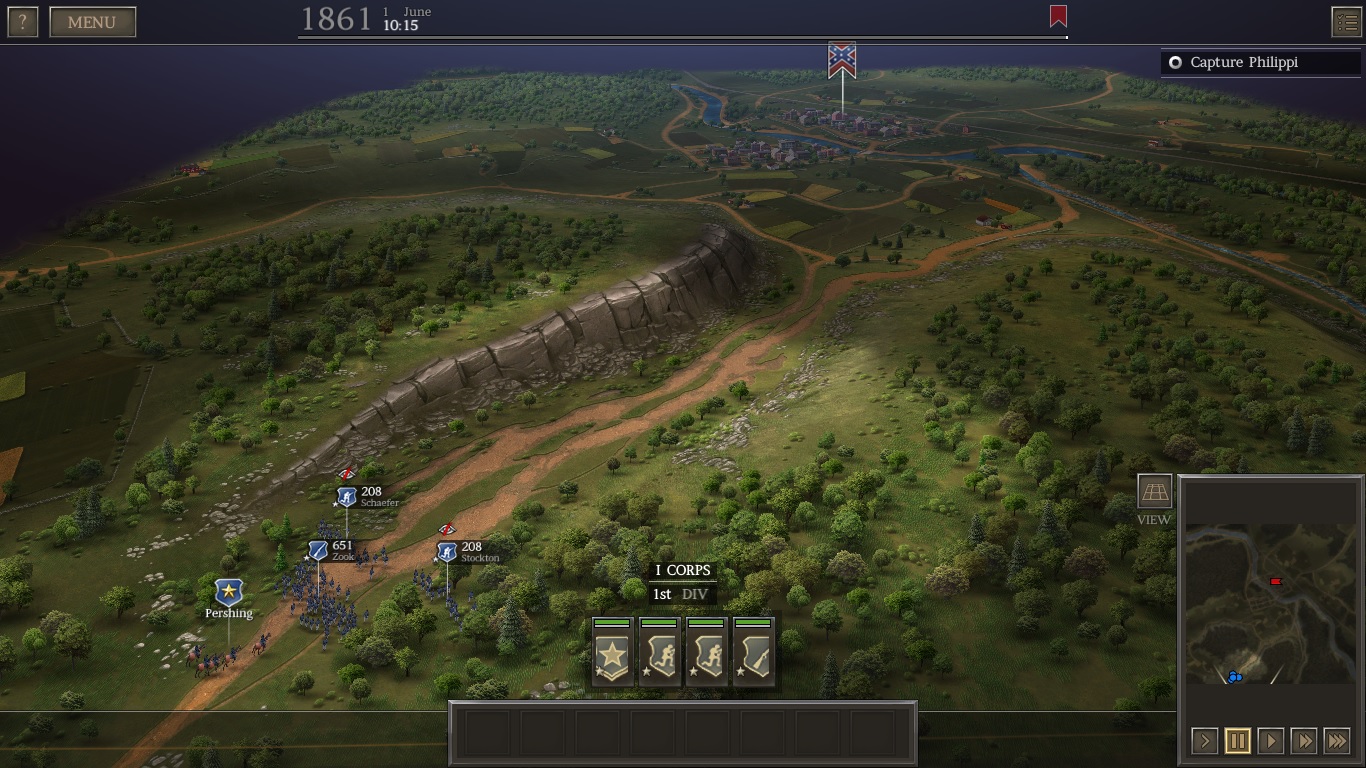
You’re thrown in at the start with ‘normal’ speed of time and your Brigades are moving. Where’s the PAUSE button? Oh, it’s the II symbol down in the lower right-hand corner overview mini-map (red arrow in image below)

Now, press the MENU button at the upper left (see the 2nd blue arrow in the image) and then select SAVE. This way you don’t have to go back through choosing your starting career options if you restart the battle here.
What are the Objectives?
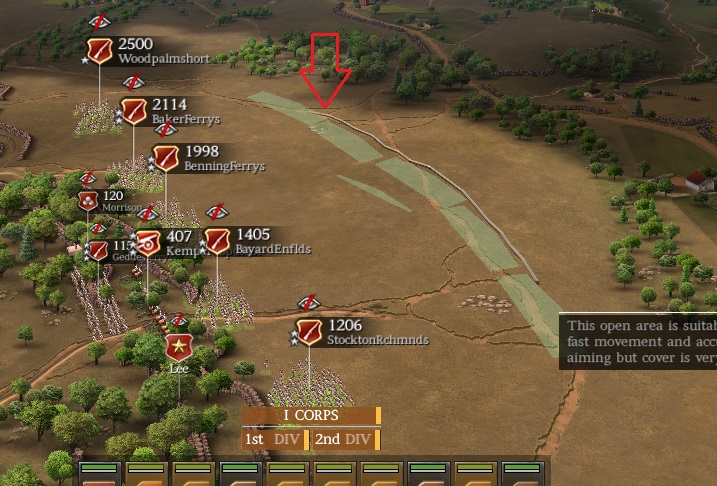
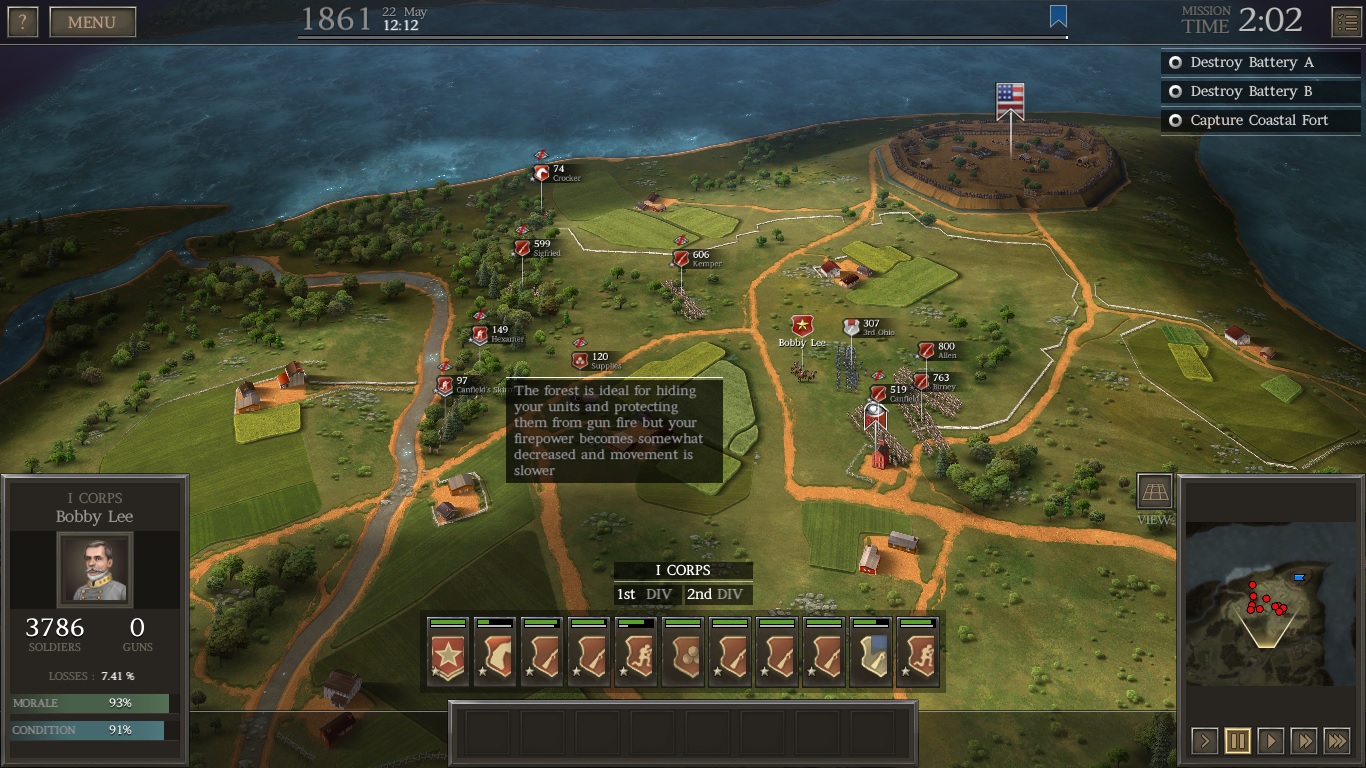
Look at the upper right (green arrow in the top image). There was an introduction just before the start of this battle that mentioned what you needed to accomplish. On the battlefield, the Main Objectives are shown at the upper right.
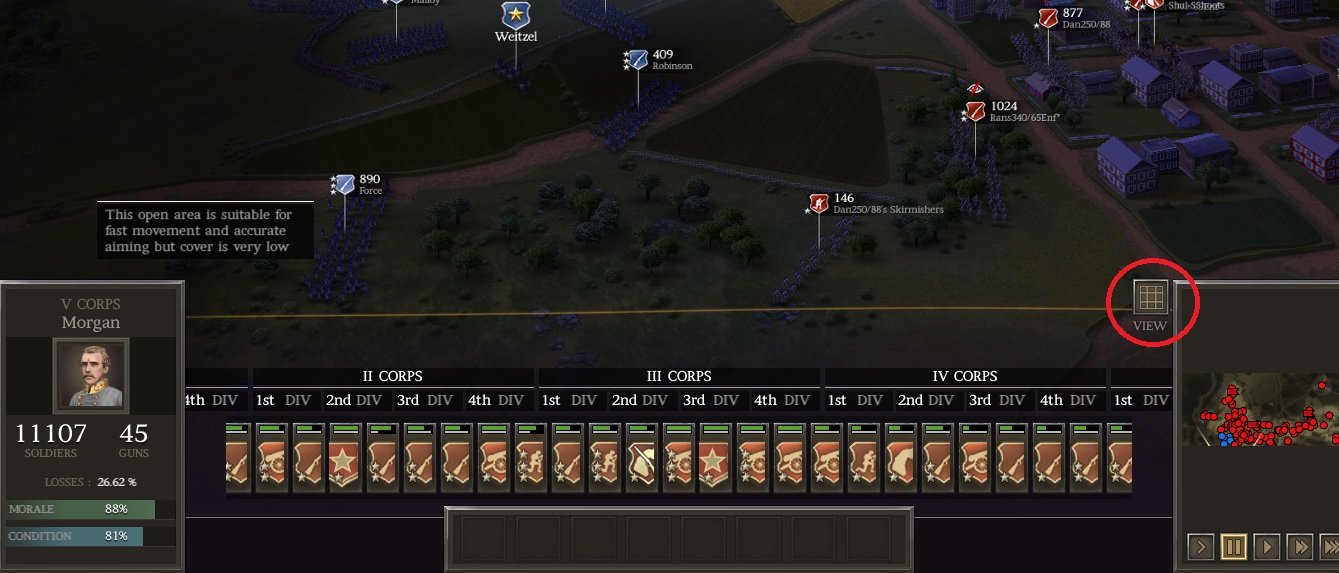
If you click on the objective, the map usually shifts to that point. This can be helpful since there are no location labels. For this first battle, clicking on ‘Capture Coastal Fort’ in the upper right will move the main map to the fort. (I believe you can’t click on the ‘destroy the battery’ objectives since you can’t see them yet in the fort due to the fog of war.) Click on the bottom right mini-map where your red dots are located to change the main map back to your men. Or you can move your mouse to the edge of the screen to shift the battlefield location.
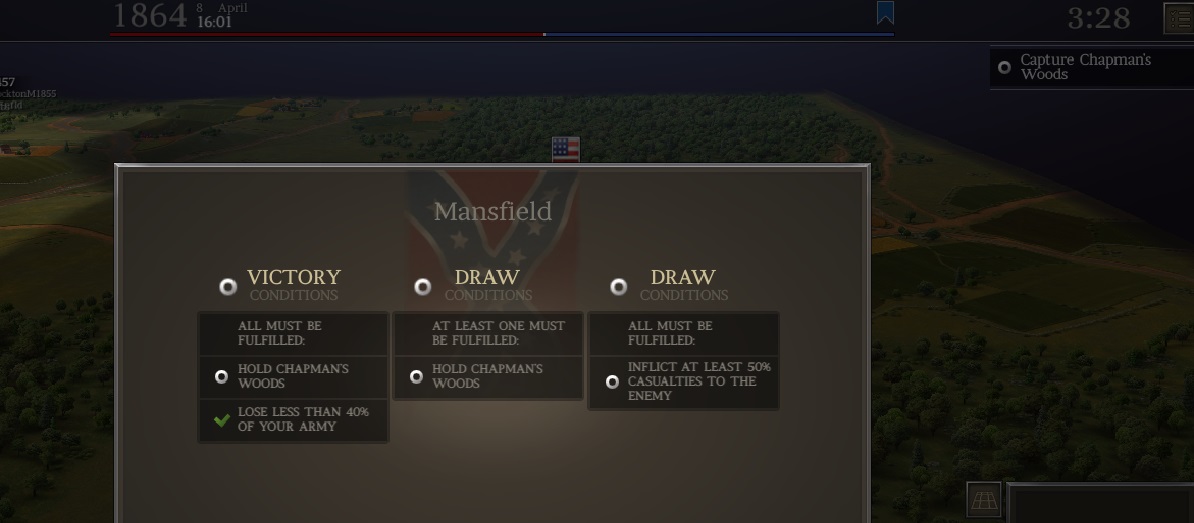
Clicking on the small box with the 3 horizontal lines at the extreme upper right brings up ALL the battle victory as well as the drawing conditions. Clicking on any of those conditions does nothing. (Darn!). This image is from a later, larger battle and shows a more extensive list of winning and drawing options for that battle (for example, there are 2 different ways to draw).
Access the in-game Guide
Press the ? at the extreme upper left for the Guide. It does have some good tips, as painful as it is to read through guides.

Keyboard Shortcuts
The in-game guide lists some of the keyboard shortcuts for controlling your men. Below, I’ve shown that section, along with the bottom row during a battle. After clicking on one of your units, hover your mouse over the icon, and a pop-up displays what the icon is and it’s keyboard shortcut (below, I have it over the Double Quick/Run (R) command). Clicking the icon or using the shortcut executes the command for that unit. NOTE: Different units have different commands, example: Cavalry with rifles are able to dismount, which gives them greater cover.
Thanks go to @Boycs1962 for the following, which lists additional shortcuts.
Time Limit


A time limit displays just above the objectives and counts down to zero. The very beginning of this first part of the battle as the CSA (and also the Union’s first battle) does not display a time limit. When your reinforcements arrive later, the timer will appear and start ticking down. All later battles start with an immediate time limit.
When you grab an objective, it starts it’s own timer on how long you need to hold it before you are considered successful. Update 1.0: In some battles, you are considered successful even if the timer doesn’t count down to zero before the battle timer expires. There is no list of these.
Note 1: Some of the later battles go through multiple parts, and you don’t have to rush to get to the objectives before the timer runs out. It’s not easy to tell if the time will run out on you or if there is another part coming. I’ve been watching the History Guy’s YouTube videos before a battle to see whether I have to rush to make the objectives before the time runs out. If I get a chance, I’ll add to this guide which battles have multiple parts and provide more time. Update 1.0: See the CSA and Union Battle Guides by D-Dub for this information.
Note 2: On some (but not all) of the objectives, if the Main timer runs out before the Objective timer clicks down to zero, you will be considered as NOT having achieved it. There is no list of these, which can be frustrating.
Note 3: Update 1.0: In some battles, esp. those with multiple parts, although you are given an objective you do NOT need to capture it, and in some cases you’ll take lots of casualties trying to capture it. Or, you do not need to capture it before the timer expires–you can still capture it in the next part of the battle. It is especially important to learn these when playing on the higher difficulties.
What do my units do?
Selecting One Unit
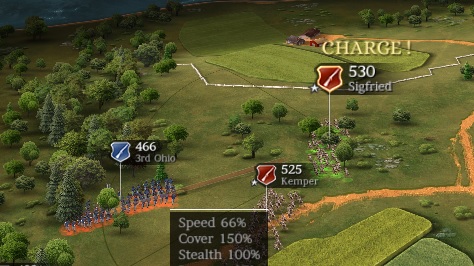
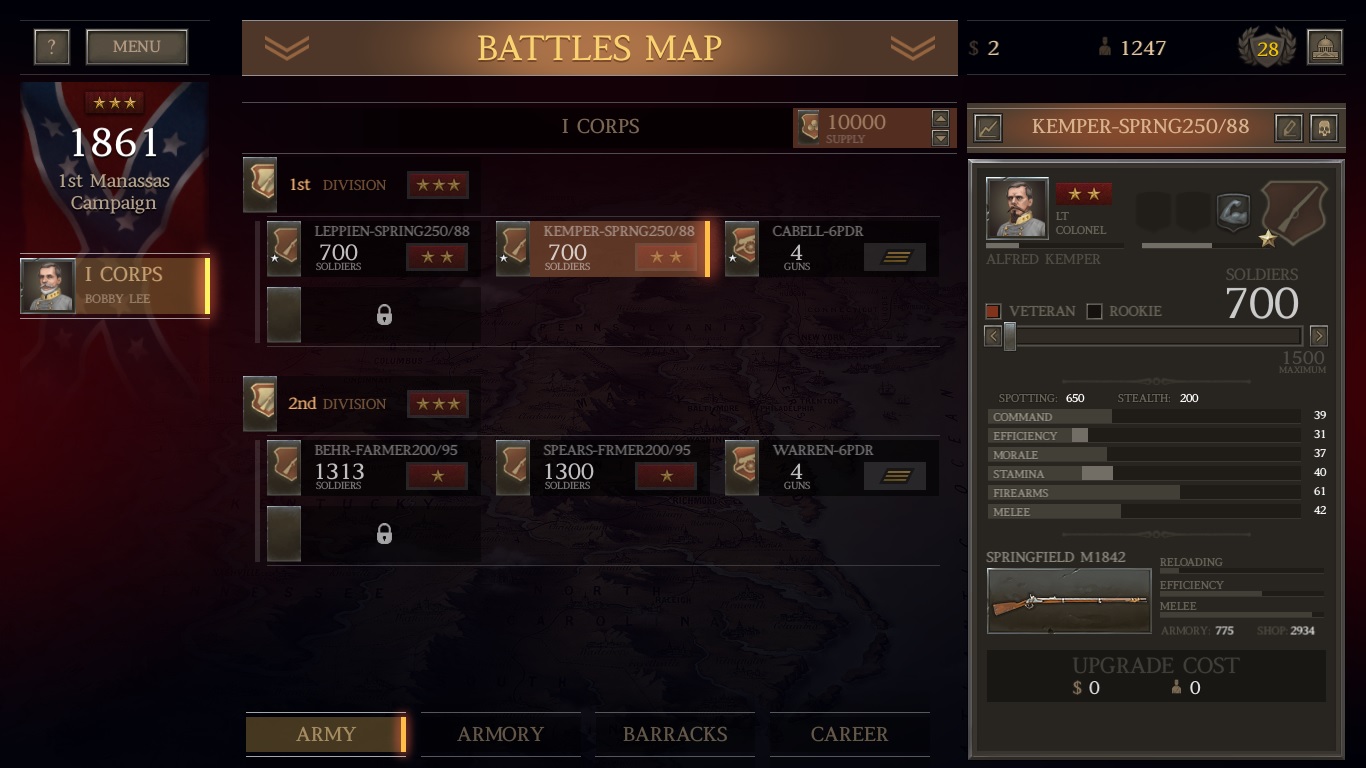
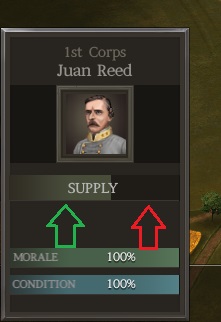
Left click on your Hexamer skirmishers (Skirmishers are denoted via the icon with the 1 knee down fellow) and a “unit card” about them appears at the lower left of your screen. The number 207 indicates the number of men in the unit.
Since we haven’t done anything yet with them, they have no kills or deaths (both numbers are still zero). Although it says they are Reloading, the red bar is full so they are ready to shoot. They haven’t used up any ammo yet (the gray bar is full).
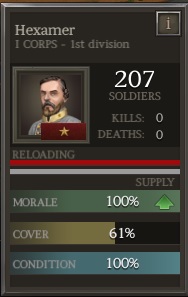
The image also shows their morale, cover, and condition.
Note: Placing your General near a unit (defined by the radius of the circle you’ll see if you click on the General) increases your unit’s morale slowly and you see a green up-arrow at the end of the bar. Not moving a unit slowly increases their Condition.
Note: Don’t let Morale and Condition fall to under 17% (according to the Guide) as your unit is apt to Waiver (their icon will flash a dim white) and then retreat or rout if attacked. This is especially true if they are Rookies.
Note: Being in woods, houses, etc. increases your cover so you take less casualties.
Left Click on the ‘I’ at the upper right of Hexamer’s info box. This next image shows what happens.
The information in the box changes, and an upper box will appear with information about their guns. Hover your mouse over the gun and the black box to its right appears with even more info about them. Notice that the range of their guns is 340 yards.

Compare that to your Sigfried infantry unit by Left clicking on them.
Your infantry unit does more damage and are better in melees, but with an older gun, they fire at a much slower rate, are less accurate, and fire a shorter distance. Notice also that they’re spotting range is less than your skirmishers.

Note: Left clicking the ‘I’ again will return everyting to a single box showing their morale, cover, and condition.
Likewise, click on your Cavalry and General to view information about them.
Movement
There are many movement options, and some can be a bit tricky, so I will explain them here. If you are impatient to get going in this first battle, use the Simple Movement Option 1. Just click each of your units and tell them to head to the woods on the other side of the river.
Simple Movement
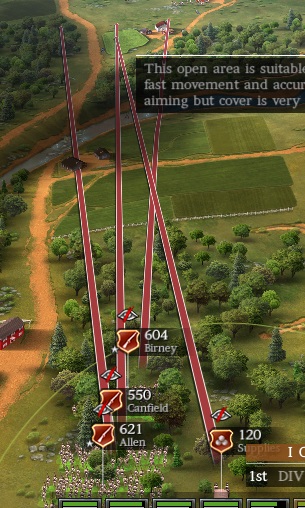
Option 1 (Easy – move in a straight line):
Left click on your Hekamer skirmishers, then Right click on the other side of the river to move them there. A short-lived red arrow will appear and they will start to move (unless you are still in PAUSE mode).
Try to aim them to cross at the ford as they will move faster.
Option 2 (tricky, takes practice, Follow a path):
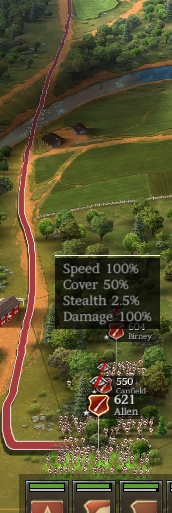
Left click and hold somewhere on the body of the unit or very close by and drag the mouse to set a path (like a road) to follow. This image is from later in the battle when reinforcements arrive and I am directing Allen’s Infantry to move along the road.
This can be frustrating because if you Left click and hold a bit too long on the unit before dragging the mouse, a direction arrow to face a new direction will pop up to turn the unit instead of allowing a path to be drawn. And if you left click not in the right place it will try to draw a selection box. (Why the developers allowed Left click and a long hold to pop the direction arrow when Right click and hold instantly pops the direction arrow is frustrating when you try to draw a path for your unit, and why this is tricky.)
NOTE: I haven’t found a method to set a unit’s final facing direction at the end of a drawn path. I think they just face in the direction the end of the path was pointing.
Facing a unit in different direction:
Turn in place:
Right clicking and holding the button down on a unit will pop up a direction arrow. Move the mouse and let go when it is in the direction you wish. The pointy end of that white indicator indicates their new facing direction.
Here I’m directing my Cavalry to turn in place to face our right flank.
Turn at the end of Movement:
Left click on a unit, but when you Right click at the destination end, hold the mouse down. As before, the direction arrow will pop up. Turn to face a direction and then let go. Your unit will gradually turn as they march, so be careful as they could get shot in the flank as they march.
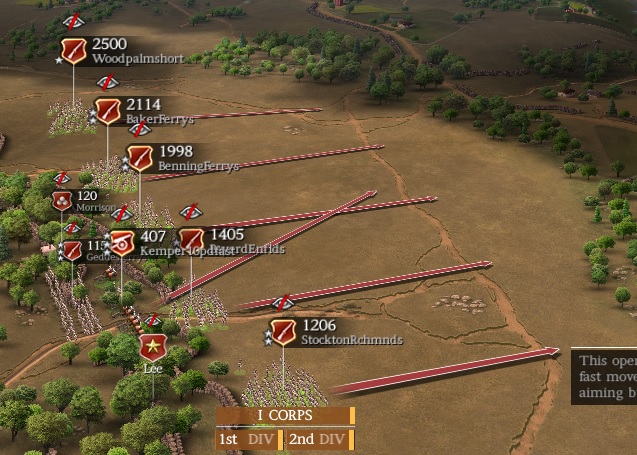
Selecting multiple Units to move
Option 1: RIght click and hold somewhere not on a unit and drag a box around the units
Option 2: Left click on each unit while holding down the CTRL key allows you to individually select/deselect units for a group. I find this more precise when many units are near each other.
Moving a group once they are selected
Option 1 (easy): Right click somewhere and they’ll all head out. This is an image from later in the battle where I’m telling the reinforcement to forge ahead.
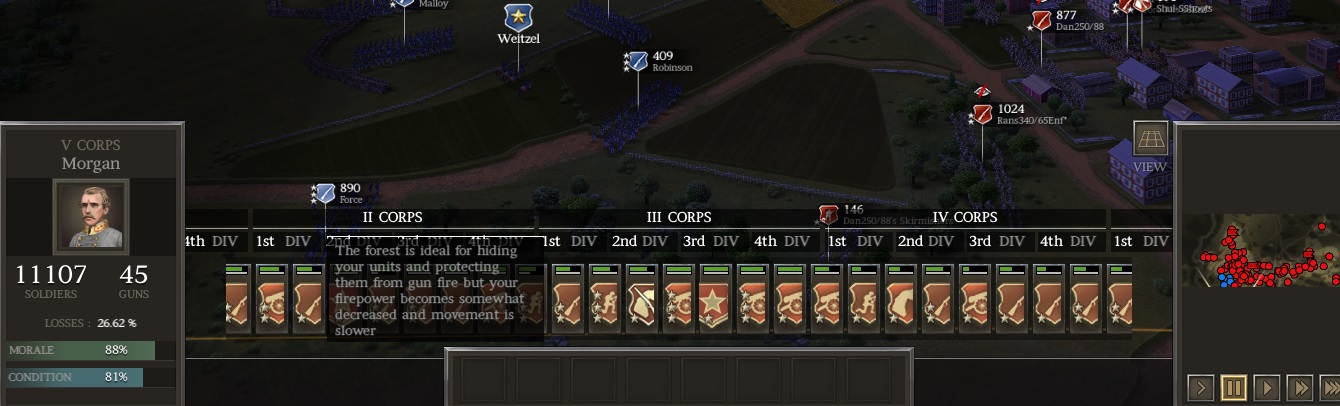
Notice that they sort of spread out as they go. They are all moving through the forest, which slows them down and tires them out. So you will need to decide if you want to execute this easy way or give a path to each individual unit (you can’t do a path for the group).
Option 2 (tricky): You can direct a group to form a line ahead following the contour of the land. This image is from a different battle. After selecting the units, right click and hold the button down at the LEFT MOST position of the line you want to form (where the red arrow is in the screen image) and then while holding the mouse button dragging to the right. Here you see the final position indicated just before letting go of the mouse button.
You’ll then see for about two seconds the directions they will move after you release the mouse button.
This method works best if your units are already in a line. If not, they seem to criss-cross willy-nilly on their way (and get shot up by the enemy).
Note: If you draw the line too long, you’ll get all sorts of weird shapes. If that happens, just release the mouse button and try again.
Note: The slightly pointy ends of the white chevrons indicate your units’ facing directions. Watch the chevrons! If your units are moving down the screen from the top, you drag right to left. I once dragged left to right as they were moving down the screen, and they all turned around to face backwards when they got to their destination!
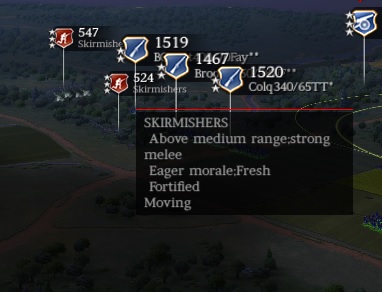
Skirmishers — a vital resource
In a previous section, we compared the Hexamer skirmishers to the infantry units. Besides dedicated skirmishers like that, each Infantry Unit can detach a group of skirmishers from its unit. These will have the same name as the parent, same weapons, but be faster and able to spot farther ahead. They will have the skirmisher icon to distinguish them (1 knee down fellow).
Detaching Skirmisher Units
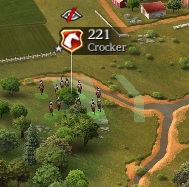
Click on an Infantry Unit, then press the ‘T’ key on your keyboard. The skirmisher unit will spawn. You can then move them where you want. Use them as scouts. In this image, I’ve detached skirmishers from each of my 2 infantry units and sent them to the woods as scouts along with Hexamer. Notice how they got there much faster than the infantry units. And, they’ve spotted 2 Union skirmishers.
Reattaching Skirmisher Units

Left clicking on a detached skirmisher unit and then the ‘T’ key (again) will cause them to find their parent group (no matter how far away) and join back up. They don’t have to be near them to do this, but if the parent group is behind them, they’ll turn around and may get shot up in their rear, so be careful! Usually you use this option when the skirmishers are ahead and holding an enemy in place and bringing up the main infantry unit. TIP: Move the parent AHEAD of them, and then give them the command. Then your infantry unit will be up to original strength.
Skirmishers skirmish — they hit and retreat
Your skirmishers will retreat when an enemy starts to close on them, so keep on eye on them! They also like to go ahead, fire, then fall back (and keep falling back). It’s a bit frustrating having them not stand and fight, so you can also try the HOLD button on them to make them stay in place (Space bar or leftmost icon in the lowest bar across the bottom of your screen. Press it 2x — once to Halt, then another to Hold). I still haven’t perfected this after 3 weeks, so I end up yelling at my skirmishers a lot to get back in there and fight.
Enemy skirmishers are tough to dislodge — how to do it
I’ve sat with much larger units shooting at small enemy skirmishers for quite a while. Best tactic: select the destination to move your infantry or cavalry unit as past those enemy skirmishers, so your guys will march forward forcing them back. Also, CHARGE them (C-Key). Heck, you’ve got more men in your infantry unit so go kick their butts.
Note: Skirmishers fall back at about the same speed as an infantry Charge, in which case watch your reloading red bar and when it’s full, HALT your charge (Space bar) and let them fire away.
Note: Charge uses up Condition quickly, so don’t allow your unit to go for too long in this mode.
All this preamble — When do I get to fight?
Yes now is the time to learn about attacking. All the info up to this point is helpful for moving and positioning your units for this moment. So now in the game, you should have detached skirmishers and directed them to the woods ahead. And you should have your 2 infantry units following them.
Your General and Cavalry are faster, so keep them in the rear of the others by only directing them ahead a bit at a time.
In this first battle as the CSA, the Union is sending reinforcements to the fort along the left edge of the map, and you want to get some units out there between them and the fort to stop them from piling into it. But first you have to clear out those skirmishers ahead of you so that they don’t shoot you in the flanks or rear.
Your plan is to fire at them with your own skirmishers, bring up the infantry units and attack and then charge the enemy, and once they’ve scattered you’ll send units out to the left to stop the Union’s fort reinforcements.
Attacking
Option 1-Pick an individual enemy unit to attack
Left click your unit then right click on an enemy unit. Your unitl will move ahead into range, halt and start firing.
They will also tend to follow the enemy unit when using this method, so I’ve noticed most of the videos use the next option. Also, your skirmishers will fire and then retreat out of range with this option, making you tell them again (and again!) to go back and attack.
Option2-Step in range and hold
Left click your unit and right click a destination closer to the enemy, not on them. When your unit moves there it will start firing, but it won’t follow the enemy around. They will turn left or right if an enemy tries to flank them. This method is better since you can set your line of units and they won’t wander around (much).
I usually click on the enemy so my unit closes with them, and when they get in range and fire, I click and hold with the Right mouse button to slightly adjust their facing direction and to keep them in place. They will continue firing from that spot. If the enemy moves back, I can then manually decide whether to direct my unit ahead.
Firing on the flanks of an enemy works great for sapping their morale and making them rout. Try to get your units to attack from the rear or side of the enemy.
Option 3-CHARGE
Command keys
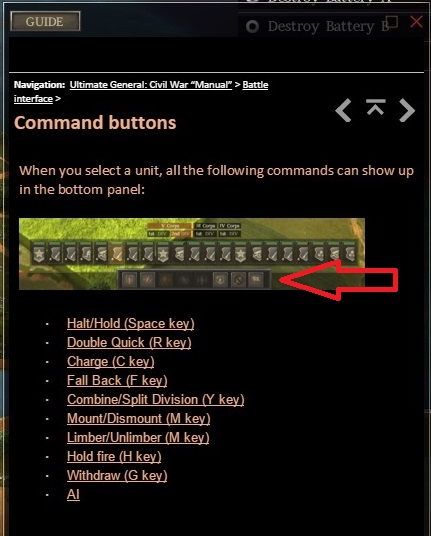
Infantry, cavalry, skirmishers and cannons have a few different commands. (Ex. Cavalry can dismount to take better advantage of cover). Go to the in-game Guide (click the ? at the upper left) to learn more about each of them.
Other useful locations on the battlefield

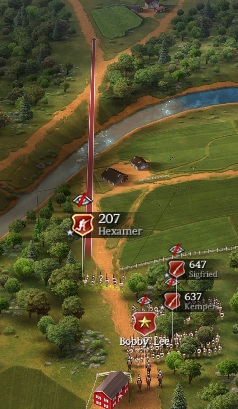
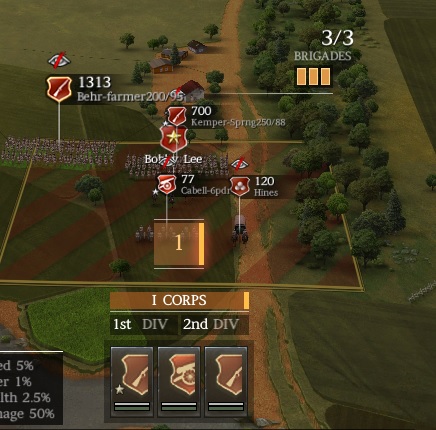
He and my 2 skirmisher units are near that eyeball. That location means that when you are near it, you can see units from farther away than normal. The little flag underneath the eye has turned red (it was blue before) to indicate that I now own it. You need to be near that eye in order to see far away. That is why I can see that one Union infantry group has made it to the Fort. I’ll ignore them as long as they don’t interfere with my delaying the other two.
My Cavalry and Kemper’s skirmishers have spotted 2 large Union infantry units on the left heading for the fort. I RAN (R-key) Kemper’s infantry, which slightly reduced their Condition, but it was important to stop those infantry units. I did not have to run the Skirmishers or Cavalry as they have only one speed.
A bit later:

Routing and Surrendering Units
Routing
If you hammer an enemy unit hard enough, they will Rout. If this happens to one of your units, rush your General near them to increase their moral and they should eventually stop.
If a unit is repeatedly hit hard, they may shatter and withdraw. This will look like a tiny, faint group of men all running in one direction with no emblem over them. Don’t bother chasing them, they are gone for good.
Surrendering
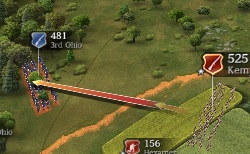
If you are crafty and surround a unit while causing them to Rout, they might surrender. This is difficult, as they usually find a gap to run through and escape. In this image, I took a chance and exposed my Cavalry to the other enemy units to block the river ford while hammering the Union 3rd Ohio in the woods. They surrendered.

Note in the upper right I have lots of time left to capture the fort. It’s time to rest up my units so their condition is near maximum for the fort attack.
Finishing this first battle
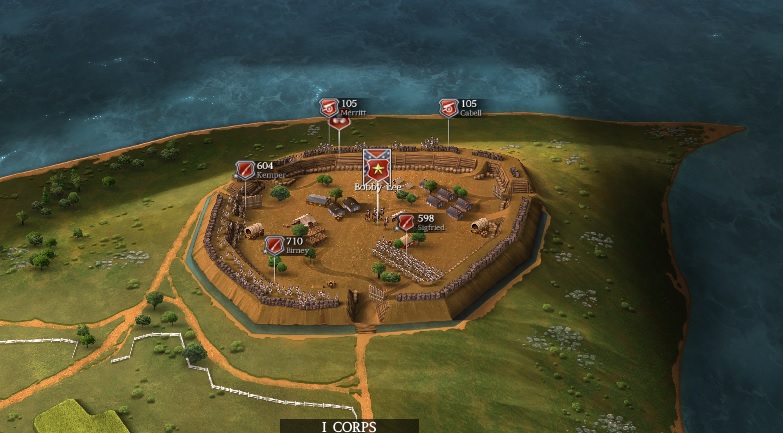
So now in my battle, one Union infantry has been captured, and the other is held to the wrong side of the river by 2 of my skirmishers stationed in the woods. (The Union unit actually retreated out of sight in the image below). When I get to the fort, there will be only 1 Union infantry, 1 skirmisher, and 2 cannons. And my reinforcements have arrived for the storming of the fort.
When you take over the fort and destroy the cannons, PART 2 of the battle will start, which is to hold onto the fort.
Update 1.0: Sigfried, Kemper and Cabell will be your units after the battle (see next section). So try to preserve them as much as possible.
Update 1.0: TIP: You can merge the men from two or more units of the same division to become a larger unit using the toolbar. Click on a unit and then the tool in orange below, and it will move to another unit and merge with it. Towards the end of this battle, as you take casualties, you may find that useful. Advanced tip: If the units have different weapons, select the BETTER equipped unit and after merging, all the units will have this weapon. After the battle, they revert back, and casualties are assigned proportionately.
Good luck!

When that second part ends, you will be given statistics about the battle and put into Camp where you can recoup, hire recruits, establish new brigades, buy guns and other options.
At Army Base Camp
OK, enough tips for the first battle. You should be able to play around by now (more battle tips come later in this guide, and watch the various videos to see how these early battles progress). After you’ve won (maybe after a try or two), now what? You’re in Camp.
First, press the MENU in the upper left and SAVE before you make any changes. Yes, now, before you do something you can’t reverse. There is no ‘Undo’ once you commit a change.
This is your Base Camp screen and is referred to in each section below.
Below I take each in turn:
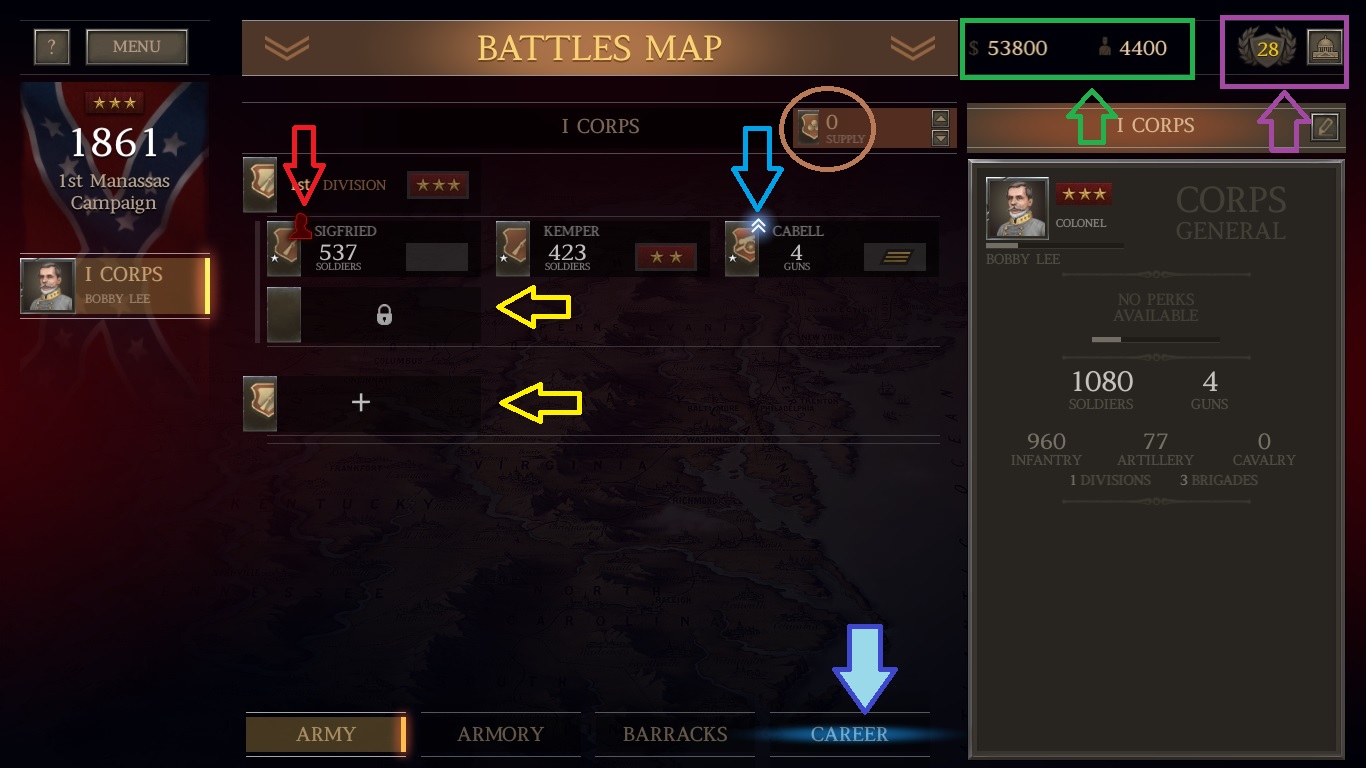
- Career Update (solid light blue arrow at the bottom)
- Replacing Dead or Wounded Commanders (red arrow)
- Upgrading Unit Abilities (blue arrow)
- Add Ammo to the Supply Wagon (brown circle)
- $ to Spend and Men Available for HIre (green box/arrow)
- Reputation Points Available for Spending (purple box/arrow)
- Creating a New Division and Brigades (yellow arrows)
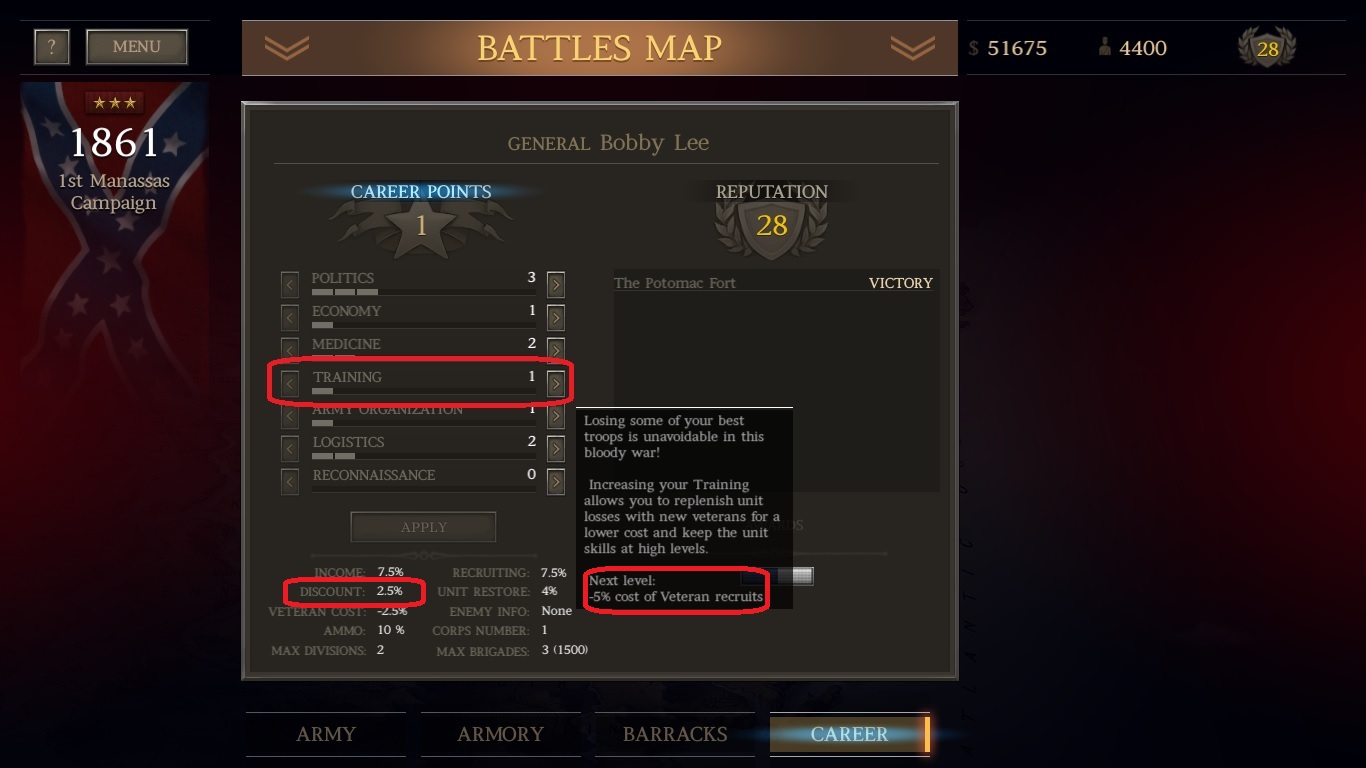
Career Update
The solid arrow at the bottom shows that the CAREER option has an upgrade available since it is highlighted. Click on Career at the bottom. Since I want to get some veterans early to build up one of my unit’s abilities,, I’m going to spend my 1 available point on Training to increase my hiring veterans discount before I add any to my units in the next steps. Update 1.0: In general, it is better to apply career points to Politics (to get money and recruits) and to Army Organization (which allows a larger army to be fielded) early. Then, as the battles get bigger, to apply points to Medicine (to heal your men).
Replacing Dead or Wounded Commanders
Poor Sigfried got killed. We need to replace him. Left click on his unit, and an information box appears at the right. His unit has a 1-star enhancement (blue circle). Without a commander, the unit’s efficiency is way down (red oval). If you put your mouse over it, it pops up the black box with more information. Left click on the empty box at the upper right (red circle in the image) where his picture would display.
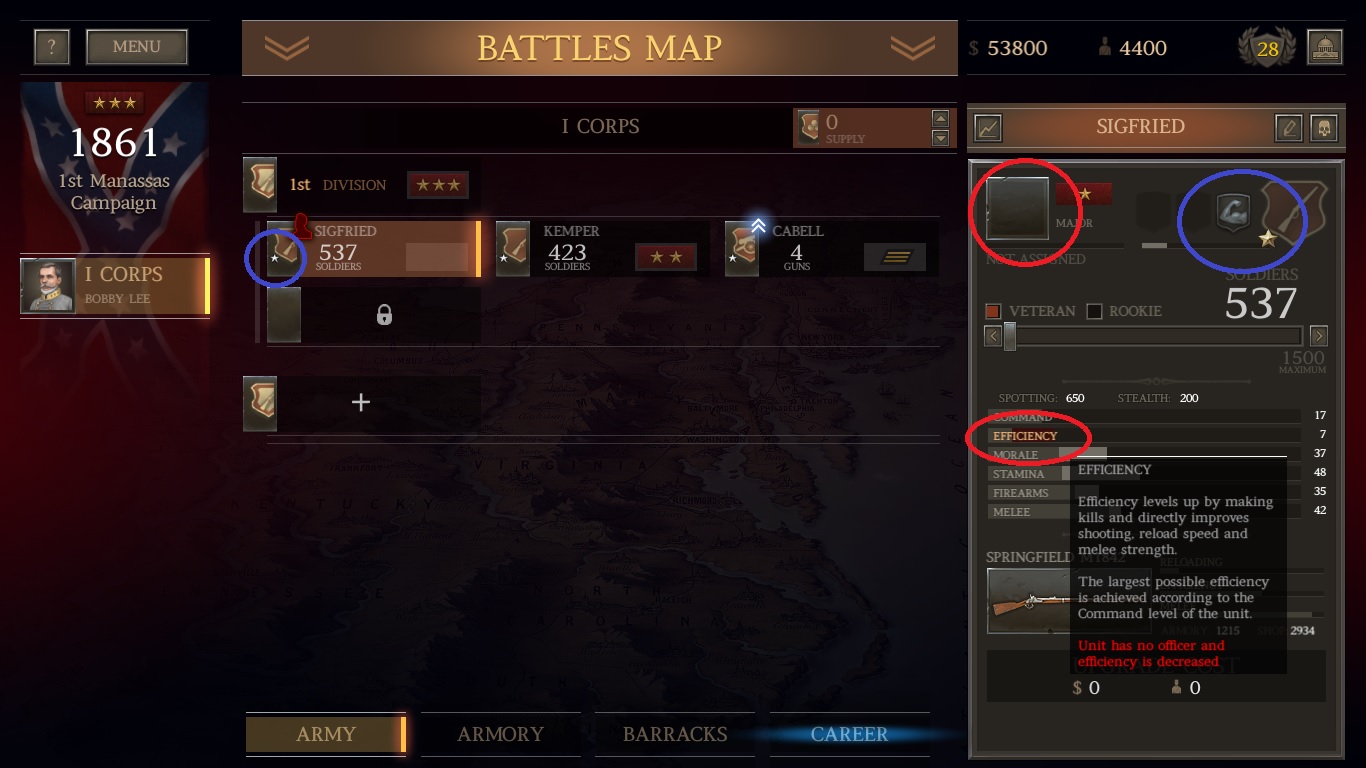
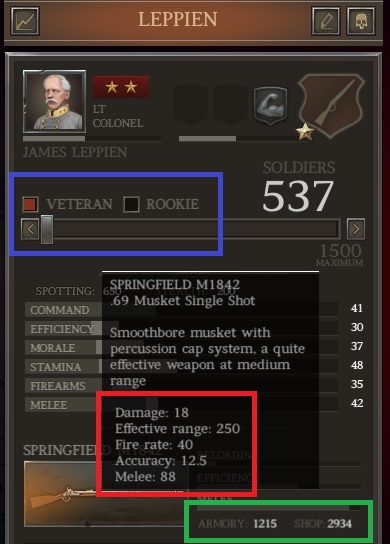
Let’s look at Leppien’s infantry unit in more detail.
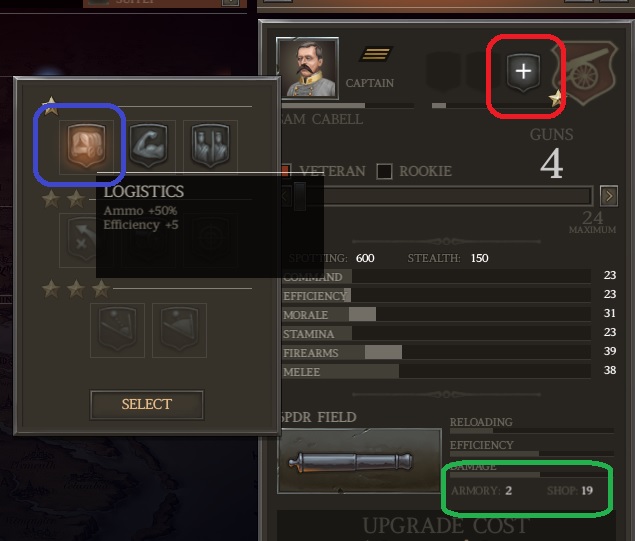
Hover your mouse over the unit’s gun symbol, and the pop up shows its stats (red box) and how many of that gun are in the Armory and the Shop (green box). Anything in the Armory costs nothing to supply your new recruits.
If you click on the gun, it will show all guns available in the shop and Armory along with their costs. There are lots of tips on buying guns for your units in other guides, so check those out when you can. You can also see weapons in the shop and armory by type of unit (infantry, skirmisher, cavalry and artillery) by clicking on ‘Armory’ down at the bottom of your screen.
Finally, the blue box shows that you can pick rookies or veterans to add to your unit. This will be explained in a following section.
Upgrading Unit Abilities
The Blue arrow in the image at the top pointed to that blue chevron that indicates my Artillery’s abilities can be upgraded. Left click on the Artillery unit, then click on the + (red box below) to bring up the popup of options.
Supply Wagon
The brown circle showed my supply wagon is empty. 1 unit of Ammo costs $1. The recommendation in the discussion boards is that you should have about $10-$15,000 in there to start, and as your army grows and battles get longer you should work up to $25-$30,000 for each Corp. So put $10K into it now for the next battle.
Money Available to Spend and Number of Men for Hire
The green box and arrow in the top image (and also in the following image) pointed to the area which showed we originally had $53,800 to spend on supplies, guns and recruiting veterans (rookies cost nothing). We have 4,400 Men we can recruit. NOTE: If you don’t use all the money or recruits, they accumulate from battle to battle.
Reputation Points
The purple arrow and box showed your reputation (28 points) after winning the first battle. Hovering your mouse over the number (28 here) pops up some extra information. You can spend those points by clicking on the capital building icon to get more guns, money, men. Click on the Capital Building.
We can spend 8 of our reputation points on the 3 options shown which will cost us 4 points each. I tend to hoard my points since the more points you have, the more your General boosts moral. Also, when you get enough points, your General gets extra enhancements. Whether to spend or not is based on your playing style. Update 1.0: 100 is the max, so if the next battle’s rewards will put you over 100, then spend some!

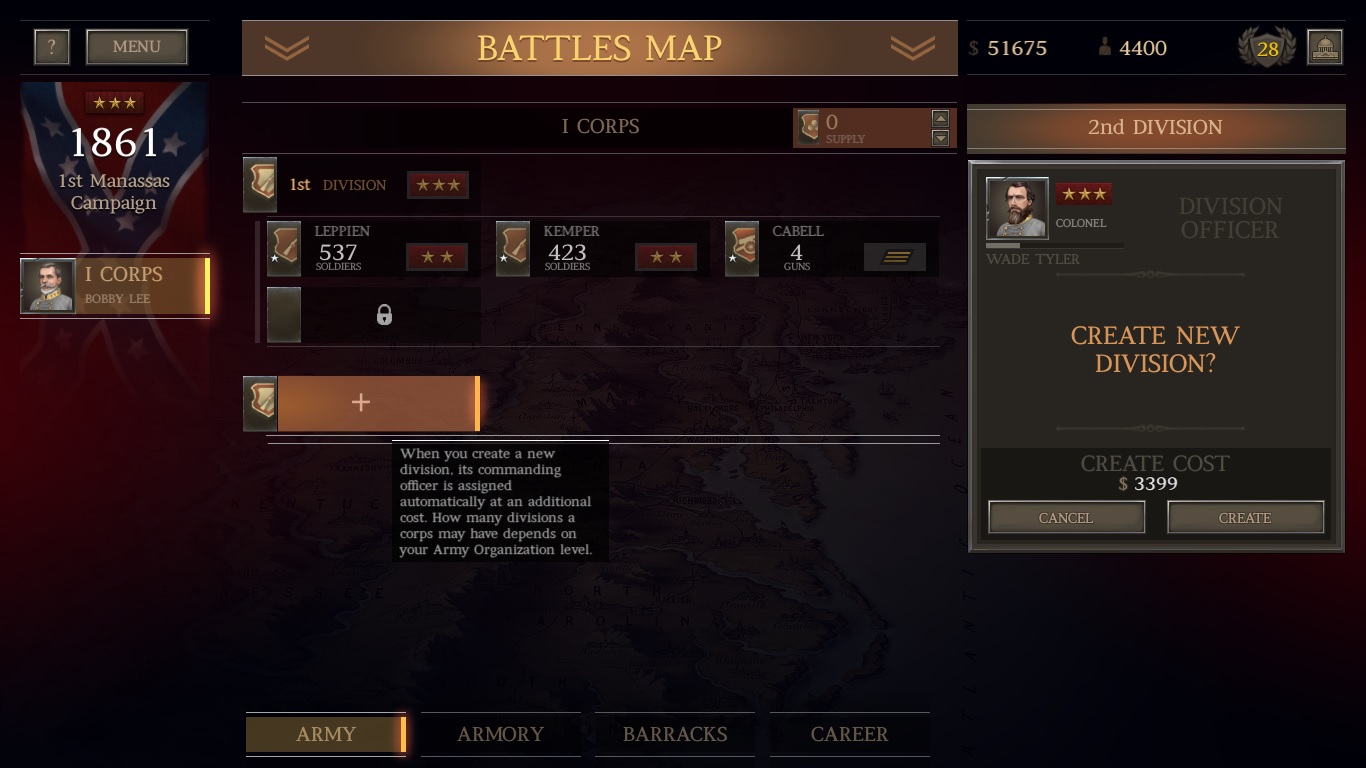
Creating a New Division and Brigades
In the original image, I can’t add another brigade to the 1st Division (the 4th brigade area displays a lock), but I can create a second Division (by clicking on the + there). As a reminder, how many Corps, Divisions, and Brigades you can have, as well as the maximum number of men in your brigades, is determined by your career points placed in Army Organization.
Let’s add a new division and brigade. Click on the + for a new division, and the game will automatically assign someone (in this case Wade Tyler).
Next click on the new + that appeared under your Division to create a new Brigade, and then choose Infantry from the pop up selection that appears.
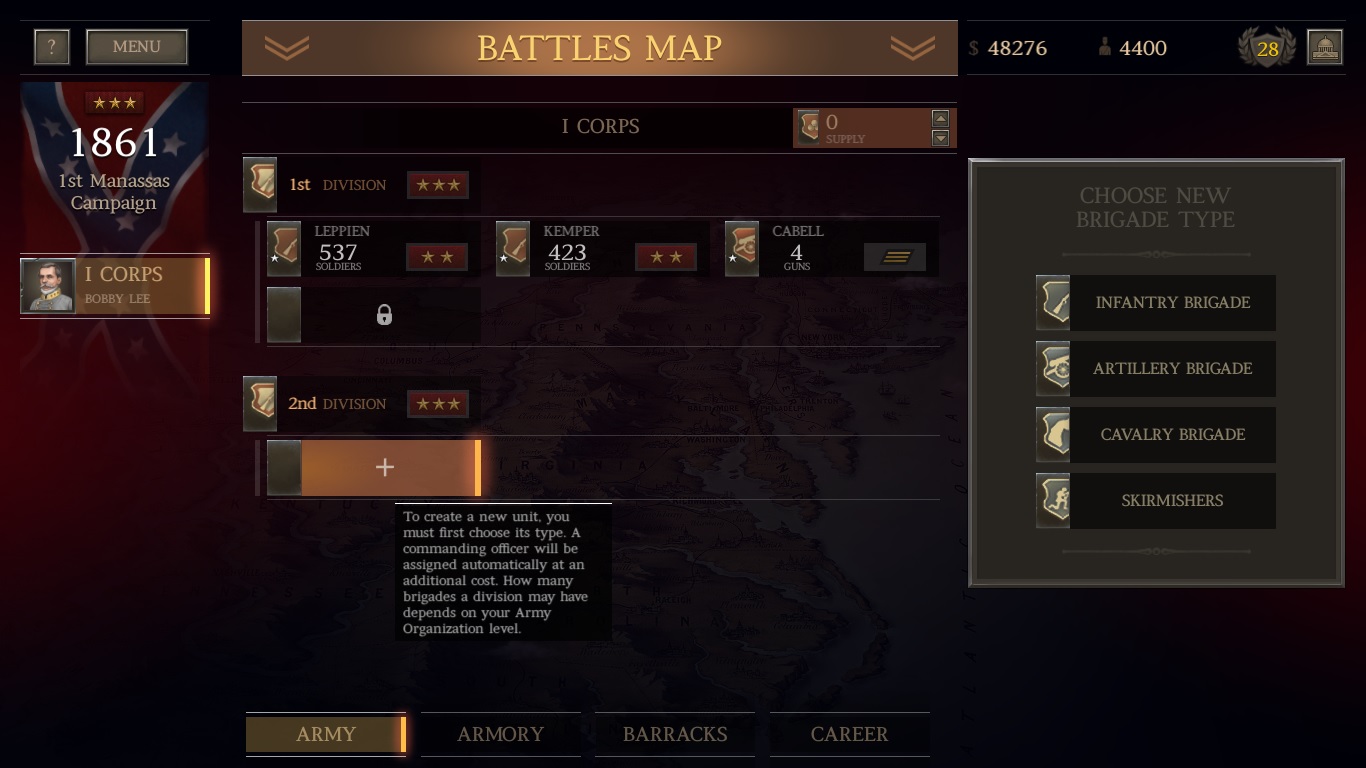
Rookies cost nothing to hire, and all newly created units get rookies.
NOTE: If you click on the rifle image here, it will show there are enough better guns in the Armory to equip them. But they are Rookies and apt to die, run and/or drop their weapons, so I’m saving those for the more experienced troops.
Rookies or Veterans?
And now for the most confusing issue: Should I hire veterans or rookies for my Brigades? What effect does each have on them?
Cost
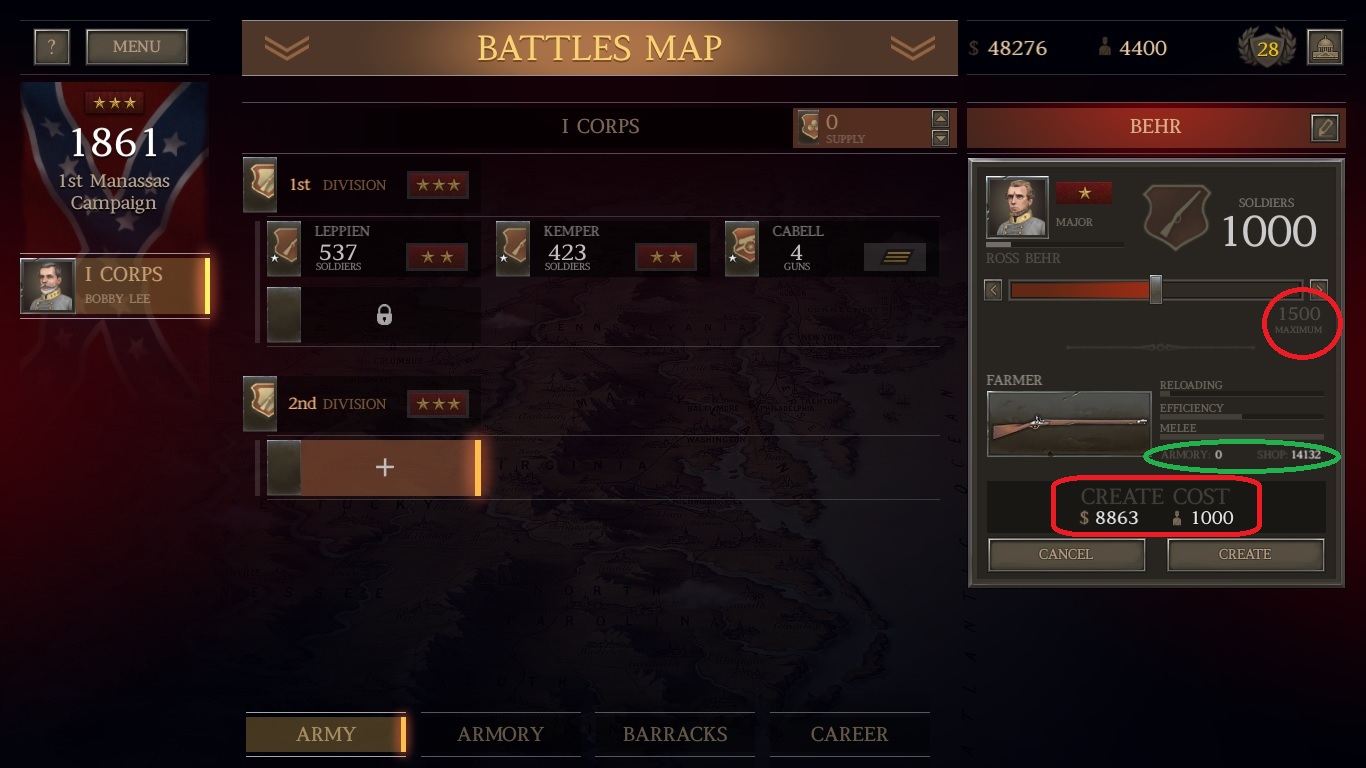
Rookies cost nothing. The cost of veterans depends on your discount (your Training career points). Going back to Leppien and his 537 men, I clicked the > one time.
and found it is $28 at this level of ‘training discount’ (blue circles). I have plenty of guns of this type in the Armory (green box) so that 1 gun will be free. The unit’s abilities are shown in the vertical purple box.
Comparing hiring Rookies to Veterans
Important point #1: The unit’s stats stay the same when hiring veterans, but go down the more rookies you add to it.
Let’s start by adding 500 veterans (left image), and cancel and go back and add 500 rookies (right image).
You’ll see from the right image that it cost us nothing for the Rookies (green box – free rookies and over 500 guns in the Armory), but WOW, the cost of those veterans in the left image uses up a huge chunk of our cash.


Also, all of our stats have gone down for the rookies (purple) compared to hiring Veterans (except for Command (41) ). The reduction in this instance is 30->25, 37->29, 48->42, 35->28, and Melee 42->31.
Important point #2: The red boxes also show that, by hiring Rookies, the unit’s progress bar towards another star enhancement has also gone down.
Important point #3: Look at the experience bar again (red boxes, to the right of the commander’s photo) which goes down as you add more rookie units. If you let that top bar fall to nothing, you’ll lose a star of improvements!
The following 2 images from after a later battle shows my 3-star unit with 1,036 men. Adding 504 Rookies (getting the unit to 1540 men) lost them a star of improvements!

Recommendations from Discussion Boards
1) Add veterans only to a couple of units so that you build them up from 1 to 2 to 3 stars
2) Add rookies just to the point where you will lose a star, apply that, and then add veterans.
Going back to my example just above, in the left image I added 124 Rookies and brought the bar almost to the point of losing a star (left image below). I applied that, and then I added 380 Veterans to bring me up to the same 1,540 men (right image below).
It cost me a lot, but not as much as if had hired 504 veterans. And I didn’t lose a star of enhancements.
IMPORTANT DIFFERENCE UNION VS. CSA:
1) CSA recruits are better, but the Union gets more men, money and weapons. If you hover your mouse over the number of recruits icon, you can see their makeup. Here is each after the first battle (CSA on left, Union on right)
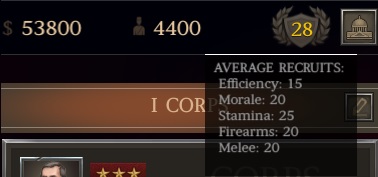
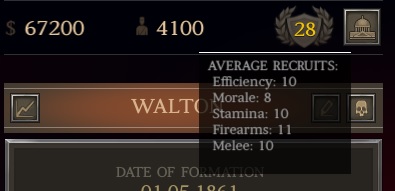
Note: I’m getting more recruits as the CSA in the above comparison only because I received an extra 1,000 men after the battle for capturing that Union infantry unit.
2) Also, if you create a new CSA Rookie brigade, and anytime before leaving Camp you give
them a Colonel (3-stars) or higher commander, the CSA unit automatically gets a 1-star improvement! And, then if you add more Rookies to it before leaving Camp, the unit’s progress bar towards another star won’t decrease so you can’t lose that star at this point. Wow!!
Note: I also discovered that in battles near the end of the campaign, you can get that 1-star improvement in your new CSA rookie brigade even with a 1-star Major assigned.
Finishing up at Camp
So now your ready to spend your dollars and hire more men. Here are a few more tips of what you can do at Camp.
Unit Casualties and Kills by Battle
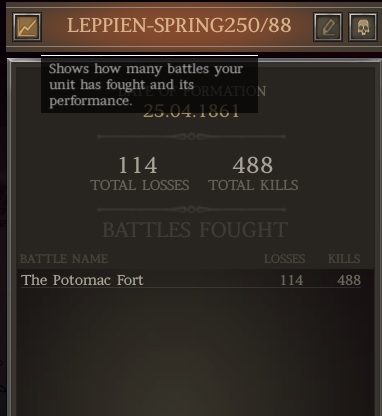
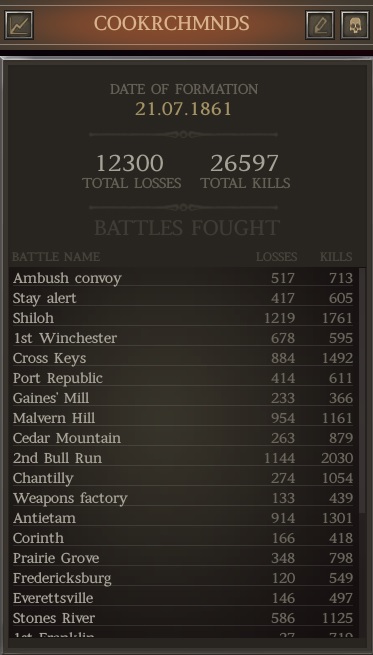
If you click on the little ‘graph’ emblem to the left of the unit’s name, it will bring up a history of their kills and deaths in all of their battles. Here are 2 images (one for Leppien/Sigfried’s old unit on how they did at the Fort battle, and one example of my later units).
Changing a Brigade’s name
If you Left click in the name of your Brigade, you can change it. Some people select interesting names (one of my favorites — the Tire Iron Brigade). Personally, since I have a difficut time remembering what the guns do, I add the gun type to the name (for Cannons with 12 pound Napoleans I append 12Naps, or LONG for Parrots since they are good for firing at other artillery at long range, etc). For Infantry I put the distance they shoot and melee power since I find that useful. For all Rookies I add Rooks. With Farmers for weapons, they are great at melees and do wonderfully when Charging an enemy.
Buying weapons (shop vs. armory)
I try not to buy better guns for units, esp. as the CSA. I found I always run out of money before I run out of men to hire. Instead I wait until I’ve captured enough in battles to upgrade the battalion with them for free from the Armory.
One of the discussion tips says that after a “major battle” you lose some of the guns in the SHOP (not Armory) so you may want to buy some guns from the shop to add to the Armory if you’re trying to get a certain number of one type for a unit. Update 1.1 Yes, the quantity of each weapon in the shop resets after each Grand Battle. Each weapon has a different number limit. So if you’re trying to accumulate 24-pound artillery and there are only 5 in the shop, buy them all, and the shop will restock after the Grand Battle.
Example of getting ready for the next battle:
So here, to get ready for the next battle after the Fort, I upped my two 1-star units with only veterans (hoping to get them to 2-stars soon) to get to 700 men each, and upped my two new rookie units to around 1300 men, and I have $2 left with some soldiers still available for hire. I renamed them all so that I know how far they shoot and their melee ability.
Choosing and starting the next battle
You’re ready for the next fight. Click MENU and then SAVE to save your Camp changes.
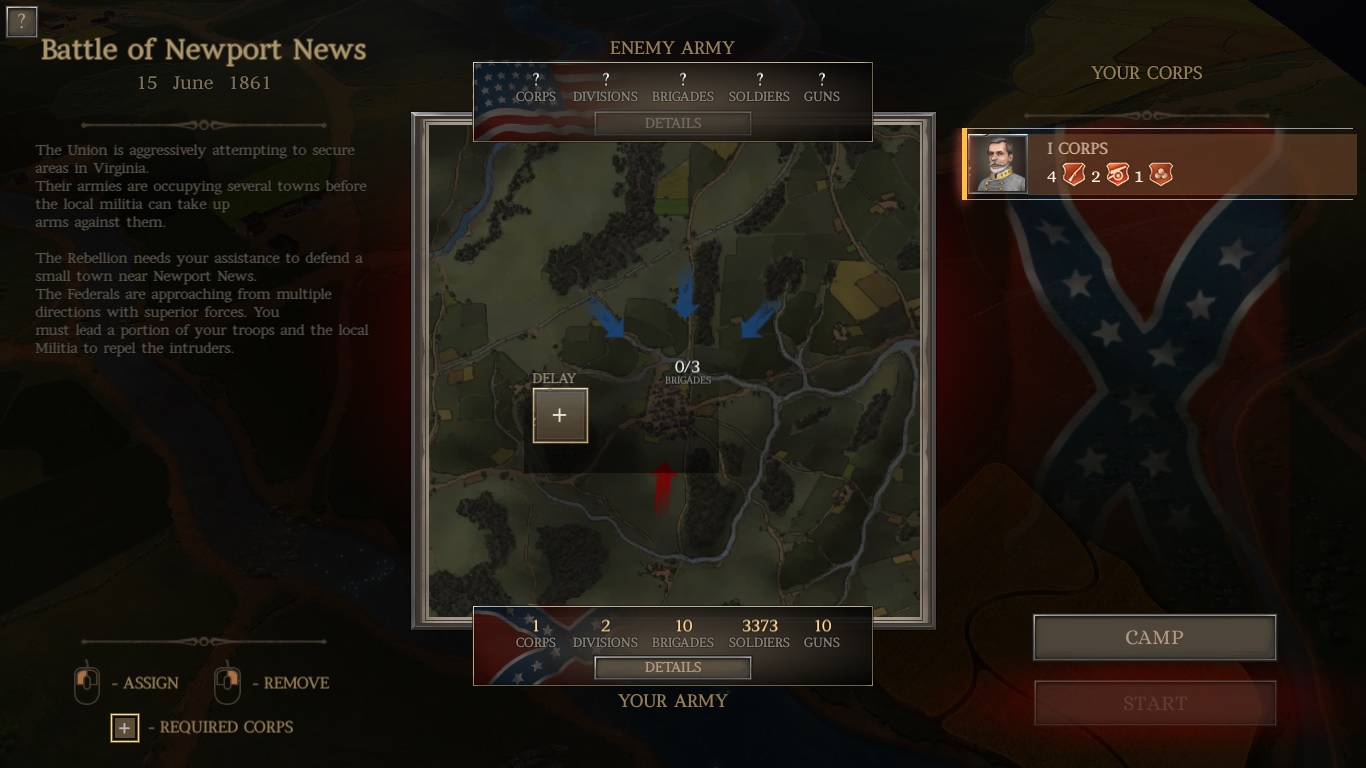
Now click on the big Battles Map link at the top. You’ll be presented with 2 choices: Newport News and 1st Bull Run. Click on both to see the rewards for winning. Always pick the one with fewest first, hoping to whittle down the enemy before the larger battle (which is the “big battle”). In this case, pick Newport News.
NOTE: Many discussions on the board mention that the enemy never seems to take a hit from earlier losses. This apparently was true in early/beta versions of the game. Now they still increase between battles, but over time if you consistently kill lots of the enemy their strength in numbers will come down.
Click in the ‘Delay’ box to put your 1st corp in to fight it. Notice that this battle only calls for 3 brigades and my Corp now has 6 (4 infantry and 2 artillery).
Oh darn, with only 3 Brigades allowed for this battle, I probably should have added the additional Cannons to my one-star Artillery group rather than creating a second one.
TIP: Before upgrading at Camp, go to the battles map, pick the next fight, and see how many brigades you are allowed. This may help you decide which units to upgrade or create. There is an option at the bottom right to go back to Camp instead of starting the battle.
Clicking Start at the lower right then places you before the battle starts within a ‘starting box’ to place your units. Now here is a key point: The computer will pick which 3 units to throw in there, but you’ll be able to modify it before the start.

Positioning Units before the start
Moving units to position them inside the box before the start of a battle is not the same as during a battle and is a bit frustrating until you figure it out.
Left click, hold, and drag the mouse to place a unit somewhere else in the ‘starting box’ (this is not the same as during play, as that sequence makes a line or path for them to march). If you left click without moving for about a half second, the direction arrow pops up instead and won’t let you move them.
Left click (not Right click like during battle) and hold longer (for a second) to then change their facing direction.
Important: Right click on Leppien’s unit and they disappear! Wait, where did they go? I restarted from Save too many times to count until I learned that they went into the pool of units across the bottom. Now I can pick them again or select another. For example, I’ve decided for this defensive battle that I’ll need more men, so after Right clicking on Leppien’s unit for them to go into the pool, I then Left clicked on Behr’s unit down in the pool. His informaion box will pop up at the bottom left. Then Left click in the starter box to put the unit in.
You’re now ready to start the next battle. The following section included more battlefield tips.
More Battlefield Tips
Fall Back
Falling Back (F-key) during battle is very useful, and it keeps your unit facing towards the enemy. You can stop them to fire if you wish (the Guide says they will fire while retreating) and then you can Fall Back again.
Note: They will keep retreating until you reverse your order, so don’t forget about them!
Tip: Sometimes they seem to go off at a diagonal instead of straight back. If this happens, order them to attack something opposite of where you want them to retreat, then issue the Fall Back order again
Tip: Sometimes you can trick an enemy unit into charging you by falling back in front of them. Then stop and fire while having your neighboring units fire into their flanks.
Warning: If you Charge and Melee and the opponent routs, it takes a while for your unit to respond to the Fall Back order. I attribute this to their enthusiasm during their melee victory. Keep this in mind. I have yelled at my screen many times “Fall back you idiots” while mashing the F-key as my unit follows the routed enemy into a mass of other enemy units. A funny discussion thread has started with folks contributing what they yell at their units during the game.
Fortifications/Dug in positions/Earthworks
It took me a while to figure out that, when you left click on a unit, if you see on the field a pole with a blank white shield, that is a fortification. I tried lining up behind the fences, but that doesn’t work.
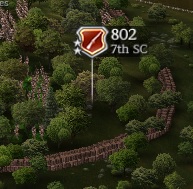
Left click on your unit, then Right click on the shield and they’ll go man it properly. (You’ll also see a blue line of where they’ll end up underneath the shield when you put your mouse over the shield). Here, the 802 men of my 7th South Carolinians will man the spot, and after they are in it you’ll see they have a double line around them indicating they are dug in.
Tip: Skirmishers can man the same fortifications, so sometimes it is good to rush them ahead to claim it before your main unit gets there.

Note: Cannons have their own fortification locations, but these appear only in a few battles. Their white shield is smaller and has a small picture of a cannon on the shield.
Update 1.0: TIP: Many times, esp. in the early battles, being in the woods or buidling near the fortification actually gives you more protection. Then, if you are charges, run your brigade into the fortification for its better melee bonus!
Supply during the battle
Your units have their own supply of ammo, depending on how many points you’ve placed in the Logistics career option. But how much ammo is in your supply wagon? It took me a while to notice that after you click on your supply wagon, the bar with the word SUPPLY is a slightly different color when full vs. empty. The bar decreases as ammo is used.
Note: In some battles, their are supply depots on the field. Once you capture them, hover your mouse over the icon to see how much supply is left in them.
Tip: Your cannons use lots of supply (Update 1.0: I’ve found this especially true of the 24 pound howitzer artillery). Put your close-support Arty (6-pounders, 12-pound Napoleons, 24-pounders Howitzers) on no fire until the enemy is near to conserve ammo. You can also click on the supply wagon and then, in the command bar at the bottom, tell them to supply only cannons or only small firearms.
Note: some battles have stationary supply areas/storehouses that will supply your nearby units once you capture them. Update 1.0: These can run out of supply eventually.
Warning: A long time later after I created a second Corp, I found it had its own supply wagon. I never noticed so I never stocked up supply for it and my units ran out of ammo during the battle. (I think when the supply is 0 to start, you don’t even get a supply wagon fielded in the battle, which is how I found out.) Ouch.
Enemy Supply Wagons
Chasing enemy supply wagons: Tell your chasing unit not to fire at it (H-hold fire) if you want to capture it. Skirmishers and Cavalry work best for this. Charge when you get close. You have to pay attention to your unit as the wagon will dodge/change directions frequently.
You can use the captured supply for your units during battle. Any amount that doesn’t get used gets converted to cash.
Small eyeball with a slash over my unit
What the heck is that? I finally looked it up after 3 weeks. It means your unit hasn’t been spotted or is being stealthy (ex. sneaking through the woods). The in-game Guide states that very large units, even in the woods, are still spotted so won’t get that symbol.
How are you doing during the battle?
There’s a way to find out. Place your mouse over the horizontal red/blue bar at the top and you’ll get a pop up of the casualties.

Note: This ONLY works after you have 4 or more Reconnaissance skill points in your Career options.
Blocked View across the Bottom of the battlefield
Update: This bugged me for a long time, and over a year later I finally learned the solution. When you field larger armies later in the campaign, your view across the bottom of the screen can become blocked. Many times you can’t even click on a unit down there. Example, I cannot select my skirmishers to go attack that routing Union unit along the bottom:
Camp Revisited
Here are a few additional tips while in the Army Camp.
Reconmaissance Points (Update 1.0)
Points in Recon provide you:
0-1 points: Nothing.
2-3 points: The top of the battle selection (where you decide which Corps to commit) will provide an estimate of how many enemy you will face.
4-5 points: During a battle, if you put your mouse over the bar at the top, you will see the number of men you have vs. the enemy (infantry/guns: current#/starting#)
I personally have never put more than 4 in. This from others:
6-7 points: (thanks to [95thNY Co.A]Teegardin21 for 6+ points info) You can view random brigades of the enemy army in the corps deployment in the same way you view yours on that screen. The viewing of enemy brigades is seeing enemy troop numbers, weapons, officers, and star numbers.
Level 6 also gives you “partial information” about the “enemy unit status” if you mouse over them during battle. See this Example below:
8-9 points: View all the enemy brigades in the deployment screen. It also gives you “full unit status” information during battle and “partial unit attributes” if you mouse over them. Here is the description from the Careers page. It
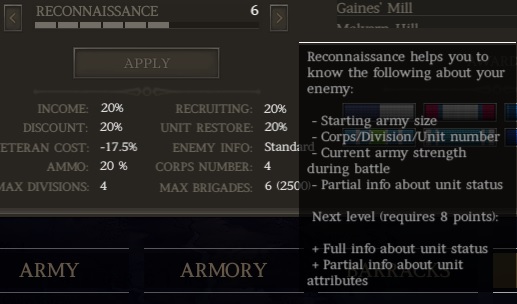
10 Points: Mouse over an enemy unit in battle to view condition, morale, and other information (adds “full unit status information”).
Commanders in Reserve
Why have Commanders in Reserve when you can buy them in Camp? Oh—I found that some of the multi-part battles let you go to Camp before the next part of the battle. If you have no one in reserve (and no money), you can’t replace the dead or wounded commanders from the first part of the battle, which affects that unit’s performance in the next part.
Moving Brigades between DIvisions
You can drag a Brigade and drop them anyplace there is a free spot allowing a new brigade creation (+). This way you can switch them to other divisions or corps depending on the upcoming battle. It is helpful to always keep one open spot in one Corps so you can move units around.
Note: You cannot directly swap one unit with another. It always has to go to a free spot. Update 1.0: Correction: If the Division is full, you can swap with one. Same if all the Divisions are full. But if a Corps is full, you can’t move in a unit from another Corps.
Upgrades going into Newport News redux
Going back, my first attempt at increasing my units looked like this:
So now, by using the tips I learned, I can go back since I saved after the Fort battle. I know to check the next battle first, and found that Newport News only uses 3 brigades. I’m going to use the tip that for the CSA, 3 star commanders give me an instant infantry upgrade. I’m going to put my extra cannons in my sole artillery unit. And I’ll put just veterans in only 1 of my original groups and move the other one to the second division.

I hope you found this Guide helpful. If you have any questions or items you’d like added or improved, let me know.
Happy Generaling!
Addendum – the first Union battle
Personally, I’ve found the first Union battle more difficult. Here are a few tips on how I proceed.
There are 2 sets of CSA snipers up on top of the cliff ready to shoot down at you, and one set of skirmishers in the woods ahead and at 2 o’clock.

3) Get your main infantry unit out to the end of the cliff along with your General. Get one or two of your skirmishers to help if you can. Stand your ground as a CSA infantry unit will appear and charge you, but they should rout after you fire on them.
4) Reinforcements arrive, so send the cavalry unit to help with those pesky CSA skirmishers who are still around. Get the rest to the town and hit the unit there.
5) The hard part is getting across the river as there are only 2 bridges. I put one skirmisher near the left-most bridge (that Union unit won’t cross to go after it), and pound the right unit with my 2 Artillery units for a while.

After you take control of the town, Part 2 is you have to hold it, and I think it is very hard.
Update 1.0: TIP: For Part 2, it is helpful to send skirmishers to the woods in the East to slow down and distract the Confederate units. This will give you more time to a) rest your units and b) get your reinforcements into town. Sending another skirmisher to the northeast will distract units coming in from the North.
Update 1.0: TIP: The units you are give after the battle are: Loomis, Walton, Woods (6-pound Arty) and Scales (10-pound Arty). Try to preserve them during the fight.
Good luck!
Update 1.0: Advanced topic – Scaling
The A.I. for each battle will field some minimum number of units, no matter how many you kill. But the game then scales them higher based on how many men YOU are bringing into the battle. It is a small effect on the easier difficulties and can be ignored when you are starting out, but the effect is much more pronounced at the higher difficulty levels. This is especially important because at MG and Legendary difficulties the enemy will be fielding 3-star units with much better weapons than you.
Essentially, the game will scale up based on the AVERAGE size of your brigades. The larger the average (ex. if you field all 2,500-man infantry brigades), the more and larger units the A.I. will bring.
So if you are playing on MG or Legendary mode and are having difficulty, you can use the following trick. Field lots of small 500-man Brigades to bring your average unit size down, and then merge them into larger units once the battle starts.
In order to see the effect, you need to have Recon level 2, which reports (inaccurately, but an estimate), what you will face.
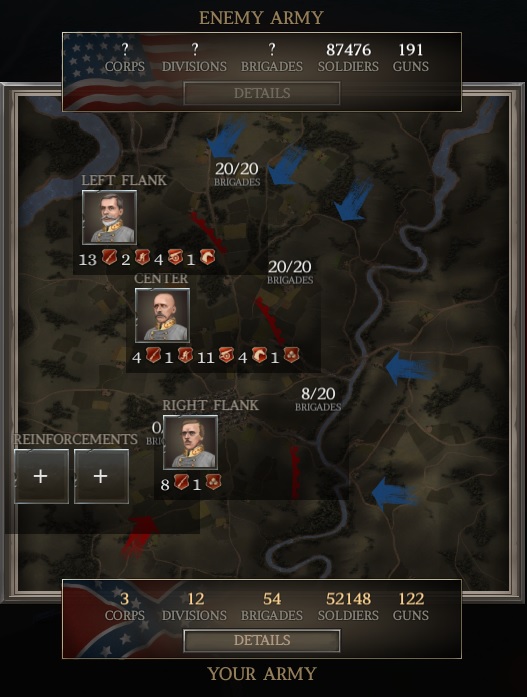
Here is a sample CSA Legendary Antietam screen, with 15 infantry brigades of 500 men each in the 3rd Corps (along with a smattering of other units):
You can see we will be facing 72,608 of the enemy.
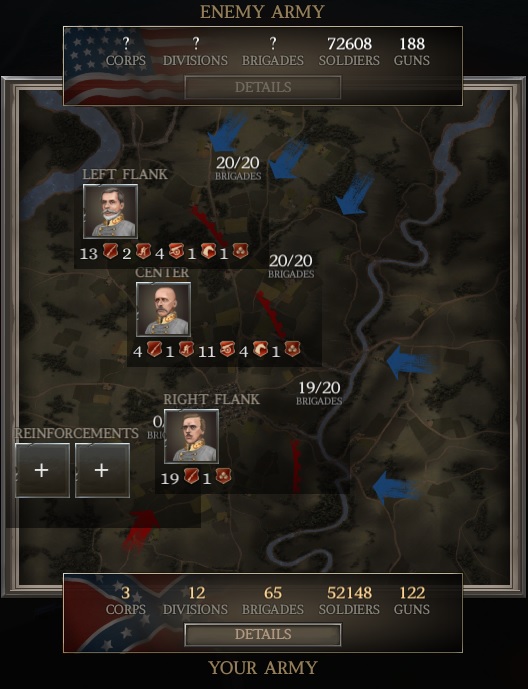
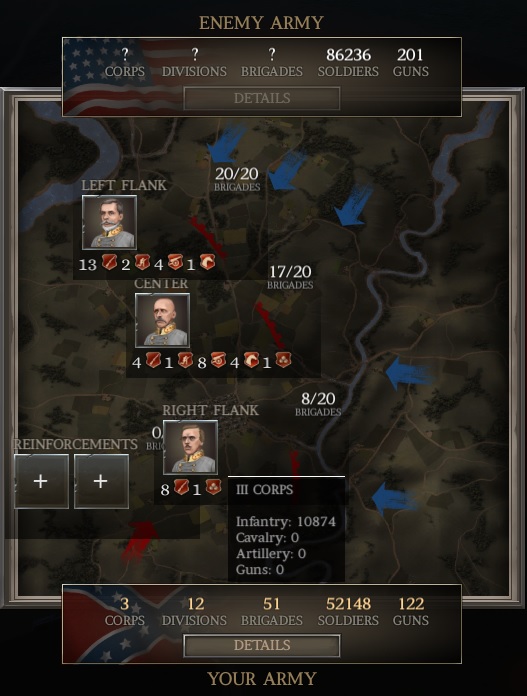
Now, deleting 7 of those 500-man units, and bringing 7 others up to 1,000 men each (so there are 7-1,000 and 1-500 brigades, or the same exact number of men, just some larger brigades):
We now will face 86,293 men! Or about 13,500 more enemy!

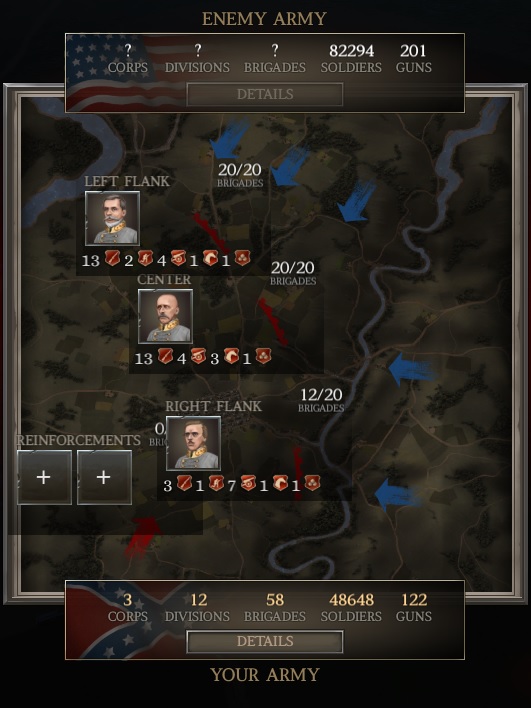
This requires some experimenting, so you need to save your different attempts, and there can be a ‘sweet spot’. In the following, I deleted 3 of those 1,000-man units and made 3 others 2,000 strong. (And deleted the lone 500 and upped the remaining 1,000 unit to 1,500).
This only added another 1,200 to the enemy size.
Why the number of Artillery changed slightly among the 3 versions, when I did not touch the artillery, is a mystery.
As a final test, I took the above, which had 6 5-guns artillery units, and changed them to 3 10-guns artillery.
This did slightly increase the number of artillery faced, and decreased the number of enemy.
My recommendation is, if you try this, concentrate on creating your main army, and then if you have spare recruites, put them in 500-man infantry brigades if you want to effect scaling. It works even better if you have a Corps that you aren’t sending into battle, since then you don’t have to worry about merging them during the fight since they never deploy.
Update 1.1 To test the effect of not having lots of small brigades to reduce your average brigade size, I went back to the original (top image) where we faced 72,608 enemy vs. our 52,148. Deleting 7 of the 500 man brigades, thus reducing our army to 48,648 with an average brigade size now larger, we face almost 10,000 more enemy!
Correction from @pandakraut: Antietam is an anomoly. In general, smaller overall army size is better for Grand Battles, and smaller unit sizes is better for the side battles. Thus it is a wise idea to test adding smaller units in the side battles, even if that increases your army size, since it reduces your average size.
Good luck!
Update 1.0: Army Organization Levels and Sizes per Battle
I’ve found it very useful to observe closely the number of units you are allowed to bring for each battle. This helps me decide when to use my Career points to increase Army Organization. Here is what each Organization level allows, with the changes marked in bold:
Level — #Corps/#Divisions-per-Corps/#Brigades-per-Division/#Men-per-Brigade [#Brigades/Corps]
0 – Does not exist (any initial option gives 1 Army Organization as a minimum)
1 – 1C/2D/3B/1500M [6B/C]
(i.e. 1 Corps of 2 Divisions, each with 3 Brigades of 1,500 men max. Max 6 Brigades per Corps.)
Army Org of 1 changes Post 1st Bull Run to: 2C/2D/3B/1500M [6B/C]
2 – 1C/2D/4B/1500M [8B/C]; Post 1st Bull Run: 2C/2D/4B/1500M [8B/C]
(i.e. After 1st Bull Run, you automatically get a second Corps slot with Army Org. 1 or 2)
3 – 2C/3D/4B/1500M [12B/C] (not sure if this changes Post Shiloh)
4 – 2C/3D/4B/2000M [12B/C]; Post Shiloh: 3C/3D/4B/2000M [12B/C]
(i.e. After Shiloh, you automatically get a third Corps slot)
5 – 3C/3D/5B/2000M [15B/C]; i.e. 3 Corps of 3 Divisions with 5 Brigades in each division. Maximum Infantry strength of 2,000 men per brigade. Total of 15 Brigades in a Corps max.
6 – 3C/4D/5B/2000M [20B/C]
7 – 3C/4D/5B/2500M [20B/C]
8 – 4C/4D/5B/2500M [20B/C]
9 – 4C/4D/6B/2500M [24B/C]
10 – 5C/4D/6B/2500M [24B/C]
—–
Here is what each battle allows you to field (as the CSA). {GB}=Grand Battle
[#] = one Corps, #Brigades.
Ex. [15] + [10] means the battle allows 1 Corp of 15 Brigades and 1 Corp of 10 Brigades
(I find the following helps me decide how many Brigades to bring to full strength in Camp).
NOTE: You can also find this and more in D-Dub’s and Kristoph42’s Battle Guides.
1-Potomic Fort [0] (Computer supplies all the Brigades)
2-NewPort News [3]
3{GB}-1st Bull Run [4] (Computer supplies all the Reinforcement Brigades)
——
4-Stay Alert [10] NOTE: You can actually field [11] even though the game tells you [10].
5-Ambush Convoy [10]
6{GB}-Shiloh [20] (So higher Army Organization levels of 5 or 6 help here)
——
7-1st Winchester [8]
8-Cross Keys [10]
9-Post Republic [9] NOTE: You can actually field [11] even though the game tells you [9].
10{GB}-Gaines Mill – Frontal Attack: [30 total from 2 Corps] + Flank Right: [25 total from 2 Corps]
(First battle allowing multiple Corps. At Organization 4, with only 2 Corp, put 1 Corps in Attack and 1 in Flank Right)
——
11{GB}-Malvern Hill – First Attack: [20] + Second Attack: [20] + Reserves: [20 total from 2 Corps] ;
i.e. 4 Corps Max (With only 2 Corps, nothing goes into the Reserves slots)
——
12-Ceder Mountain [15]
13-Manassas Depot [0] (Computer supplies all the units)
14{GB}-2nd Bull Run – Diversion: [25] + Reinforcements: [60 total from 3 Corps]
(Here, an Army Organization of 9 will allow you to field 24 Brigades in your 1st Corps)
15-Chantilly [13] NOTE: You can actually field [14] even though the game tells you [13].
16-Harpers Ferry aka Weapons Factory [12]
17{GB}-Antietam aka Sharpsburg – Left: [20] + Right: [20] + Center: [20} + Reinforcements: [20 total from 2 Corps] (First battle allowing 5 Corps)
——
18-Corinth [15]
19-Prairie Grove [12]
20{GB}-Fredericksburg – Left: [25] + Center: [25] + Right: [25] + Reinforcements: [50 total from 2 Corps]
—-
21-Everettsville [15]
22{GB}-Stones River – Left: [20] + Reserves: [20] + Right: [20]
—-
23-1st Franklin [12]
24-Blackwater Heights [20]
25-Rio Hill [10]
26{GB}-Chancellorsville – Flanking [25] + Center [25]
26a-Salem’s Church (post Chancellorsville automatic mini-battle) [10]
—-
27-Brandy Station [0] (Computer supplies all the Brigades)
28{GB}-Gettysburg – 1st Attack [20] + 2nd Attack [15] + Reinforcements [25]
—-
29-Siege of Jackson [20]
30{GB}-Chickamauga – Vanguard [25] + Day 2 Reinforcements [25]
—-
31-Mansfield [25]
32-Saunder’s Farm [25] + Reinforcements [10]
33-Laurel Hill [25]
34{GB}-Cold Harbor – Left: [25} + Right: [25] + Tomorrow’s Reinforcements [15]
—-
35-Hall’s Ferry [25] + Reinforcements [25] (Fictional retake of Vicksburg)
36-Hardin Pike [25] + Reinforcements [25] (Fictional retake of Nashville)
37{GB}-Washington – Main Attack: [50 total from 2 corps] + 2nd Attack [25] + Right Flank [25] + Left Flank [25]
Update 1.5: Percentages by Career Points
The following shows the percentage you get for each Career point placed.
This is good for both CSA and Union, and any difficulty.
Note:
Politics increases your reward of money and men by that percentage.
Economy gives you that percent discount on weapons purchases.
Medicine returns that percentage of killed men after the battle.
Training reduces the cost of Veterans by that percentage.
Logistics increases the ammo carried by your men by that percentage.
Points Politics Economy Medicine Training ArmyOrg Logistics Recon 1 2.5% 2.5% 2.0% -2.5% N/A 5.0% N/A 2 5.0% 5.0% 4.0% -5.0% N/A 10.0% N/A 3 7.5% 7.5% 6.0% -7.5% N/A 15.0% N/A 4 10.0% 10.0% 8.0% -10.0% N/A 20.0% N/A 5 12.5% 12.5% 10.0% -12.5% N/A 25.0% N/A 6 15.0% 15.0% 12.0% -15.0% N/A 30.0% N/A 7 17.5% 17.5% 14.0% -17.5% N/A 35.0% N/A 8 20.0% 20.0% 16.0% -20.0% N/A 40.0% N/A 9 22.5% 22.5% 18.0% -22.5% N/A 45.0% N/A 10 25.0% 25.0% 20.0% -25.0% N/A 50.0% N/A
Update 1.6: CSA Reputation Purchases
What you can purchase with your Reputation Points and their costs is the same for all difficulty levels. The amount of Reputation Points that you have to spend is in Parentheses.
The items and their amounts only change after each Grand Battle. They do not change after minor battles.
[Thanks for this information goes to: Pandakraut and LAntorcha]
Post Potomac Fort
Government:
– 2000 Springfield M1842 (4)
– 2000 M1841 Mississippi (4)
– Brig. Gen. James Archer (4)
Post 1st Bull Run
Government:
– 2000 Men (18)
– 2000 Lorenz (9)
– 8 12pdr Napoleon (9)
– 2000 MJ&G Type II (7)
– Brig. Gen. Richard Ewell (4)
– Brig. Gen. Jubal Early (4)
– Brig. Gen. Jeb Stuart (4)
Post Shiloh
Government:
– $75000 (18)
– 3500 men (18)
– 2500 1853 Enfield (11)
– 750 Fayetteville (8)
– 250 Whitworth (TS) (6)
– 8 10pdr Parrott (6)
– Major Gen. Daniel Hill (6)
– Major Gen. P.G.T. Beaureguard (6)
– Brig. Gen. Joseph Kershaw (4)
Post Gaines Mill
Government:
– $75000 (18)
– 3500 men (18)
– 1750 1853 Enfield (7)
– 1750 1853 Enfield (7)
– 8 10pdr Parrott (5)
– 8 10pdr Ordnance (5)
– Brig. Gen. Lafayette McLaws (4)
– Brig. Gen. Paul Semmes (4)
Post Malvern Mill
Government:
– $100000 (22)
– 4000 men (22)
– 500 LeMat (7)
– 750 Fayetteville (7)
– 2000 1853 Enfield (7)
– 6 10pdr Tredegar (6)
– 6 6pdr Wiard (6)
– Brig. Gen. John Hood (4)
– Brig. Gen. George Pickett (4)
Post 2nd Bull Run
Government:
– $75000 (18)
– 3750 men (18)
– 2000 1853 Enfield (15)
– 1500 CS Richmond (11)
– 8 12pdr Whitworth (7)
– 8 14pdr James (7)
– Brig. Gen. Lewis Armistead (4)
– Brig. Gen. William Barksdale (4)
– Brig. Gen. Richard Garnett (4)
Post Antietam
Government:
– $70000 (30)
– 3500 men (30)
– 2000 1853 Enfield (15)
– 1500 CS Richmond (15)
– 8 24pdr Howitzer (10)
– 8 10pdr Tredegar (7)
– Brig. Gen. A.P. Hill (5)
Post Fredericksburg
Government:
– $70000 (30)
– 3500 men (30)
– 2000 1853 Enfield (15)
– 1500 CS Richmond (15)
– 8 24pdr Howitzer (15)
– Major Gen. Wililam Hardee (15)
– Major Gen. Leonidas Polk (15)
Post Stones River
Government:
– $60000 (30)
– 3000 men (30)
– 2000 1853 Enfield (20)
– 1500 CS Richmond (20)
– 500 LeMat (20)
Post Chancellorsville
Government:
– $80000 (40)
– 5000 men (40)
– 3000 1853 Enfield (25)
– 2000 CS Richmond (25)
– Brig. Gen. James Pettigrew (5)
Post Gettysburg
Government:
– $75000 (35)
– 4000 men (35)
– 3000 1853 Enfield (25)
– 2000 CS Richmond (25)
– 1000 Fayetteville (25)
– Major Gen. Patrick Cleburn (8)
Post Chickamauga
Reputation:
– $70000 (25)
– 4000 Men (25)
Post Cold Harbor
Government:
– $140000 (35)
– 8000 Men (35)
– 4000 CS Richmond (20)
– 12 24pdr Howitzer (10)
– 12 20pdr Parrott (10)
– 600 1862 C.S. Richmond (8)
– 600 LeMat (8)
Update 1.6: Union Reputation Purchases
Since I did not create a Union Battle Guide, I’ve added the Union Reputation Purchase information in this CSA Guide. Note that the items and their costs are different.
What you can purchase with your Reputation Points and their costs is the same for all difficulty levels. The amount of Reputation Points that you have to spend is in Parentheses.
The items and their amounts only change after each Grand Battle. They do not change after minor battles.
Post Capture the Train Station
Government:
– 2000 Palmetto M1842 (4)
– 6 10pdr Ordanance (4)
– Brig. Gen. John Gibbons (4)
Post 1st Bull Run
Government:
– $7,500 (18)
– 4000 Men (18)
– 2000 Springfield M1855 (7)
– 4 24pdr Howitzer (6)
– Brig. Gen. Irwin McDowell (4)
– Brig. Gen. William Sherman (4)
Post Shiloh
Government:
– $100,000 (18)
– 5,000 men (18)
– 2000 Springfield M1855 (10)
– 1750 Harpers Ferry M1855 (7)
– 6 20pdr Parrott (6)
– Brig. Gen. John Swdgwick (4)
– Brig. Gen. Joseph Hooker (4)
Post Gaines Mill
Government:
– $50,000 (18)
– 2500 men (18)
– 2000 Springfield M1855 (7)
– 1750 Harpers Ferry M1855 (7)
– Brig. Gen. Henry Slocum (4)
– Brig. Gen. George Sykes (4)
Post Malvern Mill
Government:
– $120,000 (18)
– 5000 men (18)
– 4000 Springfield M1855 (15)
– 3500 Harpers Ferry M1855 (15)
– 500 Burnside (7)
– 6 20pdr Parrott (6)
– Brig. Gen. John Reynolds (6)
– Brig. Gen. Winfield Hancock (4)
Post 2nd Bull Run
Government:
– $125,000 (22)
– 5000 men (22)
– 7500 Springfield M1855 (18)
– 12 12pdr Napoleon (7)
– 12 10pdr Ordnance (7)
– 12 10pdr Parrott (7)
– Brig. Gen. George Mead (6)
– Brig. Gen. Abrose Burnside (4)
Post Antietam
Government:
– $125,000 (30)
– 8000 men (30)
– 2000 Springfield M1861 (20)
– 12 20pdr Parrott (15)
– Brig. Gen. Patrick Kelly (6)
– Brig. Gen. Samuel Carroll (6)
Post Fredericksburg
Government:
– $125,000 (30)
– 8000 men (30)
– 2000 Springfield M1861 (20)
– 12 20pdr Parrott (15)
– Maj. Gen. William Rosecrans (10)
– Brig. Gen. Phillip Sheridan (5)
Post Stones River
Government:
– $115,000 (30)
– 7000 men (30)
– 2000 Springfield M1861 (20)
– 12 20pdr Parrott (20)
– 650 Burnside (15)
Post Chancellorsville
Government:
– $150,000 (40)
– 8000 men (40)
– 3000 Springfield M1861 (30)
– 16 20pdr Parrott (20)
– 400 Spencer (20)
– Maj. Gen. Daniel Sickles (10)
– Brig. Gen. George Stannard (5)
– Colonel Strong Vincent (3)
Post Gettysburg
Government:
– $100,000 (35)
– 6000 men (30)
– 2000 Springfield M1863 (30)
– 2000 Springfield M1861 (25)
– 400 Spencer (20)
– Maj. Gen. George Thomas (8)
– Brig. Gen. John Buford (5)
Post Chickamauga
Reputation:
– $150,000 (35)
– 8000 men (35)
– 3000 Springfield M1863 (20)
– 3000 Springfield M1861 (15)
– 20 20pdr Parrott (10)
– 500 Spencer Carbine (7)
– 500 Burnside (7)
Post Cold Harbor
Government:
– $200,000 (35)
– 12,000 Men (35)
– 4000 Springfield M1863 (20)
– 12 20pdr Parrott (10)
– 12 14pdr James (8)
– 12 12pdr Whitworth (8)
– 500 Spencer (7)
– 500 Spencer Carbine (7)
– 250 Whitworth(TS) (6)
– 600 1862 C.S. Richmond (8)
– 600 LeMat (8)