
Overview
With a clear description of each travel port, this guide aims at helping Niche players to anticipate migrations from an island to another and travel with confidence.
Introduction
In the game Niche, you are leading a herd of Nichelings on an island. From time to time you’ll need or want to migrate to other islands through the use of Travel Ports.
Each Travel Port leads to a specific island and this guide will help you recognize them all. You’ll be able to answer the question : “Where does this Travel Port lead ?“
Then if you’re asking yourself “How many nichelings can travel to the next island?“, this guide will make sure you do not forget anyone behind (unpurposely).
After that, you’ll find some information regarding the travel rules and be able to answer the question : “How can I get to this Island I want to visit ?“
Where does this Travel Port lead ?
Each Island can be accessed through a recognizable Travel Port. A Travel Port consists in a Stele and several tiles, the Port Area. To know what Island is next, you’ll need to identify the Travel Port characteristics :
- its stele type
- its tile base
- its tile decoration
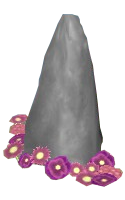
Travel Stele are erected grey stones. There is one stele in each Travel Port (for a total of 2 or 3 on each island). There are three types of Travel Stele : with or without flowers, with or without a skull. These differences indicate the difficulty level of the Island :
level
Killer ****


In previous versions of the game, all the steles were identical. The differences pictured here were implemented somewhere between v1.0.7 and v1.2.3.
Islands in Niche are associated with a main Biome. They differ one from another in fauna, flora, and climate. One can know what type of Biome is to be expected on the next island by identifying the tile base of the Travel Port :


The final difference between Travel Ports is the decoration one can find on the tiles of the Travel Area.


* Easy Island Travel Ports Table
Tile /
Decoration
** Whale Island
Tile /
Decoration

** Medium Island Travel Ports Table
Tile /
Decoration
*** Hard Island Travel Ports Table
Tile /
Decoration
– From Overgrown Jungle ** to Sleepy Reeds ***, there are no bones on the Travel Port because the tiles are or were covered with giant plants.
**** Killer Island Travel Ports Table
Tile /
Decoration
How many Nichelings can travel to the next island?
The maximum number of Nichelings you can bring to the next island is given by the number of tiles in the Port Travel Area : one nicheling per tile. When you activate the stele to travel, a warning reminds you that any Nicheling outside it will be left behind.
The number of tiles in the Travel Port Area is the same as the Arrival Port Area. The only difference is that there is no Travel Stele at the Arrival Port : you can’t go back.


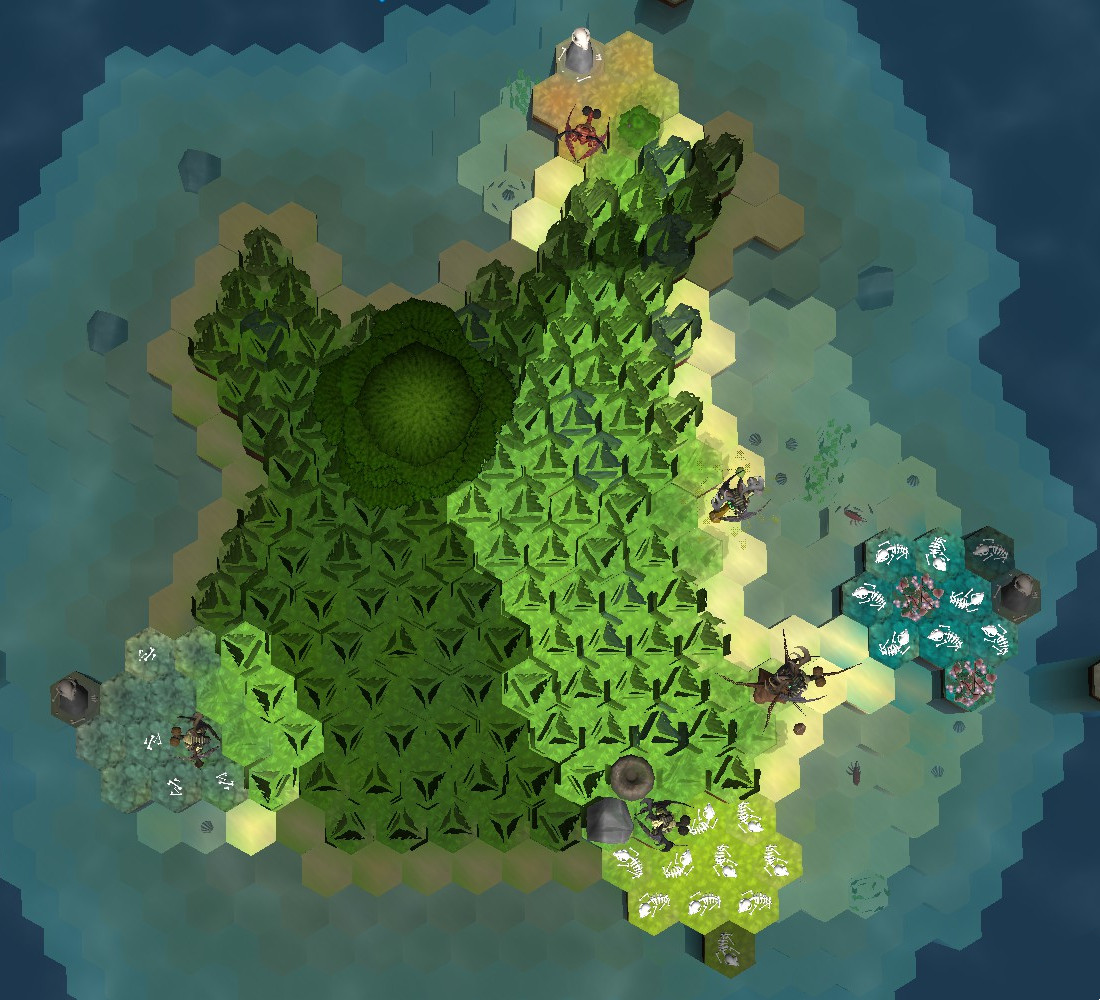
When you are ready to move your nichelings to the next island, move them within the Travel Port Area. We are talking about the tiles surrounding the Travel Stele. Most of the time, the Travel Port Area is clearly identifiable as it differs in color and pattern from the rest of the island. It’s a flat area at the lowest altitude of the island ground.


The number of tiles you can use to travel can be one the the following : 5, 7, 10 or 15.
Some other general observations :
– Number of tiles at the West Port ≥ East Port ≥ North Port.
– (/xx) in the table are observations made only when travelling from Crossing *** and Home Island ****.
In the following screenshot, the Nichelings arrived on Crossing *** from Home Island **** where there were 10 tiles in the Travel Port Area. From here, the Nichelings can travel :
– West to Sleepy Reeds *** (10 tiles), or
– East to Deep Jungle **** (10 tiles), or
– North to Home Island **** (5 tiles).
How can I get to this Island I want to visit ?
Islands port are randomly chosen when you settle on a new island. Even though it’s random, there is some logic behind it. Understand the basic rules, have a look at my home made map and you’ll be a true Nicheling Navigator in no time.
Rule number 1 : Nichelings always arrive at an island from its South extremity.
Rule number 2 : Nichelings can never go back to a previously visited island (but you can keep visiting new islands of a biome you already explored). It also means that you’ll never encounter Nichelings you left behind (nor their offsprings).
Rule number 3 : Nichelings can only travel forward, using the Travel Ports found on their current Island (West, East and/or North side).
Rule number 4 : Travel Ports will always lead to islands of types differing from the current island (e.g. : Nichelings can’t travel to Tiny Green * from Tiny Green *, not even to Whale Island ** from Whale Island **).
Generally (but not always) :
– travelling West will get your Nichelings to an island of a lower difficulty level.
– travelling East will get your Nichelings to an island of an equal difficulty level.
– travelling North will get your Nichelings to an island of a higher difficulty level.
Simplified Travel Map
This is only a simplified map, which shows the general principles. Please refer to the next section for all possible paths.

> Detailed Travel map !
(Without considering Whale Island) Have you ever noticed that there is only one way to reach Long Winter *** or Overgrown Jungle ** ? Have you ever noticed that when you choose to travel West from a Killer island, it always leads to the same type of Island ? Well, please find below the result of my observations after hundreds of migrations. I tried to draw the following maps as completely as possible. If you find paths I haven’t explored yet, please share a printscreen and I’ll update them.
