No More Room in Hell Official Manual
Introduction
Overview
No More Room in Hell is a Half-Life 2 Co-operative mod based on the popular Zombie Apocalypse scenario. Up to 8 unaffiliated human survivors can band together against the relentless zombie horde, with the ultimate goal of escaping this undead nightmare. Teamwork and communication is the name of the game, since weapons and supplies are scarce, and the undead won't stop until either you or they are dead.
System Requirements
In order to play No More Room in Hell, you must have the absolute minimum system requirements:
- Processor: Dual core 2.4 GHz processor or better
- Memory: 2 GB RAM
- Graphics: Radeon HD 5000 Series or nVidia GeForce 200 series or better
- Supported OS:
- Windows® Vista or better
- MacOS X 10.9 Mavericks or better
- Ubuntu 14.04LTS or better (highly recommend non-LTS latest)
- DirectX®: 9.0c
- Hard Drive: 10 GB HD space free
- Sound: DirectX 9.0c compatible sound
- Internet: At least 5Mbps up/down
- Other Requirements: Mouse, Keyboard
Menu System
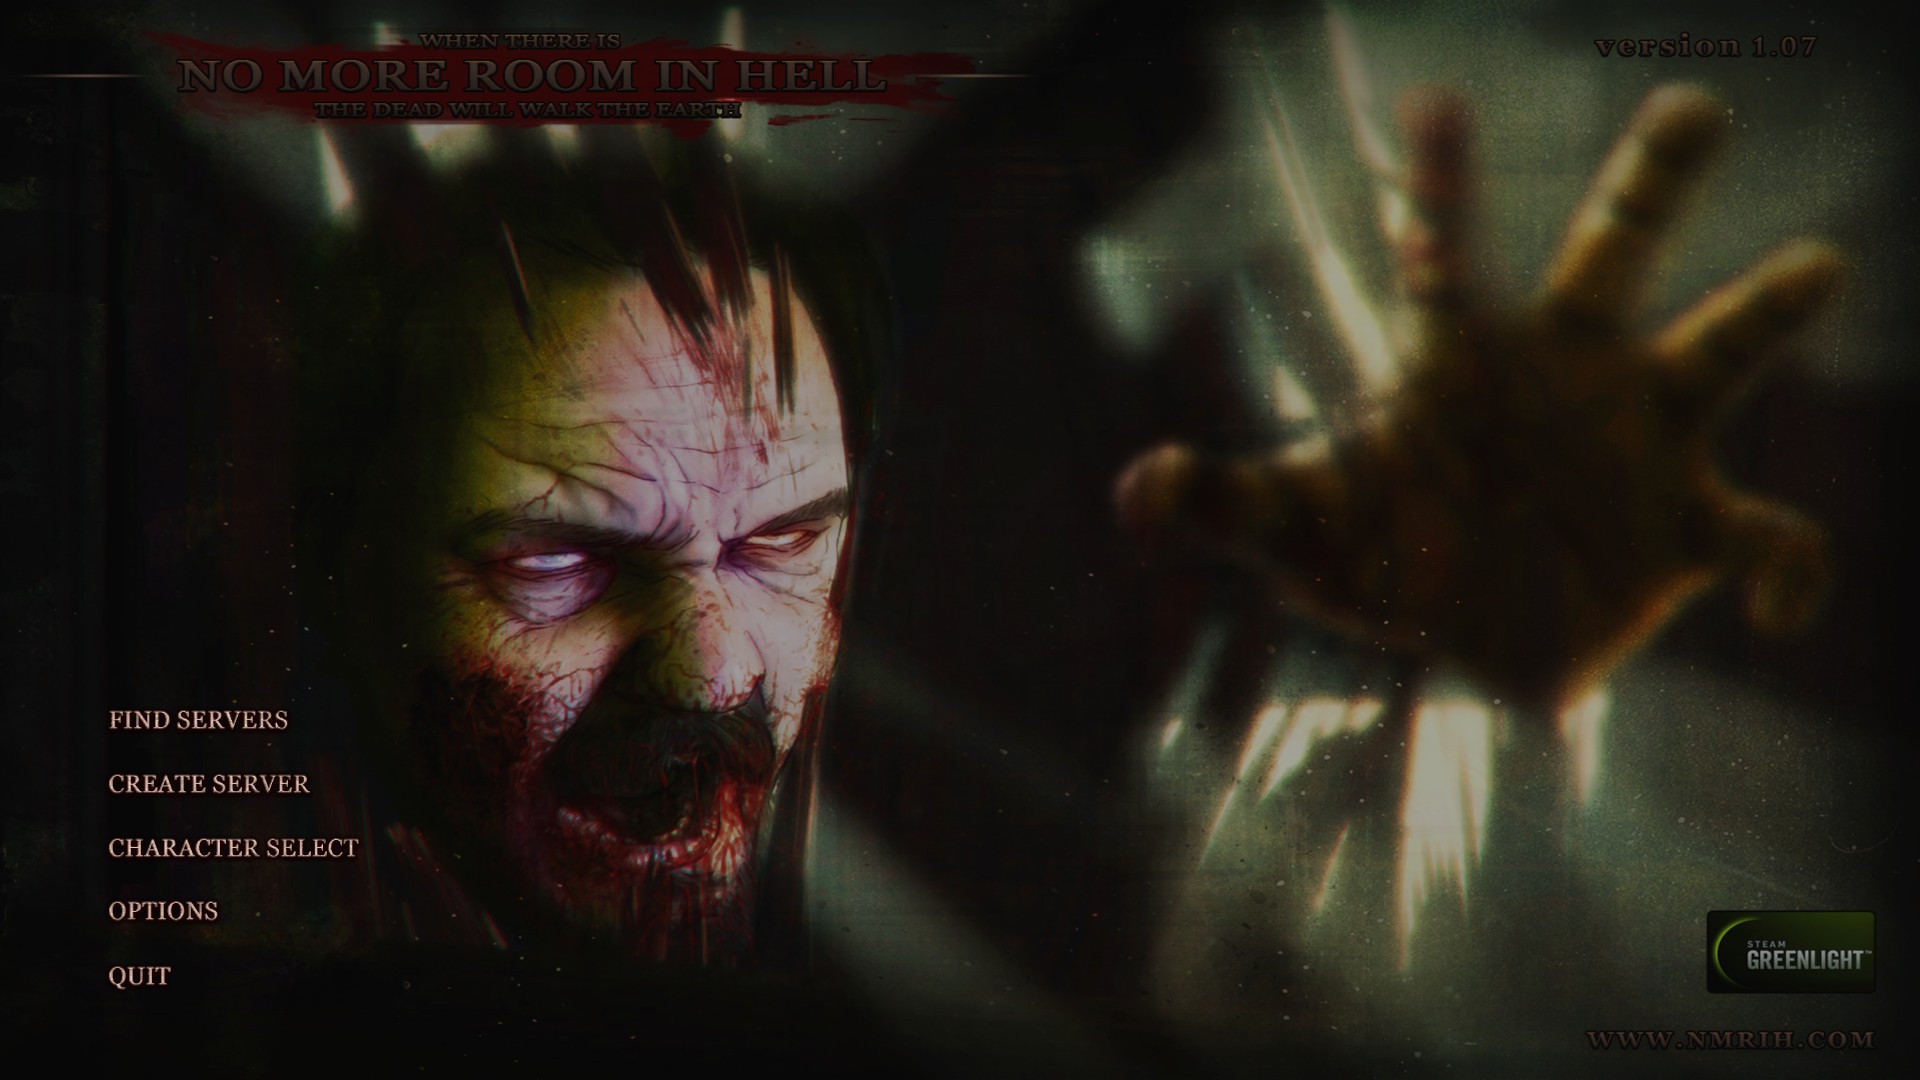
From the Main Menu, several options are available:
- 1. Continue – Allows you to exit the menu and head back in game (available only when in a server).
- 2. Disconnect – Allows you to exit the current server you're in (available only when in a server).
- 3. Player List – Allows you to view who's currently in the server and to mute specific users (available only when in a server).
- 4. Find Servers – Opens the server browser.
- 5. Create Server – Creates a local area server.
- 6. Character Select – Allows you to choose a specific character to play as. (available only when you're not in a server)
- 7. Options – Allows you to change many of the video, sound, controls, and multiplayer settings from the default values.
- 8. Quit – Allows you to exit the game.
Character Select
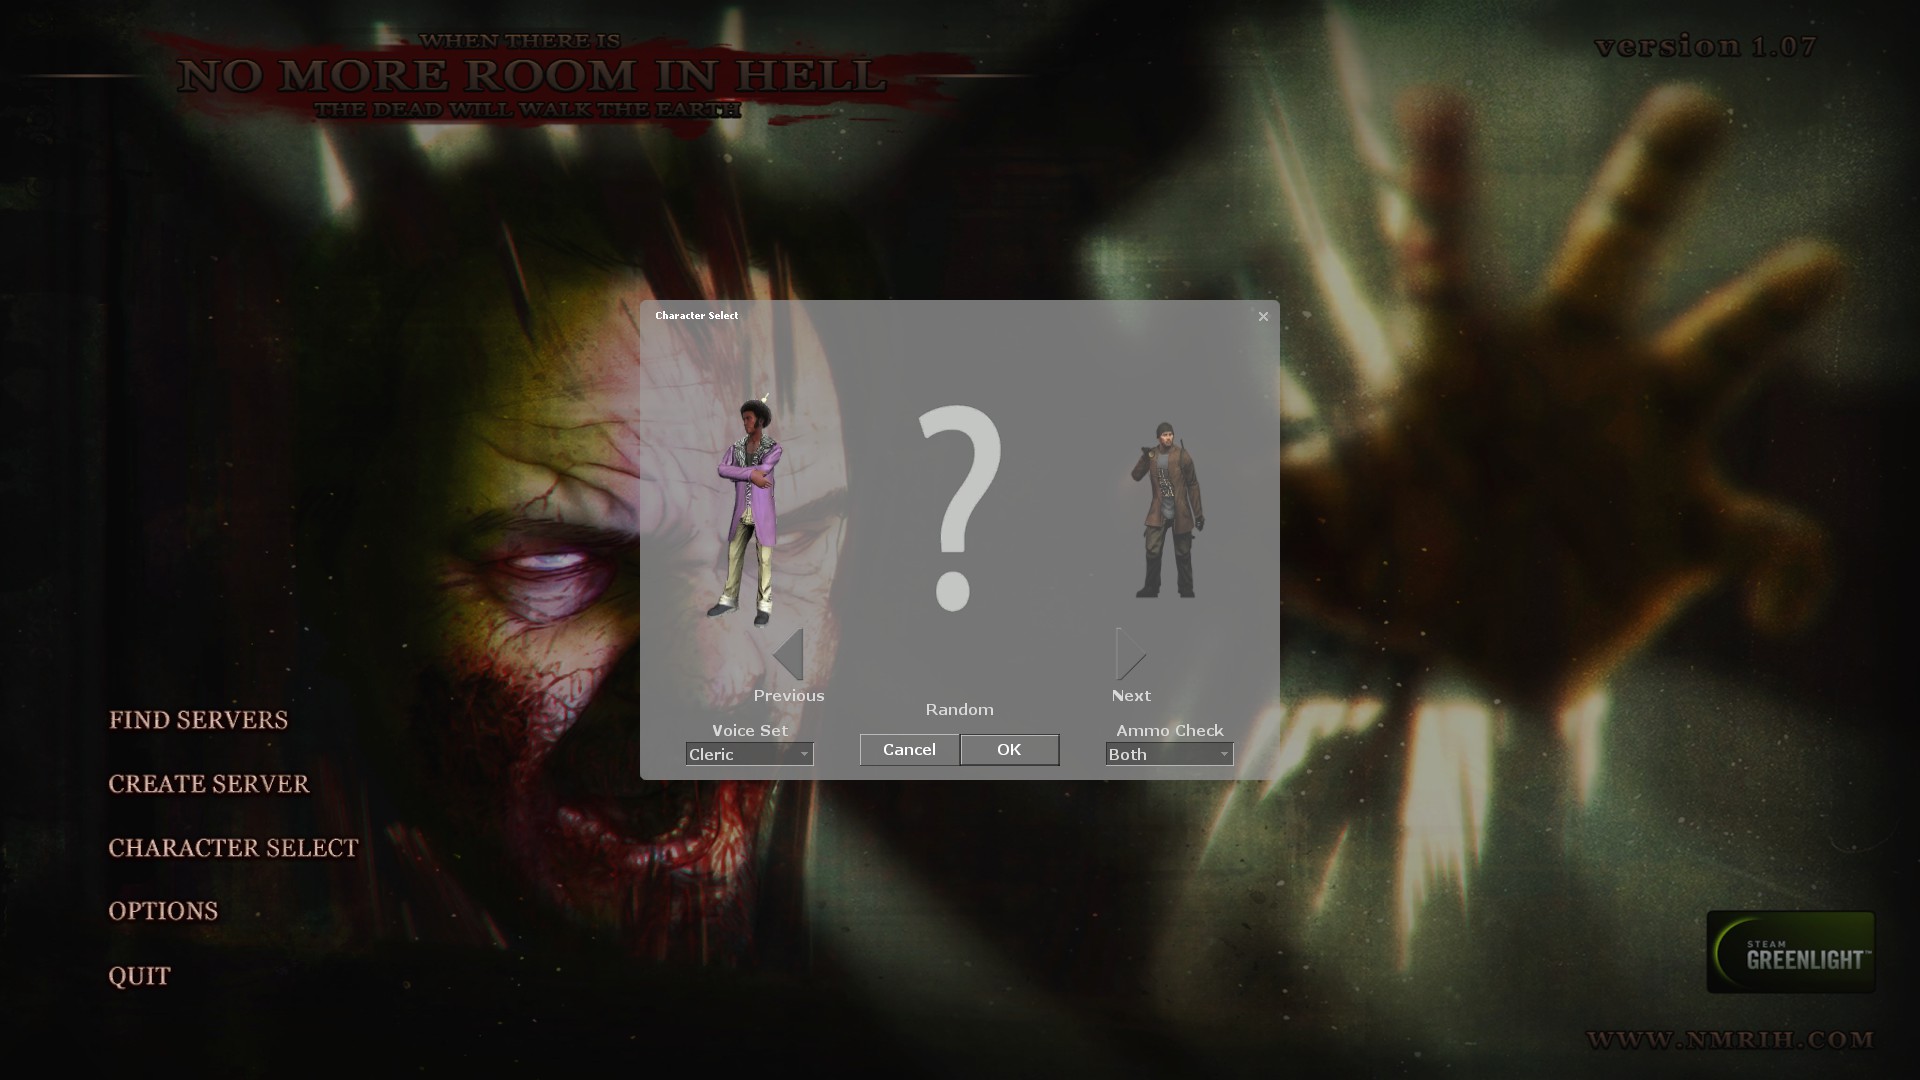
The Character Select window has several additional options:
- Voice Set: Allows you to choose what kind of voice you want for your character
- Ammo Check: Allows you to decide whether or not you want vocal only ammo check, HUD only ammo check, or for both to happen at the same time.
Create Server

The Create Server window has several additional options:
- Friendly Fire: If checked, enables friendly fire
- Realism Mode: If checked, enables realism mode. Zombies are only killable with headshots.
- Hardcore Survival: If checked, enables hardcore survival mode. You won't see the Survival HUD icons.
Multiplayer Advanced Options
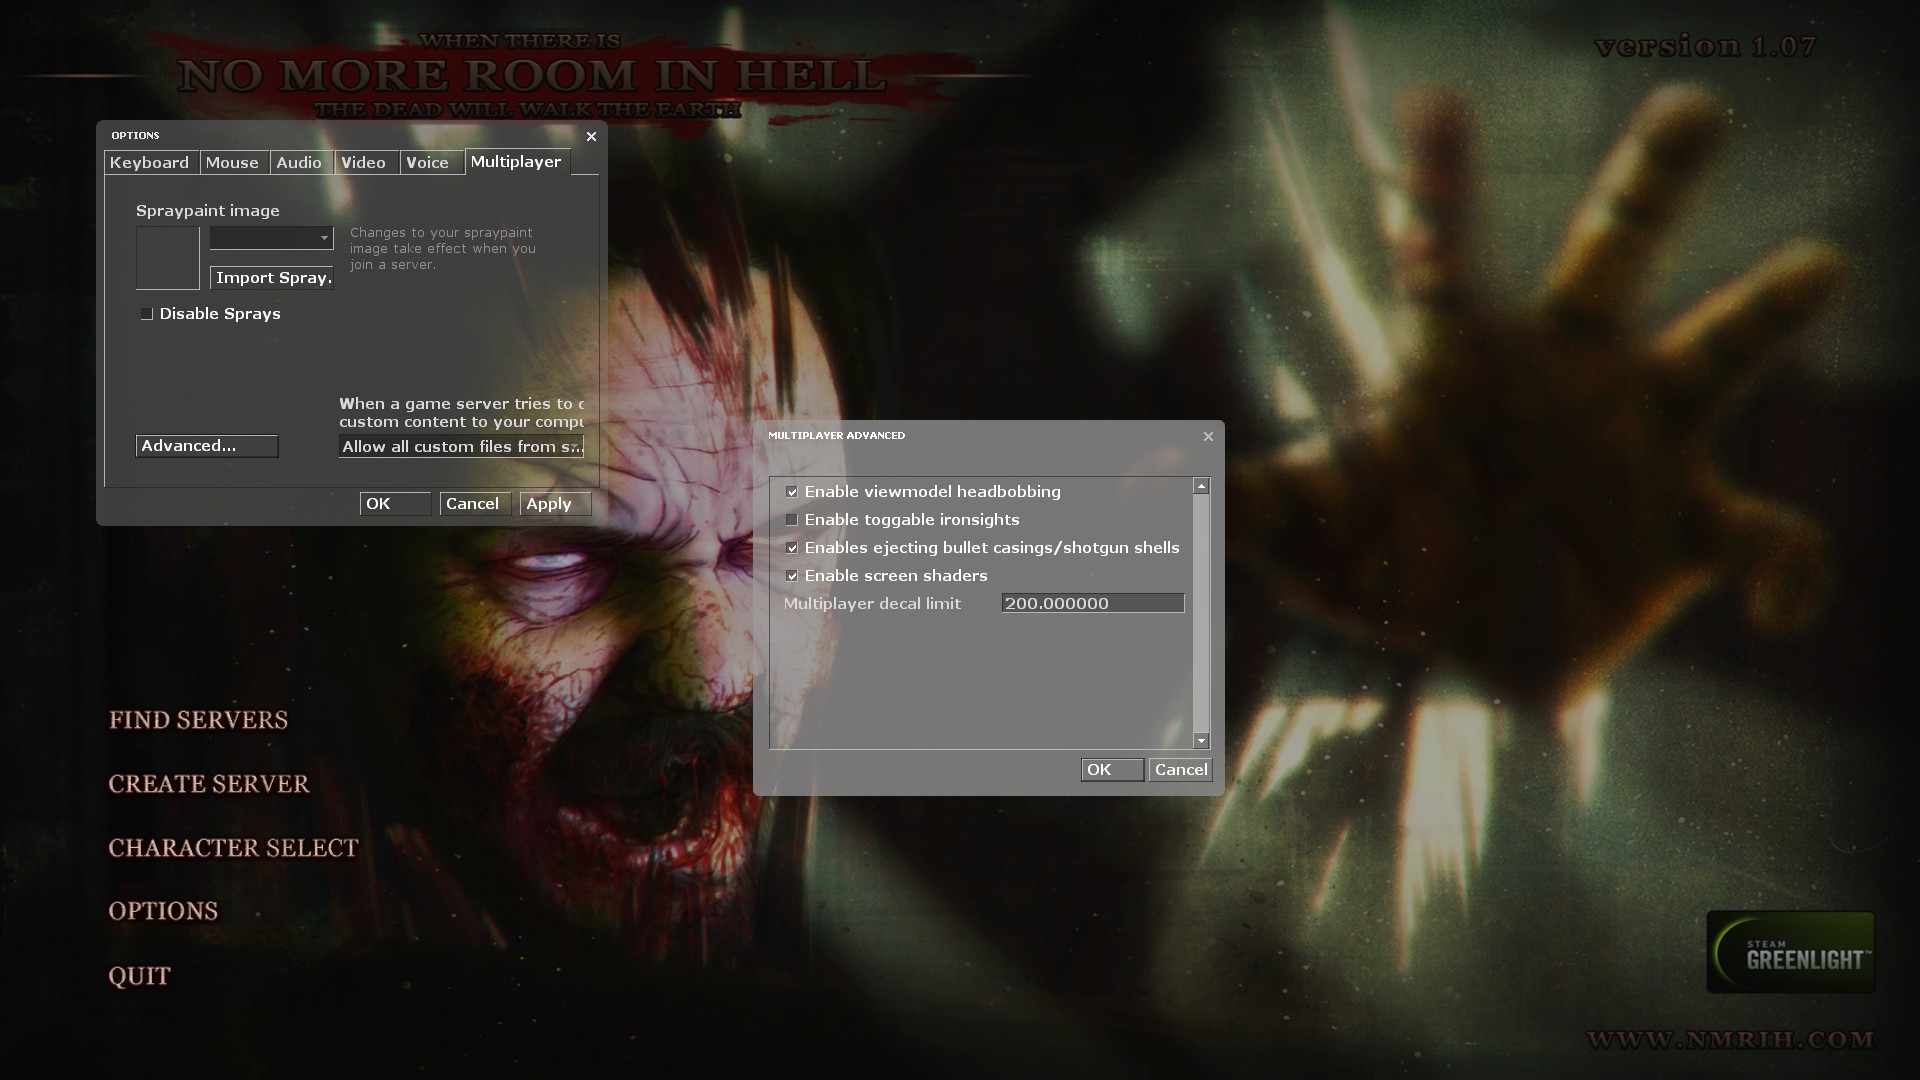
The Multiplayer Advanced Options window has several additional options:
- Enable viewmodel headbobbing: If checked, your screen will visibly move around slightly as you walk.
- Enable toggable ironsights: If checked, you'll only have to tap your ironsight key once to bring them up. If unchecked, you'll have to hold down your ironsight key to stay in Ironsights mode.
- Enable ejecting bullet casings/shotgun shells: If unchecked, disables bullet casings. Can provide a small performance boost.
- Enable screen shaders: If unchecked, disables shaders (low health, infection, etc.). Only uncheck if you're having issues with them!
- Disable HTML MOTD: This will disable HTML based MOTDs (like advertisements)
Controls
Default Movement Keys
Key
Action
W
Move forward
S
Move backward
A
Strafe left
D
Strafe right
Left Ctrl
Duck
Left Shift
Sprint
Spacebar
Jump
Default Combat Keys
Key
Action
Mouse1
Primary attack/drop item in ammo inventory wheel
Mouse2
Secondary attack/ironsights/drop item in weapon inventory wheel
R
Reload (hold to check ammo)
Q
Switch to last used weapon
G
Drop weapon
1
Show weapon inventory wheel
2
Show ammo inventory wheel
F
Turn maglite on/switch to maglite
V
Shove
K
Suicide (guns only)
Default Communication Keys
Key
Action
T
Team text chat
Y
Global text chat
3
Voice command wheel
Mouse3
Voice Chat
Default Miscellaneous Keys
Key
Action
TAB
Show scoreboard
C
Show compass & current objective
E
Use/Pickup item
U
Unload ammo
User Interface
Loading/Join Screen
When you join into a server, you'll be greeted to a loading screen. If a map has it, you'll see a specific image made for that level. When the map's fully loaded, you're now able to join the game, by clicking on the "Join Game" button on the bottom right.
Heads Up Display
This is your default HUD.
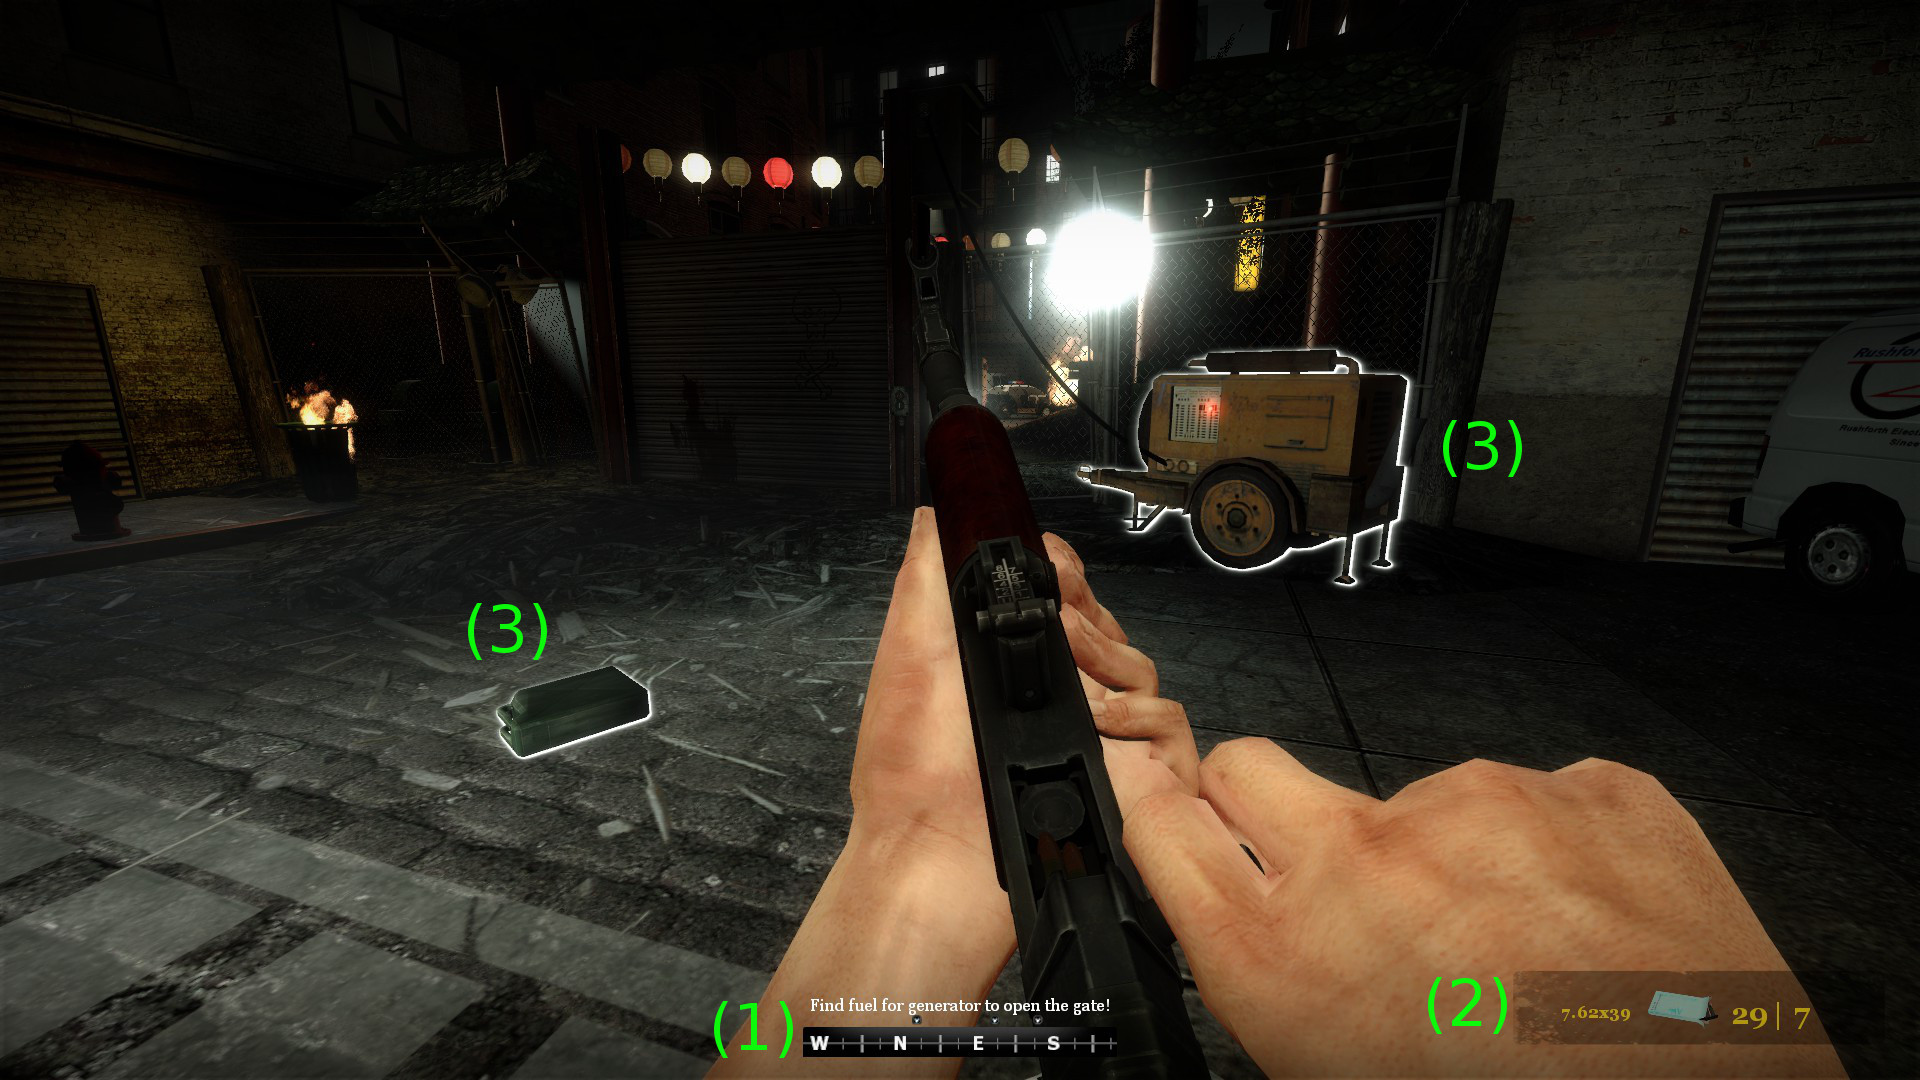
1) Current Objective and Compass (Little marks point you to special objective items, colors may differ on map, and only appear when you're within a certain radius of said item), can be brought up by pressing C by default
2) Ammo Type and Count for Currently Equipped Weapon (enabled in Character Select Window), visible when you reload or perform an ammo check (by holding R by default).
3) Glow Outlines for Objectives: These will generally tell you that they're special items that are needed to complete an objective, they'll only appear if you're within a certain distance to them.
Weapon Inventory Wheel
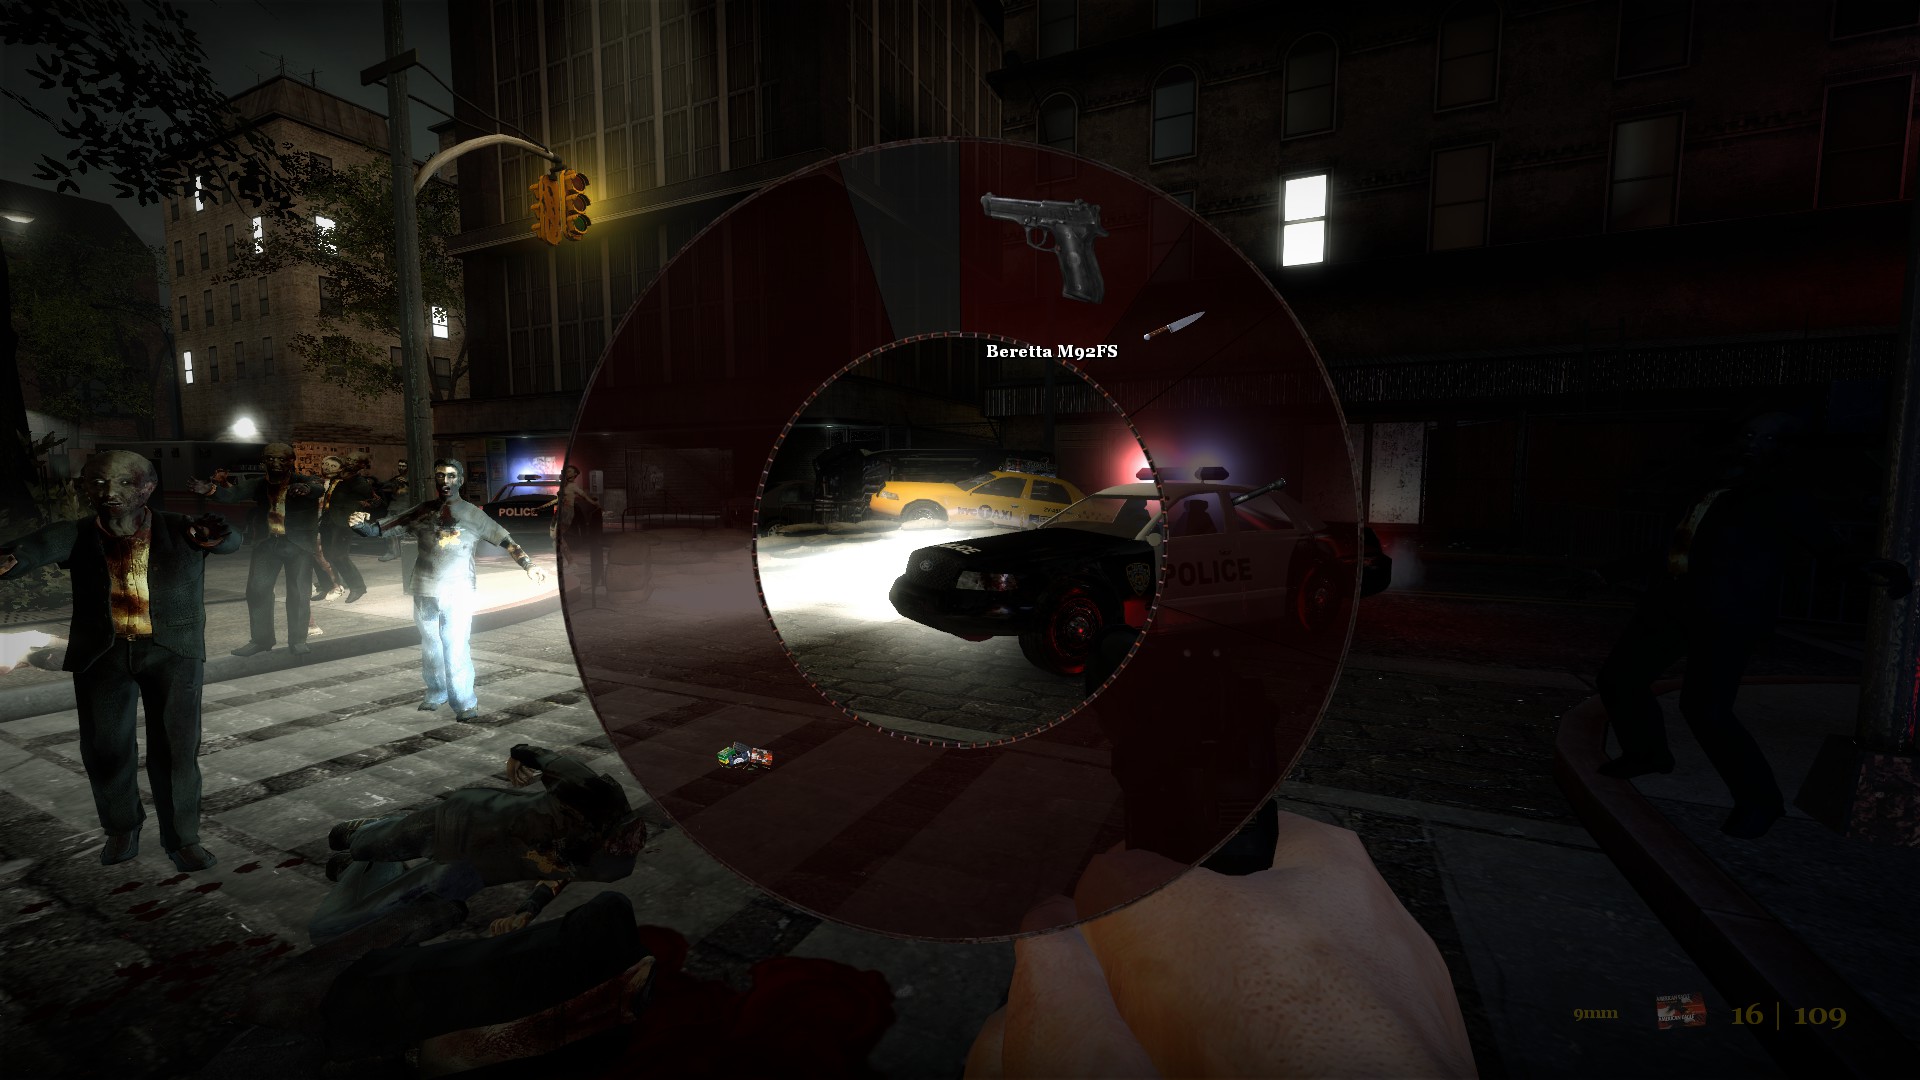
This is the Weapon Inventory Wheel. You can access it by holding down 1 by default. To select a weapon, left click on the weapon/item of your choice, or simply mouse over said weapon and let go of the Inventory Key. To drop a weapon from the menu, right click on the weapon/item of your choice. Each weapon, item, and ammo type weighs a certain amount and is visually represented as a solid red color in the wheel. As long as you have some "Gray Space" left in the wheel, you still pick up items/weapons/ammo.
Ammo Inventory Wheel
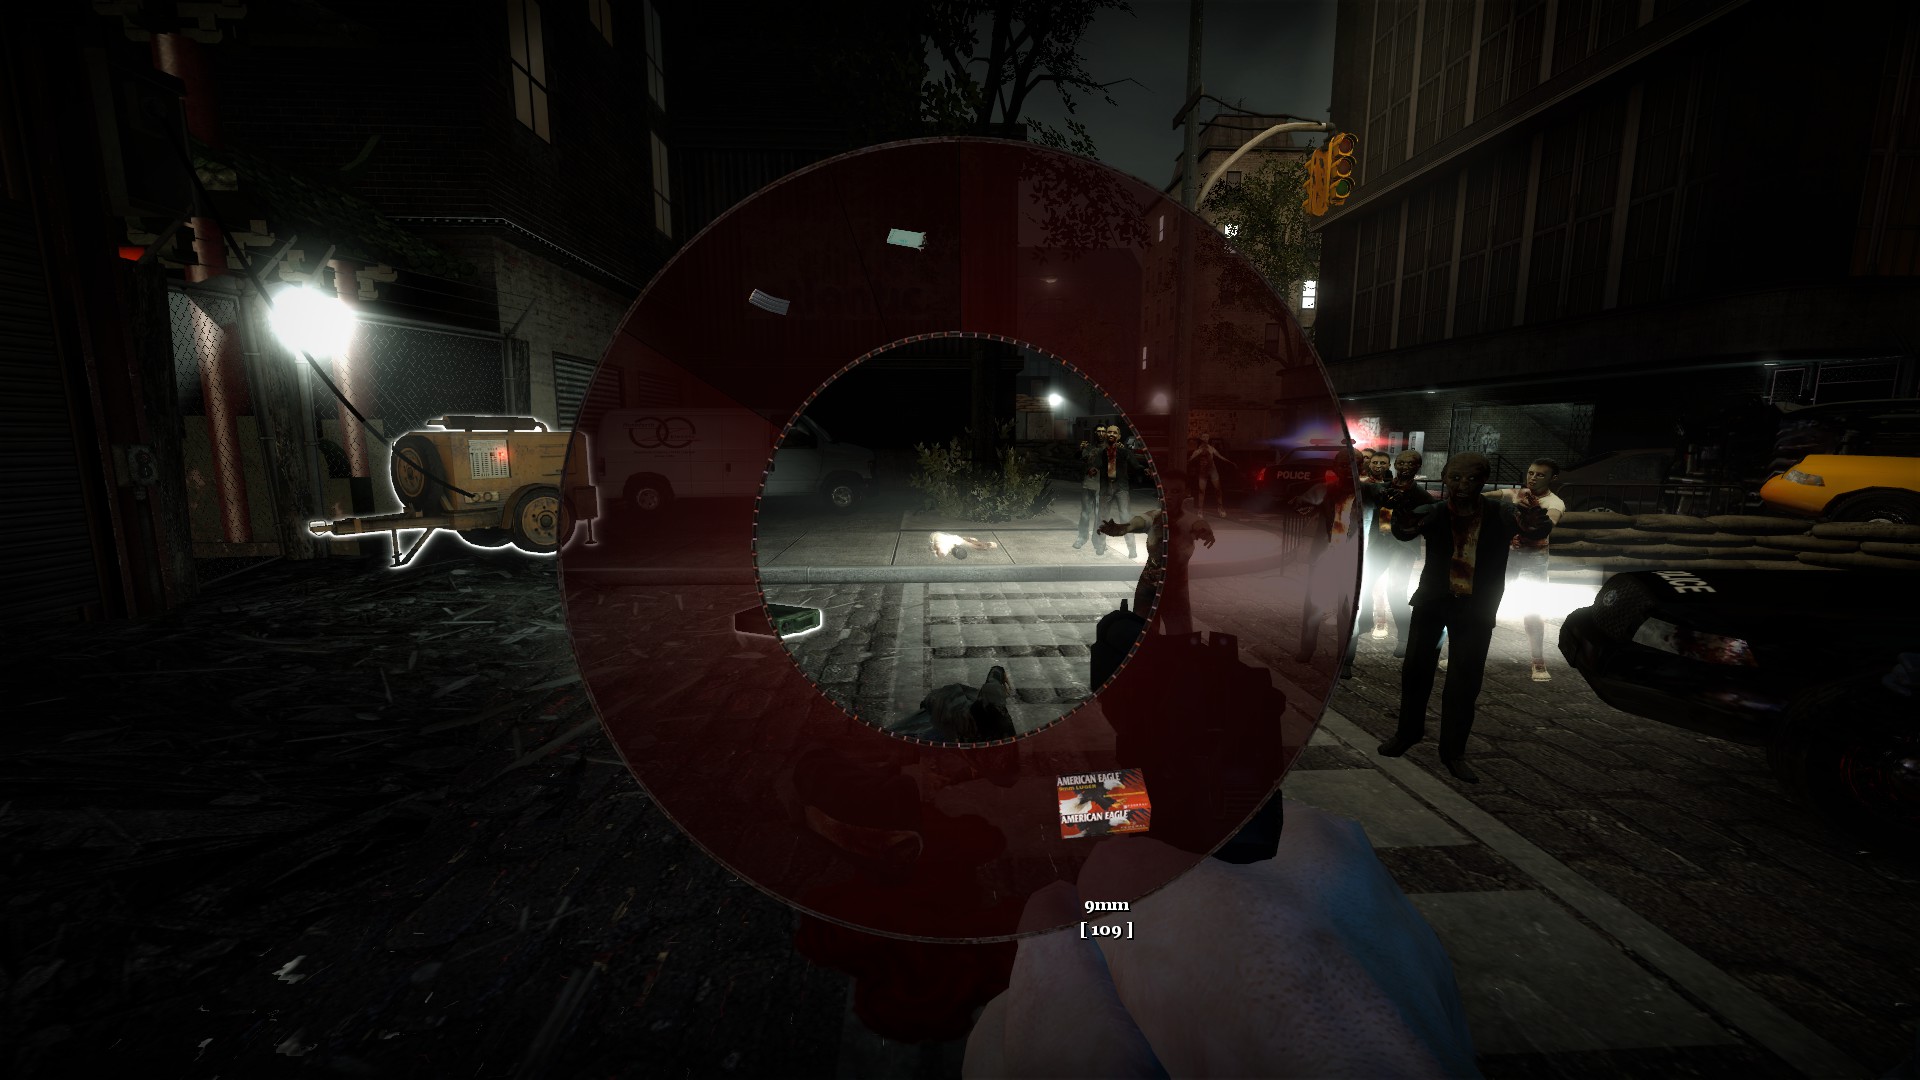
This is the Ammo Inventory Wheel. You can access it by holding down 2 by default. By mousing over each ammo type, you can see how much you have left of each type. To drop ammo, left click on the ammo type of your choice, or mouse over said ammo and let go of the Inventory Key.
Voice Command Wheel
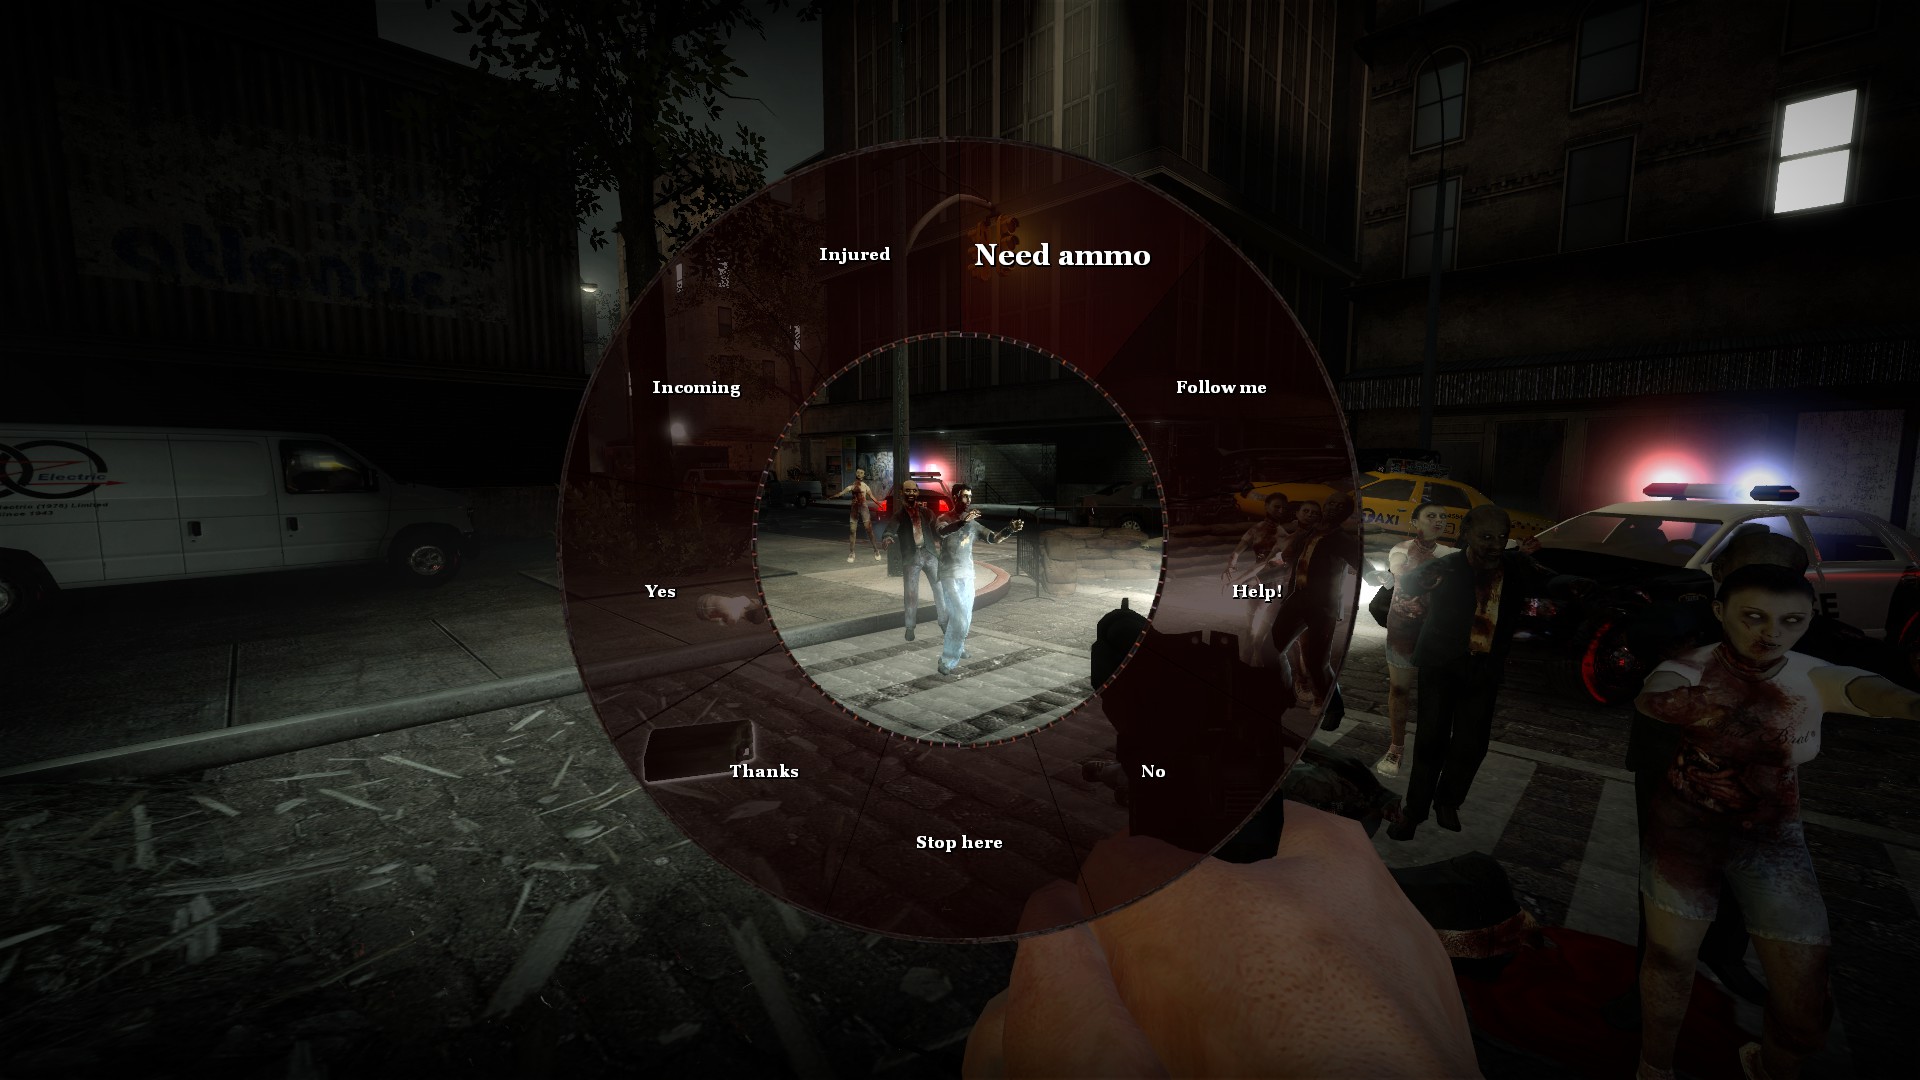
This is the Voice Command Wheel. You can access it by holding down 3 by default. To use a voice command, simply left click on the command of your choice, or mouse over said command and let the wheel close.
----
Survival Mode HUD
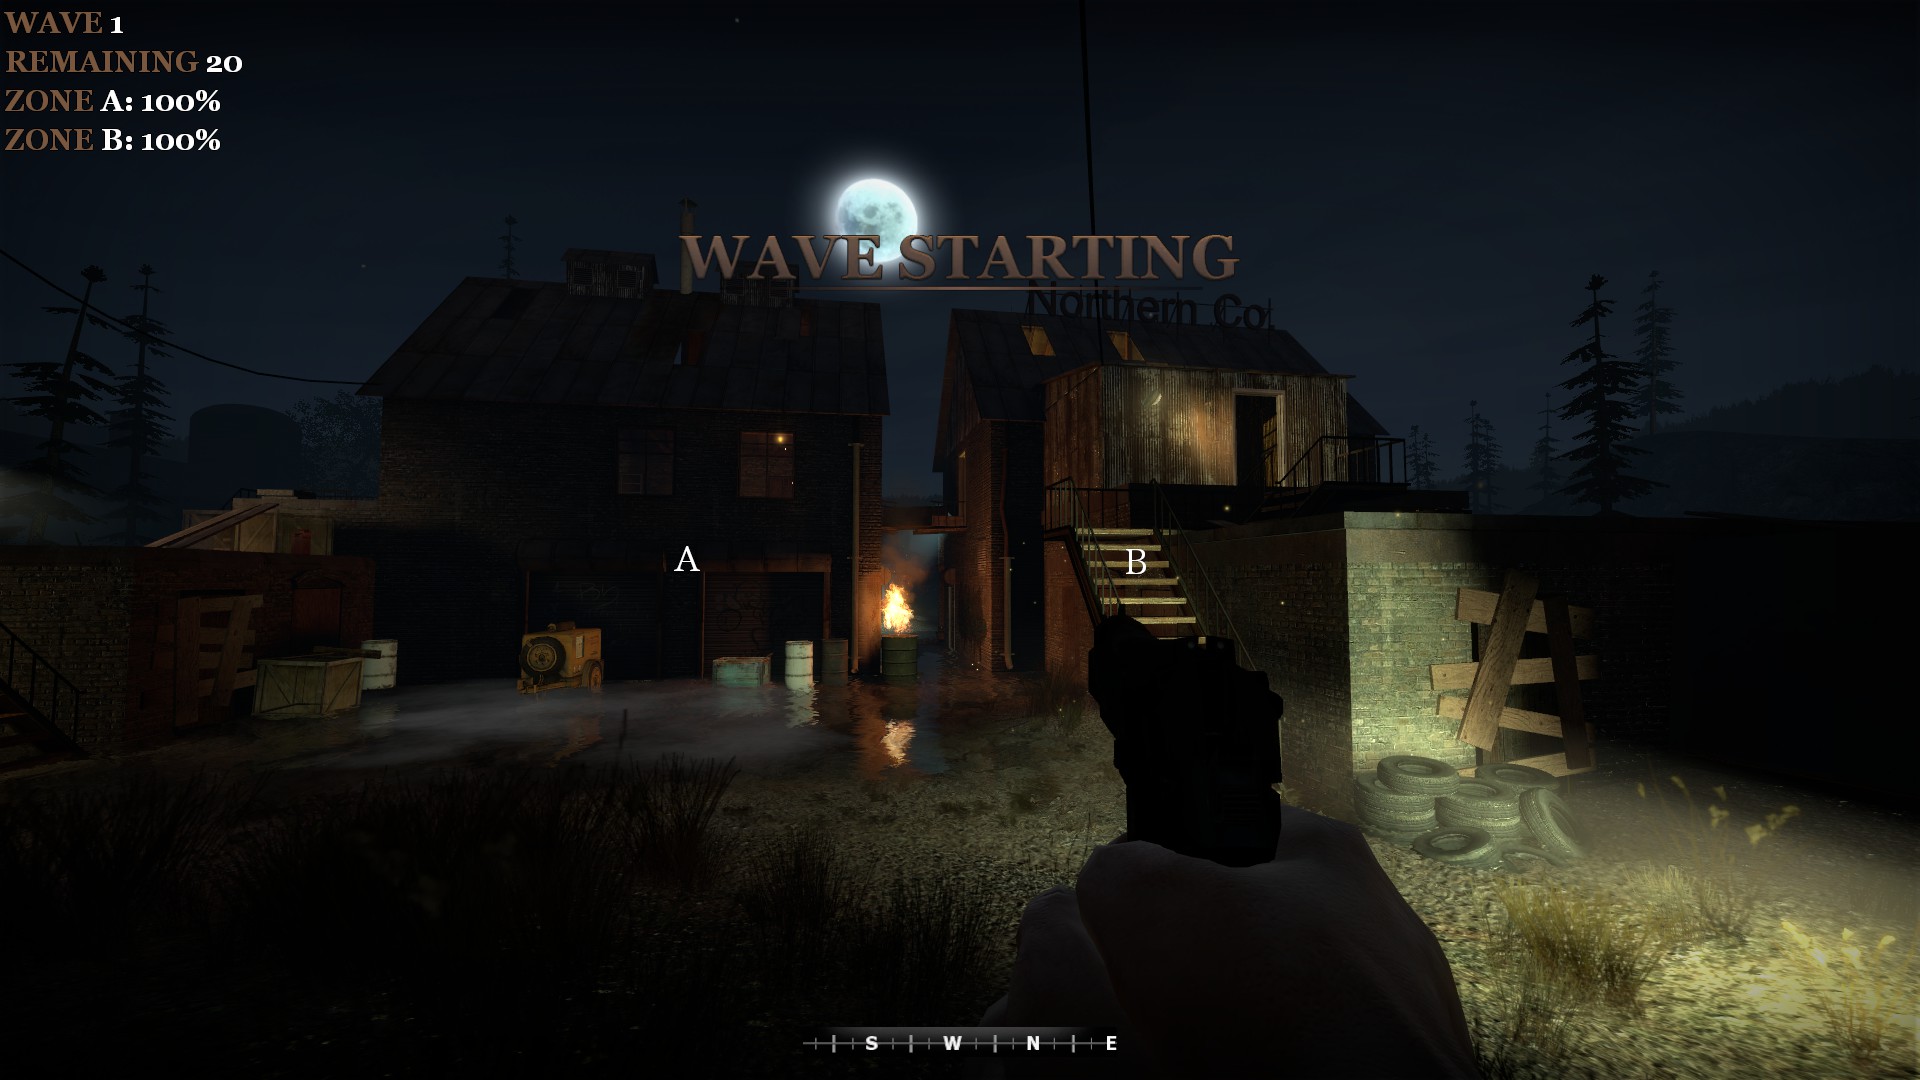
- Wave: This tells you what wave you're currently on.
- Remaining: This tells you the amount of zombies left in the current wave.
- Zone A/B/C/Etc.: This tells you how many zones are in the map, along with their health status. They will highlight if you're inside them. If they're under attack, they'll pulsate with a red color.
- The letters on the screen: If you press C to bring up your compass, these will show where your zones are.
----
Low Health Status
If you take damage, your screen will gradually start to lose color. In short, if your screen starts to get really black and white, you're in big trouble!
Infection Status
If you're infected, you'll start to see veins on the edge of your screen. Your vision will get darker. You'll also hear a music cue informing you of your infected status.
Gamemodes
There are two gamemodes: Objective and Survival.
Objective mode focuses on banding a group of survivors together, who must complete a series of predetermined tasks in order to complete the map they're in. Unlike in other zombie mods, No More Room in Hell uses an Objective Branching system which allows the map to randomly decide which objective the survivors must complete before they move on into the next area. This means that in every new round, the tasks that the survivors must accomplish may change, so they have to be vigilant and cautious. The ultimate goal is to reach the extraction zone before time runs out. Generally, Objective maps range from small and linear maps, to large and complex maps.
The objectives range from simple item collecting to say, firing a nuclear ICBM. Most of these objectives will have a glow outline which will highlight its importance to the player. You, the player, can also use the compass to help locate these areas or items (default key is C). Grey dots point you to the current objective you need to go to, red dots point you to important objects that you need to carry or pick up and bring to the current objective (grey dot on the compass)
If you are unaware on what to do, you can also bring up the current objective on your screen which also provides the compass (default C).
Objective maps are represented with the nmo_ prefix.
Survival mode focuses on two things: Area Defense and Survival.
The National Guard designated certain areas as "safe zones" for survivor groups to regroup at and wait for extraction. Unbeknownst to the survivors though, the "safe zones" are actually being used as zombie bait to lure the massive undead horde away from the major metropolitan areas, to buy the National Guard some time to evacuate the remaining populace (as well as giving them breathing space after constant battles with the undead).
Players must defend predefined areas (the loading screen and the compass will show where they are) while simultaneously attempting to stay alive. These predefined areas (referred in-game as "Zones") may differ across each map but generally, they're relatively safe to return to and regroup.
Zombies will enter the map through a wave system. The longer you survive, the more zombies you must face down (25 zombies in wave one vs. 210 zombies in wave two) and runners/children will start to make a more common appearance.
After successfully completing some waves (map determined), the National Guard will send in a UH-60 Blackhawk to deliver your group supplies in the form of a supply crate. (determined by each individual map/level). The crate contains various weapons, items, and ammo. Dead/late-joining players will also respawn in this phase. You can call for more supply drops by shooting a flare gun out into the open sky. However, the chopper will only appear if you used up the pre-existing supply crate that was dropped earlier (the National Guard wants you to make every bullet count before they hand over more supplies from their own dwindling pool!)
Survival maps are represented with the nms_ prefix.
Zones
If zombies enter the safe zones that you need to defend, they will start attacking/vandalizing/destroying the place. The National Guard will alert you if they spot it happening with their Surveillance Drones. If you allow the areas to fall, the National Guard will consider you a lost cause and discontinue their supply drops, leaving you with no help and no shelter, surrounded by an angry horde of undead... However, if you manage to defend your safe zones long enough, the National Guard may send in a form of extraction! (decided by map/level).
As mentioned before, if you use the Compass (press C), the zones will be visually represented with some letters (Zone A will be "A", Zone B will be "B", and so on).

Players can repair these areas by finding duffel bags with glow sticks on them, and dropping them into the safe zone. These bags are located inside specially marked crates (long, narrow yellowish crates with FEMA marked on them). They will replenish 25% health to the safe zone.
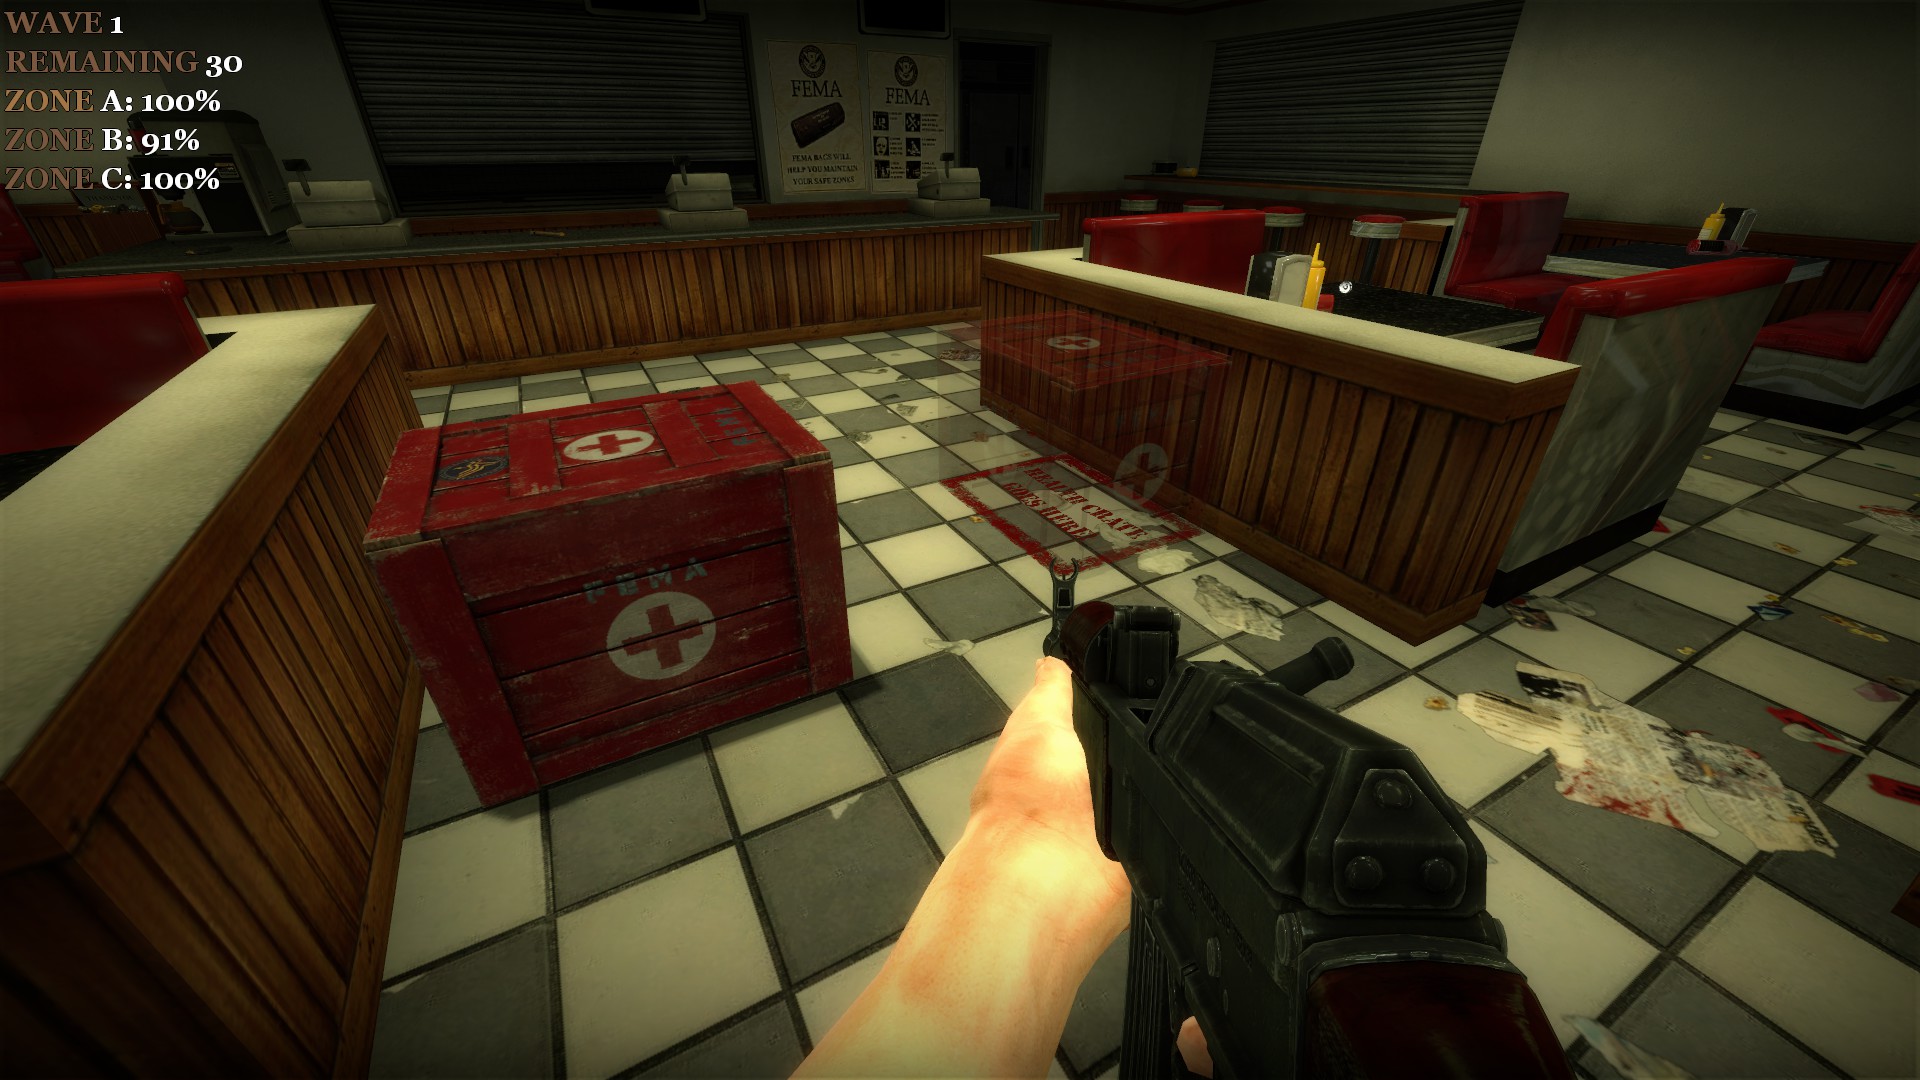
Players can also set up health stations in the safe zone, they'll need to find specially marked red crates (big, red crates with some FEMA markings on them). Once you've found one, just place the crate into the predetermined spot that you need to put it into (place the crate into a transparent looking health supply crate boundary). Each crate can heal up to 200 health.
You have two ways of respawning in survival mode; waiting till the next wave starts, or using up your earned respawn tickets. You earn a respawn ticket by killing at least 20 zombies in the current wave. If unused, these tickets will be removed at the start of the next wave. If you use a respawn ticket, you will spawn in with 100% health. Otherwise, you will respawn with 50% health.
Objective Mode
Objective mode focuses on banding a group of survivors together, who must complete a series of predetermined tasks in order to complete the map they're in. Unlike in other zombie mods, No More Room in Hell uses an Objective Branching system which allows the map to randomly decide which objective the survivors must complete before they move on into the next area. This means that in every new round, the tasks that the survivors must accomplish may change, so they have to be vigilant and cautious. The ultimate goal is to reach the extraction zone before time runs out. Generally, Objective maps range from small and linear maps, to large and complex maps.
The objectives range from simple item collecting to say, firing a nuclear ICBM. Most of these objectives will have a glow outline which will highlight its importance to the player. You, the player, can also use the compass to help locate these areas or items (default key is C). Grey dots point you to the current objective you need to go to, red dots point you to important objects that you need to carry or pick up and bring to the current objective (grey dot on the compass)
If you are unaware on what to do, you can also bring up the current objective on your screen which also provides the compass (default C).
Objective maps are represented with the nmo_ prefix.
Survival Mode
Survival mode focuses on two things: Area Defense and Survival.
The National Guard designated certain areas as "safe zones" for survivor groups to regroup at and wait for extraction. Unbeknownst to the survivors though, the "safe zones" are actually being used as zombie bait to lure the massive undead horde away from the major metropolitan areas, to buy the National Guard some time to evacuate the remaining populace (as well as giving them breathing space after constant battles with the undead).
Players must defend predefined areas (the loading screen and the compass will show where they are) while simultaneously attempting to stay alive. These predefined areas (referred in-game as "Zones") may differ across each map but generally, they're relatively safe to return to and regroup.
Zombies will enter the map through a wave system. The longer you survive, the more zombies you must face down (25 zombies in wave one vs. 210 zombies in wave two) and runners/children will start to make a more common appearance.
After successfully completing some waves (map determined), the National Guard will send in a UH-60 Blackhawk to deliver your group supplies in the form of a supply crate. (determined by each individual map/level). The crate contains various weapons, items, and ammo. Dead/late-joining players will also respawn in this phase. You can call for more supply drops by shooting a flare gun out into the open sky. However, the chopper will only appear if you used up the pre-existing supply crate that was dropped earlier (the National Guard wants you to make every bullet count before they hand over more supplies from their own dwindling pool!)
Survival maps are represented with the nms_ prefix.
Zones
If zombies enter the safe zones that you need to defend, they will start attacking/vandalizing/destroying the place. The National Guard will alert you if they spot it happening with their Surveillance Drones. If you allow the areas to fall, the National Guard will consider you a lost cause and discontinue their supply drops, leaving you with no help and no shelter, surrounded by an angry horde of undead... However, if you manage to defend your safe zones long enough, the National Guard may send in a form of extraction! (decided by map/level).
As mentioned before, if you use the Compass (press C), the zones will be visually represented with some letters (Zone A will be "A", Zone B will be "B", and so on).
Zone Repair
Players can repair these areas by finding duffel bags with glow sticks on them, and dropping them into the safe zone. These bags are located inside specially marked crates (long, narrow yellowish crates with FEMA marked on them). They will replenish 25% health to the safe zone.
Health Stations
Players can also set up health stations in the safe zone, they'll need to find specially marked red crates (big, red crates with some FEMA markings on them). Once you've found one, just place the crate into the predetermined spot that you need to put it into (place the crate into a transparent looking health supply crate boundary). Each crate can heal up to 200 health.
Respawning
You have two ways of respawning in survival mode; waiting till the next wave starts, or using up your earned respawn tickets. You earn a respawn ticket by killing at least 20 zombies in the current wave. If unused, these tickets will be removed at the start of the next wave. If you use a respawn ticket, you will spawn in with 100% health. Otherwise, you will respawn with 50% health.
Difficulty Levels
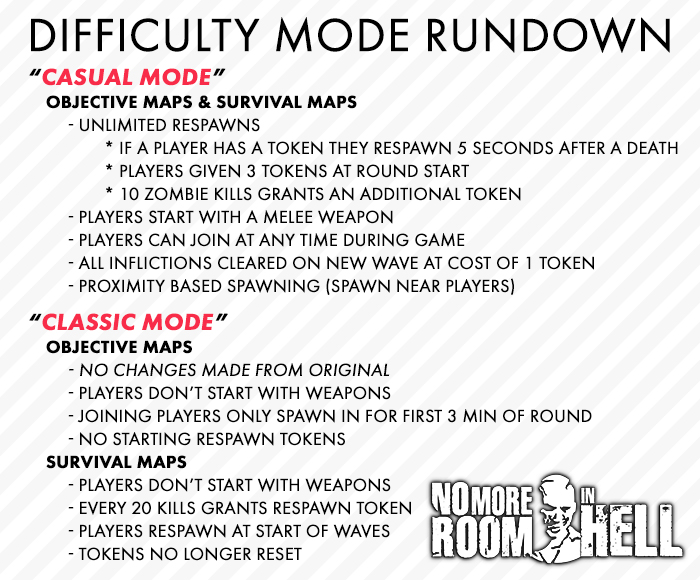
Difficulty levels are finally introduced in Patch 1.08. When you're creating a server, there's a drop down menu in the Create Server panel, which allows you to choose to play on "Classic" or "Casual" mode. "Classic" mode is the default difficulty level, and you can filter out Classic or Casual servers with the Server Browser. The image above lists out the key fundamental differences between the two modes.
Below is a more detailed explanation of the Spawning System in Casual Objective Mode:
- If you die, you'll respawn within nearby range of a living player.
- If there are any zombies near that player, you're unable to spawn on that player until he or she finds a more empty location in the level.
- If all remaining players are currently surrounded by zombies, you'll respawn in the most recent spawn point (either the initial spawn area, or a forward checkpoint spawn)
- Some maps disable their spawn points when you progress far enough in the level to prevent the round from lasting way longer than intended; when that happens you can only spawn on another player who's not in the vicinity of nearby zombie NPCs
- If all players die somewhere at the same time, and there are no active spawn points, the round ends. This is a failsafe measure, taking into account some custom maps that may or may not disable their spawn points as well.
To change the difficulty mode in a running server, use this command in the Developer Console
sv_difficulty casual
OR
sv_difficulty classic
Zombies
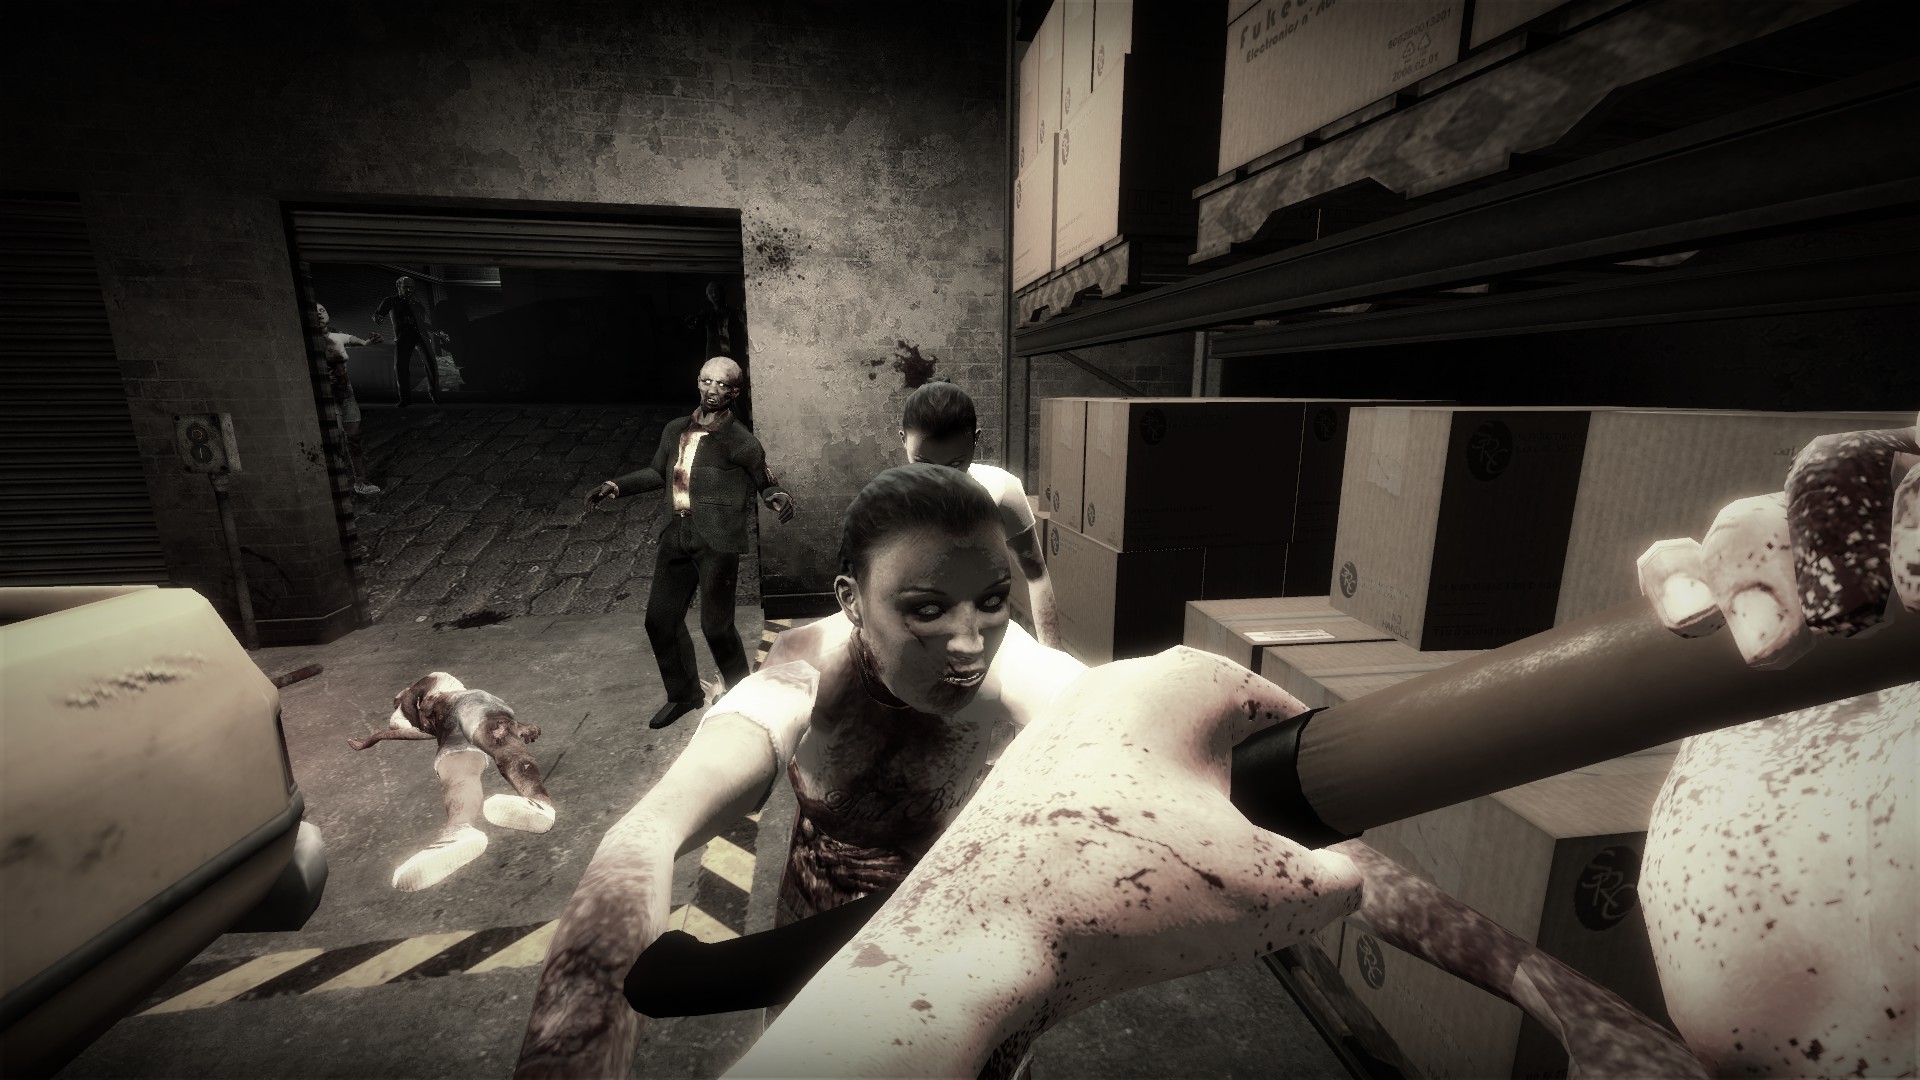
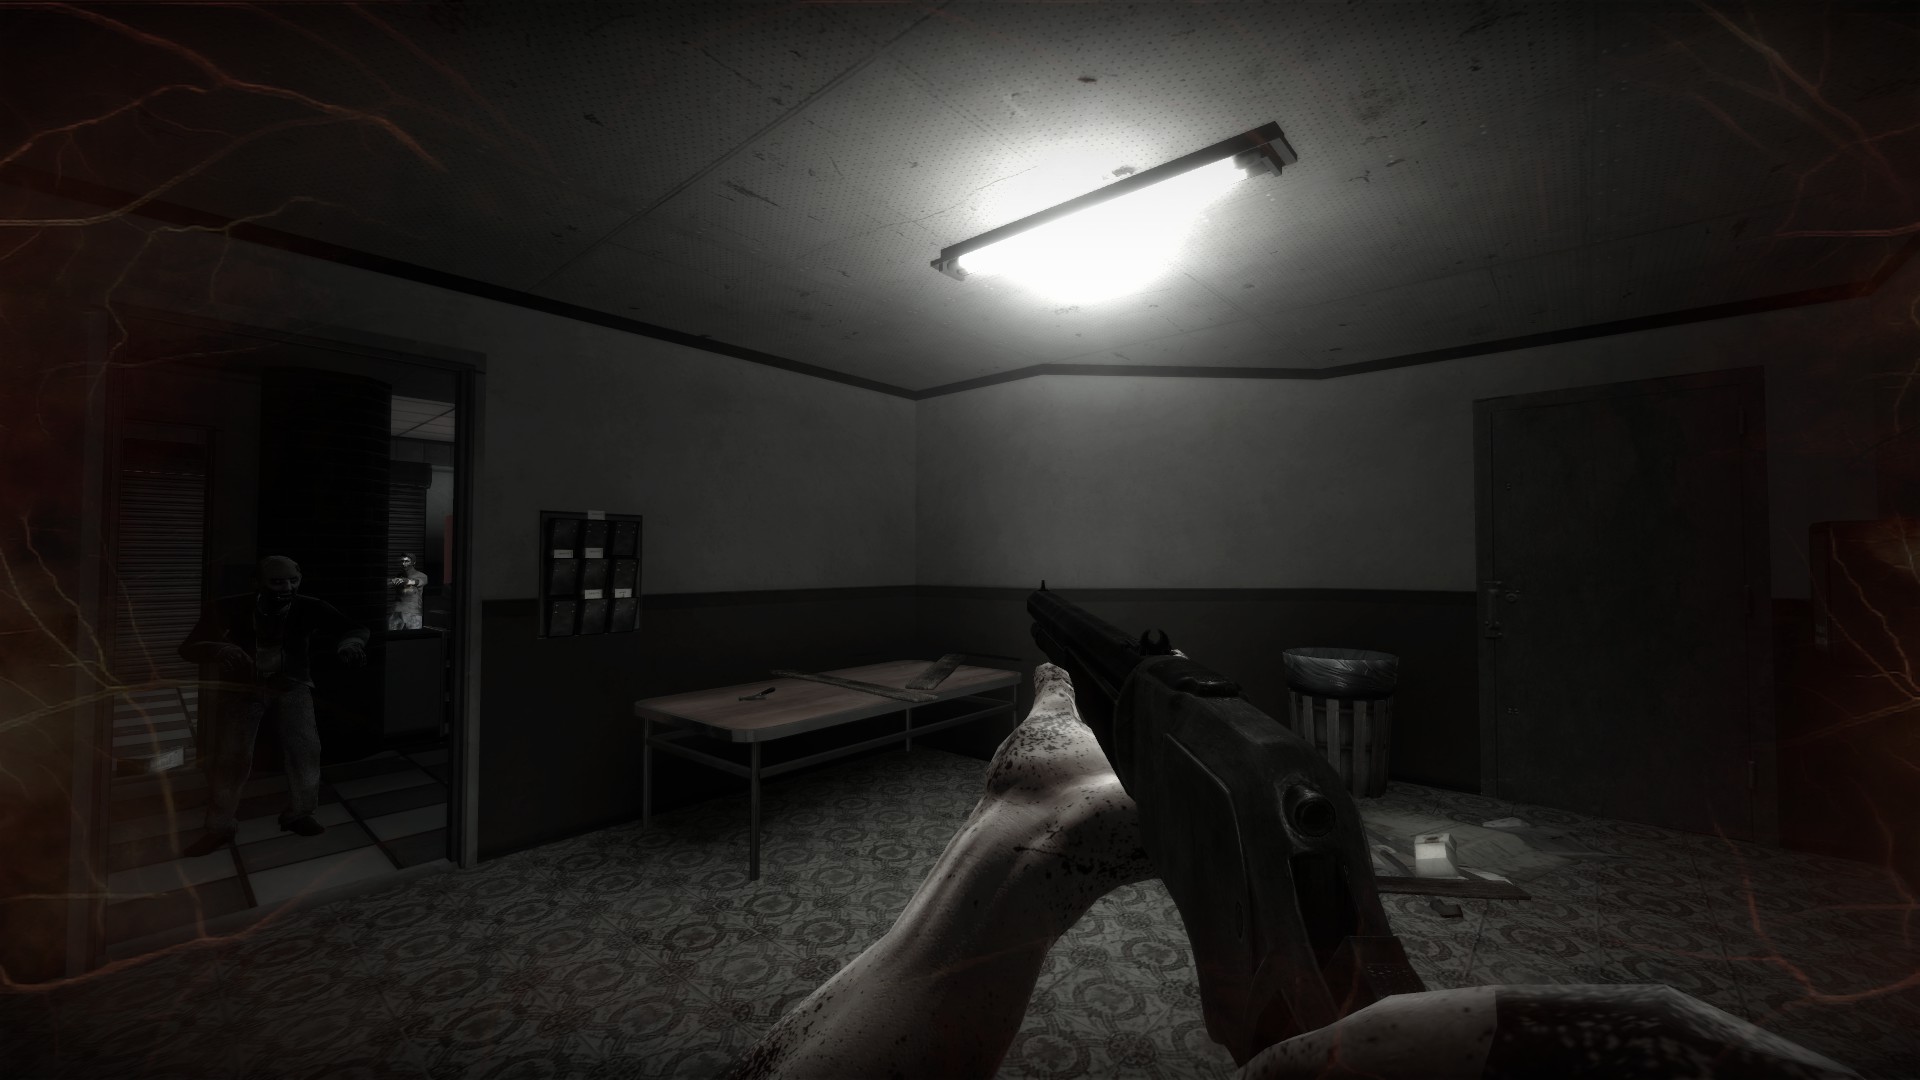
There are three categories of "Zombies" in No More Room in Hell: Shamblers/Walkers, Runners, and Children.
These zombies are predominantly based off of the Romero type; they're slow, can take a lot of damage, and are a considerable threat in close quarters environments and in large groups. They can swing at you (single hand swings don't do as much damage compared to their double handed swings), or they can bite you. Headshots are key to their destruction!
These zombies are based off of the more contemporary ones in today's films; they can run just as fast as any survivor and they're more susceptible to body shots. They do the same sort of attacks as the shamblers, but with more damage since they're freshly dead. You can put them down a bit faster with body shots, but it's still wise for you to take them down with a headshot.
Even the younglings aren't safe from the zombie threat! Child zombies are faster than shamblers but aren't as fast as runners. They have a faster attack speed, but they're unable to grab and bite players. They are the weakest zombie type in NMRiH; a player can easily take out a child zombie with only a few bullets.
------
In addition, the undead have some unique abilities:
Rarely, if you set a Shambler on fire, they might 'morph' into a special kind of zombie where they're now able to sprint rather than walk, and may deal double damage! These zombies should be dealt with first since they have the element of surprise (an entire group of survivors can get wiped out). Eventually, the fire will scramble the brain and kill the zombie.
No one knows what it is, or where it came from, but one thing's clear. If you're infected with the Zombie Virus, you're pretty much dead, and you'll turn into one of them. Each zombie attack has a chance of infecting you with the Zombie Virus. Bites have a higher chance of infection.
Infection is visually represented as a set of veins on the edge of your screen. Over time as it progresses, the veins will grow bigger, and your vision will start to darken.
You can temporarily stop infection with Phalanx Pills, but the only known way to permanently stop it is death. If you are in the late stages of infection, you can ask a friend to end your suffering with a bullet to the brain. That aspect is especially important because, if you get a non-headshot death, you'll still reanimate.
Shamblers/Walkers
These zombies are predominantly based off of the Romero type; they're slow, can take a lot of damage, and are a considerable threat in close quarters environments and in large groups. They can swing at you (single hand swings don't do as much damage compared to their double handed swings), or they can bite you. Headshots are key to their destruction!
Runners
These zombies are based off of the more contemporary ones in today's films; they can run just as fast as any survivor and they're more susceptible to body shots. They do the same sort of attacks as the shamblers, but with more damage since they're freshly dead. You can put them down a bit faster with body shots, but it's still wise for you to take them down with a headshot.
Child zombies
Even the younglings aren't safe from the zombie threat! Child zombies are faster than shamblers but aren't as fast as runners. They have a faster attack speed, but they're unable to grab and bite players. They are the weakest zombie type in NMRiH; a player can easily take out a child zombie with only a few bullets.
------
In addition, the undead have some unique abilities:
Burning Zombies
Rarely, if you set a Shambler on fire, they might 'morph' into a special kind of zombie where they're now able to sprint rather than walk, and may deal double damage! These zombies should be dealt with first since they have the element of surprise (an entire group of survivors can get wiped out). Eventually, the fire will scramble the brain and kill the zombie.
Infection
No one knows what it is, or where it came from, but one thing's clear. If you're infected with the Zombie Virus, you're pretty much dead, and you'll turn into one of them. Each zombie attack has a chance of infecting you with the Zombie Virus. Bites have a higher chance of infection.
Infection is visually represented as a set of veins on the edge of your screen. Over time as it progresses, the veins will grow bigger, and your vision will start to darken.
You can temporarily stop infection with Phalanx Pills, but the only known way to permanently stop it is death. If you are in the late stages of infection, you can ask a friend to end your suffering with a bullet to the brain. That aspect is especially important because, if you get a non-headshot death, you'll still reanimate.
Weapons
Weapons are divided into three sections; Firearms, Melee, and Explosives. To select a weapon, hold down your inventory key (1 by default) and mouse over your desired item. To drop a weapon, hold down the inventory key and right click on the item you don't want, or press H to drop the one you're currently holding.
Firearms are weapons that launch projectiles at high velocity through the confined burning of a propellent. This allows the user to accurately take down his or her opponents from a safe distance. In No More Room in Hell, there are 4 subcategories:
If you enter ironsights mode with a pistol and stand still for a few seconds, you'll enter Skillshot mode. It will end as soon as you either move or fire your weapon, but it will increase your pistol's damage.
 Firearms in No More Room in Hell (and some melee) use different kinds of ammo calibers and types; to check what kind of ammo your weapon uses, hold down your Reload key (R by default). The ammo type will be near the current ammo pool in the bottom right corner. As for checking what kind of ammo you have, hold down your ammunition inventory key (2 by default). You can drop excess ammo by simply mousing over the item you don't want (whilst holding 2) and once you've done that, press Mouse1.

Unlike firearms, melee weapons are plentiful and can be found in a common basis in No More Room in Hell. Baseball bats, fire axes, machetes, and so on, there are many types of them from which you can choose to use. Generally speaking, 2-handed melee weapons are heavier to use but can do more damage, while 1-handed melee weapons are lighter but do less damage. With any of them though, you can charge your attack by holding down your Primary Attack key. By charging, you can get an added bonus to your swing which will allow you to take out zombies with less swings. However, this will drain your stamina and could leave you in a dangerous situation if you're surrounded by dozens of zombies!
Some melee weapons also have secondary actions that consume ammo, the chainsaw being the only one (as of Beta 1.0). In the chainsaw's case, you can turn it on by pressing your Secondary Attack key (Mouse2 by default), assuming if you have the ammo for it (Chainsaws use gas, which are represented as red gas cans)...

Ranging from the M67 Fragmentation Grenade to a Molotov Cocktail, explosive weapons can deal massive damage in an area. However, if you aren't careful, you may kill off half of your team with a misplaced grenade throw!
Firearms
Firearms are weapons that launch projectiles at high velocity through the confined burning of a propellent. This allows the user to accurately take down his or her opponents from a safe distance. In No More Room in Hell, there are 4 subcategories:
Pistols
Ranging from the iconic Colt 1911 to the Beretta M9, pistols are versatile and are the most common sort of firearm you will find. In addition, you are able to use a Maglite in conjunction with a pistol.If you enter ironsights mode with a pistol and stand still for a few seconds, you'll enter Skillshot mode. It will end as soon as you either move or fire your weapon, but it will increase your pistol's damage.
Beretta M9 (9mm)
Colt National Match (.45ACP)
Smith and Wesson 686 (.357)
Ruger Mark III (.22LR)
Glock 17 Gen 4 (9mm)
Rifles
High powered hunting rifles, or simple .22 guns, rifles can engage targets at longer ranges. Unlike pistols, they are uncommon to find. They are also heavier, meaning survivors will have to carefully decide which rifle they want to pick up.Sako 85 (.308)
FN M16A4 (5.56x45)
Simonov SKS (7.62x39)
Ruger 10/22 (.22LR)
Winchester 1892 (.357)
CZ858 (7.62x39)
FN-FAL (.308)
Shotguns
The exact opposite of rifles, shotguns are the perfect close range firearm to use against any opponent. Like rifles though, they are uncommon to find and are just as heavy.Winchester Super X3 (12 Gauge)
Remington 870 (12 Gauge)
Beretta SV10 Perennia (12 Gauge)
Mossberg 500A (12 Gauge)
Submachine Guns
Submachine guns fill the gap between pistols and shotguns, allowing superb close range combat mixed with partial medium range engagements. Like shotguns and rifles, these are uncommon to find , but are generally lighter than either of them.Heckler & Koch MP5A3 (9mm)
MAC-10 (.45ACP)
Ammo
Firearms in No More Room in Hell (and some melee) use different kinds of ammo calibers and types; to check what kind of ammo your weapon uses, hold down your Reload key (R by default). The ammo type will be near the current ammo pool in the bottom right corner. As for checking what kind of ammo you have, hold down your ammunition inventory key (2 by default). You can drop excess ammo by simply mousing over the item you don't want (whilst holding 2) and once you've done that, press Mouse1.Melee
Unlike firearms, melee weapons are plentiful and can be found in a common basis in No More Room in Hell. Baseball bats, fire axes, machetes, and so on, there are many types of them from which you can choose to use. Generally speaking, 2-handed melee weapons are heavier to use but can do more damage, while 1-handed melee weapons are lighter but do less damage. With any of them though, you can charge your attack by holding down your Primary Attack key. By charging, you can get an added bonus to your swing which will allow you to take out zombies with less swings. However, this will drain your stamina and could leave you in a dangerous situation if you're surrounded by dozens of zombies!
Some melee weapons also have secondary actions that consume ammo, the chainsaw being the only one (as of Beta 1.0). In the chainsaw's case, you can turn it on by pressing your Secondary Attack key (Mouse2 by default), assuming if you have the ammo for it (Chainsaws use gas, which are represented as red gas cans)...
Explosives
Ranging from the M67 Fragmentation Grenade to a Molotov Cocktail, explosive weapons can deal massive damage in an area. However, if you aren't careful, you may kill off half of your team with a misplaced grenade throw!
Bows
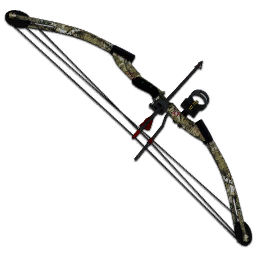
In a normal round, you can come across a hunting bow. In the right hands these can be way more effective than a gun since you can pick up and reuse arrows. To use a bow, just hold down your primary fire key (left click by default), and let go when ready. You can cancel your aiming by hitting your secondary fire key (right click by default). If you hold down your primary fire key for too long, your character will eventually tire out.
In a normal round, you can come across a hunting bow. In the right hands these can be way more effective than a gun since you can pick up and reuse arrows. To use a bow, just hold down your primary fire key (left click by default), and let go when ready. You can cancel your aiming by hitting your secondary fire key (right click by default). If you hold down your primary fire key for too long, your character will eventually tire out.
Basics of Combat
Basic Firearm Handling
Demo of firearms handling against zombies
----
Melee Combat
http://www.youtube.com/watch?v=fOkDCx5sBmw
Melee weapons in the Steam version of No More Room in Hell behave less like the crowbars in Half Life 2 and more like the swords and daggers in Chivalry and Pirates Knights & Vikings 2.
How far you hit and where you hit is determined by the actual size of your weapon, and how it swings. Pay attention to your weapon's swing arc, and note the swing trail.
Left clicking with a melee weapon performs a "Quick Attack". Quick attacks are generally horizontal and can potentially hit multiple targets at once. If you want to kill a zombie, most weapons require you to perform 2 or 3 quick attacks to its head before it goes down.
Holding down your left mouse button will allow you to perform a "Charged Attack". These are slower and swing in a more vertical fashion, but can kill a zombie with a single hit if fully charged. Currently there's no visual cue to let the player know if the attack's fully charged, but your attack's essentially fully powered if you hold down your left mouse button for AT LEAST 2 seconds.
Both quick and charged attacks consume stamina if they successfully hit an object (zombies, furniture, etc). The effect stacks if you hit multiple targets. How much stamina is determined by the kind of weapon you have. A 2 handed weapon (sledgehammer) can quickly deplete your stamina pool, while a 1 handed weapon (wrench) won't deplete it as fast. Fully charged attacks will use up more stamina than a normal quick attack.
Melee weapons are also divided into two categories: Blunt and Sharp. Sharp weapons like the Machete have a small chance of knocking a zombie back with quick attacks, while blunt weapons like the shovel have a higher chance of doing the same. Knockback chances for both sets increase dramatically if you use charged attacks.
----
Running out of Stamina
Sprinting, jumping, shoving, and swinging with melee weapons all cost stamina. If you don't have enough stamina to shove or to attack, your melee weapon will move below your screen, and you won't be able to raise it up to attack until you regenerate some stamina back.
Stamina naturally regenerates while you're moving, but you can regenerate it faster by standing still.
Items
Alongside the various weapons, you can find some special items and tools. Some of which can heal you, others are vital to completing an objective.

The Torch-It portable welding torch can both weld shut and cut open metal doors, gates, and more. It is a gun-like body with a removable and replaceable oxy-acetylene canister. It can be used as a melee weapon with a quick or charged attack. Alternate fire (hold down mouse2) will turn on the gas and pilot and burn through any lock, door or gate.
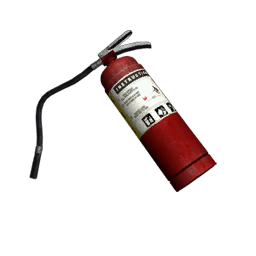
Sometimes you need to put out some fires to get to your next objective. In order to do that, you'll need a Fire Extinguisher. It can be used as a melee weapon with a quick or charged attack, or you can use it to put out fires by holding down your secondary fire key (mouse2).
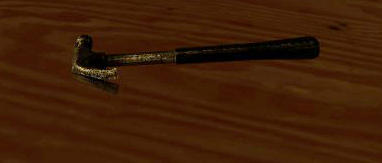
 Barricading's a staple in every zombie film and game, and it naturally makes an appearance here as well. In order to barricade, you need to find a hammer and some boards. Once you found both, equip the hammer and hit your secondary fire key (mouse2 by default) to enter "Barricading Mode". Once you found a doorway that can be barricaded (it'll have some semi-transparent boards on it), tap your primary fire key (mouse1 by default) to start barricading.
There are a series of items that one can use to temporarily cure infection, heal their wounds, or bandage their cuts. Some of them are listed below, but to use any of them you must pick them up with your USE key (E), and equip it through the Inventory Wheel. After you've done that, you can finally use them by tapping your Primary Fire key (left click).
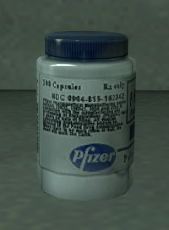 Phalanx is a prescription drug developed in the in-game universe of No More Room in Hell by real-life pharmacutical giant Pfizer. It was intended to treat those infected with 732-ZH Encephalitis Lethargica. It was a commercial success but a clinical failure. The world collapsed before Pfizer could complete research in to an effective drug treatment, but players can find bottles of Phalanx scattered around in rare places in most maps and can use it to stem off infection in themselves or others for a short time.
When used, it will be immediately consumed and take effect. It lasts for approximately three minutes before it wears off and infection sets back in from the start.
You can only hold one of these at a time.
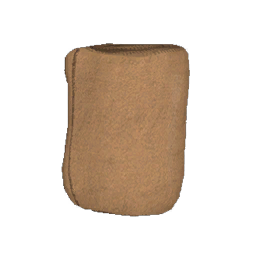
If you are in BLEEDING status (represented by an occasional pulsating splash of blood on your screen, along with a grunt of pain and a trail of blood coming out of your character), you can find these bandages to stop the bleeding. You can only hold one of these at a time. Once used, they'll also replenish 15 health points. Note: You can't use these bandages if you're not bleeding!
The First Aid Kit, or FAK, can replenish 40% of your health if used. You can only hold one at a time. It will stop the BLEEDING status.
If you have one of these in your inventory, you're able to listen to and communicate with other Walkie Talkie users, regardless of how far you are from them. These are used passively, so you can simply speak with Voice Chat. Some maps may also use them as a way to communicate objectives or important pieces of information to the player.
This is your flashlight. Unlike in other games, you won't start out with this, so you'll have to find one of these scattered throughout the level you're on. If you press F, you'll switch to the Maglite. Right clicking will turn on/off the light. Pressing F again will switch you back to the weapon you had previously equipped.
Some weapons will allow you to use them and a Maglite at the same time (pistols, some melee weapons, etc.). To do this, simply press F.
In addition to the above, you're able to see the full flashlight beam emitted by other players; this means you can have one person shine a light through a pitch black hallway, and have the other survivors kill the now visible zombies!
On occasion you might find a flare gun. You can use these things as improvised weapons (they're great at setting zombies on fire), or you can use them to call for supply drops. To call for a supply drop (if the map allows it), simply aim at the sky and shoot.
If you're caught in the dark and you don't have a flashlight, you can tap F to bring out your Lighter and left click to light it. Keep in mind that you might have to left click several times before it works. If you sprint or keep the Zippo lit for 60 seconds, the flame goes out.
If you have a Maglite in your inventory, you can bring the Zippo out by holding down the F key for half a second.
Future updates will potentially give the Zippo Lighter more functionality.
Welder
The Torch-It portable welding torch can both weld shut and cut open metal doors, gates, and more. It is a gun-like body with a removable and replaceable oxy-acetylene canister. It can be used as a melee weapon with a quick or charged attack. Alternate fire (hold down mouse2) will turn on the gas and pilot and burn through any lock, door or gate.
Fire Extinguisher
Sometimes you need to put out some fires to get to your next objective. In order to do that, you'll need a Fire Extinguisher. It can be used as a melee weapon with a quick or charged attack, or you can use it to put out fires by holding down your secondary fire key (mouse2).
Barricade Hammer
Barricading's a staple in every zombie film and game, and it naturally makes an appearance here as well. In order to barricade, you need to find a hammer and some boards. Once you found both, equip the hammer and hit your secondary fire key (mouse2 by default) to enter "Barricading Mode". Once you found a doorway that can be barricaded (it'll have some semi-transparent boards on it), tap your primary fire key (mouse1 by default) to start barricading.Medical Items
There are a series of items that one can use to temporarily cure infection, heal their wounds, or bandage their cuts. Some of them are listed below, but to use any of them you must pick them up with your USE key (E), and equip it through the Inventory Wheel. After you've done that, you can finally use them by tapping your Primary Fire key (left click).
Phalanx
Phalanx is a prescription drug developed in the in-game universe of No More Room in Hell by real-life pharmacutical giant Pfizer. It was intended to treat those infected with 732-ZH Encephalitis Lethargica. It was a commercial success but a clinical failure. The world collapsed before Pfizer could complete research in to an effective drug treatment, but players can find bottles of Phalanx scattered around in rare places in most maps and can use it to stem off infection in themselves or others for a short time. When used, it will be immediately consumed and take effect. It lasts for approximately three minutes before it wears off and infection sets back in from the start.
You can only hold one of these at a time.
Bandages
If you are in BLEEDING status (represented by an occasional pulsating splash of blood on your screen, along with a grunt of pain and a trail of blood coming out of your character), you can find these bandages to stop the bleeding. You can only hold one of these at a time. Once used, they'll also replenish 15 health points. Note: You can't use these bandages if you're not bleeding!
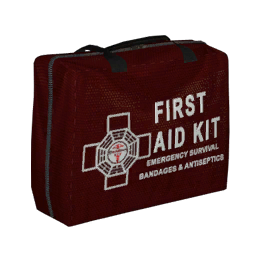
First Aid Kit
The First Aid Kit, or FAK, can replenish 40% of your health if used. You can only hold one at a time. It will stop the BLEEDING status.
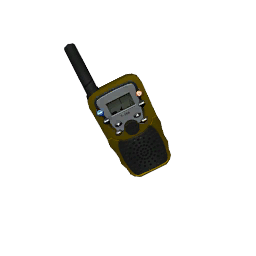
Walkie Talkie
If you have one of these in your inventory, you're able to listen to and communicate with other Walkie Talkie users, regardless of how far you are from them. These are used passively, so you can simply speak with Voice Chat. Some maps may also use them as a way to communicate objectives or important pieces of information to the player.
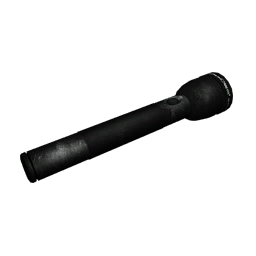
Maglite
This is your flashlight. Unlike in other games, you won't start out with this, so you'll have to find one of these scattered throughout the level you're on. If you press F, you'll switch to the Maglite. Right clicking will turn on/off the light. Pressing F again will switch you back to the weapon you had previously equipped.
Some weapons will allow you to use them and a Maglite at the same time (pistols, some melee weapons, etc.). To do this, simply press F.
In addition to the above, you're able to see the full flashlight beam emitted by other players; this means you can have one person shine a light through a pitch black hallway, and have the other survivors kill the now visible zombies!
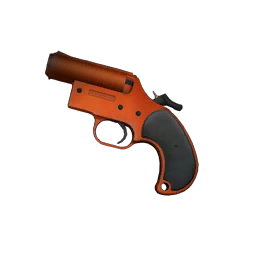
Flare Gun
On occasion you might find a flare gun. You can use these things as improvised weapons (they're great at setting zombies on fire), or you can use them to call for supply drops. To call for a supply drop (if the map allows it), simply aim at the sky and shoot.
Zippo Lighter
If you're caught in the dark and you don't have a flashlight, you can tap F to bring out your Lighter and left click to light it. Keep in mind that you might have to left click several times before it works. If you sprint or keep the Zippo lit for 60 seconds, the flame goes out.
If you have a Maglite in your inventory, you can bring the Zippo out by holding down the F key for half a second.
Future updates will potentially give the Zippo Lighter more functionality.
Quick Reference Guide
Here is a collection of tips and knowledge to quickly get familiar with NMRiH:
- Press C to use your Compass; it'll tell you what you need to do, where to go, and in survival mode, what to defend (the letters represent safe zones).
- Objective items don't glow unless you get close to them, so you'll have to explore the level.
- Objective maps have the nmo_ prefix, Survival maps have the nms_ prefix.
- Inventory keys are: 1 and 2. You can use voice commands with 3.
- You can perform ammo checks by holding down R; it will tell you how much ammo you have along with the ammo type the gun uses.
- Free space in your Weapon Inventory is shown as grey, Ammo and weapons take up weight, which is visually represented as a red color.
- Headshots are vital to killing zombies. Servers can turn on a headshot only mode -- body shots will not deal damage!
- All zombies, except for children, can bite you.
- Bites have a high chance of infecting you.
- Your current health determines how resistant you are towards infection. In short, don't get hurt too much!
- Infection can only be temporarily stopped with Phalanx Pills.
- You can only stop bleeding if you: use bandages, or heal yourself to 100% health.
- Holding down Mouse1 with a melee weapon will charge it up for extra damage: If you want to ensure a one hit headshot kill, charge the attack for AT LEAST 1.5 seconds (starting the second you hold down Mouse1).
- Some melee weapons have a small chance of knocking back a zombie with a normal attack. You can increase that knockback chance by charging your melee weapon.
- You can shove zombies back with V.
- You can sprint by holding down Left Shift.
- Shoving, successful melee attacks (if they hit zombies), sprinting, and jumping all consume stamina from the same pool.
- You can barricade with hammers, right click to turn on Barricade Mode and place the boards up where you're allowed to (represented with transparent barricade board models).
- Hold down Mouse2 to unweld/weld objects with the Welder.
- Flare guns can call for supply drops in certain levels.
- Chat is distance based, only way to communicate through long distances is if you have a walkie talkie.
Basic Troubleshooting Guide
Most issues with No More Room in Hell can be resolved by verifying your cache. This will check all the NMRiH files on your computer and update any corrupted ones. It will also fetch any updates should your client be out of date.
Step 1: Locate the game in the Library.
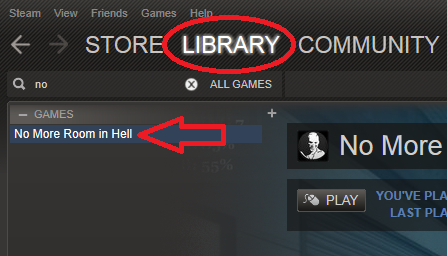 Hint: You can search for "No" to easily find the game.
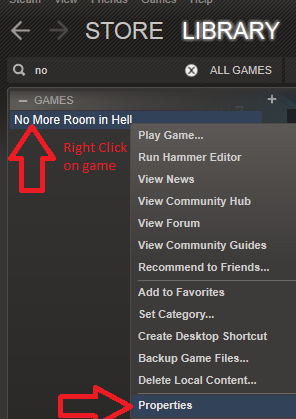
Step 2: Right click and open the Properties dialog.
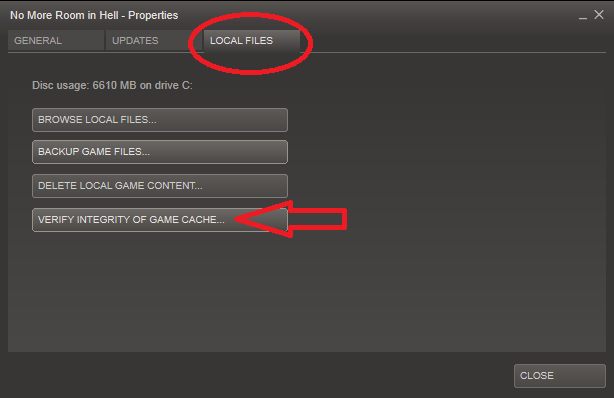
Step 3: Click on Update Files then Verify integrity of game cache.
Step 4: Allow the process to complete. You won't be able to use Steam while it does.
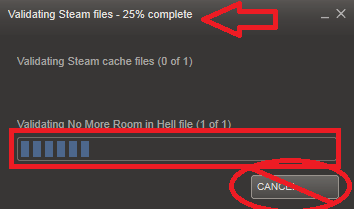 Warning: Do not cancel the process or your game may become even more corrupt.
If you're unable to fix your issues, please email us at [email protected]
Support Email: [email protected]
Step 1: Locate the game in the Library.
Hint: You can search for "No" to easily find the game.Step 2: Right click and open the Properties dialog.
Step 3: Click on Update Files then Verify integrity of game cache.
Step 4: Allow the process to complete. You won't be able to use Steam while it does.
Warning: Do not cancel the process or your game may become even more corrupt.If you're unable to fix your issues, please email us at [email protected]
Support Email: [email protected]
How to set up a Listen Server
[Part 1: Connectivity]
First, figure out what your public IP is. It's easy go HERE [www.whatsmyip.org]and it tells you right at the top.
Second, make sure you have 27015 (TCP & UDP) forwarded on your router. I'm not going to explain how to port forward because it's different for everyone depending on your modem brand and internet provider. But you can go to http://portforward.com/ which is one of the best places to learn how to port forward.
Required Ports:
UDP 27015
TCP 27015 (only if you need rcon)
Other suggested ports for No More Room in Hell (and other Source games):
UDP 1200
UDP 27000 to 27015
UDP 27020
TCP 27030 to 27039
TCP 27015
[Part 2: Setting up the server]
- In the options menu for the game, under the Keyboard tab click the Advanced button and check the box marked as "Enable developer console".
- Click create server and choose your desired options, then start the server.
- Now once in the game open the console with ~. Type "sv_lan 0" without the quotes.
- After you've set the lan to 0 use the "changelevel" command to restart the map you were on or choose another map.
- Then tell your friends to use this command in the console to connect: "connect youripgoeshere:27015" without quotes.
- Now if the game freezes while loading for your friends just tell them to take a chill pill and that it will load eventually.
Staff Credits
Staff Credits for the Steam Release
Project Manager
Matt 'Maxx' Kazan[www.facebook.com]Programming
Andrew 'ssba' OrnerBrent 'Brentonator' McAhren
Public Relations
David 'Dman757' MeadeChase 'Xendrid' Asch
Textures, Concept Art, Particles and UI
Joseph 'SickJoe' Gay Jr.[sickjoe.deviantart.com]Kyle 'Bucky' Clark
Nicholas 'Jangalomph' Seavert
Sam 'Porky-da-Corgi' Fletcher
Sound
Bryn 'TheForgotton' SchurmanGarrett 'GDawgTUK' Lindquist
Tom 'rezOnance' Wright
Voice Actors
Joseph 'Bingo Bango' BrackenRichard 'Cleric' Heller
Characters
Alex 'CYN' RiegerAnimations
Miguel 'Se7en' FélixJonathan 'JayLC' Claudius
Mohammed "X rock X" Al-Ghanim
Models & Skins
Matt 'Maxx' Kazan Christopher 'Guessy' Jones
Louie 'Cactus Fantastico' Woodhouse
Florian 'VaTTeRGeR' Schmickmann
Dave 'DiRTpayne' Henning
Lead Level Designer
Toni 'SotaPoika' SeppänenLevel Design
Nathan 'Nay0r' GouldenVincent 'Vincent074' Boer
Eric 'Payne' Blake
Jörn 'grasn' Spangenberg[grasn.tumblr.com]
Jack 'Major Banter' Skelhon
Neil 'Lou Saffire' Thorpe
Greg 'thegregster101' Weeks
Ryan 'Deadhand' Maclean
Shannon 'Hypnosis' Brown
QA Lead
RileyQA Assistant
Joshua 'Gothic' BarnsdaleTesters
Andrew 'ACallander' CallanderBruce Campbell
Chubaka
cyanyde
Paladin
Raijian
The Reverend
themanofwar
whitecoal
2ndClassCitizen
Krackman
Contributors
Coleman 'Cs42886' Sweeney : Mod Founder
Jacob 'darth_brush' Wawer : Maps
slimz : Maps
Jason 'Generalvivi' Mojica : Maps
Liam 'PogoP' Tart : Maps
Blink : Maps
Atrocity : Maps
Chris '2d-Chris' Kay : Maps
MacKenzie Shirk : Maps
Jun 'Juniez' Choi : Maps
Jabba : Video Teaser
Josiah : Interim Project Manager (2006)
wRy : Models
Morgan : Models
Sonk : Models
wchamlet : Models
Finchy : Models
Fiblah : Models
Alex 'NeoGod' Hollenbech : Models
Artis 'Machine' Lapsins : Models
Alexander 'LSR' Eskin : Models
Dmitri 'SoJa' Terskov : Models
Rino 'CurtisWS' Zvizdich : Models
Paul 'Eternal' Szczyrbak : Models
Jim 'Plasmid' : Models
D 'Unkn0wn' S : Animation
Matt 'CrazyMatt' Fagan[www.msf3d.com] : Models, Characters, Rigging, Animation
Michael 'RawMeat3000' Kato : Models/Animation
Kevin 'Blindside' Sredzinski : Animation
Javid 'Sn1pe' Ali : Animation
Alex 'THECOUNTER' Schmidt : Animation
D 'Unkn0wn' S: Animation
Stab : Textures
Kiung 'Kynde' Yoo : Concept Art
Herbann Rauth : Sound
Dimitris Plagiannis : Sound
Vance Dylan : Sound
Richard 'Beckett' Douglas : Sound
Dave 'DaveOfDefeat' Smolanowicz : Sound
Kirt 'kMoon' Moon : Sound
Ryan 'Ghostie' K : Sound
Luke 'StringedEvil' Hatton : Sound
David 'InstantSonic' Spencer : Sound
Xerxes 'XerxZz_' Noble Dennis : Sound
Jan-Kristian 'Soulspray' Koivukangas : Sound
Alexander '.sverek' Honda : Sound
Chris 'Captain Munky' Adams : Voice Acting (Player)
Aaron 'Aaronwildemusic' Wilde : Music
3pidemiC : Being Useless
Contact Us
[email protected]
More No More Room in Hell guides
- NMRiH Community Hosting Guides★ 5 (526)351k views653 ♥1 minUpdated Aug 10, 2022
- A Complete Guide to NMRiH (v1.14.2)★ 5 (996)253k views1.3k ♥280 minUpdated Jun 2
- How to play with friends★ 4 (187)69k views428 ♥2 minUpdated Jun 26, 2023
- How to Create a "Listen" Server★ 5 (453)41k views702 ♥4 minUpdated Sep 27, 2022
- Большое Руководство [RUS]★ 5 (650)22k views609 ♥27 minRussianUpdated May 9, 2016
- Oh btw, the virus in this game is based off a real one.★ 5 (328)14k views244 ♥1 minUpdated Jan 8, 2021


This guide was created by its original author on the Steam Community. Are you the author and want it removed? Request removal.