![[NON-VR] Engineering and firing the SH 282 "Mikado" for beginners. for Derail Valley](https://steamsolo.com/wp-content/uploads/2021/07/non-vr-engineering-and-firing-the-sh-282-mikado-for-beginners-derail-valley.jpg)
Overview
A basic guide to further explain and use knowledge provided by the in game locomotive instruction manual and other official sources. The techniques listed in this guide will be sufficient for short lightweight jobs which beginners should start with. This guide is written assuming that reader has a basic understanding of interfacing the controls of the steam locomotive (IE turning nobs, lighting the firebox, etc). What this guide will not teach is how to double head steam locomotives carrying thirty plus iron ore cars up a grade, that takes special talent.
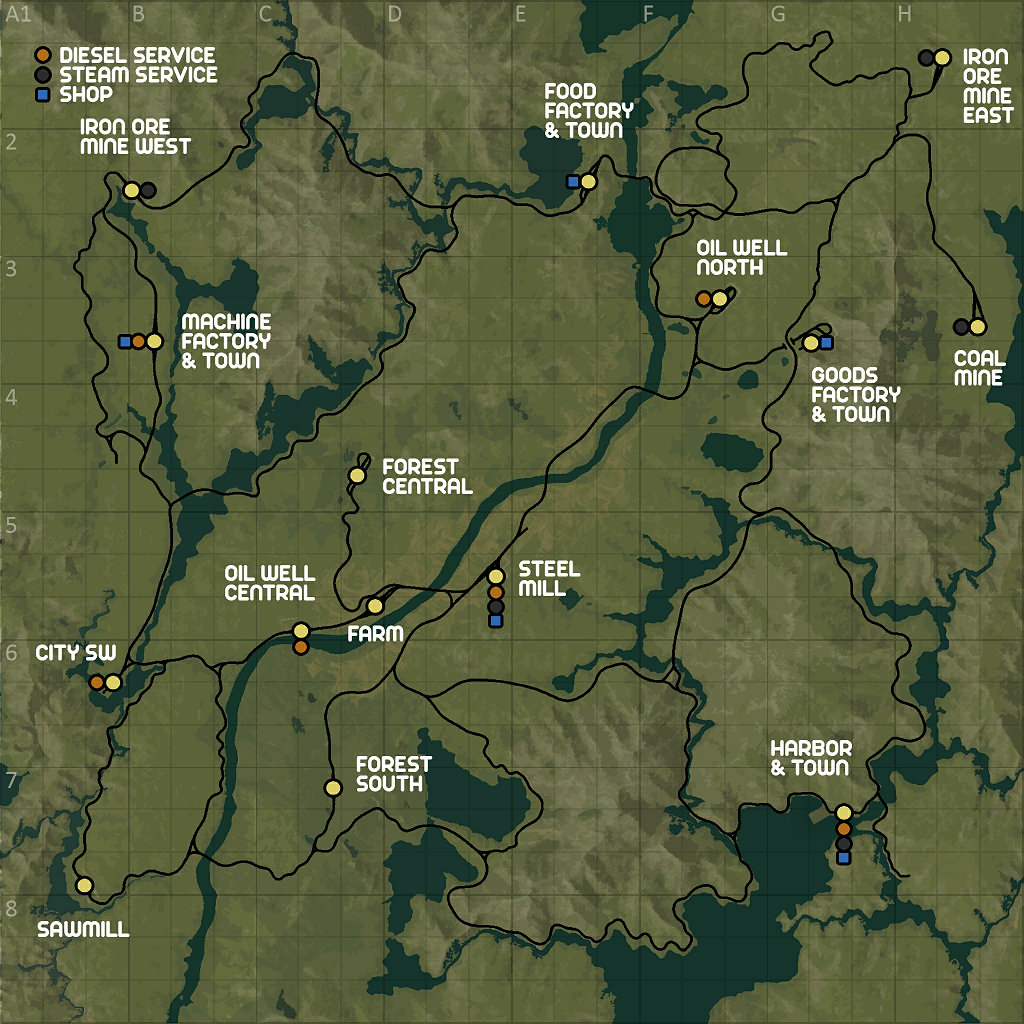
1. Know Your Route
Below is a map of the Derail Valley. The key to any successful hauling job is planning your route which is more complicated than choosing the shortest route. Routes with long stretches of gentle curves which can be safely navigated above 40 kph greatly reduce the travel time. This is besides the fact that curves greatly increase the length of a section of track compared.
2. Preparing the train for departure
When taking up a hauling job it is important to ensure that you have ample time to safely travel from point A to point B. Jobs don’t activate until you stow them in your inventory bar or take them out of the station office (I don’t know the exact mechanics if some one who knows better could send feedback that would be great). As the mechanics are right now as of build #61 you can look through the jobs available to you and select which ever one you want and leave it in the station office while you prepare your train for departure. Preparations such as prepping the locomotive and positioning it close to the rolling stock that are specified in the orders ready to pick it up and go. Once you have prepared your train for departure you can go back to the station office to pick up the orders and begin the haul job in earnest.
3. Firing the Locomotive
The steam locomotive as it is in Derail valley is a good engine in the scope of the game currently. It is capable of handling heavy loads such as both of these jobs at the same time (my finest haul job as of writing this I am very proud.) However this shouldn’t be something you should start on a steam locomotive.
Keeping the locomotive running is a never ending battle against time that can be easily mastered through practice and routine. A steam locomotive derives its power from steam pressure coming from boiling water. The water is boiled by burning coal in the firebox. The best way to maintain the locomotive is to have a cycle going from shoveling coal, to filling the boiler and monitoring the speed of the train.


The Firebox consumes coal at a fairly constant rate but slows down as the fire dies. Without the blower or draft the fire will burn between 400 and 600 degrees which will sufficiently generate steam for almost all light loads. I barely use either the blower or draft on most loads even for the longer single jobs. However when travelling below 30 kph the blower tends to work better than the draft and the draft works better than the blower at speeds above 30 kph from my experience. As you use either the draft/blower the burning rate of coal will increase greatly. Only use them if you find your boiler pressure dropping below 15 bar. I personally just leave the firebox doors open which makes it much easier to monitor fire level.
The Boiler will consume water and must be either constantly topped off or have the injector cracked open to roughly match the water drain on the boiler. As of build #61 the there are no consequences for the water falling below the bottom or rising to the top of the meter. However it is good practice to keep it somewhere in the middle as most likely in future versions boiler explosions or piston flooding may be implemented spelling doom for careless firemen. The draining of water from the boiler is determined by the throttle and cutoff. The throttle consumes more the more it is opened up and the cutoff consumes more the further from neutral it is. When the locomotive is moving it is important to reduce the cutoff as much as possible to make the locomotive use steam more efficiently.
4. Engineering the Locomotive
Driving the locomotive more complicated than releasing the brake and opening the throttle. There are three primary controls the Throttle(regulator), Cutoff(Reverser) and the brake. Both the Throttle and Brake are fairly self explanatory. The Throttle makes the train accelerate in the direction the cutoff is opened towards and the Brake just decelerates the locomotive.
The Cutoff is more complicated as not only does it control the direction of the locomotive but also the maximum speed and tractive effort. When the Cutoff is at 100% in either direction the locomotive will produce more horse power at the cost of max speed. The locomotive will quickly climb to 20 KPH and slowly accelerate above that to around 30 KPH. Reducing the cutoff will allow the locomotive to accelerate higher speeds however the overall horsepower will be slightly reduced. Once you have gotten the train going during a haul it is important to reduce the cutoff so that you consume less steam, the less steam you consume the less water you consume the further you can haul.*
When driving the locomotive it is imperative to brake earlier and more gently in the steam locomotive as the brakes are not only stronger but locomotive itself and tender are heavier than the shunter. When coming to upward hills open the throttle early to reduce the loss of speed. Sometimes sanding will be needed to prevent wheelslip.*
There are no warning lights to indicate wheelslip. There are multiple methods the easiest is looking out the cab window to check for red-orange sparks at the bottom of the driving wheels. A more complicated method is to listen to the sound the locomotive is making, say you are moving slowly but the chugging of the locomotive makes it sound like it is going faster. You might not always hear the grinding noise from the wheels slipping.
*It will be more important in later versions but it is good to form good habits early.
5. Afterword and Feedback
I just want to say this the first guide I have written and probably the longest piece of writing I have published since I went to college. Your feedback and questions would be much appreciated especially from players with more statistical knowledge than what I have. This guide has been a project over the course of a couple weeks and so when I started writing it there were no other guides. What I get for procrastinating but I digress. As the game is updated I will return to improve and update the information in this guide.