
Overview
A step-by-step instruction on how to create a mod for Natural Selection 2. It focuses on the setup of some basic tools and show best practices for creating a mod that makes (minor) modifications to the base game.
Useful Links And Scope Of This Guide
This a step-by-step instruction on how to create a mod for Natural Selection 2. It focuses on the setup of some basic tools and show best practices for creating a mod that makes (minor) modifications to the base game. If you are planning to create a new game mode, you should read about the deeper mechanics of the virtual file system NS2 uses and the various methods to load a mod in Ghoul’s modding guide here[docs.google.com] (also here[unknownworlds.com], here[forums.unknownworlds.com], here[forums.unknownworlds.com], here[docs.google.com] and here[forums.unknownworlds.com]).
For a tutorial on the cinematic editor checkout .
If you need help head over to the official NS2 modding channel[discord.gg] on discord or the Modding Section[forums.unknownworlds.com] in the Unknown Worlds forums.
Directories
Let us start with the various locations NS2 saves data. There are 3 main locations:
In these directories, there are a few subdirs you should know about:
Setting Up A Coding Environment
Before we start, we will setup a proper coding environment. You might use any text editor you like, including Decoda which ships with the game, and if you feel confident with your setup, you can just skip this step. However, the editor of your choice should at least be capable of the following:
- syntax highlighting for lua (because colors help you see mistakes)
- search across all files (you will need it. often.)
- linter for lua (to detect syntax errors as you type)
I am going to use Atom which you can download here[atom.io].
Atom has many great packages you can install, some of which we will need. In File->Settings->Install search and install the following:
- language-lua (enables syntax highlighting for .lua files)
- “linter” (framework for language interpreters, use “” in search for better results)
- linter-glualint (linter binding for GLuaFixer)
There are many more packages, feel free to install anything you like.
In order for the lua linter to work, we need to setup a seperate programm called GLuaFixer which you find here[github.com].
Just download and extract the .exe file anywhere, then add that location to your PATH variable. If you are lazy just extract it into %LOCALAPPDATA%atombin.
You should now veryify that everything is working. I.e. open SteamsteamappscommonNatural Selection 2ns2luaBlip.lua
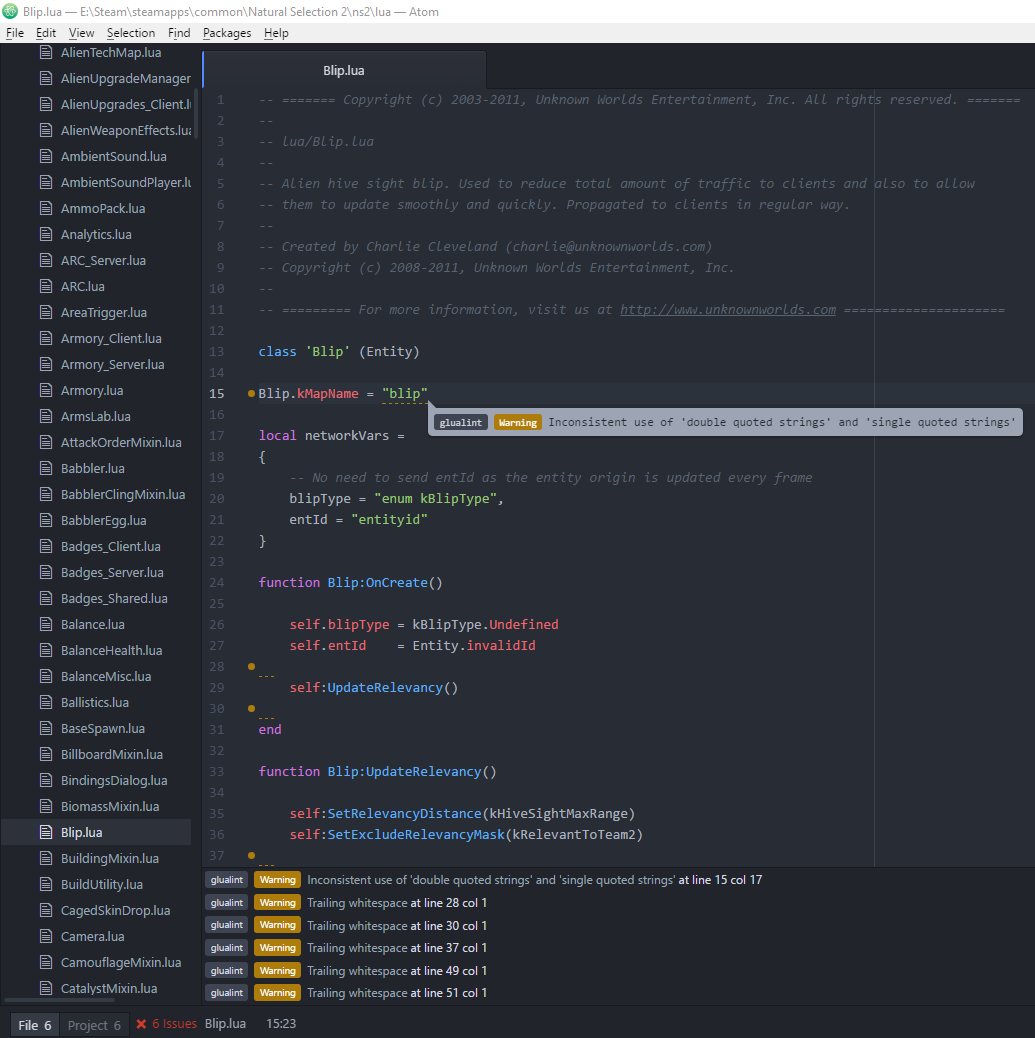
You will notice that certain lines have yellow dots and markings, also the lower left says “X Issues”. Congratulations, it is working.
Depending on the file you have opened, you will probably see a lot of “Trailing whitespace” warnings. To disable this type of warning, create a textfile in %USERPROFILE%.glualint.json
with the following content:
Notice how lint_trailingWhitespace is set to false and thus all the warnings are gone.

Word of advice: never change a file in the NS2 dir directly, or else you wont be able to connect to servers anymore since that file wont pass the consistency check. If you mess up you can always “verify integrity of game cache” from within steam to restore the original files.
Mod Creation
Ok, we are setup and ready to start now. For this tutorial, we will alter the behaviour of medpacks.
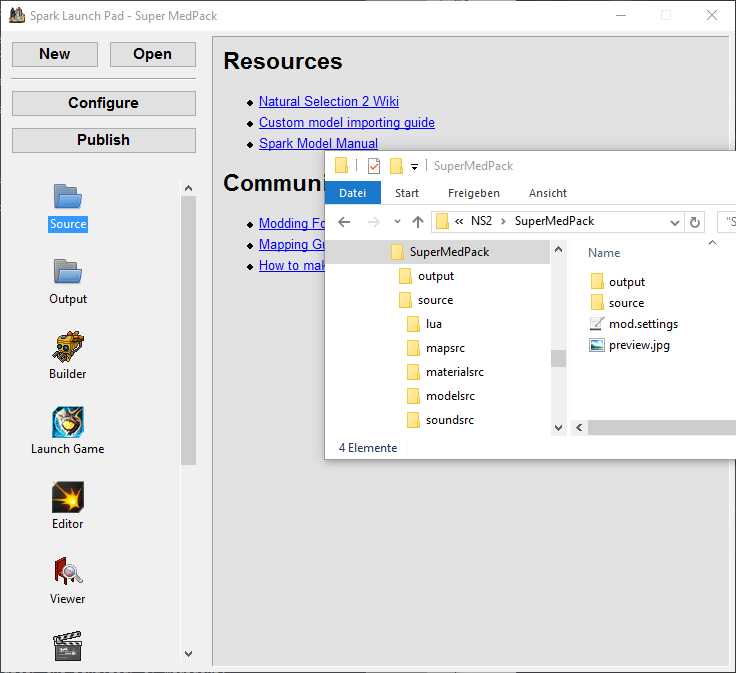
Start launchpad.exe (located in your NS2 dir) and click “New”. Choose a location outside of your NS2 directory, the directory is not important, just avoid dashes (“-“), plus signs (“+”) and maybe spaces (” “) in the directory name for now. The “Mod Name” is the name that will appear in the steam workshop and on the NS2 loading screen. Name it anything you like, you can also change it later. As tempting as it might sound, do not check the checkbox. Click create.

Launchpad has loaded your mod now and several new icons appear. Also notice how several files and directories got created in your mod location.
The mod.settings is a text file that contains all the information on your mod, most of which you can configure when you click the “Configure” button in launchpad.
preview.jpg is the preview image that will be shown in the steam workshop. You should replace it with your own before publishing.
But most importantly, there are the two new directories “Source” and “Output” now.
The way it works is that you place your files in the corresponding subdir in “Source” and then the Builder (which you can start fom within launchpad) converts it to the right output format which you then find in the corresponding subdir in “Output”.
So for example, when you place mypicture.psd in sourcemodelsrc and then run builder, it will create a texture file in outputmodelsmypicture.dds. Also as long as builder is running, everytime it detects a change in the source dir, it will update the corresponding file in output.
In terms of lua files, they are just copied from sourcelua to outputlua, so be aware which one you edit.
Later, when we publish our mod in the steam workshop, the workshop will contain everything that is inside the output dir and nothing of the source dir.
Overwrite Numerical Values
As stated before, we are going the change the way that medpacks work. For that our mod needs to override some numbers (i.e. the amount of healthpoints that a medpack gives us). The best way to do this is via Filehooks.
At first open atom, and from the “File” menu add a project folder. Navigate to the mod folder and add it.
Then repeat the step and add the following directories as project folders (Hint: you can ctrl+click to select multiple directories):
- SteamsteamappscommonNatural Selection 2docs
- SteamsteamappscommonNatural Selection 2core
- SteamsteamappscommonNatural Selection 2ns2
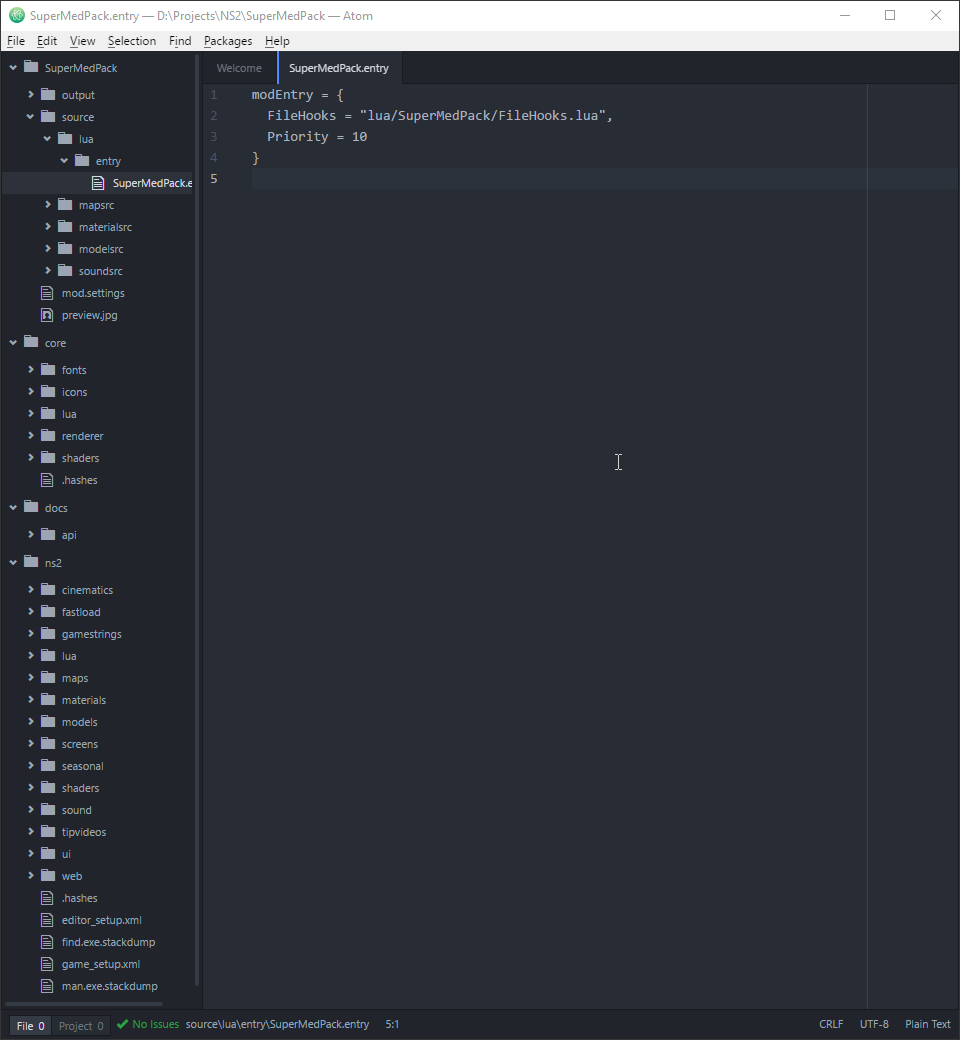
Now in sourcelua create two new subdirectories: “entry” and “SuperMedPack”. Also create a new file called “SuperMedPack.entry” and save it under sourceluaentry. Copy & paste the following content:
When you are done it should look like this:
We have done two things now:
- By setting up the project dirs we can now search across all files in the 4 directories, which we will need in a second.
- We have created a FileHooks entry point. That allows our mod to be loaded as soon as certain files are loaded. The details are left to “lua/SuperMedPack/FileHooks.lua” which we have not created yet.
Please note that NS2 separates directories with slashes (“/”) and that all directories and filenames are case sensitive.
Since we are going to change existing code, we will use “FileHooks”. If you are adding new things (let’s say a new weapon), you can also use the entry file to load your new code. For that, several other keywords such as “Server”, “Client” or “Shared” exist. Read Ghoul’s Modding Guide[docs.google.com] for the full details.
The “Priority” determines the order in which mods are loaded. If you encounter compatibility issues with other mods you can try to lower or rise it.
It is time now to dive into the NS2 code and see what we need to change for the desired effect. For the beginning, let us try to change the amount of healthpoints a medpack can heal. If our mod is called SuperMedPack, it better heal a super amount of them. The question is now, where do we find this number. And the answer is “I don’t know”, so let’s try to find it. What you should know about the NS2 code is that every thing has it’s own lua file, so MedPack.lua is probably a good way to start our investigation. Hit ctrl+p and start typing “medpack”, when you see MedPack.lua click on it. That’s a fast way to open files without knowing where to find them. Also the search is using fuzzy matching, so even if you type “mdpak” it will still suggest you some reasonable results.

The code in MedPack.lua isn’t too long and complex. One thing we see right at the top is this line.
kMedpackHeal is probably the amount of healing a medpack provides and its value is stored in kHealth. Our theory is supported by this line further down:
Now one way would be to override the value in MedPack.kHealth, but who knows where else kMedpackHeal is used, so better try to change it at the source. Now where is kMedpackHeal defined? Not in MedPack.lua, that we can tell.
Let’s search for it. Hit ctrl+shift+f and search for “kMedpackHeal”. This searches all files in all project directories, which is why we have added them earlier. In general it might be a good idea to limit the search to lua files only. I frequently use “*.lua, *.json” as a search pattern.

Now we see that kMedpackHeal does in fact only occur twice in the whole NS2 code. When you click on the first result you see that it is defined as a global variable in BalanceHealth.lua with a value of 25. Now we know which file we actually want to change.
Back in our source dir, it is time to create source/lua/SuperMedPack/FileHooks.lua (case sensitive!). In the tree view, right click the right directory and click “New File”.
For the content use this:
It means, when the content of “lua/BalanceHealth.lua” is loaded, also load the contents of “lua/SuperMedPack/BalanceHealth.lua”. “post” says our file should be loaded after the original one. Other options are “pre”, “replace” and “halt” but you want “post” 99% of the time. Our file could have any name we want, but since it contains the changes to BalanceHealth.lua, this one seems appropriate. The most important part is that we place our file in a subdirectory. That way, when our mod is loaded by the game engine, both files coexists. If we had placed our file in “source/lua/BalanceHealth.lua”, NS2 would only see our file, or in other words, our file would replace the original one. This is almost always a bad idea since such a setup breaks easily with a NS2 update.
Now “lua/SuperMedPack/BalanceHealth.lua” has only a single line of content:
Since it is loaded after the original BalanceHealth.lua, it will overwrite the old value.
Ok, let’s test what we have. But before we can do that, we need to build the mod. So far we only placed files in “source” so let’s start the “Builder” tool from launchpad to generate the “output” files. When you start it after you changed the files, it is a good idea to click “rebuild” from the menu. You should see 3 files being processed.

If you get the error that an instance of builder is already running, open it from the tray area.

Now that the medpack heals an insane amount of HP, it should cost more. So while we are at it, let’s change that, too.
Doing a ctrl+shift+f search for “medpackcost” gives us
in Balance.lua. As a general rule, most of the numbers can be found in Balance.lua, BalanceHealth.lua and BalanceMisc.lua.
So let’s add an additional filehook for Balance.lua. In FileHooks.lua add a new file hook, but this time for Balance.lua instead of BalanceHealth.lua:
Also create “source/lua/SuperMedPack/Balance.lua” which contains only a single line: our new medpack cost.
Since we have not closed the Builder tool yet, it is still running in the background and silently updating our output directory.
Please be aware that the Builder only adds and updates files in the output dir. It does not delete files! So when you delete/move/rename files in the source dir, either do the same in the output directory or just delete everything in output and tell Builder to rebuild everything.
Testing Your Mod
Now we can start the game using our mod. In launchpad, click on “Launch Game”.
This is a shortcut for running “C:SteamsteamappscommonNatural Selection 2ns2.exe” -game D:/Projects/NS2/SuperMedPack/output.
From the main menu, start a local server either by opening the console with the tilde key and typing “map ns2_summit“. Alternatively you can do the same by clicking “Server Browser” -> “Start Server”, but the console is much faster.
Once you are ingame, here are some console commands you might find useful:
- cheats 1 (enables cheats and starts the game)
- alltech (unlocks all upgrades)
- autobuild (finishes structures automatically)
- j1 (join marines)
- j2 (join aliens)
- rr (join readyroom)
- pres (give personal resources)
- tres (give team resources)
- takedamage 150 (take damage (30 armor * 2 + 90 hp = 150))
- spawn medpack (spawns a thing where you look, you might replace medpack with marine, gorge, rifle, …)
- spawn hydra 2 (2 is for the alien team)
- gorge (makes you a gorge, works with skulk, fade, exo, dualminigun, jetpack, …)
- disconnect (disconnects you from the server, also stops your local server)
- exit (closes the game)
An even longer list you can find here[wiki.unknownworlds.com].
So in our case the procedure would be: map ns2_summit; j1; takedamage 150; spawn medpack and then walk over it to confirm that it heals us back to 100 health. When you change something in the lua code, that change will not immediately take effect and depending on the change might cause some errors in the console. In order for the change to take effect you have to reload the lua VM which is easiest to do by loading the map again (“map ns2_summit“). This is also the reason why you want to reduce load times as much as possible: in the config dir, open ServerConfig.json and set “consistency_enabled” to false. Also move NS2 onto a SSD if possible.
Replace Functions
Ok, everything works as expected, so let’s do more changes. So far we only tweaked numbers, let’s do something more complicated now. In order for our super medpack to be truly super, it should be able to heal armor as well. Now when we study the code in MedPack.lua, we can easily see the line where the healthpoints are added. It is this line in function MedPack:OnTouch():
There are three arguments, and we already established that the first argument is the number of healthpoints to be healed. Maybe one of the others does the same for armor. But we can’t know for sure unless we look at the definition of the AddHealth() function.
Now when we ctrl+shift+f search for “AddHealth”, we get a lot of results. We could check each one, but we can do better. Search for “function.*AddHealth” and click on the “.*” symbol to enable regex search. This time we only get 2 results, and the second one is the one we are after.
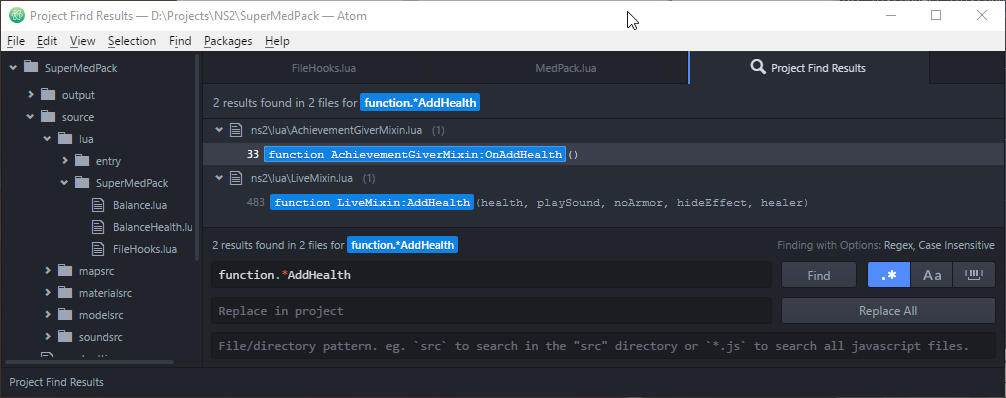
Now if we look at the code of function LiveMixin:AddHealth(), we see that the third argument decides whether armor should be healed or not. So all we need to do is to change the third argument from true to false and we are done. But since that function call is in the middle of another function (MedPack.OnTouch), we need to replace the whole function with our version.
Let’s start with a new FileHook for MedPack.lua:
Also we create “source/lua/SuperMedPack/MedPack.lua” and place our own function in it:
Since the filehook loads our file after the original MedPack.lua, our function will replace the old one just as our variables replaced the old ones earlier.
Append To Functions
Replacing whole functions is sometimes needed, but you should avoid it if possible. The reason is the same as with replacing whole files. If a NS2 update makes changes in the function, your version wont have those changes and that might cause all kinds of errors.
Luckily, and by the power of lua, we can also just append/prepend to functions.
Ok, since our medpacks are so expensive now, let’s say you can only use them if you are down to 66% health (other wise it would be a waste of precious resources). For that we a going to change MedPack:GetIsValidRecipient, but this time we will append to the existing function. Here is what it looks like:

Let’s go through it line by line. At first we store the old function in a new local variable. (Notice that it uses a dot after MedPack).
Then we overwrite the function with our own version. The first thing we do is to call the original version of the function. Remember here that “MedPack:GetIsValidRecipient(recipient)” is syntactic sugar for “MedPack.GetIsValidRecipient(self, recipient)“, which also explains why we had to use a dot instead of a colon earlier. We store the result of the old function in some variable.
Now when we return, we return everything the old function would have returned but with an added constraint. Simple.
That’s how you make simple changes to the lua code.
Dealing With Locals
Sometimes you will find that the code you want to edit is inside some local function. Local variables and functions are visible only in file scope, so your replacement file cannot replace or call them easily. One way to deal with that situation is to create a new local variable/function and then replace all functions that use the old local variable/function, so they use your new value now. But be warned, you might end up with copying large parts of the file you want to change.
However, there exists a method to manipulate local variables and functions directly.
Read the file at the path
from the section “debug.setupvaluex and debug.getupvaluex” and onwards, where $ns2root is the root of your NS2 installation directory.
It explains how to replace local functions in the cleanest way possible.
Debugging Your Mod
When your code is not working as intended, check the console for errors. The console output is also dumped to %APPDATA%Natural Selection 2log.txt, and since you can’t scroll the console, it is probably easier to read the error dump there. You can also print your own stuff into the console. For simple text use Print(“text”), to dump the values of variables better use Log(“%s”, variable), Log(“%s %s”, variable1, variable2) and so on. There is also Shared.Message(“text”) which prints the text on the Server and the Client, for cases where you can’t see the server output.
Texture Replacements / Reskins
Now let’s try something else. Right now our super medpacks look like regular ones, how will people ever notice the difference? How about we make them look special.
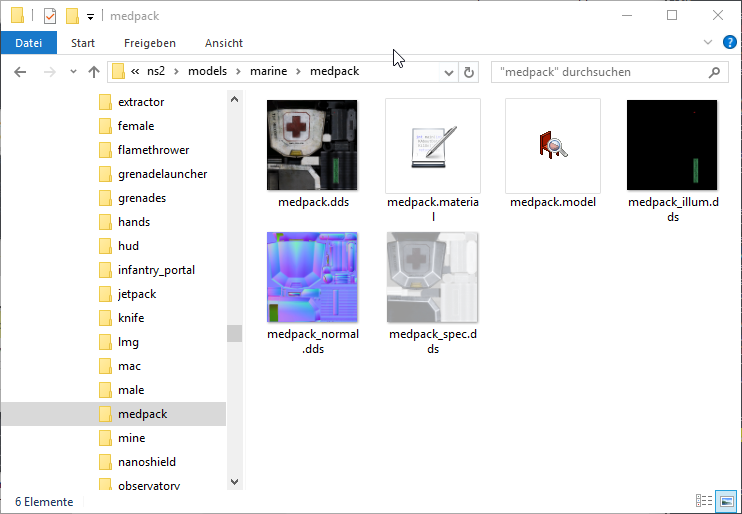
The medpack textures are easily found. They are in “SteamsteamappscommonNatural Selection 2ns2modelsmarinemedpack”.
Now we have two ways to approach this. We can create a .psd file, place it in source and let the builder convert it to a .dds file (also make sure it has the same dimensions as the original). It is not very different from what we have done before, only that you save your file under “sourcemodelsrcmarinemedpackmedpack.psd”.
The other method is to circumvent the builder and to directly paint onto the .dds file. And that is what we are going to do now.
Of course the same rule as always applies here: never modify the files in the NS2 dir directly or else you wont be able to join servers.
So first of all copy “SteamsteamappscommonNatural Selection 2ns2modelsmarinemedpackmedpack.dds” to “outputmodelsmarinemedpackmedpack.dds”. That will be the copy we modify. Create subdirectories as needed. Notice how this time we place and edit files directly in output, not source!
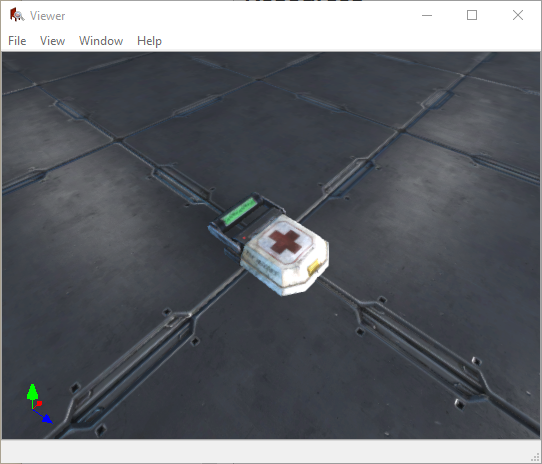
Time for a new tool. From launchpad start the “Viewer” and open “SteamsteamappscommonNatural Selection 2ns2modelsmarinemedpackmedpack.model”. It should look like this:
Now open the .dds file in your output directory with an image editor of your choice. In order for you to do so you might need a plugin.
Here is one for Gimp: [link]
and here is one for Photoshop: [link]
I am going to use Gimp (pro-tip: use the single window mode). After you’ve opened the texture, draw somethin onto it. Then export it as .dds file. When asked use DXT5 format and generate mipmaps, since the original had them, too. As soon as you save the file, the viewer should update and you can see your changes on the model.
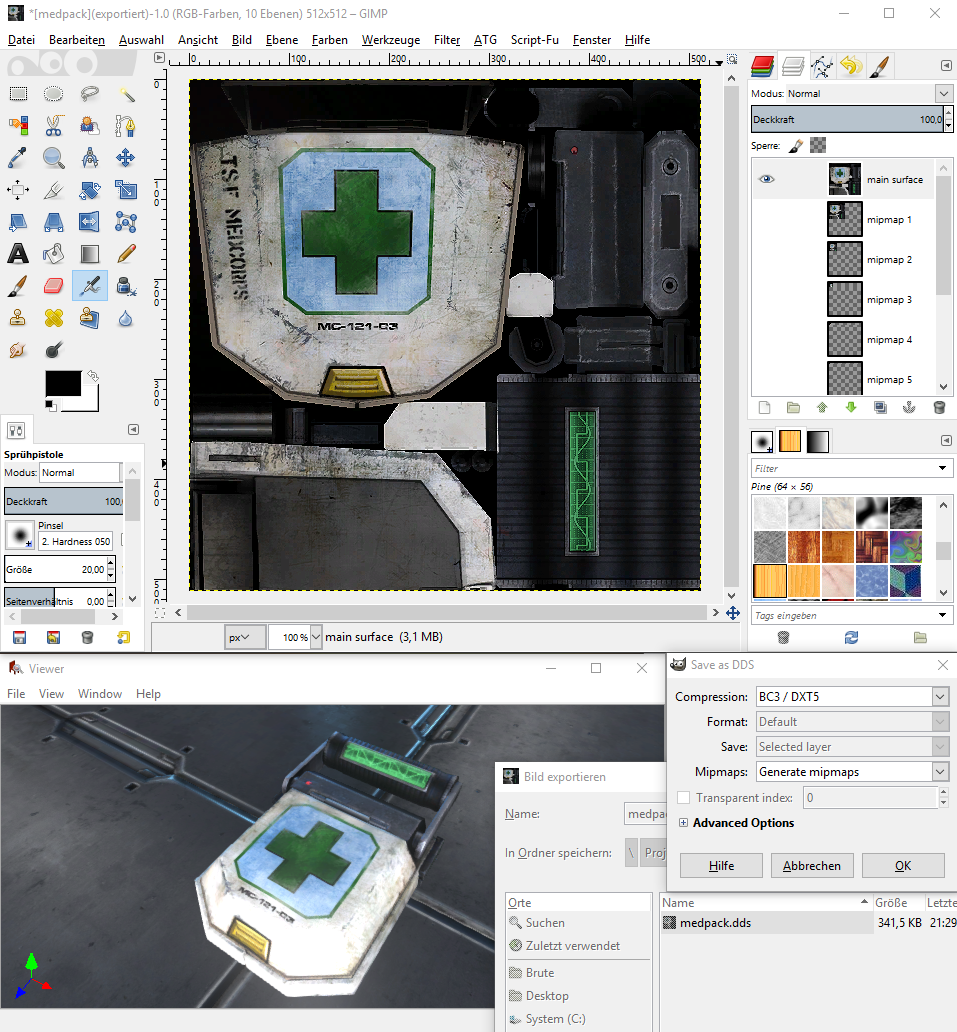
Iterate until you are happy with the result.
Publishing Your Mod
Our mod is done now, time to show it to the world.
In launchpad, click configure and edit all the fields. When you have changed lua files or textures, your mod certainly requires to be run by the server, since the clients wont pass consistency checks otherwise. This is also a good time to replace preview.jpg in your mod dir.
When you are done, click on publish.

The mod should now appear in the workshop. The workshop item id is also saved into your mod.settings file (in hex). So the next time you hit publish, it wont create a new workshop item but update the old one. From the steam interface you can add additional pictures or change the description text (careful, launchpad does not know about your changes and will revert them the next time you publish). It is good habit to include your hexadecimal modid in the description since serverops need that to use your mod and it saves them the trouble to do the decimal to hexadecimal conversion.
Working With The Workshop
If you want to look into the files we have discussed so far, you find the mod at [link]
When you subscribe to it, steam will download all the files and save them in “%APPDATA%Natural Selection 2Workshopm2fcd5323_1479501850”, since 2fcd5323 is hex for 801985315 (which is the workshop id that you can see in the url) and 1479501850 is the timestamp of the last update. You can also download it directly at [link]
If you need to locate a specific mod in the workshop folder, here is a powershell script that might help you:
and here is a bash script